


popeye the sailor
-
Posts
16,007 -
Joined
-
Last visited
Content Type
Profiles
Forums
Gallery
Events
Everything posted by popeye the sailor
-
 hope it's not too late to wish you good luck on the Hornet.......do they have a 'buy it now'? your doing a fantastic job on 'ole Biz'....can't wait to see what you'd do with the Hornet. I guess this means that I vote for the Hornet too.
 -
the fact that you caught it this early, means that the fix won't be too big a job. scratch building at it's finest you'll straighten it out in fine shape!
-
planes look great.......must have really been tough to make. is there a rear section to the canopy?
-
hi there Rob......good to see your returning to the table boats and davits look good. sorry to hear of your loss.......glad to hear of your gains.......and hope for smooth sailing in 2018!~ one can only hope......life doesn't play fair sometimes.
- 1,208 replies
-
- 2
-

-
- great republic
- clipper
- (and 1 more)
-
looking good Mike! catching up.......I do the same as everyone else. no worries about the moisture of the filler fiddling with the hull, I never seal before doing the filler the bow came out super best suggestion I can give would be scale planking......short strips. keep the butt joints staggered and evenly spaced, like every other one, or two. tapering will be your friend here.....create a line and stick with it.....if your line goes off for any reason, you can always fill in with a stealer or joggle in the filler piece. there is always the banding method too, if you think it will benefit you better. I have a little booklet about planking that I wanted to send you. it's kinda old and likely out of print, but it covers it all {planking is planking, it hasn't changed that much}.
-
catching up with your project Piet........your making good progress so far love the time line your going by, and the history so far is very interesting. for very small parts, I tend to stick them on tape to paint. lost too many parts in my day
- 378 replies
-
- 4
-
-
- java
- pacific crossroads
- (and 2 more)
-
congratz on the finish Greg! the ship looks absolutely awesome! love the colors and the use of P.E. really adds a lot to her. that's also a very nice collection of ships there...superb display. I've always liked Foster's here in the states.......is that a popular beer in your neck 'o the woods?
-
rigging looks awesome Bob........very cleanly done! you nailed it with the braces.......no deflection on the shrouds you've really done a superb job on this vessel
- 682 replies
-
- 4
-
-
- halifax
- lumberyard
- (and 1 more)
-
sweet looking model.........very nice paint work and a really neat display! very well done Thanasis.....a lot of charm and detail!
-
the work week kept me away...have to apologize for that thank you all so very much for the kind comments......so many.....and thank you as well for all the likes jeeze......I wish I had an update, but I ended up spending the day removing the tires and stuff off of my son's old car. it's going to the junk yard, 'cuz the engine sounds like a bag 'o rocks. we weighed it out and the car isn't worth it......he bought another car. it's due to be picked up this Thursday, and with 6 - 8 inches of snow coming tomorrow, this was the best window in which to get 'er ready. he had like new tires on it, so I bought a hand operated bead breaker, and taught him how to mount tires {the rims on his car weren't too good...we both have a camry} {same year too!}. looks like I got a lot of catching up to do here too! so many logs I follow have updates thanks Patrick.....when we owned our own home, we used to have a swimm'in pool. if I only had that now hello Aldo.......so good to see you! the fastest build I had was the M&M Fun Ship.....just under 5 months thanks Pat! thanks OC........never could wrap my head around the new potato thing.......I would thing that if you have to dig them up, then they're old potatoes thanks Piet! thanks John......of course there is.......what are builds for?!?!
- 378 replies
-
- 5
-
-
- t78 norden
- billing boats
- (and 1 more)
-
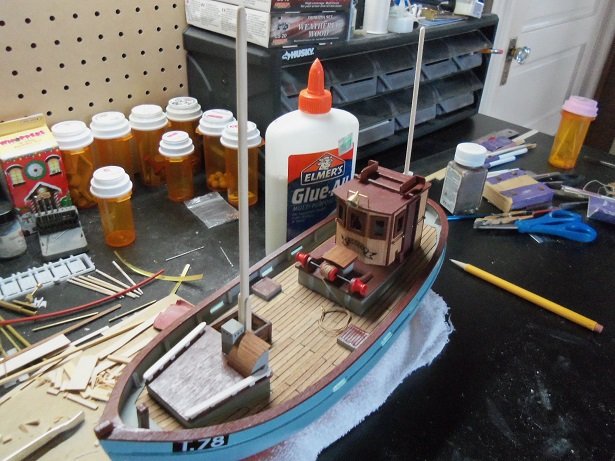
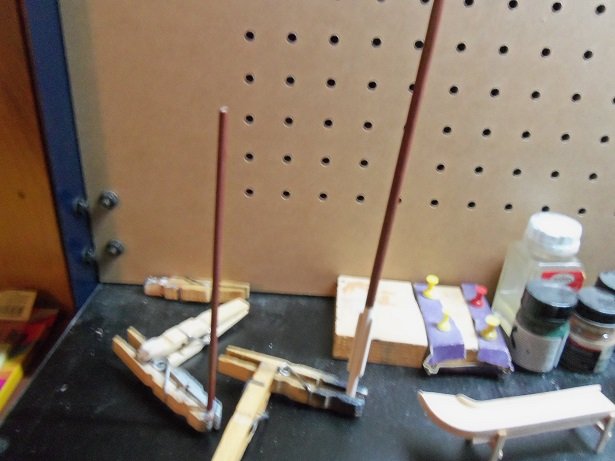
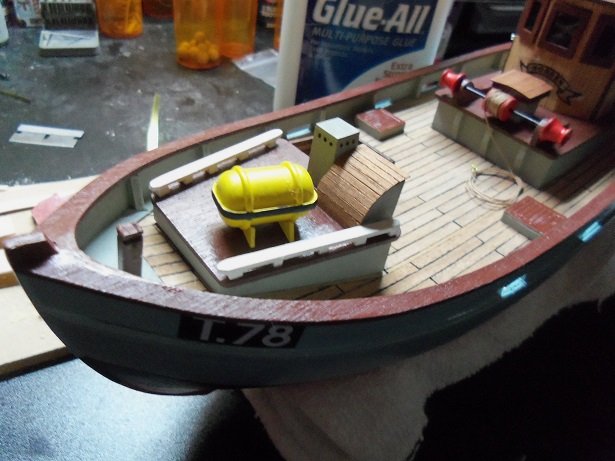
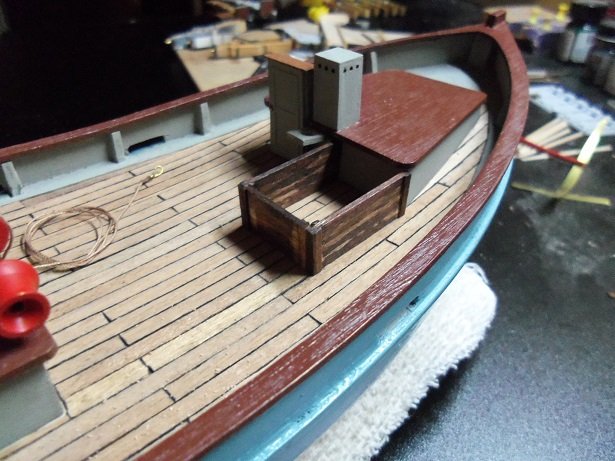
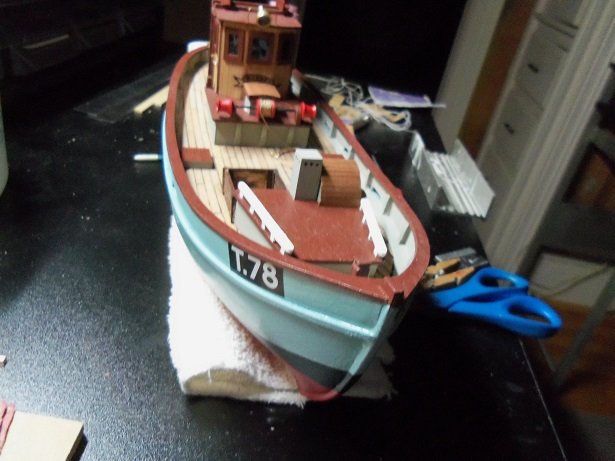
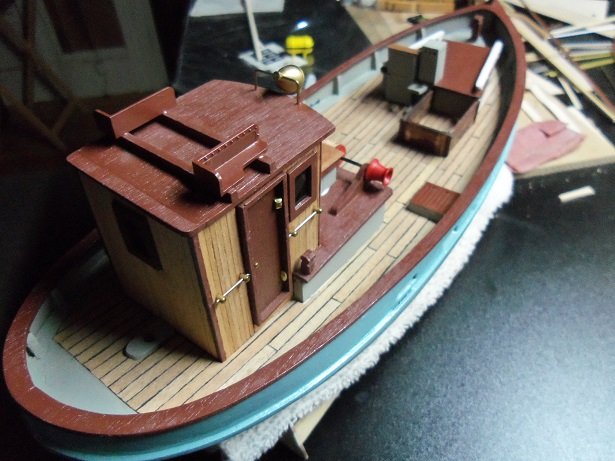
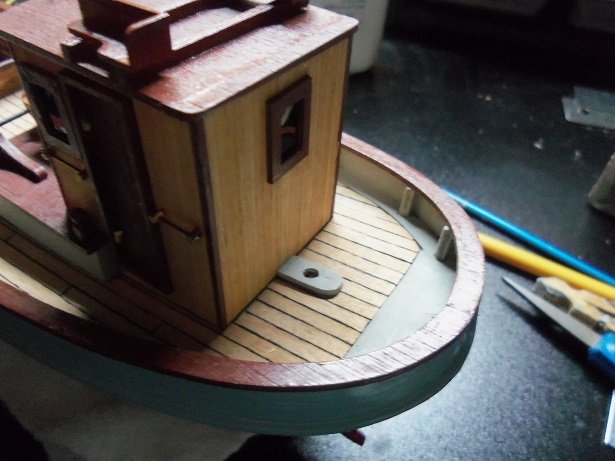
I already did John...... that's the extent of what I'm going to do I did spend a little time at the table yesterday evening. to start off with, both masts are cut and sanded. the main mast has already begun to be assembled. there are these two side boards near the base. the aft mast and brackets... after....the mast got some paint I also started to paint the winch and smoke stack. I still have half a mind to put a shield on the muffler. the last thing I did was to cement the raft locker n place one day down and two more to go...I get done with the work week, and then I can get back to her thanks for look'in and and the likes!
- 378 replies
-
- 14
-
-
- t78 norden
- billing boats
- (and 1 more)
-
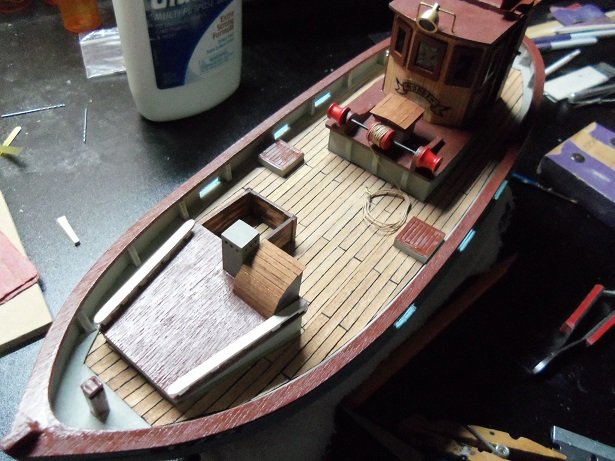
thank you gents for the kind comments. I didn't get to do much today......both masts are cut to length and tapered. I still need to do the booms though. I did get a chance to stop in at Hobby Lobby to pick up some stuff.....then off to Harbor Freight, but all I came of of there with, was a hand operated tire bead breaker and a rubber mallet. I'll be swapping tires from my younger son's car to ours.......I can't swap the rims because the lug holes are enlarged. his car is going to the junk yard, because the engine's fried....sounds like a bag 'o rocks. I wish the weather was a bit more conducive......it's getting colder again. yea John......I saw that post you made. I figure that on the actual boat, the front of the 'dog house' is likely open and it may be belt or chain driven. I'm sure that this bit of detail might be there, if it were a larger model. so, I just substituted the solid drum with a concaved drum and wound some rope on it, with a hook. if it has a multi purpose, a hook would be the most probable attachment. I likely won't use the sluice table either.....the layout would make the deck look cramped. I think the pilot house should have gone aft more....would have given me more room. I'll add more and see how the room factor looks then.....if I can squeeze in a short one, I will. I might even make an extra bin. if I get more done, I'll post it later. thanks again for the kind word and thanks to those who hit the like button.
- 378 replies
-
- 6
-
-
- t78 norden
- billing boats
- (and 1 more)
-
you've made some really nice progress John! once your done framing in the bow, it'll be off towards the stern looks great!
-
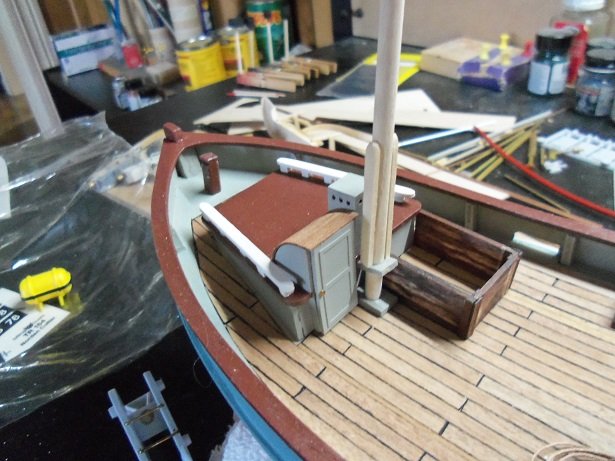
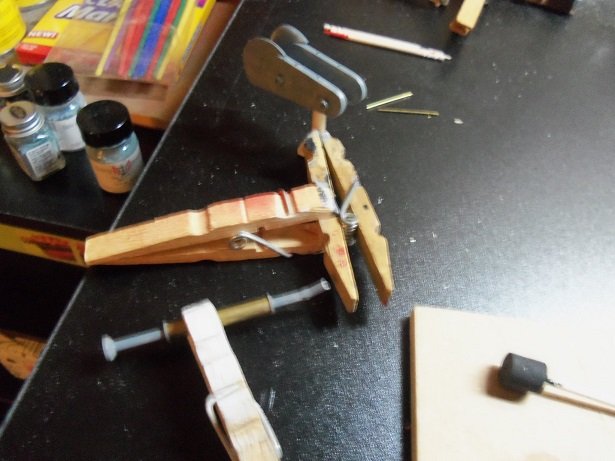
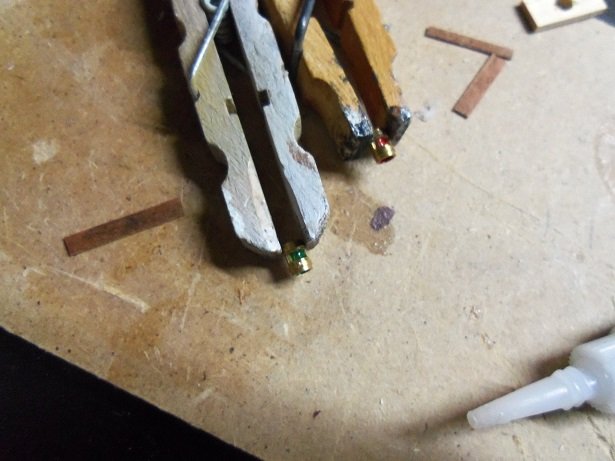
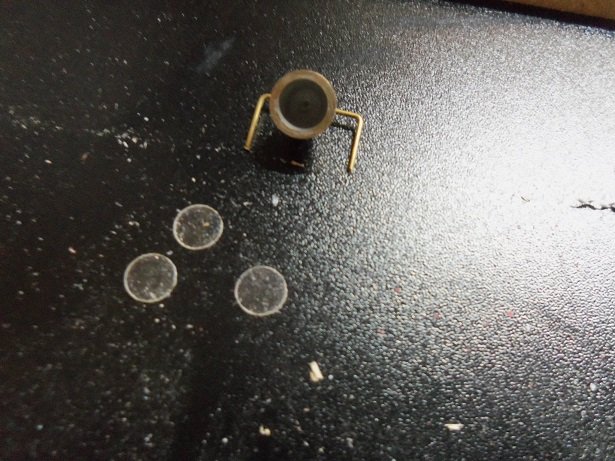
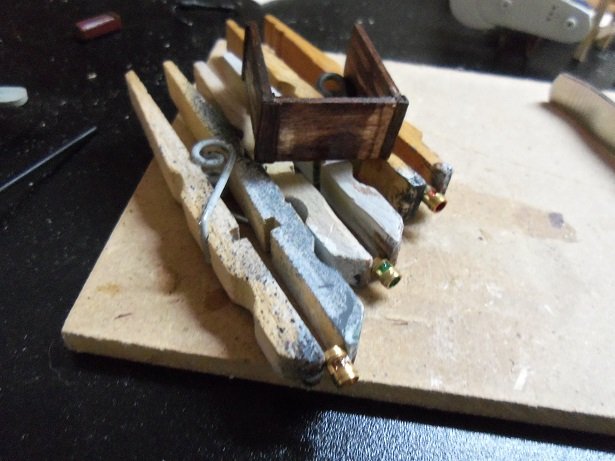
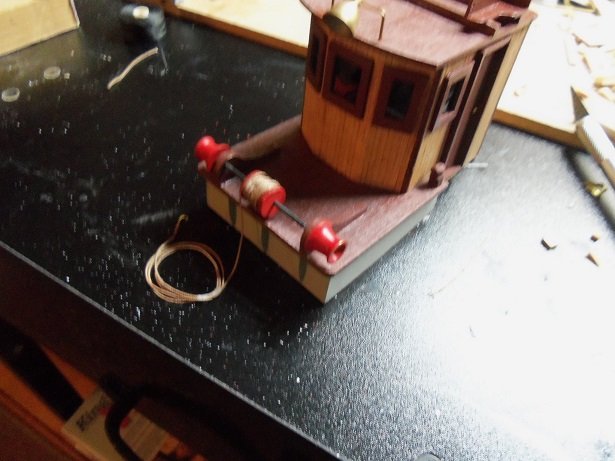
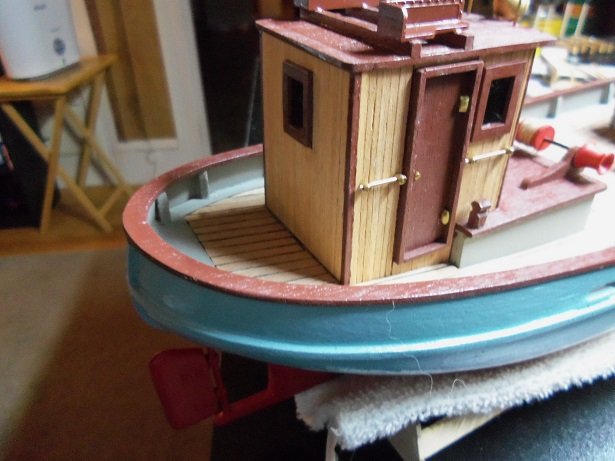
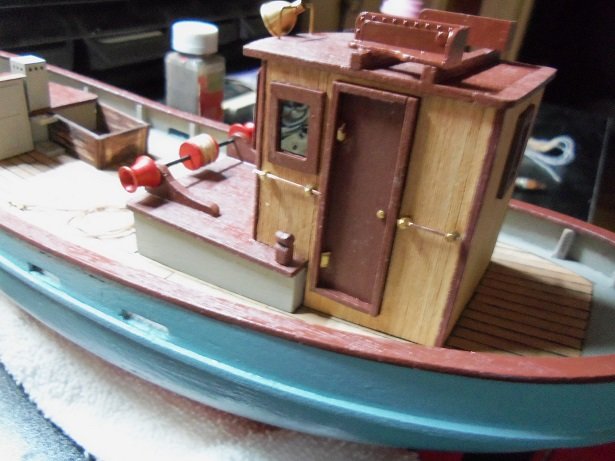
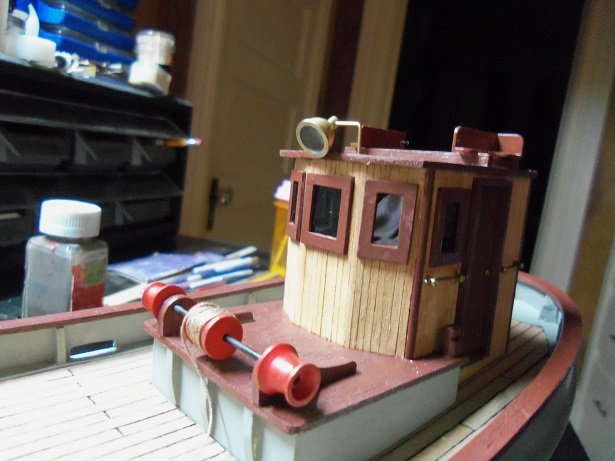
if you've read the post above, it's been an aggravating night. almost ready to throw it in for the evening...but no. I've had worse nights earlier I had stuffed a fine brush in the nav lights, to color the lenses. one of them, being small, did fill with the window maker......I just drill it out. but somehow, I got confused I guess, and ended up with two red nav lights. it not terribly bad......just rip out the widow maker, tie it to a piece of wire, and swish it around in thinner.....ready to start over. the bigger ones work out a lot better......they even look better too. the other one was dried off and window maker was filled back into the lense. while it was drying, I assembled the spotlight. the wire was bent to shape, the interior of the light was painted with flat silver....but what to do about the glass? I tried to cut out a circle from some clear cello.....but that came out poorly. the paper punch is too small.......I estimated the opening to be 5/16". then I thought of my binder paper punch.....I use it to put the instructions in binders.....makes it easier to thumb through. looking at the punch pegs.......they look like they {one of 'em anyway}, will do the trick. so I punched out a few circles. ....a little window maker......and there ya go......lense glass checking the light......it's dry! it's a new bottle......the other bottle I had, I've had for many years, it was turning to snot as can be seen, I also stained the buoy box.....I could have done better with it. glue blotches are an absolute pain. the winch on the pilot house was set up at this time. as I was running the shaft through, one of the brackets broke free from the base! it was set up and glued back in place. I had filled the drum with rope and tied a hook on the end. what I did wind up will be coiled up and laid on the deck. the spotlight is also cemented in place too. then......the trilogy with the hand rails!.......coulda spit nails! of course, I'm on the floor, so Gibbs took advantage of it....cuddling all over me! when he was younger, something like this would bring his alpha out......he'd turn into the Tasmanian devil. you couldn't do anything but stand up and ignore him. he's gotten older now, and to the point where you can talk to him, snapping him out of it. I'm not kidding......he used to tear clothes! I refuse to give up on him. after I took him out.....and then changed my flannel shirt because it had Gibb's hair all over it {It gets on my table too}, I could get back to work. I had found the hand rail bolt I lost, so I was able to finish them. there's a hair on the boat......{as I pick it off}. the buoy box has bee cemented in place. if you look where the mast will be, I added an extra bracket. I could drill a couple of holes for belaying pins, but I will leave it plain. at this point of the evening, I put on everything I could put on without fuss. the railings on the forward structure, the cold bin holds, the excess rope from the winch was coiled up and cemented in place, the numbers on the bow, and the pilot house name plate {which is actually a stick on decal}. the little dog house was added to the pilot house base as well. a mast collar was added for the aft mast too. I have the second one which is the upper bracket....it will be up near the roof line. the pilot house is cemented in place now.......no more taking it off and playing with it. well my friends.......the spinach is wearing off........me thinks Olive has sawed a cord by now.....time for me ta make some sawdust too A-K-k-k-k-k-k


- 378 replies
-
- 12
-
-
- t78 norden
- billing boats
- (and 1 more)
-
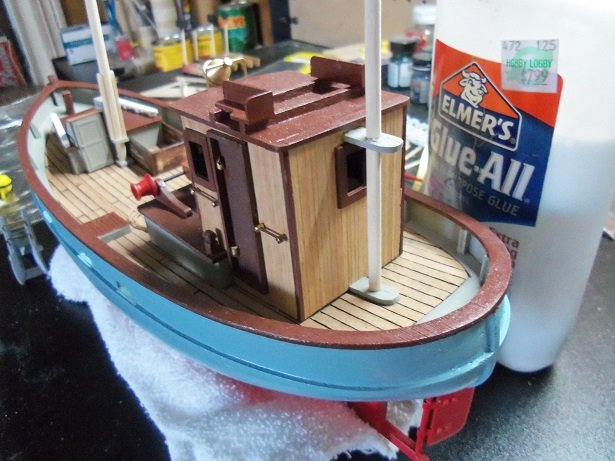
it's been a trial tonight OC.......the kit wants you to use eye bolts for the little railings on the pilot house. I have some of the really short stanchion pins. in earlier Billing's kits, they were supplied for eye bolts. well......they don't look the part, so I ordered up a bunch of the really small and medium size eye bolts, and use these for hand railings. anyway.....I had one in my needle nose pliers, ready to cement it in it's hole...when------->ZING! off it went! I looked all over for it. while I was looking for it, I must have disturbed the assortment tray for the Thermopylae parts....and then THEY were all over the floor! I got no finger nails, so here I am with a flashlight and a pair of tweezers, picking everything up. done with that......and not finding the part I had lost, I took Gibbs out for his evening outing. when I came back in, I took another quick look {since I would be short 1 if I didn't find it}, and there it was! it was right there in the open......don't know why I didn't see it earlier. I didn't look at the color scheme for the model.....I went off on my own like I always do. I hit onto the radar and looked to see what Billing's suggested, and all I saw were the numbers of the paint......no names......bother! so, I went to the USA site and looked up the colors. it seems that I was fairly on target with the colors after all....the pale gray, the satin brown, the sea blue, were all in the list. I went back to work.......I kinda hurried........made a tiny boo boo, but once it's on there, there's no going back. still looks good it's getting late my friend.....better get the latest update posted before I hit the bunk.
- 378 replies
-
- 5
-
-
- t78 norden
- billing boats
- (and 1 more)
-
those look sooooo good really nice work!
-
thanks Lawrence and Piet I had a few weird moments...my own doing too I think I can finish the model now without any more hiccups {I hope} I should have an update real soon now......
- 378 replies
-
- 5
-
-
- t78 norden
- billing boats
- (and 1 more)
-
I take it, that's a Blue Jacket kit. I think Billing Boats lists a Bluenose fitting kit, if that will be of any help. either that, or one might turn up again. check here periodically also......they get older kits in every once in a while : oldmodelkits.com your adjusting well.....glad to hear that. I know it can be hard...I told my wife today that if she ever left, I'd never remarry. it's very hard to replace perfection. I wish you the best my friend. Linda don't need no microscope....she's able to watch over you just fine stay well.....look forward in seeing your return
-
Cutty Sark by NenadM
popeye the sailor replied to NenadM's topic in - Build logs for subjects built 1851 - 1900
our couch is old....we plan to get a new one someday. Gibbs sits with me to watch TV- 4,152 replies
-
- 5
-
-
- cutty sark
- tehnodidakta
- (and 1 more)
-
looking at the upper portion of the planking , they came down further. you couldn't do it Mike, because of the clinker effect. looking at the hull, there isn't much tapering there, since they are butting up to the existing planking. they joggled it on that last plank, because the other plank interfered with the run.....note that they tapered that particular one. I'm sure it's the same on the starboard side.......we can't see it. I'm sure they did something different at the stern......likely stealers
-
good to see your still making progress on her. the bottom paint looks very good, and as long as there are no sharks, I'm in for the board