


popeye the sailor
-
Posts
16,007 -
Joined
-
Last visited
Content Type
Profiles
Forums
Gallery
Events
Everything posted by popeye the sailor
-

USS united states instructions?
popeye the sailor replied to Seadogrich's topic in Plastic model kits
click on December 2011 in the lower right hand corner.......the main part of the instructions are November 2011 -
USS united states instructions?
popeye the sailor replied to Seadogrich's topic in Plastic model kits
yup! go here: http://cuttysarkdrydock.wordpress.com/ you might have to dig around a little, but they are there -
hi there Daniel!........she sure looks good in the bottle was that a fairly new idea you came up with?.....bet you'll be filing that one away for future reference awesome job!
-
good to see your back up and running Michael........I look forward in seeing more
- 749 replies
-
- 4
-

-
- albertic
- ocean liner
- (and 2 more)
-
look'in really nice Jesse. are you going to add tulle netting?
- 1,306 replies
-
- 3
-
-
- syren
- model shipways
- (and 1 more)
-
nice progress Kevin!
-
wow! this is the first model that does this, you know.....never seen this before it's always been refreshing to see folks want to rig the shrouds on plastic kits. heck....even I have been daunted from doing it. the initial worry was that the method would distort the masts.......I've never had to strengthen them by the use of metal rods. yea......that's a sticky wicket.......what to do about the ones that are already cut from the sprue?!?! what can be done for the ones still on the sprues? you could cut both sides of the sprue box and lengthen them, to widen the spread. just depends if you want to go through the hassle. kinda feel bad bring this to light
-
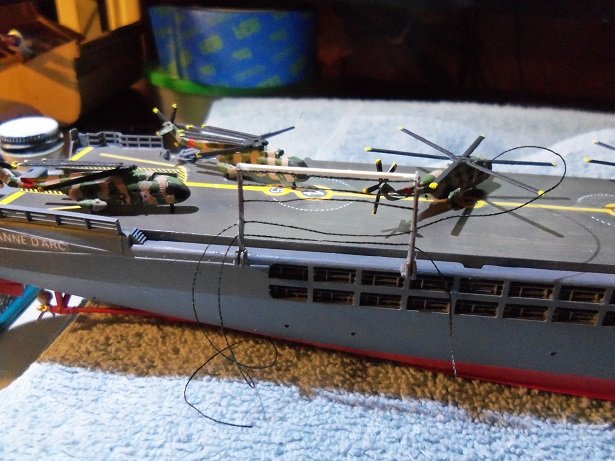
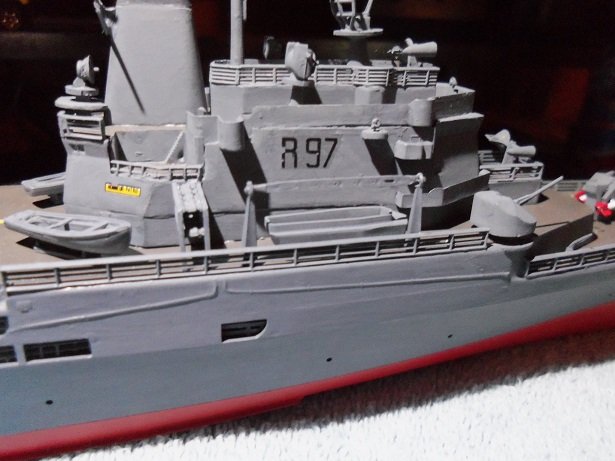
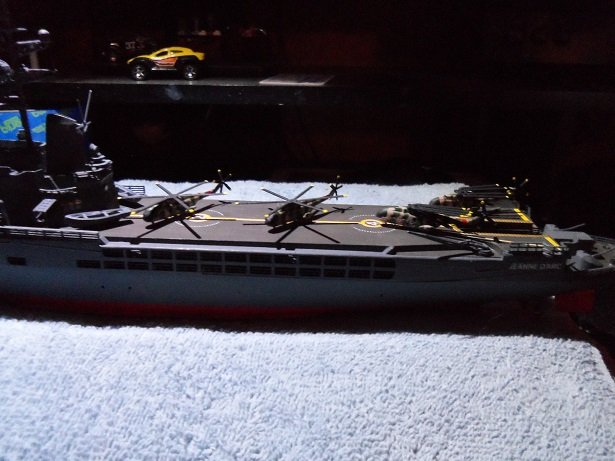
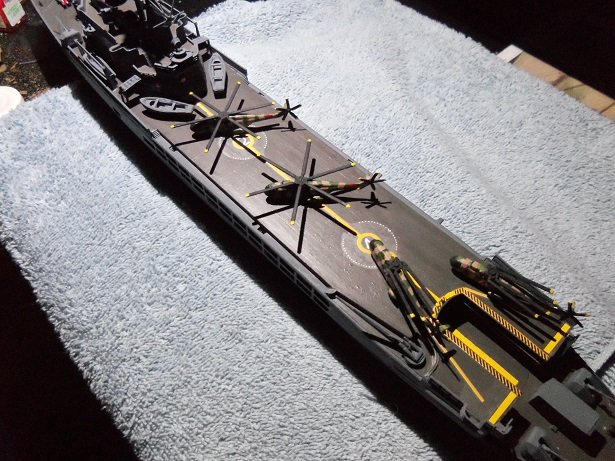
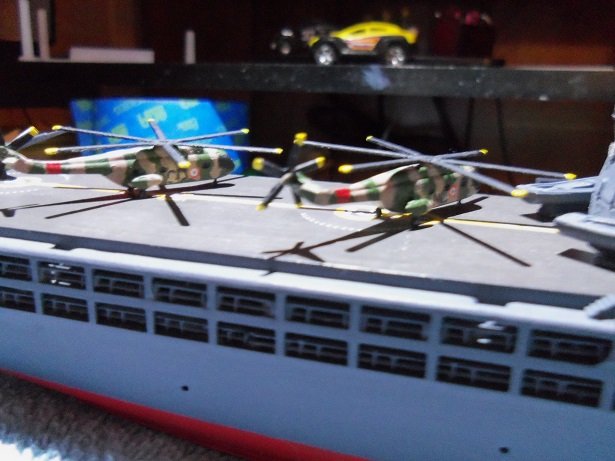
well.......this has been a dangerous preposition. with all the stuff on the deck, something was bound to get broken. it started with a bow antenna and the flag, but I was reaching for the mouse...doesn't count with actually working on the model the latest one happened this morning.......should never had touched it before my first cup of coffee. stringing one of the lines.......tying it, my pinkie finger lashed out straight and sent one of the Helicopters flying! it's fixed now, but touch ups are in order. during the end of last week, I solved the anchor issue. with the center parts broken off, there was no way to cement them in place on the model. there is about a 1 mm hole where they are to go. what I did was cement anchor chain on them. when I cut the chain, I left enough to shove into the hole. I haven't touched up yet. after this, I worked on that net thing. I wasn't pleased to see how flimsy it was to rig. as mentioned, I added a cross bar to the top of it, but I had done some of the rigging beforehand. I ended up with some limp lines. I could go either way with this......I could have cut all of it off and used tulle for the netting, but I felt that the mesh would be way to small. so I figured that I would weave my own and add the vertical lines to it. the mesh is probably too large, but it will do. once it's painted, it may not look too bad........I've done three lines so far. more will be added the Helicopter to the left of the picture is the one that got binged.

- 133 replies
-
- 10
-
-
- jeanne d arc
- heller
- (and 2 more)
-
too bad you couldn't have hid the blemish with a rope coil or something. the redo came out nice though
- 455 replies
-
- 3
-
-
- slightly modified
- greyhound
- (and 1 more)
-
thanks Walt......glad to have you look'in in thanks for the suggestion Mobbsie.......but it's a bit late, I'm afraid. the cross 'threads' have already been cemented in place. the problem was that the uprights were so flimsy....they bent at the slightest tug. the closer to the base I got, it got better, but there's one that looks a little limp. I have an idea though that might change it a little and make it better. I even added a cross bar at the top between the uprights....but the problem had already presented itself to me by then. I haven't taken any pictures of it yet......I'll do that before I make the adjustment. appreciate the good word and the likes folks......just got in from taking care of the snow fiasco outside.......2-3 inches of snow and rain on top of that....UGH!
- 133 replies
-
- 4
-
-
- jeanne d arc
- heller
- (and 2 more)
-
yup.......with a bit of research, and some modification, any model can be mirrored to any subject that is similar. of course, you want to be sure that at least the hulls are close....outfitting the model afterwards can be very easy to do. the only real vessels you have a lot of leeway with, are pirate ships, since they used pretty much every ship they captured. what I find about this medium and modeling in general, is being able to think outside the box, and do some of the lesser ships, that manufacturers don't produce kits of. it gives one the option to be creative.....you can learn a lot more that way. a little more Christmas hub-bub.......it's snowing right now. not much on the ground.....but it will turn to rain soon, which I think is worse than if it stayed all snow. dioramas are cool......the usual + or - is a good rule, but don't go too far with scale
- 133 replies
-
- 5
-
-
- jeanne d arc
- heller
- (and 2 more)
-
switching to white glue might be your best defense. I scrape very seldom, since white glue is made using water.....it does tend to cause the thin strips to curl. but, usually sanding with a coarser sand paper, then following it up with a finer sand paper, will clean it up nicely. for those who use thicker planking, this is not an issue, a damp cloth is all that's needed. I only use CA for tedious assemblies.
-
that's the outer frame you've built so far? all I would have suggested, is to bring in the two top windows and make them even with the lower windows. those two windows looked out of sync with the hull line. OC's picture is exactly what I'm talking about......the way they all line up. the frame you made will do just that, but it will be a lot more work........looks good though, but check out the starboard side......the line slants inward at the top.
-
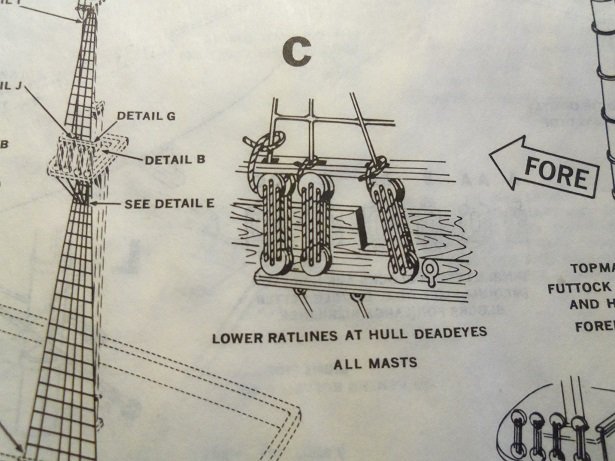
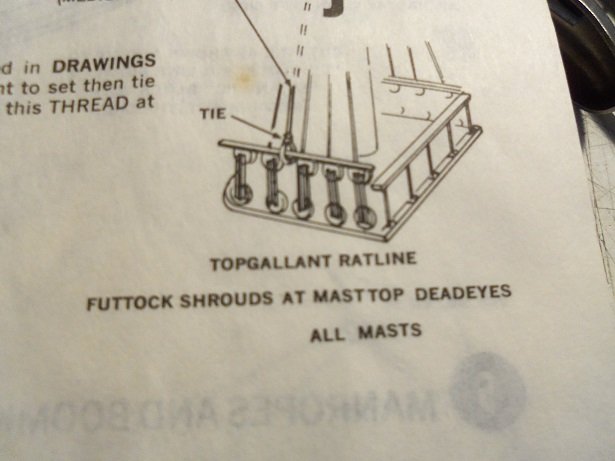
before you get too far on the dead eyes........I really hate to tell you this......but they are too short.....lanyard wise. the spread between dead eyes should be 1 1/2 times the dead eye size. if your using 5 mm dead eyes, the lanyard spread should be something like 8 or 9 mm in between. I went into my 1:96 Connie kit to give you an example.......the actual parts appear exaggerated, but the rigging instruction sheet appears normal. the appearance factor would be greatly improved, if they were spread out more. having used CA, you may not wish to go through the change them. you could cut the thread and drill out the holes. I only say this because of the picture of them rigged on the sprue......it would be great if the model manufacturer created the sprues as a form of jig to do this. I'm surprised that no one mentioned this earlier.....even me. I'm not one to critique, but I couldn't see you doing them all like that, and then find out that they were wrong. I hope someone else can chime in and correct me if I'm wrong. the presence of draught marks on the Victory has been done by other modelers on this site. they were usually located on the stems....bow and stern. I wouldn't remove them from the rudder....that would be very messy. live and learn........no concern. they are fine the way they are please...don't take offence......I mean well........you've done some nice work at the bow
-
thanks Sam.....I think I can hold my own with Murphy I do my best to counter his every move. the net thingie is posing it's own problems....I'm trying to rig it, but the thread is coming out looking loose.....the uprights aren't very ridged and bend at the slightest tug. I may have to live with it, if I can't modify it......I was thinking of eliminating it all together. I hope to have her finished soon.......I have a couple chores to do beforehand though. I very well could John.......but I think the best thing to do is clear up what I have. I was looking at the Norden kit I have in the closet.......Phyl was looking as well, and asked how big it was. when I showed her, she was sorry to hear that it was a small model. I told her.......there, there.......just get me another Nordkap I have pictures of another ship...the Progress. it looks a lot like the Nordkap except it doesn't have the aft cabin. I'd love to build the Nordkap again....try a different approach.......then I could clone the hull parts for the Progress. there's a method to my madness I also have the Bluenose project, that I'd like to get off the ground finally......the Bluenose, the Bluenose II, and the America, all at 1:65 scale. I also have the A.L. kit of the Marina II that is also waiting in the wings. as a fortune teller once told me........."your future looks very busy"
- 133 replies
-
- 5
-
-
- jeanne d arc
- heller
- (and 2 more)
-
the tower structure looks really super........all that PE looks awesome really nice progress Greg!
-
stumbled onto your build....looks very interesting looking forward in seeing more.
-
jee Lawrence, I would have thought you'd have snow by now we are looking towards having an event or two during the week end. for all that matters as well......I am ready. not a problem......browsing around the Cornwall site, you may find other things that you might be able to use. I'm getting closer towards continuing this build....all I need is some uninterrupted time. we take it as it comes........I suppose. very nice progress on your golden Hind......I enjoy watching her develop....your visionary skills are exemplary. ......and my admiral Phyllis and I want to wish you a wonderful holiday as well. be well and enjoy!
- 453 replies
-
- 4
-
-
- thermopylae
- sergal
- (and 1 more)
-
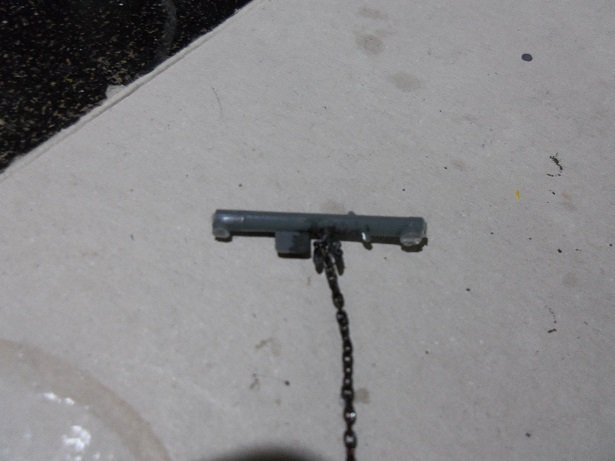
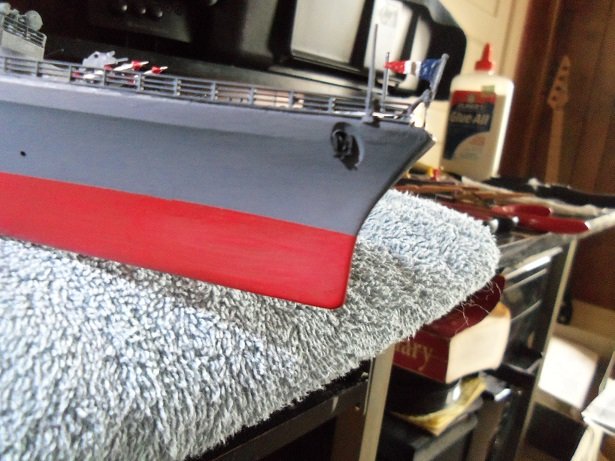
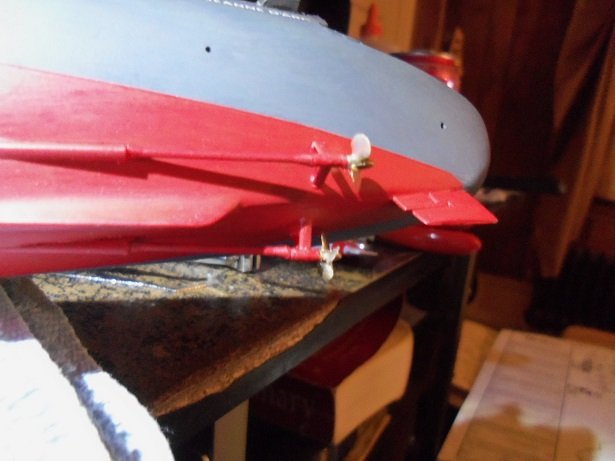
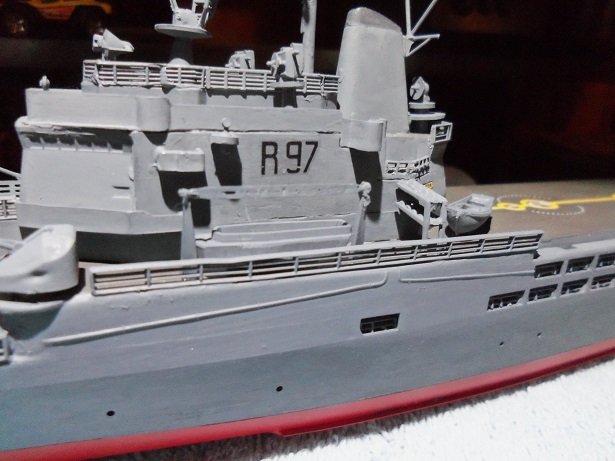
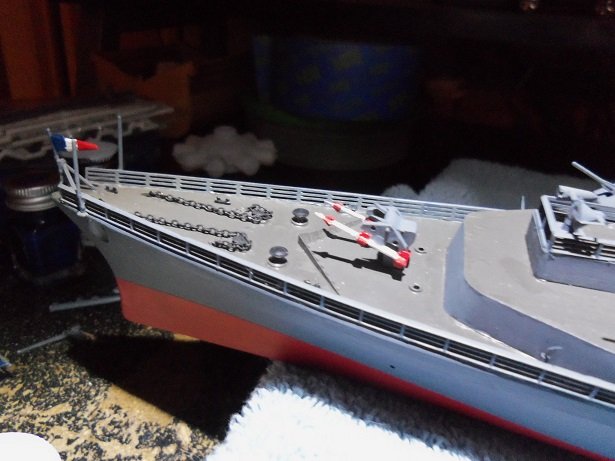
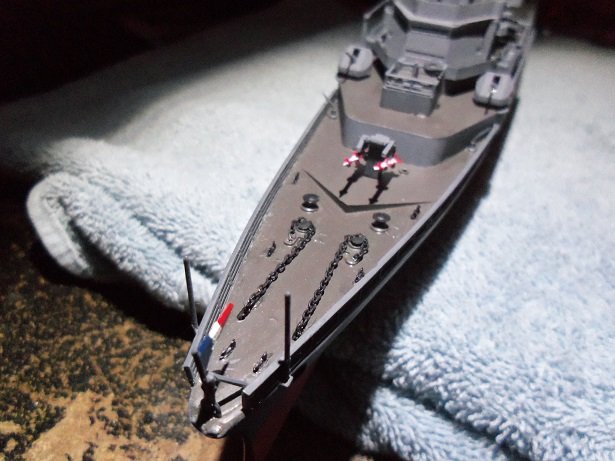
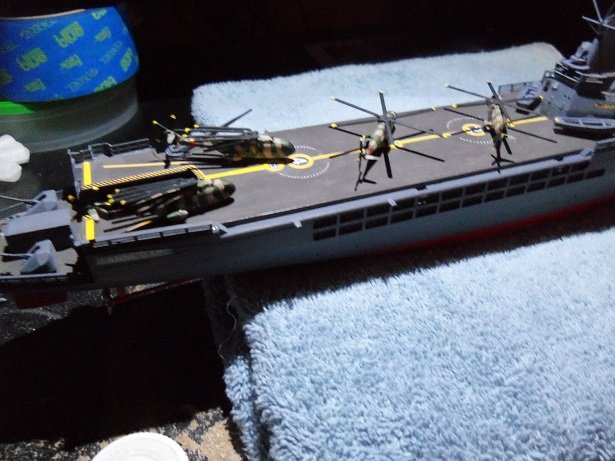
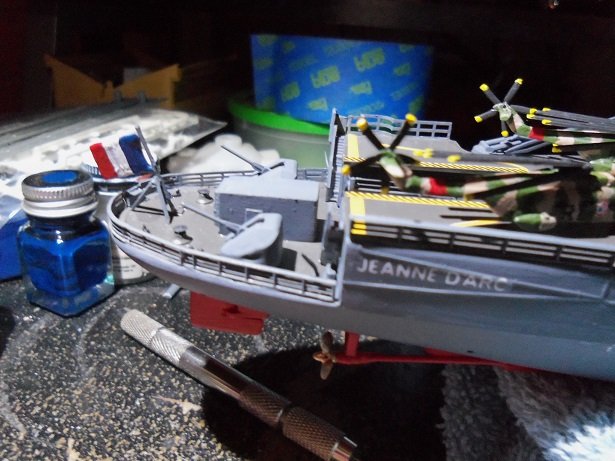
fairly big jump today.......the only fly in the ointment, was the center breaking off one of the anchors when I went to remove it from the sprue. I usually use a razor to cut it free, but I decided to bend it off. I just touched it up and will use them.....doesn't look too bad. only the anchors and antennas are left......quite a few antennas. so first off, the props were cemented in place. then the davits for the port and starboard boats. I still need to touch up the numbers........next was the anchor chain, SAM launcher, and the bow flag the folded rotors were already cemented on the 'Choppers......I flipped a mental coin {very hard to catch, by the way}, and decided to cement them to the deck. I cemented the 'prepped' 'choppers on there too, without the rotors. when I added them, I saw that they were too close together, so I had to move one of them.......very minor glue mess to fix. they weren't on there too long before I added the rotors. the flag at the stern was next. I added the two uprights that, when I finish it, will look like a sort of net. it isn't finished yet. I may try to do some resemblance to the rigging, but there is no provision to attach it to the deck {ie....holes..instructions don't show much either}. I may have to rely on the pictures....but they can be rather bland for some of them. almost there
- 133 replies
-
- 15
-
-
- jeanne d arc
- heller
- (and 2 more)
-
they do sell brass strip...cut to length, drill holes the entire length. hope you solve the problem great and interesting to see.
- 1,013 replies
-
- 1
-
-
- gun dispatch vessel
- victoria
- (and 2 more)
-
good to see your still making progress with her....she's a fine look'in ship. the sails look very good too.......they will really dress her up! paddle looks pretty neat.......you should have seen my first ones
- 101 replies
-
- 1
-
-
- L Toile
- Billing Boats
- (and 1 more)