


glbarlow
-
Posts
4,133 -
Joined
-
Last visited
Content Type
Profiles
Forums
Gallery
Events
Posts posted by glbarlow
-
-
-
Printed and added to my build notebook. Thanks Chuck.
-
Always great to have another Glenn on board, especially with the correct spelling with two n’s. Welcome!
- Keith Black, mtaylor, Dave_E and 1 other
-
 4
4
-
Thanks for sharing this!
- Kevin, thibaultron, Canute and 1 other
-
4
-
1 hour ago, scrubbyj427 said:
Well done on the moldings.
Thank you, it’s one of those things that now that I’ve done it I know I could do it better. Move on Glenn, move on.😂
1 hour ago, Rustyj said:This was a pleasant read
I appreciate you saying so Rusty. I do try to make the posts entertaining and possibly informative.
- Dave_E and FrankWouts
-
2
-
Finished up the port gallery, other than the singled roof which comes next. Replaced all the column caps on the starboard side with slightly wider ones like these. Forgot to get a photo with the female figure, she fits without needing extra shoulder room. I did however, with due apologies to her, have to sand a bit of her butt to get a nice fit into the overhang. Sorry lady.
- scrubbyj427, CaptMorgan, DelF and 12 others
-
14
-
 1
1
-
21 hours ago, Dave_E said:
No words.
Thanks....I think 😄
21 hours ago, rafine said:Beautifully explained , and even more beautifully done.
Thanks Bob, I appreciate the kind words
20 hours ago, Blue Ensign said:love the sweep of your hull timbers up to the the lower counter
I do too BE, not sure how I managed that but it did come out nice. Application of Chuck's plank bending, hull lining, and every plank a project. I'm amazed at the difference a simple #2 pencil makes applied between planks. And of course there's that Alaskan Yellow Cedar...
20 hours ago, Kevin said:stunning work,
Thank you, it comes from a lot of doing over bad work and practice.
- Dave_E, hollowneck and FrankWouts
-
3
-
1 hour ago, Thistle17 said:
use my Byrnes sander and carefully tune them to fit.
I did the same thing, it’s a great tool.
1 hour ago, Thistle17 said:how thin the inside of the uprights of each bulkhead
It’s in the monograph, 3/16ths, the width of the cap rail. The pattern can be printed out on the chapter 10 monograph.
-
QGalleries Continued
It’s a process. To close up the galleries there are friezes and moulding to make. However those are a continuation of friezes and moldings with the stern, and there is moulding to make, did I say that already.
I made one moulding for Cheerful, a simple basic one, and when I say made it that means cutting a profile into a piece of brass and scraping it into a strip of wood. All the Winchelsea builders of course know this of course, but for others its worth noting this isn’t necessarily easy. There is both art and math to make a scraper, I’m not sure I’m all that great at either one of those. Scraping is the easy part, it’s that thing to scrape with, there’s where the fun is.
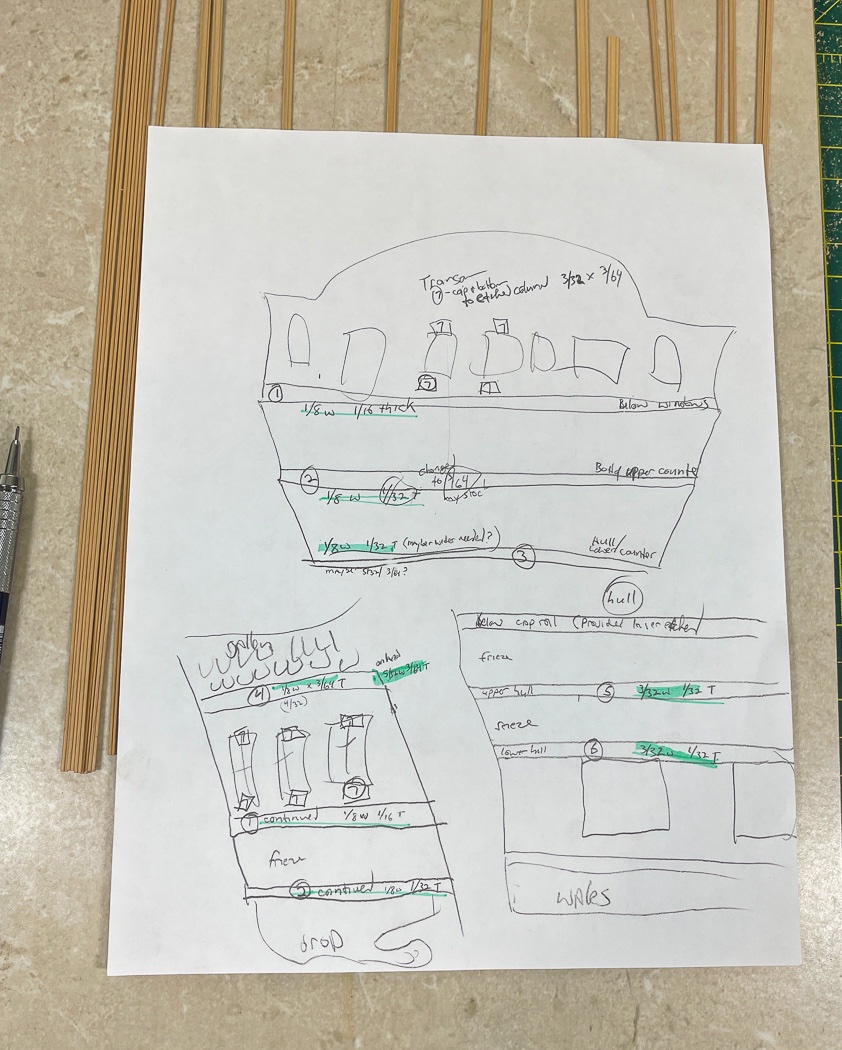
For Winchelsea there are 7 different profiles required, on multiple sizes of strip boxwood. One of the 7 is provided as laser etched, the rest have to be scraped. I started by mapping out what and where I needed them. The galleries need three different mouldings, two of which are continued around the stern. As you can see from my map, I am confirming my lack of talent for art.
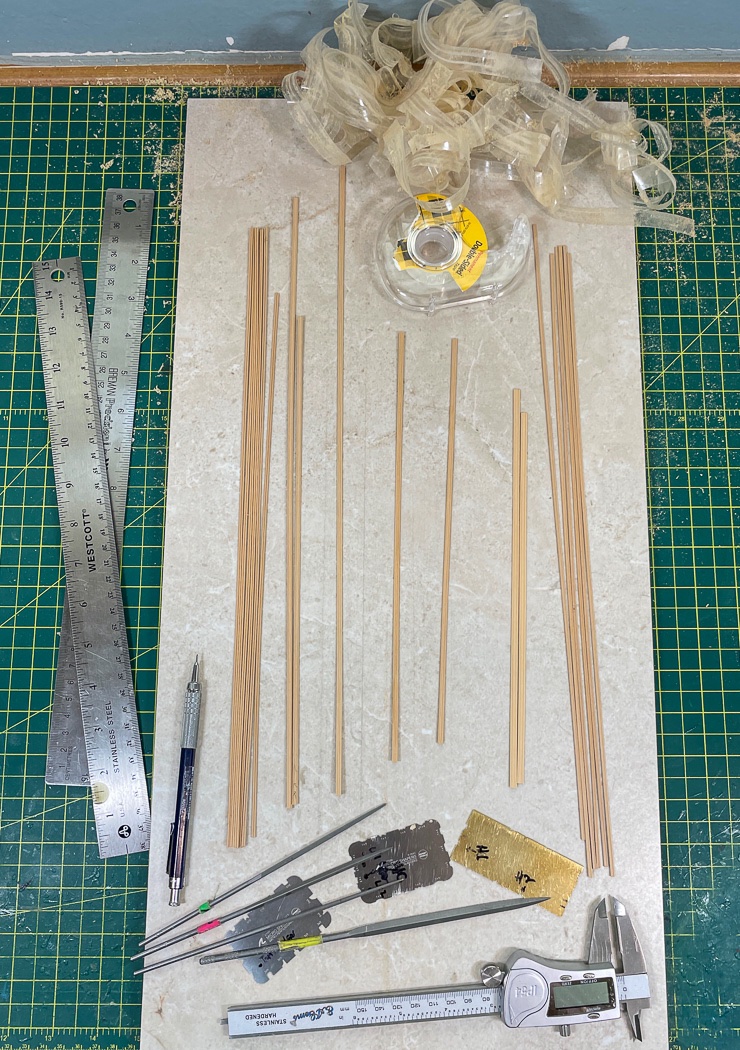
I decided if I was going to make one moulding I might as well make all that I needed and so I had Moulding Day(s). I’m sure there are many better ways, I chose to use a porcelain tile as my firm, flat base and my double sided tape to keep the strip held in place while I scraped away...I went through a lot of double sided tape. I used the two metal rulers to get the long thin strips straight and then pressed it into the tape.
Ok, so I cheated a little. I acquired the silver Amati scrapers for Cheerful, they were no help. Here with Winchelesa the smallest sizes were a good start. The scrapers are in millimeter and the strips imperial, so the first modification was adjusting to fit with my mini-files. I also, again displaying my math art skills, I modified the shapes, width, depth, and design also with the mini-files. This worked for the larger sized strips, but like with Cheerful, they were no help for the small strips, the two rows that run the length of the hull. For that I was on my own with my brass scraper, I used my mill to precisely size and start the shapes I wanted and went back to the mini-files to finish them.
Way more than you wanted to know about moulding - but in the end I’d matched the monograph, plans, my map, and my scraper set to complete all the moulding I’ll need for the model, at least for Chapter 3 anyway. My run at moulding scraping turned out ok I think.
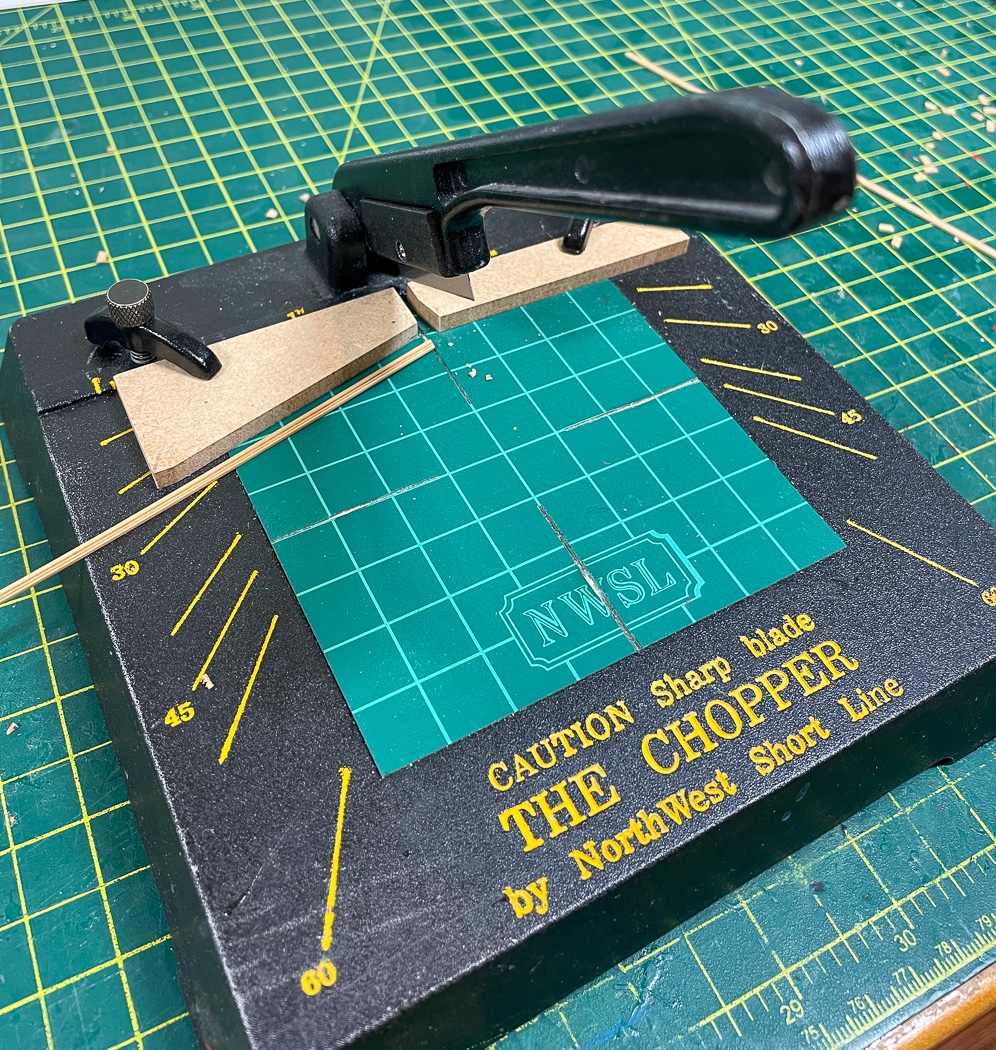
But wait, there are the caps for the laser etched columns between the windows. Credit to @Trussben for showing us how to make use of extra (at least I hope it turns out to be extra for me) of the laser etched moulding to cut the caps from. Nice, uniform, and a perfect match to the columns, just a matter of cutting 16 (near) identical ones at the right width and angle. Did I mention my math skills. Knowing I could never free hand 16 (near) identical anything, I cut templates for my chopper and sliced away. I’ll do this again for the stern windows (ok, stern lights for the mariner minded) later.

And with that I had all I needed made to complete the galleries, sorta.
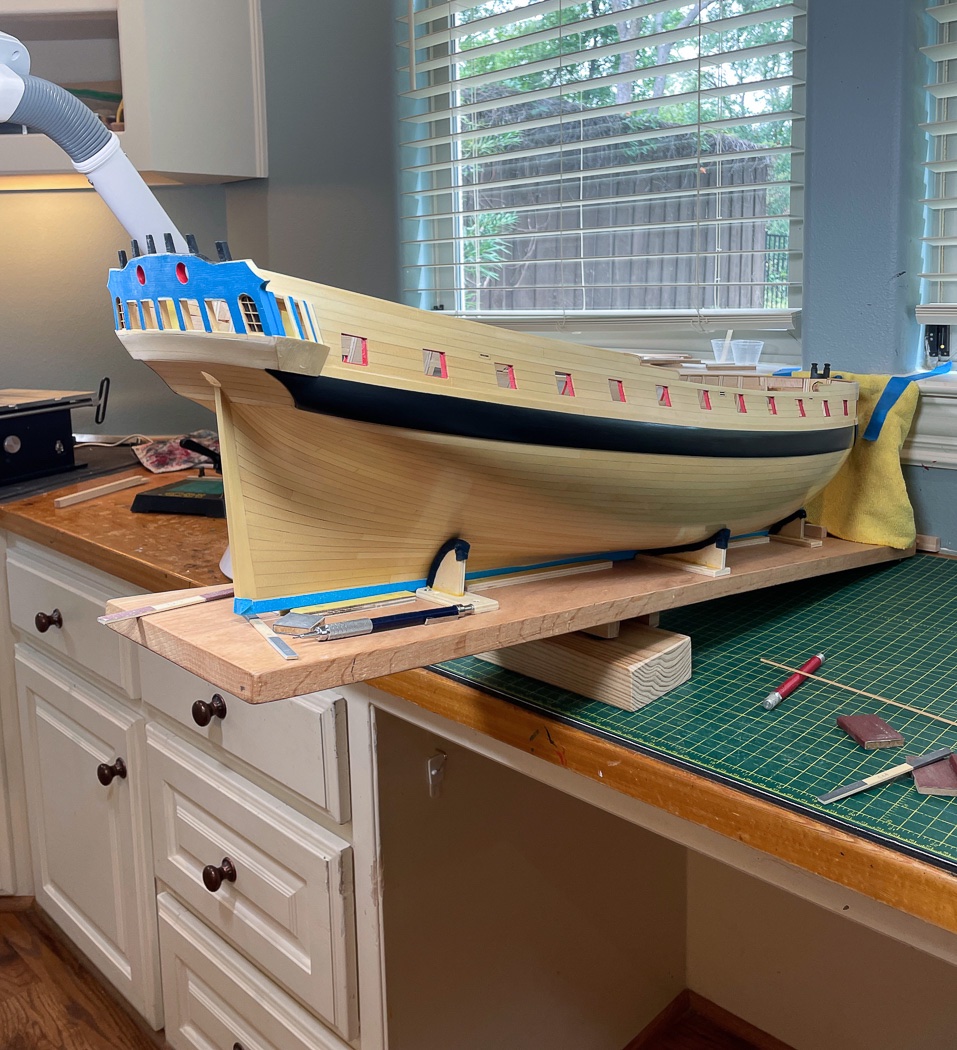
Winchelsea is a big model, bigger than I anticipated when I designed my workshop. My neck was getting tired of the strain of bending sideways, so with a block and and shop towel to keep the stem from crashing into the wall and more blocks to raise up the back I now have this precarious way to work at the stern and on the galleries more closely from the side. This photo is about as far as I move away from the model, it goes back on the table before I leave the room. I don’t want to hear a crash. The balance point is pretty dicey, but it works.
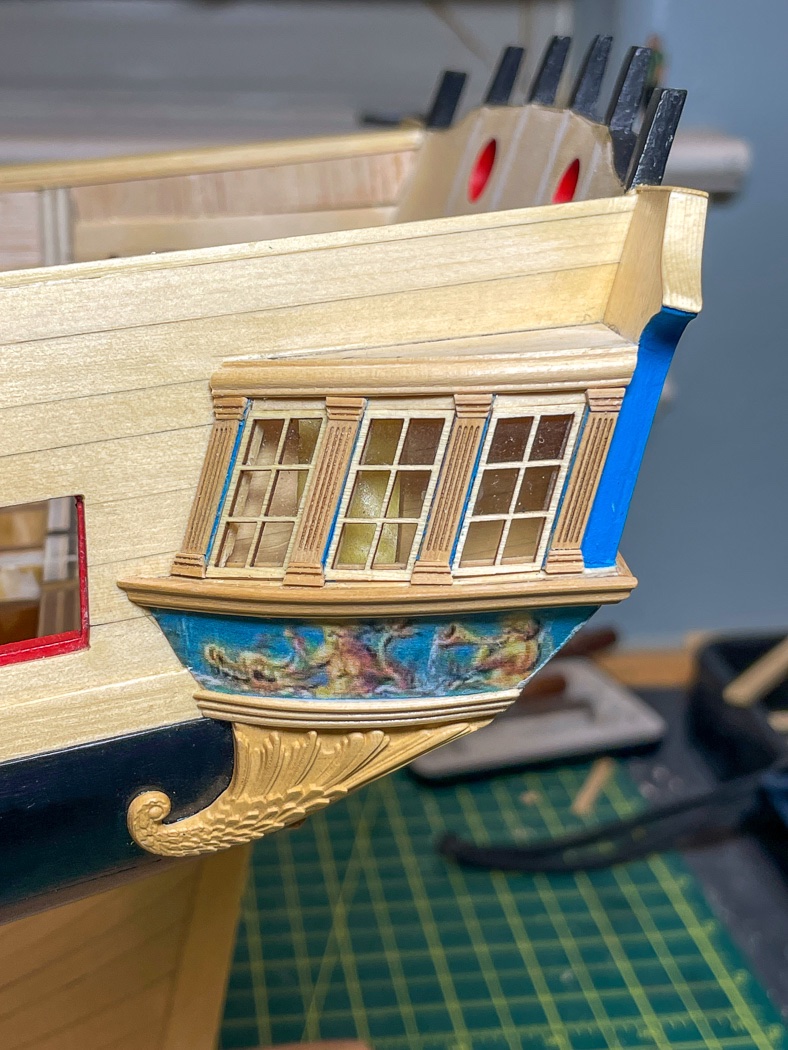
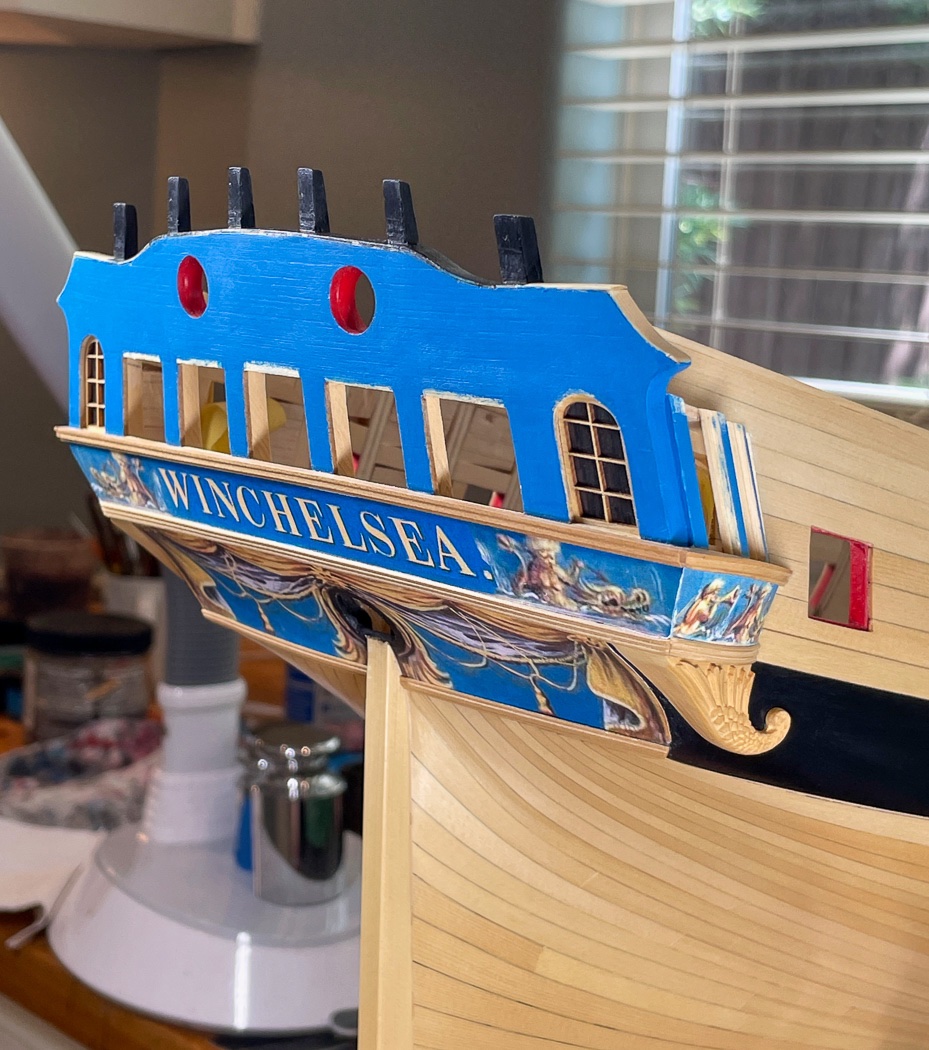
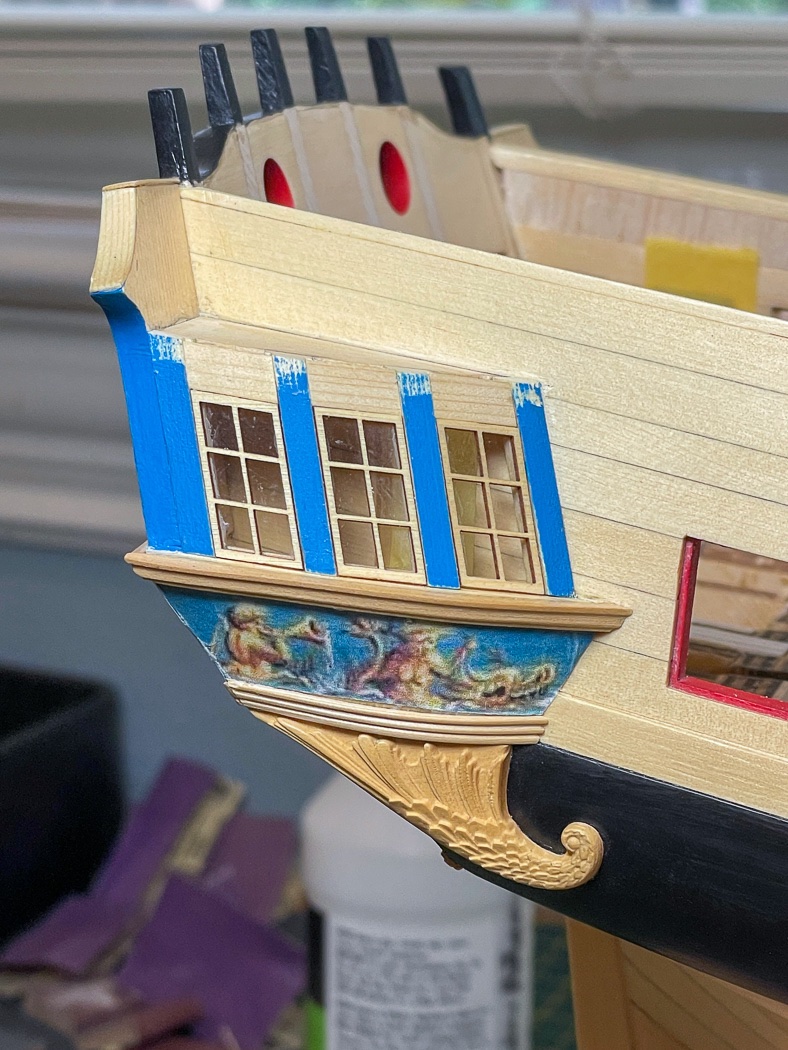
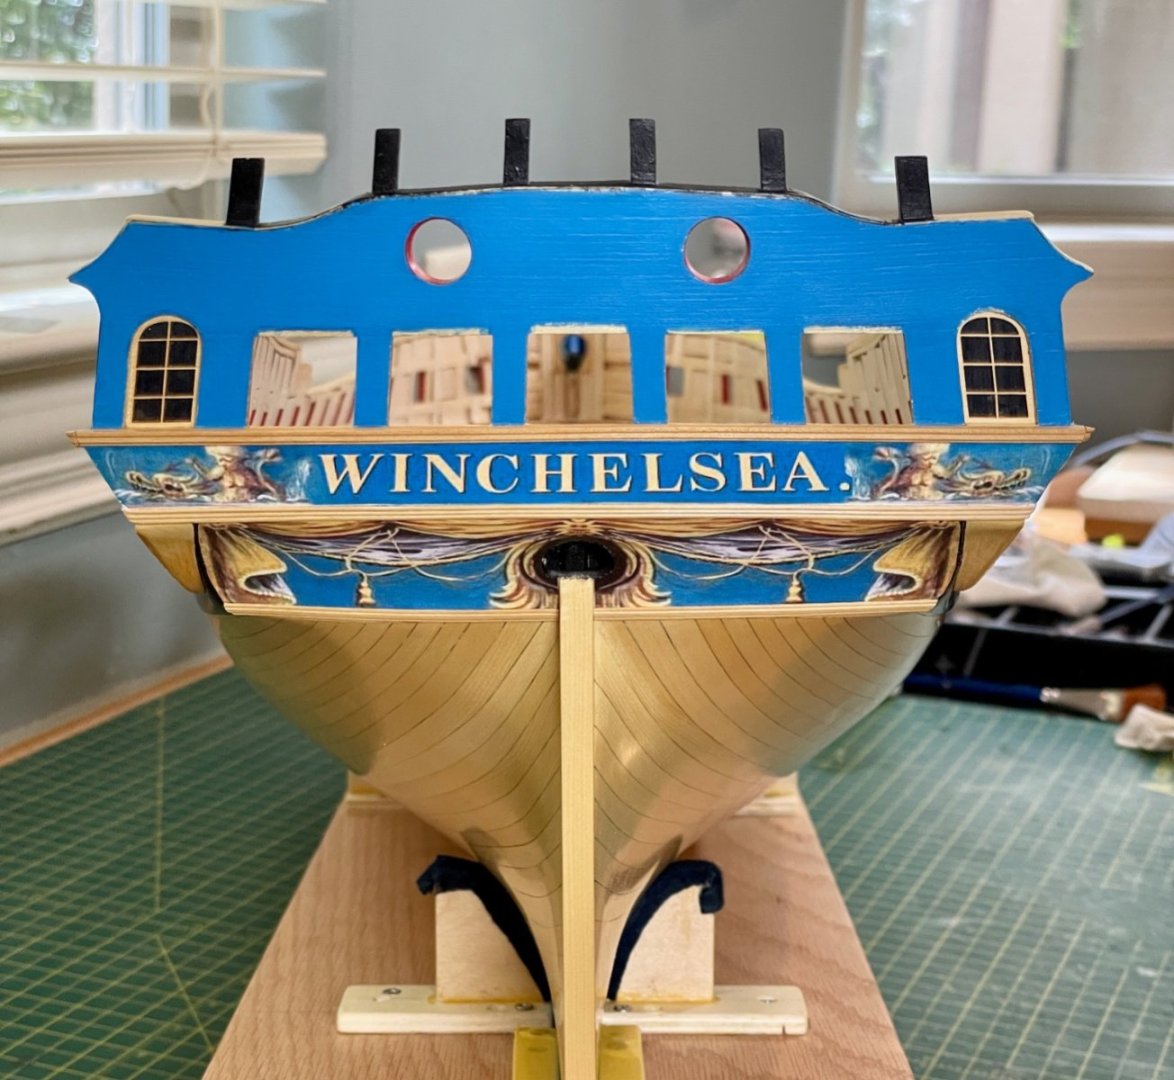
Anyway. Finally here’s a photo of the actual model. Two mouldings, window frames, and a frieze are added to the base described in my last post along with the drops. I admit I was skeptical of applying the friezes. If you haven’t done it (and there is so much on this model I have never done before) sticking paper printed off my printer with a glue stick that’s basically what my grandkids use (I did get the extra strength craft version) just seems like it wouldn’t work.
It really does. I printed with the best possible media format my printer will do on ordinary copy paper, sprayed it with Winsor & Newton Fixative, talked my wife into cutting it out, ran the glue stick over the back and on it went. A slight diversion here The world does not favor left-handed people like me, starting with scissors. You right handed people wouldn’t get it but the way the blades on scissors are set up a left handed cutter can’t see the line being cut. Consequently I can’t get close to cutting out the friezes with the precision required. Fortunately my wife is good at it, as long as we used my Singer scissors to cut paper and not one of the 17 pair she has for her hobbies, ok maybe not 17.
I like the moulding designs, applying them is a process. Like planking, there are multiple curves at work so out came the bending station. Being a little tepid about it at the start, I ended up enjoying the moulding making process and am now ready to scrape away in the future.

Everything I do, I do right the first time….not. As I’m prone to do if I decide I don’t like something I rip it off and do it again. In this case I didn’t like the upper moulding run and how the upper counter frieze looked so off they both came. It took a while to clean off the tightly glued frieze but it did all come off. I didn’t want to use a lot of solvents to avoid damaging other areas but a little carefully applied denatured alcohol took care of the paper removal and a little acetone even more carefully applied removed the moulding. In for a penny……
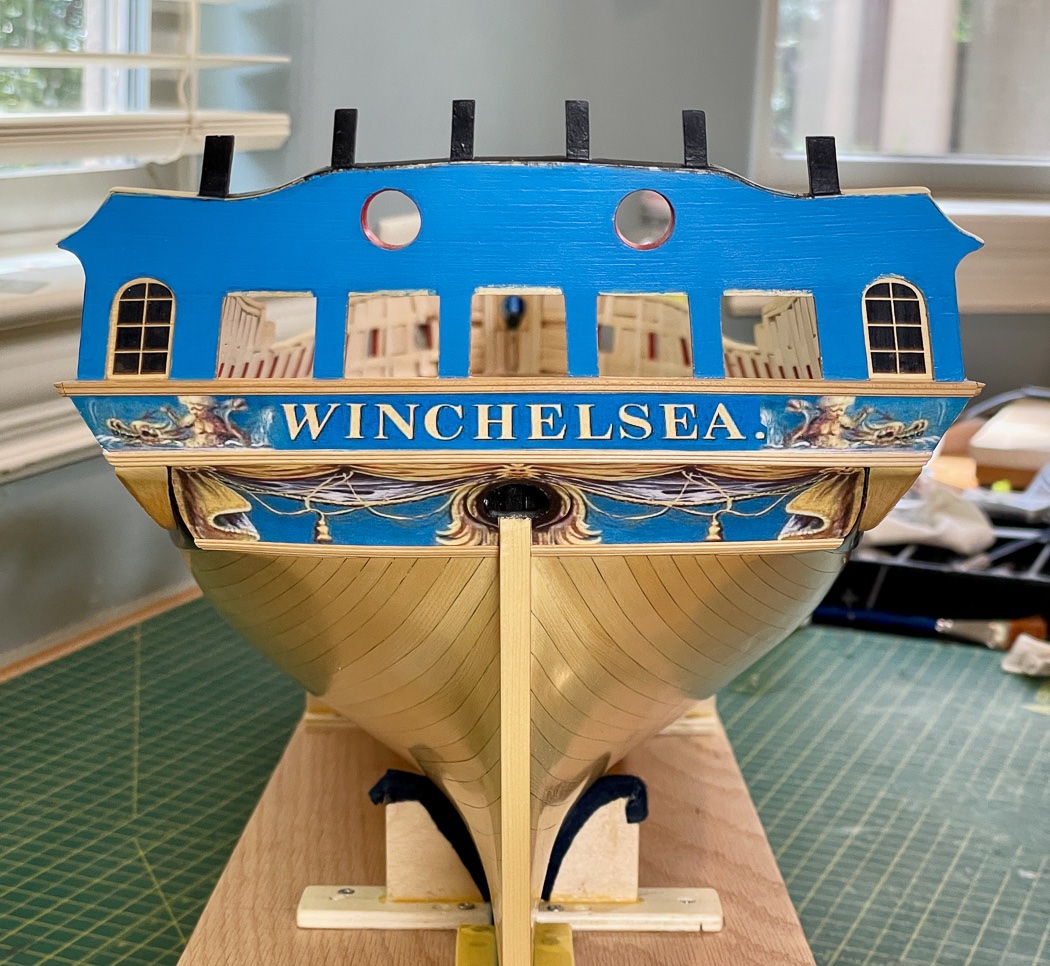
Eventually I got there. Since the both the moulding on the galleries continue on around the stern, seemed like a good time to get everything below the stern windows done. Plus it’s so pretty, all that glue stick work in action. All the moulding was applied with CA.
The first of those beautiful carvings is now added in the form of the drops - these and the ones to follow really, really make this a special design and a special model. They make this ship so much more than the usual kits. Very cool all by themselves, I’m excited to see them installed on my model.
Assembly time, I added the window along with upper sills cut to fit. The paint is scraped off the top of the frames to accommodate another moulding size and differentdesign. I made what I liked, not sure if it’s accurate or not, but they are accurately made.
I’ve said this before, so once again for those who follow. Chuck’s design works perfectly, there are tolerances and room to adjust to some degree. However as I assembled these galleries I was reminded just how important it was to get the ship’s stern frames and gallery framing right way back when it didn’t seem all that important so many months ago. It really pays off to take your time. It’s not like Chuck doesn’t say that a lot, it really does pay off, the take your time thing.
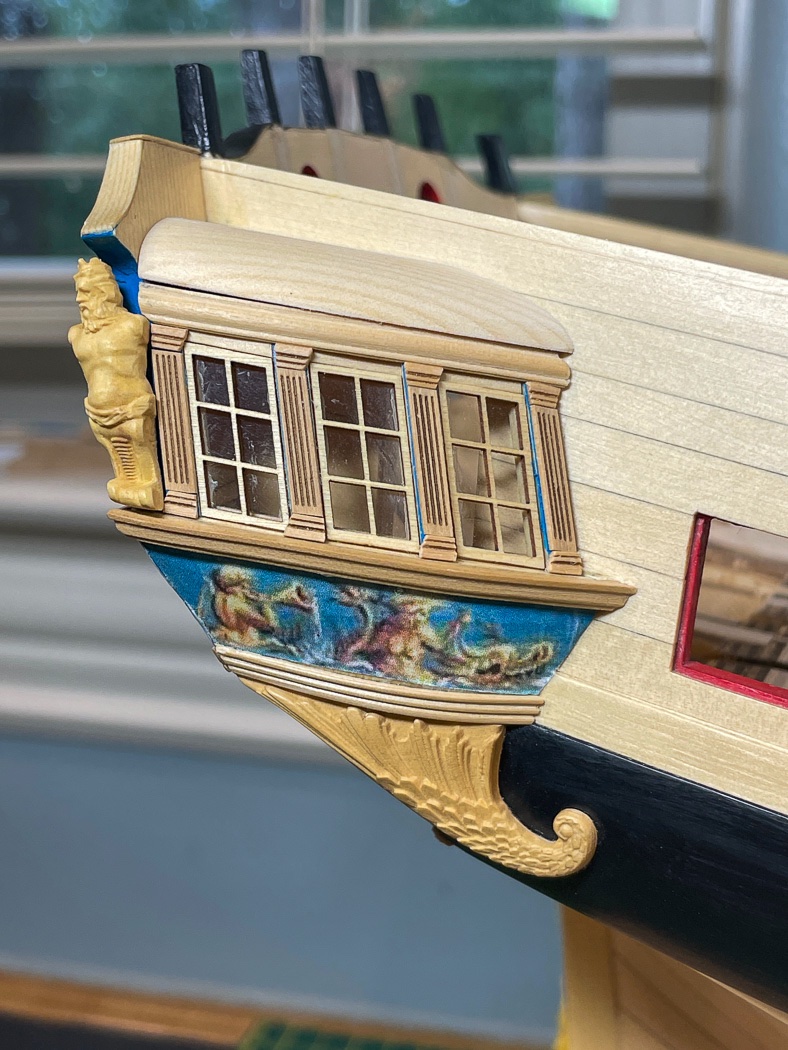
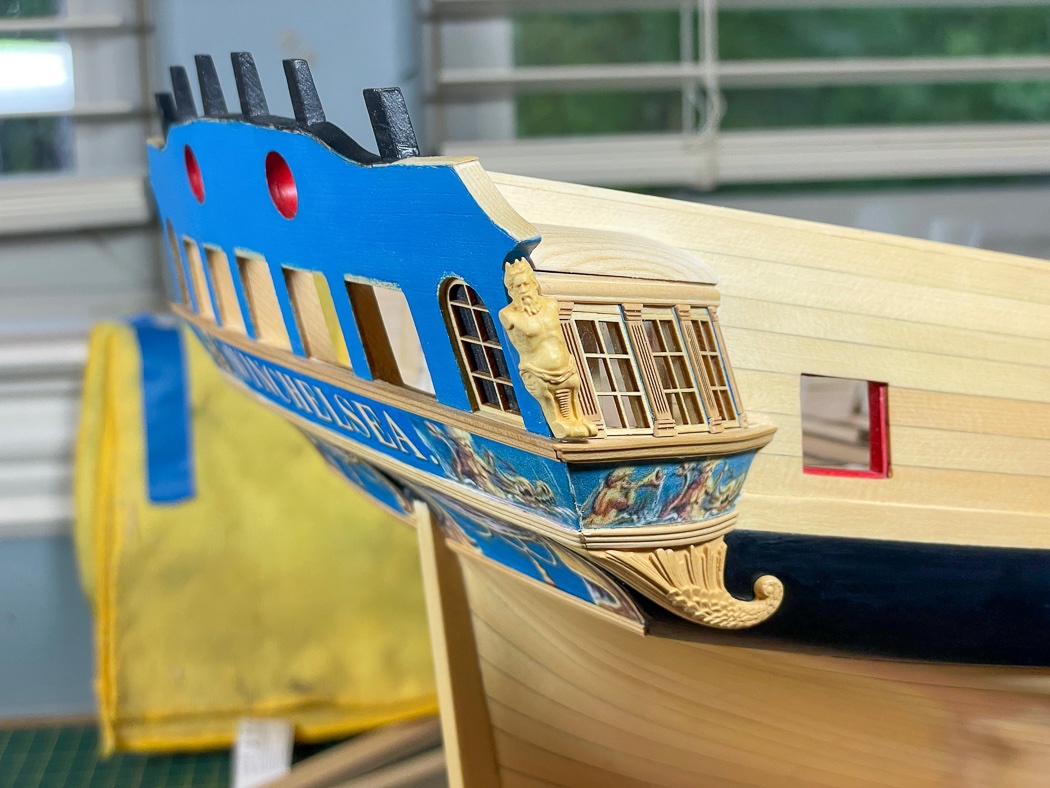
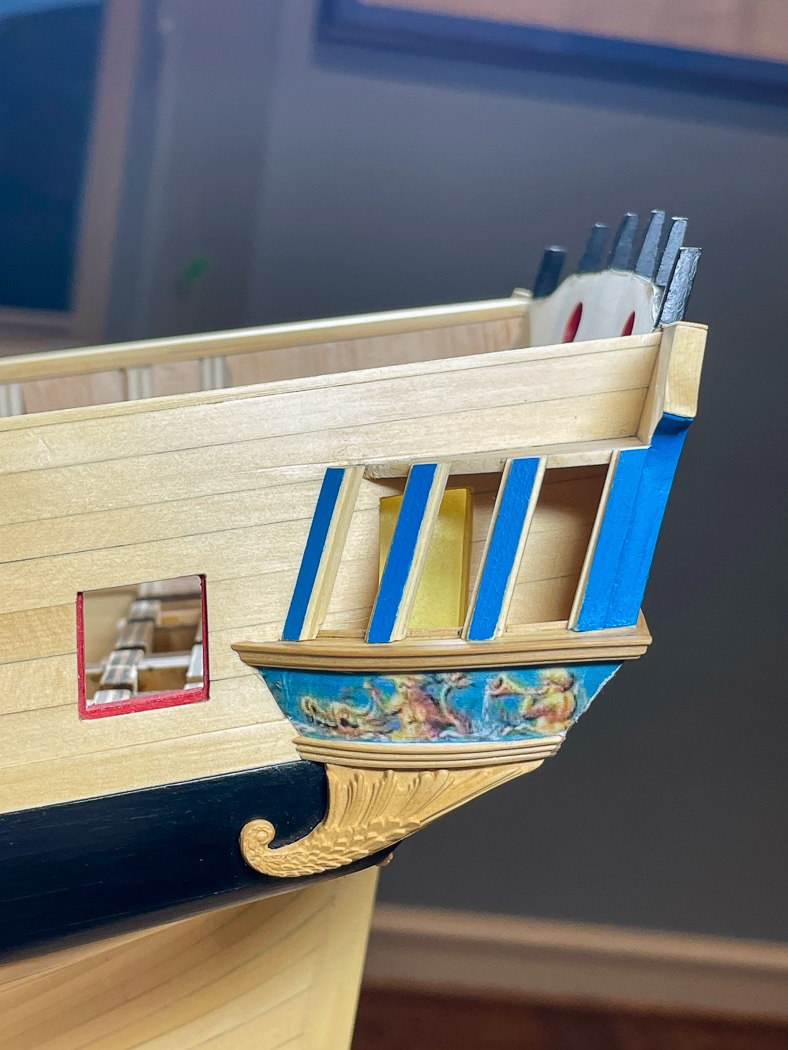
With that I added the top moulding, the columns with their caps (may still need a little adjustment there) and test fitted and adjusted the roof I’d shaped and sanded and will soon shingle in preparation along the way. I’ve been doing both sides by stages so I only have this last step to finish the port side. As you’ll notice another carved figure is test fitted into its eventual space. The moulding was adjusted a little to accommodate his shoulder. Don’t tell anyone, I sanded off a bit of his butt to get a tighter fit. He’s held there loosely by, you can guess by now, double sided tape. His female companion on the other side is an easier fit than this big dude. (I see in this macro photo I already need to call in a window cleaner).
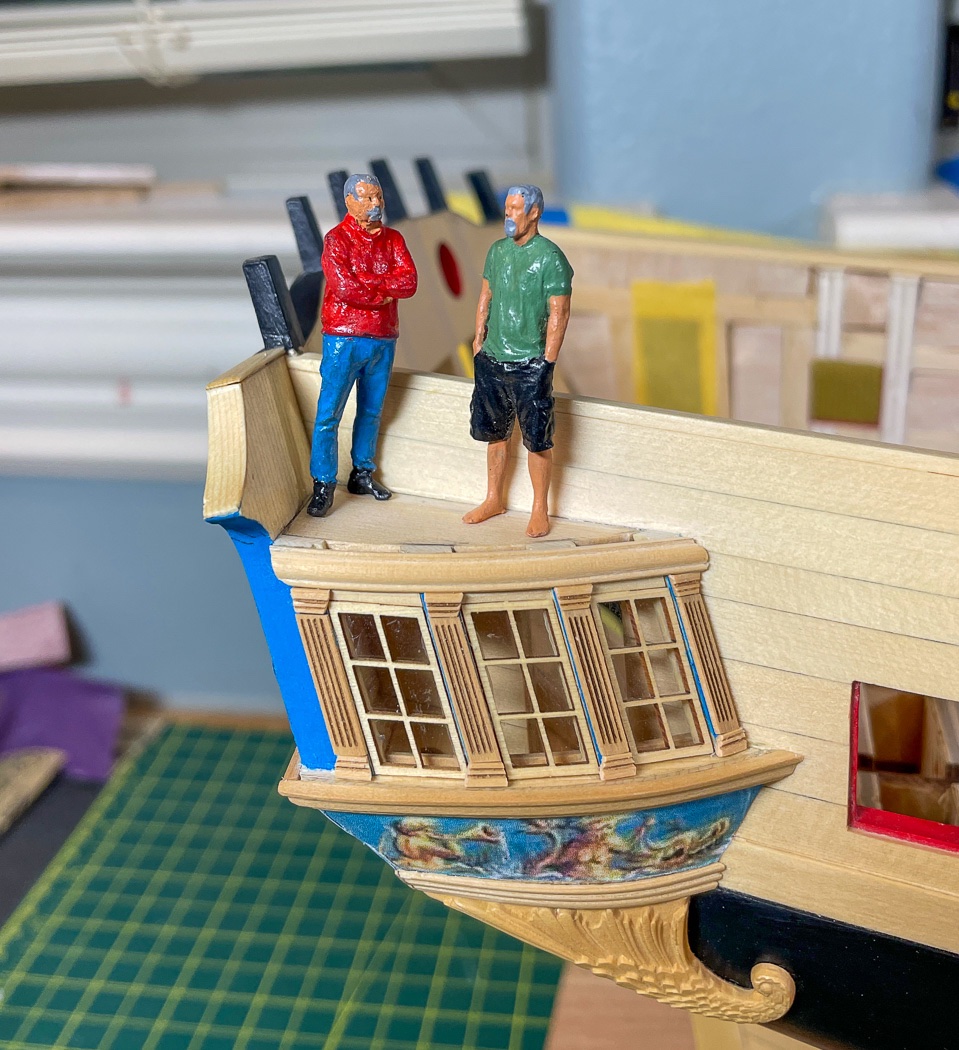
So with that mini-me (or my imitation as someone said) stops by to take a look and invites his neighbor, clad in my Winchelsea color scheme seemingly by chance, to join him (by wife wanted me to paint him, so here he is).
Next up the hull sides and stern above the upper counter. As always thank you for stopping by with your likes and your comments, they are very appreciated.
-
On 8/28/2022 at 2:37 PM, bartley said:
Kyocera bits. T
I got some of these, they broke so fast and so easy I tossed them. Glad your experience is different.
- Canute, thibaultron and mtaylor
-
3
-
It's been a minute. A longer post once I complete most of the galleys.
Meanwhile I've been plugging away, teaching myself how to do mouldings...and trust that a glue stick really is a great way to add paper to wood.
More to follow soon - if I can get to it before we head off to Alaska.
- scrubbyj427, DelF, Archi and 9 others
-
12
-
It’s good you took the time to get it right. Everything done right now pays off later in the build.
Be sure to follow the plans getting the lower counter and stern end of the wales right.
Your patience and attention to detail are serving you well. Nice work!
- Rustyj and FrankWouts
-
2
-
-
-
I’ve been in this search for a long time and have a drawer full of junk bits.
I like this set mostly because there are multiple ones of each size I typically need and because they are sharp and durable enough to do the job…until they aren’t and I reach for another one.
-
Any tool that relies on a Dremel isn’t a good use of money. The best machines are by Byrnes modeling, though he doesn’t make a drill press. In my opinion a mini saw, sander, mill, and lathe all have greater value to modeling than a drill press. When I need one my Proxxon Mill serves to do the job. I’d look at the Proxxon line, reasonably affordable and good quality.
The first, and by far most used tool in my modeling is the Byrnes saw.
- thibaultron, mtaylor, Bob Cleek and 1 other
-
4
-
-
-
Well said BE, well said.
Also, aside from an excellent model, that’s some really nice photography.
- shipman, Dave_E, Blue Ensign and 1 other
-
4
-
This is some really nice work, not only the model, also the photography. Well done on both!
What is your method on removing char from the cannon trucks, they look great?
- CaptMorgan and FrankWouts
-
2
-
Two rules of modeling, if you think you have enough clamps, buy more clamps. Not relevant here but the same applies to drill bits. As everyone has suggested find a good source and get smaller bits. They inevitably will break or dull at this size so buy several.
After drilling the right size hole I just pool a little CA on a piece of paper, dip the end of the eyelet in the CA, generally with a small needle nose pliers that has a smooth face so as not to mar the eyelet, and insert it in the hole. It doesn’t need much to hold, I’ve yet to have one pull out even years later. As someone also noted, rigging only needs to be taunt not tight, which also helps.
Jewelry hobby stores are a good source of the tools we use. I have nice flush cutters and other tools from this store and have been working my way through this set of bits for a while now. Rio Grande drill bit set
Have fun and welcome to modeling and this great forum.
- Dave_E, Ryland Craze and Chuck Seiler
-
3
-
My work table faces a window and wall. It’s not deep enough to face the stern towards me, which I could with every model but Winnie. I’ve been working at an angle which is not doing my neck any good.
-
I need a safe way to hang my Winnie from the side of my table height work bench to work on the transom. I’m not much of a carpenter or workin with wood larger than 1:48 scale. Any ideas or suggestions appreciated 😊?
-
I need a safe way to hang my Winnie from the side of my table height work bench to work on the transom. I’m not much of a carpenter or workin with wood larger than 1:48 scale. Any ideas or suggestions appreciated 😊?


HMS Indefatigable 1794 (prototype) by James H - Vanguard Models - 1:64 - FINISHED
in - Kit build logs for subjects built from 1751 - 1800
Posted
Allow me to offer my expert opinion on the topic, based on my extraordinarily deep experience and expertise in building wooden models from a multiple manufacturers, expertise that is known far and wide throughout the modeling industry and is an unquestioned source, though I don't have a cool name like 'stargazer'
Cool, it looks nice.
🤣😂🤣