


glbarlow
-
Posts
3,813 -
Joined
-
Last visited
Content Type
Profiles
Forums
Gallery
Events
Posts posted by glbarlow
-
-
The Ibex planers are great. I have one, didn’t know there were so many variations.
- thibaultron, mtaylor, JpR62 and 1 other
-
 4
4
-
15 minutes ago, scrubbyj427 said:
Boats and photos!
Thank you!
- Dave_E and FrankWouts
-
2
-
Thanks Rusty!
- Dave_E and FrankWouts
-
2
-
46 minutes ago, Chuck said:
Lovely progress
Thanks Chuck! Your design makes it all fun.
- FrankWouts and Dave_E
-
2
-
3 hours ago, Gregory said:
how did you get the elephant and lion shots?
Thank you. The animals don’t consider safari vehicles a threat having grown up with them. I used a 100-400mm, many of the shots were closer to 100 than 400 in particular the elephants. I was sitting on the ground back to the vehicle for the elephant at about 100mm, the lion I was in the vehicle (no getting out around them) closer to 400mm. I never needed more than 400, some were with a 24-70mm. It was amazing how close we were.
-
Until the past few days it had been over a month since I last worked on my Winchelsea. My wife and I took a two week trip to Kenya on safari to the Amboseli and Masa Mare Reserves. It was an amazing trip. Photography is my other hobby, while there we took over 10,000 photos. If you’re interested I’ve published a small set on my web site GlennBarlow Photography Here’s a sample from each location (yes we got that close):


That was followed by a fabulous weekend in Colorado for my youngest son’s outdoor wedding with perfect weather. Now I’m back home sorting through photos and getting back to ship building.
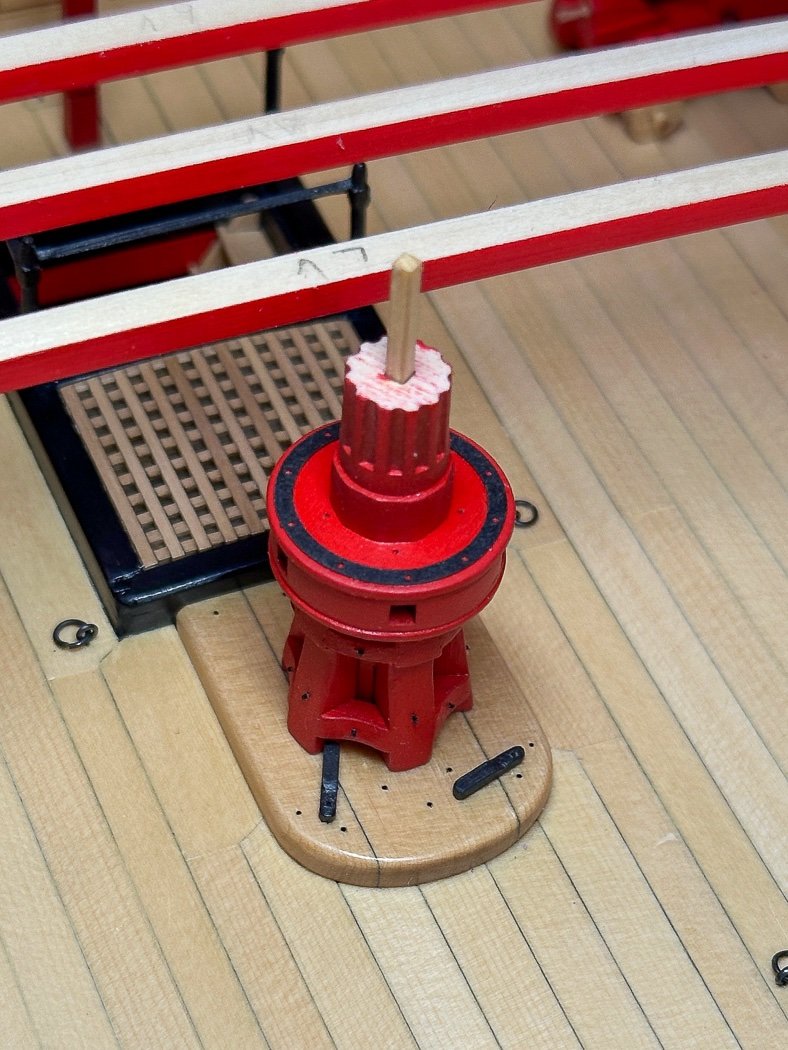
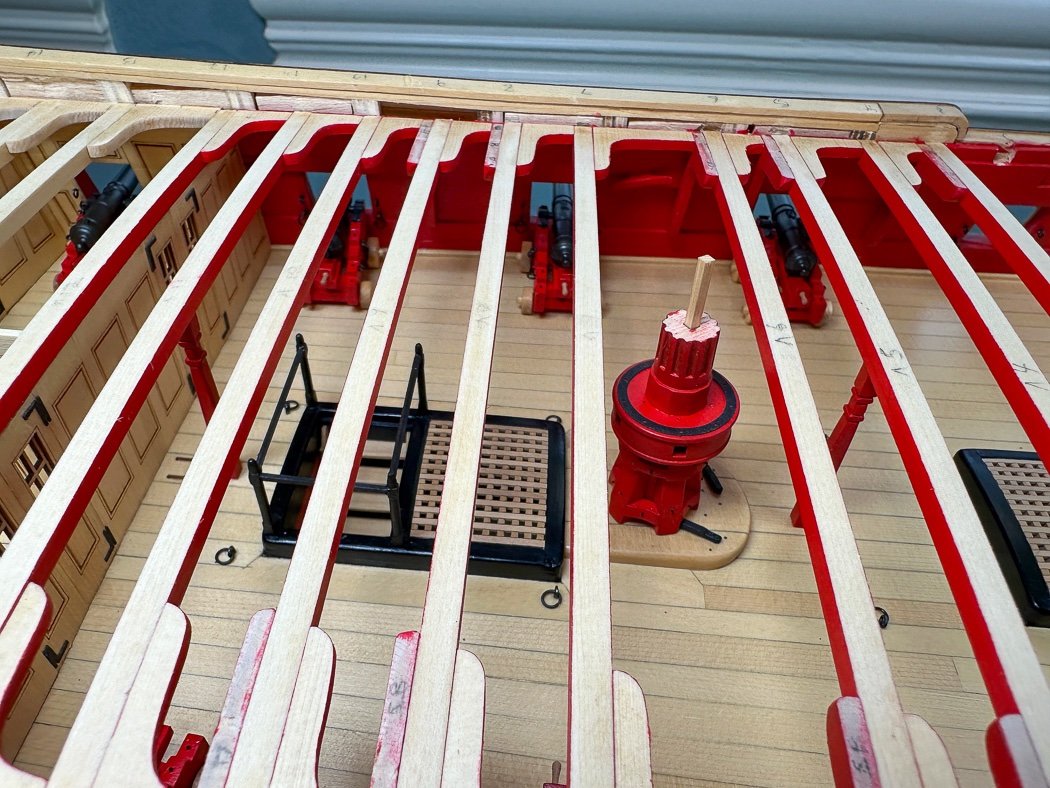
So not much progress. I’ve been installing quarterdeck beams from stern forward and reached the point of installing the capstan I’d made a while before. The paws were a fun little, and I mean little, project. It doesn’t really show in the photo, they are thinned down on the back half. After painting with Ironwood Black and weathered I pinned them by drilling a hole using 25lb black monofilament as the pivot. The key with the capstan is for it to be centered front and back between beams and more importantly port to starboard. I guess it more challenging as my the dowel on the capstan bottom was smaller and shallower than the platform. I got there eventually, thankfully the PVA had enough drying time.
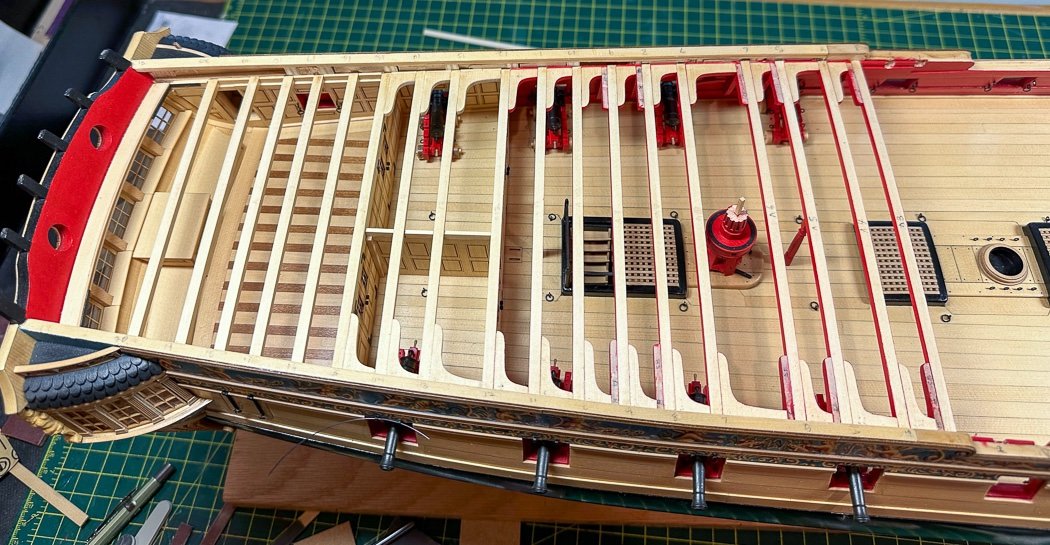

I’m enjoying installing the lodging and hanging knees, though I’m already a bit disappointed knowing none of it will show after the q-deck is partially planked. ’m going to have to think about that some but will defer it until much later.
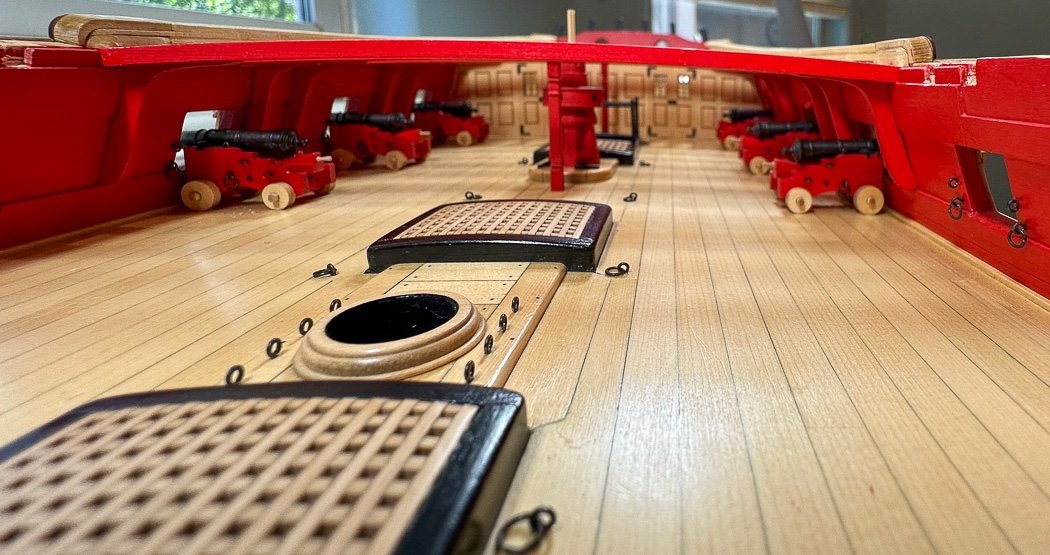
Kind of a cool view down the deck, forgive the iPhone created distortion. I’m now at at the point for the pumps, main jeer, and gallows, So something new to do besides beams. I plan to first go back now and install the port lids - I decided I’d rather knock them loose than a cannon - and repair my quarterdeck roof…again.
So it’s back to work on Chapter 7 while I also work on photos and a book I want to have ready before Christmas. Thanks for stopping by.
-
Making great progress. I like the modifications to show some of the ledges and knees. I just completed the quarter deck on mine, thinking all the while I’d be covering all of those up. Only I’d know they were there. I’ll have to give this solution some thought.
- Blue Ensign, hollowneck and mtaylor
-
3
-
I’d love to build this but all the fairing and planking. Actually that I could do, finding a place to display it might require marriage counseling.
- Ryland Craze, mtaylor, scrubbyj427 and 3 others
-
2
-
 4
4
-
Fortunately there is no wind or weather for a model to endure both methods work to seize block and hooks to the line. Appreciate the history lesson, and here I thought the earliest modelers came up with it.
- Glen McGuire and Thukydides
-
2
-
Lots of things with lots of names. Point is it works for seizing blocks and hooks.
-
Here’s another video more on point Seizings
- jpalmer1970 and Thukydides
-
1
-
 1
1
-
I guess it’s properly called a Clinch knot The link is to a fishing video tying it to a hook, same thing. Instead of the loop being through the hook eye (which obviously works for our hooks) a block goes in that loop. The quad hands is an essential tool to hold the block in this case. I vary the number of wraps from 5-7 depending on the size of the block. Done with fly fishing line it makes for a nicely seized block. For a block and hook seizing the hook goes as shown in the video and the block in the upper loop made. Then both ends of the rope are trimmed after a bit of watered down white glue or clear acrylic (or matte varnish, I haven’t tried that)
I’m pretty sure I covered this in my Cheerful log in more detail, hope it helps.
- Jack-in-the-Blue, AJohnson, jpalmer1970 and 1 other
-
2
-
2
-
Nice to see you back on Winnie, it’s a good thing you point out your errors otherwise we’d never ever see them😂😊Very nice work as always.
-
-
On 9/17/2023 at 3:13 PM, Thukydides said:
In retrospect I think I needed a finer thread,
As l ready suggested I’ve converted to the fly fishing thread, it works nicely. I would also suggest looking into tying a figure eight seizing. The same method used to seize a fish hook onto the line. I do all my block and hook attachments using this, it’s a handy knot to know.
- Gregory, AJohnson, jpalmer1970 and 3 others
-
6
-
The first plank and second plank laid should be the lower layer of the wales. Measure where they go from the plane then first plank up then down from there. Only once you’re completed and happy with the second planking making sanding easier then add the upper layer of the wales. Have fun. Don’t be reluctant to pull a plank and do it over. I like to claiming planked three sides of my Cheerful having pulled and replaced so many.
- Dave_E, dunnock and chris watton
-
3
-
Beautiful model! Congratulations on a job so well done.
-
As others noted, the first layer is practice and a base, the second layer is more important to get right. You may elect to move forward some day to a single planked ship so now’s the time to learn. Look at lots of logs but be forewarned, there are as many opinions on planking as there are builders. Your math method is fine, especially for a small hull. It’s how I did it before I moved to Chuck Passaro’s method which for me is the ultimate answer to planking. Once you choose a method stick with it, one way to get thoroughly lost is trying to incorporate every different method.
I love planking, saying it’s just going to be painted later is a cop out. Enjoy the process, but make it a process and not an ordeal.
- modeller_masa, CiscoH, Dave_E and 3 others
-
6
-
-
You’ll definitely have to taper, look at many build logs, the process is the same, and search other parts of the forum on planking techniques. However be forewarned, there are many opinions on how, many of them contradictory. With my Nelson and every model since I adopted Chuck Passaro’s heat bending method and lining the ship to get correct widths. Lining for such a small ship as Nelson may not be more than good practice, but doing the math is essential. I think I described it in my Nelson, Cheerful, and Winchelsea logs enough to help (again planking isn’t model specific). So do the research and plan accordingly.
Adding balsa filler at the bow and between first and second bulkhead will make things easier.
-
Incredible work, excellent display.
- mtaylor, billocrates and jpalmer1970
-
3
-
Really amazing and impressive with what you’re doing here especially given you’re learning as you go with both design and production. Does ‘back to work’ you’re back on board a ship, if so keeping the design work going is even more impressive?
- scrubbyj427, mtaylor and FrankWouts
-
2
-
1
-
I highly recommend doing the math, no offense but with planning, and adjustments as you go stealers should never be necessary, especially at the bow. Especially not on a relatively simple bow like this one. I’d pull several of the top level planks to get a more precise fit with tapering. Definitely something to think about. I try to demonstrate this in my Nelson, Cheerful, and Winchelsea logs. I’d also recommend researching by looking at lots of logs, doesn’t have to be this model, planking is planking.
- mugje, AJohnson, Thukydides and 3 others
-
6
-
That’s correct about the multiple angled window choices, it’s great Chuck thought of that. The template will naturally lay in place as you have it. If I recall the key thing is for the gallery window sills to be parallel with the water line. I know I checked multiple build logs to compare, it is a big step. Looks like yours are fine, great work.
- CiscoH and FrankWouts
-
2


HM Cutter Alert by Thukydides - Vanguard Models - 1:64 - first build
in - Kit build logs for subjects built from 1751 - 1800
Posted · Edited by glbarlow
Though a different ship @DelF Speedy log was helpful for me at this point as I learned to do servings for my Cheerful where I also attempted to describe rigging the shrouds including serving the full length of the leading (bow most) shroudThe principal is the same. Your second attempt is much better than the first as you note.