


glbarlow
-
Posts
4,015 -
Joined
-
Last visited
Content Type
Profiles
Forums
Gallery
Events
Posts posted by glbarlow
-
-
-
It’s your first model, cut all that junk line off and re-rig it with better line and blocks from Syren or Ropes of scale. The practice and second run through will be good experience. There’s no hope for what’s on there now.
- dvm27, ferretmary1, BenD and 2 others
-
 5
5
-
If only we could outsource char removal. Hope you’re doing ok.
- Rustyj, Ryland Craze and FrankWouts
-
3
-
-
I then proceeded to knock one off while doing fenders. Fortunately it was PVA glue that gave and not the wood, so it was an easy fix.
- FrankWouts and Matt D
-
2
-
12 hours ago, Rustyj said:
craftsmanship
Thanks Rusty, much appreciated from someone’s who’s work I’ve admired for a very long time.
- FrankWouts and Ryland Craze
-
2
-
17 hours ago, Chuck said:
the home stretch
Thank you Chuck, for your support along the way and for this fine model.
- FrankWouts and CiscoH
-
2
-
21 hours ago, Erik W said:
I like the display base
Much appreciated Eric!
18 hours ago, Matt D said:Beautiful work,
Thanks Matt, enjoying your Winchelsea as well.
17 hours ago, Toolmaker said:You have certainly done this kit justice.
I appreciate the kind words, thank you.
-
Looking great Matt. Those railings are a great look and no small thing to get right. Well done!
-
Well done JJ, amazing design work! I can't imagine a hike to the Himalayas parking lot let along any further. Be careful and enjoy the trip. Having just "located" the channels your design element marking them and making them easier to install is a excellent feature.
- mtaylor and scrubbyj427
-
1
-
 1
1
-
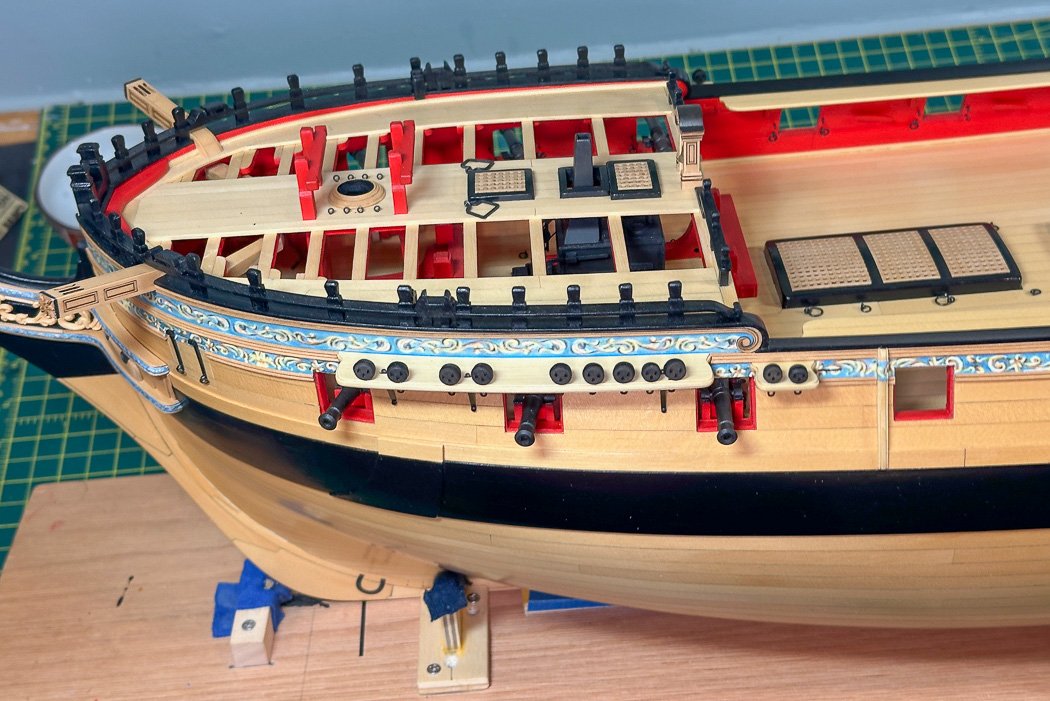
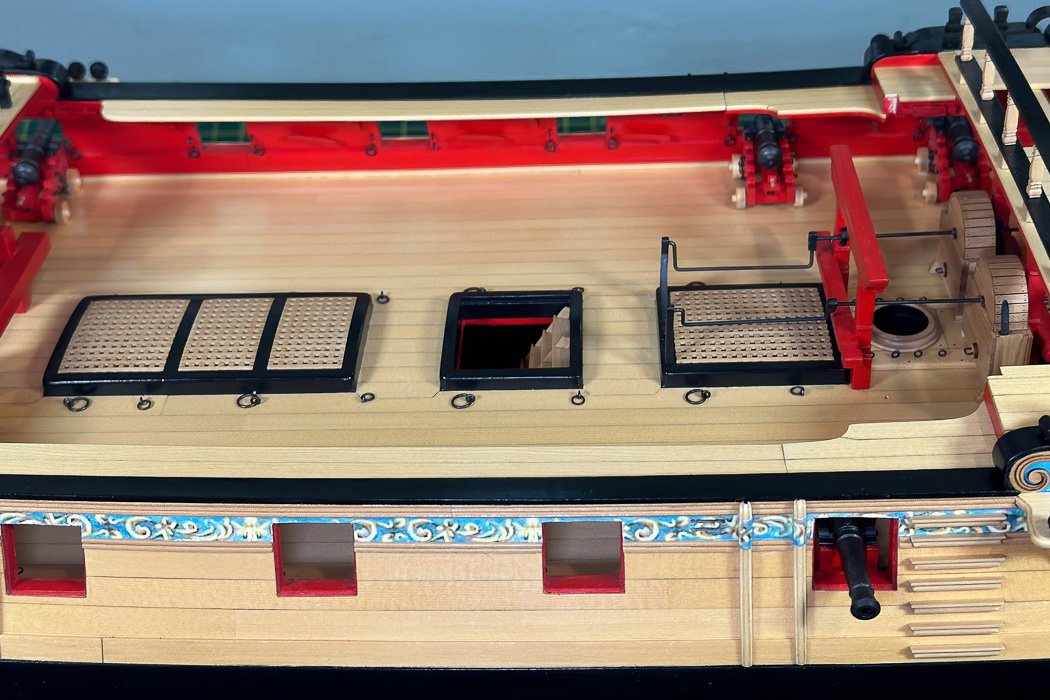
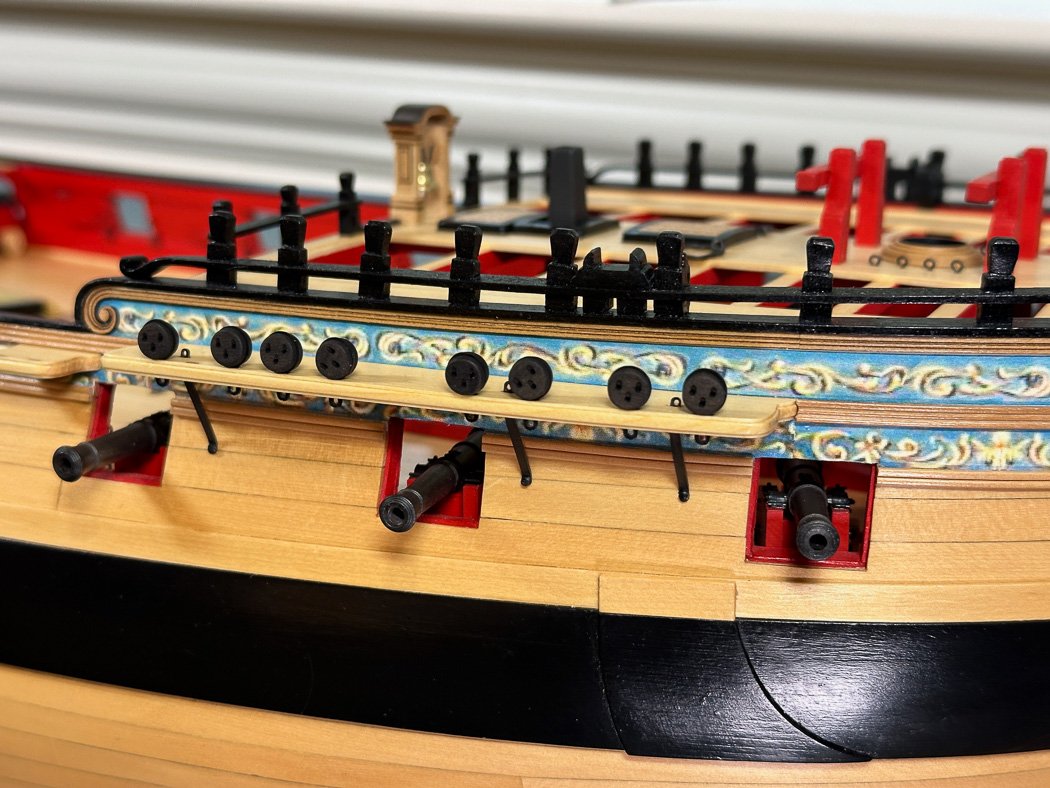
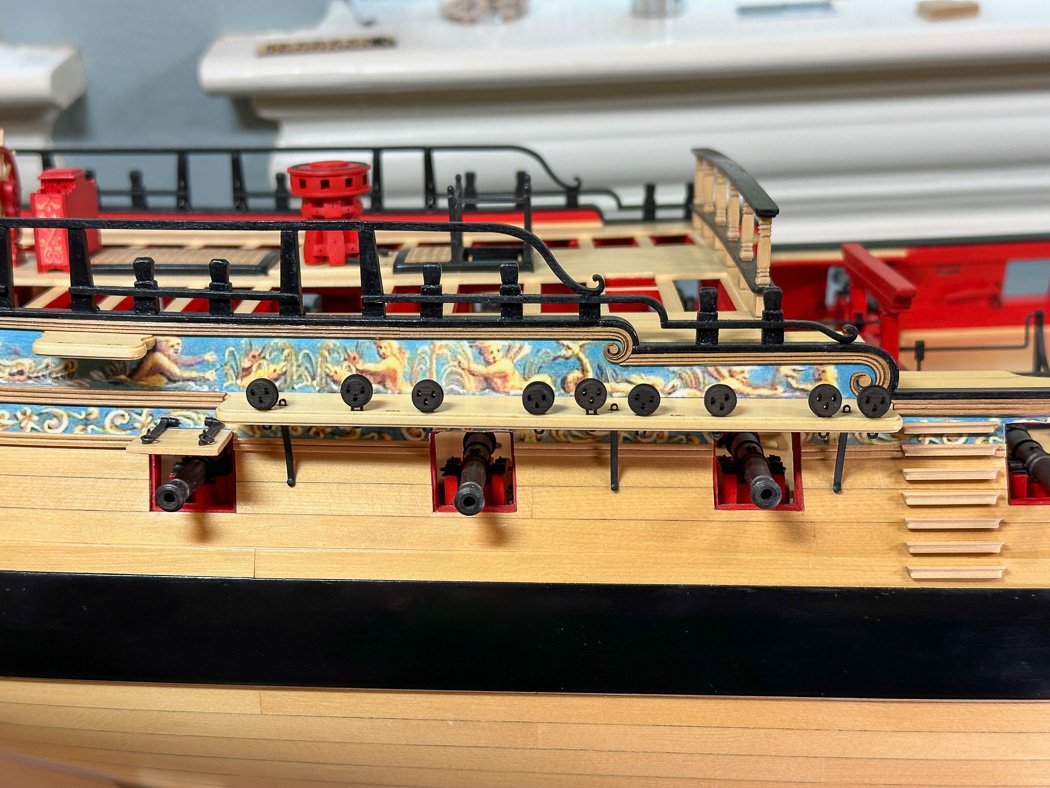
Channels and Gangways
An update as I near the end of chapter 11:
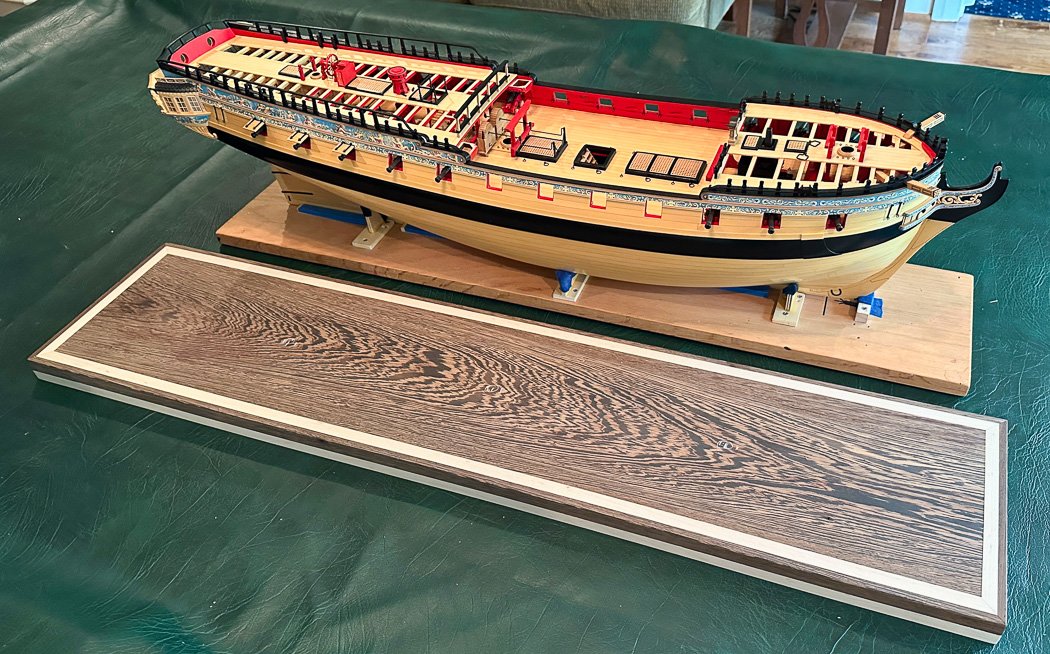
My friend is making a stand for me. He’s an artist, he selected this particular wood piece of Wenge because the model will appear it’s ‘breaking the water.’ This is not something I’d ever thought of, but pretty cool. The color of the Wenge with its elm inlay, especially once finish is applied, is a nice accent to the model. Good to have artist friends with big tools.
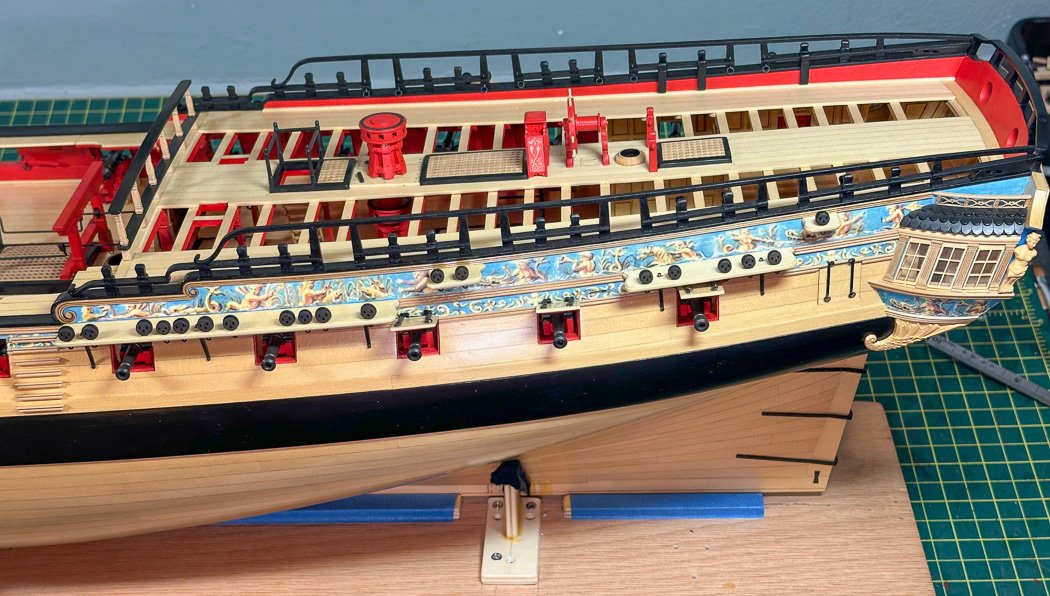
The channels are complete port and starboard. The stress of cutting away mounting and cutting into friezes to fit the curved ends of the channels is behind me.
I’m happy with the ebony wood dye used on the deadeyes with its result of the boxwood texture showing through. They stand out in their own right and are a nice compliment to the rest of the model.
I have completed the gangways, as did Chuck I elected to position the knees after attaching the long gang board. I was concerned about midshipmen falling overboard but having just received the latest Sea Watch Rodgers collection of 5th rates (given my Not vast nautical knowledge). I saw ropes and posts were mounted along the rail. Not something I’d want seen on our Admiralty board model, but I feel better about the midshipmen now.
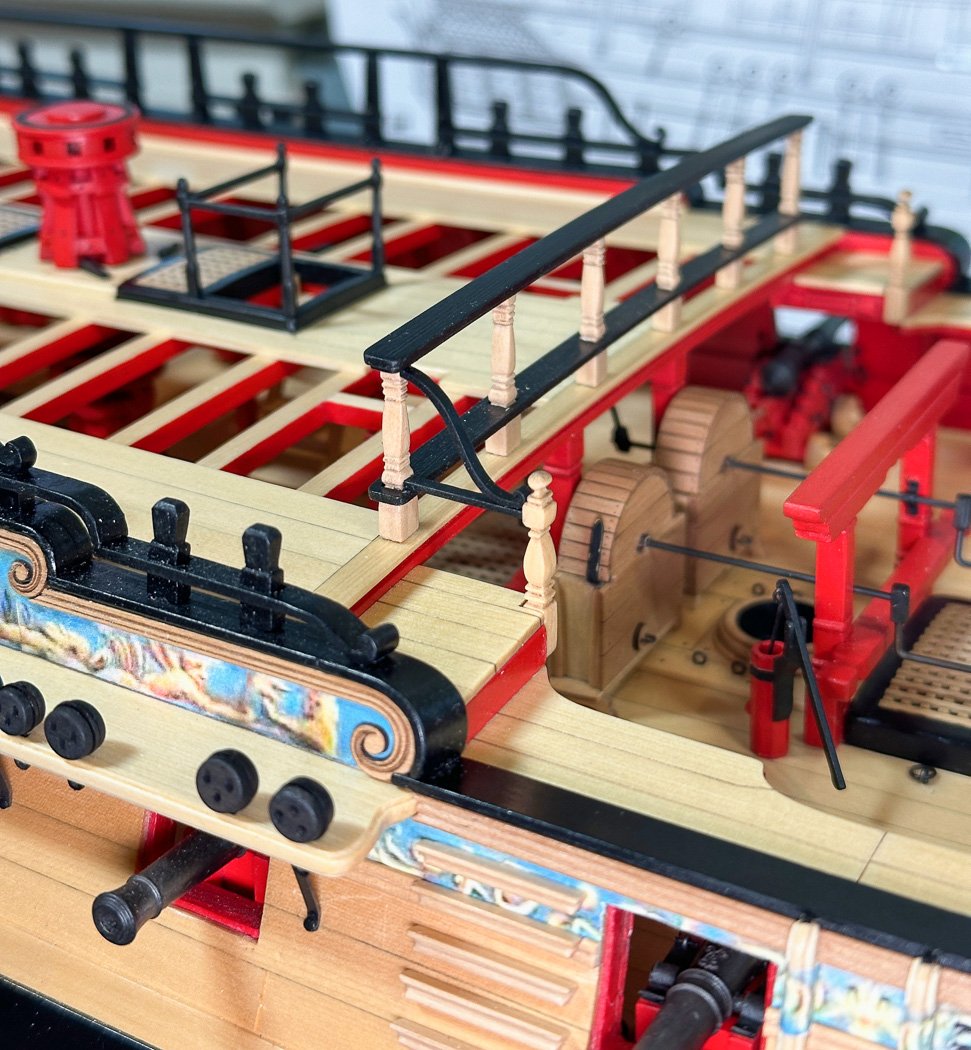
The newel posts and their fancy rail are yet another signature element of the model. For a level fit to match up to the newel post my lower rail is mounted to the breast rail post rather than its rail, plus I like the look. As Chuck notes, getting the post level on multiple planes, especially given the platform follows the sheer and camber of the deck, took some patience and a jig or two.

A major milestone: With the addition of the ladders and installing the elm tree pumps I completed more than a year ago my Winchelsea is complete between the bulwarks (short of my gluing on the remainder of the guns).
Work continues. Thanks for stopping by.
-
Most likely my next build after Winchelsea, it’s just sitting in my cabinet waiting for me.
-
Great start Rusty, you make the hard look easy. All those pieces so perfectly assembled!
- FrankWouts, mtaylor and Rustyj
-
3
-
23 hours ago, davyboy said:
Luckily we have same quality kits from Chinese manufacturers at one third of the price"
It’s just a pre- announcement of a ‘copy’ being pieced together now by some Chinese hack. 😳
I just read it as well (as a guest, I was kicked out long ago). Interesting how some members are complimentary while the staff and admins work hard to disparage Chuck at every turn. This comment by a member “ I emailed Chuck with updates and progress pictures and found him to be very personable, interested and encouraging. A much more personal investment of his time and interest than one might otherwise expect from the head of a commercial venture.“ must have really hurt.
-
You could stop right here and it would be an amazing model.
- FrankWouts, Chuck, allanyed and 4 others
-
7
-
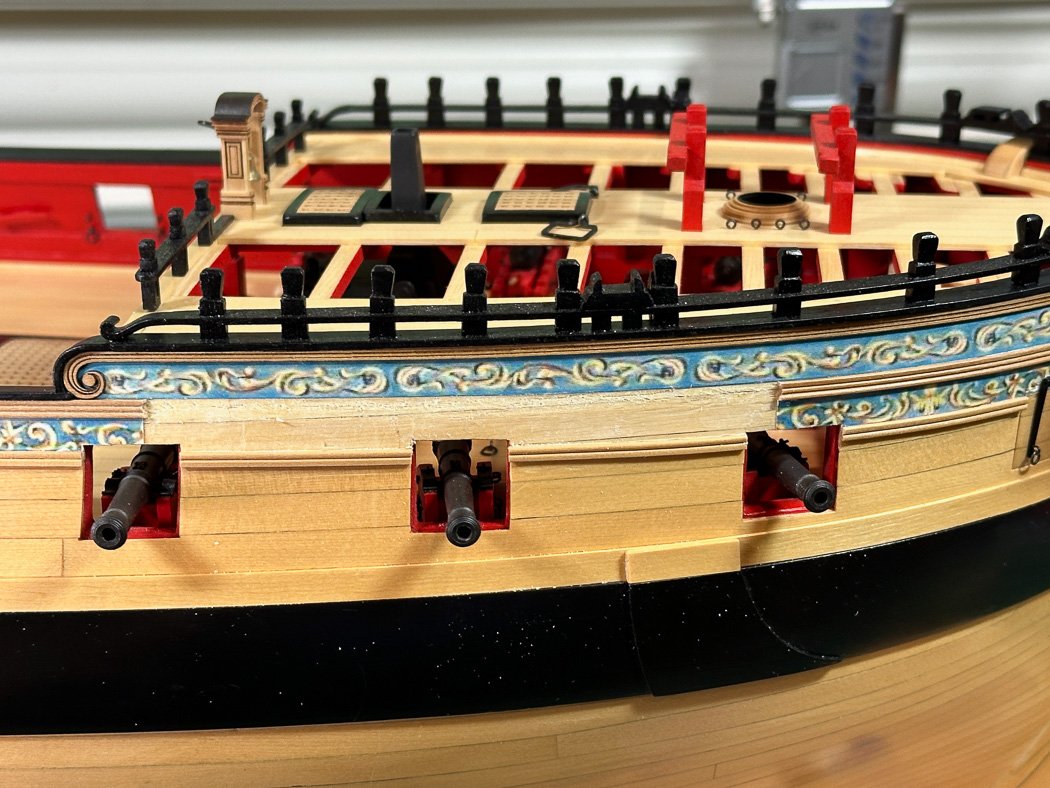
Channels
Initial progress on channels, a really fun opportunity to cut away some of that moulding I so lovingly added a long time ago.
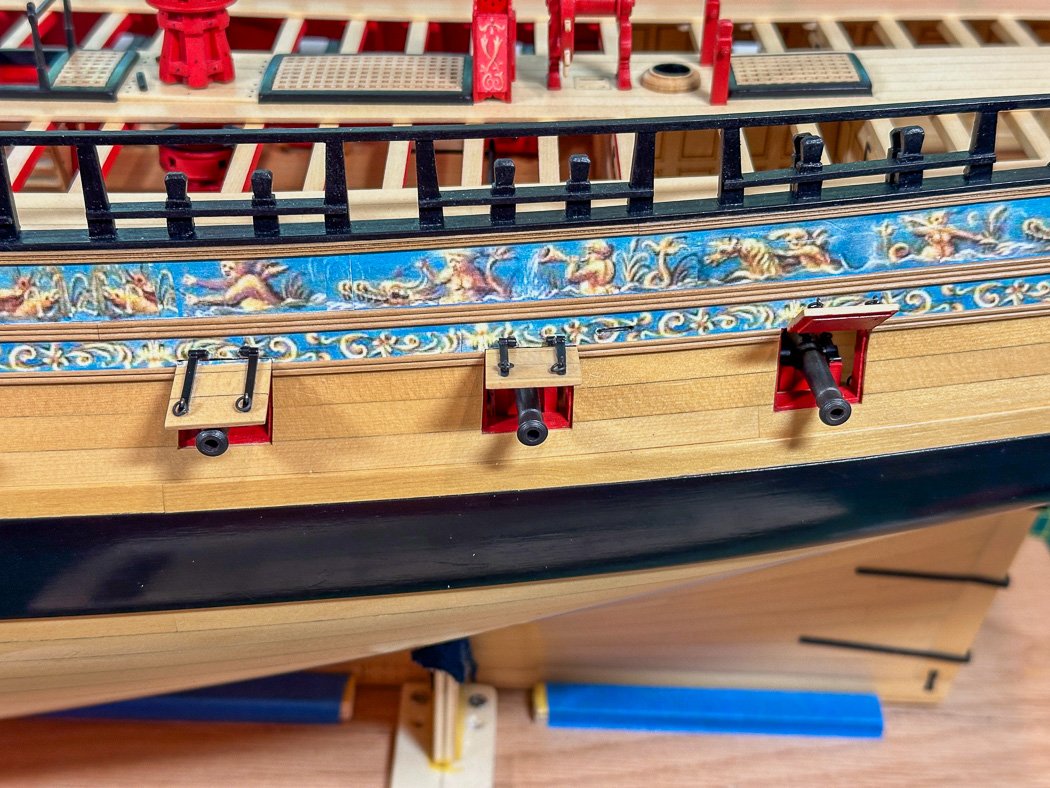
But before starting that I decided to bite the bullet to remove and replace the port lids. As I’ve mentioned a few times I have broken and glued back these lids too many times to count, all of course due to carelessness. It took some delicate work to remove them and the hinges without damaging the hull, especially the friezes.
This time I used the wider, thicker hinges @Chuck offers. Unlike I failed to do before I kept these movable rather than fixed. I can now display these more like the right most port. My lesson learned is to install the port with both ends of the hinge on the lid, not one part on the hull and the other on the lid then threading the wire to connect them. This time I was able to keep the hinge tight enough to hold position. My first effort ended up with ‘floppy’ lids so I had to glue them into a fixed position, and by consequence made them vulnerable to my careless movements.
Though it took several days it was a good call to take this step back and get a better result. I’m happy to report the friezes all survived as did my sanity.
Well the friezes survived around the ports anyway. Cutting away moulding the exact width and shape needed for the channels was pucker time, go slow, measure once, twice, three times before cutting, did I mention go slow. @FrankWouts was wise to factor this in at the time he installed his moulding, wish I’d thought of that.
I did remove and replace the frieze below the fore channel, it didn't prove necessary for the main and mizzen.
The beauty of this forum is the willingness to share means and methods. Something I always try to do and certainly take advantage of myself. This surgical tool, for podiatry I think, is absolutely perfect. My thanks to @Blue Ensign for sharing it. Two choices for replaceable blades: The wider chisel blade is thin, sharp and the perfect width for pushing through the moulding, keeping a clean edge on the remaining moulding either side. The smaller blade that opens up the slot for the strap perfectly. I have used this tool repeatedly for many varied purposes when my even my mini-Veritas chisels (@DelF) prove to large. A multi purpose sharp, light tool for model work. I have not yet tried them on my feet.
I have a wood chisel set for my lathe that until now were a bit too large to be useful. However one of those with a tight, sharp curved edge was perfect to notch and shape the moulding to match the channel. You can see the wood handle in the background, I failed to include it in the photo.
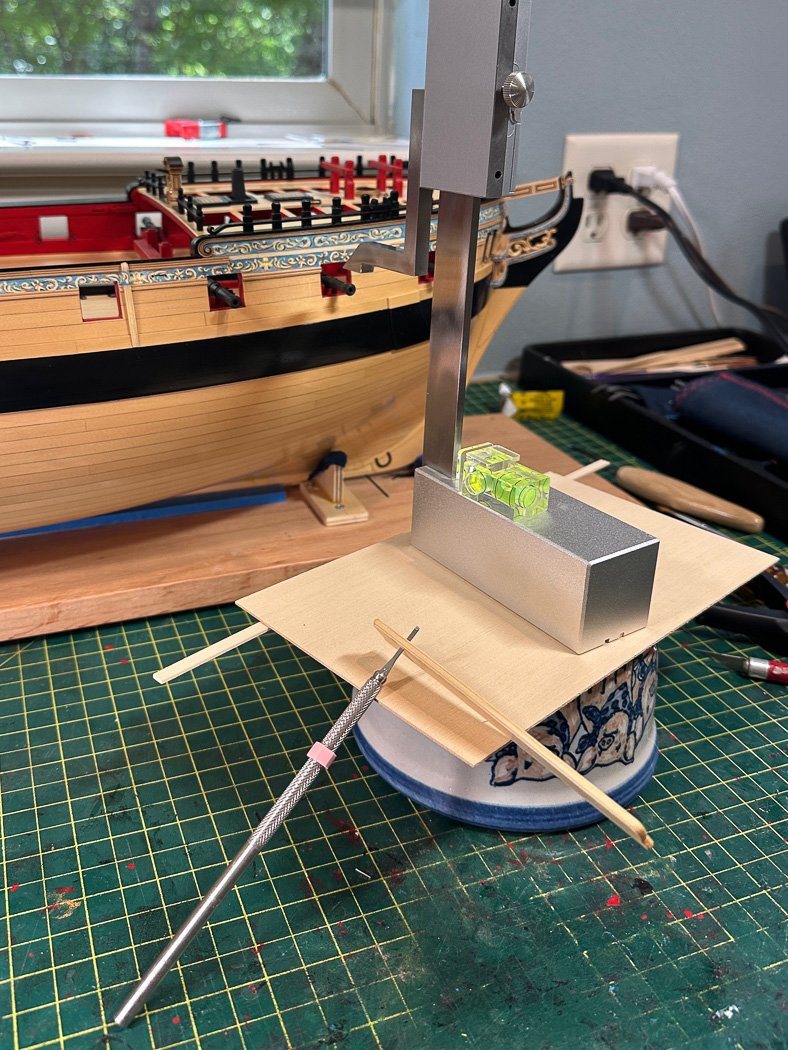
The tall height gauge, courtesy of @Stuntflyer, was very helpful in keeping the channels level with the waterline, I added the bubble level to make sure it was first level itself. I need a better platform for it than a bowl, but it does the job. The tumblehome of the hull distorts what level seems just looking at it, the gauge brings it to actual level.
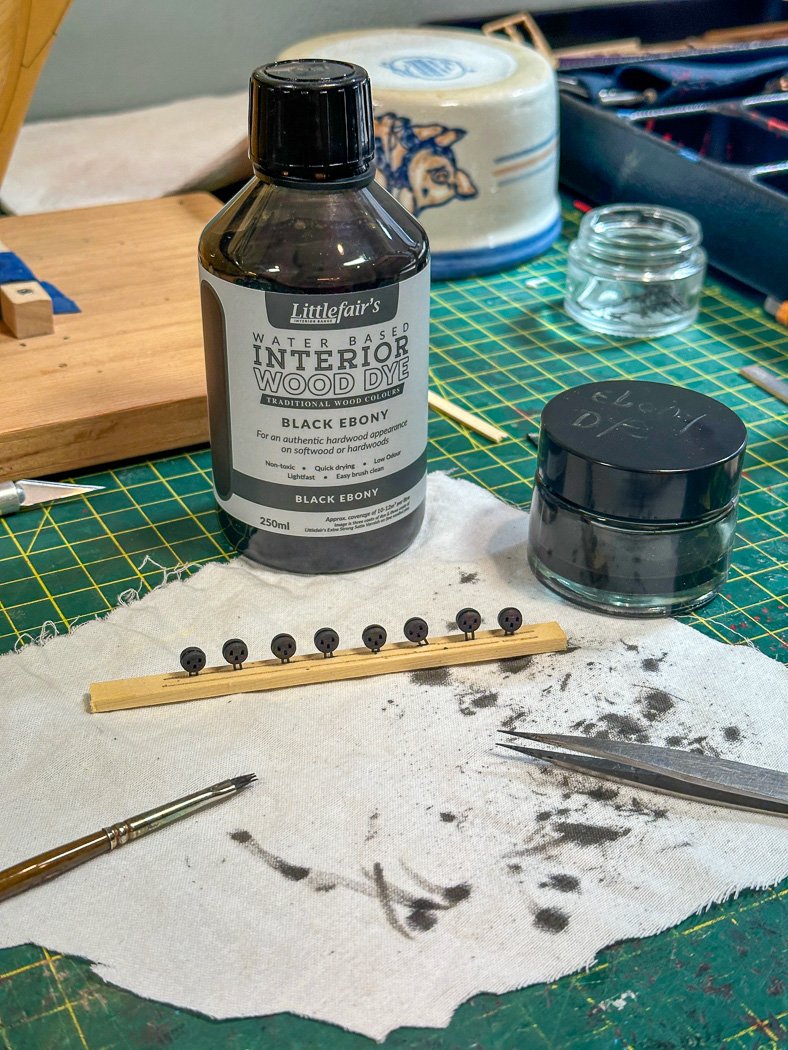
Long ago I acquired ebony deadeyes I wanted to use, however the center diameter of these proved too large for Chuck’s nice acrylic strops. So after splitting a few to learn that I went to Chuck’s make your own 5mm and 6mm versions. I still had a desire to go with ebony, but didn’t like my result just painting them black so I went with this ebony wood dye. With the thickness of water it takes 4 coats (and maybe still one more) to get them there, I like the resulting look. It’s hard to tell in the photos but the boxwood grain still shows through and they look more “natural,” not perfectly black. The little paint stand is a strip of wood with the mill cutting a groove its length.
I didn’t take any photos of constructing the actual channels. Not much to it, just removing char, minimal shaping, and gluing together the three layers, and of course multiple coats of WOP.

So here where it stands. I’m going to wait until I have all the 5 and 6 mm deadeyes finished and both port and starboard channels installed before finishing these (including straightening the smiling faces) to ensure uniformity. Not too much to go on chapter 11 after that, I’ve been working on the gangways, posts and ladders in parallel to the channels so it's fitting and mounting them. I’m of mixed thoughts on the swivel guns - so decision deferred for now.
As always thanks for stopping by - I appreciate your taking the time with your likes and comments.
-
-
I always glue them firmly in place using guides and jigs. It’s important to me to have straight and level masts and bowsprit withe the proper angles as needed, using lines to achieve that is an exercise in futility for the perfectionist I am.
Hardly cheating, it’s a model not an actual sailing craft. It’s more impressive and interesting to get it right. You don’t have the same ability to step and tension lines on a small 23” model nor the hundred or more sailors it took to do it pulling from multiple lines at the same time.
-
Well done as always BE. Another great model and another learning guide in the form of your log for those that follow.
Always a joy to follow your logs!
- Thukydides and Blue Ensign
-
2
-
On 4/5/2024 at 7:48 PM, Rustyj said:
a #74 drill bit
Same bit I use
-
-
-
The stem looks so cool on Syren models.
- Rustyj and FrankWouts
-
2
-

HMS Winchelsea 1764 by glbarlow - FINISHED - 1:48
in Member Build logs for the HMS Winchelsea
Posted
Only the swivel guns to go to finish Chapter 11. A quick update on what was the long process of adding the chain plates to fix the deadeyes to the channels. Basically a lot of holes to drill in a straight, level, and angled lines.
Another exercise in patience, planning. placing, and adjusting each of the three mast sections of channels and deadeyes
I am a big fan of the acrylic strops and chainplates - so much easier and such a much better look than fighting through their metal equivalents. I’m not going back.
I also had a new opportunity to make many eyelets along the hull following the plans. At this point the twist around the drill bit in the vice and the cut, snip, fit is mindless, easy work. Maybe someday I’ll count how many I’ve made for Winchelsea - or maybe not.
The model is transformed with these additions - looking completely like a ship at this point (don’t look at the stem, that’s Chapter 12). It’s really quite something. I'm going to take some better photos after I finish Chpt 11. I still haven't glued in the remaining guns, but that's coming up soon.
Thanks for stopping by - some swivel guns are up next.