-
Posts
13,136 -
Joined
-
Last visited
Content Type
Profiles
Forums
Gallery
Events
Posts posted by druxey
-
-
If using tweezers, perhaps a narrow groove filed into each side of the business end will prevent the ring from popping out as you close it?
- mtaylor, Hubac's Historian and FriedClams
-
 2
2
-
 1
1
-
That broadside view is now particularly impressive, Marc!
That is a lot of breeching rings to close up. I hope you have a pair of very small-nosed parallel pliers for the job....
- Hubac's Historian, FriedClams and mtaylor
-
 2
2
-
 1
1
-
Sweet! That hull is looking terrific, Keith.
- Keith Black, KeithAug, mtaylor and 2 others
-
 5
5
-
-
If sanding, use sandpaper glued to a flat stick to keep the bevel flat at a constant angle.
- Ryland Craze, robert952 and MBerg
-
 3
3
-
-
Terrific, Michael! Your metalwork is equal to that of the late, great Gerald Wingrove.
- michael mott, FriedClams, Egilman and 6 others
-
 9
9
-
Your trials and tribulations are familiar to all of us. Persevere, and you will find that your skill at cutting joints will keep improving.
- Matt D and jpalmer1970
-
 2
2
-
-
-
Nice (re)start, Michael.
-
You have a lot going on, haven't you? Hopefully you'll keep the kitties away from the model now!
- Ryland Craze and aaronc
-
 2
2
-
-
Very neat and ship-shape work, Mark.
-
Nice to see you resurface, Michael!
- michael mott, Keith Black, AJohnson and 3 others
-
 6
6
-
-
-
Excellent, Chris. But it sort of begs to be placed on a bit of airfield landscape....
- Old Collingwood, Egilman, Dave_E and 5 others
-
 8
8
-
Terrific and convincing result, Gary!
- Glen McGuire, Keith Black, FriedClams and 2 others
-
 4
4
-
 1
1
-
They look terrific, Eberhard. Interesting collection of corks as well....
-
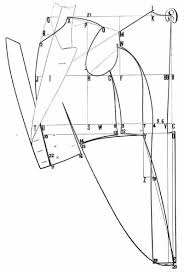
I agree with Martes; the coat is fitted using a drop shoulder seam to the back of the shoulder and separate pieces along a curved seam from the rear shoulder down:

It give a very elegant line. You can just see the curved seams in the uniform coat photo. Darts in clothes were used once wider bolts of machine-made material became available.
- mtaylor, hollowneck, thibaultron and 3 others
-
 4
4
-
 2
2
-
As impressive as ever!
- Thukydides, Keith Black, Jack12477 and 3 others
-
 6
6
-
If the hands are too large - and perhaps the extended one of the standing figure might be - the head is rather small for the figure's height!
- mtaylor, Canute, chris watton and 1 other
-
 4
4
-
You should be OK painting the filler. It may need sanding and repainting a few times to get a really smooth finish, though. For larger gaps a tube of wood filler (such as LePage's 'natural') is easier to handle and sand. It also dries faster!
Looks like a nice job that you've done. You commented on the variation in wood. As it is a natural not synthetic material, any wood piece has its own peculiarities that you have to adjust your techniques to. We all experience this, whether kit or scratch builders.
- davec, Ryland Craze and robert952
-
 3
3


Norwegian Sailing Pram by Dan Poirier - FINISHED - Model Shipways - 1:12
in - Kit build logs for subjects built from 1901 - Present Day
Posted
Well, that's one mistake you'll never make again! Hope the re-do goes without a hitch.