druxey
-
Posts
13,375 -
Joined
-
Last visited
Content Type
Profiles
Forums
Gallery
Events
Everything posted by druxey
-
 Kits aren't necessarily historically correct, Rick. Some are better than others, others are flights of fancy. The open exposed toptimbers are more representative of 19th century and early 20th century fishing craft. If you are interested in historically accurate models, there are many, many good books available on the subject.
 -
While Ollie's model is nicely done, it does not represent a typical Naval cutter circa 1800. The contemporary Science Museum's model is a better guide. There are no exposed timber heads on the inner bulwarks.
-
Dear Alex, Those are good examples of cross-sectional drawings you have cited. I absolutely agree that the earlier ones show more of a 'birdsbeak' joint amidships. However, was that actually how the rabbet/garboard joint was carried out in the shipyard?
-
The usual convention in drawings shows the rabbet as your version 1. In reality it would look like versions 2 and 3. This was not a dumb question, Dave.
-
Some sub-assemblies work: where there is a flat mating surface, such as deadwood to keel. Some are near impossible, unless you are the world's most accurate model maker. The curved stem to knee of the head joint is an example. In that instance, one piece at a time is a better strategy. However, if you want to find out the hard way.... So, the Subaru 4-wheel drive got you to work this morning? Do you get merit points for making it in?
-
Not sure about tattoo procedures, but two possible ways of transferring patterns to wood are: 1) Graphite paper. This is similar to old-fashioned carbon paper but not greasy or messy. Place a sheet face down over the wood, the paper pattern on top and press through the design with a sharp hard pencil tip. 2) Rubber cement. Coat the wood surface and the back of the paper pattern and allow to dry. Press the surfaces together like contact cement. Cut out to part, then peel off the paper. Rub any remaining rubber cement off the wood with a piece of crepe rubber.
-
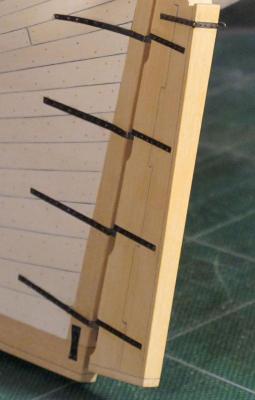
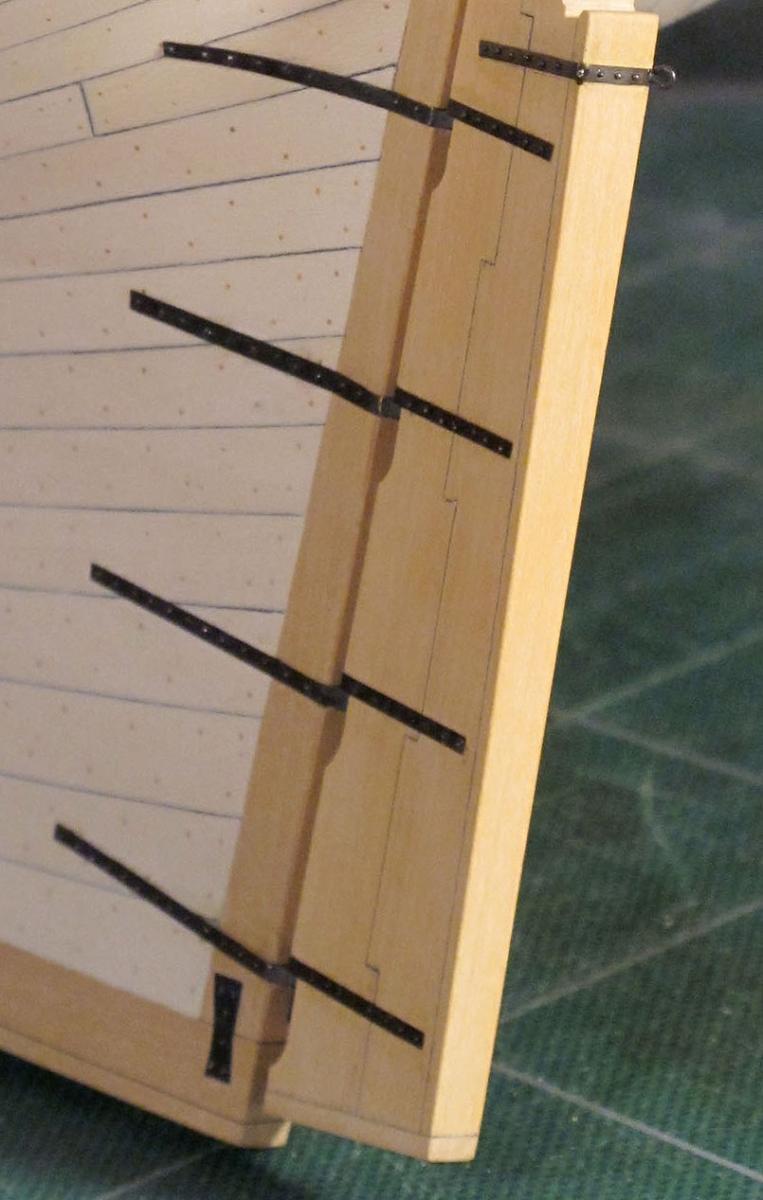
Well, you are a prolific modelmaker, with time for pysanky as well! Nice work on the pintles and straps, Toni.
-
Don't try to clean up the curve with the stem yet, or glue up all the knee of the head components! Make and glue up the stem pieces and keel first, then fit each individual piece of the knee of the head to the stem. Otherwise you will drive yourself crazy and overflow your scrap box.
-
This is brilliant, Kurt! I've been putting off inventory of my library for a long time. I guess there's no more excuses now.... Thanks for the link.
-
Lovely bit of miniature machining, wefalck!
-
Proxxon compound table -- Opinions?
druxey replied to rtropp's topic in Modeling tools and Workshop Equipment
I've had no problem with the Proxxon table, which I've been using for several years. Yes, the hand wheels are a bit small in 'throw' and not the most comfortable such as on my watchmakers' cross-slide, but they are useable. I placed a dot of red paint on the '0' of the hand wheels and yellow at the '5', which makes life much easier when counting off turns and decimal fractions of a turn. -
So...the sawdust commences. Good stuff, Alan.
-
Very, very neatly and cleverly done, toly.kol!
-
I'm smiling as I look and read your log, Ed - yet again.
- 3,618 replies
-
- 3
-

-
- young america
- clipper
- (and 1 more)
-
In the Bellona model photo, the pawls are on the upper capstan head. In the Science Museum Ajax lower deck photo, does this imply that the fore capstan had pawls only on the upper capstan, while the lower fore capstan was fitted with long pawls? (In a photo of the NMM model of Ajax, one can see the pawls on the fore upper capstan.) This is becoming an intriguing thread!
-
I believe that the pawls were only on the upper capstan, Siggi. This is the case on the contemporary model of Princess Royal, 1773. (Legacy of a Ship Model by Rob Napier, page 75.)
-
I agree with your short pawl version, Siggi. I've seen many contemporary models with pawls similar or identical to the ones in the photo you've posted. They are on the upper deck partners.
-
Once again, beautiful, clean detail. That is one lovely model, Alex!
-
I use a propane torch over a cast iron ladle. Cutting the pewter ingot into smaller pieces and using a small quantity speeds things up. RTV rubber is quite soft, so I recommend an outer plaster retaining jacket to prevent distortion of the casting or leakage between the mould halves. Don't forget to make the vent channels through the plaster continuous with the RTV mould. Please make sure the plaster is completely dry before casting, for safety's sake!
-
When I cast (in pewter) I made the mold muzzle up, with relieving vents at the trunnions. I made sure that the pouring vent was large. This helped filling and also provided mass, so that the metal would not solidify before filling the mold. In addition I talcum-powdered the mold to improve metal flow. The first few pours were defective (possibly the RTV mold needed to 'mature'), but after that everything worked perfectly.
-
Just discovered this thread: fascinating presentation idea!
-
Looks pretty convincing to me! Nicely adjusted. Small point: make sure that the lips of the scarphs in the stem are wider than the rabbet.
-
My preferred method is to cut small slices of copper or softened brass tube. Then I flare both sides on a hard block using a center punch. Finally, I chemically blacken the thimbles.
-
Very neatly done, Toni. I believe that in real life the rudder sole was higher and angled a bit to ensure it wouldn't snag if the ship touched ground. Your call, of course.