mtaylor
-
Posts
26,273 -
Joined
-
Last visited
Content Type
Profiles
Forums
Gallery
Events
Everything posted by mtaylor
-
Check the Wasa... I believe that she had them also, but I could be wrong. Billings had them in kit and were, at the time, making changes to model regularly based on the research.
-
I've had to come back several times and have a re-look at this... just amazing.
- 1,051 replies
-
- 7
-

-
- cheerful
- Syren Ship Model Company
- (and 1 more)
-
Jan, Hans says they're not gunports. But you're right, they could be with the aft most 2 guns being moved there as needed. Then again, Wasa has two ports like that with guns... confusing.
-
Super sweet detailing, Matt. Logos on the wheel....? I'm taking up knitting and hopscotch.
-
I've noticed they've done nothing for the bulwarks except some netting. Make her look a little bizzare in many ways like you know there's a reason but not why. I guess the project to give her pivot guns went away also as I've not read about it for several years.
- 553 replies
-
- 1
-
-
- sloop of war
- constellation
- (and 3 more)
-
Jan, If there's guns on that deck, then maybe but only if the port will allow the muzzle to clear. Otherwise the muzzleblast will happen inside the ship. It would also depend on how close to the waterline they are.
-
NIce save on the frame, Tony. Your problem solving is great and will pay off on future builds. Interesting method for the waterways. i fought with that one and I'm still not sure I won.
- 132 replies
-
- 3
-
-
- triton cross-section
- cross-section
- (and 1 more)
-
Julie, Complete instructions on putting pictures in posts and PM's is here: http://modelshipworld.com/index.php/topic/540-how-to-add-pictures-in-your-posts-and-pms/
-
Good to see you back at her, Erik. She's looking great. Other hobbies and life do get in the way which seems to be the norm.
-
Best guess is about all we can do on this ship with some things and these are one of those. Pity that some of the drawings were destroyed or changed... but I think you're doing a lot better with the research that I was able to do. Interesting on the bronze hinges. I would have thought they were iron. Where did those photos turn up?
- 553 replies
-
- 1
-
-
- sloop of war
- constellation
- (and 3 more)
-
Hans, Those two ports might be air ports for letting fresh air in below decks and also used as loading ports for supplies, etc. from the ship's boats.
-
Just fantastic.
-
Amazing details, Keith. It's a pity that it's just us that will see them. You might have to incorporate some photos of this cabin into your display when finished.
-
It's probably a good thing not to have the bulwarks folding on an RC ship. I could see water coming over the stern (gust of wind or a wake from someone else) and suddenly a wet deck. I'm liking what I'm seeing overall... looks and sails great.
- 553 replies
-
- 1
-
-
- sloop of war
- constellation
- (and 3 more)
-
Beautiful work, Glenn. I'm learning as much from the discussions involving decisions and methods as I'm from your build. Thanks.
-
Impressive work, Daria. You're doing a fine job of building this ship.
-
Great looking water tank, Maury. And that gear set is something else. How big is that main gear?
- 525 replies
-
- 1
-
-
- anchor hoy
- hoy
- (and 1 more)
-
Good attitude to have, Tony. I made my share of "oops" on the cross-section. It's the learning process for many of us that's important.
- 7 replies
-
- 3
-
-
- Triton cross-section
- pillars
- (and 1 more)
-
Tony, As I recall, some of us went with one piller right smack dab in front of the steps, other choose to go with two pillars. I'm not sure what the full build shows as it's been a long time since I looked at the plans. If I were doing this today, I'd go with either 2 pillars or leave them out. I did the one...
- 7 replies
-
- 3
-
-
- Triton cross-section
- pillars
- (and 1 more)
-
Cutty Sark by NenadM
mtaylor replied to NenadM's topic in - Build logs for subjects built 1851 - 1900
Congratulations on being patient. She'll be right at home very quickly now.- 4,152 replies
-
- 4
-
-
- cutty sark
- tehnodidakta
- (and 1 more)
-
Bob, Uninstall it. A quick Google basically says that no one knows about ScanGuard nor what it really does. There's one website that has it on it's "top 10" list but that site opened up a month before ScanGuard showed up. It just smells very suspicious.
-
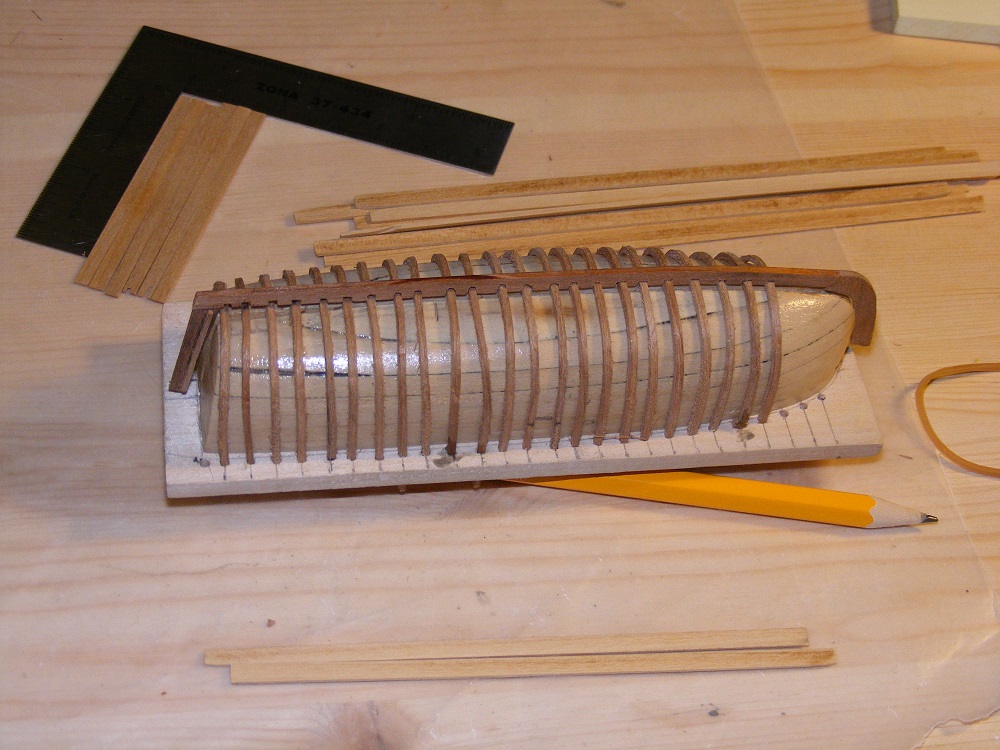
Cutty Sark by NenadM
mtaylor replied to NenadM's topic in - Build logs for subjects built 1851 - 1900
Nenad, Here's a plug with frames being installed. I hope this helps.
- 4,152 replies
-
- 12
-
-
- cutty sark
- tehnodidakta
- (and 1 more)