


mtaylor
-
Posts
26,273 -
Joined
-
Last visited
Content Type
Profiles
Forums
Gallery
Events
Everything posted by mtaylor
-
Can you show what the seizings look like? I and I'm sure others aren't familiar with this method.
-
She looks great in her case, Tony. I knew she was big but not THAT big.
- 1,279 replies
-
- 1
-

-
- agamemnon
- caldercraft
- (and 1 more)
-
Nice work on the rudder and good for you on putting it away for now. I think you learned a good thing there on re-doing.
- 1,616 replies
-
- 1
-
-
- caldercraft
- agamemnon
- (and 1 more)
-
Cutty Sark by NenadM
mtaylor replied to NenadM's topic in - Build logs for subjects built 1851 - 1900
I'm sorry to hear that. I do hope tomorrow is a better day. -
Casting epoxies from Smooth-on
mtaylor replied to src's topic in Modeling tools and Workshop Equipment
Pat, Excellent article. Send it to Chuck. He has the access to do add it. -
Casting epoxies from Smooth-on
mtaylor replied to src's topic in Modeling tools and Workshop Equipment
Joe, I didn't use a heat setting on the hair dryer back then. I guess it could be called a pressure type of thing in that blowing the air across the epoxy caused the bubbles to come to the surface and break. -
Casting epoxies from Smooth-on
mtaylor replied to src's topic in Modeling tools and Workshop Equipment
Sam, I have no idea of longevity. In a former life, I made clocks that used a clear epoxy (photo glued to wood and then epoxy the whole mess). I used a hair dryer on cool to degass and get rid of any bubbles. Might work for you. -
Now that's incredible.. machining the oil pan. Anyone else would have bent and silver-soldered some brass. Michael, your machining skills just amaze me.
-
Casting epoxies from Smooth-on
mtaylor replied to src's topic in Modeling tools and Workshop Equipment
Sam, If you go with the clear plastic, use canopy cement (the aircraft guys use this stuff) so the plastic doesn't craze. -
Casting epoxies from Smooth-on
mtaylor replied to src's topic in Modeling tools and Workshop Equipment
Alternately, use the MicroMark product: I haven't used it yet, but reports from other builders say it works very well. Gill Middleton used it on his Victory's lanterns. -
Oh my. My brain hurts just from thinking of doing something that small and delicate.
-
That's a pirated kit by one of the ZHL companies and fronted by a Russian for sales. See here: http://modelshipworld.com/index.php/topic/181-banned-kit-manufacturers-on-msw/ If you look carefully at the kit pictures, the wood is burned by the laser cutting. They claim "Amati" kits but Amati doesn't package their kits in Chinese. If you buy it, you won't be allowed to do a build log as per the above link, MSW does not support piracy.
-
That's a nice, clean, and impressive display in the armory, Augie.
- 2,191 replies
-
- 2
-
-
- confederacy
- Model Shipways
- (and 1 more)
-
Nice framing indeed, John. It's good to see you getting some building time in.
-
Thank you for the "likes" and the comments. I'm working on it, Augie. It softens both the glue to remove the glued pieces and also softens the brain of the shipwright. PM sent. Fiddly I think is an understatement, Sam.
-
Deck clamps
mtaylor replied to butch's topic in Building, Framing, Planking and plating a ships hull and deck
Pete, Measure from the build board up is the easiest way. Mark on the frame (I go between the frames) then work from the inside using our marks as a reference. If you'll look at the plans, Hahn, shows the clamp as a line with the beams on it. Use that line for your measurement to locate the top of the clamp. I use a tool I copied from Ed T's Naiad log... here's my version: http://modelshipworld.com/index.php/topic/5339-licorne-by-mtaylor-pof-316-french-frigate-hahn-version-20/?p=154262- 1 reply
-
- 1
-
-
If you hadn't told us and only shown the finished work, we might thought it was a POF. Very well done, Bob.
-
Beautiful work, Hans. I like the looks of the wood having that hewn look on her.
-
Cutty Sark by NenadM
mtaylor replied to NenadM's topic in - Build logs for subjects built 1851 - 1900
A great gesture for the dog's well-being. You've learned a lot in two years, but we can't go back. There's a limit we put on how much re-do we do otherwise the ship would never get finished.- 4,152 replies
-
- 1
-
-
- cutty sark
- tehnodidakta
- (and 1 more)
-
Lovely work, Dan. I'm assuming there's a jig for making the ladder(s) as you do? It's a great idea when there's a bunch of ladders to be made.
- 241 replies
-
- 1
-
-
- queen annes revenge
- pirate
- (and 2 more)
-
Dan, What Bob said applies. Except I'll add another "Wow!"
-
Nice fix, Chris. Sometimes when things go wrong and hit the floor, we get lucky and the damage is hidden. Yep, been there, done that, and have the T-Shirt.
- 144 replies
-
- 1
-
-
- corsair
- bermuda boat
- (and 1 more)
-
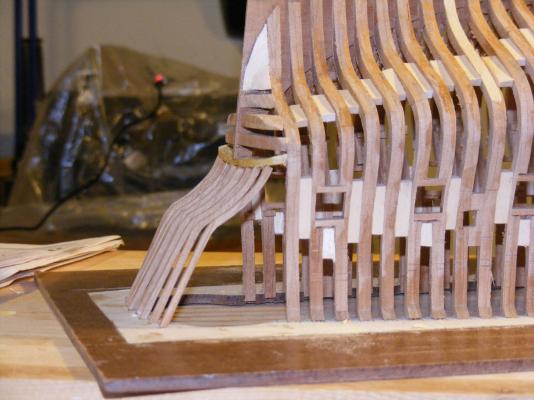
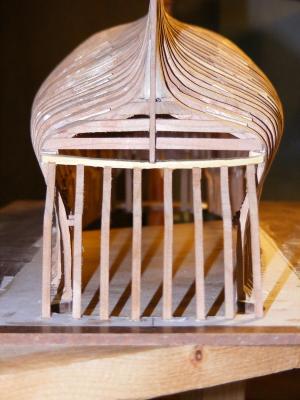
Thanks for the likes and comments. Finally... happy dance time again. At least a small one.. It took me several tries but the top transom is done and in place along with the stern timbers. I used some pen blanks as I didn't have any stock of cherry, boxwood, or pear thick enough. The final ended up in yellowheart. Thankfully, it will hidden by the planking. I cut the curve (which doesn't quite match the deck camber per the plans) on the top and bottom. Spot glued the waste back on and then the cut the curve of the stern. A soak in alcohol and the piece emierged. Notches were cut into the timber for the deadwood and frame timbers. Everything was then finessed into postion per the plans. The photos I contrast corrected helped a lot. Then the stern timbers were cut and matched to size and finessed into position. The further outboard the timbers go, the longer they get. I've checked and rechecked as these two bits are critical to the stern being right. I still have a lot more work in this area, but at least I know I won't be scrapping this one out because the stern was a hopeless cause. Just a small amount of fairing needs to be done before planking but I feel the rest of the framework should be added first to give it some strength. Those timbers are bit fragile as they are now. Here's the pics. Sorry, I forgot to take pictures of the process. As always, you click on them for enlargement.

-
The day the entire German fleet surrendered - moved by moderator
mtaylor replied to Kevin's topic in Nautical/Naval History
Robin, That info is buried in a sidebar. Here's a cut and paste of it:

