mtaylor
-
Posts
26,273 -
Joined
-
Last visited
Content Type
Profiles
Forums
Gallery
Events
Everything posted by mtaylor
-
Augie, She's looking great. Actually better than great, I just can find the dinosaur (thesarous) right now to look up the right work. I'm both impressed and inspired by your build.
- 1,668 replies
-
- 1
-

-
- syren
- model shipways
- (and 1 more)
-
Thanks everyone. It is I who needs to thank everyone for not only the inspiration but the encouragement to push my limits and become a better modeler. I'm not there yet, but my confidence level is building. Decisions, decisions... Popeye, The pumps and capstan are loose right now as at some point there's artillery to be built, fitted, and installed. Fat fingers and small parts in the way aren't a good mix. Harvey, Your Conny is practically a scratchbuild..
-
Thanks for the nice comments everyone. I'm at a point of comtemplating the next step.... more furniture? I have the fireplaces to do. Or finish the planking in the Great Cabin? Or maybe...? I'm thinking I'll finish the Great Cabin before the fireplaces. In looking back, I can see errors and areas that could be better overall but when I did them, my skills just weren't there. But as someone has said, it's the next ship that will be better. Hmm... I just realized that I'm putting off the exterior planking..
-
Thanks Harvey. Don't toss the kits... just bash them. Thanks John. You don't have to worry. It's back in the bottle now that I'm done ripping the capstan apart.
-
Thanks Popeye. Michael, Oops... I meant pics of models...Sometimes my fingers out type my brain.
-
Microlux Tilt Arbor Saw Problems
mtaylor replied to capnharv2's topic in Modeling tools and Workshop Equipment
Harvey, Narrower towards the rear? With a slitting blade...yes. Also, use a push stick between the blade and fence and you'll be less likely to pinch the wood and more likely to keep your fingers. -
Blackie, The easiest way is to open the hole in the deck slightly and then shim the mast with wedges to get the desired rake.
-
Microlux Tilt Arbor Saw Problems
mtaylor replied to capnharv2's topic in Modeling tools and Workshop Equipment
Try making the cut in two or even three passes... I think there's a limit on the depth of the cut with the various blades. The slitting blades don't have the teeth offset so you could just be loading up the cut with sawdust and that's what is grabbing the blade. -
Thanks Mike. Ok.. I lied.. not intentionally... I couldn't wait to shape the whelps. It has a few rough spots to be cleaned up, but I'm pretty darn happy with it.
-
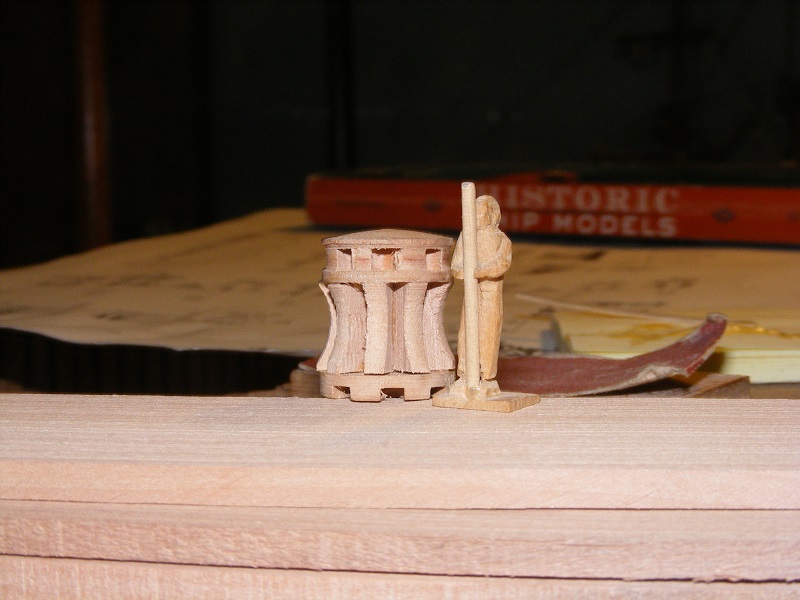
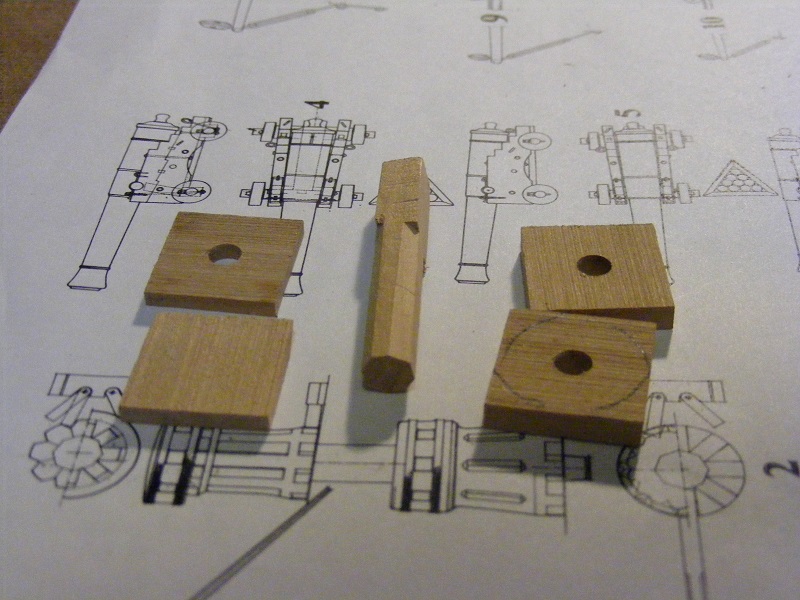
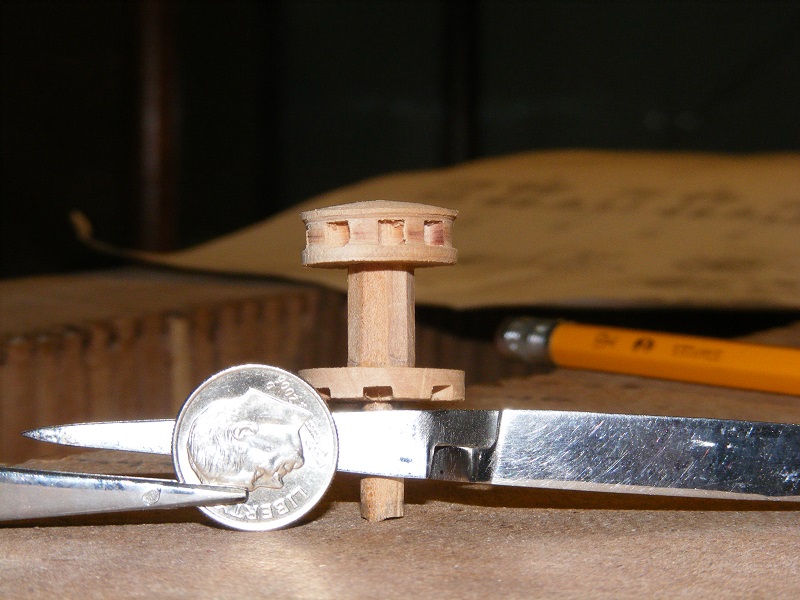
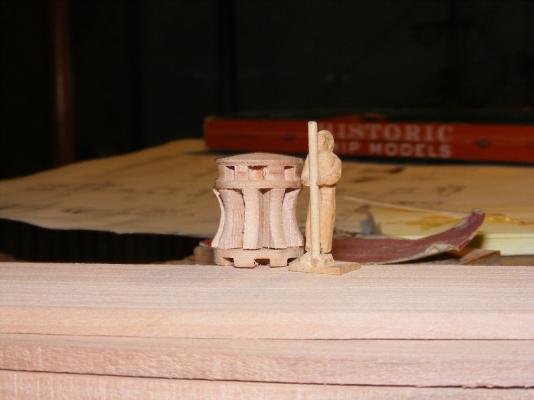
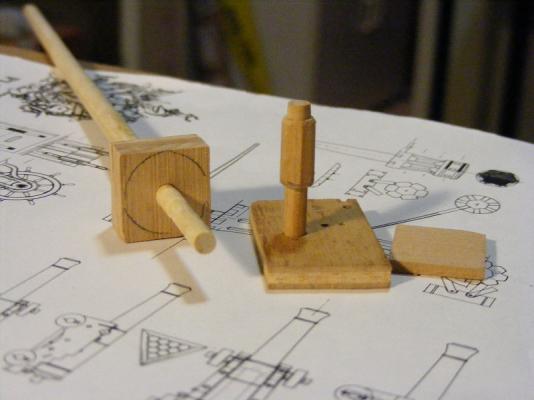
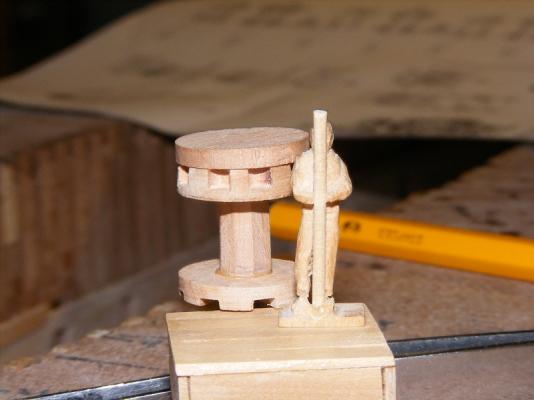
Thanks for dropping by and the kind words Aldo, Juergen, and Mobbsie. I've been working on the gundeck capstan. I'm on hold for the foredeck capstan as it's smaller and I wanted to see how the big one went first. Taken several tries but that part of learning. Mostly, I had issues with the power tools.. the mills specifically in setting things up. Somewhere around here are probably 10 to 15 bits of things that went flying off before I figured how how to get everything clamped down perfectly.. Live and learn. I also had to do some research. The plans and most of the builds I've seen for French ships show the capstan style from the late 1600's to the mid-1700's. I finally located several pics of some ship models for the mid-late-1700's. First picture is of the parts (but not the whelps). This was the fun part.. using the rotary table. Had a bit of problem figuing out how to secure things to it. Took a couple of runs to various hardware stores for some M6 screws and nuts but I got it sorted out. Below are the parts set up for rounding off and starting the machining. The spindle has been machined down. As for the chunk on the left, I ended up using a tapered wood screw to center the wood square pieces and secured with washer and nuts. I didn't get a picture of that. After machining in the pawl slots on the bottom and the bar slots on the head, I assembled everything (but not glued) for a size check. Twas a bit too high. After re-sizing the height, I finished the shaping of the head and then reset the height again.... it was still to high. It's been taken apart, re-machined for height and reglued. Right now the whelps blanks are drying in position and I'll spin it on the lathe to shape them. Probably tomorrow. I hope. Side note.. I have an old coffee cup that is kept about 1/4 full of alcohol. Simple matter to drop the whole assembly in and in a bit, it comes apart. Wipe off the softened glue and the parts are as good as new. Save a lot of re-making parts when some part of the assembly need re-work or replacement.


-
Microlux Tilt Arbor Saw Problems
mtaylor replied to capnharv2's topic in Modeling tools and Workshop Equipment
Is the fence straight and parallel to the blade? It might be pinching the wood between the fence and the blade. -
Mobbsie, She looks great. As for the Spitfires and Hurricaines... I believe they're keeping the ME-109's, 110's and the Focke-Wolfe 190's away. If it weren't for them, you'd have to put up with air raid sirens and all that and possibly some Dornier 17's.
-
So... today's tally.... one "saint", one "his goodness", and one "the spiders are putting on oxygen masks". This sounds like a "B" movie from the 70's... now you know why I bring popcorn.
- 1,668 replies
-
- 3
-
-
- syren
- model shipways
- (and 1 more)
-
Microlux Tilt Arbor Saw Problems
mtaylor replied to capnharv2's topic in Modeling tools and Workshop Equipment
I took the plastic one and CA'd a chunk of hobby plywood underneath it to stiffen it up. The plastic is very flimsy. -
Frank and Augie, I'm not sure we want to know what is the "what"....
- 1,873 replies
-
- 1
-
-
- occre
- san ildefonso
- (and 1 more)
-
NIce work, Danny. Can't wait to see the jig.
-
USN Anchor Hoy 1816 by Hank - 1:48 Scale - POB
mtaylor replied to Hank's topic in - Build logs for subjects built 1801 - 1850
Hank, Sounds like a carefully thoughtout and rational decision, albiet a tough one. I too will be here for your hoy's return. -
ancre Le Fleuron 1729 by rekon54 - 1:24
mtaylor replied to rekon54's topic in - Build logs for subjects built 1501 - 1750
I'll ditto both of them.... I'm in awe and then some. -
Dan, Just a very sweet and clean build. Speedy lines....
-
Elmir, Beautiful work so far. I hope you can get your saw fixed or modified and continue.
-
Barrel making
mtaylor replied to PJW's topic in Discussion for a Ship's Deck Furniture, Guns, boats and other Fittings
Here's the instructions I've played with.. http://arsenal-modelist.com/index.php?page=accessories Down near the bottom. But then again, I'm building a French ship.... -
Looking good, my friend. Ignore the war mongers and carry on.