AON
-
Posts
2,812 -
Joined
-
Last visited
Content Type
Profiles
Forums
Gallery
Events
Everything posted by AON
-
 Of all the challenges this ship will toss your way I just can't seem to see past the dust! I'd say good luck but you're in a group that doesn't need it! So happy refit! Alan
- 59 replies
-
- 4
-

-
- norske lowe
- billing boats
- (and 1 more)
-
You made me laugh not once but twice! We all would steal AEW's whole library and I love the shot (pun intended) with the level!! I appreciate the large photos (and not just because I'm old). I just discovered a few weeks ago that if I use the roller on my mouse with the CTRL button held down I can zoom in on the photos so the large photos plus the zoom works really well for me Keep up the fantastic build as this guy literally half way round the world will be learning from you.
-
My New Found Respect for Table Saws
AON replied to AON's topic in Modeling tools and Workshop Equipment
I've spent the week watching table saw videos on line and it is amazing what some people creating these instructional videos do. Of course I'd not have given it a second thought before last Sunday. I've decided I do not like the back corner edge push stick as much as I thought and those pads still put your hand too close for my taste. I'll be creating a hybrid push pad/stick to assure my hand is well back and I'll be making myself a RIPPING JIG ( ). The scariest TABLE SAW video describing kick back was found here ( ) This guy has prooven the push pad with a low over the top grip is a bad thing. Once again I did not experience kick back, my accident was due to the weakness in the wood due to the hole allowing it to bind and twist from the outside. My table saw guards, riving knife and toothed anti kick back attachment did absolutely nothing for me. -
My New Found Respect for Table Saws
AON replied to AON's topic in Modeling tools and Workshop Equipment
I've been telling people it is a knitting injury you should see the looks I get -
My New Found Respect for Table Saws
AON replied to AON's topic in Modeling tools and Workshop Equipment
thank you druxey I thought I was smart enough to avoid this type of incident smart has nothing to do with it RESPECT for your tools means more then taking care of them -
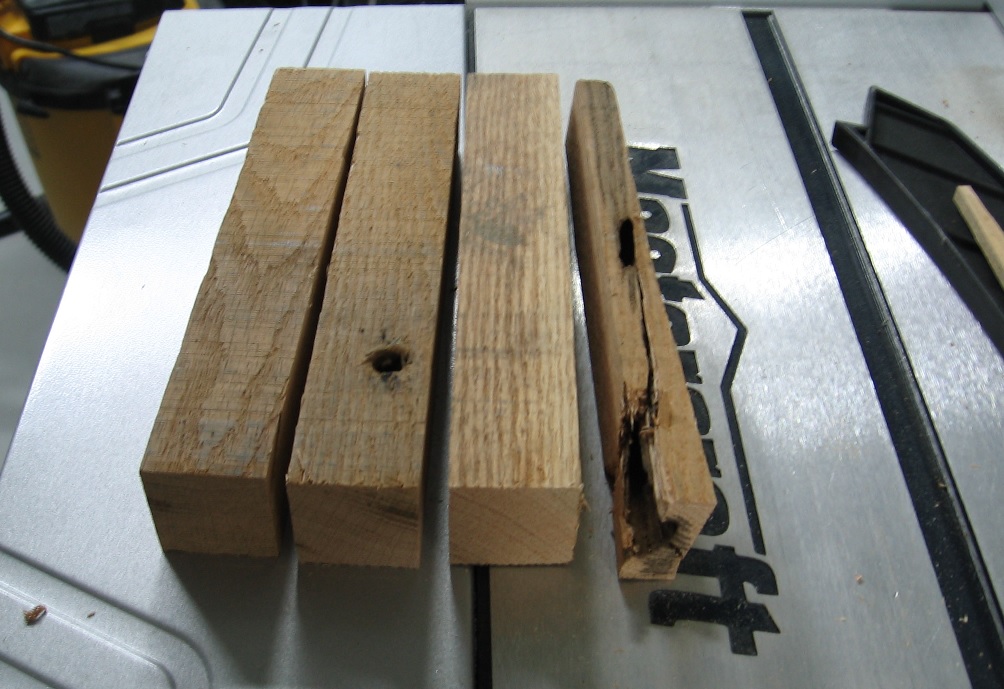
How to Make a Honey Stick... or... My New Found Respect for Table Saws Every morning at work I enjoy a good hot cup of tea with honey. I had been thinking about it for weeks and one week ago on Sunday, August 2nd, I decided to make myself a honey stick. I decided to use oak as I have some old oak skid pallet parts in my stock pile and I just love oak. I took a board (about 1-1/2" thick) and cut a short length (8-1/2") off of her. I set the fence on my table saw to the thickness of the board so I'd end up with a square piece to put on the lathe to turn it down and shape it. The cut went smooth without incident.... I should have stopped there. In my experience the first piece never looks quite good enough and I knew I could get another cut out of the drop so I decided to prepare a backup piece. Well the board had a bolt hole in it so I'd have to cut that out, and the outside edge had what I call a worm hole (more likely a wood wasp burrow) and that would not be good. On close inspection I calculated I could cut it down without resetting the fence. The second cut went without a hitch, bolt hole gone. The final cut was going wonderfully until the very last inch and "what the [bleep] just happened!" I grabbed some paper towel, clamped it to my index finger with a death grip and was rushed to the hospital. At the hospital the nurse told me I could let go now... well I couldn't. My hand was cramped in place. I could not remove my left hand from my right. It took all my concentration and then it opened just enough to slide my finger out. I had to press it against my thigh to get it to open the rest of the way. WHAT A MESS. I couldn't bring myself to turn and look at it. I was sure it was cut straight up and I now had a forked finger tip. The nurse wrapped it back up and told us it was going to be at least a five hour wait. As we are blessed with an Emergency Unit in our home town I'd have been better off if I was having a heart attack (heaven forbid) as I would then had been getting immediate care. We left and drove the 15 minutes to the next town that is designated Urgent Care and I was tended to completely within two hours, including x-rays. I had removed 3/4's of my finger nail and the meat just below it and, thanks to guardian angels, just missed the bone. I am healing quickly. I can lower my hand without my finger tip throbbing, and every other day the nurse changes the bandage and that process hurts less than the last time. So what happened? The wood does not show the classic signs of kick back in that the part between the blade and the fence did not climb up and over. The small piece with the worm hole is twisted and cracked. It was outside of the blade, I was using a push stick inside of the blade. I always used my hand outside and removed it as it approached the blade. I was just about to pull my hand away as the piece twisted and my hand was drawn underneath and inwards just in front of the blade and ... bad luck would have it was swiped. I will never, ever, ever put my hands anywhere near a power blade, ever again. EVER. (I make tonnes of scrap wood and will use it) I'd post photos but if I don't want to look at it why would I let you. I learned to type using all my fingers way back in high school but have since resorted to two fingers. Strangely I use the index finger of my left hand and the third finger (next to the index finger) of my right. So my typing ability has not been affected. How strange is that. Also, in 1990 I had the nerves along one side of my neck cut during surgery while they removed a tumour that had wrapped around them and from that I'd lost the feeling in finger tips of my right hand. I was just mentioning to my wife the day before the accident that I'd noticed the feeling had come back. Oh Joy, just in time! As for the honey stick, it will get done but not for awhile. I've got more healing to do first.


-
Sorry to say but you are assuming the floor in the room is level, the table top is level and the vertical blinds actually hang vertically. I do not believe any of those are true for my home. On the other hand if I ignore the blinds and compare it to the deck amidships it looks to be perfect!
-
women go figure
-
wasn't that Ricky's line to Lucy?
-
I started using Inventor after the crash and burn of 2015 (that is how I am referring to it) Many moons ago at another company, when we were looking int switching to a 3D program we compared SW to Inventor and the result of that "test" was that a task was completed with SW by executing fewer steps than Inventor and that was perceived as time = $$$. Then I worked at another firm for a year and a half and they use Inventor so I found out a few more things about the program. I would have to agree with a present working associate that Inventor is the "workhorse", but somehow I still prefer SW for easy of use. (and, not that you asked, but splines will be the death of me)
-
quarterdeck or forecastle?
-
FYI - I had a quote for work months ago and the basic SW version is $3995US
-
Thank you Don presently having some issues appreciating how Inventor works with splines and mirroring seems they may need to be constrained every which way !!! as when mirroring things go wonky. Presently I am very frustrated with this program... it is the learning curve
-
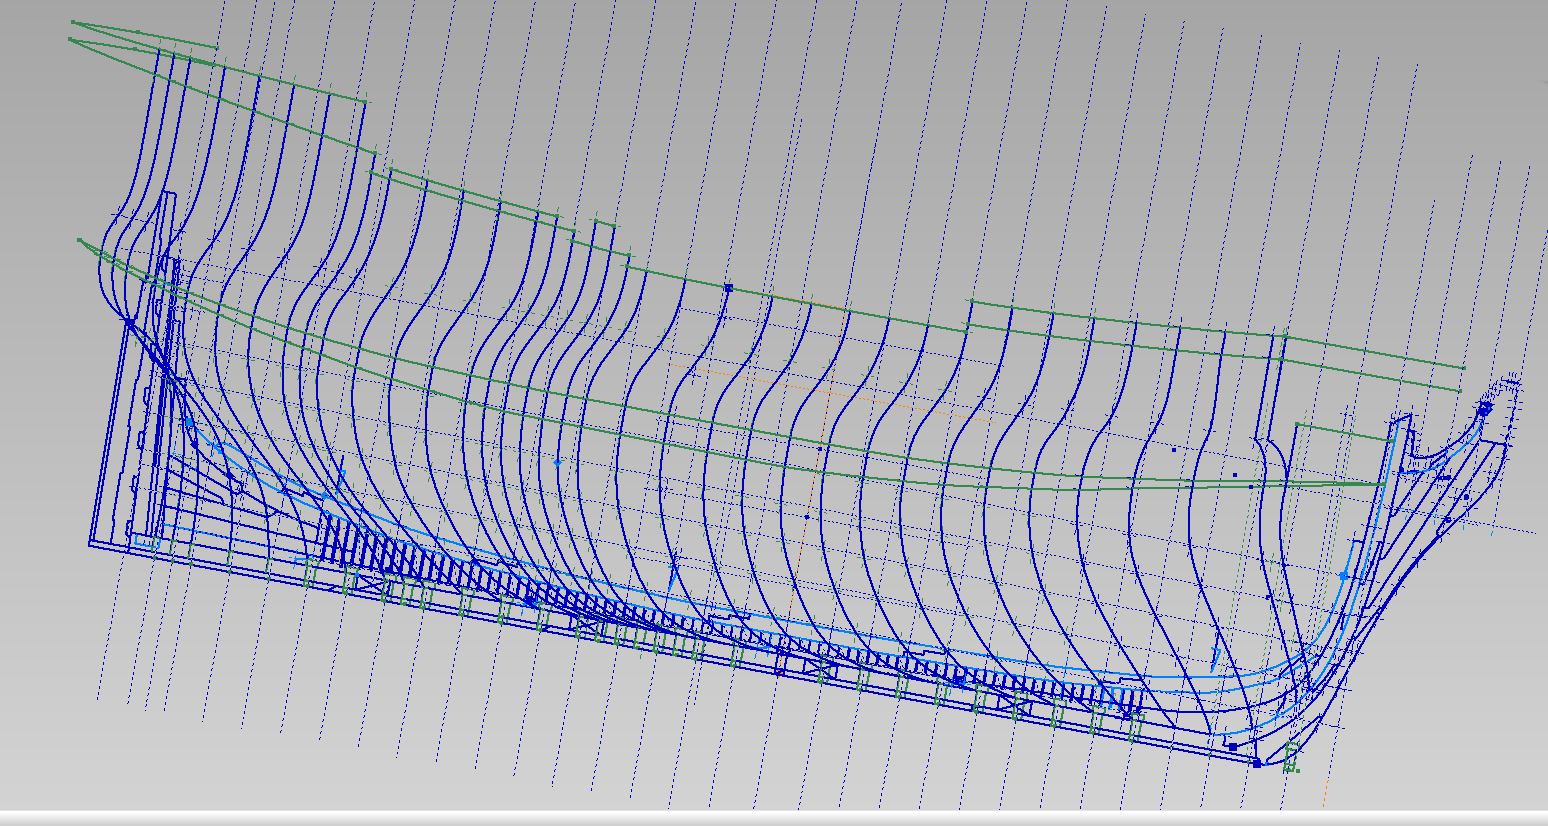
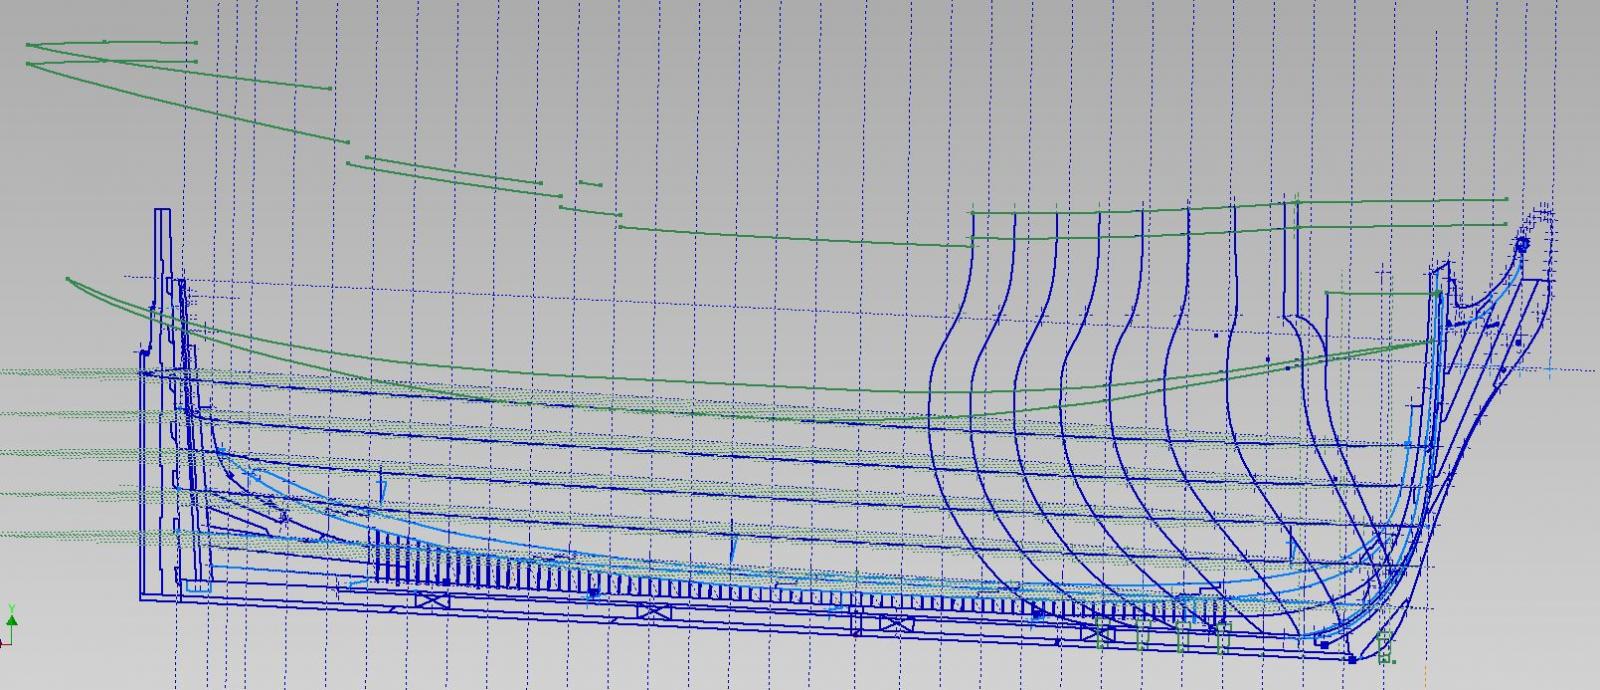
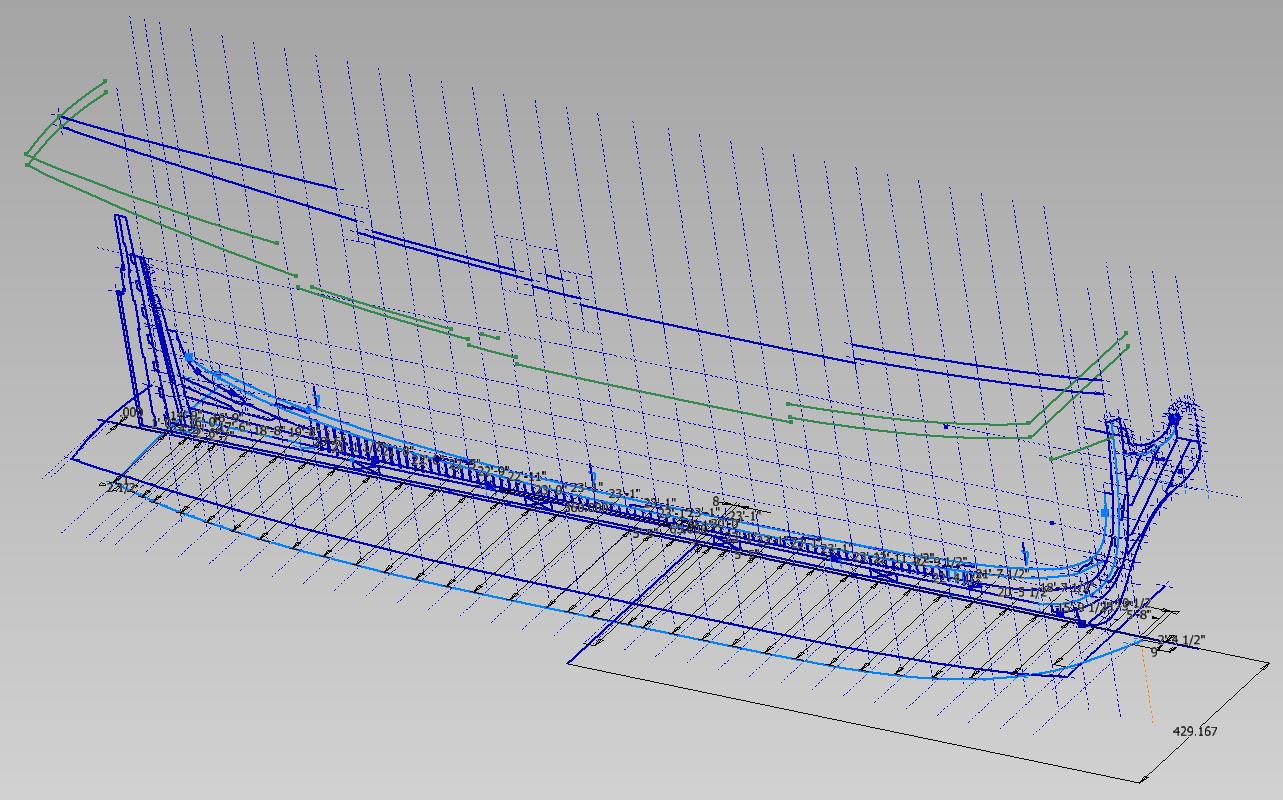
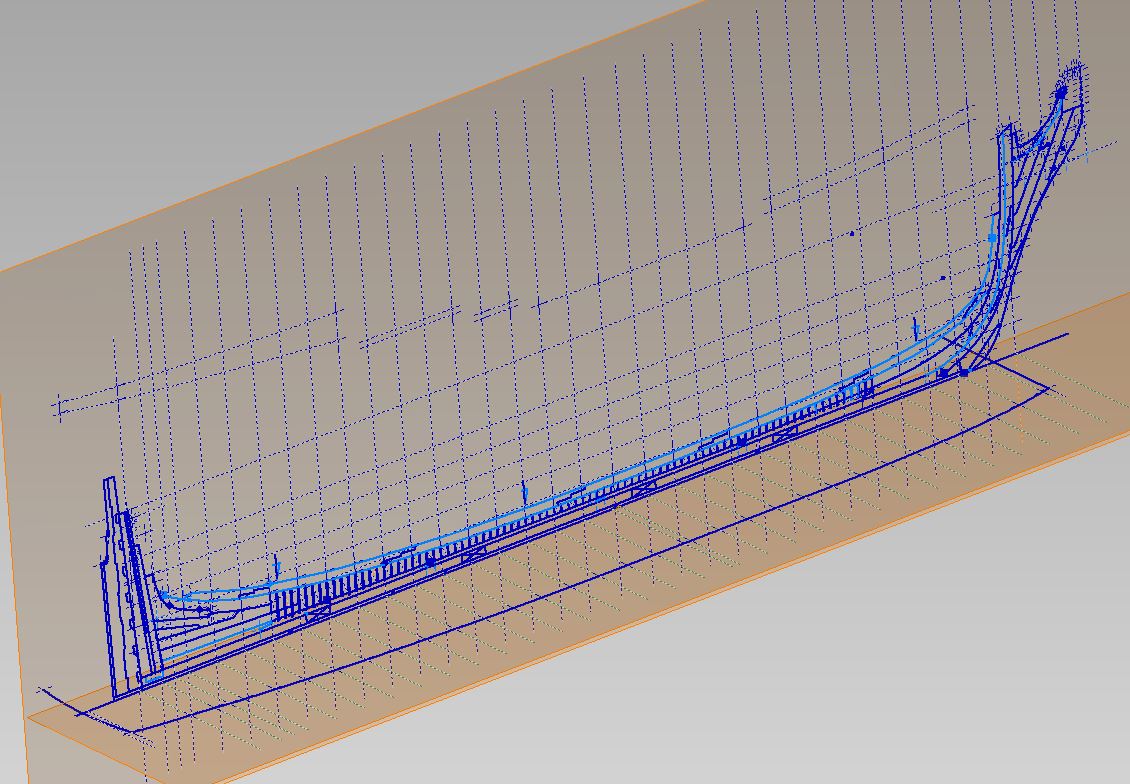
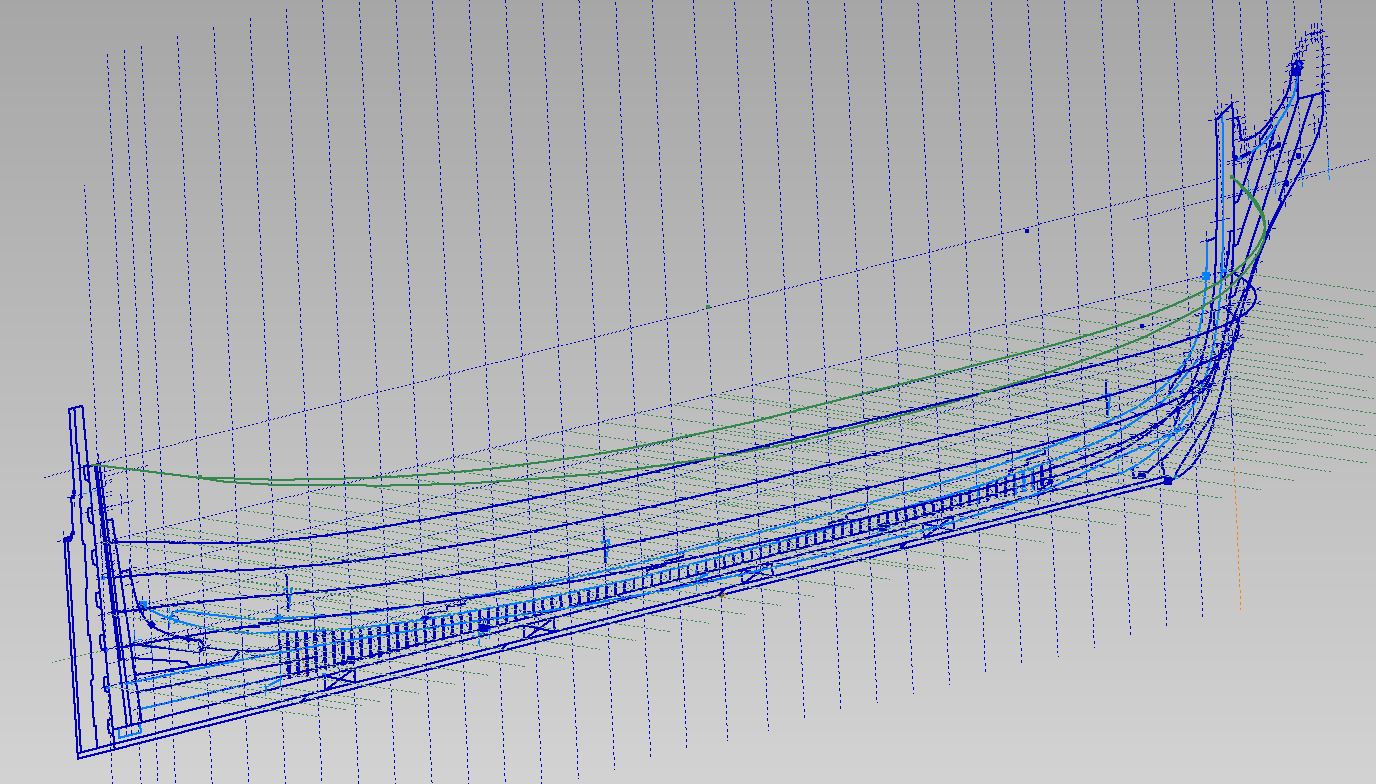
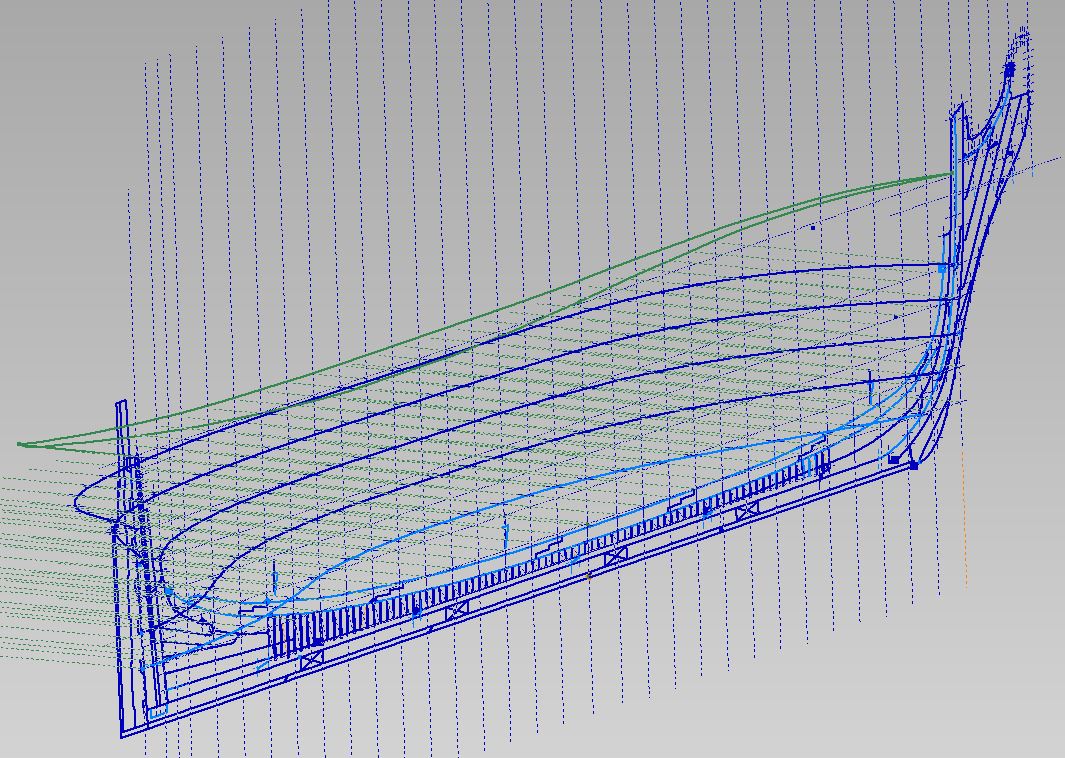
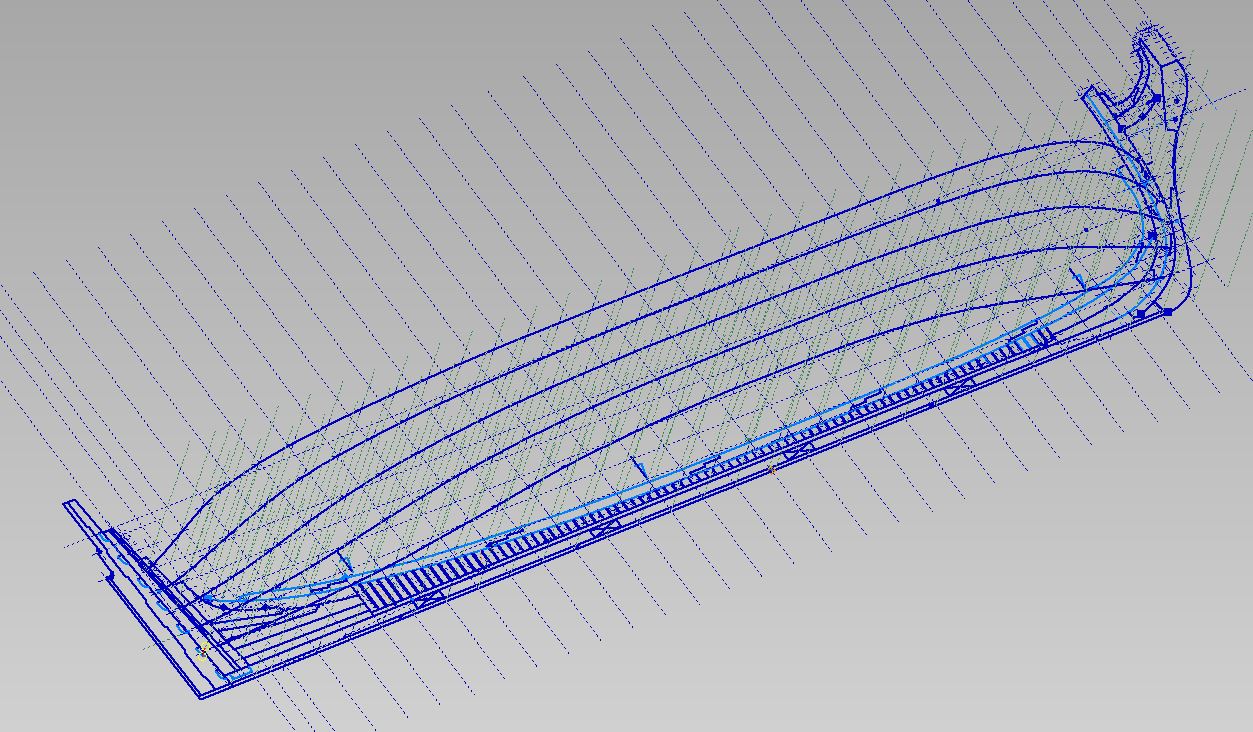
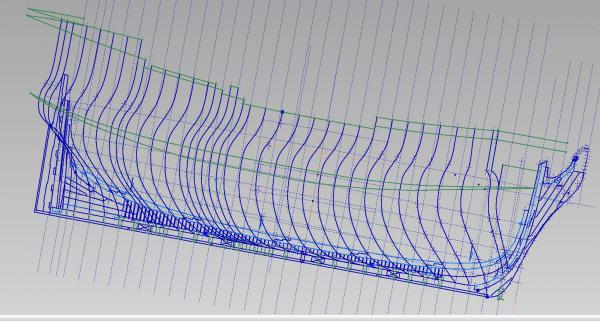
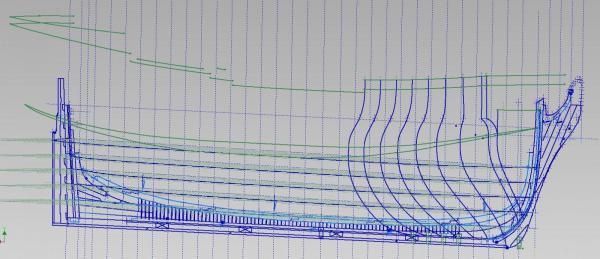
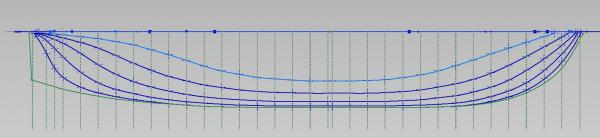
Well I completed the hull shaping at each station line. Have to complete the stern transom shaping. I think I will draw the frames, and this time extrude between them (rather than lofting), then slice and dice into individual frames to make my templates... which was were I was before the crash. Almost there. and btw July the first.... Happy Canada Day, eh!
-
shaping the hull at the station lines going much quicker than the first time and the line work is much cleaner It pays to work smarter... but learning to work smarter means you have to learn in the first place So my computer crash was an opportunity after all.
-
This will sound easier than it is... Practice on two or four scrap pieces first. Take all your pieces (top and bottom) and use CA glue (a very extremely small dab) at a similar corner at both ends and secure them to a base board, side by side, in line, solder style to look like one solid piece, Let this cure. Mark off the thickness of the pieces with a very sharp pointed soft HB pencil and a 90° square perpendicular (across) to the joints Cut into the pieces (straight down, light cuts) with a sharp thin blade (exacto) knife to not more than half the thickness of the pieces following the lines Chisel out the notch making light diagonal cuts Fold some sand paper and using the edge sand out the humps... or use the edge of a nail file if it will work Use rubbing alcohol on a cotton ball to wet the glued ends of the wood, let this soak in for some time to free the glued ends. Do not force the pieces apart however tempting this may seem. The rubbing alcohol will dissolve the glue and you should be able to twist them off. Dry fit the notched pieces together If they look reasonably good glue them together to make your rough grating Very lightly sand top and bottom sides to be flush and you are done There is no better feeling then having done it yourself!
- 44 replies
-
- 4
-
-
- Sultana
- Model Shipways
- (and 2 more)
-
Are your gratings finished or dry fitted? I ask because I believe they should be set into each other (like egg crating or those divider cardboard sheets between bottles at the liquor store) so the top side and underside are flush.
-
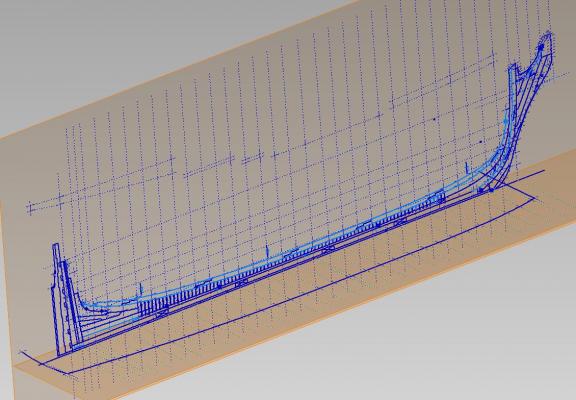
Completed the 3D layout of the top timberline Now I can begin to layout the frames at the station lines (again)

-
Thank you Druxey The new approach I've taken has also made quite an impact Christian, the first go around was with SolidWorks. This time I am using AutoDesk Inventor. The programs are similar but different enough to give my brain a workout.
-
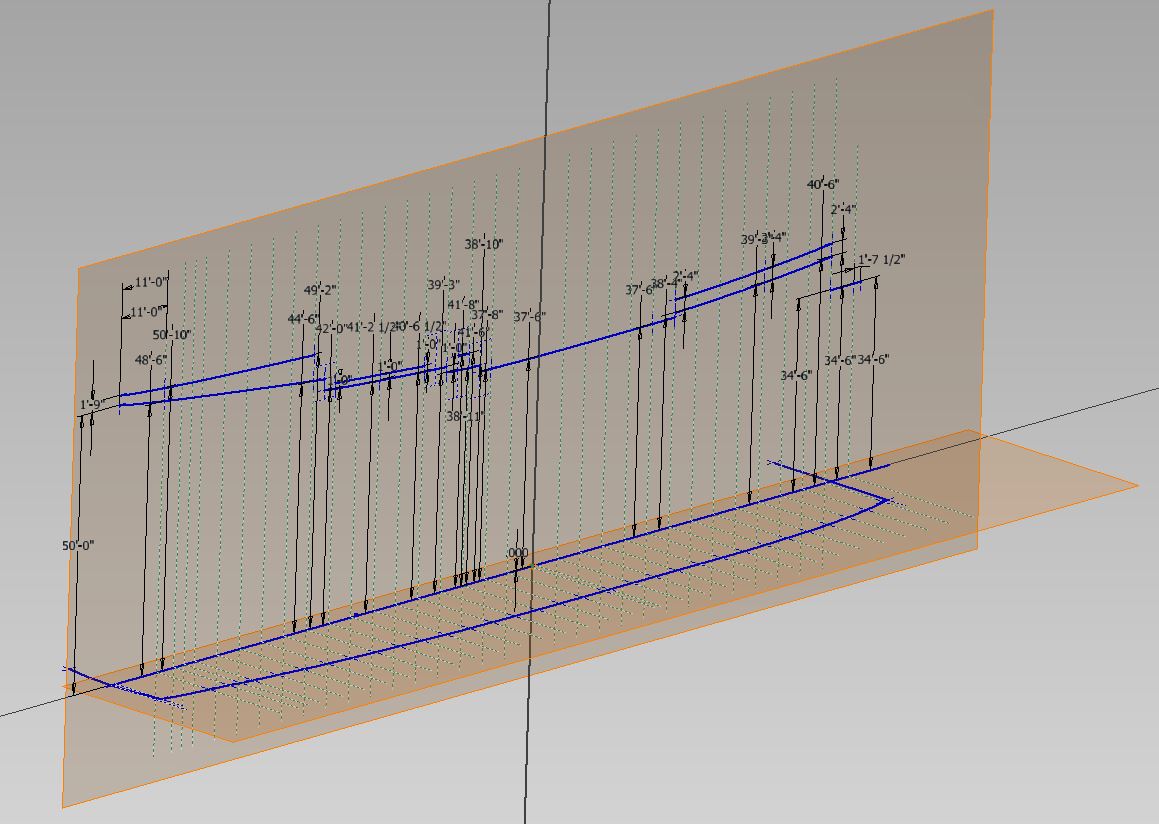
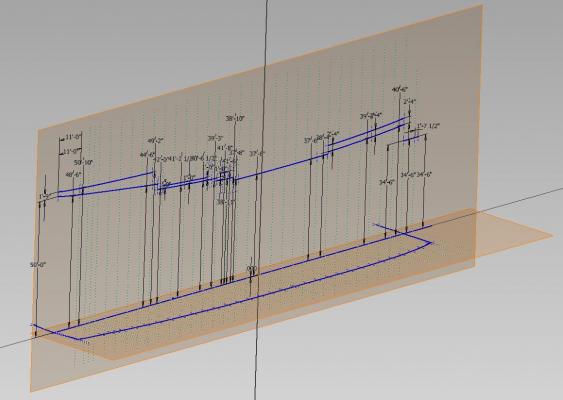
Managed to get a good start at the top timber line 2D layouts you can see both in the image below yet to fine tune (extend) the side view (sheer) so they are presently construction line until done Since we will be having a wonderfully stormy weekend I suppose I might get it done tomorrow (???)
-
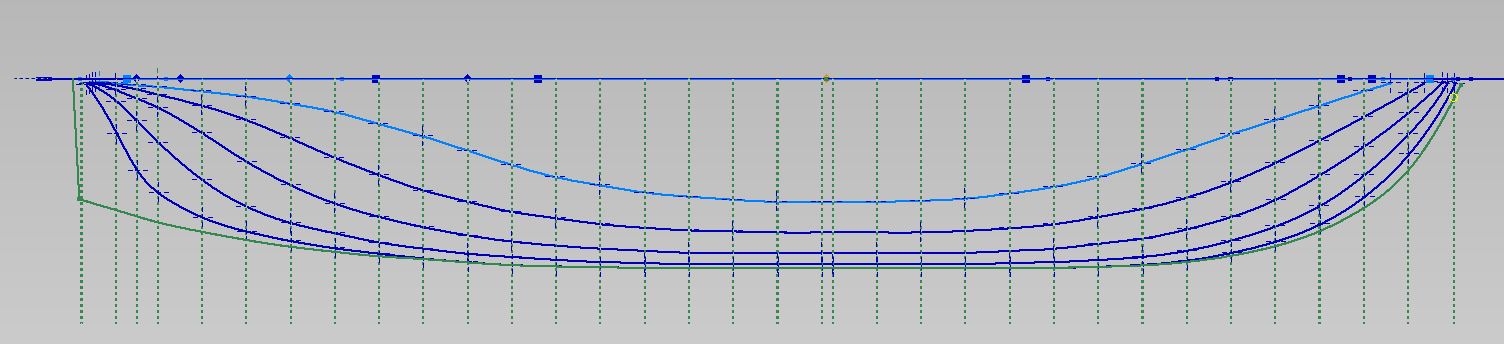
Well I managed to get my Upper and Lower Breadth Lines drawn I plotted them on the Breadth Plan (bottom 2d view) and then again at elevation on the Sheer Plan (2d side view) and finally projected them to a 3D line from those two views (the green lines) One step closer to drawing the frames (again) First I must draw the top timber lines.

-
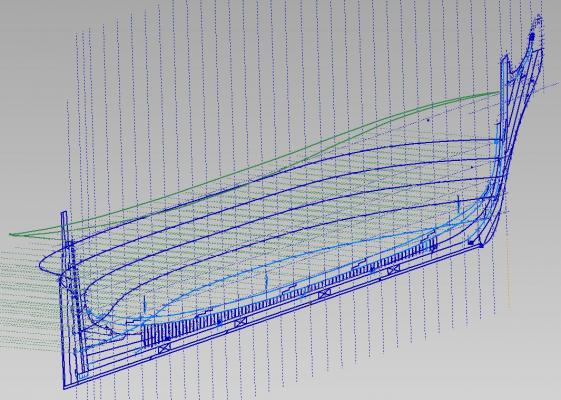
I had some feed back on my layout... I chewed over the suggestions a bit and looked at some other plans and models. as recommended. Of course most of what you want to see on models are covered up in the photos. Images don't seem to ever show that one detail you want or when they do it disagrees with both what you did and what helpful people are suggesting. In the end I made some changes to the pieces that comprise the bow assembly and the rising/dead wood and its connection forward and aft. Thank you for the help. EDIT NOTE: dwg removed and update posted 15 NOV 2015
-
Dan love the build re the oars we called them sweeps on the 32' cutters and 27' whalers back in the 70's not sure if that is a relatively new term or not the blades had a definite curvature to them... once again that could be a newer thing Alan
-
So I've completed the first template drawing and will be getting it printed out this week I have labelled the pieces to help me remember the names. I have also sketched the five waterlines at elevation. This was done differently from the first go around. The first time I had plotted it out all on one level, having sketched each section line as painstakingly measured from the Body Plan. Then I compared the two by inspection from the top view... they were quite different. This time I intend to use them directly in the shaping of the station templates. I also relaxed my measuring... using my trusty triangular scale with 1/4" = 1'-0" scale on it I can comfortably read to within a 1/2" I am getting into the tough part now... how to plot the upper and lower breadth line in 3D (everything else has been 2D). I won't bore anyone with the steps (as I am not quite sure of them myself yet) But I hope this version will be simpler and quicker. So far so good.