.JPG.ca33079f5815b861e67b9c2cccd37982.JPG)

Blue Ensign
-
Posts
4,567 -
Joined
-
Last visited
Content Type
Profiles
Forums
Gallery
Events
Everything posted by Blue Ensign
-
 Nice work Bob, I like the idea of leaving her in frame below the waterline. B.E.
- 682 replies
-
- 3
-

-
- halifax
- lumberyard
- (and 1 more)
-
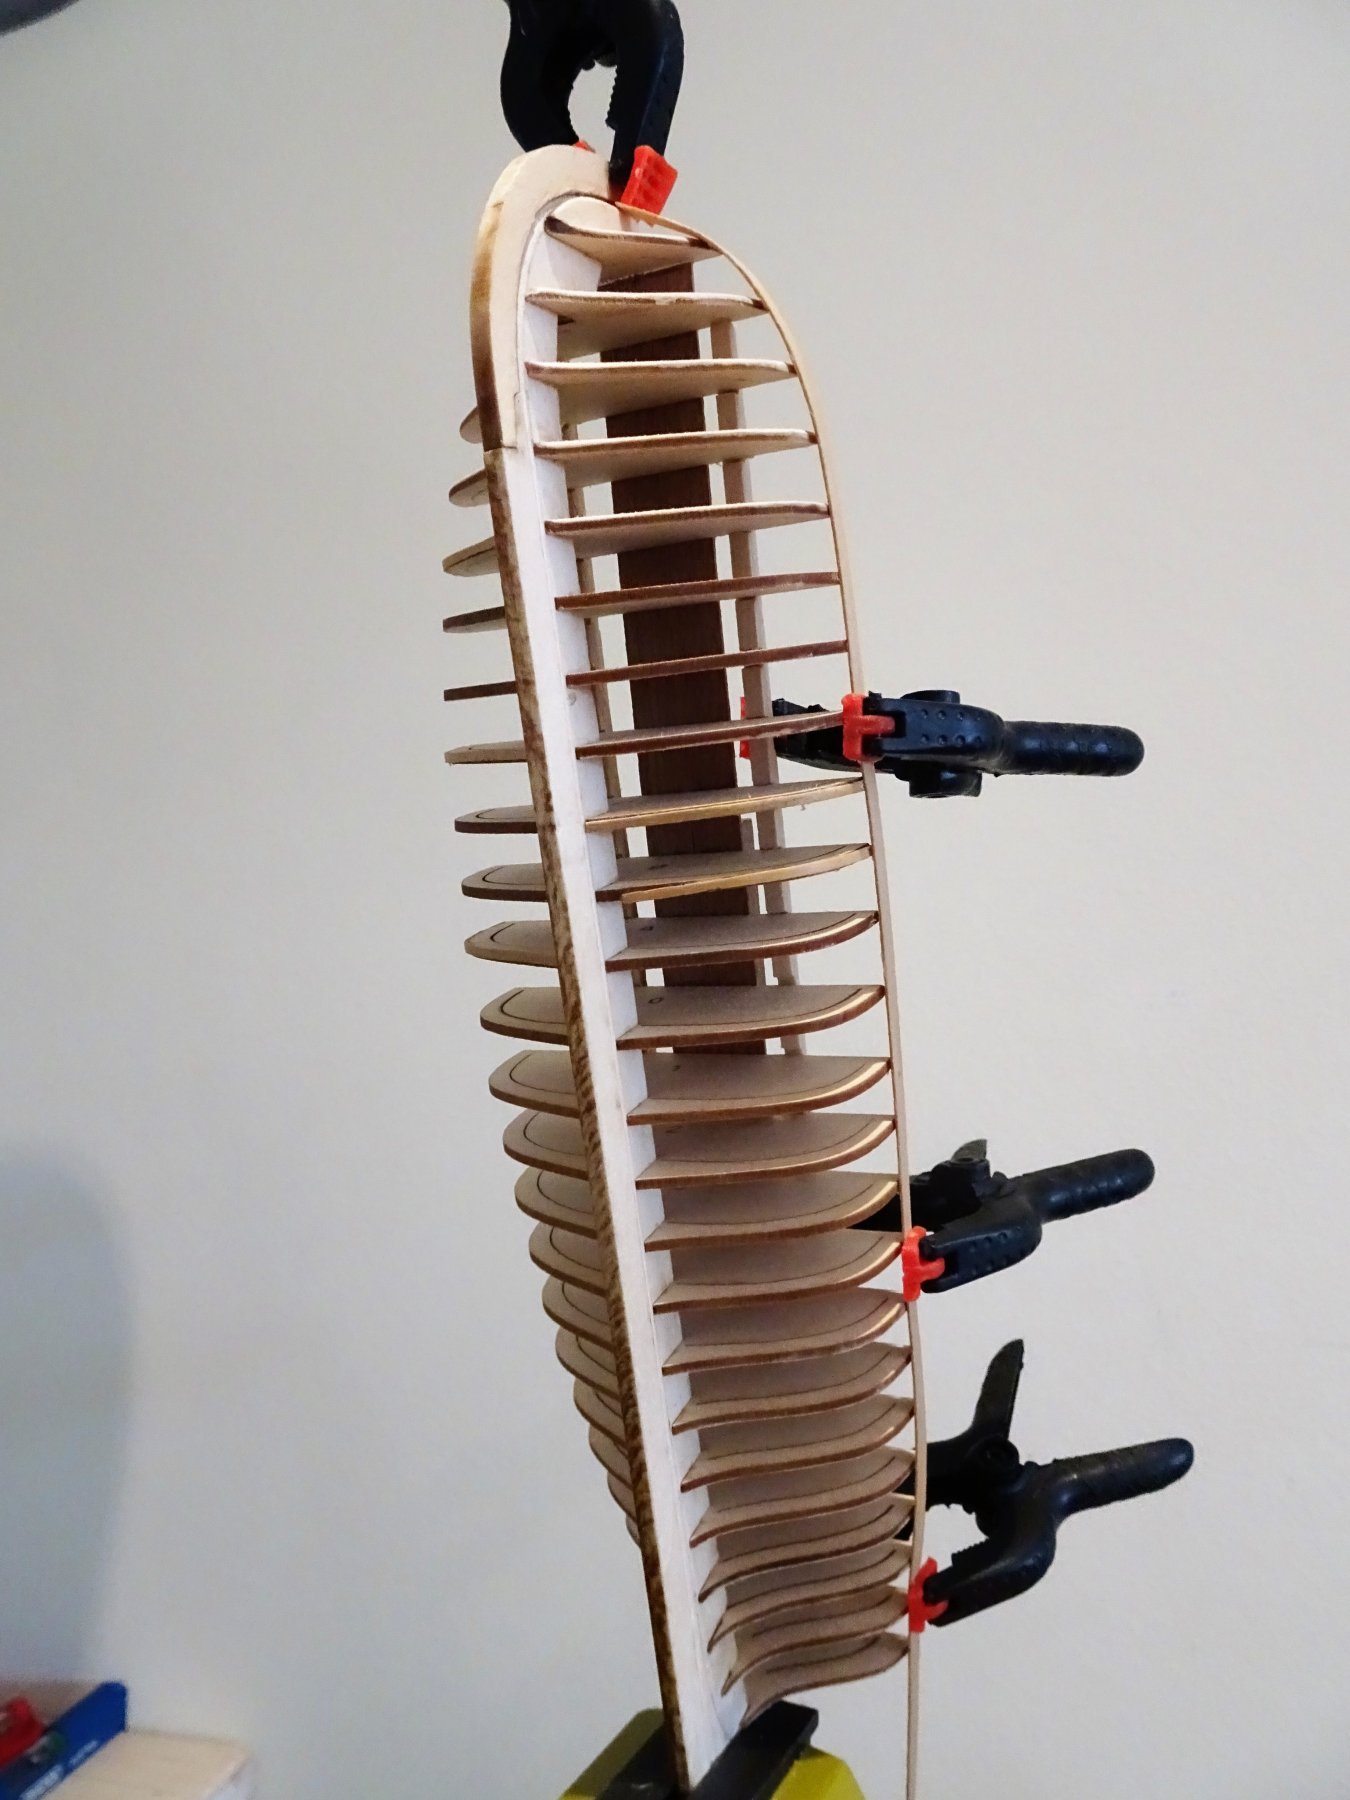
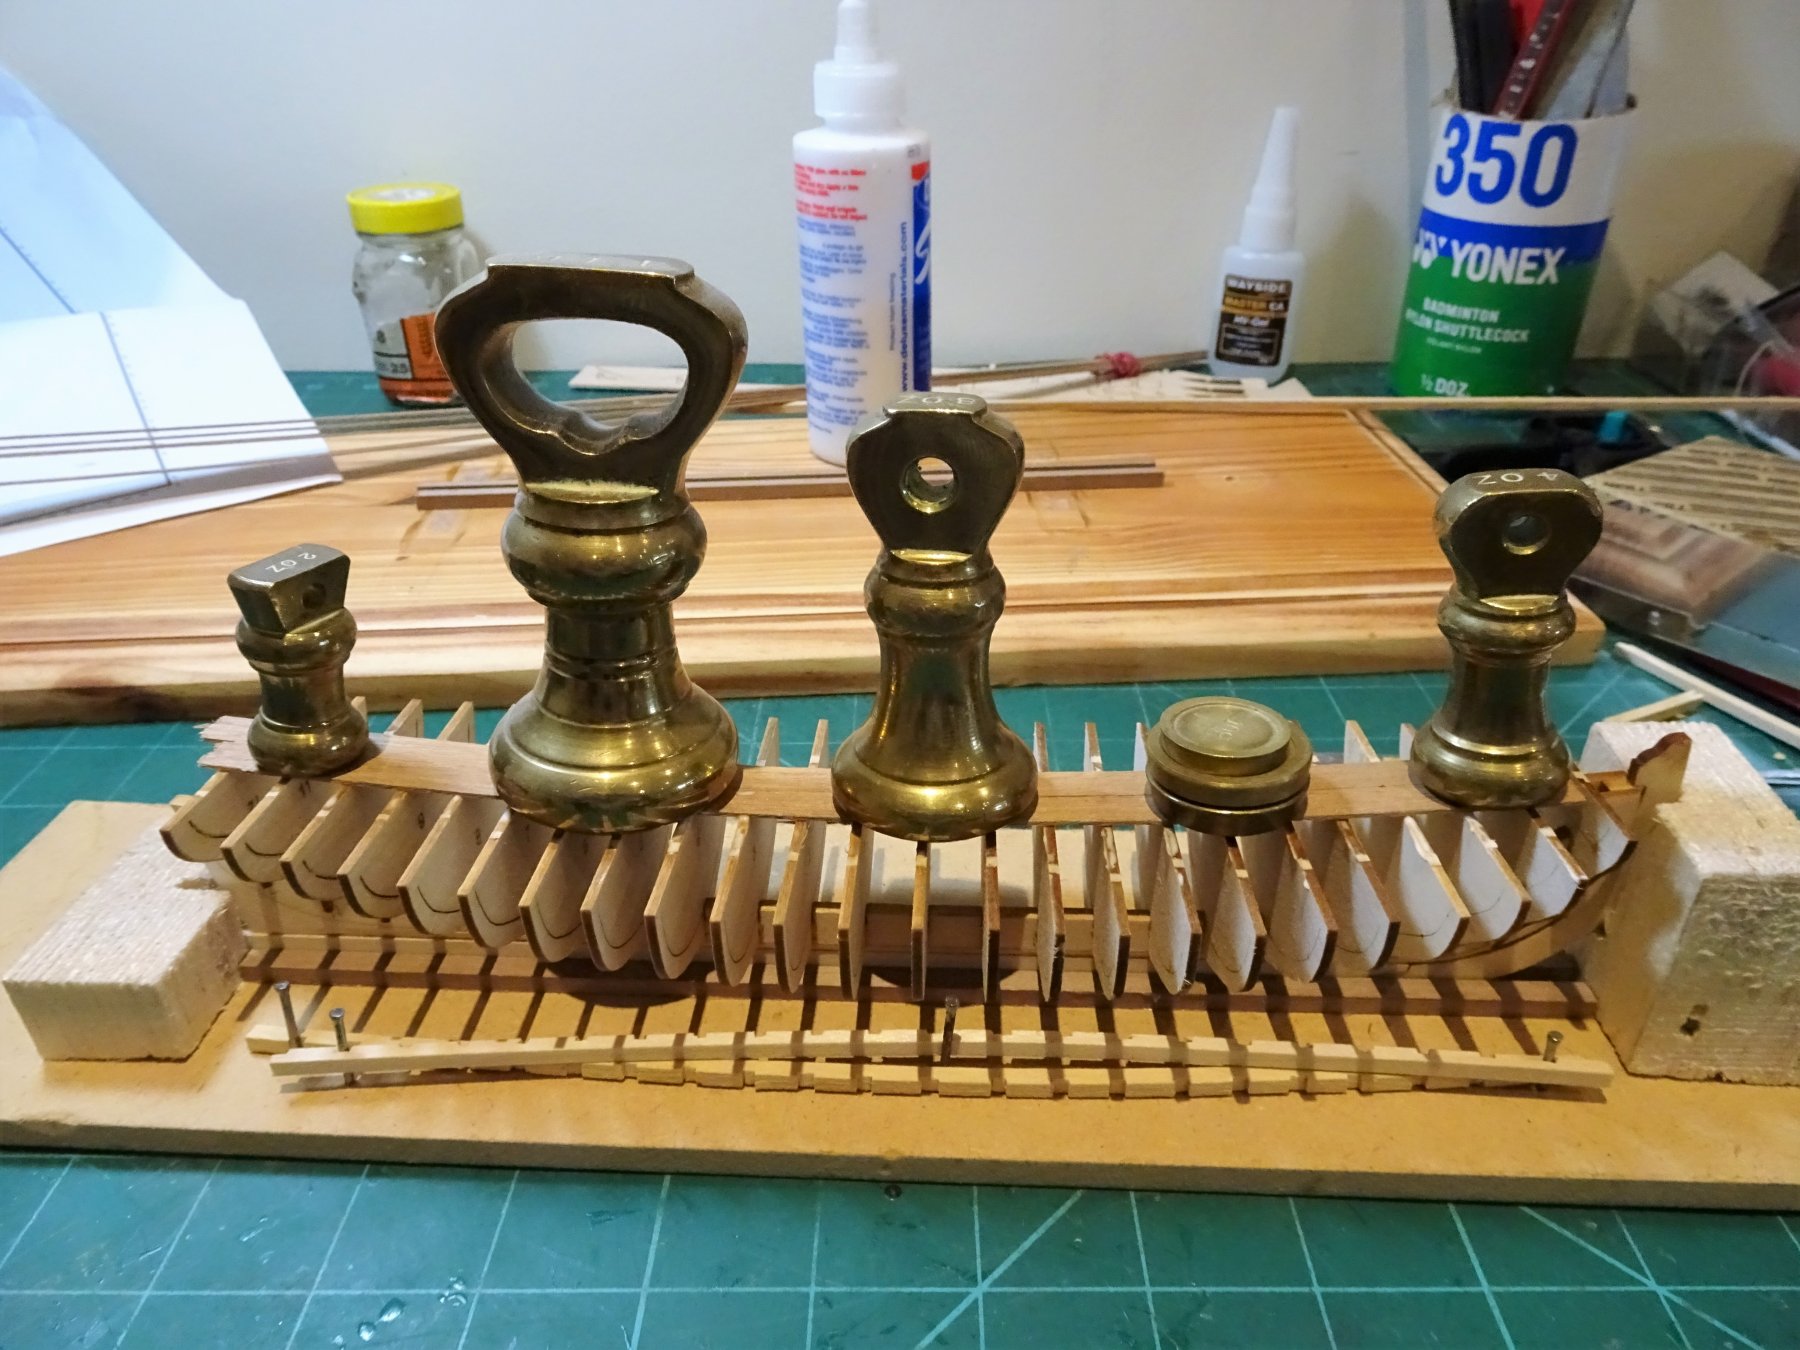
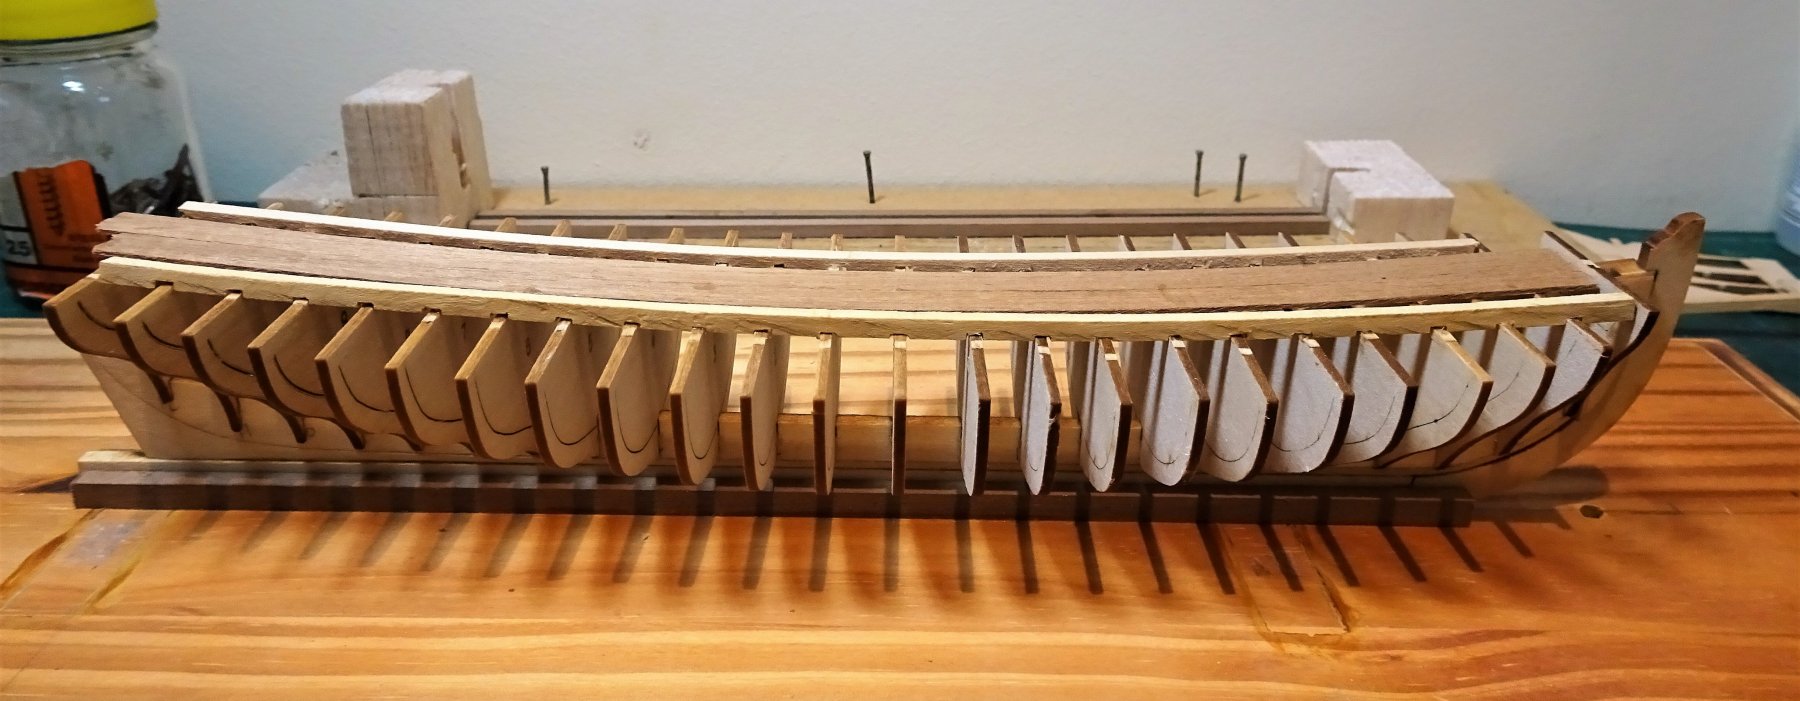
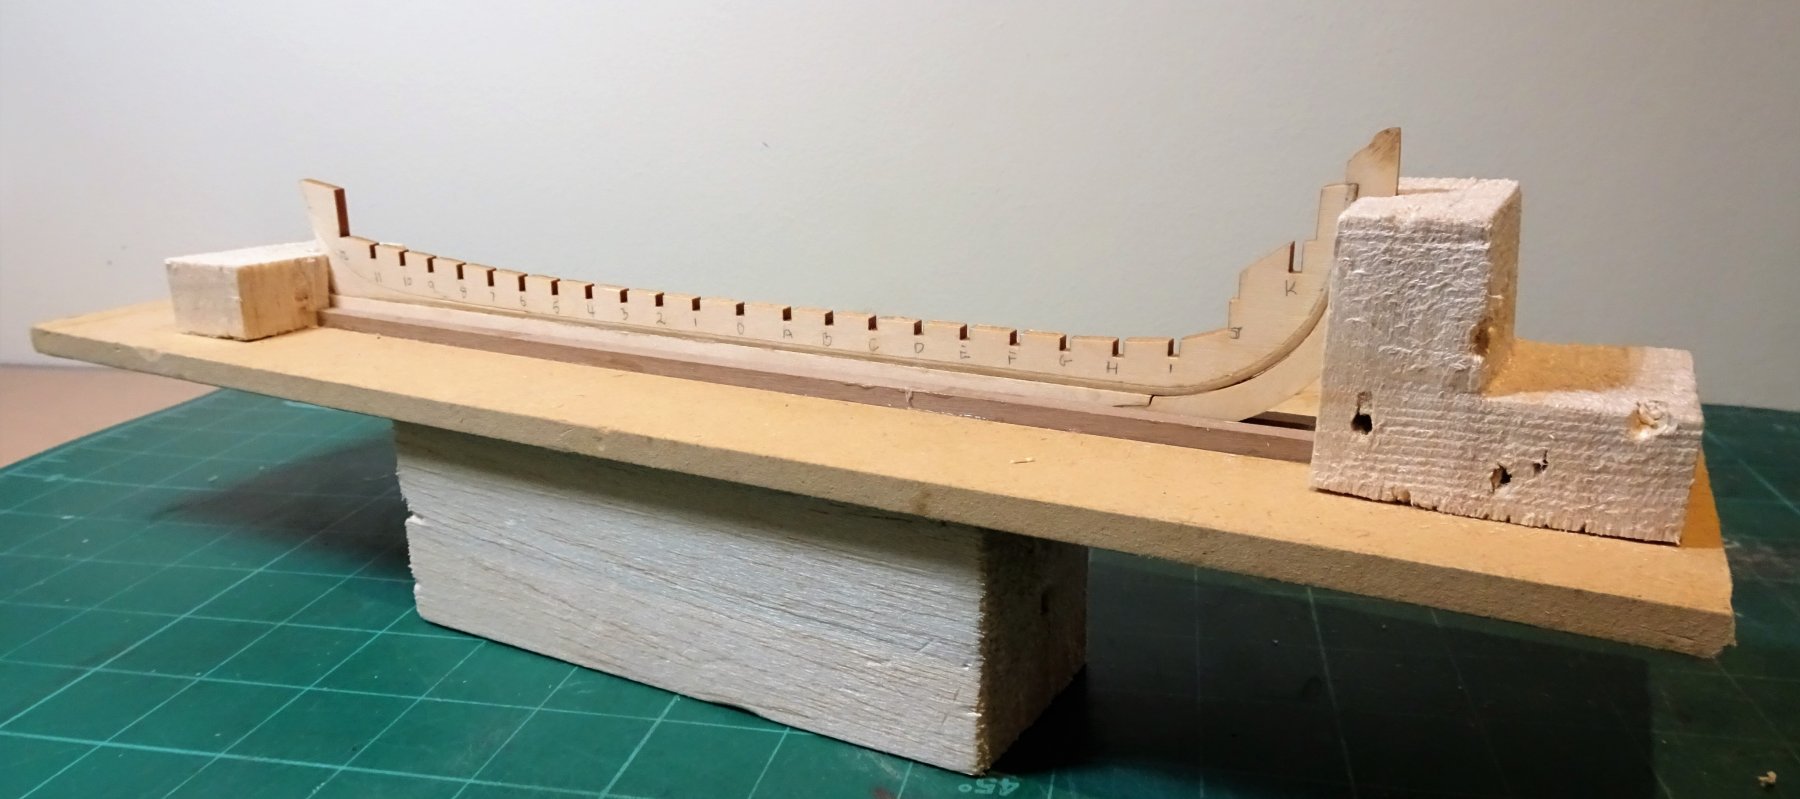
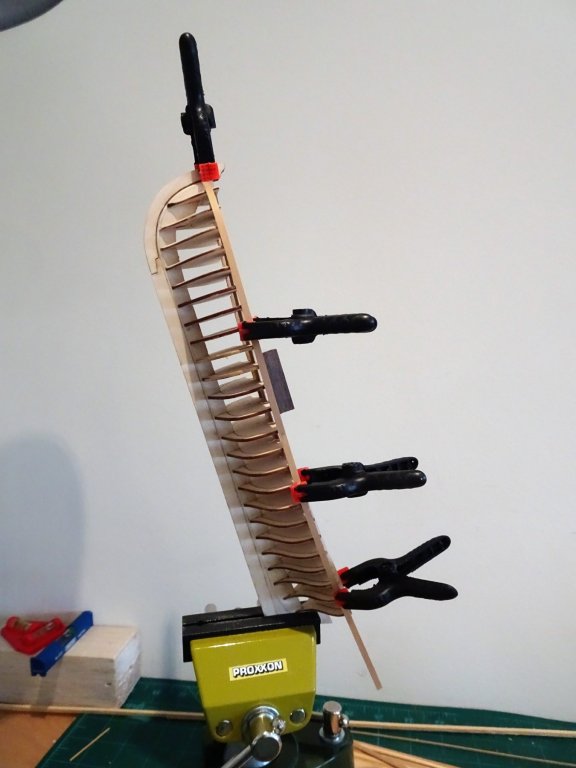
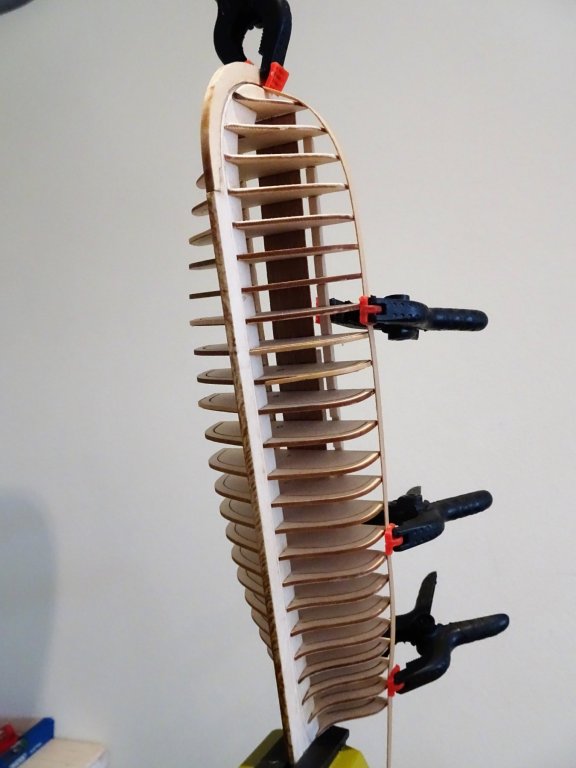
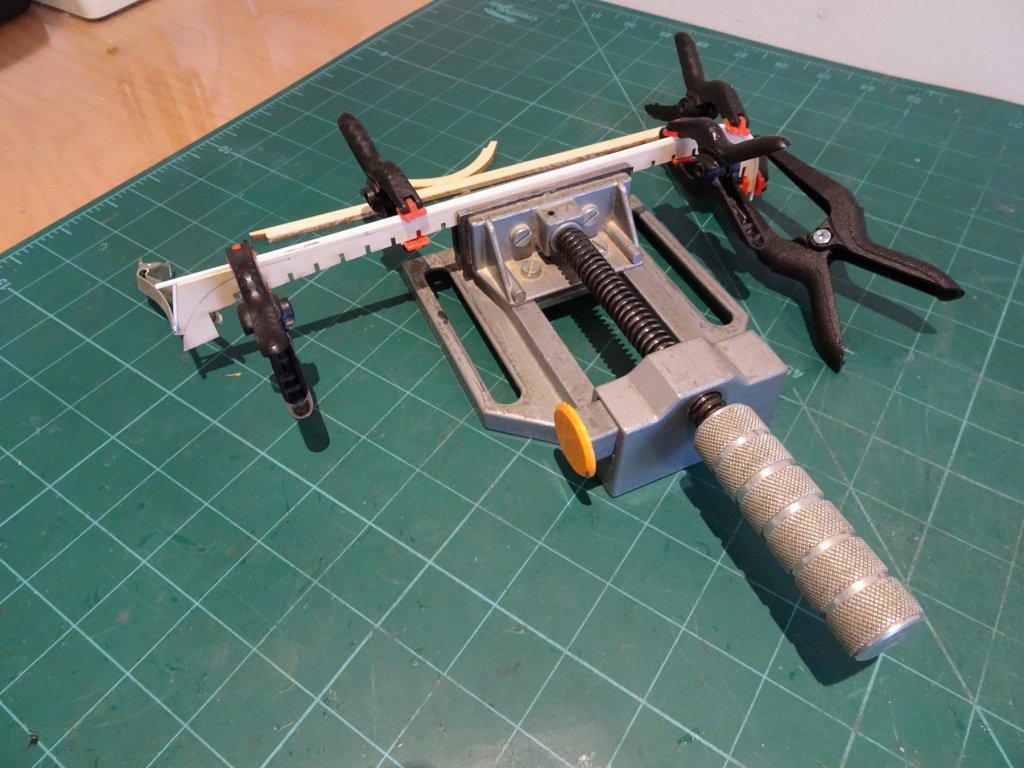
That fairing business. The temporary bracing I have employed is keeping the frames rock solid for fairing. Early check reveals that several b/hds needed shims to give a fair run along the hull. A little surprised by this but some 0.6mm boxwood strip sorts the job out. In total I have shimmed two on the portside and four on larboard, but now along the sheer at least there is a fair run. Not one of my favourite pastimes fairing, seems to take forever, even on a small project such as this, just when you think you have it right another hollow reveals itself. 6941 Not first planking but a boxwood strip to check out the fairing at sheer line level. 6938 one of the benefits of the notched bracing strips is that it provides an anchor for the clamps. 6942 Speaking of boxwood I do have a good supply of Boxwood strip 4.50mm x 0.6mm plus several other wider sizes. The kit provides Limewood strip for the outer planking 3/16" x 1/32" (4.76mm x 0.79mm) In practice the thickness is closer to 0.70mm =0.66" My 0.6mm boxwood strips at 1:24 scale = 0.57" a tad finer than the kit provided stuff. Limewood is a very soft wood normally used for first planking on double planked hull and I'm a little concerned about dinks and getting a smooth finish. So the question is should I go with the limewood or would the slightly thinner Boxwood be ok. Hmmn something to ponder. According to Steel, the timbers for a 21' Pinnace are 1½" thick equiv to 1.59mm at 1:24 scale. Back to fairing for the moment. B.E.

- 156 replies
-
- 13
-
-
- pinnace
- model shipways
- (and 1 more)
-
An interesting project Danny of a not very well represented era in ship modelling terms. Look forward to seeing her develop. Cheers, B.E.
- 193 replies
-
- 3
-
-
- cerberus
- paper shipwright
- (and 1 more)
-
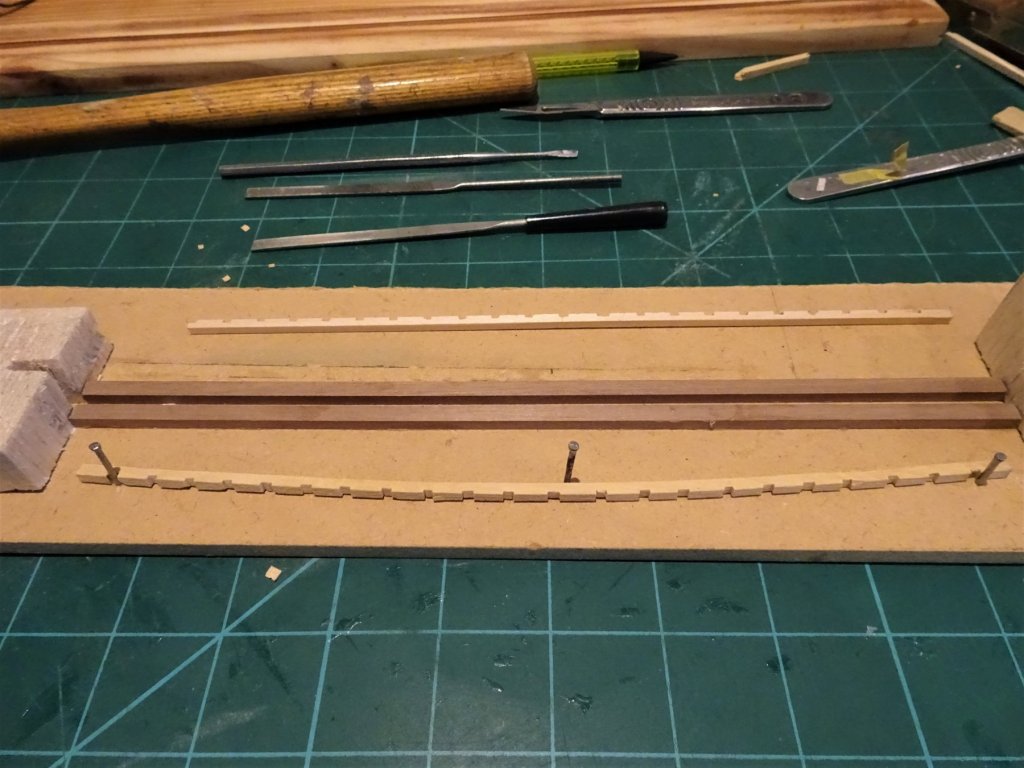
Thanks Michael, I just marked them off along the top of the bulkheads, cut them with a razor saw and finished with files. Easy to do as the strip wood is soft limewood. B.E.
- 156 replies
-
- 3
-
-
- pinnace
- model shipways
- (and 1 more)
-
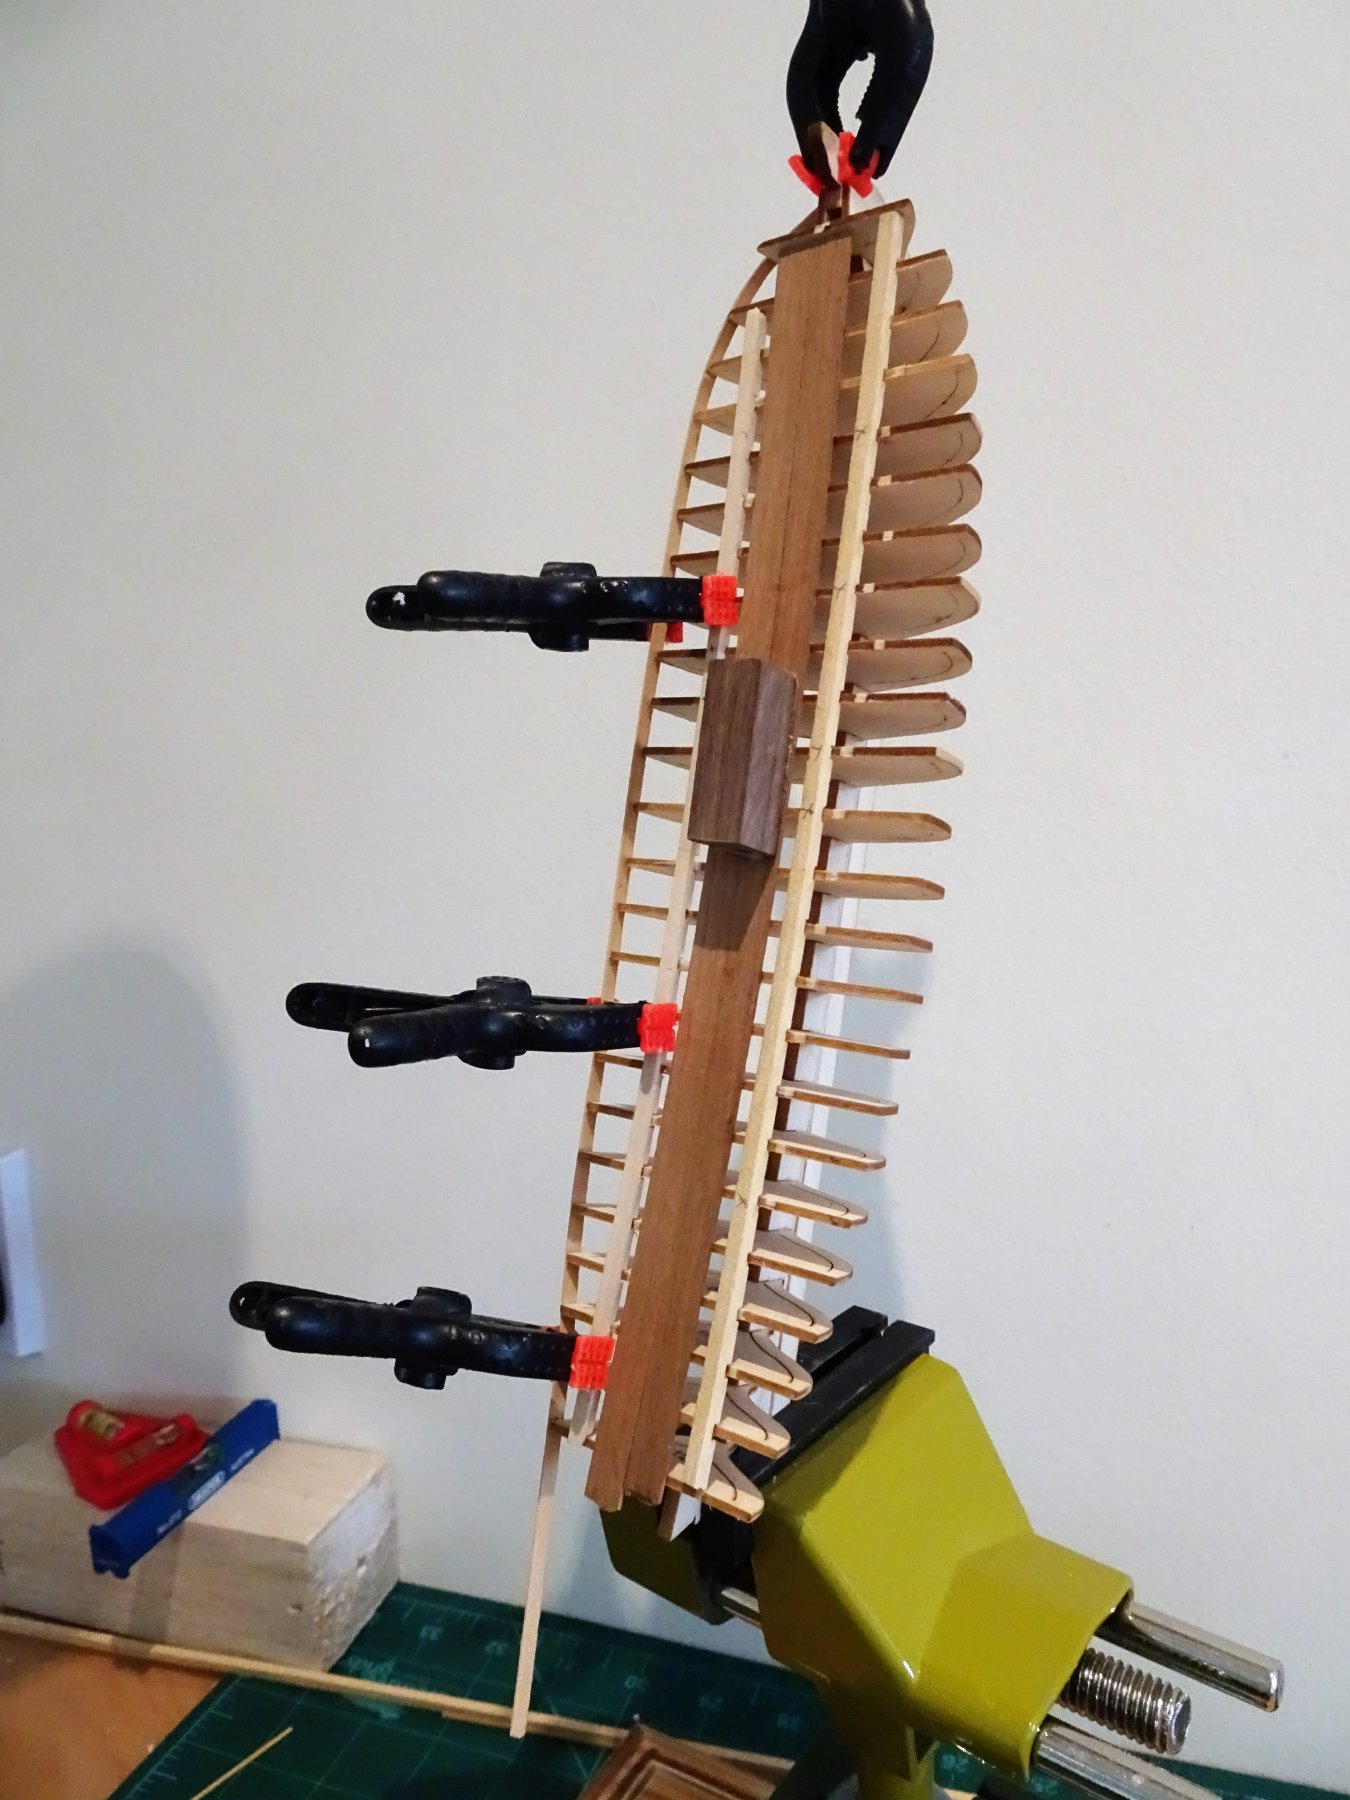
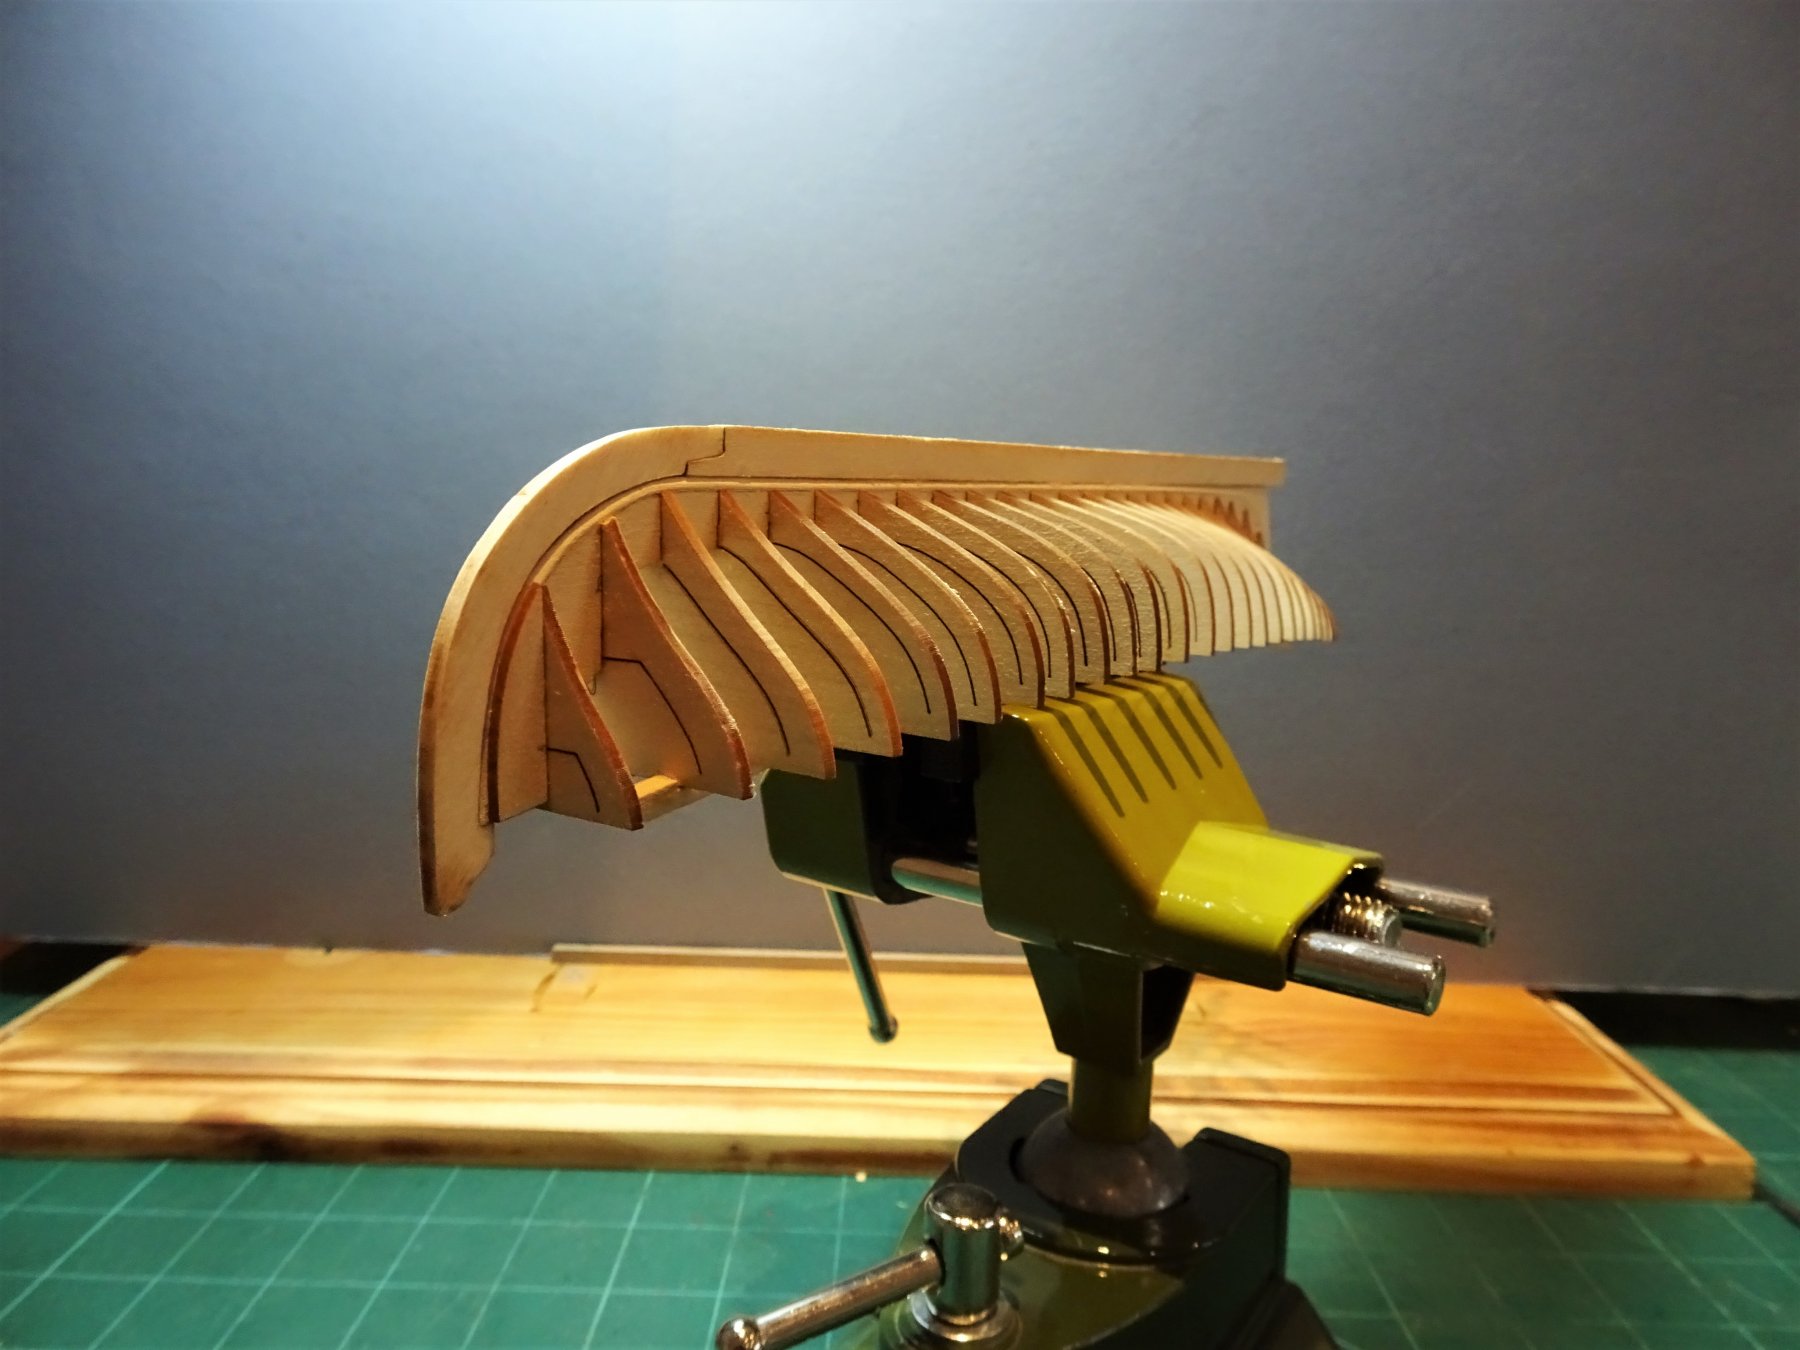
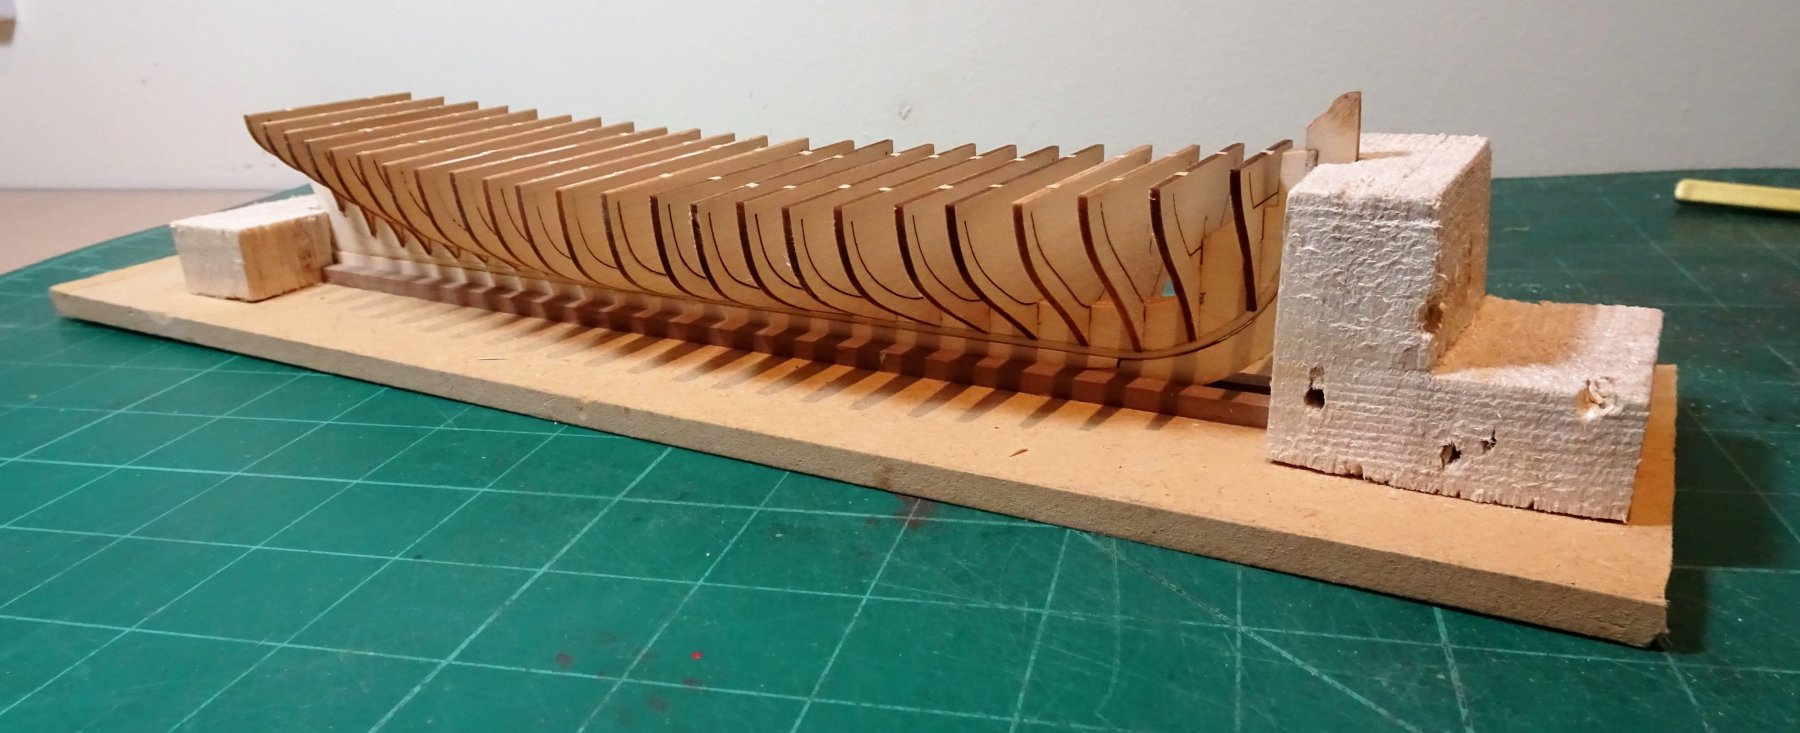
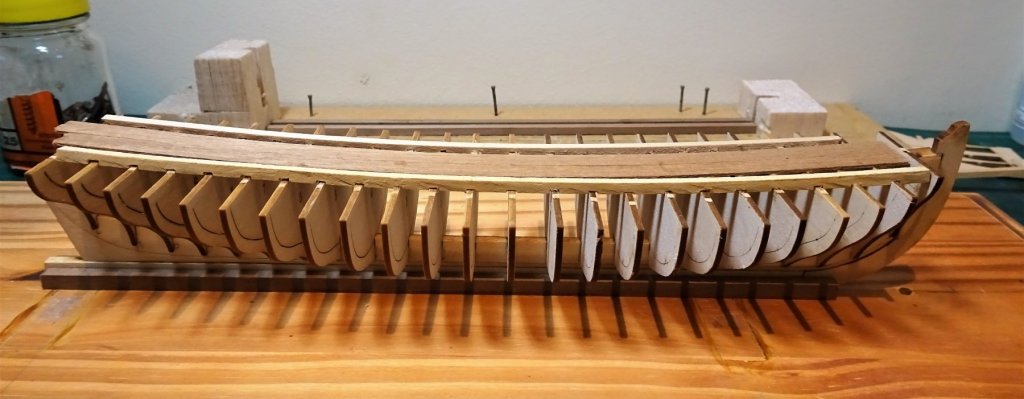
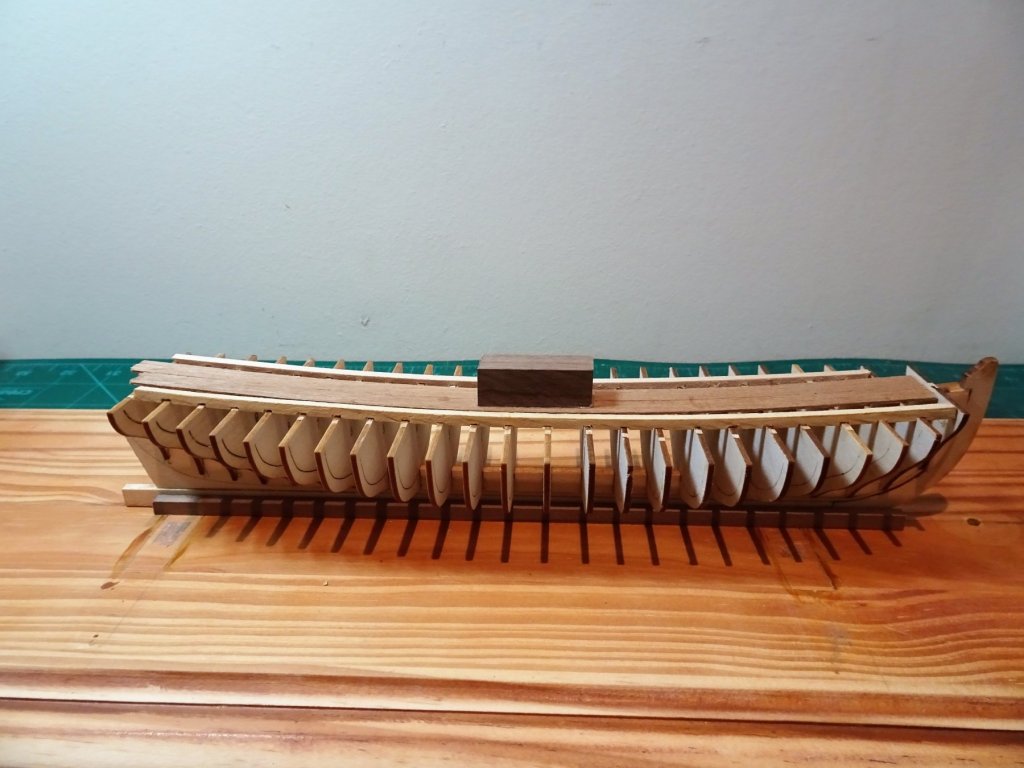
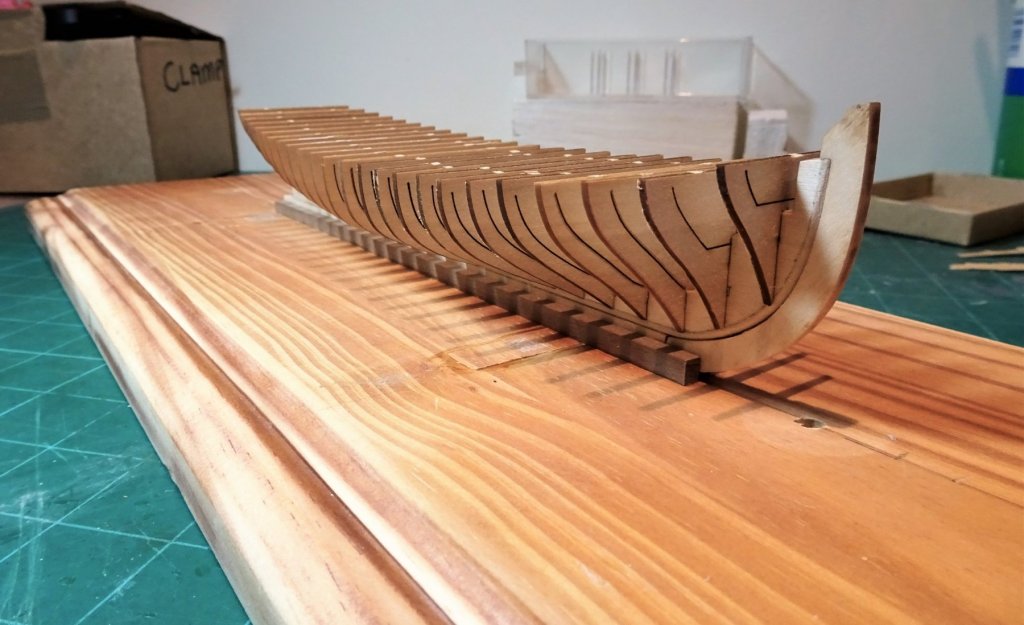
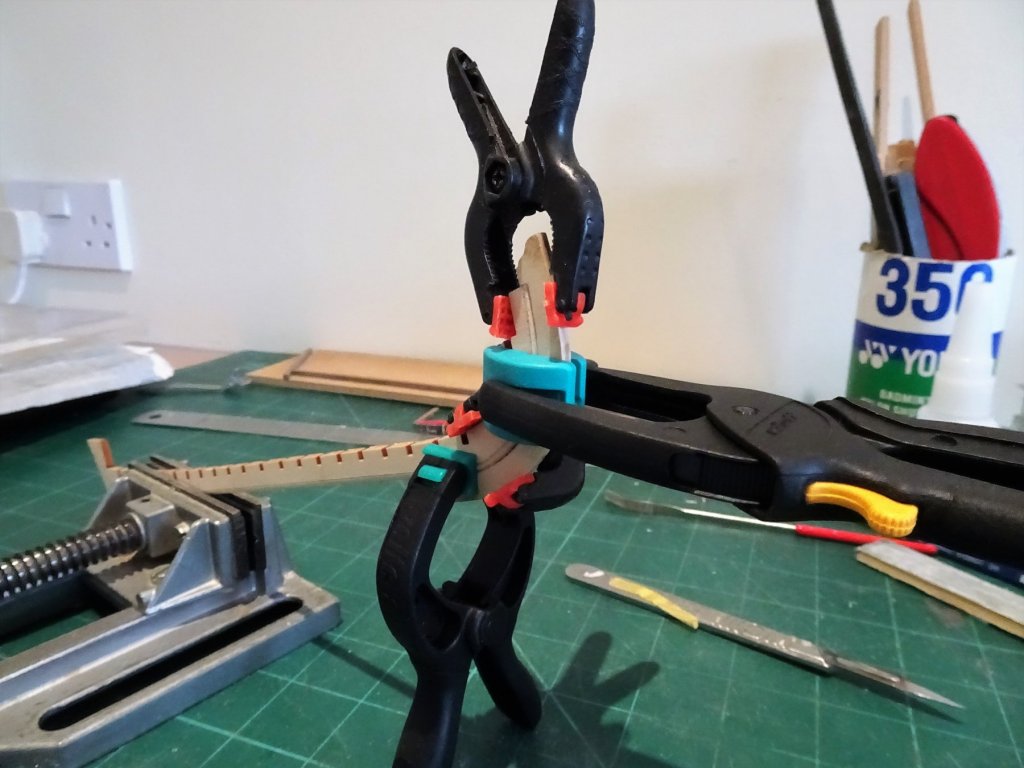
Before I start fairing the bulkheads I need to consider their relative fragility and to this end two broad strips of beech are glued along the tops of the frames to stiffen the bulkheads against the sanding process. 6831 6829 and two notched strips either side, I'm a Belt and braces sort of guy. 6887 I have also at this stage added the filler pieces at the bow. (although four pieces are provided in the kit Chuck has confirmed to me that only one each side is required.) 6894 Atop the Beech strips is a Walnut block which will be used to hold the boat when inverted in a vice. This is secured with double sided tape to allow for easier removal. 6893 So now ready to start the fairing process. B.E.


- 156 replies
-
- 15
-
-
- pinnace
- model shipways
- (and 1 more)
-
Thanks Tom, but it's only for my personal interest, and I know who I am Hi Dirk, I paid £72.00 for the maximum number of pages (120), the basic album is (24 pages) It would have cost me not far short of that in printer ink to do it myself on my inkjet, and without the professional binding. Cheers, B.E.
- 366 replies
-
- 7
-
-
- pegasus
- victory models
- (and 2 more)
-
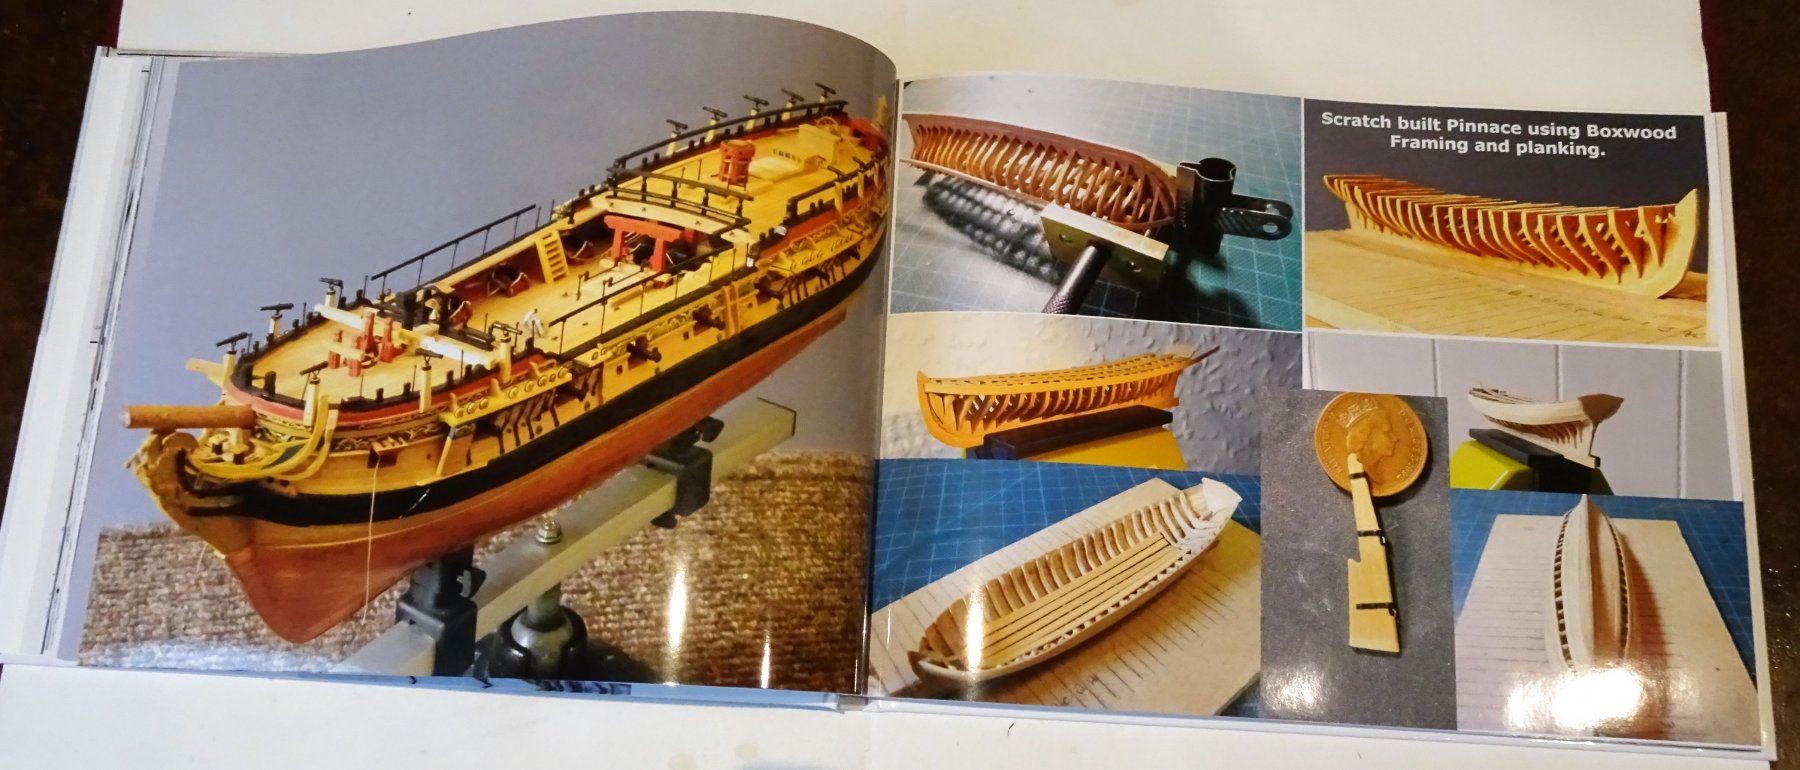
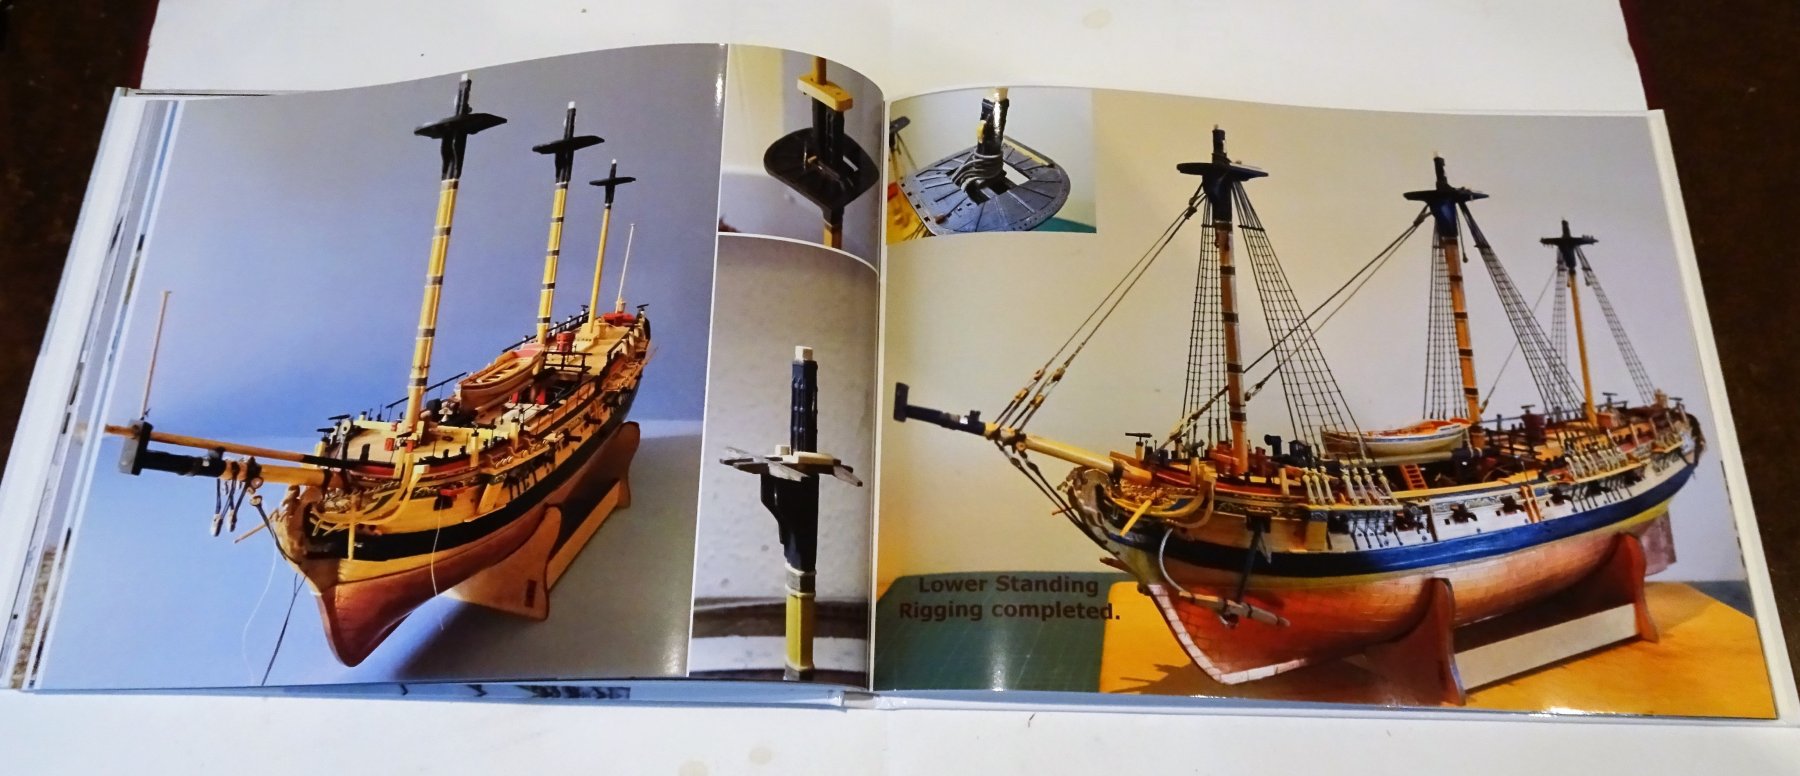
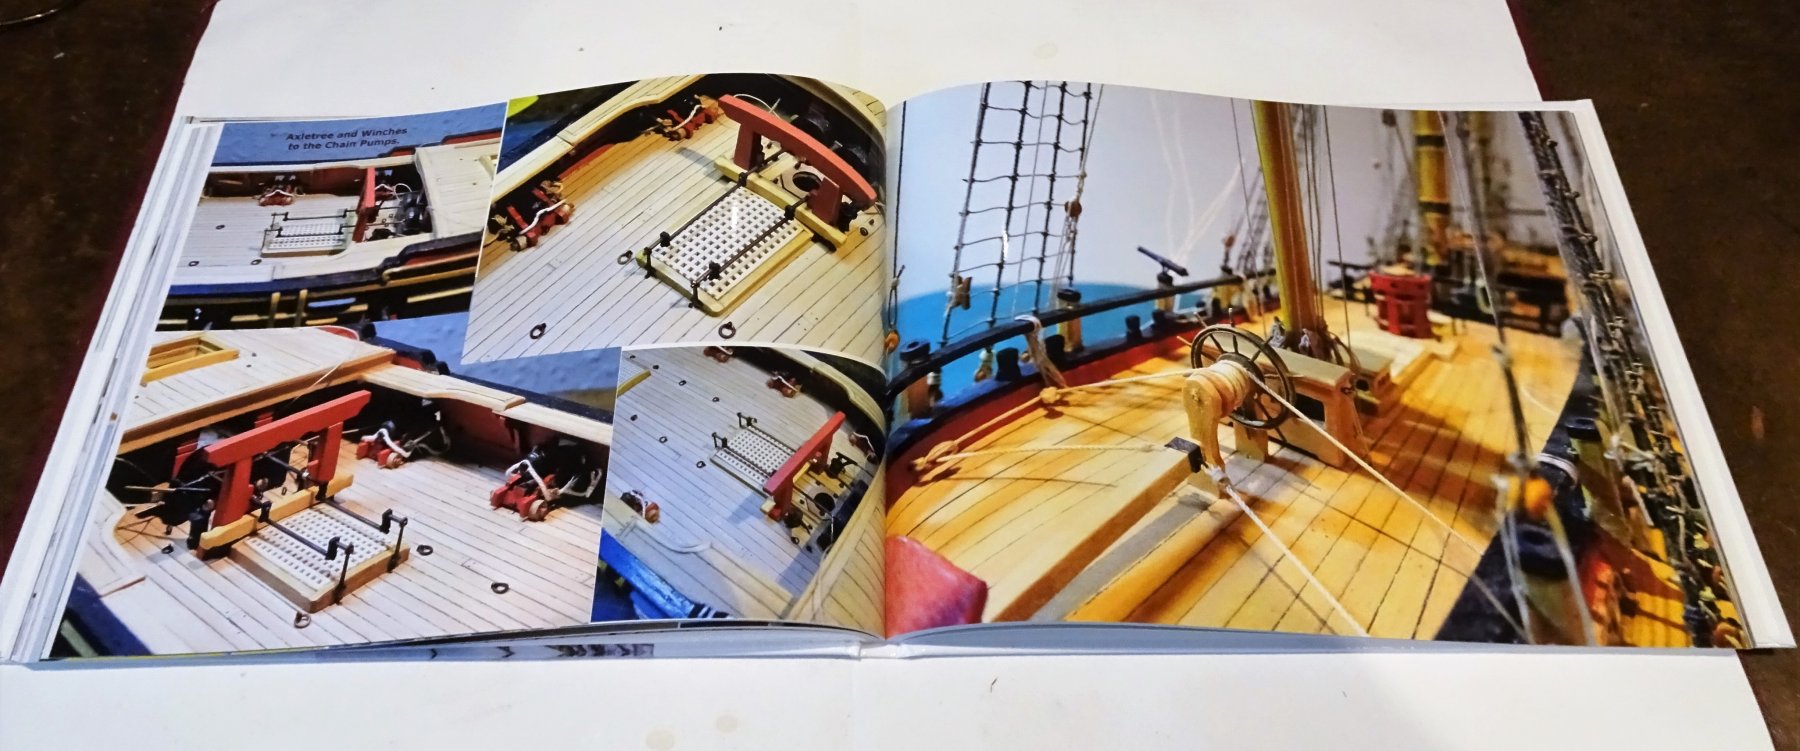
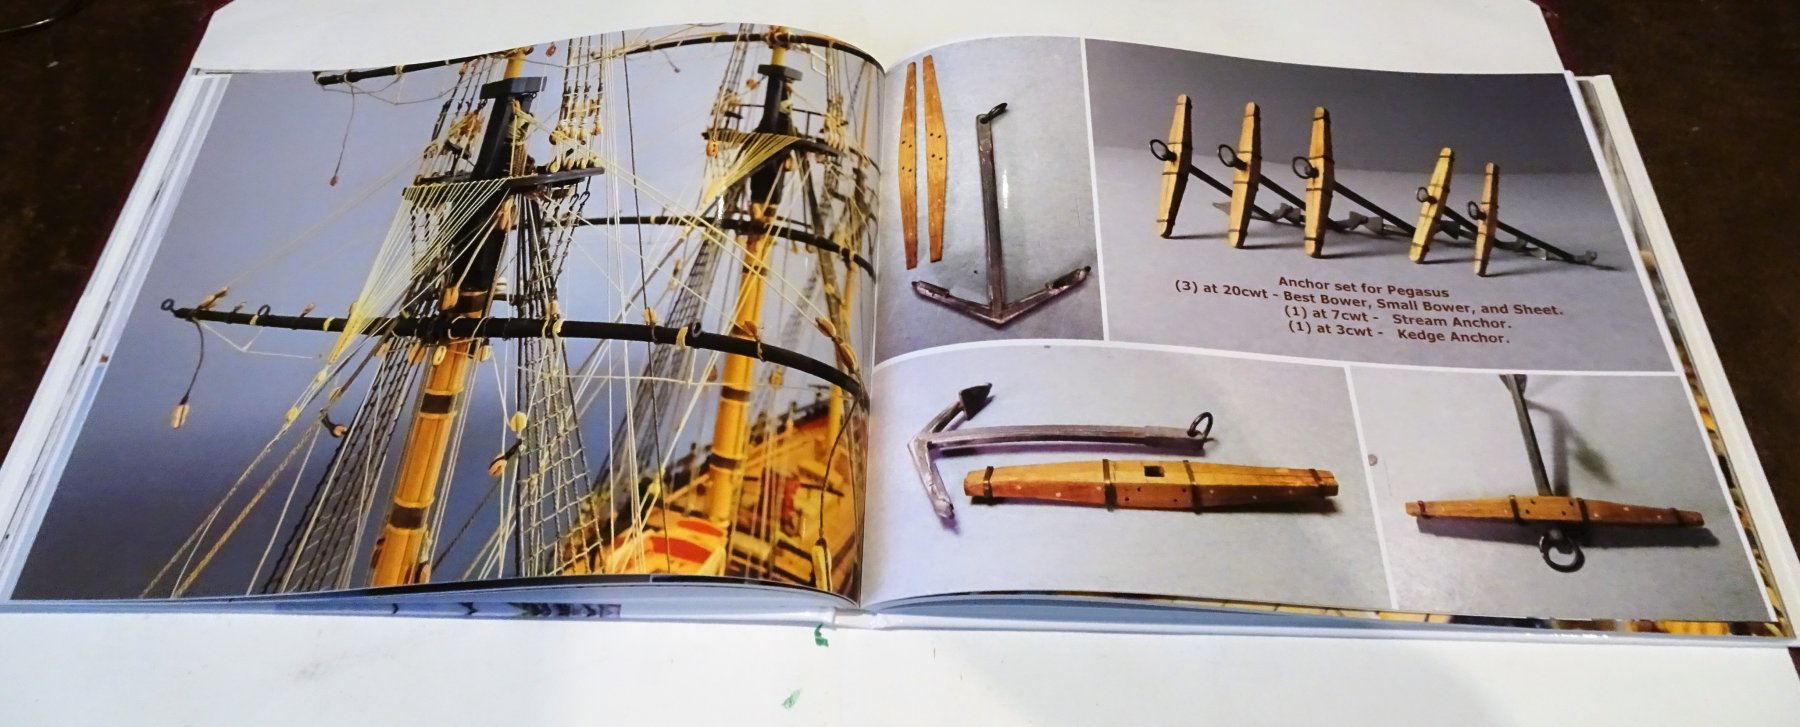
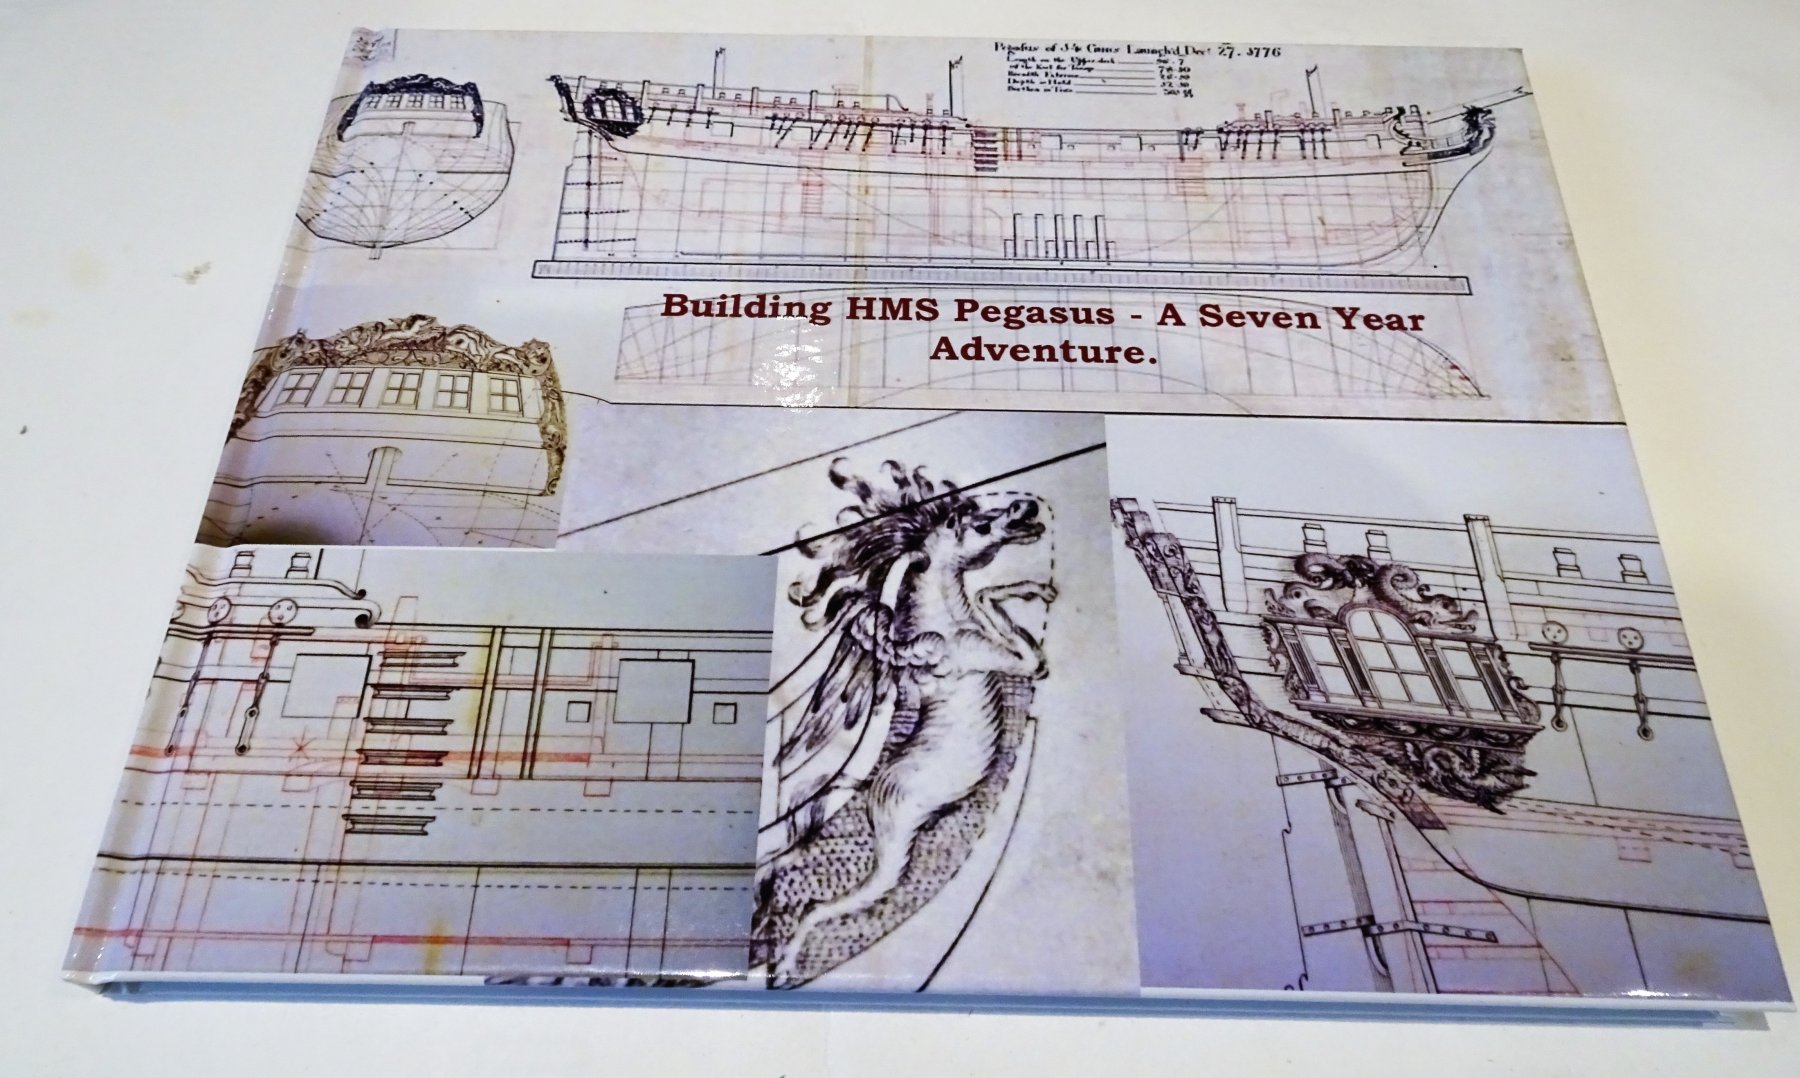
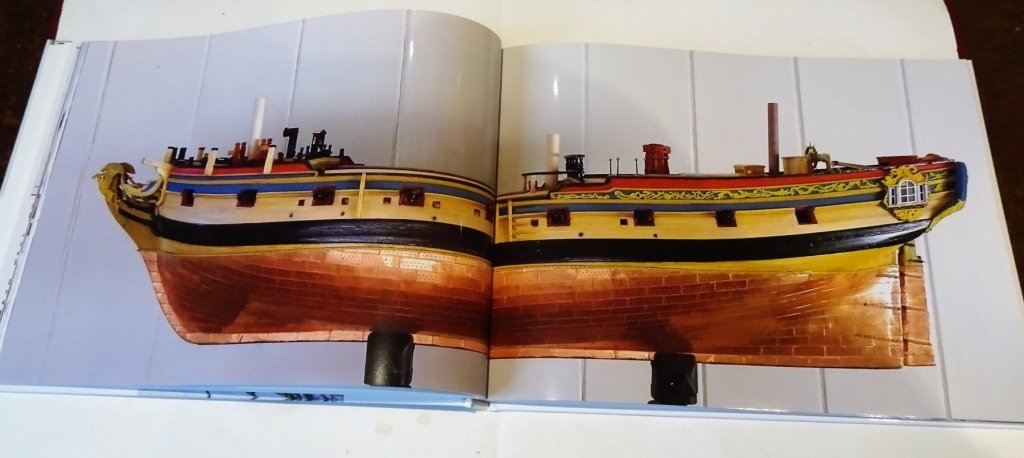
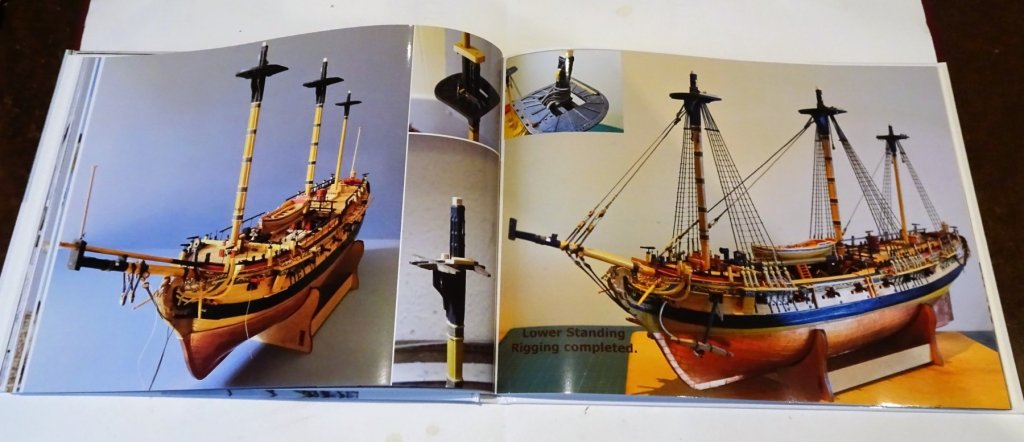
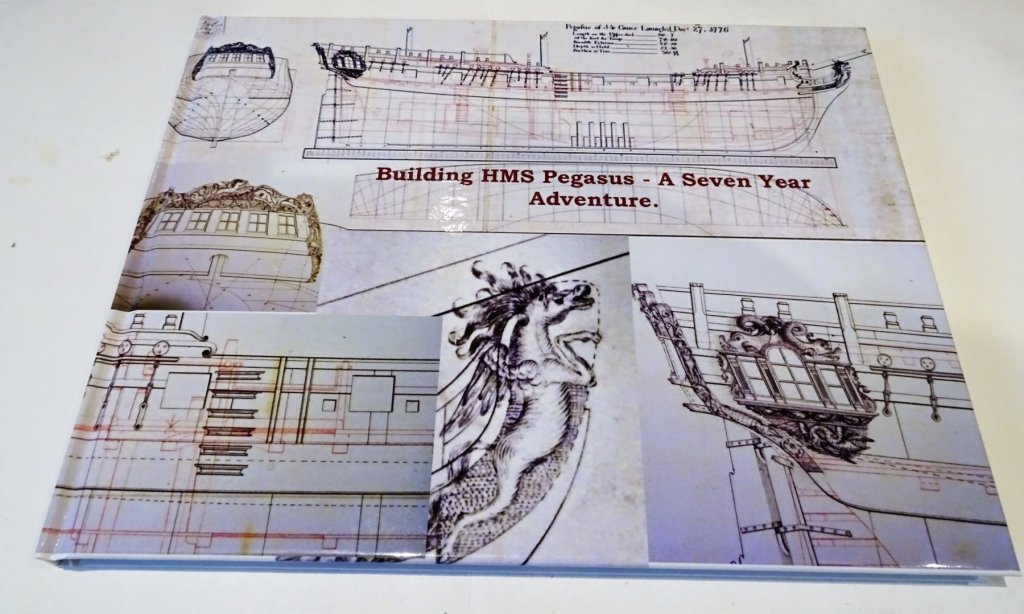
As I mentioned in an earlier post, I have used some of my post build time to create a Photo Album of my build utilising some of the many photo's taken over the course of the build. The album is large format (28 x 21cm) and runs to 120 pages. The book has now arrived and I thought you may like to see how it worked out. The book was designed and created from software downloaded from Vistaprint. who then produced the Album. Here's are a few pages to give you a glimpse of how it looks. In reality the photo's are far better than may appear on this post, and it's nice to have a record outside of a computer to look back on a build. Regards, B.E.


- 366 replies
-
- 31
-
-

-
- pegasus
- victory models
- (and 2 more)
-
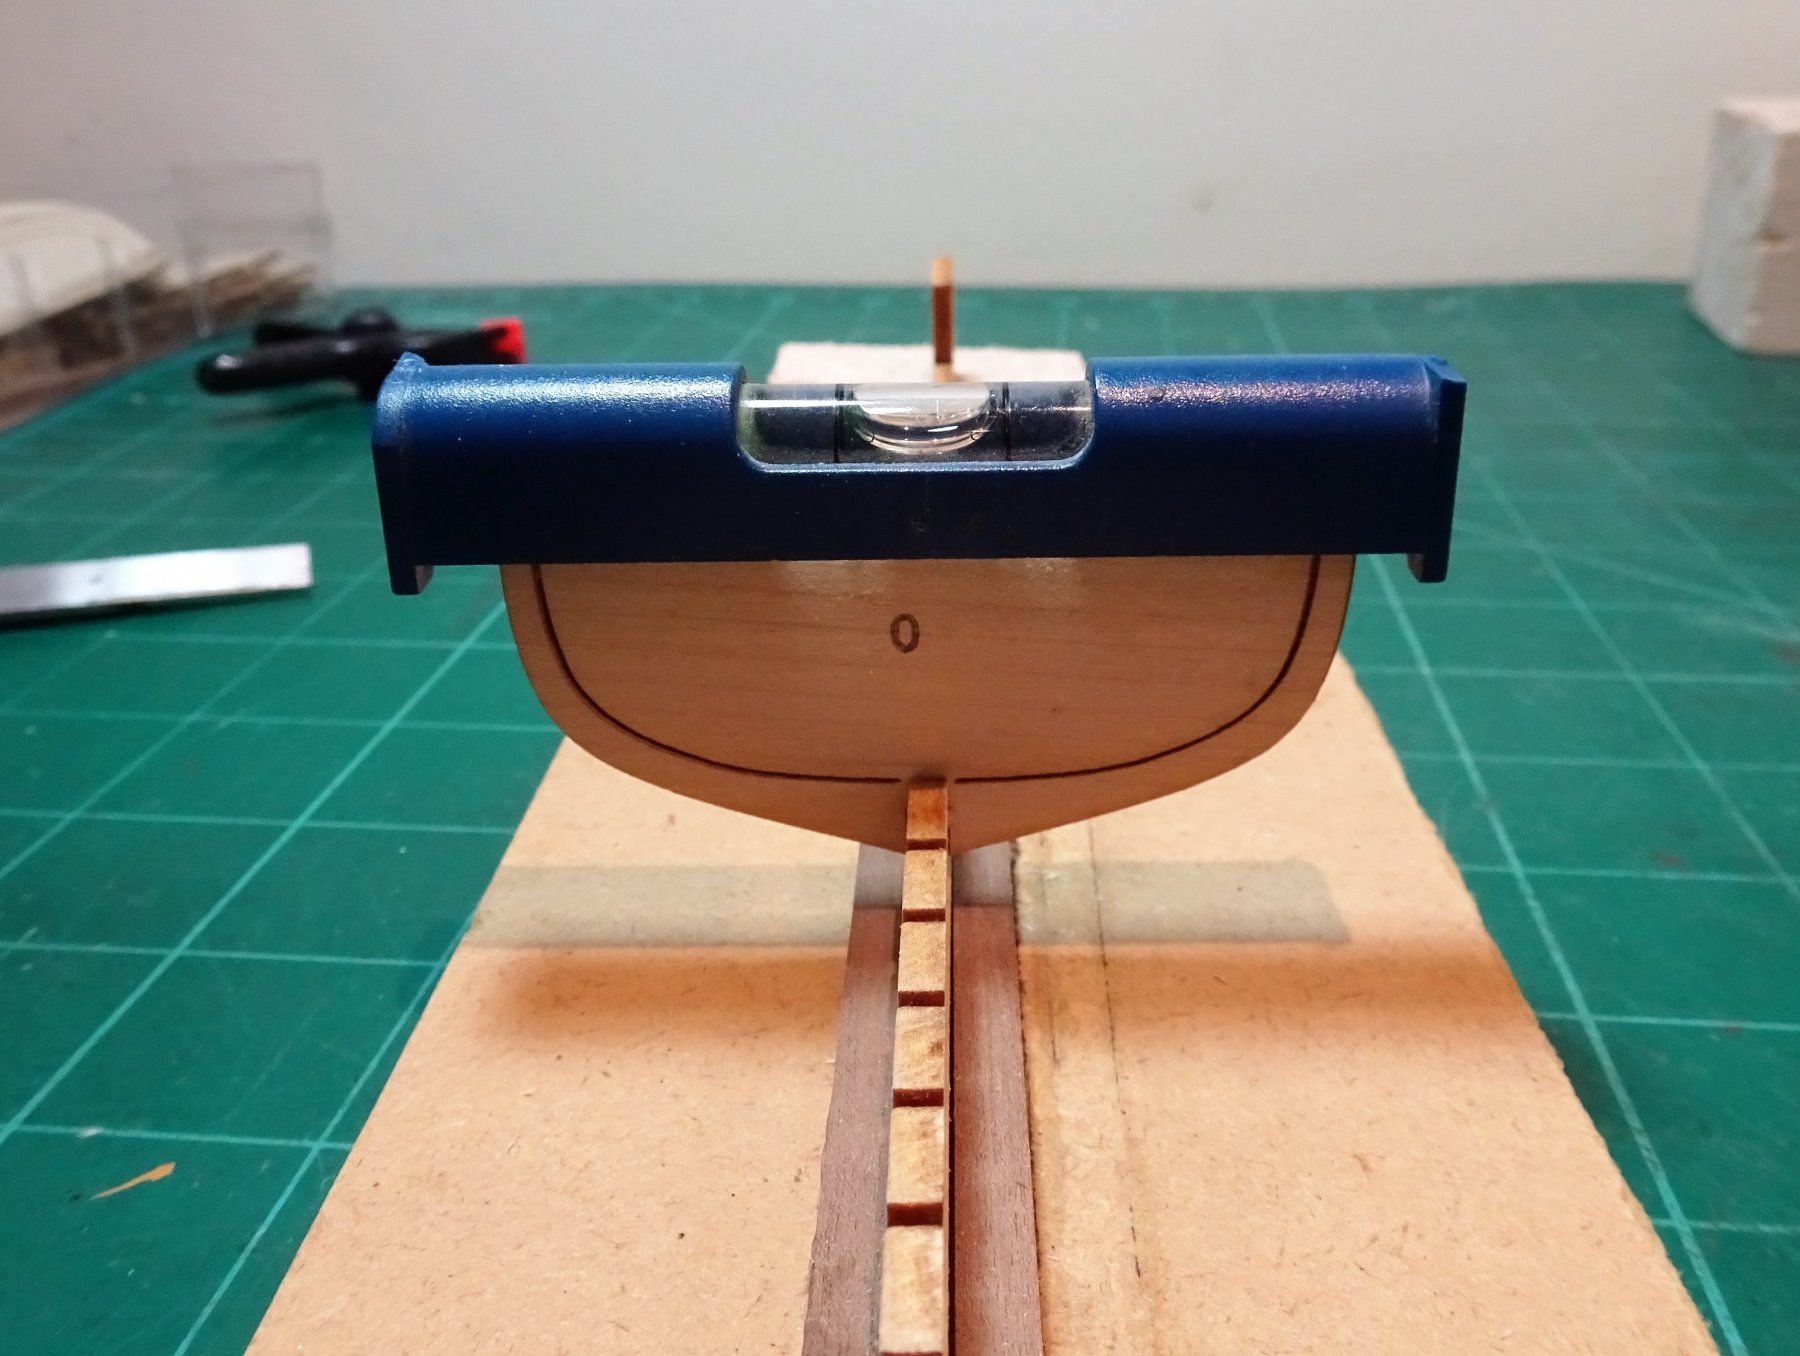
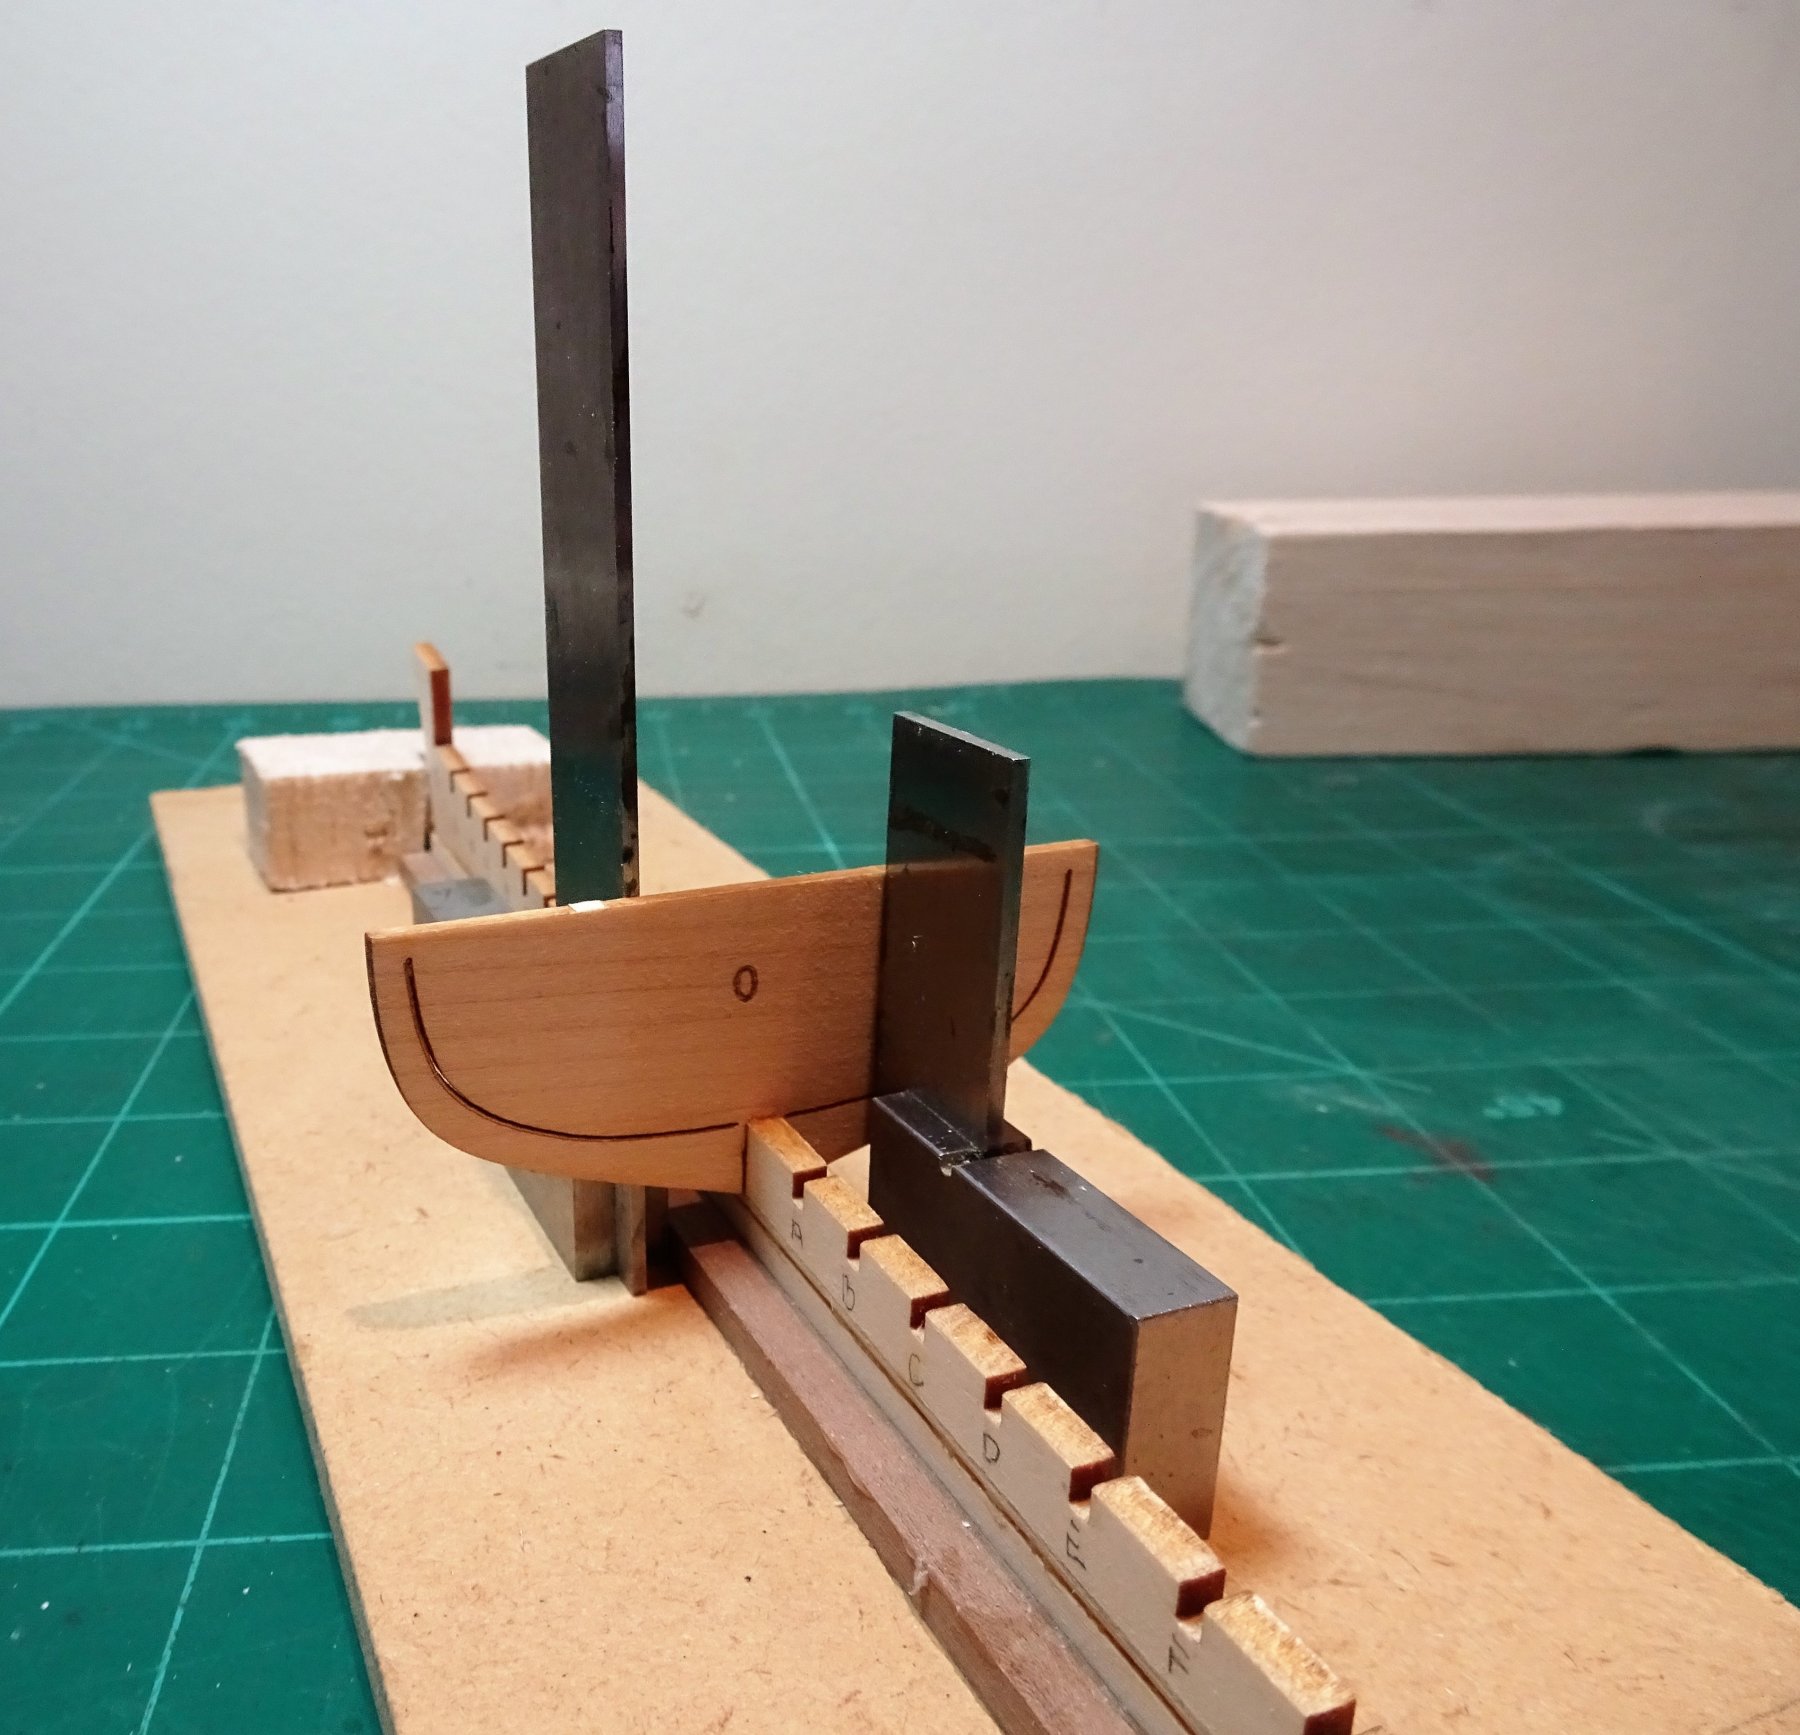
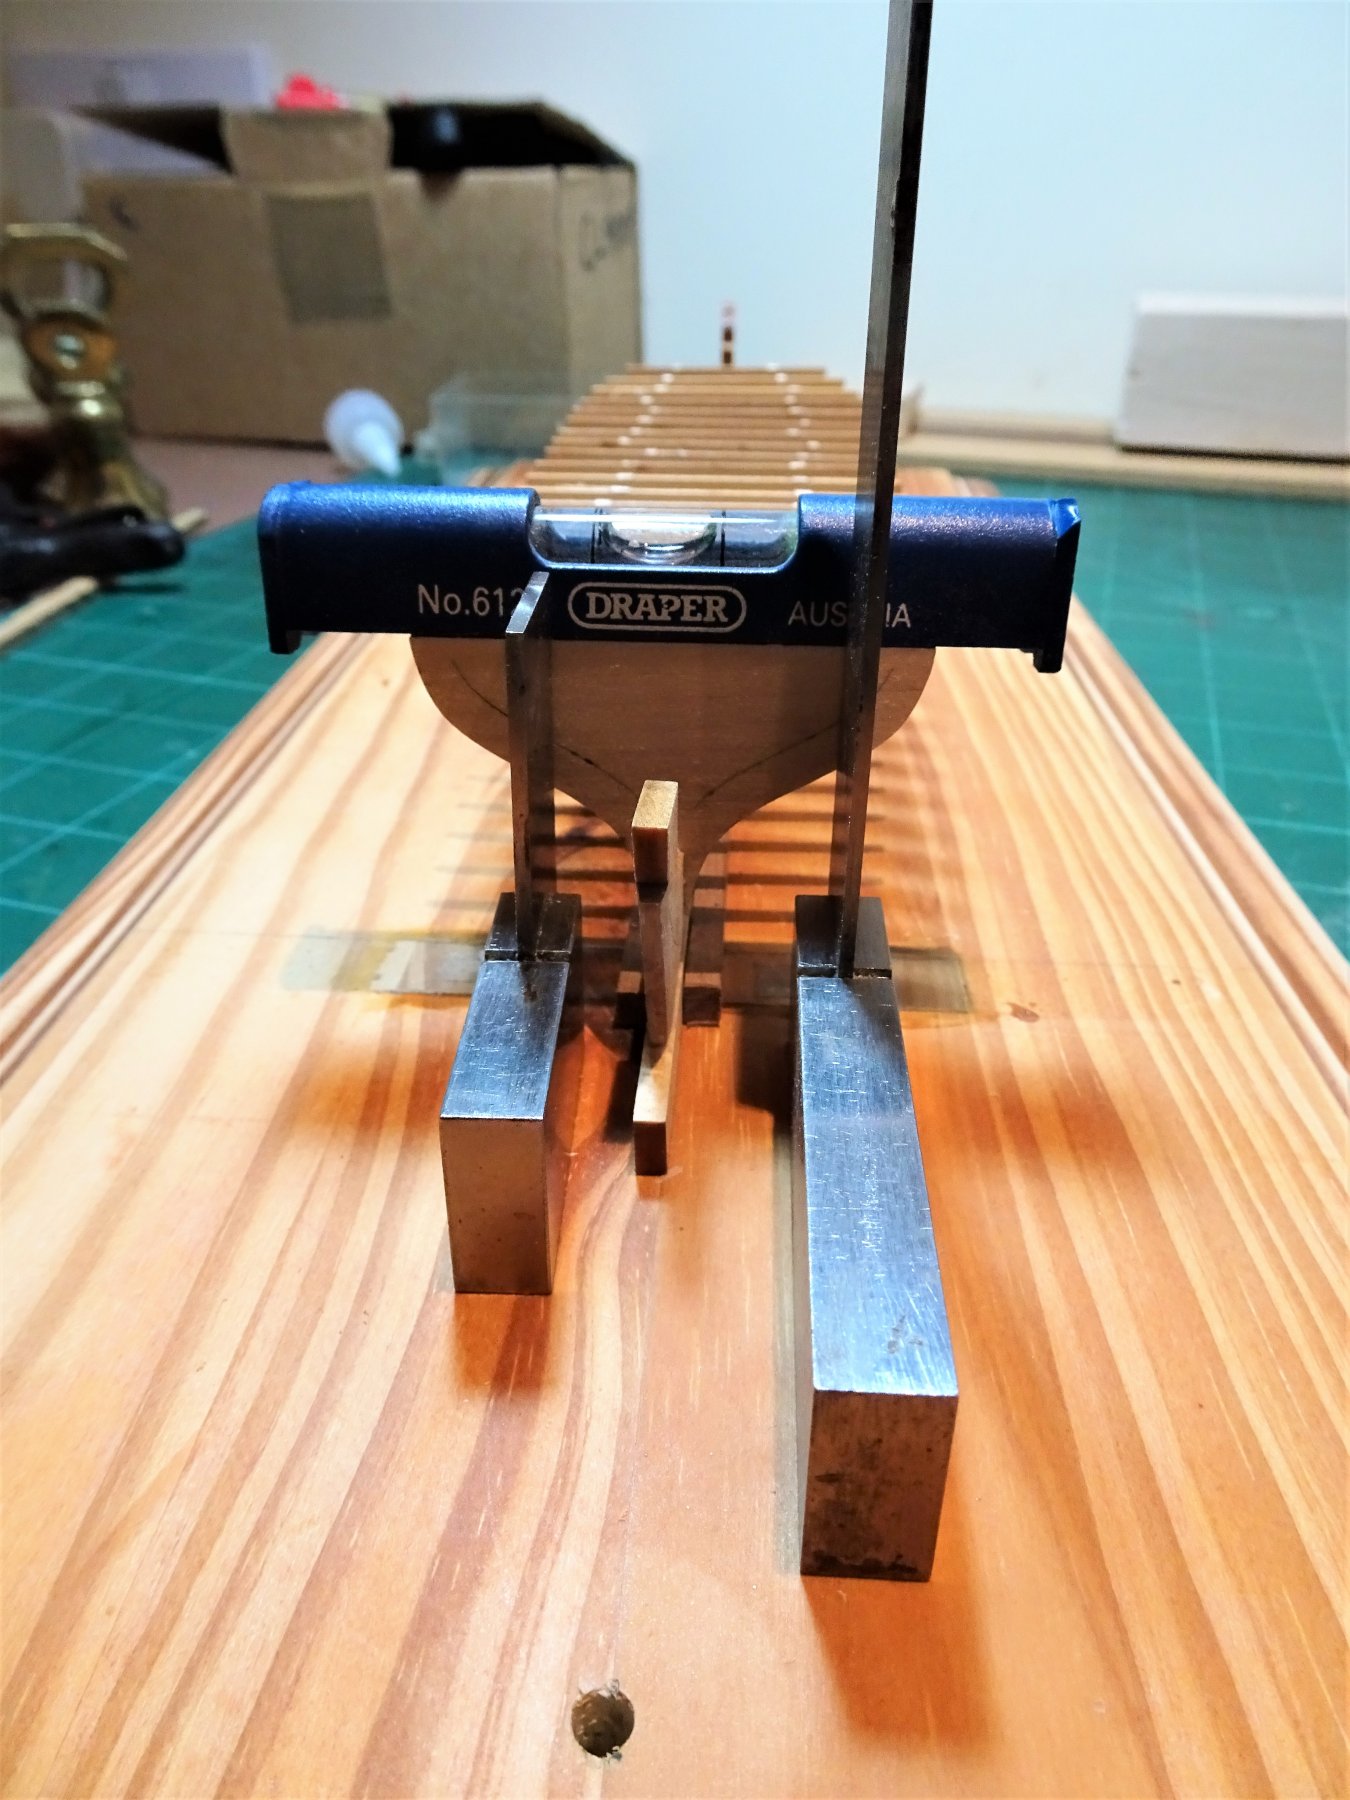
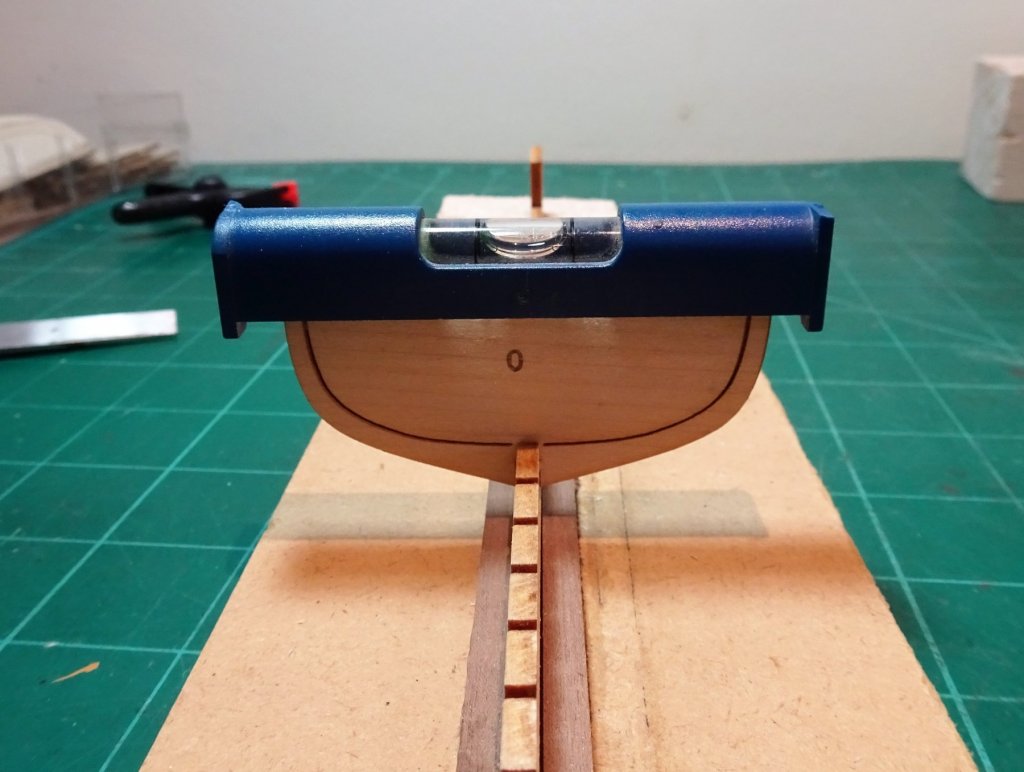
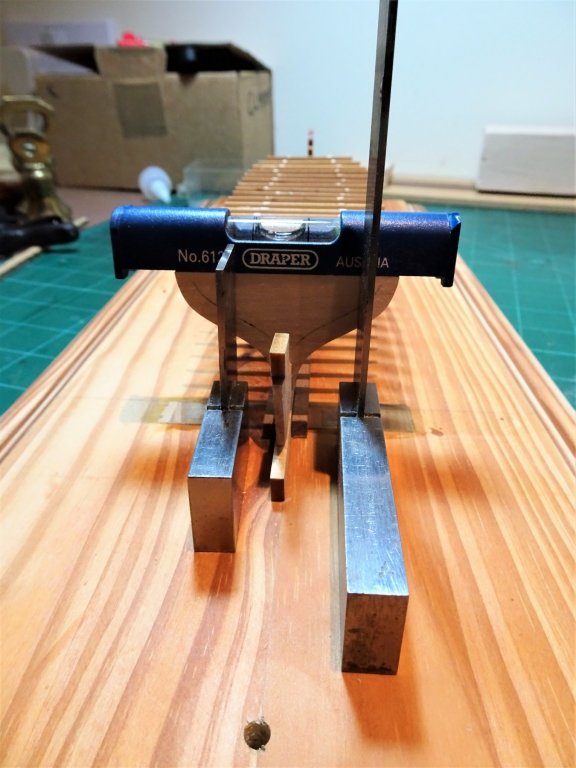
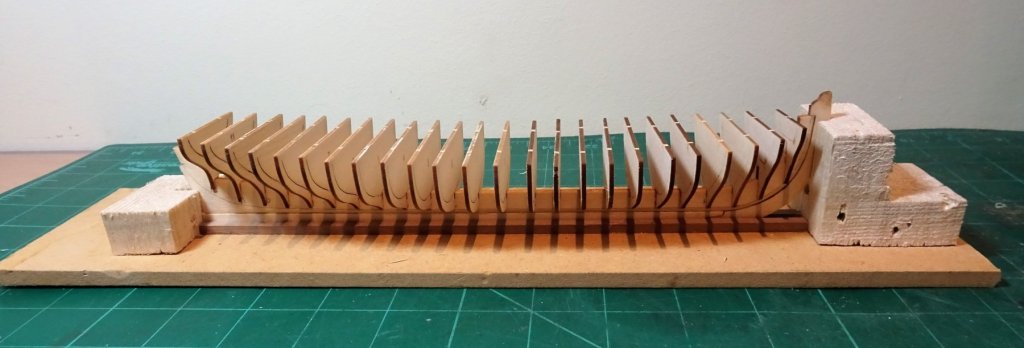
Gluing the Bulkheads My approach to gluing the bulkheads is to start with the centre one (0) and then work sequentially aft and forrad. 6804 To get the important first bulkhead set square I use a mini level and Engineer squares. 6805 In addition to vertical planes the square is also used to check that the Bulkheads are square to the keel. This will be the benchmark against which all the other bulkheads will be lined up. 6810 Each bulkhead in turn is checked with square and level until all are in place. 6812 I also set up a separate keel support base so I can turn and eye-sight along the frame tops. Well that's the easy bit, progress will inevitably slow as I get into the build proper. B.E.

- 156 replies
-
- 14
-
-
- pinnace
- model shipways
- (and 1 more)
-
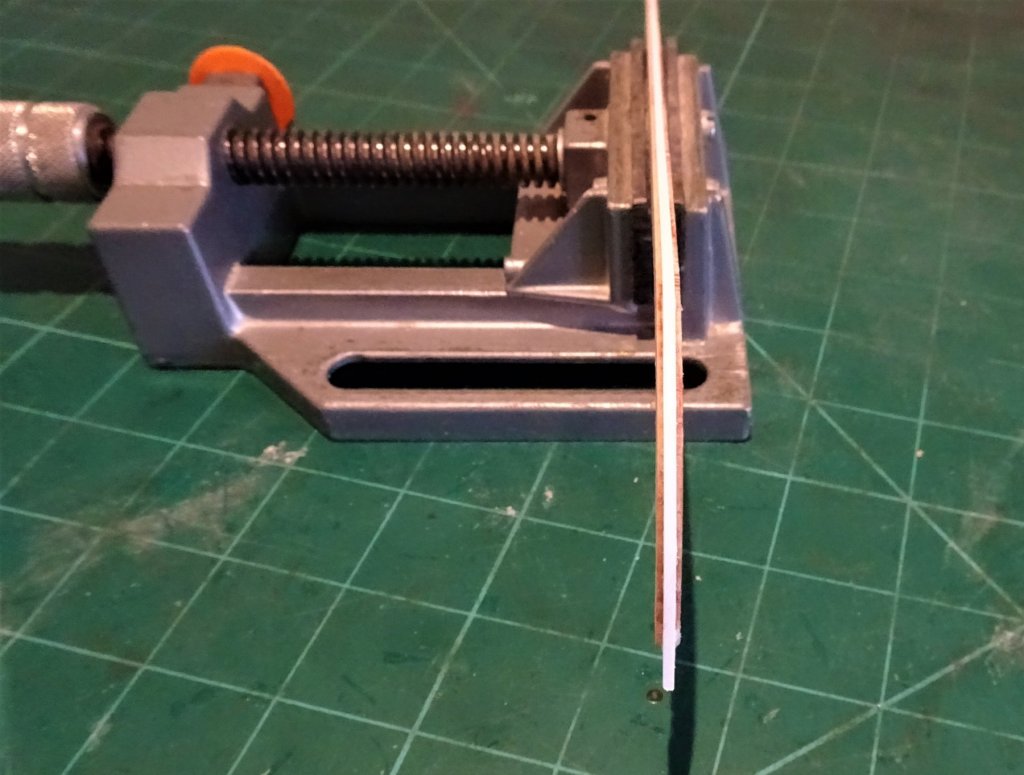
Thanks Guys The beginning Being an American kit all the measurements are in imperial measure whereas we in the old country are now used to the metric system particularly in relation to ship modelling, although perversely I still think in terms of feet and inches, pounds and ounces, Pints and Gallons etc; in relation to other stuff. The first job is to thin down the false keel from the bearding line and form the rabbet along the keel and up the stem to take the planking. The thickness of the false keel is 3mm and it needs to be reduced to around half to form the rabbet. 6767 I have used a strip of 1.50mm wide styrene strip temporarily pva'd along the keel to provide a guide to form the rabbet. 6777 Once the false keel has been fettled I firstly glue the stem piece using pva. 6789 I think it is easier to centre this short piece onto the false keel first, and then line the keel up to it. The scarf also helps hold the long keel piece in place. 6800 With the keel in place it is time to make a temporary working stand. Not very pretty but it will do the job. The Bulkheads are easily removed, and are a good fit, maybe just a tad tight once the glue is applied, so a very fine sanding of the notches to ease their passage will be done. 6797 6798 Dry fitting the Bulkheads, no issues with the bulkhead centres, so I will proceed to fettle the notches and start assembly. B.E.


- 156 replies
-
- 16
-
-
- pinnace
- model shipways
- (and 1 more)
-
Nice work on the headworks Doug 😊 It's always puzzled me why Amati left that strange void between the Main head rails, looks so much better with a little framing as your photo's show. B.E.
-
You're doing a great job on that vintage kit Andrew, and I think you will achieve your ambition to produce a model that is pleasing to your eye (and mine) Regards, B.E.
- 74 replies
-
- 1
-
-
- Marine Model Company
- Joe Lane
- (and 2 more)
-
Old Floquil paints?
Blue Ensign replied to MEDDO's topic in Painting, finishing and weathering products and techniques
Reminds me that I have a set of Floquil Marine Colors many years old. Such interesting names :- Orange Ochre. Tallow Coat. Pine Tar Oil. Weathered Manilla Stain. Verdigris. All in excellent condition apart from the Verdigris which has developed a thick skin over the paint. No wonder it was discontinued, given the dire warnings on the jars. B.E. -
You've made some great progress since I last looked in Anton, impressive stuff B.E.
- 322 replies
-
- 4
-
-
- sergal
- sovereign of the seas
- (and 5 more)
-
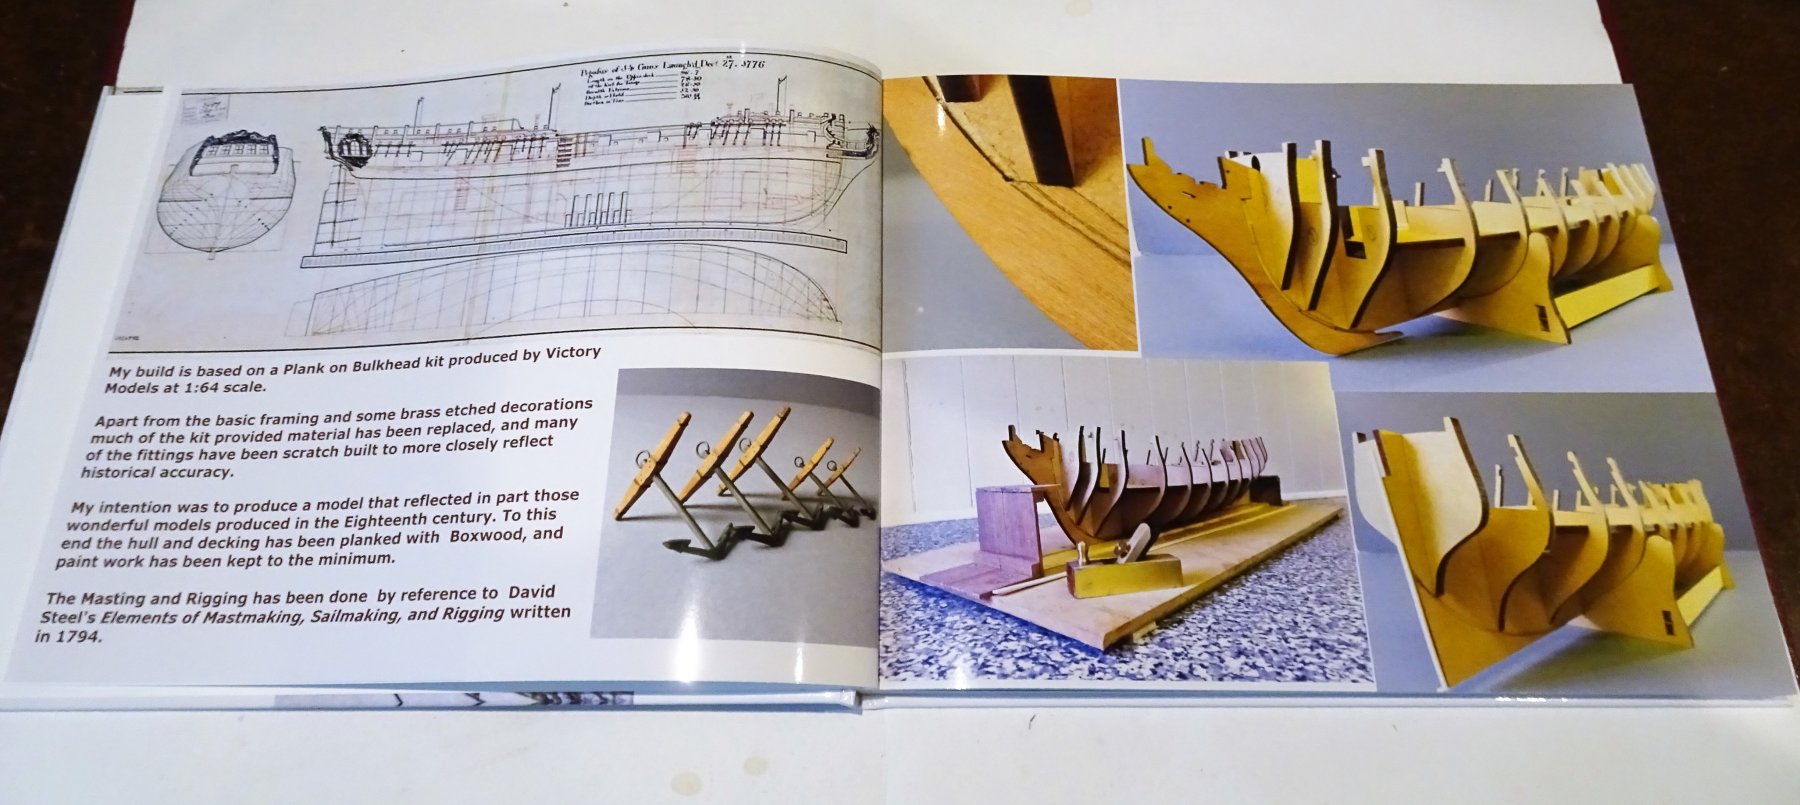
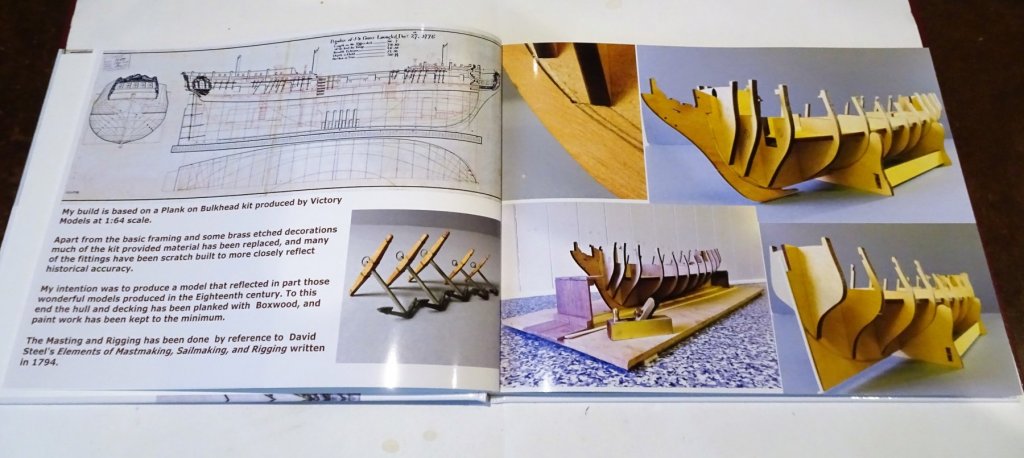
My Pegasus build was my last foray into the world of 1:64 scale Square Rigged ships. My future projects will consist of larger scale models of smaller vessels. Chuck's beautifully designed kits of the Pinnace and the Longboat fall perfectly into this category, and the Pinnace will be my new project. I used the Pinnace plans to produce the reduced scale scratch versions for my Pegasus build. It has been some six years since I last planked a hull and I'm feeling quite ring rusty, so I will have to do some serious revision of the art. Not quite decided as yet whether to go with the provided Limewood, or upgrade to Boxwood There are some excellent Pinnace builds on MSW as well as Chuck's own exemplary build, and I am grateful to the work of Mike Y and MikeB4 whose logs I will browse to assist my own effort. May be a while before I have anything to usefully show, but here's the 'mini' version as a place holder. Cheers, B.E.

- 156 replies
-
- 18
-
-
- pinnace
- model shipways
- (and 1 more)
-
Ray what are you doing, I presume you are getting some satisfaction, or why do it, but I find it hard to imagine what image you're seeing from the fruits of your labour. I have to tell you that this is not wooden ship modelling as would be recognised on even the most generous of assessments. If you have a genuine interest in the subject I think you need to start with the basics of planking a model, and there is a tutorial for beginners on MSW. here's the link. http://modelshipworldforum.com/resources/Framing_and_Planking/plankingprojectbeginners.pdf if you can grasp the principles of fairing a hull before planking, and tapering planks to better fit the hull, you will be on the road to making a half decent model, and hopefully gain far more satisfaction. Members are very generous with help on the forums, but they need to see that an effort is being made to understand how to construct a wooden kit model. I'm sorry if this sounds harsh, but you're going nowhere in the hobby with your current approach, and I suspect many members are at a loss to comment on your log. My advice would be to get a simple beginner kit to hone your skills on, using the tutorial above. B.E.
-
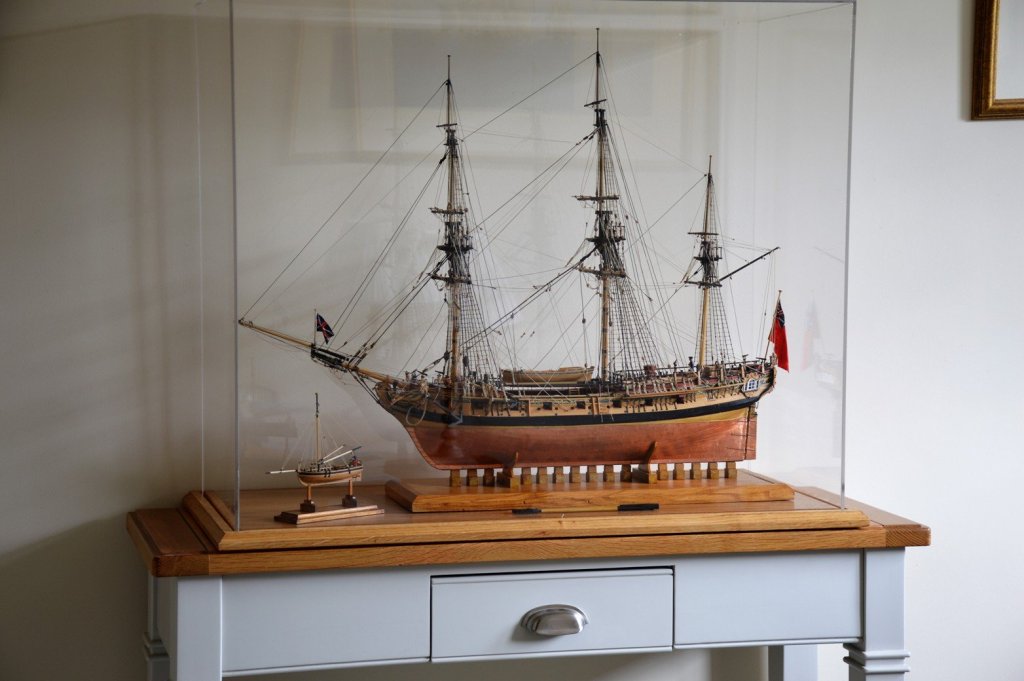
Great result Hennie, a fine model completed, and she looks so good displayed on your sideboard. Models look so much better to my eye when uncased, but present a major cleaning problem for these large square riggers. Well done B.E.
- 214 replies
-
- 2
-
-
- agamemnon
- caldercraft
- (and 1 more)
-
Well done Steve, I just love the Gallows display mode. I may find myself using that idea in the future. B.E.
- 165 replies
-
- 1
-
-
- finished
- model shipways
- (and 1 more)
-
A fine, fine, model Peter, love the look of the boats on the Davits. How lucky is your friend to be the recipient of such a handsome gift. I think she will as all models do look better out of a case, and she is of the style that could be kept clean with periodic dusting - easy access and limited rigging. Well done Peter B.E.
-
Hi Michael, your Masthead and shrouds look great, and I know where you're coming from being attracted to interesting little rigging exercises, I'm prone to it myself. I don't know if it's perspective from the photo but the blocks look a little oversize for the Catharpin rigging to my eye, and I see that you have used a triple block rather than a deadeye in your trial, both Anderson and Lees show deadeyes, unless I'm missing something. Lees has a good drawing of the English setup on page 43 of his Masting and Rigging book. It seems to me that the falls between the blocks could be rigged off model (set the appropriate distance apart) and the line made fast around itself. The Catharpin legs can then be secured to the shrouds and rigged thro' the deadeyes, maintaining and controlling the tension. There seems to be sufficient doubt about both fitting and style for anyone to really gainsay you whether you decide to fit or not, but it would be an interesting little feature on your Vasa. B.E.
-
Love those outdoor shots Don, a very fine model. I suppose the tarred rope binding around the mast base performs the function of a mast coat to prevent water ingress, a nice touch. B.E.
- 653 replies
-
- 4
-
-
- trabakul
- marisstella
- (and 1 more)
-
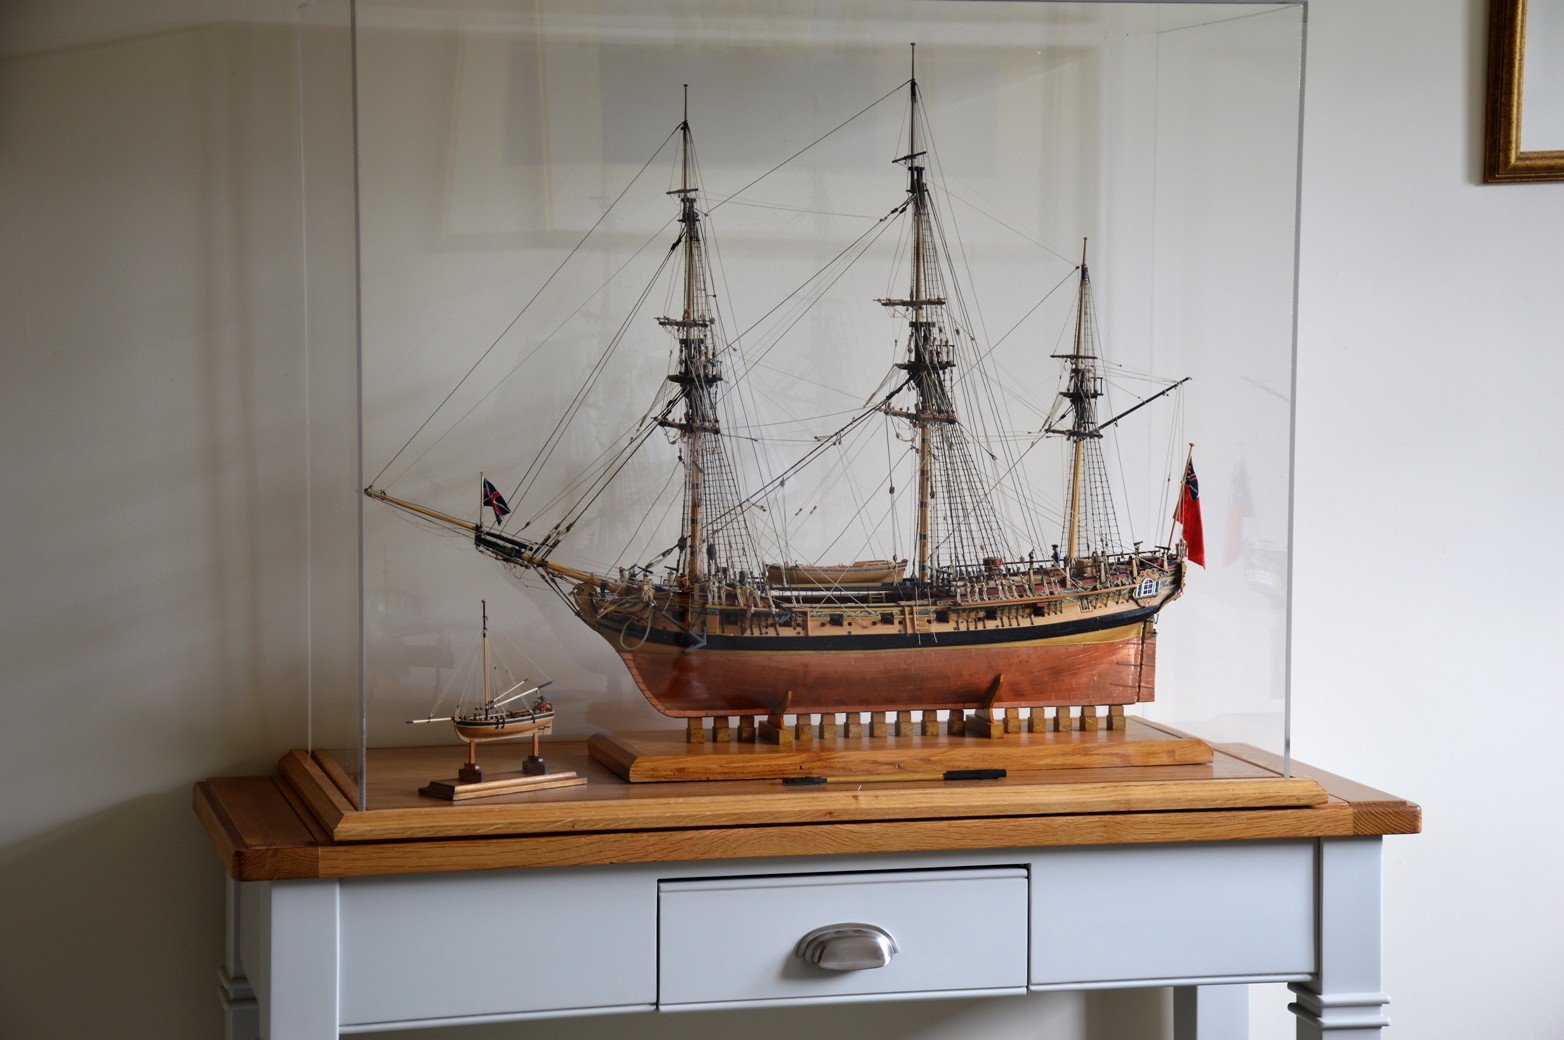
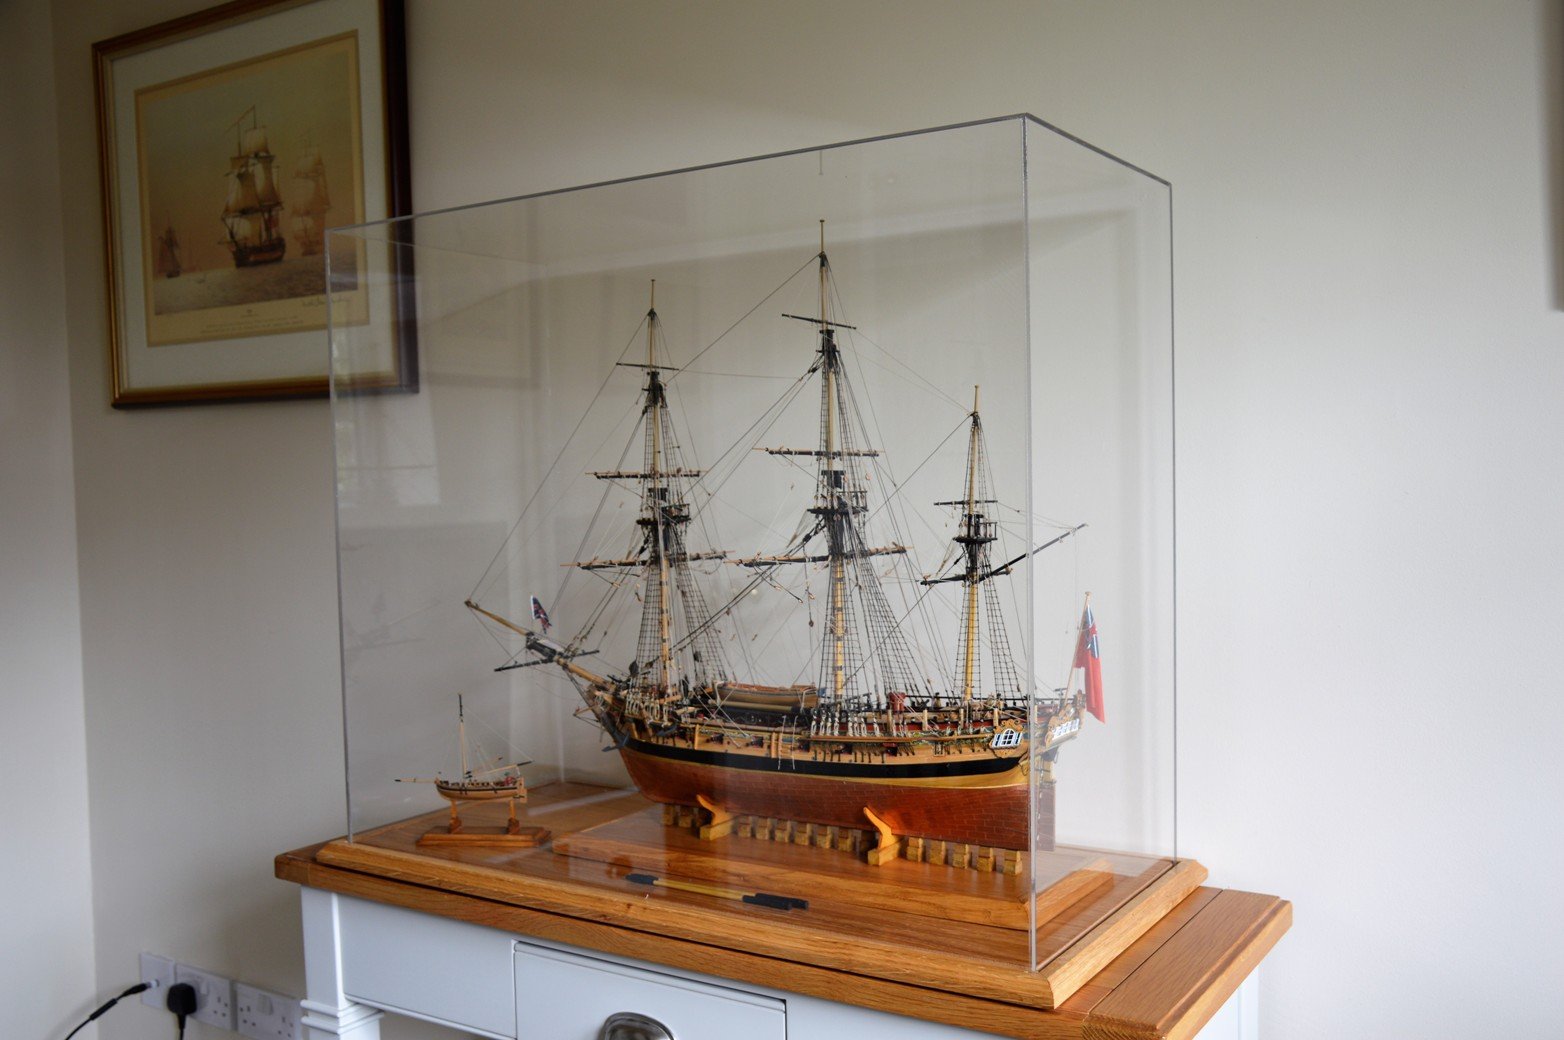
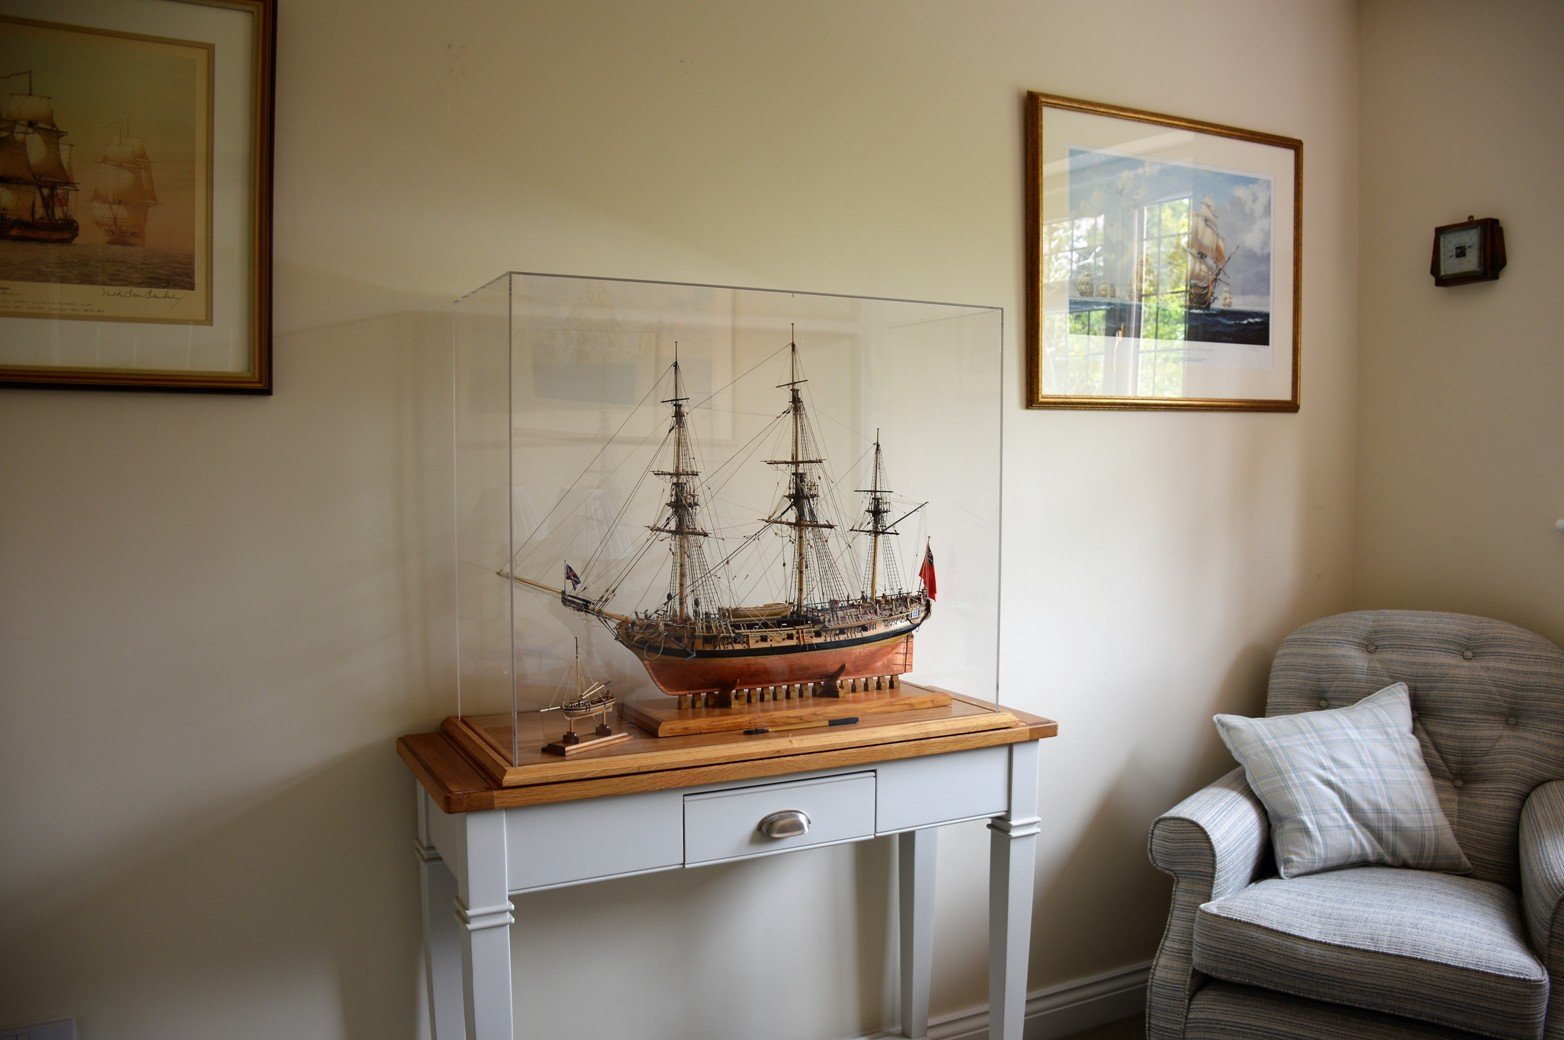
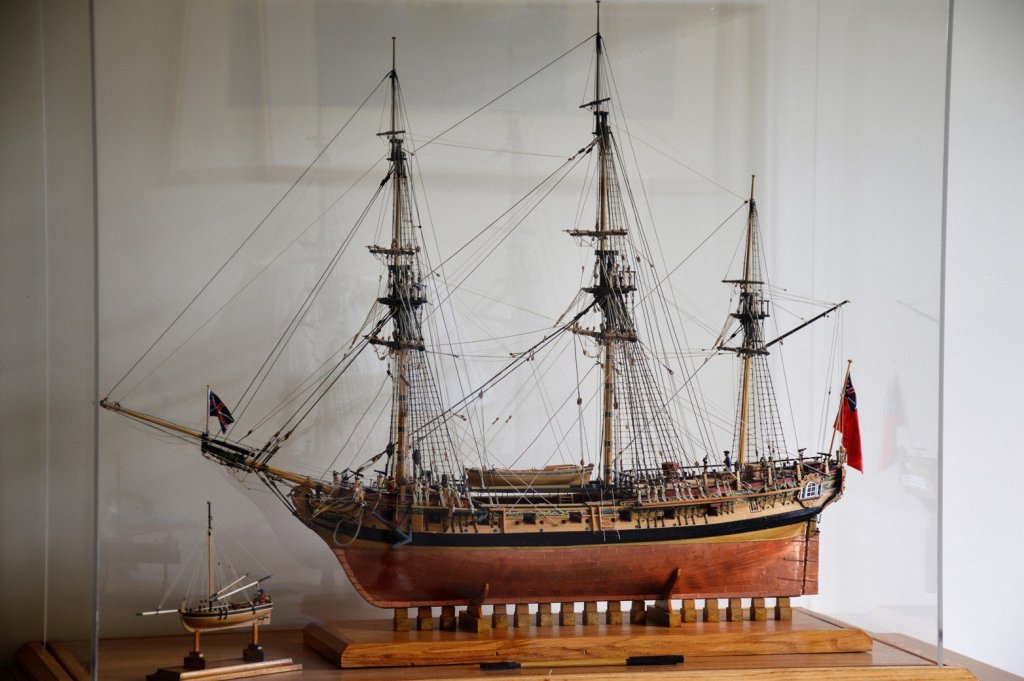
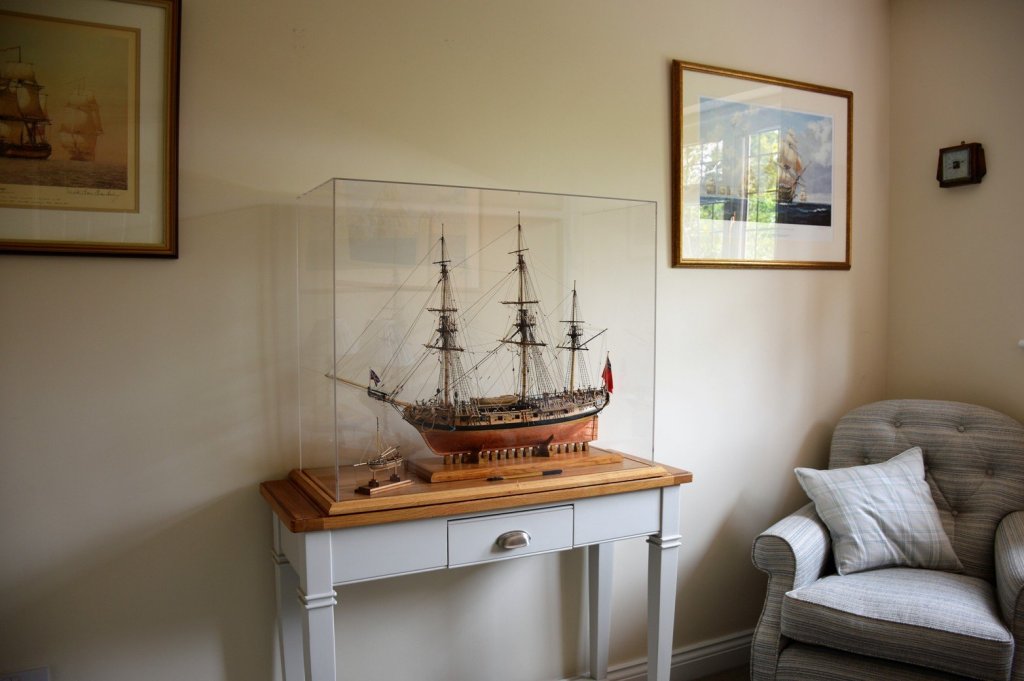
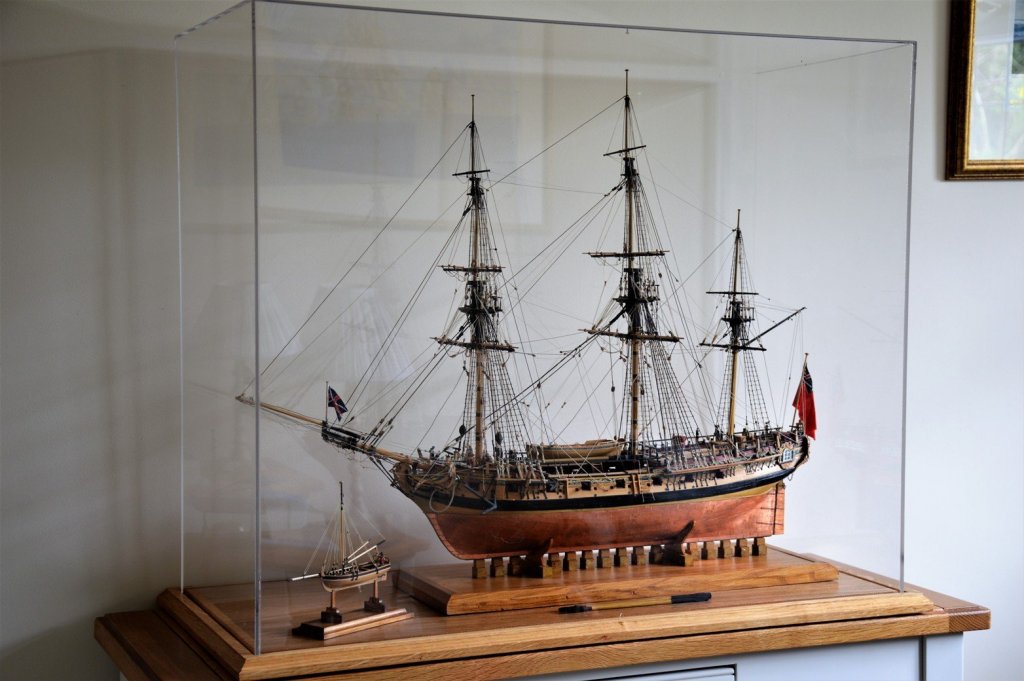
The casing of Pegasus took place yesterday, one of the most stressful operations since constructing the Headworks. Slipping the cover over Pegasus with only a few mm clearance each side of the Main Studding Booms ends and Jib boom was scary to say the least. Still all done now, and here she is in her designated place. Moving on now, to what not quite decided. B.E.

- 366 replies
-
- 45
-
-
- pegasus
- victory models
- (and 2 more)