Landlubber Mike
-
Posts
4,544 -
Joined
-
Last visited
Content Type
Profiles
Forums
Gallery
Events
Everything posted by Landlubber Mike
-
 I voted for the Boeier, with the Chebacco a close second. I’m not all that interested in cross sections, though the pictures you posted are beautiful - and it would look nice next to Swan class models a bunch of us are building. At 1/4 scale, how long is the Boeier? I’d be interested in a larger scale model if there was a lot of interesting detail that could be added. Also wanted to add my voice to those commending you for looking at novel subjects. These are all quite interesting and different.
 -
Don really great stuff there. Your planking looks fantastic! I too love the look of the beech. These kits seem very nicely done. Just out of curiosity, what do you think about the copper plates? How do they compare to the Amati ones? My MS Charles Morgan uses copper tape that you have to punch for the rivets. I think it’s easier to apply, but the Amati plates look amazing.
-
Thank you - I remember now seeing this (sorry, old age). Now I know who to send my models to for similar work - you did a fantastic job! The Pegasus kit has PE pieces for the frieze decorations (as well as the name board). I think I'm going to try the paint route with both using your technique, which I think I recall seeing something similar in the TFFM series. Thanks again! Happy new year to you!
-
Happy new year to you BE! I haven't been on much lately, but missed your Cheerful project. Great start already, and even better, you have extra toys to play with Hope you don't mind if I follow along, it's always a treat and a learning experience.
- 574 replies
-
- 2
-

-
- cheerful
- Syren Ship Model Company
- (and 1 more)
-
Just wanted to echo Geoff - the counter block is really tough to do, having done one myself for my Morgan. Really nice job.
-
Really beautiful work Jason. Do you mind me asking how you did the stern lettering and filigree design on the red areas? They came out absolutely superb.
-
Patrick, your work is incredible. Your work with Ebony is really impressive. Thank you for sharing with us this work of art and your techniques.
-
Hey Mark, happy new year to you. She's coming along really nicely, beautiful work! I think you always tell this to others -- you're the captain For me, when facing these kinds of decisions, I always try to think ahead and consider whether I will regret not adding an element or taking a particular approach. If there is any possibility of regret, I go ahead and do the item.
-
Looks really good BCD, very nice job.
-
I agree about zu Mondfeld as being a good overview book. But it’s odd that he listed the ship’s stern as being the Swedish privateer “Jupiter” from 1760. If he looked at Chapman’s works, I can see him saying it’s a privateer (where it’s listed in Architectura) and Swedish given Chapman’s background. And I can see the name Jupiter from the figurehead. But 1760? I doubt he made up a date, but who knows? It’s almost like he knew the ship -otherwise I would think it would be odd to pick that particular ship of all the other ships out there.
-
Thanks guys, really appreciate it. I'll go with gradual tapering. It seems to me a pronounced step like that would have less structural integrity than a tapering to the front part of the stem too. Mark, I'm pretty sure that this kit is not intended to be the French Renommee that's in the Ancre monographs. The ship is the same as one of the plates in A.F. Chapman's Architectura. It's listed in his section on "Privateers" and not in the section of "Several Kinds of Vessels used by Different Nations" - which interestingly, includes one Swedish pleasure boat. It also looks very much like a larger version of Chapman's Venus, which was of the Swedish Bellona class. What is interesting is that zu Mondfeld has a picture of that exact stern and labels it a Swedish privateer of 1760. Given that the Architectura was published in 1768, zu Mondfeld seems closest to what kind of ship that was. Unfortunately, I can't seem to determine how zu Mondfeld arrived to that.
-
Thanks Jason! If that's the view from the top, wouldn't the width of right most edge of the bottom diagram have to match up with the width of the farthest right point of the stem as it's shown in the right diagram? I think I need a "Reading Ship Plans 101" class
-
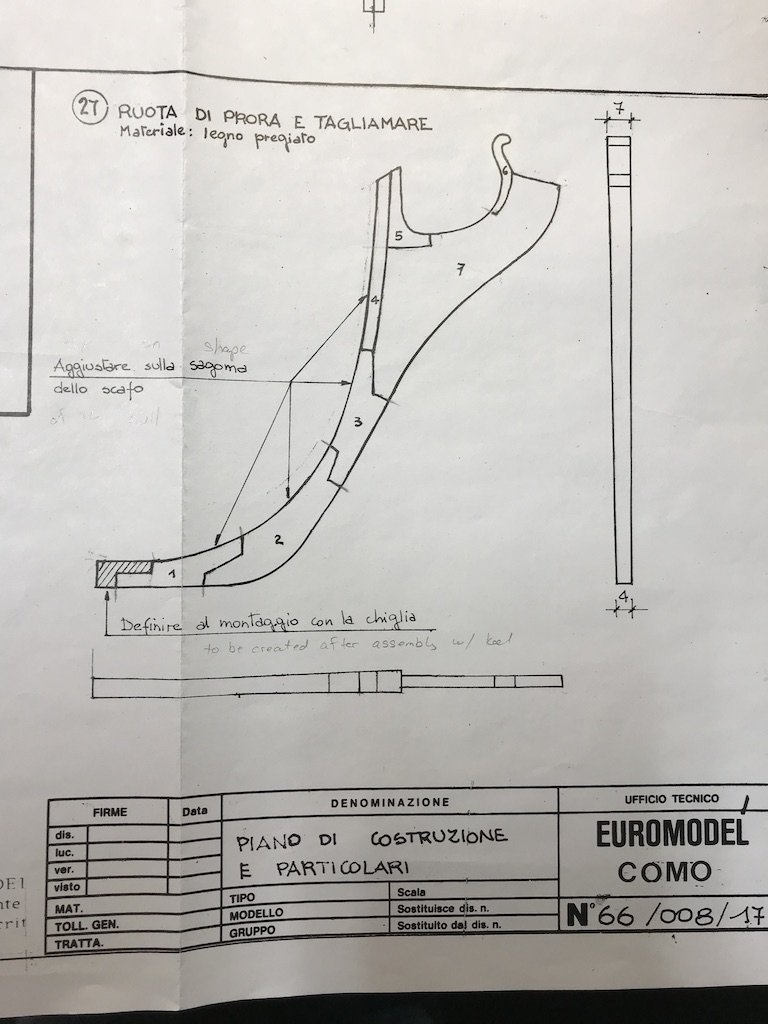
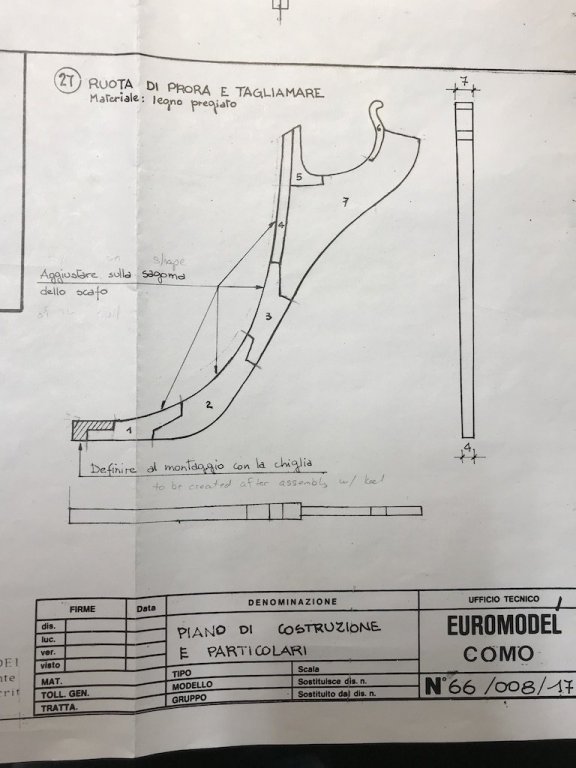
I'm a little confused by the plans for the stem: I get that the front-on view (the diagram to the far right) shows a slow taper transition from 7mm at the top to 4mm at the bottom. What I can't seem to figure out though is the diagram at the bottom. I'm assuming that this shows the taper from the underside of the stem (if you are looking up at the stem from underneath it). What I'm confused about is that step transition midway through does that seem correct? It's almost like the stem is full width until the stem post (Part 4), but then there is a dramatic change in diameter with the main piece (7) and figure piece (6). The stem needs some tapering to get the figurehead to sit properly, but not as much as suggested by the lower diagram. Unless I'm reading it wrong? Anyone have any ideas?
-
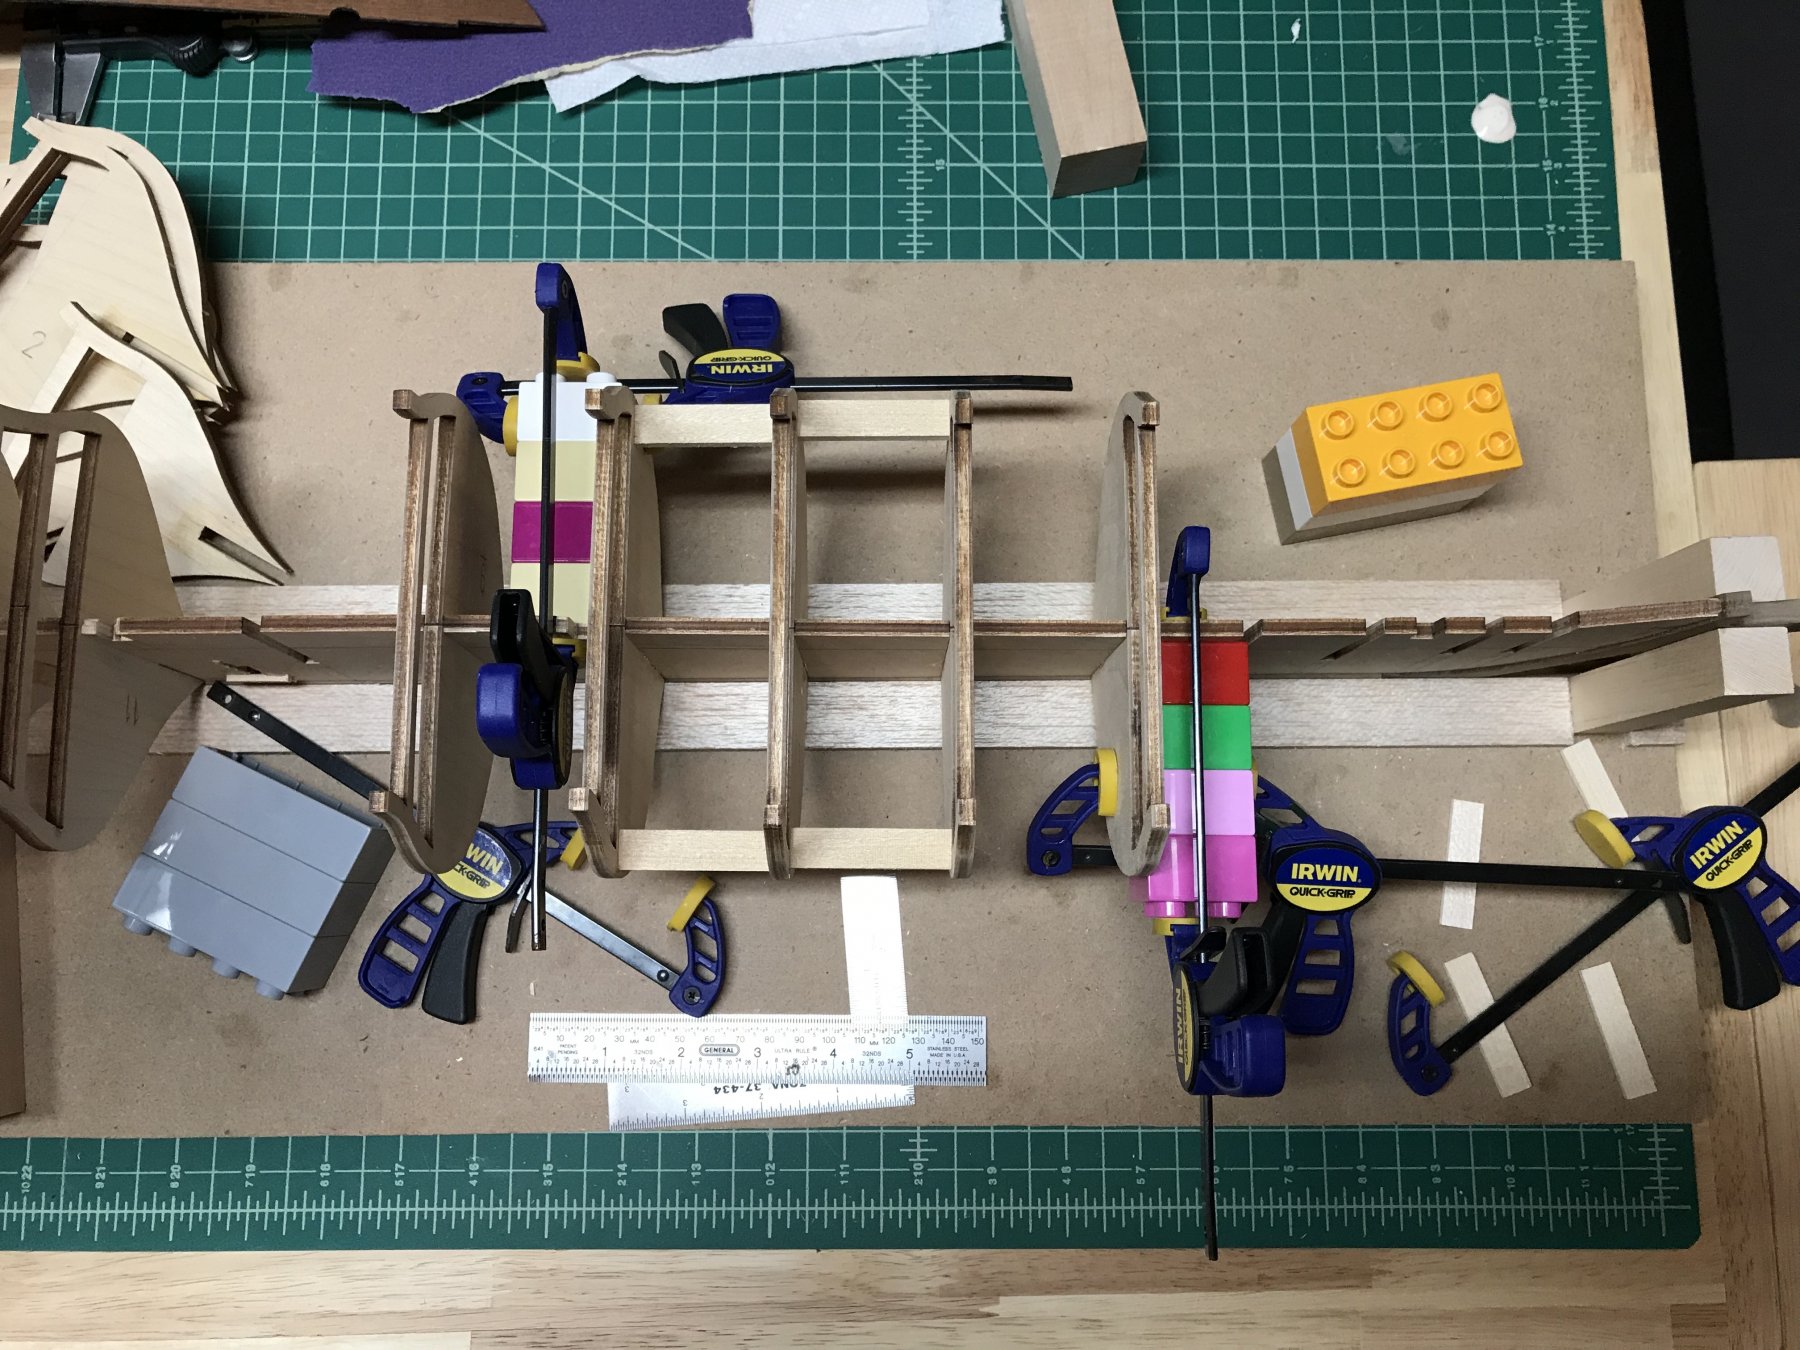
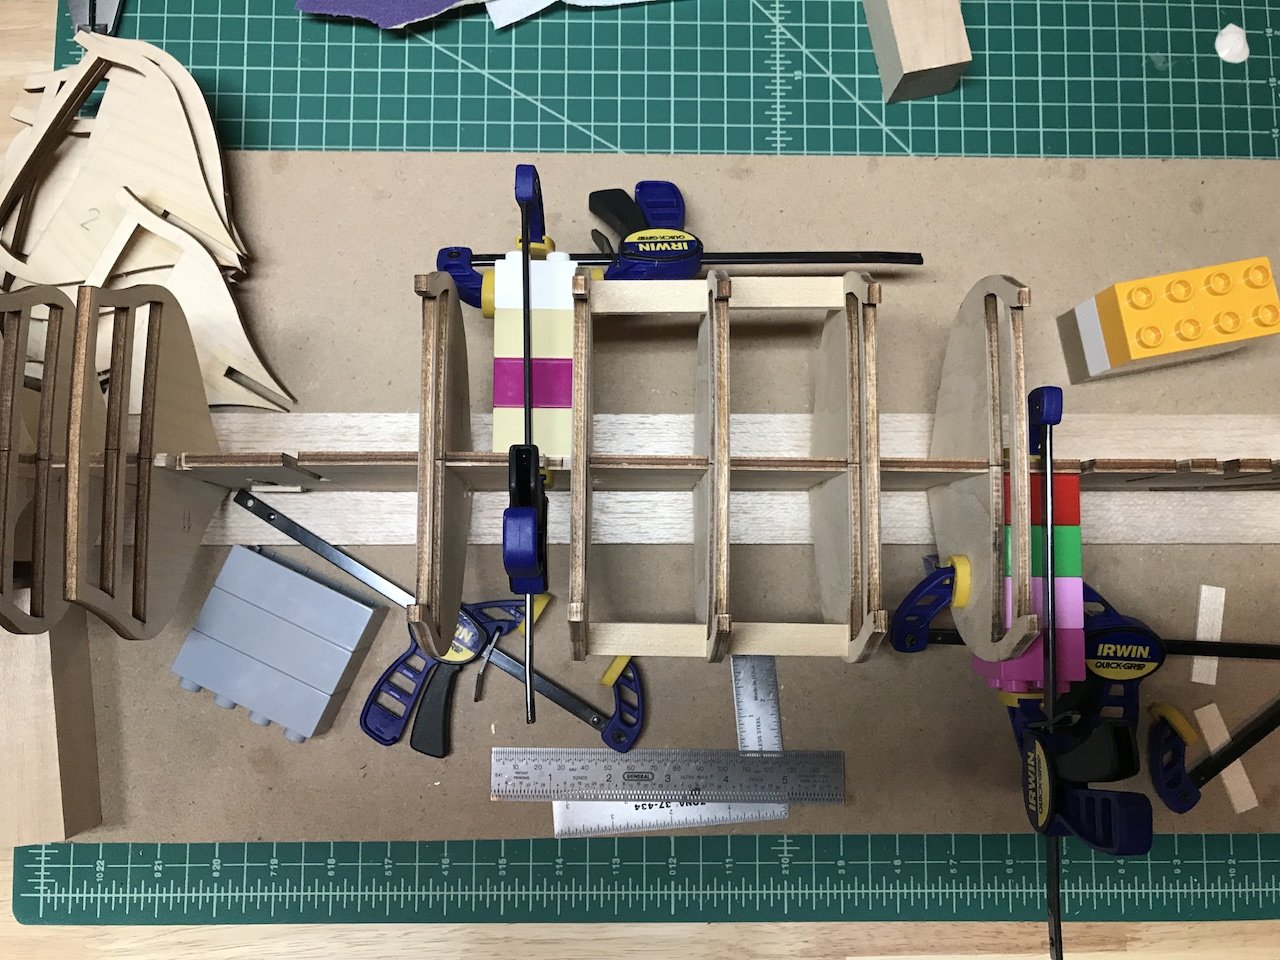
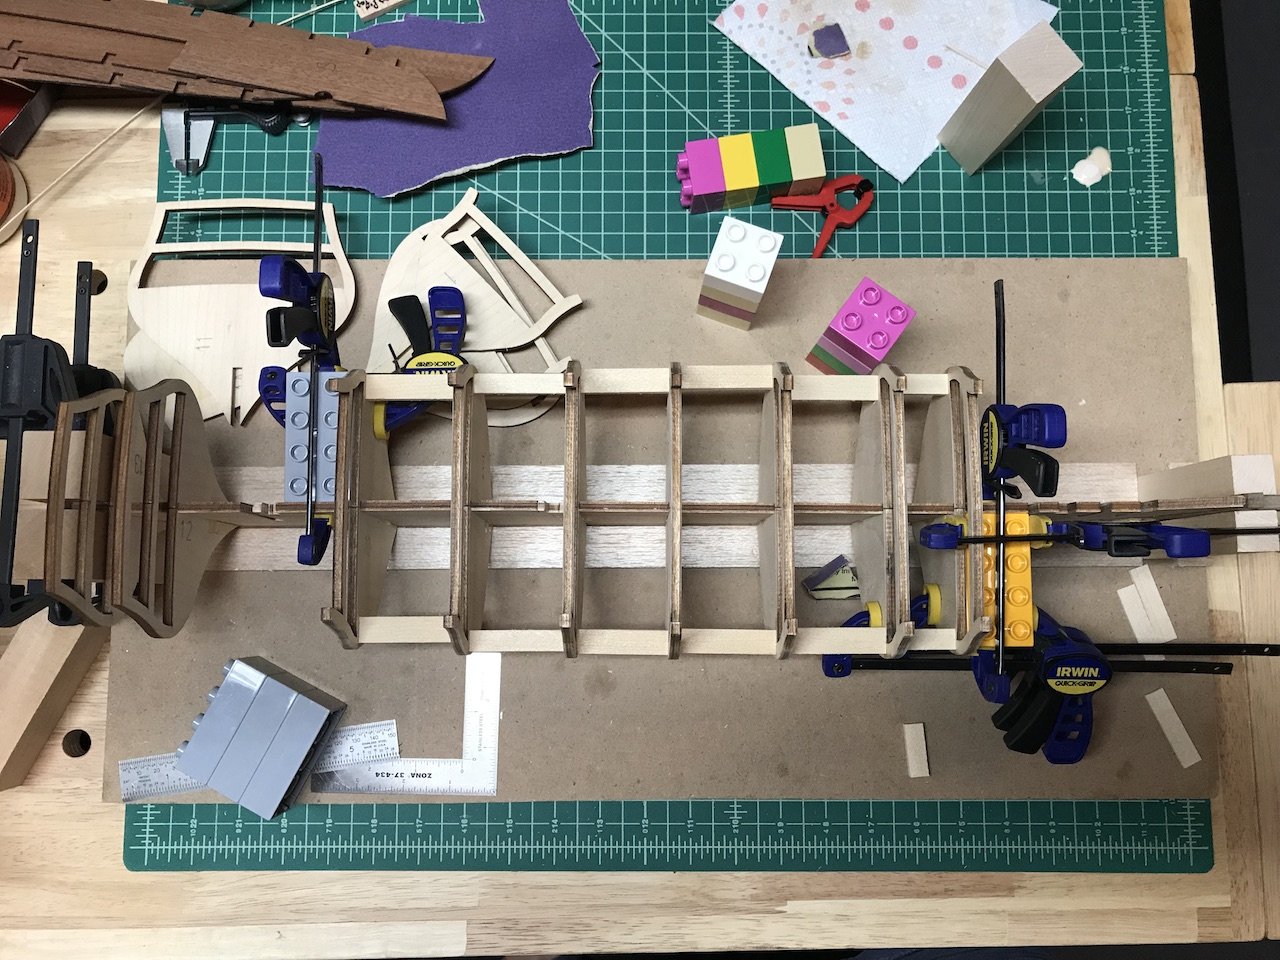
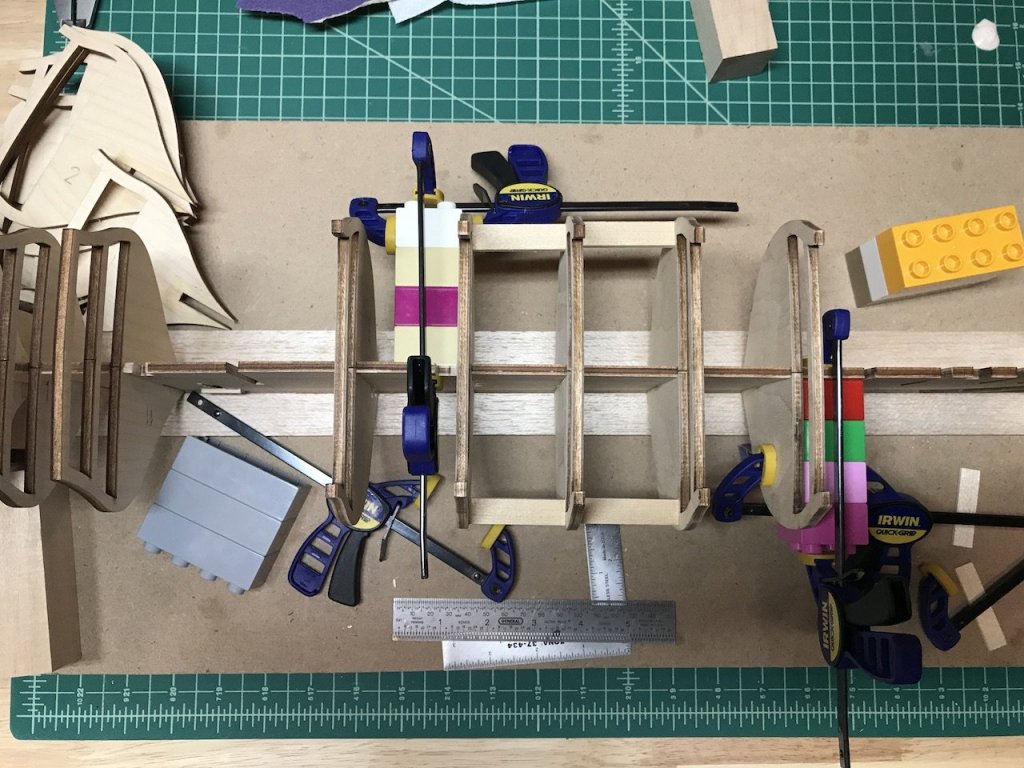
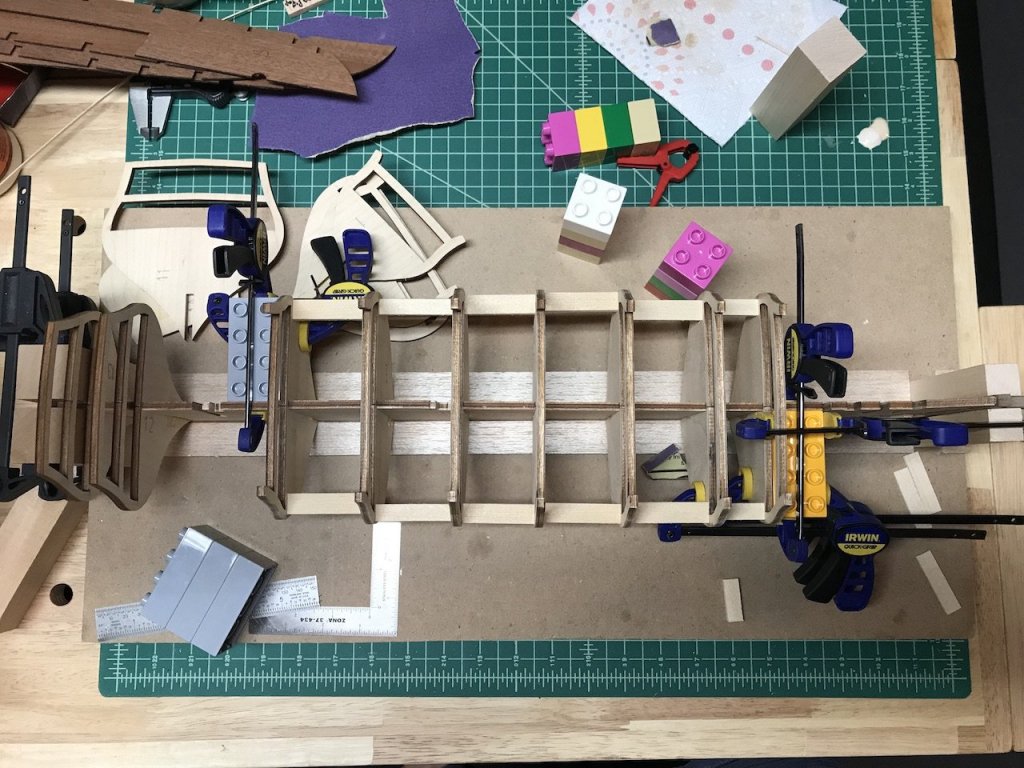
Some progress while home for the holidays with unseasonably cold temperatures - lots of hull work, and still lots more to do. For the first time, I built a basic frame board to help square things up. Usually I've just eyeballed things and built the hull in my lap, but I think using a frame should help. At this stage of the build, I also decided to do attached the keel and stem to the false keel. I know that some wait until after the first planking, but I like adding it now to help ensure that everything is square. I also install nuts in the false keel to take the machine screw which will run through the pedestals, so it's better to drill the hole one through the keel and false keel than have to do it later. For the stem, I used a scalpel to initially scribe the various part definitions as per the plans. Will likely need to deepen them, and possibly use stain or pencil, to further define the lines -- especially after I taper the front of the stem per the plans: After attaching the stem and keel, installing the pedestal nuts and running a few brass rods to help pin the keel to the false keel to the hull for stability, I started installing the bulkheads and am about halfway through -- using my kids' legos to keep everything square: As I mentioned in the first post, when I got the kit (secondhand), the false keel was really warped. The really nice folks at Euromodel sent me a new one for free which was much better. It still had a slight wave to it, but after adding the stem and false keel, and the bracing blocks as seen in the pictures above, everything is pretty straight and should only get straighter after the two decks are added. I should say that the fit between all the parts is very nice and snug and pretty much perfect. Nice, particularly after my experience with the MS Charles Morgan where I needed to do quite a bit of work to get everything to fit correctly and adjust for issues in the shapes of the bulkheads.


-
Hi MSW friends, hope everyone had a wonderful holiday and wish you all the best in 2018. Work and kids have been keeping me really busy the past few months. I made a little progress on the Morgan, but am at a point where I need to figure out what technique to use to accomplish certain next steps of the build. I'm at a similar point in my Pegasus build. So, I decided to turn back to the Renommee. A few months ago I thought about selling the kit so that I could be a little closer to scratch building a few ships on my wish list. But, with the heavy bashing of my Pegasus and Morgan, I thought that it would be nice to have a challenging kit that I could build right from the box. Plus, this ship, which I'm further convinced is a Swedish frigate, is really a gorgeous subject and the Euromodel kit is really fantastic in so many ways (plans, fittings, wood, Euromodel customer service, and PiratePete's great guides). So, I'm back working on her. I'm still thinking about the overall color scheme, but I think I'm going to use as much of the kit wood as possible. I'll probably switch the redheart for the bulwarks and gun carriages, and something lighter like maple or maybe tanganyika for the deck. Depending on how the hull comes out, I may leave it in natural wood or paint on white stuff. Either way, I think I'm going to try and use stains and finishes to achieve a more weathered look if possible. Thanks for looking in!
-
Sorry to have missed this earlier Don, just saw your gallery pictures. Fantastic work, thanks very much for sharing!
-
Really nice work Jeff. Amati makes great kits (at least in the Victory line which is what my Pegasus also is). The lighting will look fantastic!
-
Congratulations on the upcoming arrival of the little one, that’s really great news! I have three which cut into my time and energy to do hobbies like this one, but wouldn’t have it any other way.
-
Beautiful Mark. Great work on an impressive subject. What's next?
- 652 replies
-
- 3
-
-
- royal william
- euromodel
- (and 1 more)
-
Ken, this is a really gorgeous model of one of the most impressive subjects out there. What a fantastic job you did, particularly in less than a year! Your model is a walking advertisement for this wonderful kit - Euromodel should pay you to use your pictures to advertise it I noticed you wrote this in your first post of your log: "I started building model boats from kits about six years ago not as a serious builder with a passion for accuracy or perfection but as a pleasant way to pass my time and that is how I will approach this build." Your RW seems pretty accurate and perfect to me So, I think I speak for everyone when I ask what is next on the list?
-
Daniel, were the lines run from the masts to the hull outside of the bottle (i.e., with long slack lines) so that all you had to do was tighten and tie off? I'm thinking about that approach for my SIB build which is using an upright bottle.
-
The headwork came out really nicely Martin. Great job! Can you do mine? For the hawse holes, does the 3/8" include the hawse hole lining or is it limited to the opening of the holes (i.e., the space between the lining)? I would probably go with the NMM plans, but I can check my Pegasus plans and the TFFM series if that's helpful. Also, I got some of the Admiralty Ship Models materials (plans on mylar sheets, etc.), and can check those as well.
- 467 replies
-
- 1
-
-
- fly
- victory models
- (and 1 more)