Landlubber Mike
-
Posts
4,544 -
Joined
-
Last visited
Content Type
Profiles
Forums
Gallery
Events
Everything posted by Landlubber Mike
-
 I'd say take your time Chris. I'd rather have one ship that represented my best work, than 4-5 ships that I put together in the same period of time that weren't my personal best. Plus, if your wife is like mine, she'll appreciate your house not looking like a museum. My wife's friend was over this weekend and saw my Renommee on the kitchen island. First thing she said was that she was really impressed I was tackling such a difficult project. Second thing after I left the room was to ask my wife if she was going to be ok with my putting these models all over the house. My wife assured her that I was so slow in building that she wasn't too worried.
 -
Looking really good John. Lots of interesting techniques that I’ll have to borrow.
-
Really nice work Elijah. Love how your stained hull came out! Amazing! Can I ask what stain and preconditioner you ended up going with?
- 228 replies
-
- 3
-

-
- gunboat
- model shipways
- (and 1 more)
-
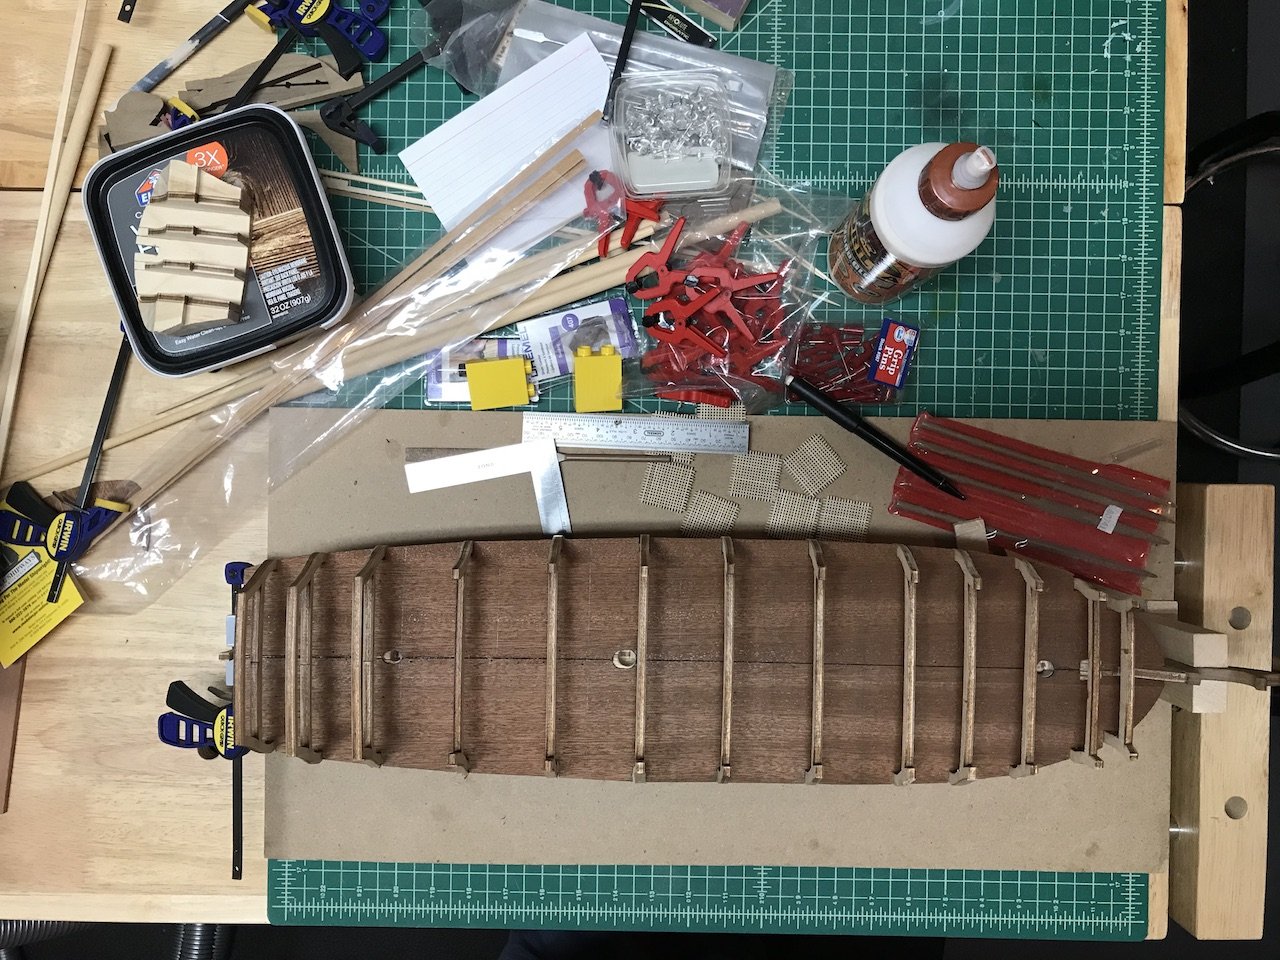
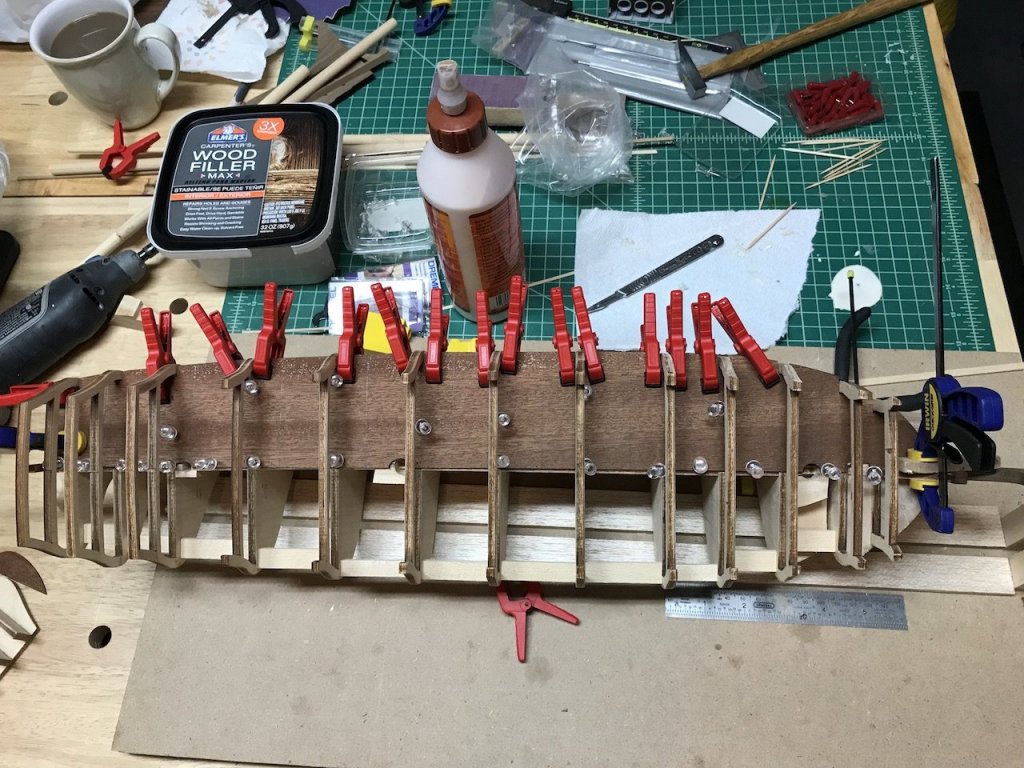
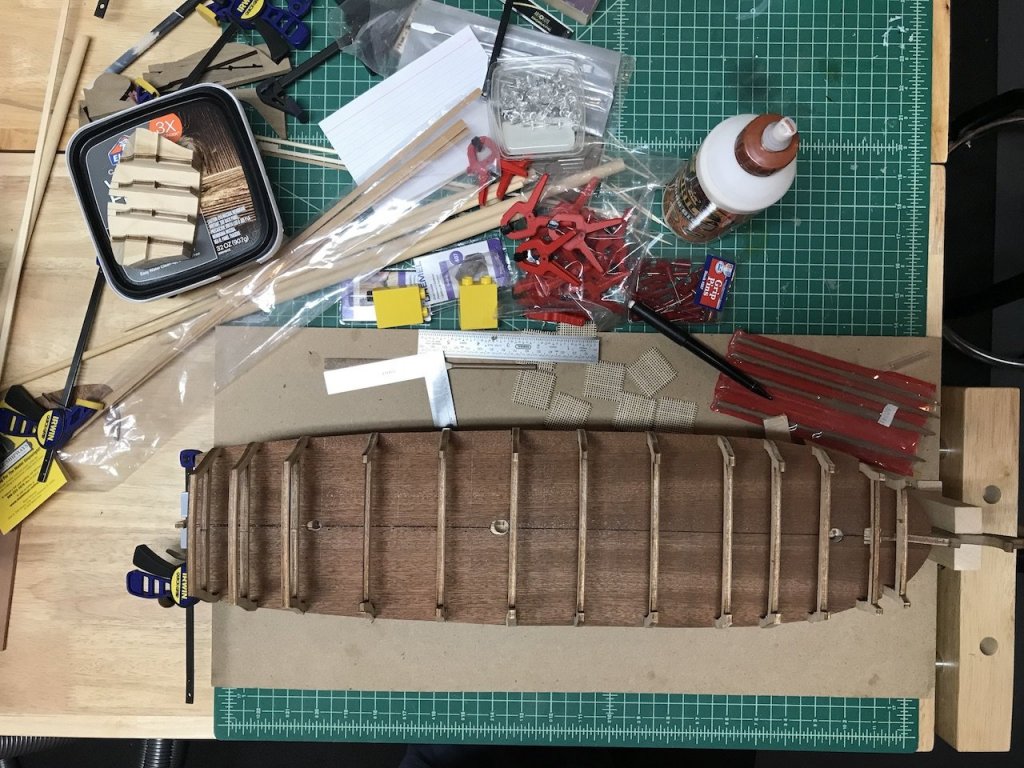
After a family vacation and being busy with work the past few weeks, I haven't had as much time on the build. I did make some progress, including gluing down the gun deck templates and making a little more headway on the hull fairing. As a break, I also glued up the grating strips to begin making the hatches and other grating items. Yes, a messy shipyard! At this stage I've been working on fairing the bulkheads and filler blocks. This stage takes a long longer than one would think, but I've learned that it's better to take time now, rather than have to later do a lot of filling and sanding. I had a slight wave in my false keel, which was largely straightened after attaching the stem and keel. Unfortunately, the top of the false keel lists slightly by about 1-2mm to the port side between bulkheads 8 and 11. I'm a bit annoyed because I spent a lot of time dry fitting, using square blocks, spacers, etc. to make sure that the bulkheads were square and perpendicular, but it looks like I couldn't fully get the keel fully straightened at that section. This resulted in the tops of bulkheads 8-11 listing slightly over to port, which in turn required a bit of opening up the gun deck template slots and the port template being slightly askew at the stern (still scratching my head on that one). These are all small deviations which I am fixing by adding extra material on the starboard bulkheads, and will sand a bit off the port bulkheads. In the end, I'm expecting these end up being non issues, especially after two layers of hull planking, etc. I keep thinking back to my Pegasus build, where Amati used MDF that was perfectly flat and everything fit like a glove.
-
To me, holly looks a little too light. But, I think it really depends on the overall aesthetic you’re trying to achieve. It certainly works if you’re using it with woods of bright color and no grain (or if you’re using paint). If using darker colors, or woods with more grain, etc., it might not work as well.
-
Exceptional work as always Bob. Congratulations on a beautiful model! Looking forward to following your next one!
- 682 replies
-
- 2
-
-
- halifax
- lumberyard
- (and 1 more)
-
A lathe for masts and spars
Landlubber Mike replied to Don Quixote's topic in Modeling tools and Workshop Equipment
I used the Proxxon DB250 for the masts and spars on my Badger. It was a really great tool, and made constructing them very easy. It had an opening to be able to work with longer masts, and really was an easy tool to use. I just used sand paper as the wood was turning to create taper in the masts, and it worked quickly, easily, and accurately. I ended up selling mine because I upgraded to the Sherline thinking it would be more versatile to turn metal as well as wood. In a way I wish I kept the Proxxon given how easy it was to use. I haven't used it yet, but it's good to hear from Roger that there is a hollow spindle so you don't necessarily need to buy a longer bed. -
Wow, I don't know how I missed this log before. Very nicely done Patrick!
- 756 replies
-
- 2
-
-
- galleon
- golden hind
- (and 2 more)
-
Quite the motley crew. They will certainly bring the ship to life!
- 692 replies
-
- 3
-
-
- eagle of algier
- chebec
- (and 2 more)
-
This looks like a really nice kit, and you're doing a great job so far. I agree that the details are fantastic!
-
I had the same issue with one of my hulls - thankfully I was able to find a machine screw in a much longer length so I think I'm ok. Otherwise, the threaded rod should work too, or even a rod without threads I would imagine. For pedestals, I bought a bunch from Model Expo a while back. They are brass and come in different heights which help when dealing with hulls where one end of the keel is lower than the other side. Haven't used Amati. Given your location, have you looked at Cornwall Model Boats? They sell lots of fittings across a number of manufacturers.
-
I agree with SpyGlass - the nuts are mounted really high up the keel. You have to factor in the pedestal height, as well as the height of the baseboard or the base of your display case.
-
GMO and Mobbsie, so sorry to have missed your posts on this log. I was so focused on my Renommee that I neglected to look here. Thank you for sharing your techniques! Mobbsie (and GMO), no worries at all about asking permission to post pictures on my log - the more the merrier! I would love to see the results of your work. Aldo, thank you very much for the kind words. The Morgan is a nice subject - long history, you can see it at Mystic Seaport in Connecticut (it was recently refurbished - not sure if that is the right term), and it's something other than the multi-cannon subjects typically seen. Lots of cool and interesting details that go along with these whalers too, like the tryworks. It's been a nice learning experience building this ship because like most MS kits, this one requires you to add framing pieces, whereas the European manufacturers tend to use things like gunport strips and the like to make things easier for the builder. It's also been nice working on this subject because I'm going to get to "paint with wood" - though, we will see how well that turns out.
-
Wow, this is sure to be another masterpiece. Hope you don't mind me following along. Loved your Dragon, and it's clear your Tiger is going to be another beauty.
-
Aldo! Thanks for looking in my friend. It's a really beautiful subject, and Euromodel makes a nice kit. Plenty of complexity and optionality from Euromodel to help me learn new skills. It, along with the other two models I'm working on should get me to the point where I can start trying scratch builds. I see you mothballed your Pegasus, are you going to take it up again? I'm at the point where I am going to start scratch building some of the decorative elements of the ship. I wanted a little more experience before doing so, and started the Charles Morgan. Then I needed a break from the Morgan so started the Renommee. I ran into stages of burnout with the Badger (some lasting six months) that I found bouncing between builds helps keep my interest going. Nils, thanks very much and thank you for looking in. It's a beautiful subject, and Euromodel makes a very nice kit that allows you to add as many details as you would like, so it's been fun to work on. I was originally thinking of selling it last year to move to scratch building, but I've already gained valuable experience with this kit that I'm glad I'm building it.
-
Nils, I just spent the last hour going through your log and some of your completed logs. Can't believe I missed this one! What a beautiful project! I have to agree with everyone that your use of figures really brings your models to life. I'm also so impressed by how you have managed to find external detail pieces like the decorative brass railings and added them to the model so seamlessly. That decorative brass rail in particular worked very nicely. Thanks for posting such a detailed log. I learned a lot of tips and techniques going through it. For example, that hollow drill bit worked out very well. Also, your work with cast resin for the ornamentation looks like a very good technique that us fellow modelers should learn.
- 692 replies
-
- 7
-
-
- eagle of algier
- chebec
- (and 2 more)
-
Just read through your log Zappto, very nice work on a beautiful subject! The colors and details you used, along with your craftsmanship, are making this a real showpiece for Mamoli.
-
Nils, so sorry I missed the conclusion of this build. Wow! Really amazing work on this and the other models in your personal museum. Absolutely incredible detail and precision. Your work on such complex curves for models like this, the Pamir and Gorch Fock and really impressive. I also look to your Pegasus log often when working on mine. By the way, your wife is a saint for helping and allowing for such large models to be displayed. When I finished my first model (the Badger), my wife was concerned that I'd fill the house with models. I told her I work so slowly that she won't have to worry about that ever happening. Congratulations again my friend. I just signed up for your Chebec log which is going to be another stunner
- 2,625 replies
-
- 4
-
-
- kaiser wilhelm der grosse
- passenger steamer
- (and 1 more)
-
Aldo!!! I'm so happy to see you back here my friend. It's been quite some time, and I was wondering how you were doing. You've made some really nice progress on your Triton build - it's coming along fantastic! It's really cool to watch you move from kits to scratch building, in particular, your work with the plans and CAD. The CAD stuff is a brave new world for me, so I'm taking notes while watching you. Stay good my fellow Badger Brother. Glad to see you are back
-
Really impressive work Jason. Top notch, masterful joinery, painting, etc. Incredible! On the rudder coat, I saw that Micromark now carries “leather paper” - I think it’s a kind of textured paper that simulates leather. I’ve never used it so can’t vouch for it, but just throw that out there if you are looking for potential materials.
-
Very nicely done BE. The stern to me is one of those make or break parts of the model, and it looks like you executed it flawlessly.
- 574 replies
-
- 4
-
-
- cheerful
- Syren Ship Model Company
- (and 1 more)