


David Lester
-
Posts
660 -
Joined
Content Type
Profiles
Forums
Gallery
Events
Posts posted by David Lester
-
-
I had to hold myself back from jumping in with both feet on the Constitution which is a big build. I built one "learning kit" which was the Model Shipways Armed Virginia Sloop, and found it was enough to give me the confidence to tackle the Constitution. I believe the CWM is a pretty big build too, so your idea of getting some experience under your belt first is probably a good one. The Kate Cory should be a good choice to give you the type of experience you need to take on the CWM.
David
-
Thank you everyone for your comments and "likes." They're very much appreciated.
I'm now getting my workshop re-organized and ready to go for the next one.
Thanks again,
David
-
-
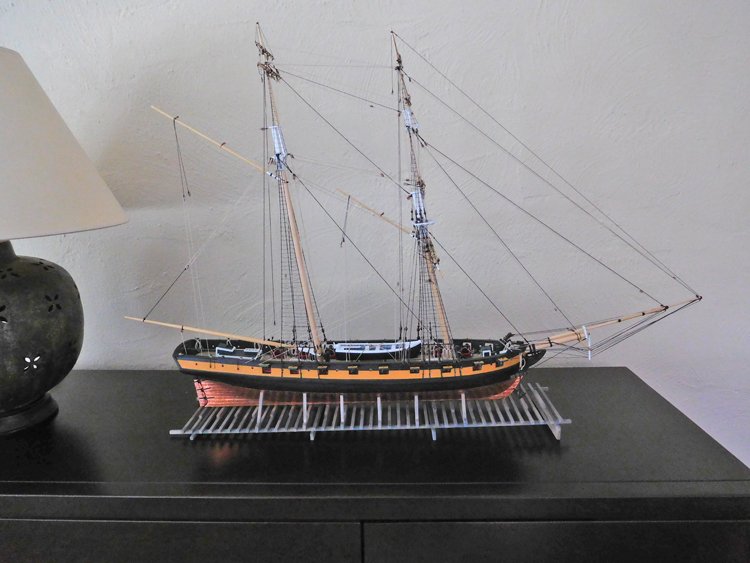
Well, I'm calling this model finished today. The last remaining items were rope coils and paint touch-up.
I'm never really very happy with my rope coils, but I'm not sure I can get them any better than this. As I mentioned before, I tried the Tom Lauria method, and while it worked well enough, I found I was more comfortable if I reverted back to the similar, but slightly different method outlined by J Brent in his YouTube video.
So, I have some thoughts on this model. I believe that the Prince de Neufchatel was an extraordinarily beautiful ship, and that was largely the reason I wanted to build this model. I was also in the mood for relatively simply and not too taxing a build, which I though this would be. I'm happy enough with the result, but I found it to be a very frustrating model to build and not my favourite by a long shot. The design flaws of the kit and really very poor plans presented some challenges that I didn't anticipate and took some of the pleasure away for me. I'm used to sketchy MS instructions, but they usually have excellent detailed plans, which makes it easy enough to figure out what to do. But not in this case and I had to resort to a lot of (sometimes unsuccessful) guesswork. Not helping the situation was the lack of consistent reference material for this ship. I managed to locate pictures of three different versions, apart from the MS version, but they all differed so greatly that they might as well have been of different ships.
I know some other builders are concerned about the inaccurate gun carriages on this model, and I agree that the kit supplied ones seem too big, but I chose to go with them anyway as my motivation on this one was waning.
I'm now getting ready to start my next build which will be the Charles W. Morgan and I'm hoping for a much more satisfying experience. It looks like a challenge, but the plans appear to be excellent and there is plenty of reference material available.
Many thanks for comments, likes, etc.
David
-
Almost finished!
Over the weekend, I completed the running rigging. Now I have three more things to do - the anchors, the rope coils for the belaying pins and finally my "punch list" which is a number of minor repairs, paint touch-ups and other little tweaks.
I've trying different ways to make the rope coils, but this time around I'm going to follow the method outlined by Tom Lauria in his Youtube video. Of course, success really just comes down to getting the coil's length and the length of the loop at the top right and that's dependent on me regardless of the method I use to make them, so I'm sure I'll find this as frustrating an exercise this time as I have in the past. But Tom's method looks promising, so I'll looking forward to giving it a go.
Thanks for the "reactions."
David
-
Hi Mysticfr,
The whale boats are mini kits in themselves. While I haven't started my CWM yet, I did make four similar boats for my Constitution. Shaping the exteriors is relatively easy, but it's very hard shaping the interiors; it's difficult to get even the smallest tool into the corners at the bow and stern. I have since read of two techniques that might be helpful and I'm planning to try this time. The first is to leave the bottom piece off until after you've shaped the interiors. The allows much easier access from both top and bottom. And the second idea that I'm interested in trying is a little more drastic. It also involves leaving the bottom off at first, but then running the boat through a band saw lengthwise which would allow very easy access to the interior of each separate side. Once each interior side is shaped, glue the two halves back together, then add the bottom. Once all that is done, then shape the exterior.
I'm not sure yet how helpful these techniques will be, but with seven boats to do, there's plenty of room for experimentation!
David
-
Good Morning Mysticfr,
The CWM is going to be my next project; I have one waiting on the shelf. While I think it will be a challenging build, there are plenty of good resources available. There are some build logs on this site and one builder has created his own website about his build, which offers lots of good advice and many good photos of the real ship. It's at www.charleswmorganmodel.com. Another builder has developed a mini practicum on how to build the tryworks, which is worth taking a look at. It's available under the resources section of the NRG website. And, of course, the actual ship itself is always available for first hand reference!
I'll be starting mine this fall, so I'll be looking forward to following your progress at the same time.
David
- geoff, Mysticfr and Jim Rogers
-
 3
3
-
Hello All,
Hope you're all enjoying the summer weather. We are having a very hot and humid spell - my basement is a welcome cool retreat.
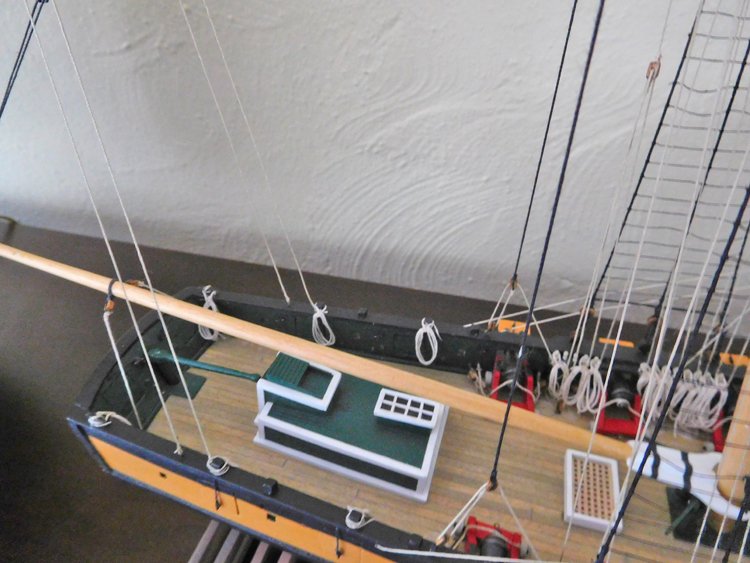
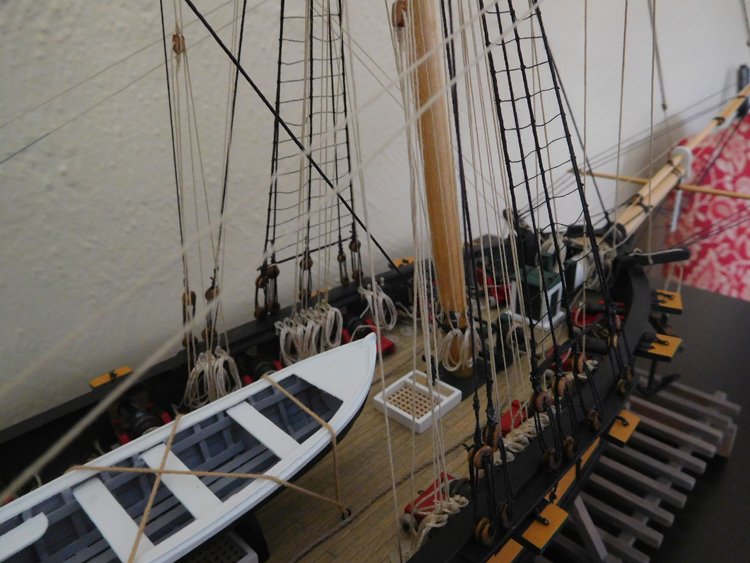
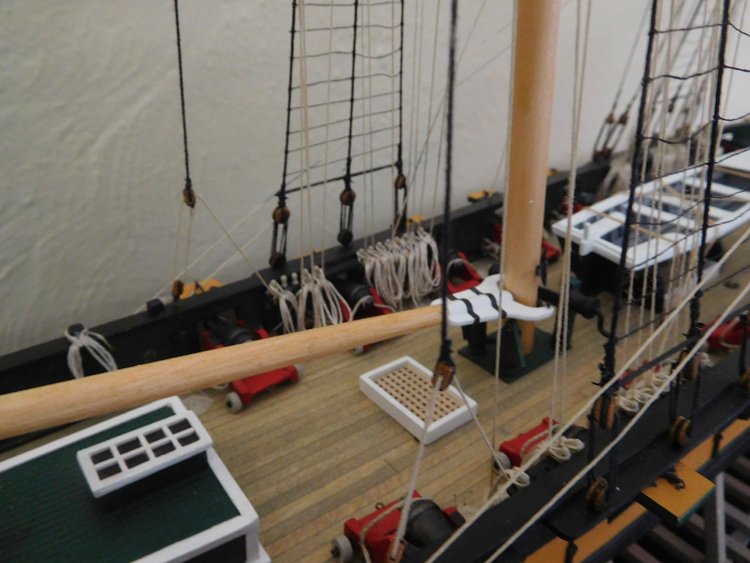
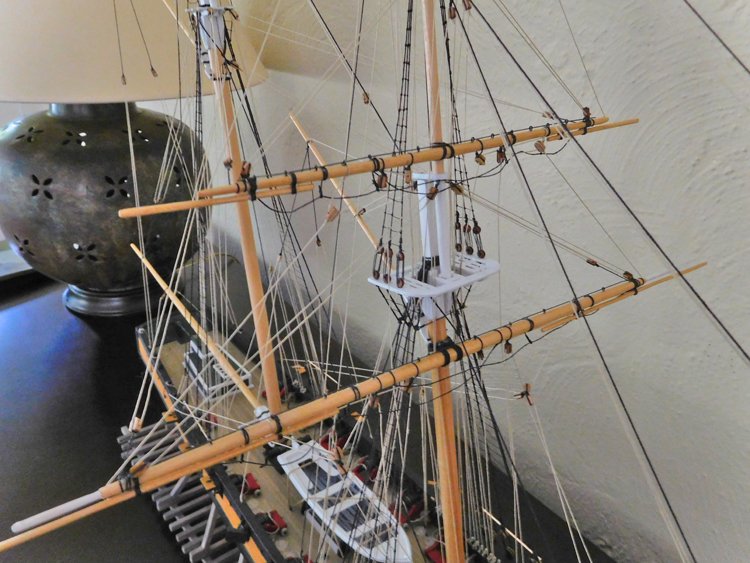
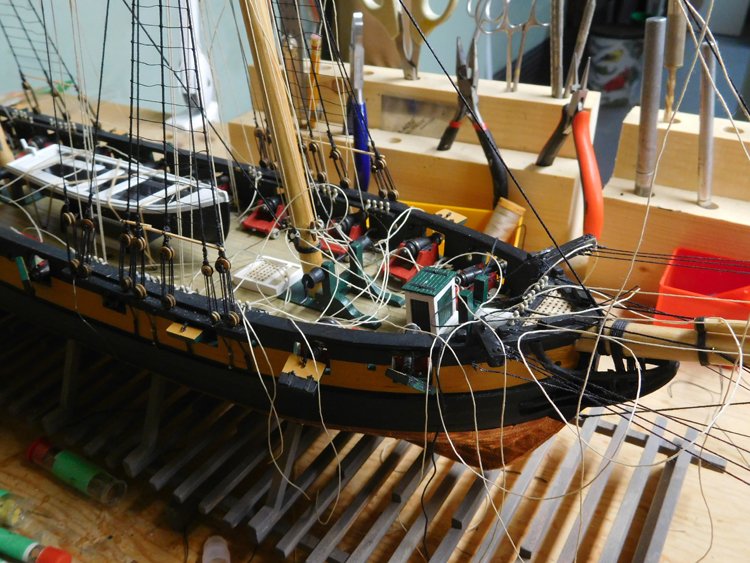
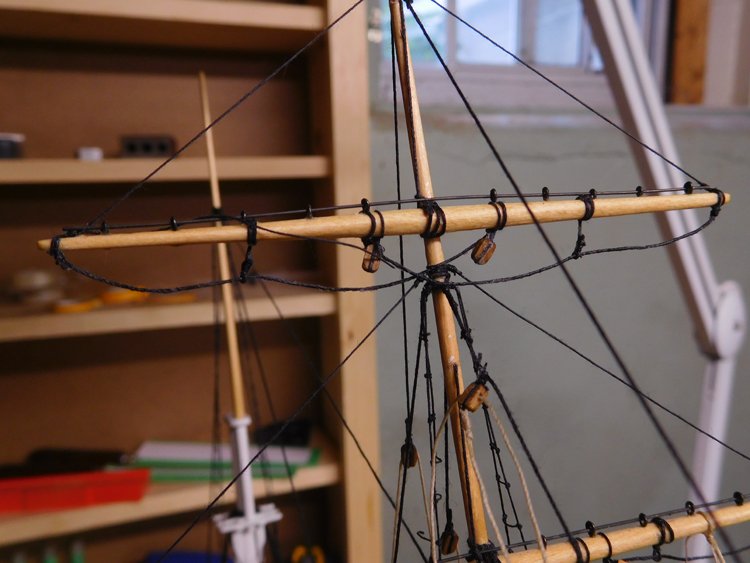
I've been working away at the rigging although I've been quite negligent about my build log. So here are a couple of update photos. It all looks quite a mess at this stage, as there is a number of unfinished lines, still left long, but I have learned from experience not to cut them off too soon.
I have always found the footropes very difficult to do, and I've spent a fair bit of time on them for this model. My first attempt was not very good, so I experimented with using wire. I have some 26g annealed wire and I made a couple of sets with it. While it has some advantages, I still found it very hard to get it to lie smoothly without tiny twists and turns. In the end I went back to using line, but this time I used much more glue on it than I have in the past. I attached a large paper clip to the low point of each loop and applied a lot of glue. When it was dry, I removed the clips, which left sharp low points at the centre of each loop. I used a pair of tweezers and quite firmly grasped the line and ran them back and forth along the length of each loop. That seemed to work the low point out quite well and removed excess glue which showed up in a couple of spots. There are still a couple of tiny spots that look shiny, so I'll touch them up with a dab of flat black paint. The result isn't perfect, but it's the best I've been able to achieve so far.
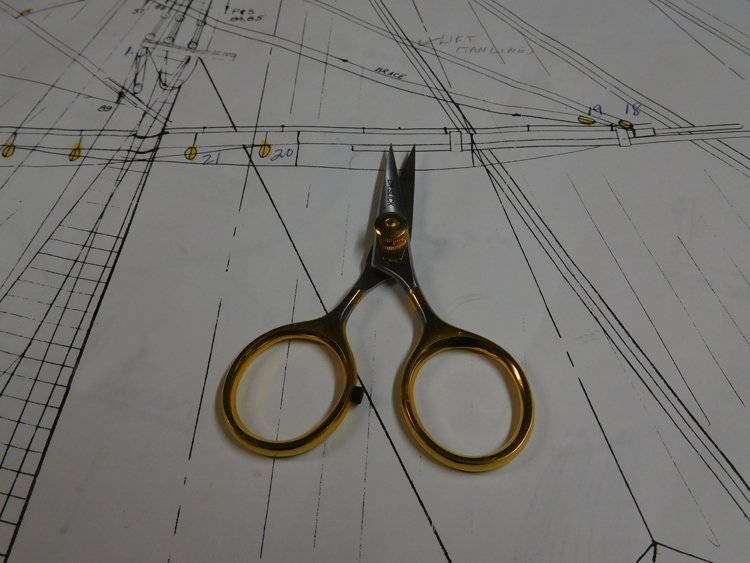
The last photo is of my new Dr. Slick scissors, which are now among my favourite things. I have gone through a couple of sets of cheap scissors from a sewing store and wanted something a little better. I found a discussion on this forum about scissors and based on the opinion of several others, I opted for these and I can't recommend them highly enough. They are very sharp and you can cut very close to the knot, but the chief advantage in my opinion is that they cut equally well at their very tip as they do along the length of the blade. which increases control and lessens the chance of cutting the wrong thing.
David

- JpR62, DocBlake, Haliburton and 6 others
-
9
-
Good Morning All -
Some progress to report. I've been working on several different fronts simultaneously.
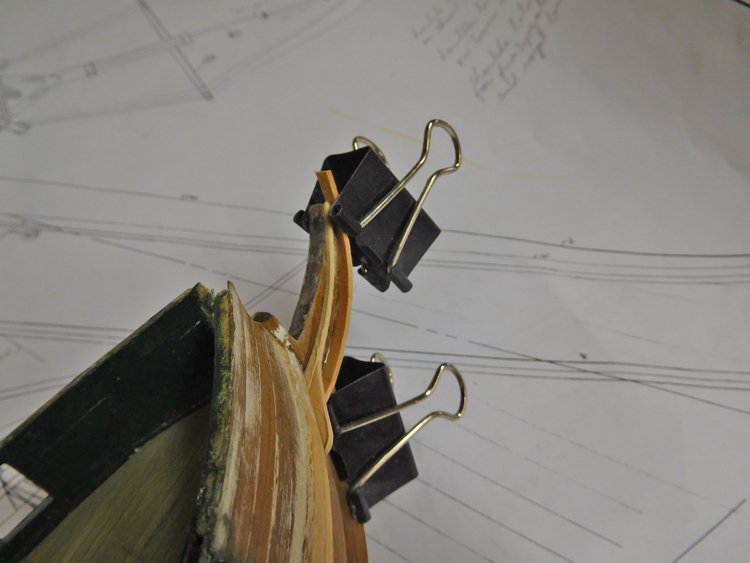
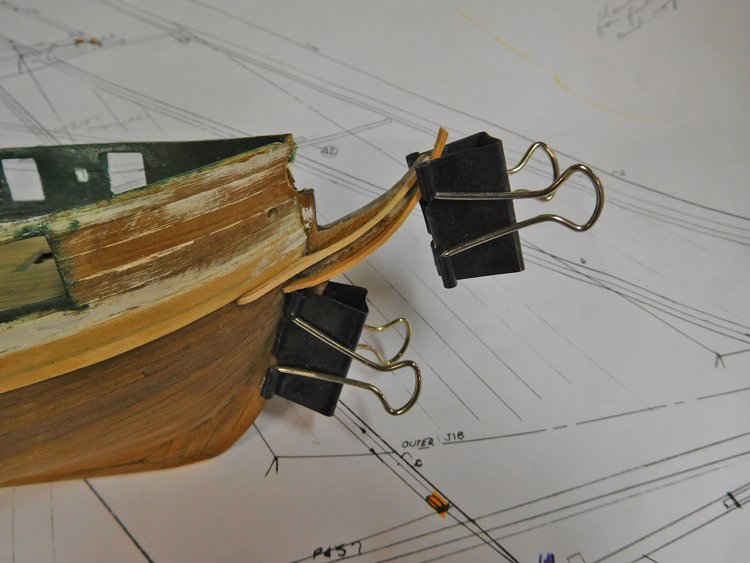
The main one has been the boat. It's a tricky little project and I didn't particularly enjoy it, however the result is satisfactory enough. It involves making a build board and in typical PdeN fashion, the instructions are not only vague, they are actually incorrect. I'm thankful to a couple of others' comments, who learned the hard way. The resulting boat is a pretty flimsy structure, with 1/32" planking over 1/16" square "frames." I chose to double plank the hull, which was a good thing to do and improved the result considerably.
.JPG.732e7b3bfb2eafec2535dbc79888ada3.JPG)
.JPG.2512d7c8c605b40a5d234197398ce200.JPG)
.JPG.0e887554436da7d3454eafbc0a48532d.JPG)
.JPG.08913316d01d05471dd1fd0332bdc6ce.JPG)
.JPG.3f4ab3290cdb008dbe2925a38e3998ee.JPG)
.JPG.0014660c364b1b5caa7cfb26aeb4b33e.JPG)
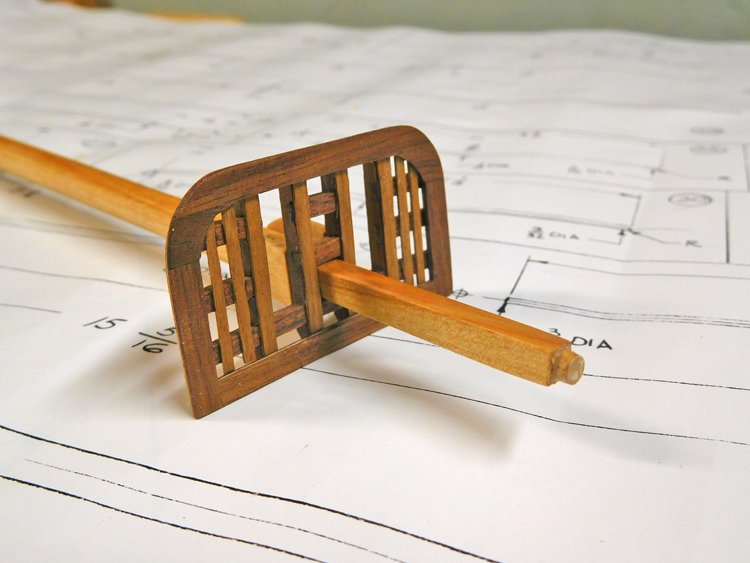
The second thing I've been doing is adding the jackstays and studding sail booms to the yards. On my Constitution build, I used plastic strips to simulate the iron bands. I found it difficult to do and I wasn't particularly pleased with the result. This time, I soldered brass strips and I'm quite happy with the outcome.
.JPG.89a85ceb9e9ec0fe7a719ed3f8e42afe.JPG)
And I've started work on the standing rigging. I have the bowsprit in place and the lower fore and main masts and have just started on the lower shrouds.
.JPG.a54114248d53094bf72ec9cc6f342394.JPG)
.JPG.5abee459133aeac4e02bd2b39c7a83e4.JPG)
That's going to be it for a little while. On the weekend we're heading to the UK for two weeks. Sadly, there are no ships on the itinerary this time, but last time we toured five, so I guess I can't complain.
Again, thank you for comments and "likes."
David
-
Hi Jim,
I'm really pleased you're doing a build log for this model and I'll be following along with great interest.
David
- jfinan, coxswain, mort stoll and 1 other
-
4
-
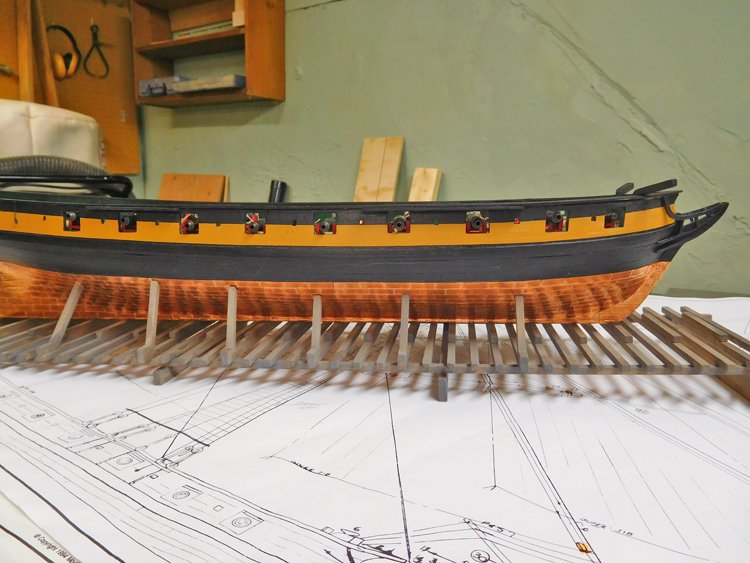
Thanks Jim,
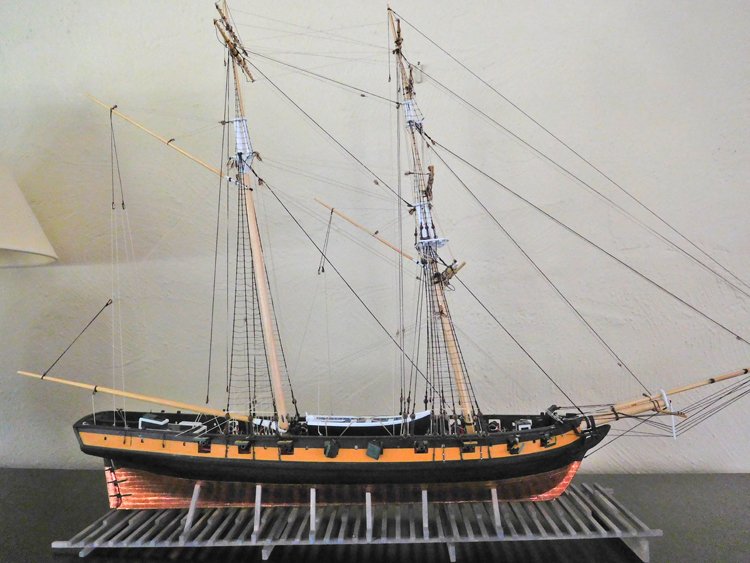
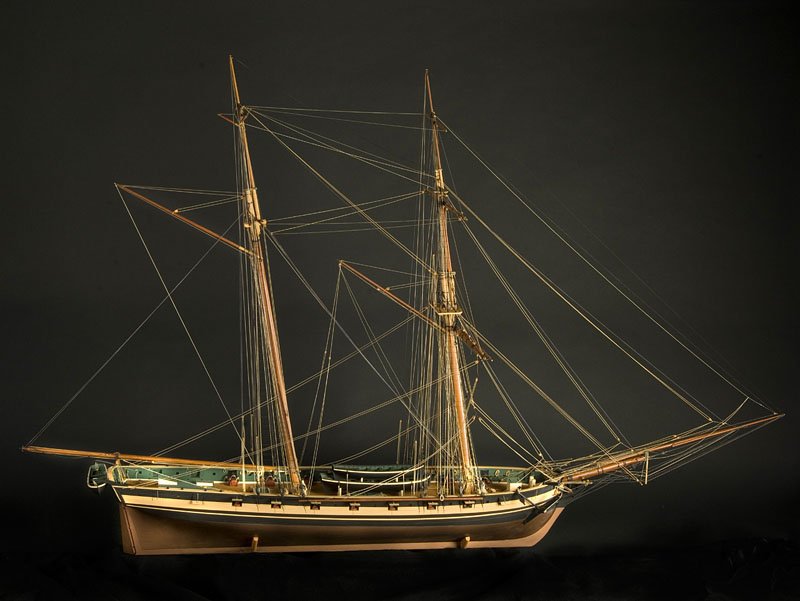
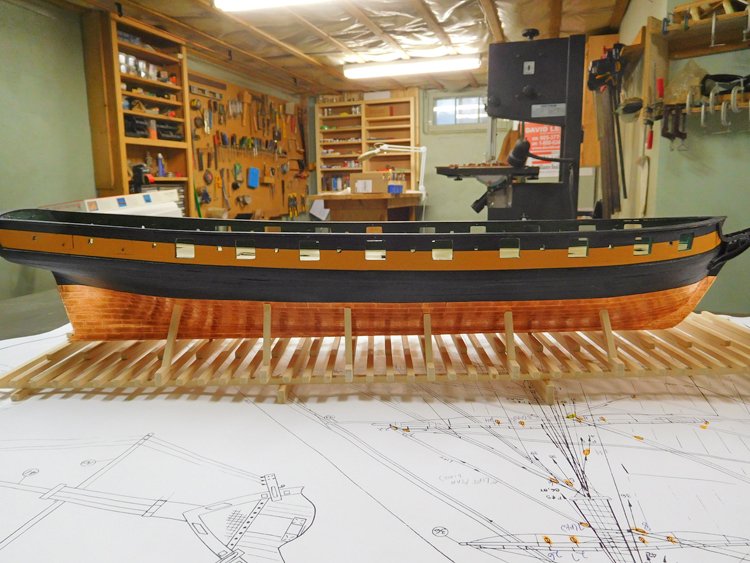
I like the green too. I used the model at the Smithsonian as inspiration. Here's a picture of it. I would have loved to put in that second narrow stripe of yellow, but I knew that getting such a narrow stripe dead straight and even would be for me a "that way madness lies" scenario, so I left it out.
David
- coxswain and Captain Poison
-
2
-
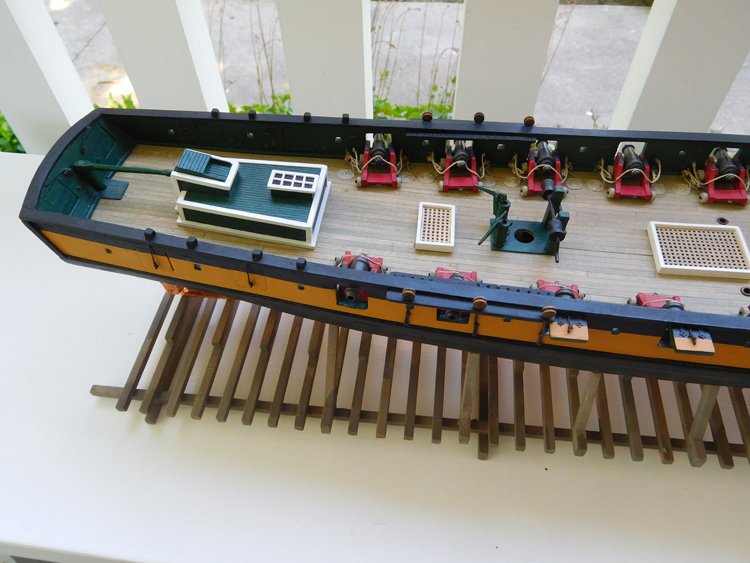
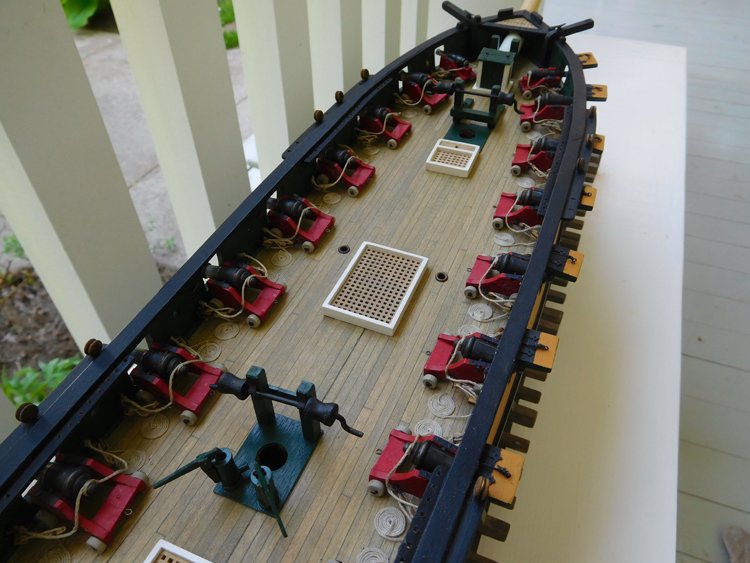
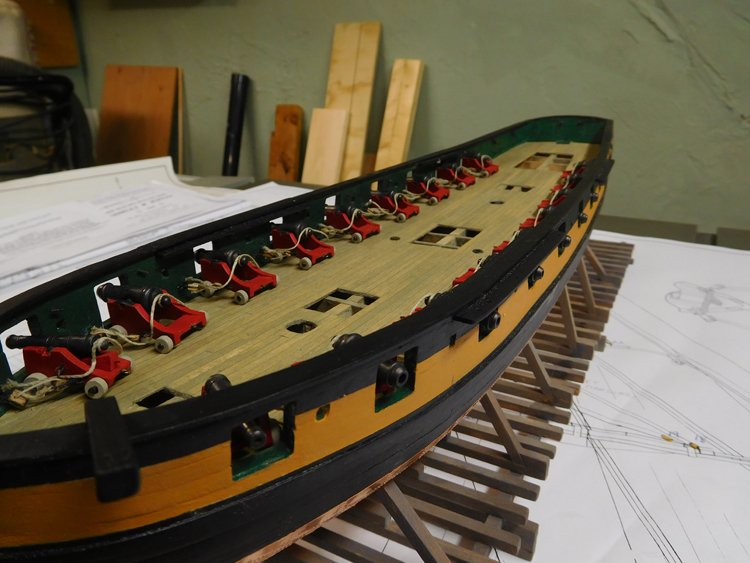
Good Morning All,
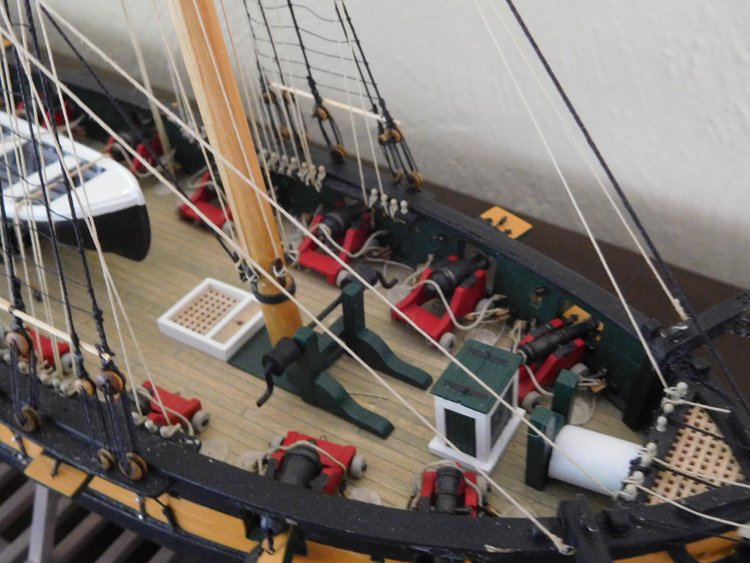
Some progress to report - I've been finishing up details on the hull and deck. I've finished rigging the gun carriages and added most of the deck furniture and bowsprit. I've attached the rudder. Some of the chainplates are finished. So far I've only attached the ones that secure the lower shrouds. I placed the lower masts on the model and ran a line from the mast tops to the deadeyes in an effort to get the chainplates to line up accordingly. There are a few deadeyes that attach to stays which originate from a higher points on the masts, so I'm going to leave those ones until I have the masts in place.
I'm in the process of adding the gunport lids. I'm running a line from the lid, through a hole in the hull and then attaching it to a cleat in the bulwarks. I saw this detail in the Reed book on modeling this ship. I believe only the anchors are left before beginning on the masts and spars. Oh, I almost forgot - the boat. It looks like a real challenge to get a good result. If I'm happy with my result, I'll add the boat, but if I'm not able to do a decent job on it, I'll just leave it off.
Thanks again for comments and likes.
David
- rafine, Mirabell61, Barbossa and 11 others
-
14
-
That's a very nice job, Bob. I think leaving the nail heads off looks just fine.
David
-
Hello Everyone,
A little progress to report - I've been putting off finishing the launching ways. I wanted a fairly natural looking aged wood look, but have been hesitant to start staining because I know how badly basswood takes a stain. About the only way to avoid a blotchy look would be to stain it either a very dark brown or dark gray, but I wasn't sure that was the look I wanted. I have a Minwax weathered oak stain, but on test pieces of basswood even it was giving a pretty bad result.
Then I came across a Youtube video by Tom Lauria about applying a weathered wood finish. If you haven't come across his videos, be sure to look them up on Youtube. There are only a few of them, but they are really excellent. His techniques are amazing and he presents the videos very professionally which is a refreshing change from how badly most Youtube videos are produced.
He suggested using watered down artists' acrylic paint. Following his lead, I used burnt umber, white and black. I first applied a coat of burnt umber, but watered down to the point of being little more than coloured water. I painted it on generously and then "rubbed" it out with a small dry stiff-bristled brush. Once it was dry I applied a coat of gray, made by mixing the black and white and again watering it right down. And again rubbing it out with the small dry stiff-bristled brush. While I am quite happy to have a slightly imperfect and inconsistent colour coverage, I wasn't happy with the few glaring bits of CA glue that showed through in a couple of spots. To cover those up, I mixed all three colours together and dabbed it onto the gluey areas undiluted and it covered well. I'm very happy with both the colour and the nature of the finish. I may go over it again and touch up a few spots, but even if I don't I think it's considerably better than the result I would have gotten with a simple Minwax stain finish.
Next on the list was the gun carriages - a tedious and repetitive job which I'm glad to have over. Now I'm finishing up a number of items on the hull - catheads, channels etc.
Thanks again for comments and "likes."
David
- robdurant, JpR62, Mirabell61 and 10 others
-
13
-
Looks Nice, Bob. Painting the upper edge of the wales first is a good idea. I always find cutting in or masking at a change of plane to be very difficult. What I have done in the past is place the masking tape about 1/32" above the point where the two surfaces meet, which works pretty well, but next time I think I'll try your approach and paint the edge of the wales first.
David
-
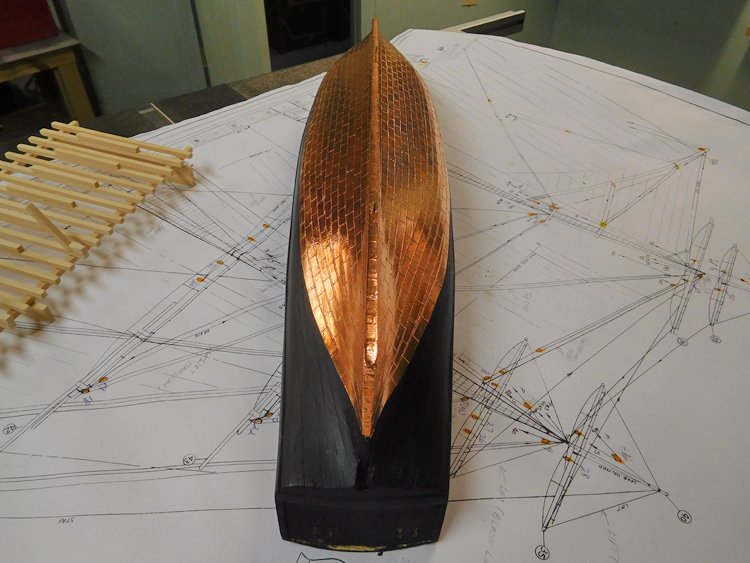
Thanks for the comments and likes!
Bob - your coppering will look great. This was my second coppered hull, so I used the Bob Hunt practicum for my Constitution as a guide. He recommended dividing the hull into three belts, the third (top) belt being two rows of whole plates. I underestimated how much smaller this hull is than the Constitution's and made the lowest belt too big on my first attempt. He suggested that the first belt on the Constitution should be 10 rows, so I reduced it to six for this model and got into trouble as I neared the top. I stripped much of it off, making the first belt only four rows. I also reduced the final belt to only one row of whole plates at the top. This arrangement seemed to work well for this hull.
David
- Old Collingwood, rafine and robdurant
-
3
-
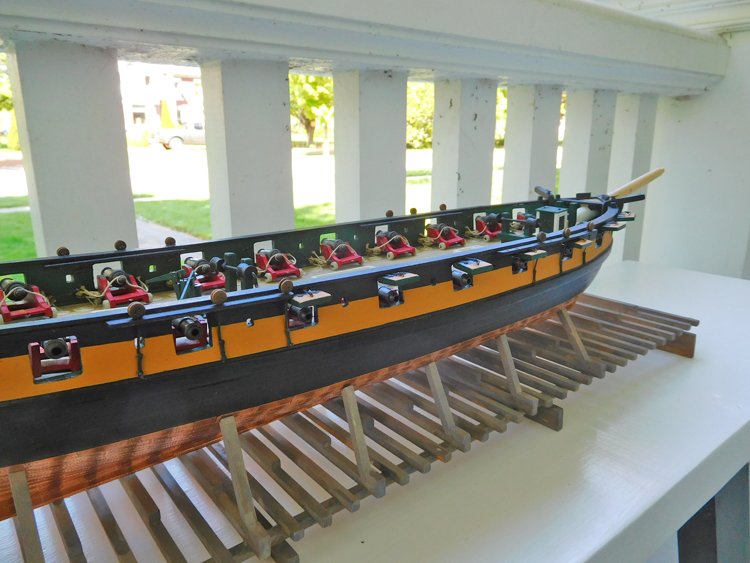
Good Morning Everyone,
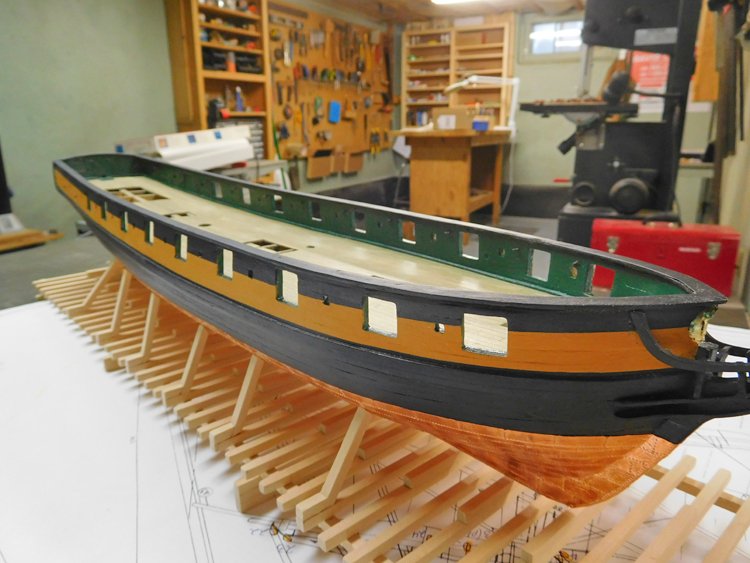
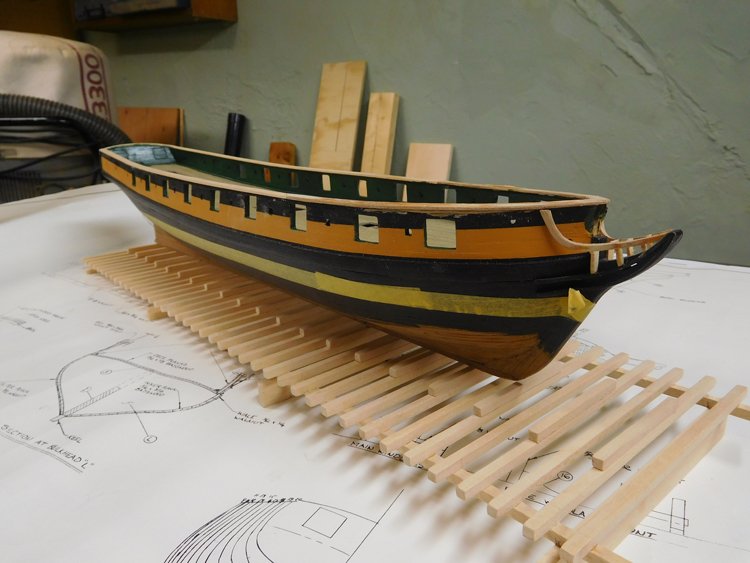
Some more progress to report - I have pretty much finished the hull including the coppering and I've built the launching ways.
I used the self-adhesive copper tape which is what I used on my Constitution as well. I was surprised at how quickly it went, but I was forgetting how much smaller this hull is than the Constitution's.
I really like launching ways as a stand. This one is considerably different than my other one on the Armed Virginia Sloop, but I like it just as well. The next challenge is finishing it. Basswood doesn't stain all that nicely and I had trouble getting a satisfactory finish last time, so I'm putting that off for the time being.
I've just started making my chainplates and I'm really pleased to be using my new soldering iron. Earlier I had bought the cheapest one I could find, because I knew I would be giving it only light duty, but it was false economy. It was 25 watts and just didn't seem to be adequate and it caused me a great deal of frustration. After a bit of on-line research, I settled on a new one which is a Hakko FX888D and it is a real pleasure to use. It's probably overkill for my needs, but I was afraid of making the same mistake twice. This one works extremely well. It comes with a small chisel tip and I bought an extra pointed tip. I'm now trying to think up things I can solder.

We're off to Ottawa for the weekend (3 1/2 hour drive east of here) for my mother-in-law's 90th birthday, but at the same time waiting for a phone call from my son in Dundas (2 hour drive west of here), whose new baby is due Saturday, so a bit of driving in my immediate future!
Have a great weekend,
David
-
Hello Everyone,
Thank you for your comments and likes.
I'm getting very close to being ready to copper the hull, but I can only cut so many of the plates from the roll of tape without going completely crazy, so I've been breaking it up with a few other odds and ends.
I've finished the head rails, and I think they have a reasonably credible profile, given how derelict the plans are and they are essentially of my own design. I'm going to paint them black, so that should help disguise any deficiencies.

I then added the cap rail. The instructions suggest using three pieces, each 5/64" x 5/64" laid side by side. I decided not to do that, but rather just used a piece 1/16" x 1/4" which I think makes it easier to get a good result. It means that I couldn't bend the pieces around the bow, so for that area I laminated some scrap billet material and cut it out using a template.
I've also been working on the slipways which is not quite finished yet, but is going to work out just fine.
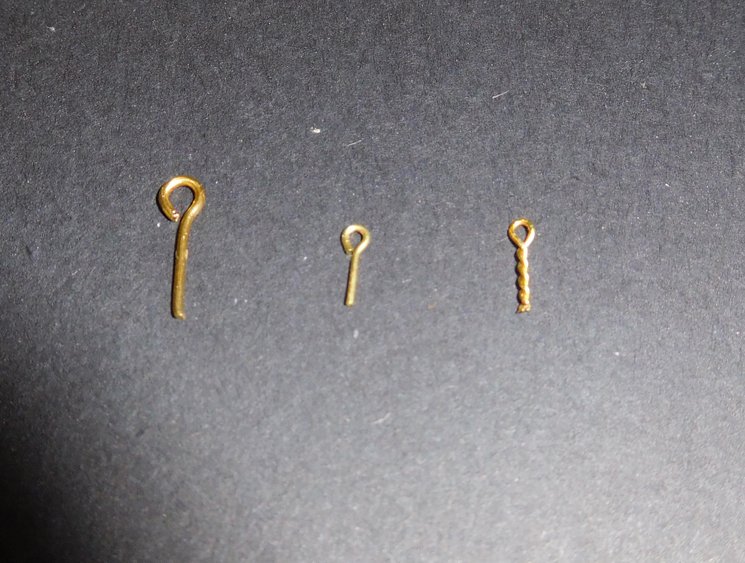
The other thing I've been doing is finishing off the guns and carriages by adding the eyebolts. I always find that the eyebolts provided in kits tend to be too big. Some time ago, I found a really nice small eyebolt at BlueJacket, which I have used on most of my models so far. I thought I still had lots of them, but it turns out I don't. Every time I order them, I think I've ordered plenty, but I always underestimate how quickly they get used up. So, this time I tried making my own. I never thought I'd be able to get a decent result, but after only a little experimenting, I discovered how quickly and easily you can make one.
Below you can see a typical kit supplied eyebolt on the left, the small BlueJacket one in the middle (inside diameter of eye is about 1 mm) and my homemade one on the right which is about the same size. It's made from 28 gauge brass wire. The secret, which I found on someone else's build log, is to drill a small hole in a piece of wood which is about 1/4" thick. Loop the wire over a drill bit (about a #60 or there about) and then push both ends of the wire through the hole. Then grab the ends of the wire with pliers, pulling the loop down tight against the drill bit and the drill bit tight against the piece of wood. When you twist the wires together a few times, the 1/4" thickness of the wood ensures a straight shank on the eyebolt.
That's the update for the time being - not it's back to cutting copper plates.
David
- robdurant, Heronguy, Ryland Craze and 7 others
-
10
-
-
Happy Thursday Everyone,
I have a little progress to report. I've been working away at several different things, mostly because it only takes a few minutes to paint something and then you can't handle it until it's dry, so as a result I've had several different things on the go at the same time.
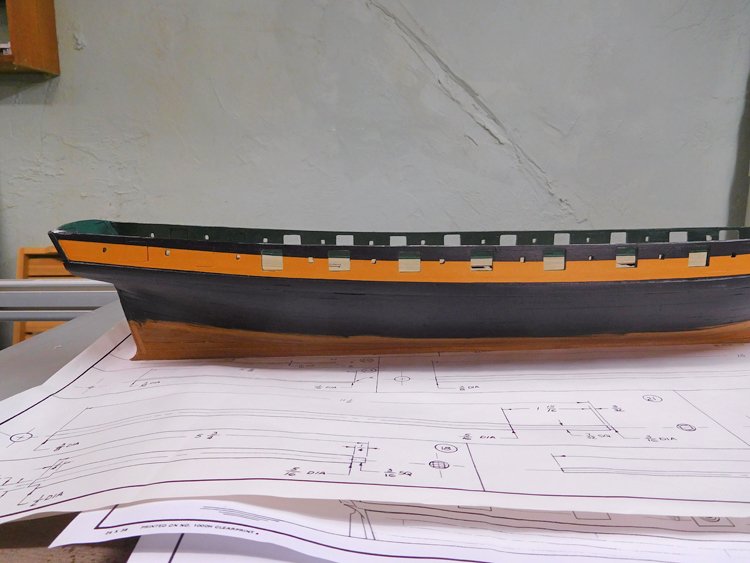
I have the upper hull painted. Next I believe I will add the cap rail and then begin coppering the lower hull.
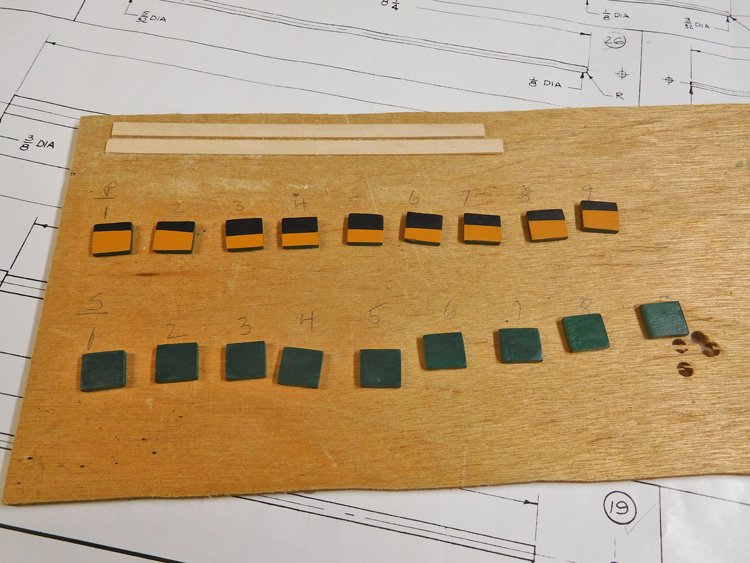
I'm simultaneously working on the gunport lids -

the gun carriages and -
the mast top.
I know that many are of the opinion that the gun carriages provided in the kit are not quite right, but I have decided to just go with them anyway, rather than make new ones. I've used brass rod for the axles and I've blackened the guns. I don't have any brass rod that's the right size for the trunnions and rather than order some in, I discovered that 1 1/4" finishing nails are exactly the right size, so that's what I used. To my surprise, the nails blackened just like the brass did when placed in the blackening solution.
The mast top was a bit of a mystery to make. As is the case for almost everything in this kit, the instructions do not address it, photos in the instructions are so dark as to be useless and the plans are not at all detailed. In fact, they're worse than that - they're usually contradictory and sometimes just plain wrong. While the plan is drawn full scale, the dimensions indicated (in the few places that they are indicated) don't agree with actual measurements taken from the plan and often the same component will be different sizes when it's shown from more than one perspective. So, I more or less made things up as I went along, but in the end I think it's an acceptable result and I think it's more or less what the plans are getting at.
Now on to cutting copper plates!
David
- John Allen, rafine, coxswain and 3 others
-
6
-
Good Morning Everyone,
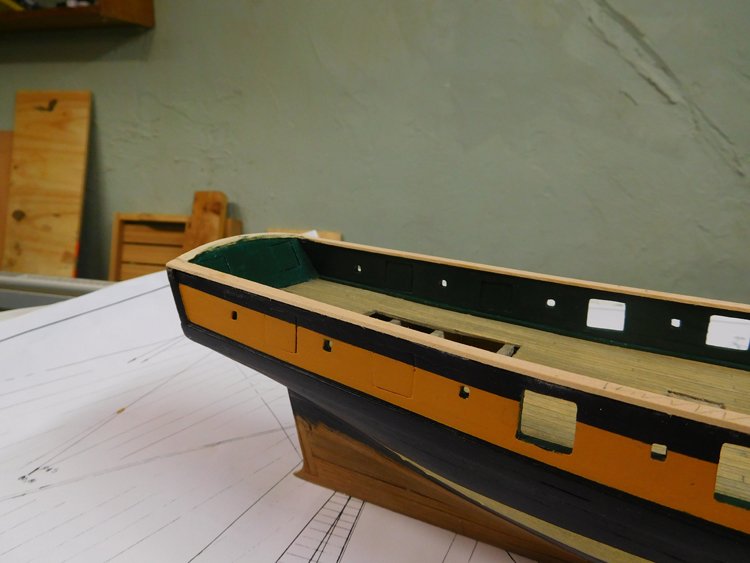
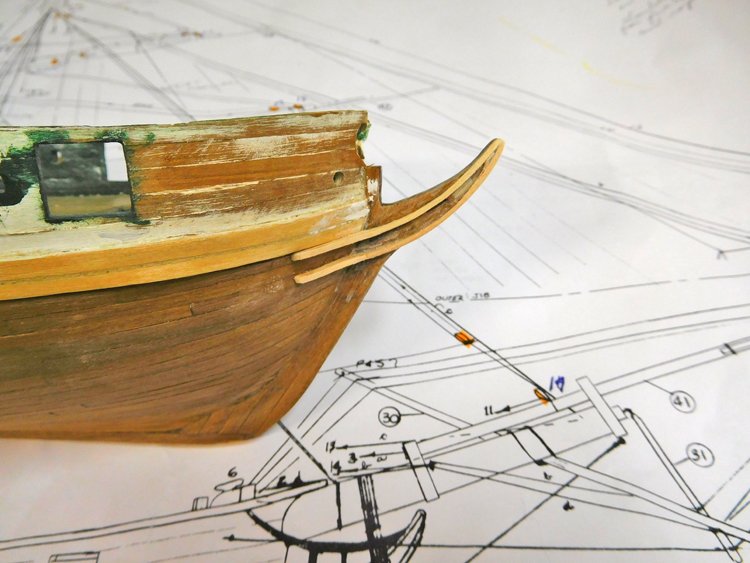
A little progress to report. I next turned my attention to the cheek rails. For some reason, these were causing me more trouble than I've had on other builds. The plans include only one poor picture, with no indication of their size or shape and the plan didn't really match my model very accurately in any case. After several unsuccessful attempts, I tried this approach: I edge-glued a piece of 1/64" x 1/8" stock to the stem, bending it to follow the contour. Once it was in place, I sanded it, leaving it at almost full depth where it meets the hull, down to almost nothing at the tip of the stem. I then added the cheek knees. This is by far the best result that I think I can achieve.

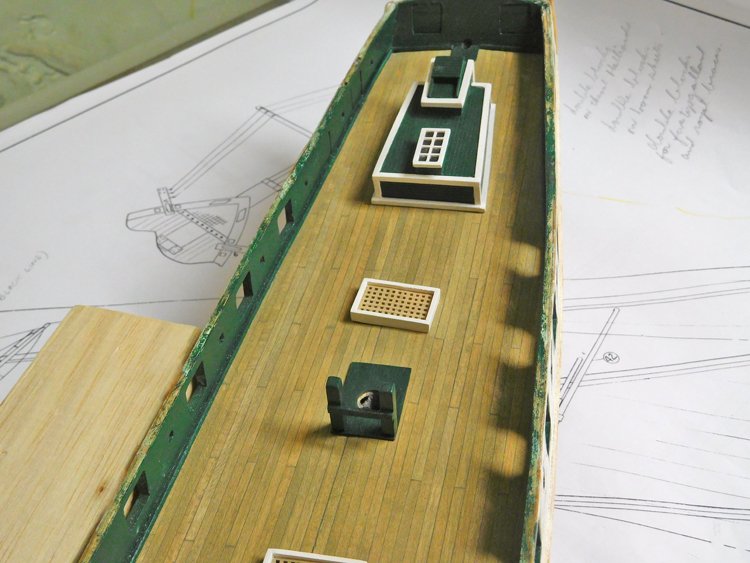
I've also been working on some of the deck furniture. It's all just sitting in place for the pictures - not attached yet, so everything isn't necessarily sitting square. I've had to rely on several sources other than the plans for some of the details. The plans give no real indication of how the cabin and companionway should look, so the result is a combination of ideas from others' builds and my own interpretation.


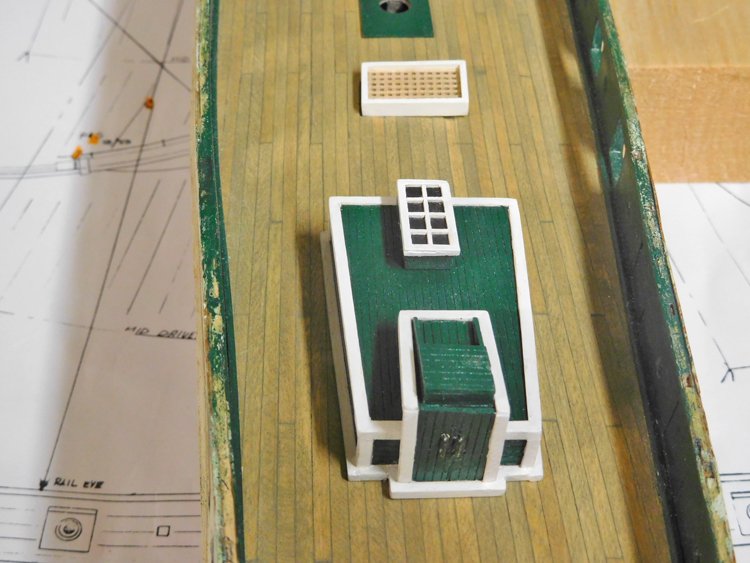
That's all for now. I'm just about ready to paint the exterior of the hull above the waterline.
David
- Jim Rogers, Papa, robdurant and 6 others
-
9
-
Where did you find this video? I have visited this gallery a few times and it's really fun to see it being put together. The Thomson Ship Gallery is part of the Art Gallery of Ontario in Toronto, which is a stunning display space designed by Frank Gehry. A major component of the ship collection comprises the many prisoner of war bone models. I don't particularly like them, but they sure are interesting to see and they add another dimension to the display.
Thanks for the posting.
David
-
Bob, I'm going to do the same thing for the copper as I did for my Constitution. I'm using that self-adhesive copper foil tape, cutting it into individual plates, and creating rivet heads with a ponce wheel. It worked quite well and I got a good result. The only problem is deciding when to do it. You can't do too much to the deck and upper hull first, because then you can't easily invert the hull without it resulting in damage. On the other hand, the copper tape is very fragile and will not tolerate much handling once it's applied. I think I'll check back on my Bob Hunt practicum for the Constitution to see at what point in the build he recommended doing it and use that as a guide.
David
- Canute, Old Collingwood, KenW and 3 others
-
6
-
That looks terrific Bob. One nice thing about this model is the hull isn't hard to plank. I did double plank mine, but I have to admit that the whole time I was asking myself "why am I doing this?" I'm going to be using paint and copper sheathing as well.
David
- Martin W, popeye the sailor and Canute
-
3

Prince de Neufchatel by David Lester - FINISHED - Model Shipways - Scale 1:64
in - Kit build logs for subjects built from 1801 - 1850
Posted
Again, thanks for comments and likes. Jim, it's going to be the Charles W Morgan. I'll outline my thought process in choosing this kit when I start its build log.
David