dgbot
-
Posts
3,993 -
Joined
-
Last visited
Content Type
Profiles
Forums
Gallery
Events
Everything posted by dgbot
-
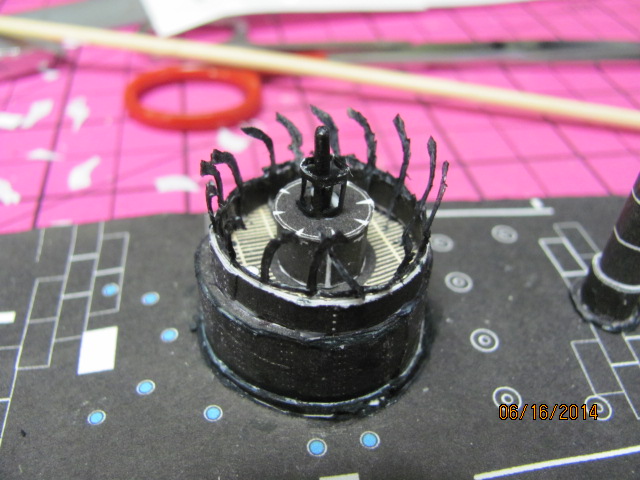
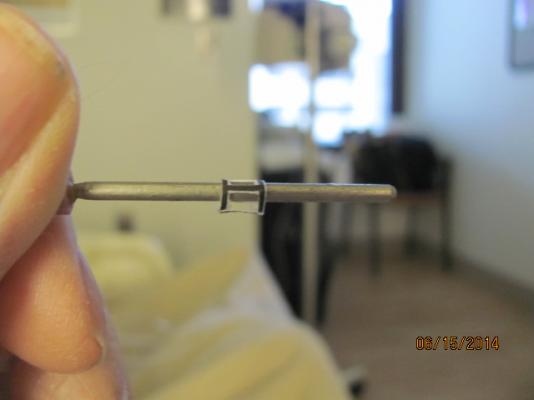
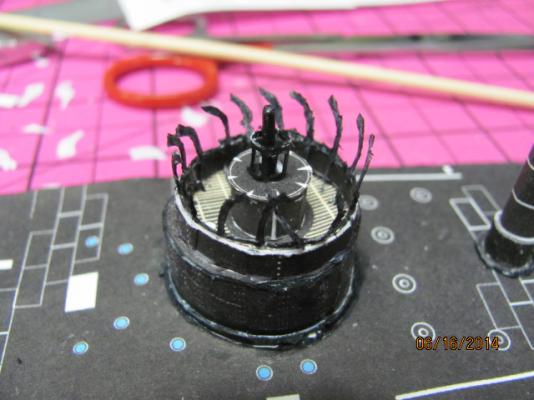
 I finished off the pilot house with the guard around the periscope. When forming the part i used the shaft of a grinder that I had in my tool box. This made it easy to shape it without tearing. Once formed I gued it to the pilot house. When I get back to Raymond I think I wil order some scalpel blades. I am finding out the adage the sharper the better. I then touched everything up with a marker. David B
- 39 replies
-
- 3
-

-
- lehigh
- papercraft square
- (and 3 more)
-
Help with Mill handwheel and dial too tight
dgbot replied to rtropp's topic in Modeling tools and Workshop Equipment
I mess around with small bits all the time. When I bought my Foredom years ago I also invested in their drill fixture as we. Great investment, with the accuracy of a jewers drill and the foot speed control I rarey break a bit. As for Sherines sensidrill I know several modelers who love it for those small drills. David B -
Nice way to make use of different parts. Your planking and interior detail is nice. What kind of wood did you use? David B
-
If you had an x y table you could use that. What I have done is make a fixture to hold the part and marked out the holes with an awl or a pin. This made a spot that would hold the drill bit. Then I could drill out the part without the bit skipping. David B
- 1,756 replies
-
- 3
-
-
- constitution
- constructo
- (and 1 more)
-
You are doing a wonderful job. The nice thing about the Virginia is nice because you can do many things with it. David B
-
Thanks for the info. I will keep an eye open here. It would be perfect for my sisters place. David B
-
While in the hospital I used the table that they kept by the bed. What I found out was that the top could be extended to almost twice the depth. With the raised edges going around you would never have parts roll off. It is mobile and can be raised up so that it could fit over the bed or your lap if you are sitting in your lounge chair. If I knew where to get one at a good price that wood be nice for working in a small area for many of us. David B
-
If the plans show the dimensions and shape of the bulkheads I would always double check each one to make sure they were okay. Any that were not were marked and then repaired off or on the model as needed. However I do not remember if MS came with the bulkhead plans. Otherwise I would do like you and go by sight and a batten. Good work. David B
-
Boxwood has always been a good choice. A couple of others are holly, apple, pear, and degame. These are used by modelers I know who build at 1/192 or smaller. They all have a very tight grain and have the strength. David B
-
Check out jewelry supply house. I use Sante Fe Jewelry Supply. There is also Connentti. David B
-
Nils, have you tried tweezers used by jewels for working with pearls? I know some modelers who have them and they are the cats meow for holding blocks securely. David B
-
Impressive work Omega. What kind of wood are you using? David B
-
Help with Mill handwheel and dial too tight
dgbot replied to rtropp's topic in Modeling tools and Workshop Equipment
Check the scale for a opening for an Allen wrench. That is what I did on my Sherline. David B -
You must be taking energy pills. Looking good. David B
-
I notice you are pre-painting smart move as it gets harder down the road. David B
-
Great metal work. You are doing a great job. I cannot wiat to see the finished model. David B
- 346 replies
-
- 1
-
-
- terror
- polar exploration
- (and 2 more)
-
Your coppering is coming along fine. David B
-
On your skylight try some acitate for the windows. It can be tinted or shaded as needed. David B
- 1,756 replies
-
- 1
-
-
- constitution
- constructo
- (and 1 more)
-
You are starting out well. Keep up the good work. David B
- 786 replies
-
- 1
-
-
- Royal Louis
- Finished
- (and 1 more)
-
Keep it up. You are getting there. David B
-
A unique model Bob. I found your build very interesting. Nice job. David B
-
Harbor Freight Workbench
dgbot replied to Landlubber Mike's topic in Modeling tools and Workshop Equipment
Nice workshop. David B -
It seems to me that you are addicted to Her reshuffle David Bottob
- 142 replies
-
- 1
-
-
- buzzards bay
- herreshoff
- (and 1 more)
-
Harbor Freight Workbench
dgbot replied to Landlubber Mike's topic in Modeling tools and Workshop Equipment
There is a Harbor Freight in the Chicago area. I have gone on many times. Their prices are indeed good. But to me they are the Walmart of hardware. Great deals on many items. But on their tools both hand and power do not buy sight unseen. I got a good look at one of the bench drill presses because it was cheap. The item was made on the cheap. For extra $40 I could get a good one at Menards. David B