


VTHokiEE
-
Posts
1,528 -
Joined
-
Last visited
Content Type
Profiles
Forums
Gallery
Events
Everything posted by VTHokiEE
-
 I think it’s fair to assume the pictures may not have been updated with new parts. What I would suggest is placing all the bulkheads and checking the run to make certain they look like they all are lining up correctly as a double check before gluing them in when you see a discrepancy like this (of course it looks like 6 doesn’t match the picture either). You can lay a plank along the run of bulkheads to see that they all are basically following a good line (and an idea of what to do when you need to fair the bulkheads before planking). Edit - I’m half heartedly searching for an AL Red Dragon kit but I noticed in build logs that they switched from die cut pieces to laser cut pieces (so I’m looking for the later laser cut version). I assume they did they same to this kit and the pictures in the instructions are from the earlier version of the kit. No idea why they doubled up on 9 though. Are there any logs on this version? I haven’t had a chance to look and see if they had a similar question.
 -
Congratulations! She looks very nice; I’m sure you’re quite proud of your effort (and you should be!). I like the little touch of the launch on the base.
- 414 replies
-
- 2
-

-
- caldercraft
- victory
- (and 1 more)
-
Slow and steady does it, looking goo so far. Do the instructions say anything about sanding the false keel down a little past the bearding line (basically the run of the bulkheads)? This may help get your planking to flow into the stern piece nicely (or it may not really matter, hopefully someone with a little more experience e can comment).
- 29 replies
-
- 1
-
-
- constructo
- prince
- (and 1 more)
-
Is there an easy wooden tall ship out there to build?
VTHokiEE replied to thegrindre's topic in Wood ship model kits
A few weeks might be tough for a tall ship (at least as far as I know). A lot depends on how much extra detail you add and how much time you can spend on the build. Ships with a single mast would Probably be on the complex side. I’m biased because I am building it, but I think the Vanguard HM Alert is a great starter kit. Of course there have been some great builds of the Caldercraft Sherbourne which might be in the same level. -
I can’t emphasize this enough. The only time I didn’t get a reply to a PM was when the user never came back to the site. Everyone I have messaged has been incredible!
-
I'll have to send you a PM (to keep this build log on track), but I picked up a handful of miniatures from Langton Miniatures and while I've read a handful of blogs and other articles I'd love any advice that you could share before I dive in (brushes arrived yesterday and paints arrive tomorrow 😁).
-
Great start! I really like the way your deck came out, much better than if you simply drew the lines in. Have you looked into any of the planking tutorials? Of course I should caveat that with I read them all and still messed it up and had to restart my first layer. http://modelshipworldforum.com/ship-model-framing-and-planking-articles.php Finally, I also really like the painted miniature. I'm going to take a shot at 1/1200 miniature at some point in the near (hopefully) future.
- 29 replies
-
- 1
-
-
- constructo
- prince
- (and 1 more)
-
To add sails or not? What is your preference?
VTHokiEE replied to Bill97's topic in Masting, rigging and sails
Signatures aren’t visible when you’re on the mobile version of the page (even if I request the desktop page on my phone I don’t see them). -
Removing a link
VTHokiEE replied to Blue Ensign's topic in Using the MSW forum - **NO MODELING CONTENT IN THIS SUB-FORUM**
You can delete the photo link by clicking it in edit and then pressing backspace (or maybe it’s placing the cursor in front of the picture and pressing backspace). I’m on my phone at the moment but if the question doesn’t get resolved before I get to a computer in a few hours I’ll double check myself. I need to double check this as well, but I believe if you use the link button (3 chain links) in the bar above the text window (when editing) you can add the link and a picture won’t appear. -
I also really like this stand; I’ll have to take a look at Dirks and maybe get some similar inspiration. I can’t wait to see what it looks like at the end.
- 1,039 replies
-
- 2
-
-
- ballahoo
- caldercraft
- (and 2 more)
-
Awesome gift and welcome to the Alert club. I’m enjoying the build very much (I choose to go for the etched deck which came out after I had my kit). Looking forward to watching your build!
-
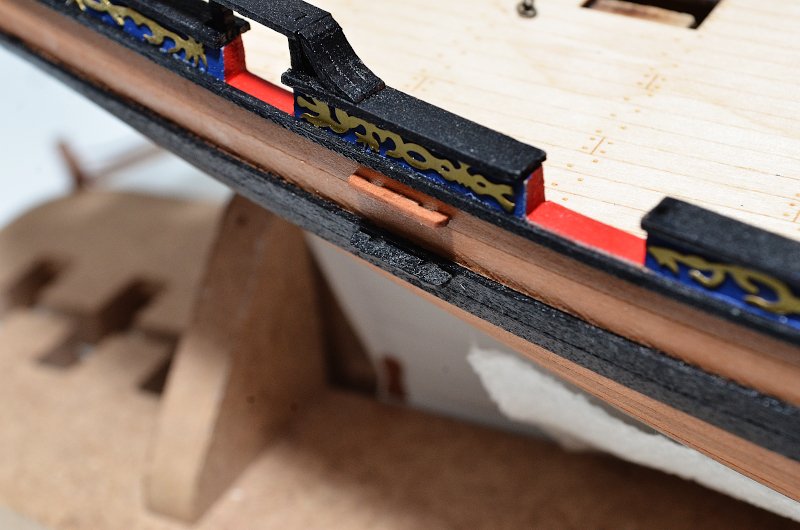
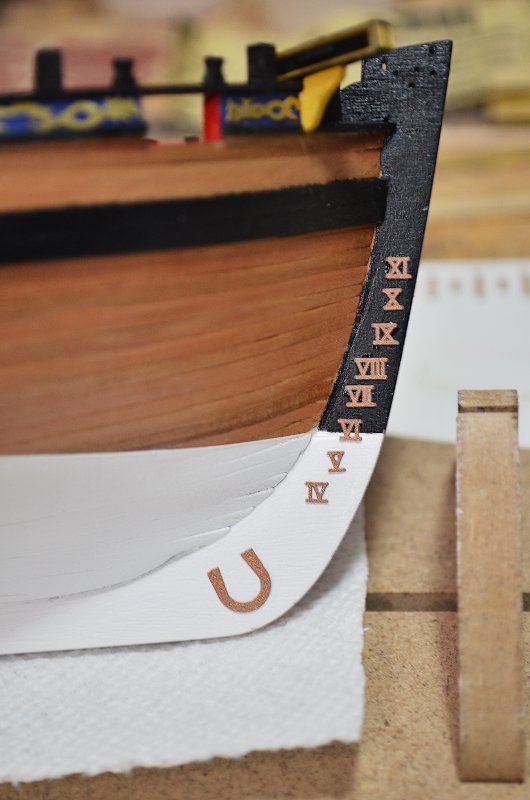
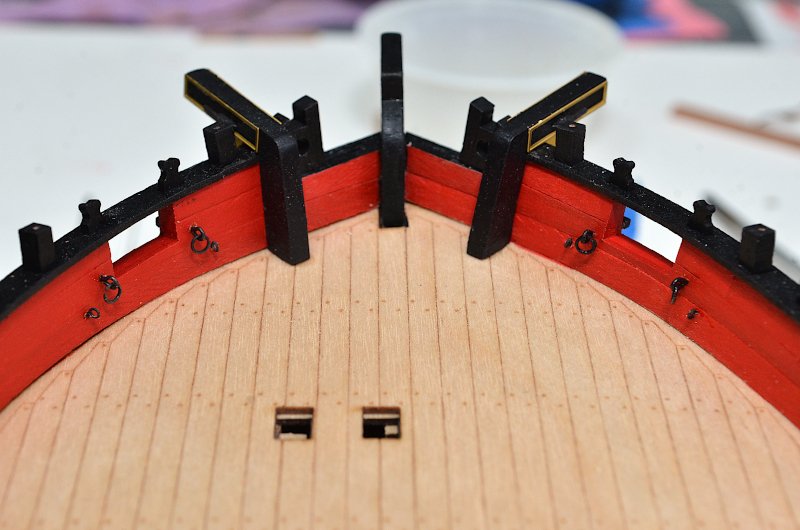
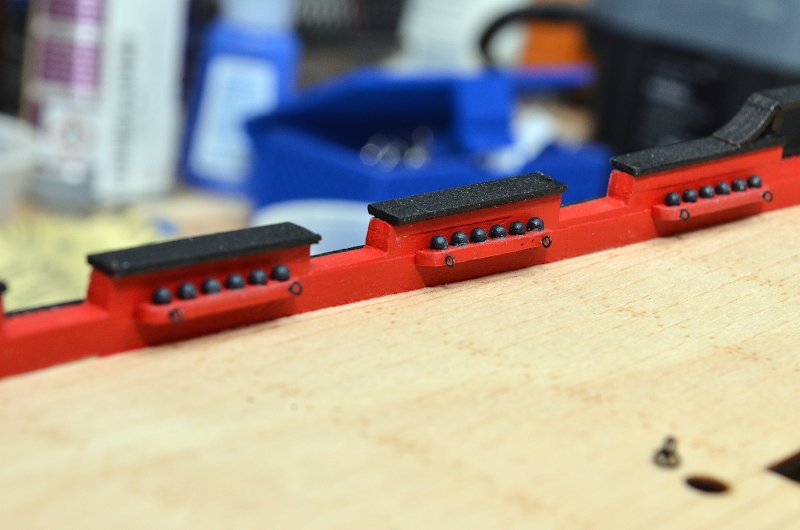
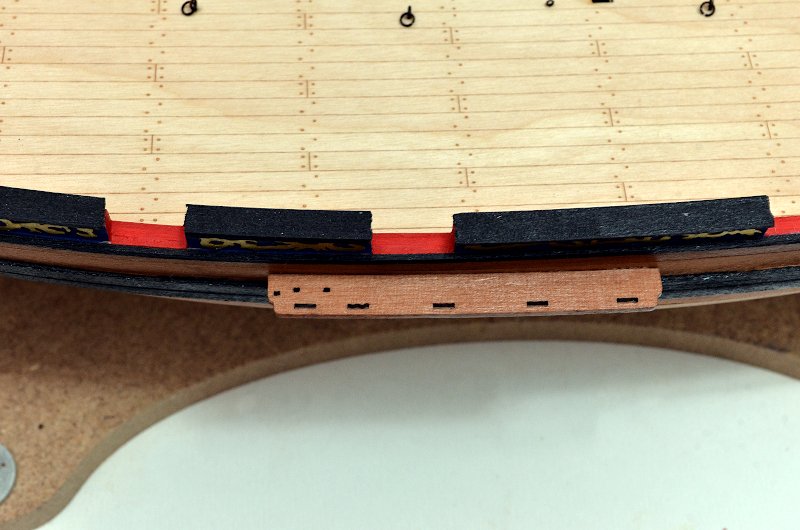
Thank you all for the comments and likes, I truly appreciate them. I placed the channels and then noticed that I had them too far astern, I very carefully removed them and them replaced them as you see below (which closely mirrors the location in the manual, again my gun ports are wider than than the opening on the channels, but looking forward in the manual it seems to look quite similar to when the deadeyes line up). Next I added the steps and draught markings. The instructions say to paint the markings copper; I liked the way they stood out in the pictures so away I went. Finally I added the ring bolts for the side tackle (I should have done this before gluing the shot holders on, but I managed). Now I'm currently adding the holes ring bolts for the breeching line. I only glued the set up in the bow since there will not be any cannons there. I still have to drill out the remaining hold, but I needed a break. Thank you for following!
- 436 replies
-
- 15
-
-
- vanguard models
- alert
- (and 1 more)
-
Very nice solution; thinking of the structure of card board - so the pins are going through several ridges (or whatever they are called) in between the exterior layers and then the glue fills that gap between the final ridge and the wooden part?
-
Cannon Rigging
VTHokiEE replied to JohnA's topic in Discussion for a Ship's Deck Furniture, Guns, boats and other Fittings
Here is a comment that I recently saw which may help out: You can find some good quality rope here (as well as new blocks, assuming that the scale doesn't get too large): https://www.syrenshipmodelcompany.com/miniature-rope.php https://www.syrenshipmodelcompany.com/boxwood-rigging-blocks.php Good luck! -
I would say start the log where you are. If you want to post any of the earlier pictures do that in the first post (or few) to give some back story to your current state (but I don’t think it’s necessary). PS - Welcome!
-
Great job! I feel like everyone is getting an airbrush lately; it’s a lot of fun to watch! Edit: Aside from the flow improver did you thin it at all?
-
Change Theme
VTHokiEE replied to cog's topic in Using the MSW forum - **NO MODELING CONTENT IN THIS SUB-FORUM**
Did you try switching the theme back to uniform? The button is at the extreme bottom of the page on the left. The text should be black on white again..png.992c3861353c758a386b55cbf71e0ff1.png)
-
It can be quite relaxing to put these together (and sometimes quite frustrating when I launch the 4th minuscule part from my tweezers into the great expanse of my garage). Do the instructions call for them on the boom? I was under the impression that they only go on the mast (but I could easily be mistaken). Here are a few pictures of a mast from my Scharpie Cchooner to show a potential alternative lacing for the boom.
- 60 replies
-
- 1
-
-
- swampscott dory
- finished
- (and 1 more)
-
I haven't done any rigging like your ship yet, but from what I have done and what I have seen recommended - do as much as you can off model before stepping the masts. It is a lot easier to work off ship (this aligns with Mastini's advice as well). I'd like to hear what others think as well once they reach the point that the masts need to be mounted.
-
Nice work so far! Hopefully I didn't miss this from earlier, but is the planking pattern laid out in the plans?
- 778 replies
-
- 3
-
-
- cheerful
- Syren Ship Model Company
- (and 1 more)
-
Somehow I missed this post, I'm glad to hear that you're still working on it and will return when you can. Regarding plank bending, what worked for me was edge bending with a travel iron. This doesn't work for everyone, but I was pretty happy with the results for my first time planking a hull. Good luck and I can't wait to see your updates when you return!
-
I believe clearway is referencing this log (I am linking to the post about the garboard plank):
-
That's a great link, bookmarked now, thanks for posting it! I didn't realize that Speedy had smaller guns. I mistakenly assumed that larger (more masts) meant bigger guns. If there isn't a good block made at that scale then I'd probably pass. I did find some nice hooks at hismodel for my Alert (they took a long while to arrive though) if you do go down the fully rigged path.
- 725 replies
-
- 1
-
-
- vanguard models
- speedy
- (and 1 more)
-
I’ll have to apologize for my lack of understanding all the terminology (edit - so I’m unsure which is the training tackle). My AotS Alert book calls out the breeching rope, gun tackle, and traversing tackle. I plan on doing the breeching rope and gun tackle (I don’t currently plan on doing the traversing tackle though). For the guns I’m pretty much following BE’s log to a T here: It looked so good to me I couldn’t not do it and most seemed to like the scale. Hopefully I get it close to his.
- 725 replies
-
- 1
-
-
- vanguard models
- speedy
- (and 1 more)
-
It’s looking great! I’ve started placing the ironwork for the cannons on my build (not a Speedy) as well and wow there are a lot of small pieces to make... I think I’m going to regret my decision to rig the guns, that is until they are rigged and done then I’ll be really glad that I did 🙂.
- 725 replies
-
- 2
-
-
- vanguard models
- speedy
- (and 1 more)