cog
-
Posts
8,764 -
Joined
Content Type
Profiles
Forums
Gallery
Events
Everything posted by cog
-
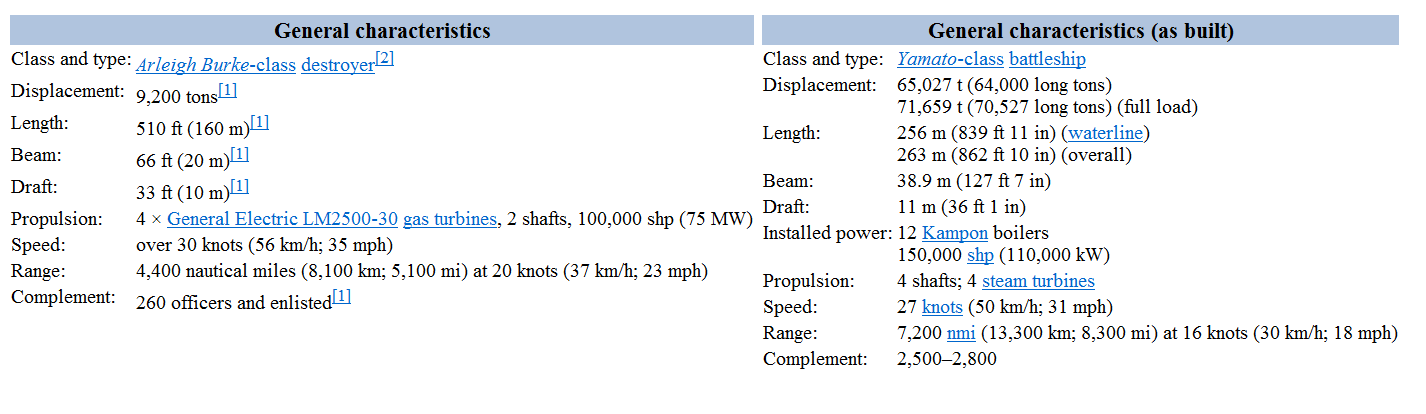
 You think the DDG should be smaller ...? Compare door sizes a.o. or the sizes from their respective data sheets ...
 -
About half the size, as far as I can see. What about the fire power ... the "exact" opposite ...
-
Hmmm, starts to look like a "well used tub" ... You seem to improve with every part you add to your ships ...
-
Eric, Could the threaded rod have been pulled up an inch or so, that would explain some of the difference between the top of the wood and the nut, the remainder than could be a missing piece of wood which split and got lost.
- 599 replies
-
- 6
-

-
- sidewheeler
- arabia
- (and 4 more)
-
Congratulations Sam, the deed is done. I hope you and your missus will have the ride of your life, as calm, or as exciting as you wish it to be. Rest me to say take care of each other ... Cheers
-
You're right ... a dry dock would be a 500% improvement
- 122 replies
-
- 5
-
-
- tamiya
- King George V
- (and 2 more)
-
stunning ...
-
nice a bit like: Two roads diverged in yellow wood ... It does make a difference
-
I didn't realise, but I just see the steps outside the upper deck cabins. A bit odd, as the middle deck cabins do not have the high instep ...
-
Caulking would "taint" the taste of the contents. Ever seen a caulked wine barrel ? It's the liquid which make them swell and tighten the seems shut ... such a perfect system ...
-
Are the images on an image server where you link to?
- 122 replies
-
- 3
-
-
- tamiya
- King George V
- (and 2 more)
-
I'm glad I found your build before you are finished, or nearing the end as I did last time, Siggi. You didn't loose your touch after a year ... I think you even got better! I will enjoy your build from the side line
-
Sand paper, or a sanding stick will mostly do, but a file or small plane can be helpful
- 20 replies
-
- 1
-
-
- lady nelson
- victory models
- (and 2 more)
-
My offer still stands Lovely display case, Mike. Very handsome, something your build deserves!
- 969 replies
-
- 3
-
-
- hahn
- oliver cromwell
- (and 1 more)
-
it's how she looks, the plank size is less important. Well done
- 20 replies
-
- 2
-
-
- lady nelson
- victory models
- (and 2 more)
-
Be glad you didn't try the sharpness of the hand axe ... Princess is right, eventhough we do not like to hear what she has to say ... Take good care of that hand ... we are ever so patient, Nenad
- 4,152 replies
-
- 3
-
-
- cutty sark
- tehnodidakta
- (and 1 more)
-
Luckily you used different materials, Greg ... else you might have been replacing those tiles for the remainder of your time with all them hail storms about Canberra... a never ending build More details than I expected on this one
-
I used a "punch" (correct, it's called just that) Those barrels look marvelous. When I started at the top, I thought them way bigger, until the last image. Quite a surprise ! Lots of patience
-
Done that, didn't work. Tried another browser, didn't work either ...It looks like the link to the image is broken. Do you use an external site where you keep your images?
- 122 replies
-
- 4
-
-
- tamiya
- King George V
- (and 2 more)
-
I first thought your wife needed a platform I'm glad I can leave the struggling to you. Very impressed by the amount of detail and the number of tiny parts you have to deal with. Hope you got rid of that flu for a long time.
-
HMCSS Victoria 1855 by BANYAN - 1:72
cog replied to BANYAN's topic in - Build logs for subjects built 1851 - 1900
Inspiring work Pat. She's becoming quite attractive with the make-up you add- 1,013 replies
-
- 2
-
-
- gun dispatch vessel
- victoria
- (and 2 more)