
HOLIDAY DONATION DRIVE - SUPPORT MSW - DO YOUR PART TO KEEP THIS GREAT FORUM GOING! (83 donations so far out of 49,000 members - C'mon guys!)
×


BANYAN
-
Posts
5,946 -
Joined
-
Last visited
Content Type
Profiles
Forums
Gallery
Events
Everything posted by BANYAN
-

Tools, supplies and workstation......
BANYAN replied to CPDDET's topic in Modeling tools and Workshop Equipment
Hi Dave, as Kurt suggests there are several discussion topics that can be read, including the 'stickies' and also have a look in the Database where there are some excellent topics to help you. One of your first questions is what style of build you want to do as that will govern your needs. Is it a basic klit (plank on bulkhead), solid hull, plank-on frame, or a scratch build. Some modellers have produced excellent scratch built models using the most basic tools; this may be a bit slower but can be achieved. Others (like me) are a bit of a tool aholic and have amassed a suite of power tools. There is a topic devoted to basic tool needs and perhaps if you start with 'beginner' level quick build of a similar type of vessel (motor, sail, static, period?) you will be able to assess which tools need to be improved, added to or unnecessary? cheers Pat -
These things happen mate. If it is not too late one easier way to mate these is to glue the item back together, then drill down if it is not too great a distance. Then insert the pin with a good coating of glue to reinforce it. Good luck cheers Pat
-
Looks great Rob and I love that painting in the background. cheers Pat
- 1,208 replies
-
- 4
-

-
- great republic
- clipper
- (and 1 more)
-
I did all the standing rigging and only the running rigging that would have stayed in place when the sails were unbent. Same as you, I had to make a decision Both authors apparently have a few errors in their books so it is best to triple check against other sources as well I found. I did not catch that item on the thimble Good luck with your research; you are rapidly closing in on the closure of your rigging yard cheers Pat
-
Glad to see you back Clare, and especially to hear that the accident didn't do you any major injury. Love the details on this build of an unusual subject. cheers Pat
-
Unless you pointed that out Dave, only the more knowledgeable riggers would have known Looks good and nicely done. cheers Pat
-
Superb work Jason, that looks really well detailed with clean crip joinery and metalwork. cheers Pat
-
If you find some that would be great, thanks Dave. I sourced my in a beadshop (doing the same thing - browsing and on the hunt) but have never found any as nice as that. Cheers Pat
-
That's a very comprehensive coverage of the process and nice results on the bowsprit Joss. What's the brand and type of tweezers (locking) that you used, it looks very useful for rigging also? cheers Pat
- 38 replies
-
- 1
-
-
- bounty
- caldercraft
- (and 1 more)
-
That sounds very feasible and good way to do it Rob; look forward to seeing this. cheers Pat
- 1,208 replies
-
- 3
-
-
- great republic
- clipper
- (and 1 more)
-
Very nice Ed, you must be happier to be approaching the end of spar installation cheers Pat
- 3,618 replies
-
- 2
-
-
- young america
- clipper
- (and 1 more)
-
Nice idea for grabbing the attention of the younger generations Peter cheers Pat
-
HMCSS Victoria 1855 by BANYAN - 1:72
BANYAN replied to BANYAN's topic in - Build logs for subjects built 1851 - 1900
Hi Mark; definitely not around the masts which are clear in the full photograph. I think this was done more often than not as the permanency of that rail with canvas around the stack suggest? The whole arrangement sits atop the stoke hole ventilator and coaling/access hatches so it would need to be a determined individual to touch the 'hot' stack The few photos I havre do provide some nice detail Eberhard, but I would really appreciate finding a photo providing details of the forecastle and midhips sections of the upper deck cheers Pat- 1,013 replies
-
- 4
-
-
- gun dispatch vessel
- victoria
- (and 2 more)
-
Hi Rob, you are making some significant headway now; look forward to seeing those masts. WRT sails - filled or furled? if furled, perhaps a bit of a waste but you might still see the ends protruding; if filled, wouldn't you see them as the sail boltrops etc only were bent to the jackstay but would not have fully covered them? Your call though when it comes to such detail. cheers Pat
- 1,208 replies
-
- 4
-
-
- great republic
- clipper
- (and 1 more)
-
Very nice mate; a lot done in a shortish amount of time - the masts look good. cheers Pat
-
HMCSS Victoria 1855 by BANYAN - 1:72
BANYAN replied to BANYAN's topic in - Build logs for subjects built 1851 - 1900
These are good questions Eberhard, and I really don't know for sure; but, I think these were only stowed here/used in action or for ceremonial. Attached is the picture (crop) I used as reference. The photo was taken in late 1867 when the ship was the escort for the visit of Prince Alfred, and is shown dressed overall. cheers Pat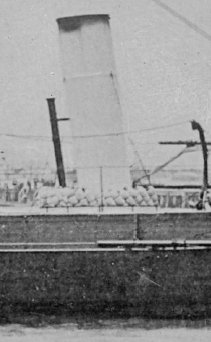
- 1,013 replies
-
- 4
-
-
- gun dispatch vessel
- victoria
- (and 2 more)
-
Without evidence I think you are making some reasonable assumptions here Steven; well informed assumptions at that. Your progress and work is looking good. cheers Pat
-
Very neat and good looking rigging Dave. What type of parral beads are you using; the one I used were not so nice and uniform in size and shape? cheers Pat
-
HMCSS Victoria 1855 by BANYAN - 1:72
BANYAN replied to BANYAN's topic in - Build logs for subjects built 1851 - 1900
Thanks for the comments and ideas guys; much appreciated. Carl, thanks - I am reasonably happy with them but practice will make better Dave, I had thought of that but once I decided to avoid the fold over I did not pursue the option. I will certainly try that on the 1:48 versions. Thanks Ed, only 22 this time as they were only shown stowed around the funnel. the crew allowance was for 140, but by the time you take out the senior sailors and officers etc it would have been closer to 100 crew. I have yet to establish their purpose there (except that is a great place to air and dry them over the stoke hole ventilation above the boilers. The only other purpose I can think of is some form of protection for the Captain and conning officer in battle? cheers Pat- 1,013 replies
-
- 3
-
-
- gun dispatch vessel
- victoria
- (and 2 more)
-
Beautiful work Daniel; your work is always a pleasure to view and gives me the inspiration to improve. cheers Pat
-
Very nice work well up to your usual high standards Gaetan; as druxey says 'you make it look easy' but it is anything but. I have issues just straight sawing yet allowing trying to do a compound cut. cheers Pat
-
Hi Patrick - I want one; just zap it with your 'expanda' gun and send it over to me please Looks great and nicely detailed. cheers Pat
-
OC, what about a baseboard with a brass/iron wire frame then cover that with thick clear plastic (hardware shops stock this). The wire could be form as 2 x U shapes along the longer axis and inserted into holes in the baseboard.. Alternate is to use wood dowel or square section rounded where it is inserted into the baseboard, then glue the cellophane/plastic (such as that used in shirt boxes etc) onto the wood. You could stain the wood dowel the same as the baseboard? cheers Pat