BANYAN
-
Posts
5,954 -
Joined
-
Last visited
Content Type
Profiles
Forums
Gallery
Events
Everything posted by BANYAN
-

HMCSS Victoria 1855 by BANYAN - 1:72
BANYAN replied to BANYAN's topic in - Build logs for subjects built 1851 - 1900
Thanks for looking in Denis, and the kind comments. cheers Pat- 1,013 replies
-
- 2
-

-
- gun dispatch vessel
- victoria
- (and 2 more)
-
Extraordinary - what a whopper of a ship! Very nice work Gaetan, I look forward to your detail work. cheers Pat
-
I am sorry I missed this so much earlier, a truly inspiring build. I very much like the detail being applied; artisans at work :). cheers Pat
-
HMCSS Victoria 1855 by BANYAN - 1:72
BANYAN replied to BANYAN's topic in - Build logs for subjects built 1851 - 1900
Hi Elijah, yep genuine copper They are at correct scale of 1:72 and the sets come pre-stamped for port and stbd sides so you can get the pattern correct. They are from AMATI I think (I will have to go back and check). cheers Pat- 1,013 replies
-
- 2
-
-
- gun dispatch vessel
- victoria
- (and 2 more)
-
HMCSS Victoria 1855 by BANYAN - 1:72
BANYAN replied to BANYAN's topic in - Build logs for subjects built 1851 - 1900
Thanks for looking in Carl, Ed and Jason, much appreciate the feedback. Yep Carl, a 'tad' fiddly at 1:72 but if I can get half as good as Ed at it I will feel I am starting to accomplish Thanks for the tip on using the vise Ed, I'll give that a try. I am also going to give the 'jeweller's mitre' I have a go. Using the same technique of nipping off just above the face plate and peening with the mitre jig held in a vise with the face facing up. I hadn't thought of that until your timely input. I also need to go back through your work again to refine my polishing technique; I am still not controlling the 'piece' enough and it moves while filing - I think I need to get a better small vise Thanks Jason, appreciate these comments after seeing your meticulous work. As this is a 'club' build, I find I am often trying to repair/improve on some of the 'finish' applied by others - but in this case the copper sheathing plates were applied by a fellow club member (his first attempt at doing coppering) and he did a great job - I just needed to tidy up after cutting the holes etc for the pintles and glue back a couple of plates I dislodged in the process cheers Pat- 1,013 replies
-
- 4
-
-
- gun dispatch vessel
- victoria
- (and 2 more)
-
HMCSS Victoria 1855 by BANYAN - 1:72
BANYAN replied to BANYAN's topic in - Build logs for subjects built 1851 - 1900
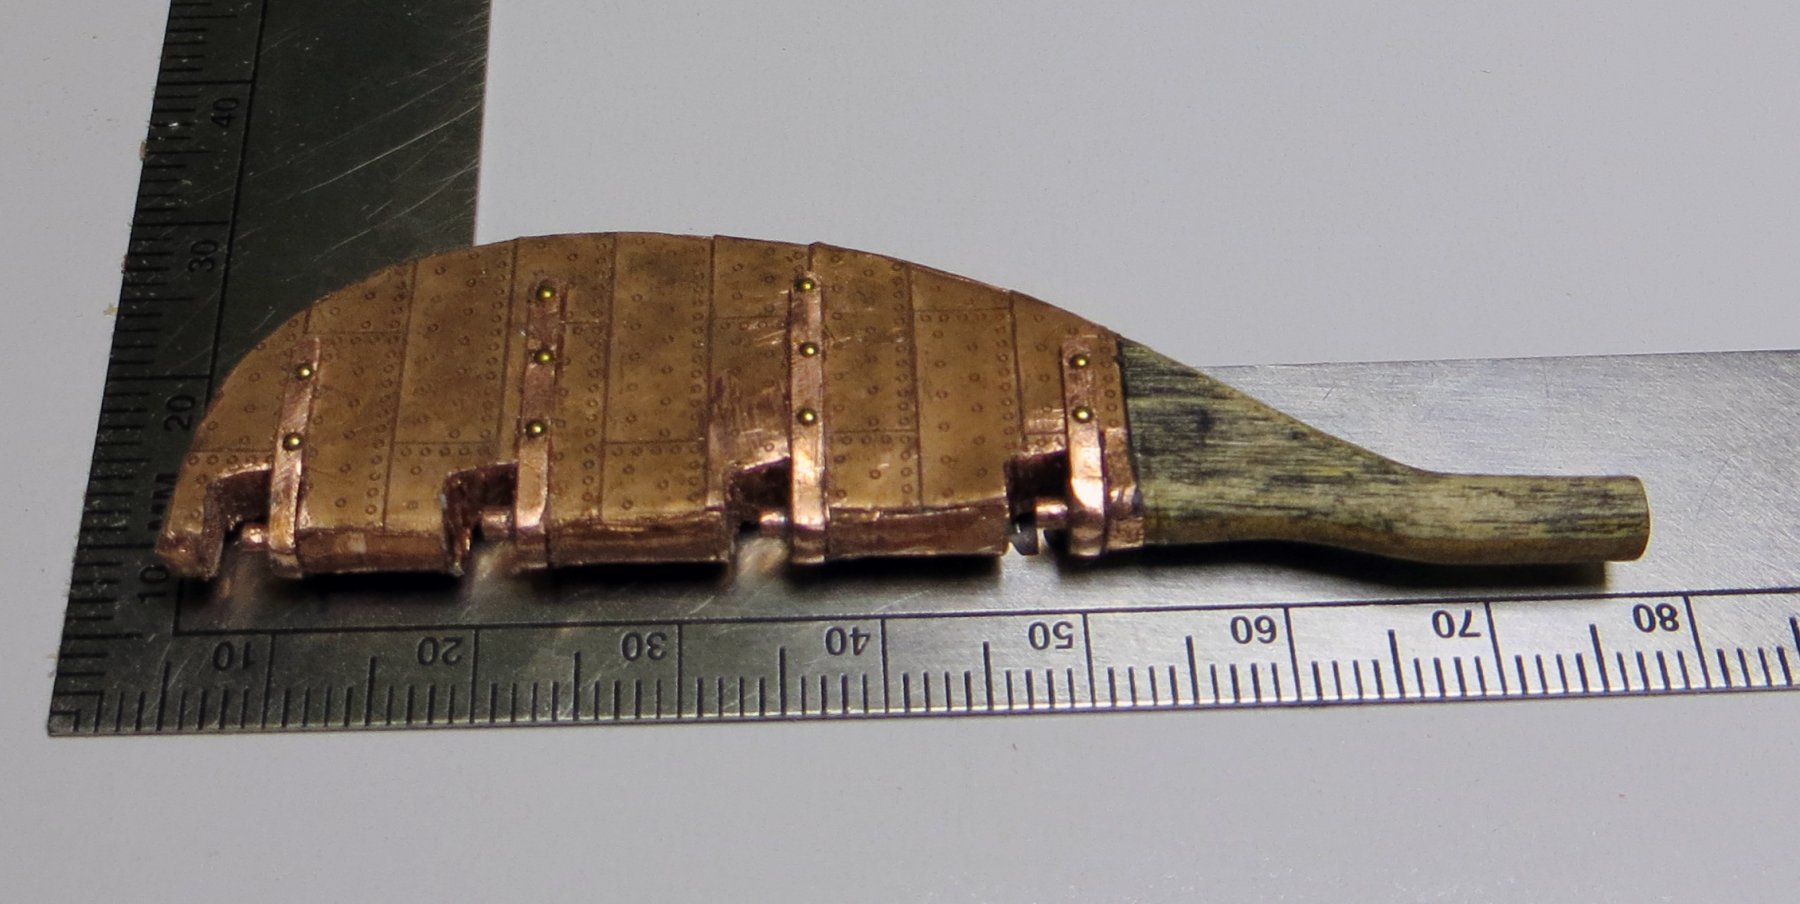
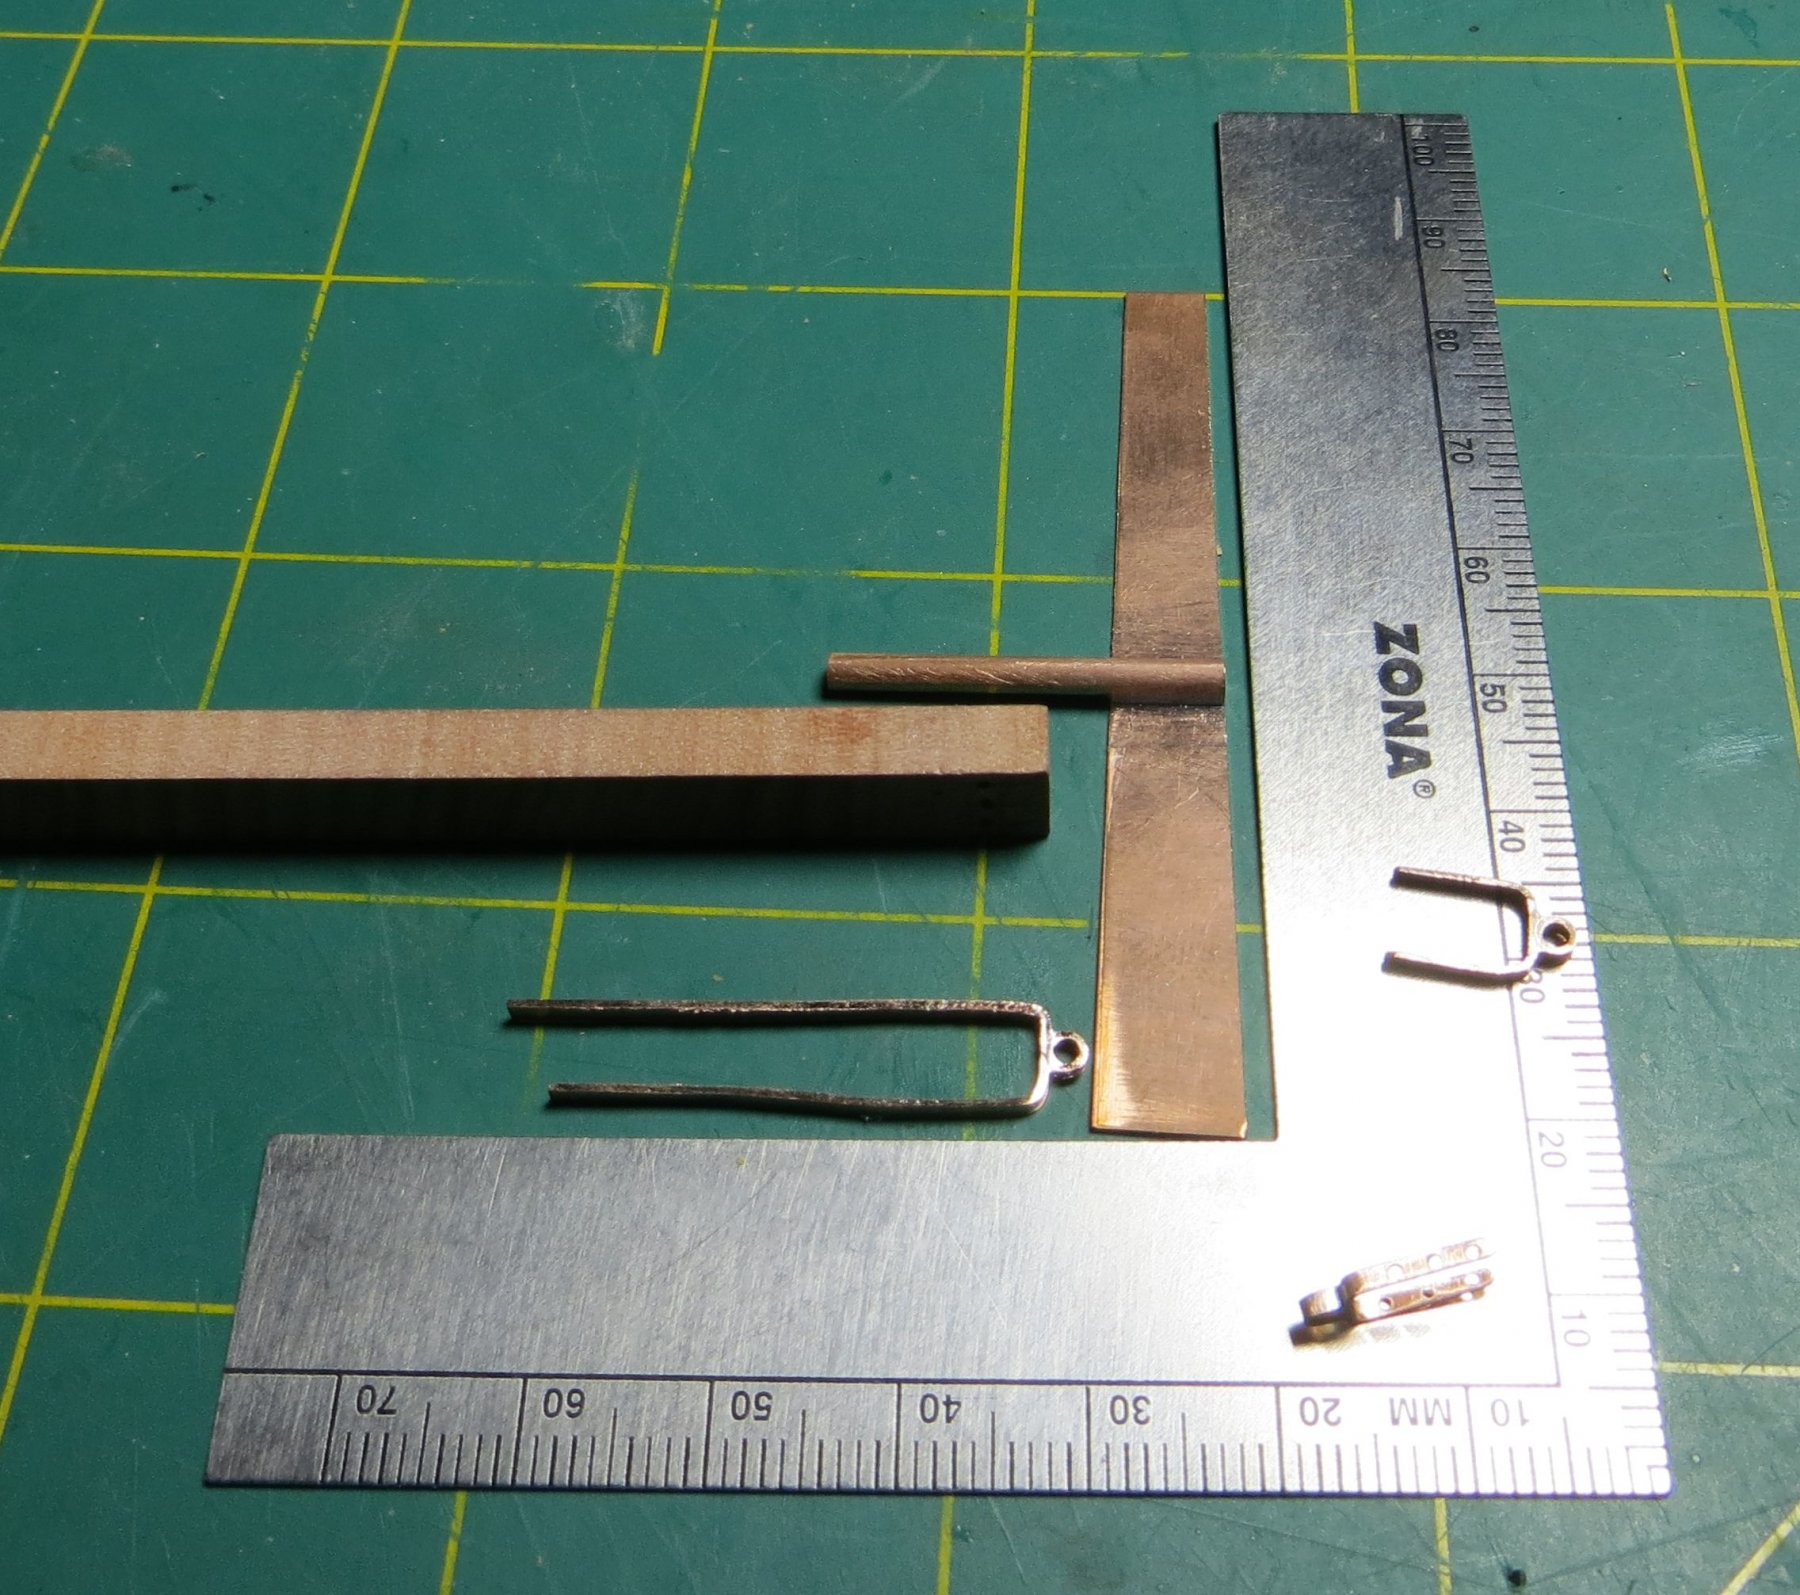
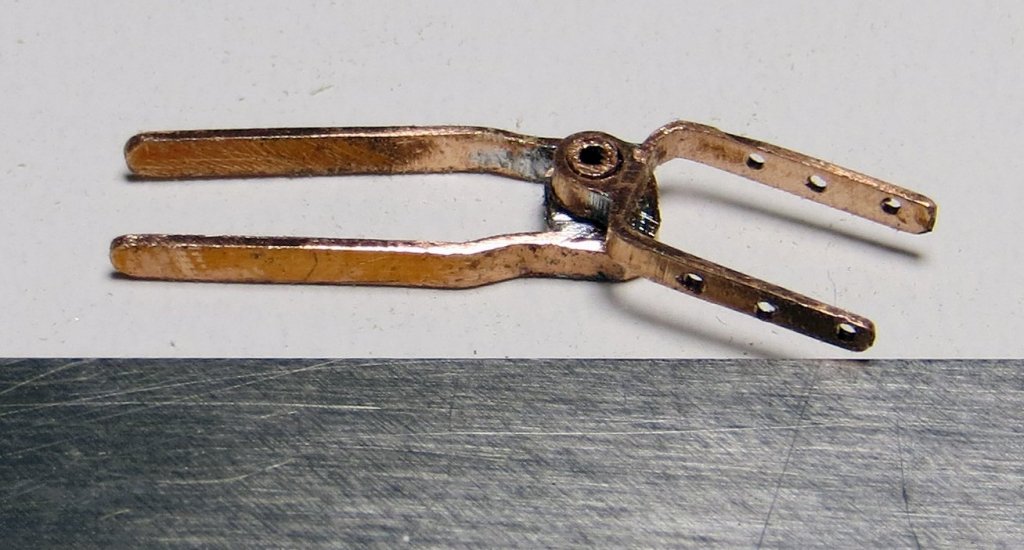
Hi folks. Some further progress on the rudder which is now ready to hang. Below is the process for making the pintles which was made by first soldering two telescoping tubes of copper together to get to the right size for the leading edge of the rudder. This thicker walled tube was then soldered to the the copper plate which was then cut on my hobby saw to the right strap thickness. The was pintle was then shaped on a former to the same thickness as the rudder blade. The photo with the raw materials shows the telescoping tubes with the smaller being the same size as the mating hole in the gudgeon. The photo showing a near complete pintle (still to be drilled) and gudgeon shows a nice tight fit - the pintle still has cleaning of the solder to be completed. Everything is made of copper except the nails I used to simulate the rivet heads which are brass. i tried making some small nails but have yet to refine/improve my technique (based on Ed Tosti's method) and really need to make a jig for this. With my nerve issues I find I cannot hold the wire in a plier with grovve as Ed does. These turned out okay as shown in the completed rudder, which I will hang after painting the rudder head and fitting the strap and eyes to accept the emergency chains and shackles. cheers Pat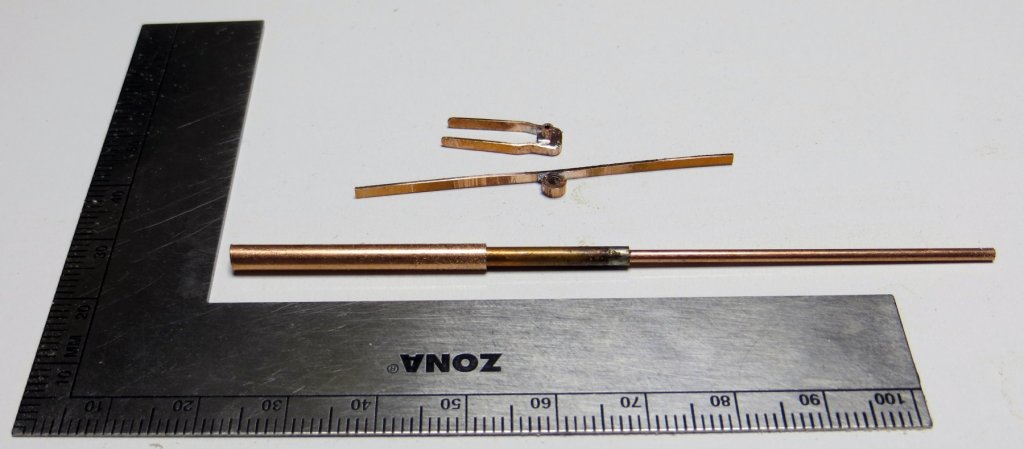

- 1,013 replies
-
- 18
-
-
- gun dispatch vessel
- victoria
- (and 2 more)
-
Good luck with the move Michael - hopefully no new repairs needed the other end cheers Pat
-
You don't muck around do you Danny. This will be another interesting build so I'll pull up a chair also. cheers Pat
-
So, a little easier than Vulture (but not much) Nice work Danny. cheers Pat
- 295 replies
-
- 4
-
-
- amatsukaze
- halinski
- (and 2 more)
-
Hi Gaetan, you could also try to make her like an 'accordion' with a flexible bellows type construction to shorten/lengthen as required Nice work by the way cheers Pat
-
You have made a lot of nice looking progress Greg, she will look a treat when completed. cheers Pat
-
Kurt, I found taking small amounts each pass worked best as there is less chance of the 'kickback' especially with small pieces. I use about a 1/3 turn of the front wheel -usually works for me. If you do try to take more off make sure you are not standing behind the entry/feed side just in case of kickback - I usually work with the sander across my body so it feeds right to left. With very thin and small pieces try using double sided tape (such as carpet tape) to hold the piece to a larger carrier piece. cheers Pat
-
That is some very fiddly work and you have achieved mastery over it Danny - very clean and precise. cheers Pat
- 295 replies
-
- 4
-
-
- amatsukaze
- halinski
- (and 2 more)
-
HMCSS Victoria 1855 by BANYAN - 1:72
BANYAN replied to BANYAN's topic in - Build logs for subjects built 1851 - 1900
Just an airfare Carl; I can provide the 'coldies' cheers Pat- 1,013 replies
-
- 4
-
-
- gun dispatch vessel
- victoria
- (and 2 more)
-
hello from Reynella south aust
BANYAN replied to richard the 3rd's topic in New member Introductions
Welcome aboard Richard; lots of helpful advice both in the forum and in the articles database. Look forward to seeing your work. cheers Pat -
HMCSS Victoria 1855 by BANYAN - 1:72
BANYAN replied to BANYAN's topic in - Build logs for subjects built 1851 - 1900
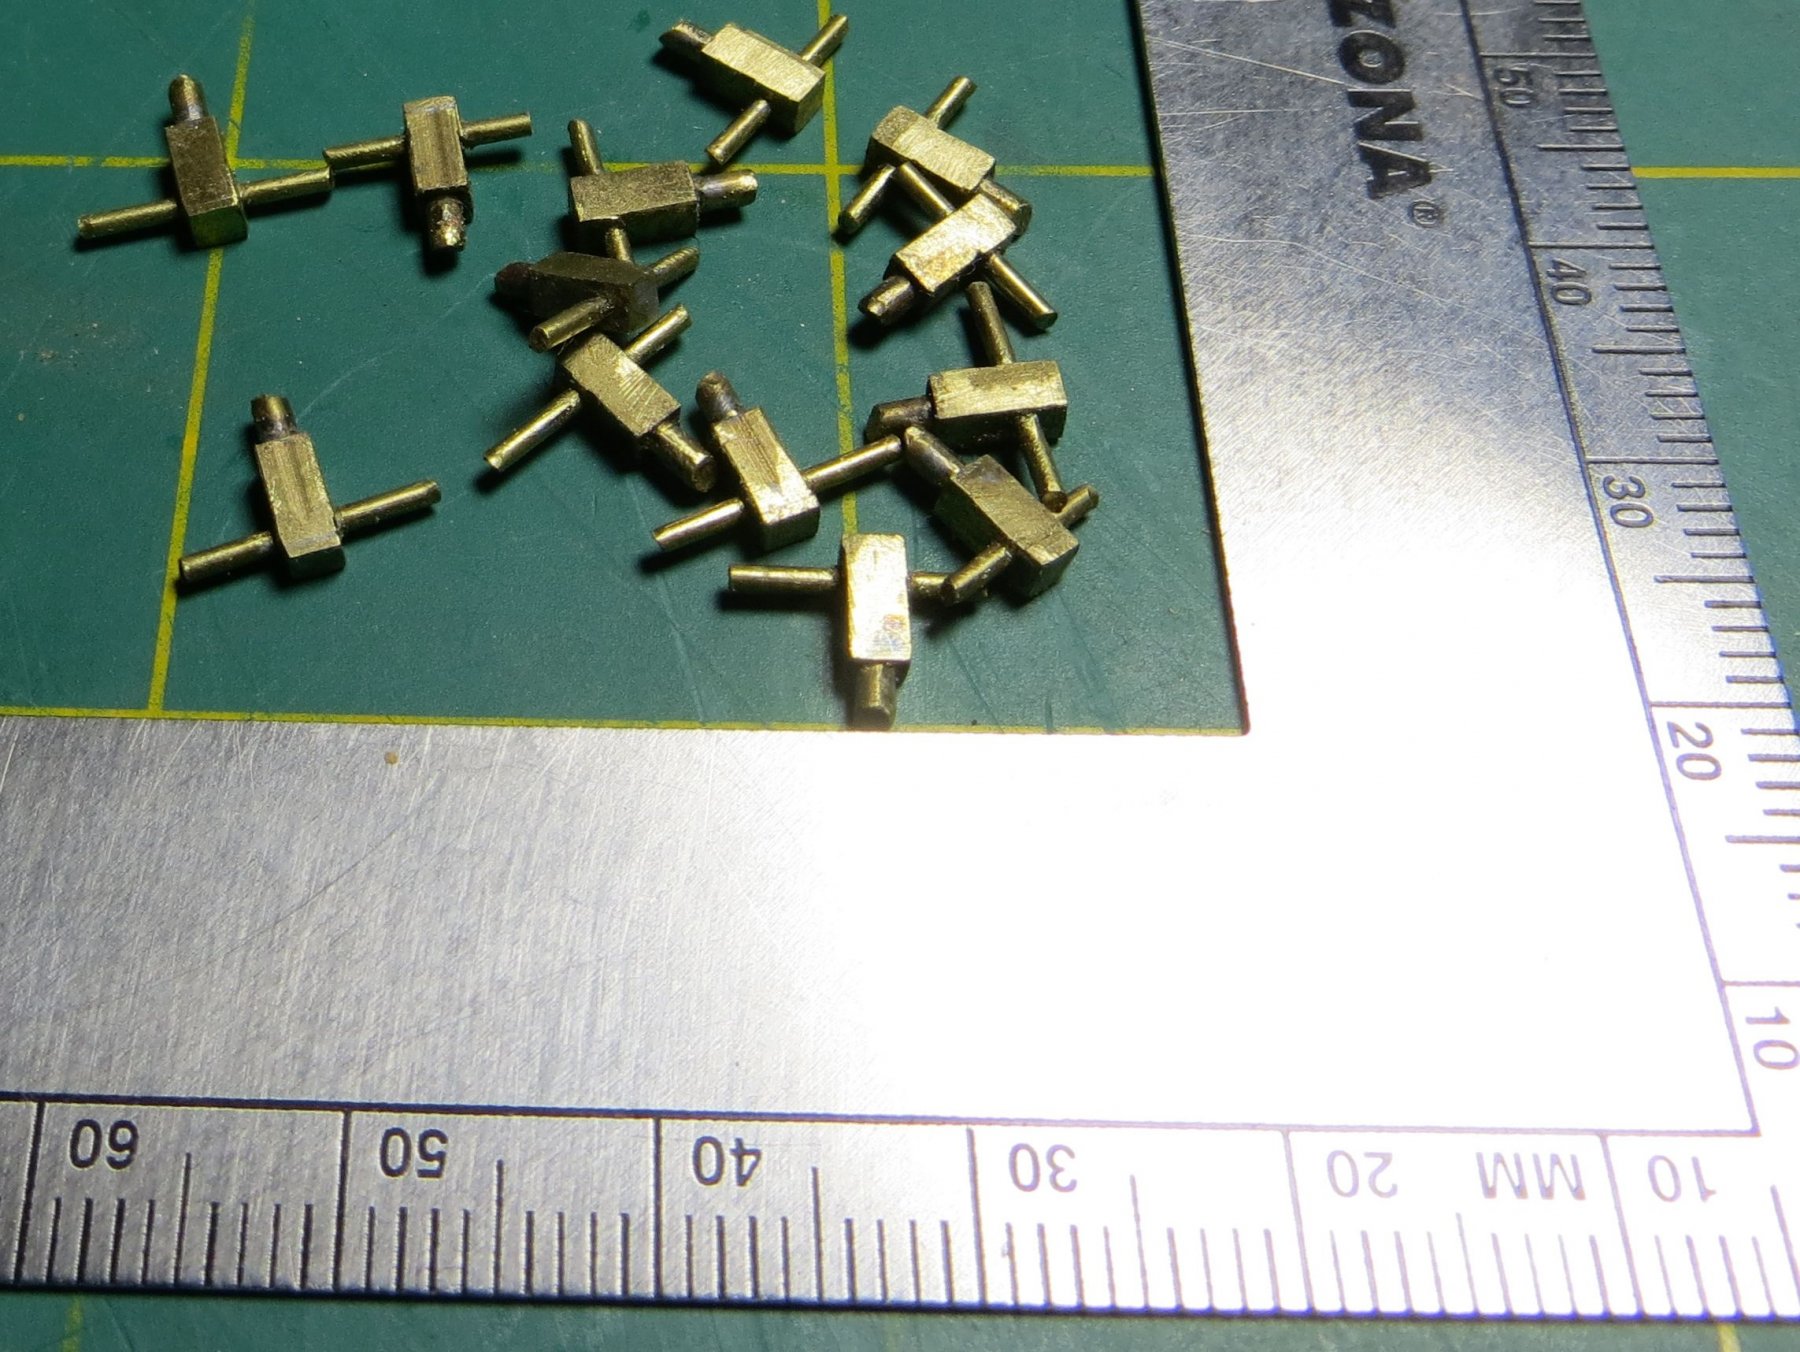
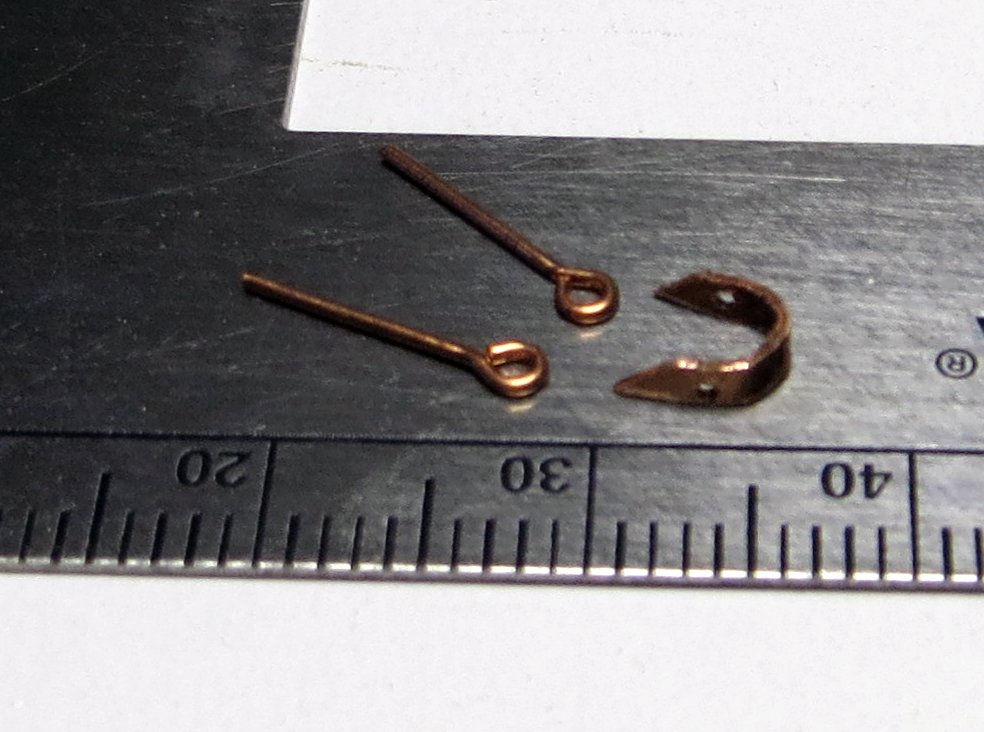
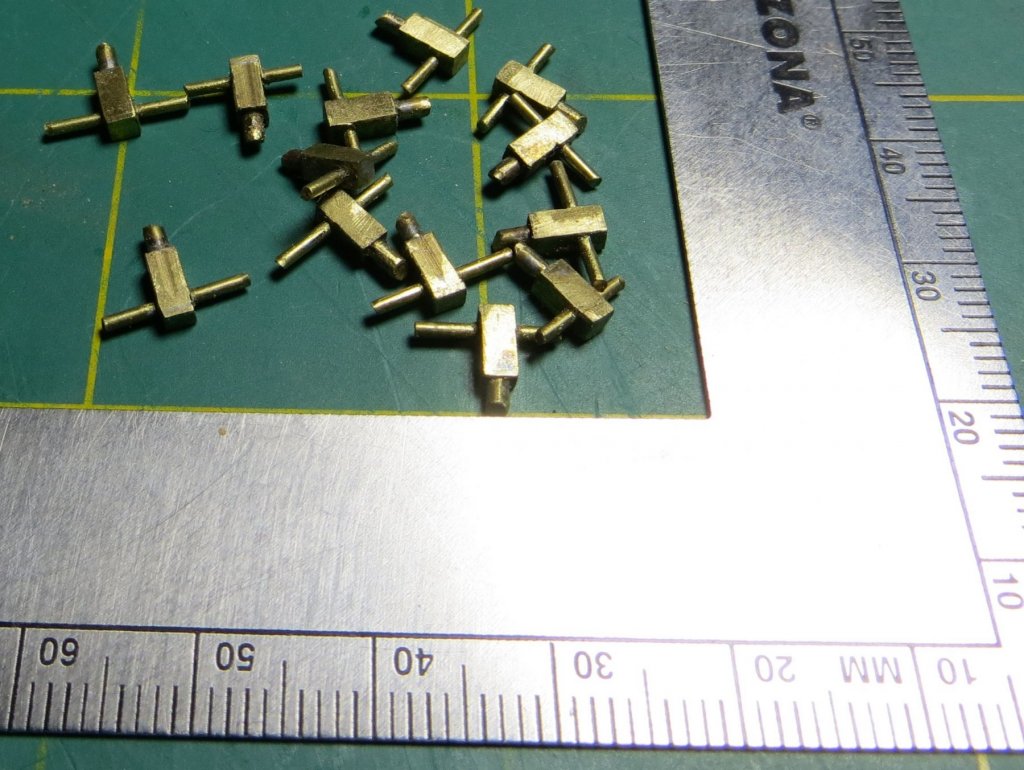
Hi folks, I have been making slow progress lately as the research side of the project has taken more time than I can really spare and, I have been busy making furniture for the nursery for the soon to be born first grandchild. The following pictures show some of the small items I have been, and continue, working on. I have also completed the heads, stern bench and made a start on the common service lifebuoy (more on the latter in a later post). First the pissdales. These are only 8mm across, 4mm deep at the apex, and 4mm across the opening. The drain tube looks a little out of scale in the photo but look OK in real life These still need to be cleaned up a little. The second photo shows the process of making the rudder gudgeons. The process I have used is the one Ed Tostie described in his Naiad build and modified in his YA build; this process and works well once you learn to control the copper when cutting (hence the odd shape - it got away from me a couple of times ) - Ed did warn of it grabbing so my error . These still have to be polished and cleaned up a little. I have made 4 but only two show in the photo. The wood strip is a jig of the same size as the rudder post (width and depth). The straps are short as the rudder post is quite thin and in reality the gudgeon straps would have wrapped around the post. however, as We have already fitted the propeller and its control mechanisms (see earlier posts) this is impossible now so will terminate at the end of the post. The third photo shows where I am at in constructing the towing timbers (bollards). These are about 75% complete; the process I used was to cut some 4mm brass square tube to length, solder a cap to the top, drill for the cross pin, insert and solder the cross pin, insert and solder the base locator pin. The cross pins have yet to be trimmed to size and the ends rounded over with a cup burr. The bottom round bar pins are for locating the bollards and to reinforce the glue connection. Then, a lot of cleaning up before blackening. I decided to make them from brass as at this scale, I found it near impossible to make a sub post of wood and add an iron cap. These will be blackened and would appear much the same as if I had made them from wood and iron as the whole item was painted black anyway. I don't know how Ed does such detailed work at this scale - respect! cheers Pat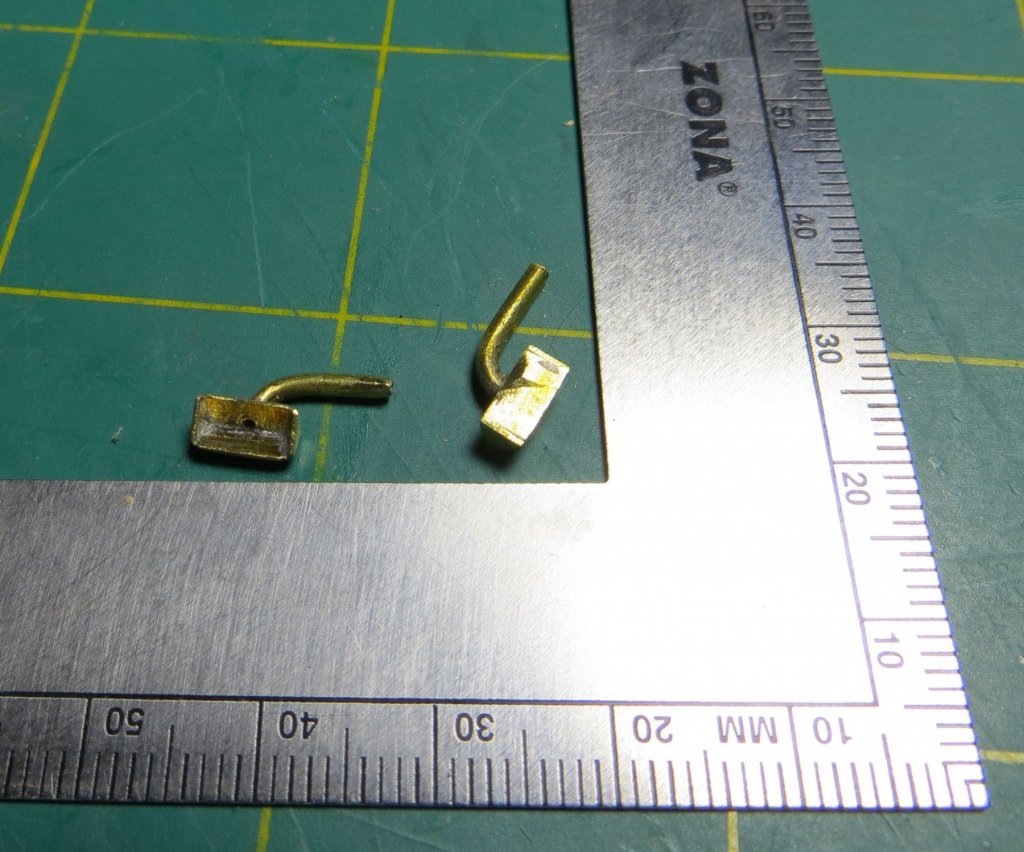

- 1,013 replies
-
- 9
-
-
- gun dispatch vessel
- victoria
- (and 2 more)
-
Snowy, I went through this saga with my Endeavour build. I am about to lose the internet connection here as a new system is being fitted today - fingers crossed all goes well If i get a chance to find this I will update this post but otherwise I will do so after reconnection. in the meantime try looking for The Boats of Men of War by "May" . A search through the forums may also bring up a few answers as it has been raised on several occasions. [Edit: a quick search found this, but there is more definitive info avail. cheers Pat
-
Great to see you back at it Rusty; you haven't lost any of your skills during the interval - very nice work. cheers Pat
- 310 replies
-
- 3
-
-
- cheerful
- Syren Ship Model Company
- (and 1 more)
-
Nice work Carl, plenty of detail and well worth the frustrations. Mark - I wouldn't recommend wax of any type unless you are absolutely sure you will get it all off before painting? cheers Pat
-
Stunning work yet again Ed, everything is so well manufactured and finished - QUALITY cheers Pat
- 3,618 replies
-
- 2
-
-
- young america
- clipper
- (and 1 more)
-
Thanks Ed, a very nice clean job you have done of that, hence my question. I have also just noticed the material you have used in the vice for holding the mast to minimise any marking and movement. Will need to find something similar. Thanks again for all the feedback and ideas cheers Pat
- 3,618 replies
-
- 4
-
-
- young america
- clipper
- (and 1 more)
-
Danny you have really mastered this building medium very quickly; very nice work and great detailing at that scale. cheers Pat
- 295 replies
-
- 3
-
-
- amatsukaze
- halinski
- (and 2 more)