HOLIDAY DONATION DRIVE - SUPPORT MSW - DO YOUR PART TO KEEP THIS GREAT FORUM GOING! (Only 72 donations so far out of 49,000 members - Can we at least get 100? C'mon guys!)
×


BANYAN
-
Posts
5,946 -
Joined
-
Last visited
Content Type
Profiles
Forums
Gallery
Events
Everything posted by BANYAN
-

HMCSS Victoria 1855 by BANYAN - 1:72
BANYAN replied to BANYAN's topic in - Build logs for subjects built 1851 - 1900
experimenting with that as you ask Mark - only concern is slicing it if I fill the tube. I think the safest bet is to fill after I cut the slice from the tube but run the risk of getting excess on the edges and sides which can't be cleaned until it is dry. Get back to you on that. cheers Pat- 1,013 replies
-
- 2
-

-
- gun dispatch vessel
- victoria
- (and 2 more)
-
Those shrouds look great set up Ed. I particularly like the colour and lay of the lanyards which look really good. cheers Pat
- 3,618 replies
-
- 5
-
-
- young america
- clipper
- (and 1 more)
-
Quite a stack of frames there Gaetan. That will be a big hull when assembled. cheers Pat
-
Another graceful model Russ; her lovely lines are starting to show. cheers Pat
- 420 replies
-
- 5
-
-
- captain roy
- lugger
- (and 2 more)
-
Very nice rigging work Dave (and the 'sinners' in the dockyard - see your post ) I did not query this when I rigged mine, but this is a neater solution you have achieved. cheers Pat
-
HMCSS Victoria 1855 by BANYAN - 1:72
BANYAN replied to BANYAN's topic in - Build logs for subjects built 1851 - 1900
Thanks John. The research is the hardest part as there is not much direct info; we're having to make a lot of assumptions based on the wording of the Contract. For example, we know she had a single Browne and Harfield Capstan but not exactly where it was placed - same for Elliott Riding Bitts etc etc cheers Pat- 1,013 replies
-
- 2
-
-
- gun dispatch vessel
- victoria
- (and 2 more)
-
HMCSS Victoria 1855 by BANYAN - 1:72
BANYAN replied to BANYAN's topic in - Build logs for subjects built 1851 - 1900
Hi Eberhard and thank you very much for that very helpful feedback. I have tried to find smaller rod but to date can only get 3mm BUT only in bulk and at 1m lengths. This supplier is quite distant (here in Aust) so postage is an issue. Based on your info I will look further into this. I like the idea of the acrylic cement. Noting the small tube size, would a drop of this solidify within the ferrules and remain fixed to allow me to work it? That way I would not need rod at all? As to turning, yep, I have learned those lessons the hard way I take very very small cuts and pause after every three. I have also found the appropriate feed speed and rpm to make this work but it is very tedious. I only need 10 all up so thankfully, I will not need to turn too many more as I have found doing 15mm lengths the best. cheers, and many thanks again. Pat- 1,013 replies
-
- 5
-
-
- gun dispatch vessel
- victoria
- (and 2 more)
-
That will sand back nicely Russ as the planks appear to butt up very nice and cleanly. cheers Pat
- 420 replies
-
- 5
-
-
- captain roy
- lugger
- (and 2 more)
-
HMCSS Victoria 1855 by BANYAN - 1:72
BANYAN replied to BANYAN's topic in - Build logs for subjects built 1851 - 1900
Thanks Russ- 1,013 replies
-
- 2
-
-
- gun dispatch vessel
- victoria
- (and 2 more)
-
HMCSS Victoria 1855 by BANYAN - 1:72
BANYAN replied to BANYAN's topic in - Build logs for subjects built 1851 - 1900
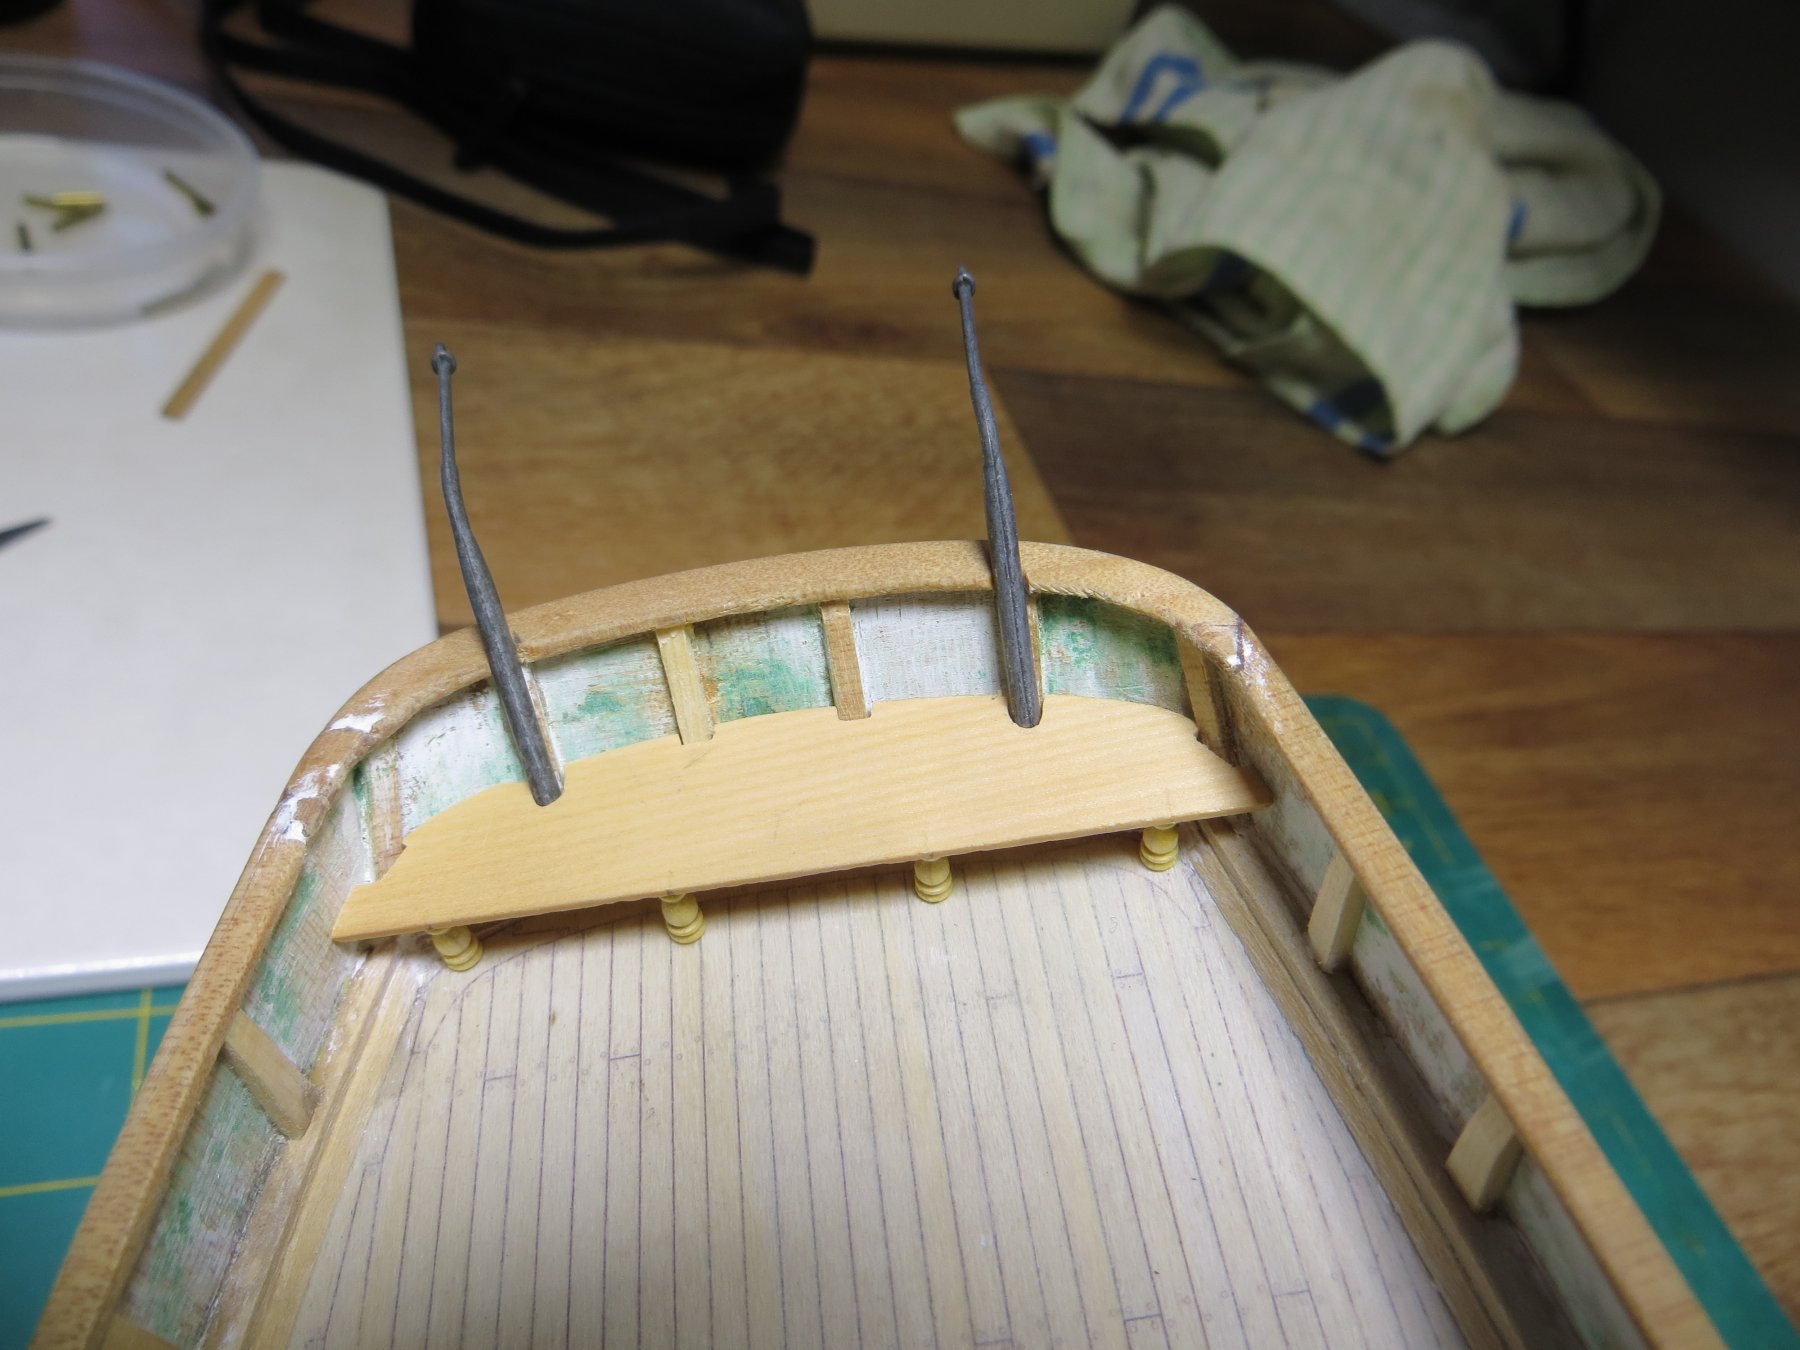
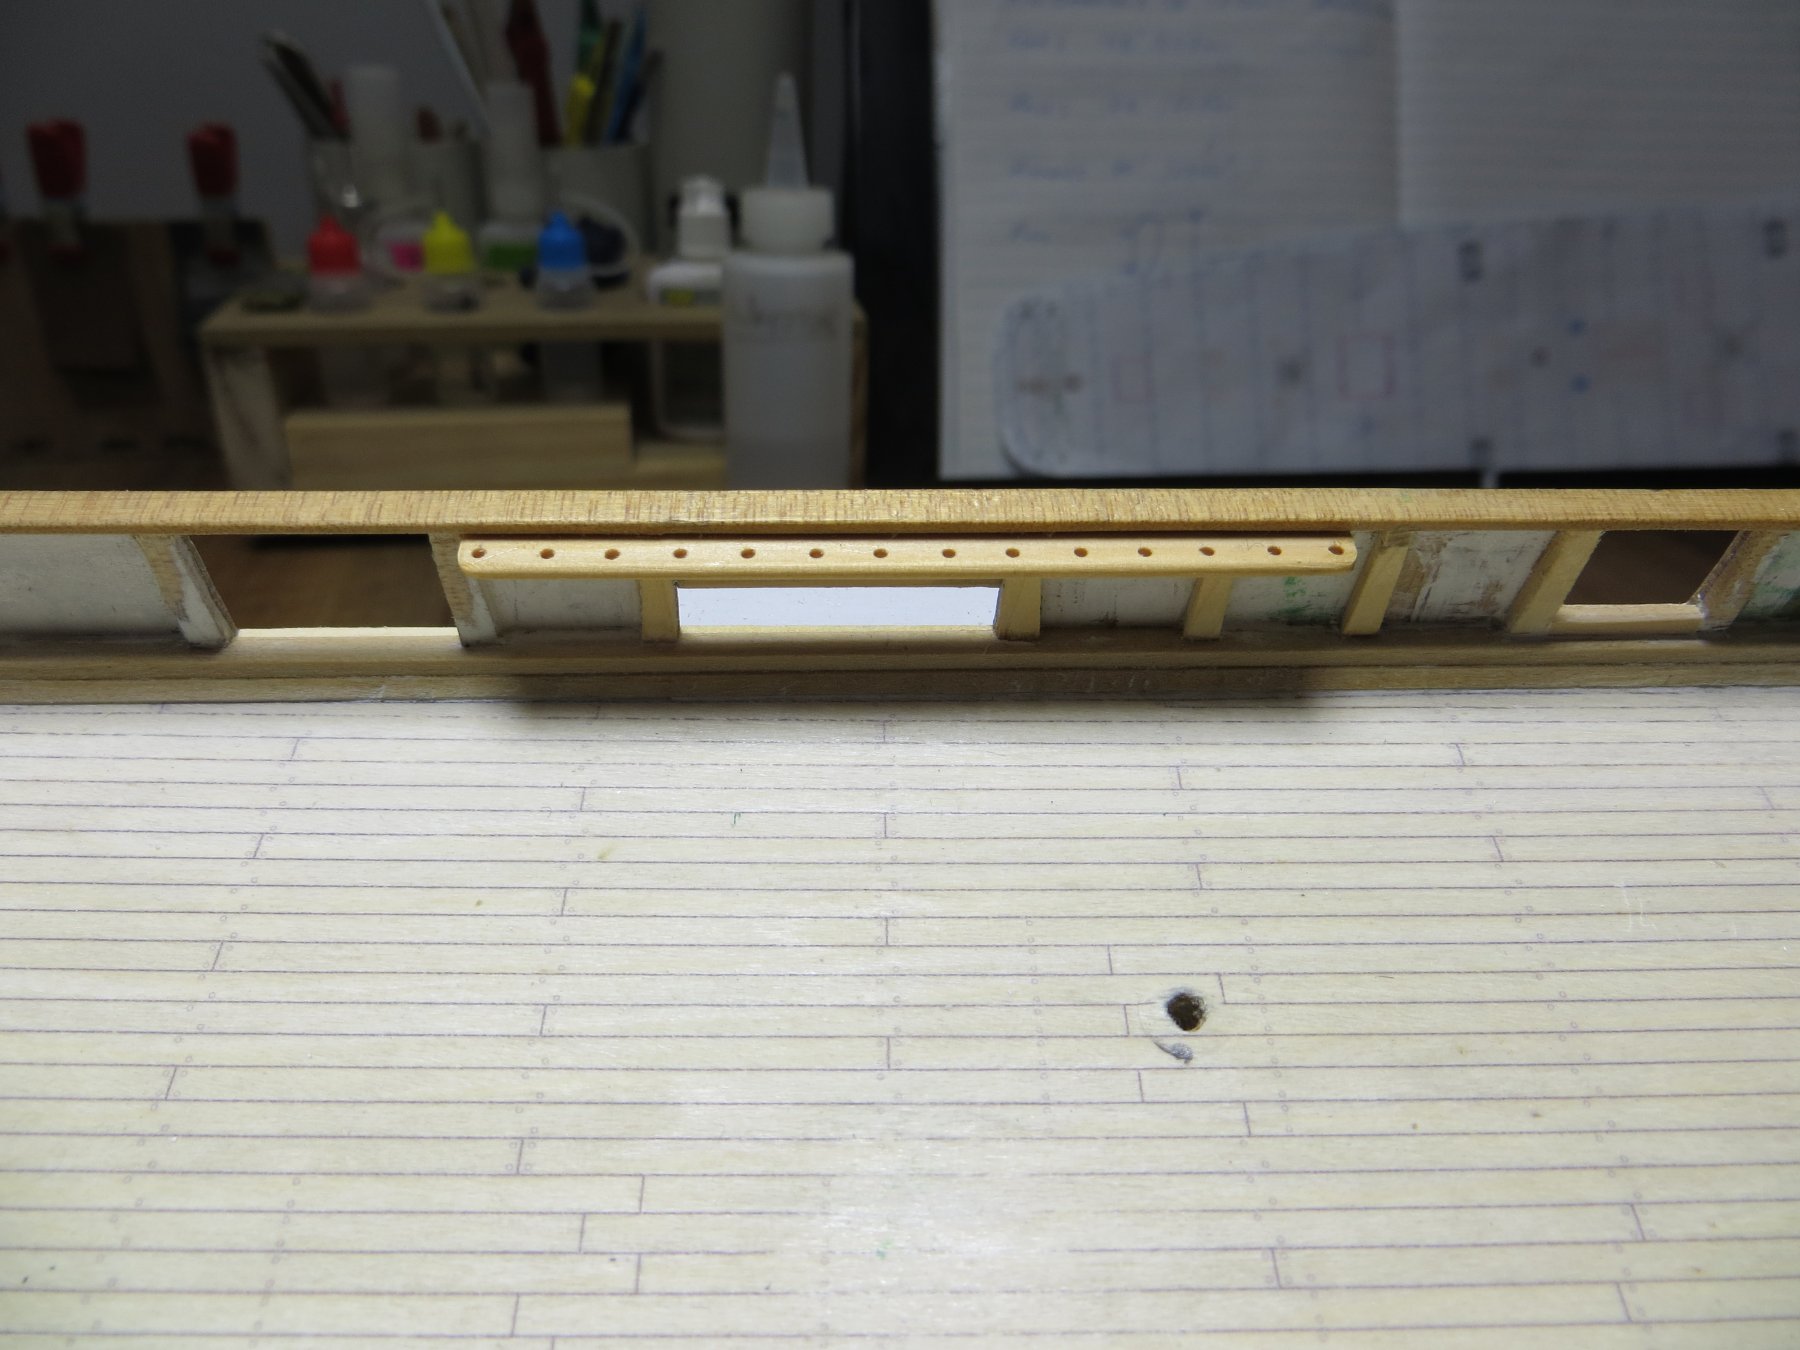
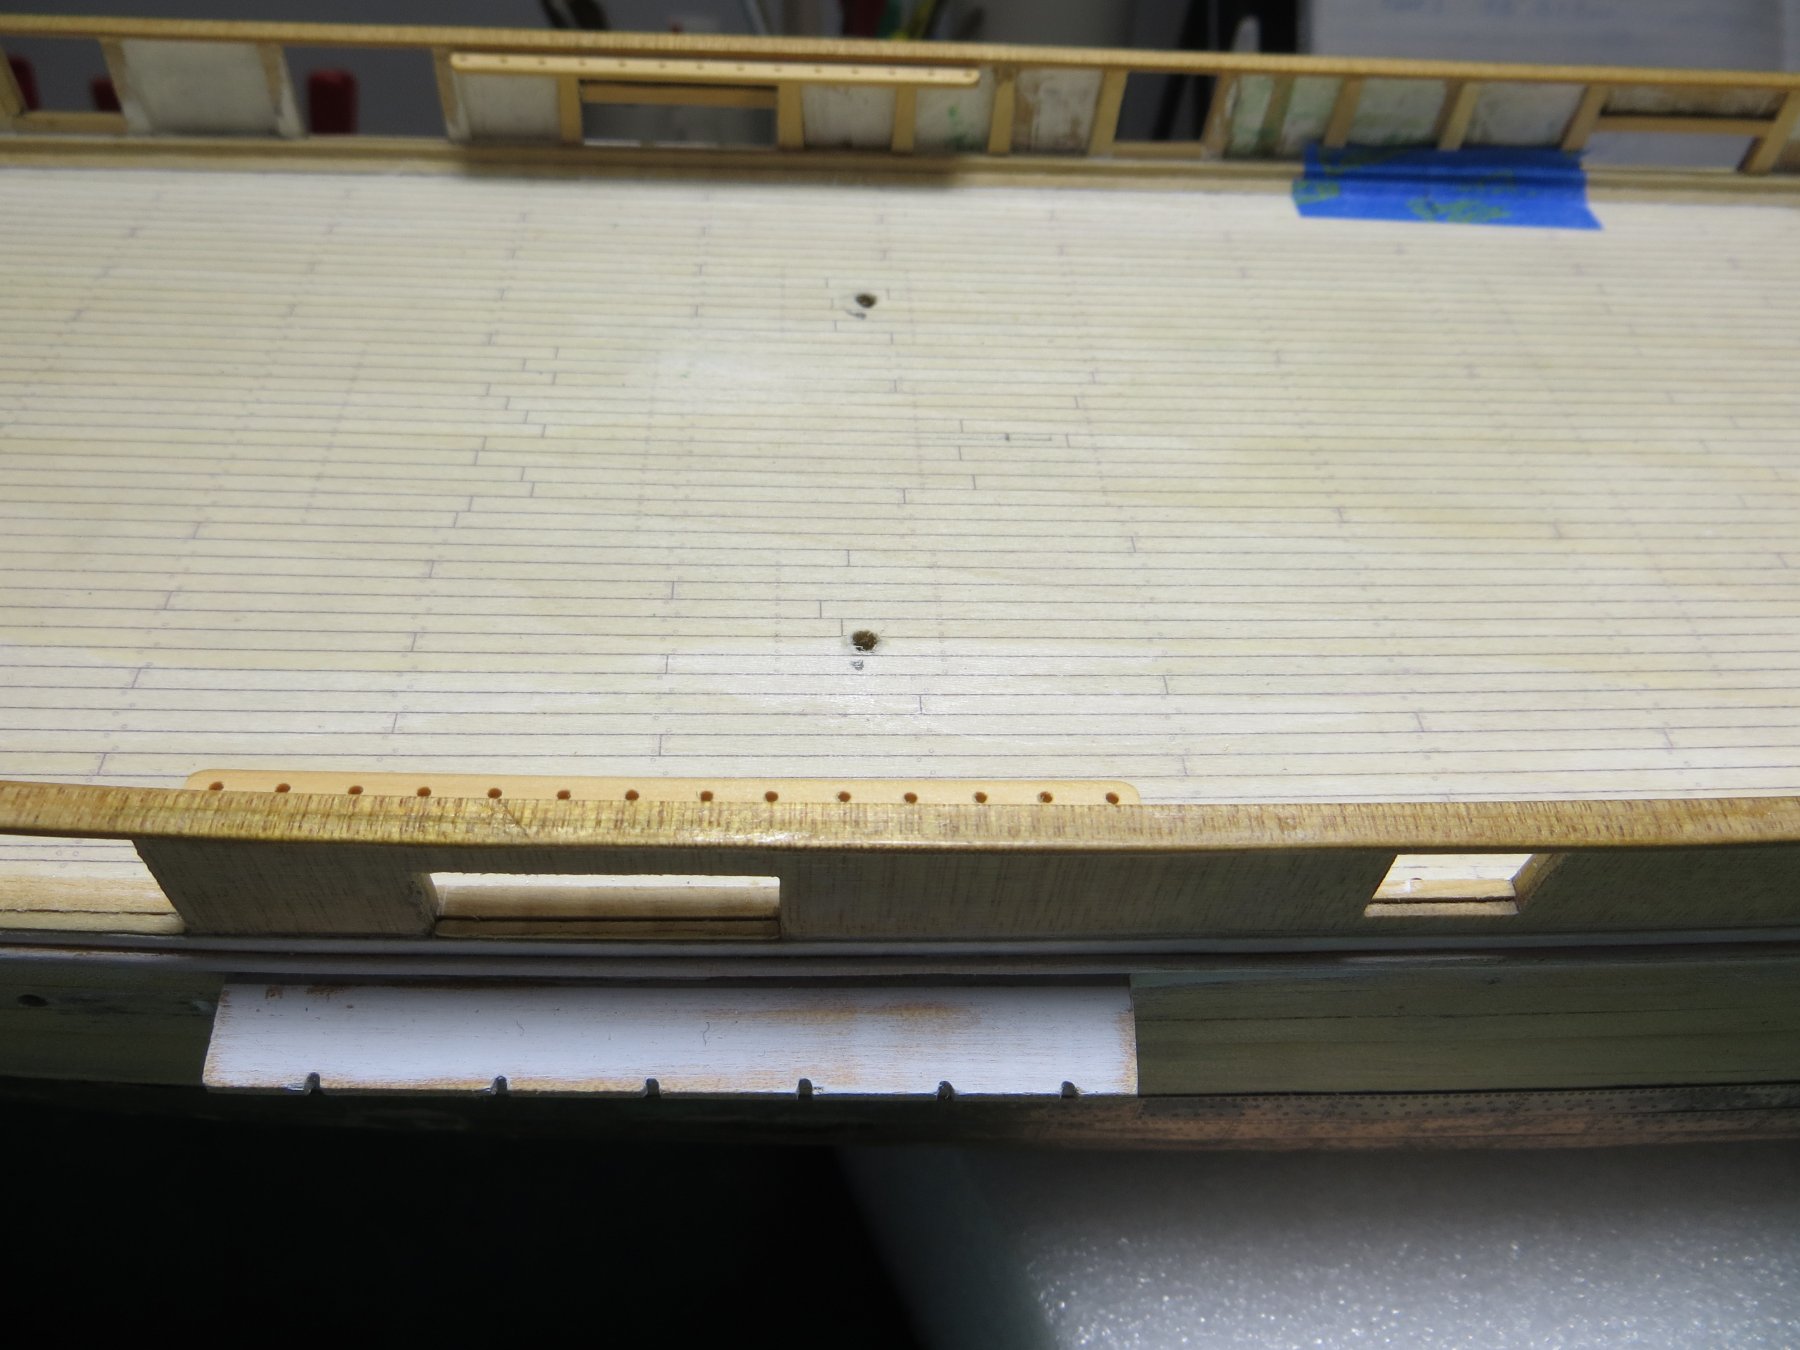
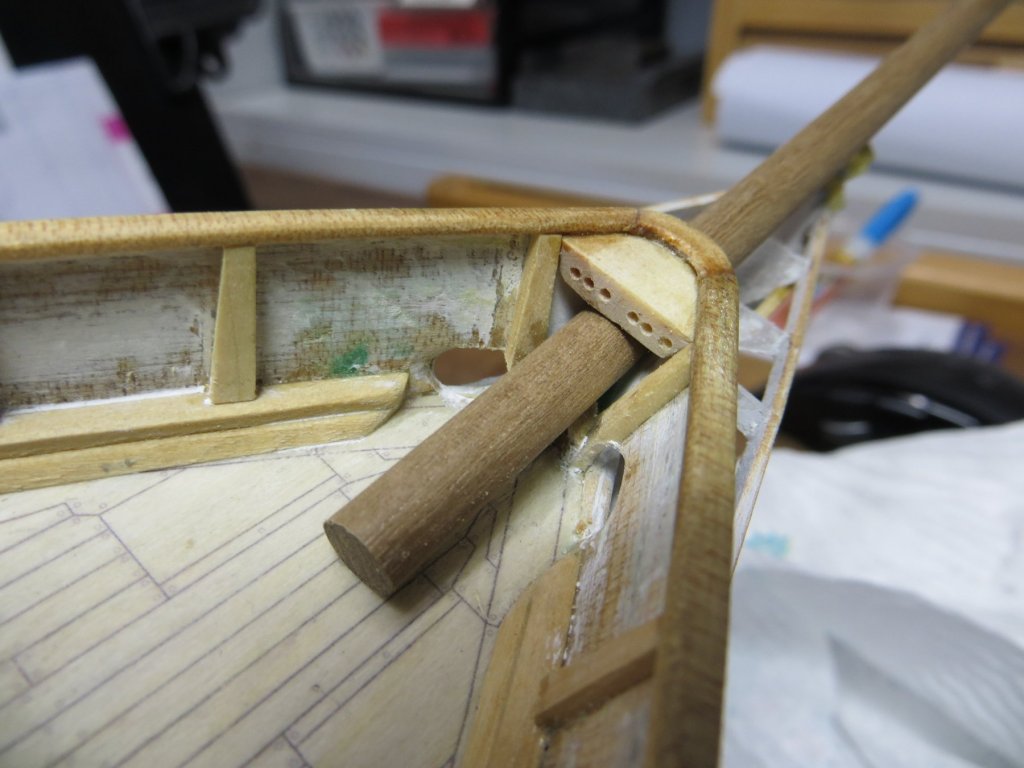
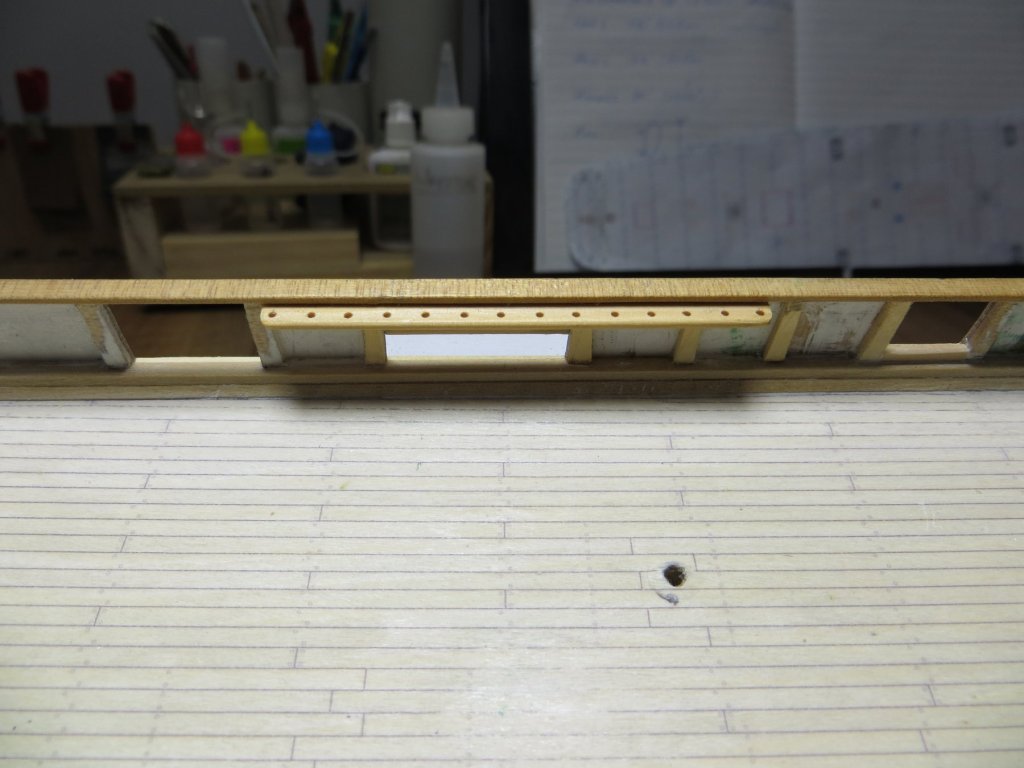
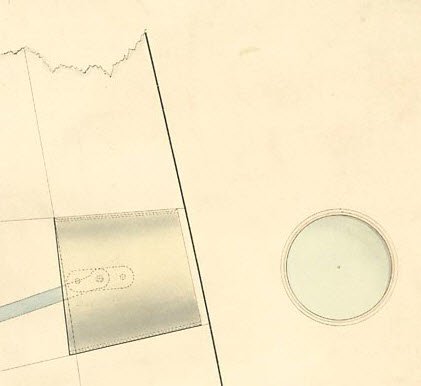
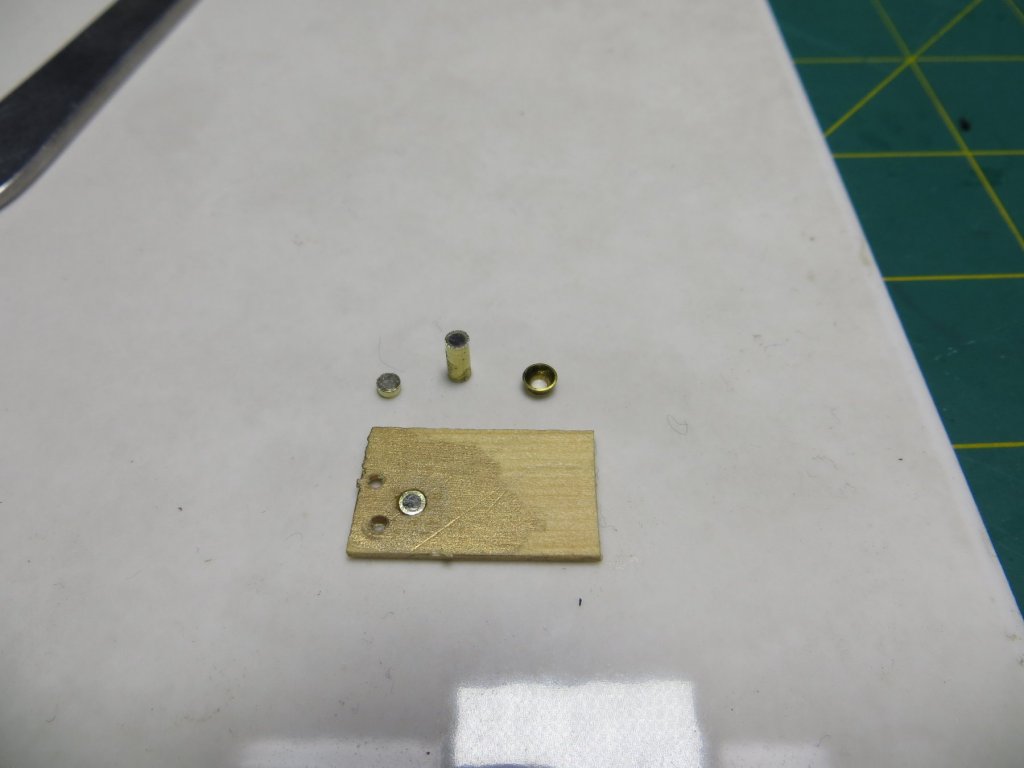
Hi folks, well after a delay due to holidays and some further research, I decided I needed to make some further progress with the build. I am trying to create and fit all of the necessary detail to the inside of the bulwarks that need to be done prior to painting as I do not wish to mar the finish once the paint has been applied (airbrush). I am also hoping to identify and fit all the necessary fitting to the inside of the bulwarks prior to fitting any deck furniture and equipment as these latter items will impact my ability to add detail later - hence the research. I have fitted the pinrails, the chock in the bow through which the jib(s)' downhauls etc are led, and have made a start on the after bench through which the stern davits are fitted. The following photos show my progress on these items; the after bench and davits are only loose/dry fitted at the moment.. I have yet to let in the ash shute, pissdales and heads. i am also just starting to contemplate where and how to let in the scuppers. I am also experimenting with the Lang Scuttles, which look a little like a porthole from outside, but are quite unique. I have located a drawing (following) showing the detail and an article in the Nautical Magazine of 1841 (extract shown) which provides me with some relevant detail. essentially I will mimic the external appearance only by using a very thin walled brass tube (drilled out) into which I will set some thin acrylic . I will then drill out the holes in the hull to match the OD of the assembly and glue thin slices of this material into them. Unfortunately I only have 10mm acrylic rod so I have had to turn the diameter down on my lathe - this proved somewhat difficult as the rod tended to melt if I had the cutting angle or the rpm wrong- persistence paid off I would value any feedback on how to turn acrylic properly as i cannot get rod of the correct diameter (being so small - 1.8mm to fit the ID of the brass tube). The following photograph shows that I can achieve this look and my experiment in a scrap of wood does the trick. When I shine a light behind, it mimics the appearance of thick glass. The expanded brass tube slice (top right in the photo) is the start of my experimentation for the scupper inlet in the waterways. My current punch is not suited and I will need to turn a better punch and die arrangement to use. cheers Pat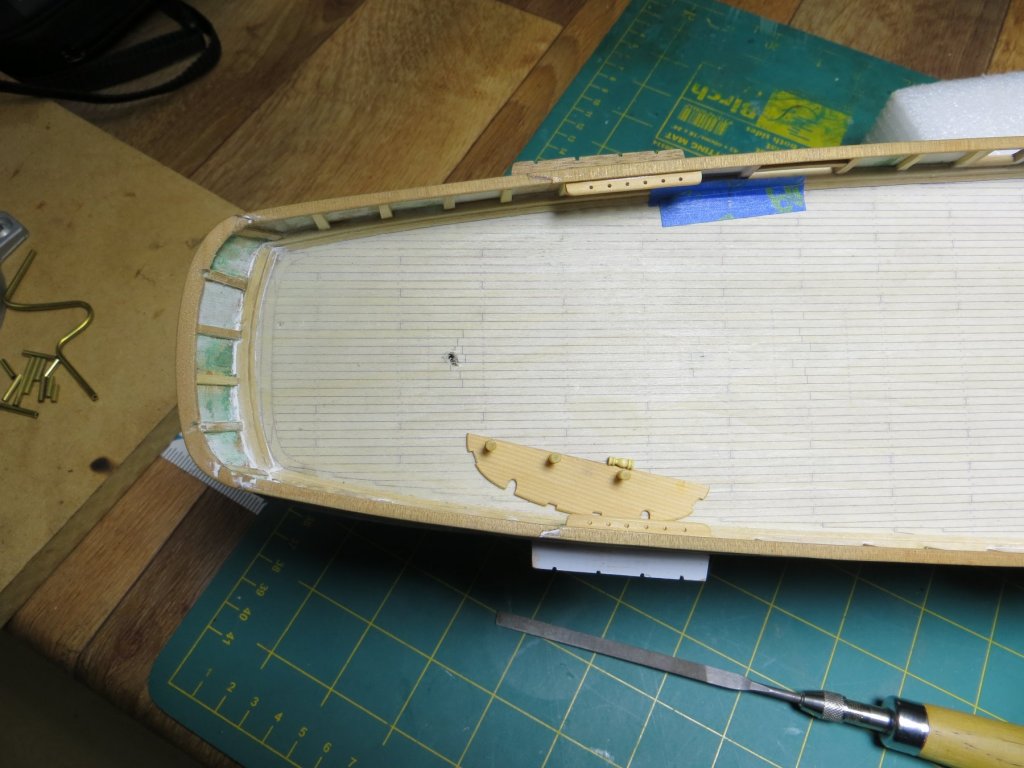


- 1,013 replies
-
- 12
-
-
- gun dispatch vessel
- victoria
- (and 2 more)
-
Sorry I have missed this log until now Amalio; simply astounding quality and an inspiration for all modellers. cheers Pat
-
Those shrouds look great set up the way you have done them Ed. cheers Pat
- 3,618 replies
-
- 3
-
-
- young america
- clipper
- (and 1 more)
-
Very nice updates Dan; that is a very good rendition of the windows using styrene and will add very nicely to the great detail you are achieving. As Druxey also said, the portholes are a marked improvement. I am very much enjoying following your build. cheers Pat
- 287 replies
-
- 3
-
-
- michelangelo
- ocean liner
- (and 1 more)
-
Very nice work on Speedwell Greg and best wishes for a successful publication. cheers Pat
-
Some nice ideas among that lot Greg, she should look good. The main stressed hull areas would be the water outlets/discharge area and rust streaks from angles/joined equipment where water would collect. Some rust would develop from the anchor and cable rubbing on the hull also. In 1945 I think extreme long periods of action may have been very few for Japanese Navy? cheers Pat
-
Good progress there Danny and you seem to be overcoming the challenges being put to you (despite the dockyard workers :)). Interesting build you have going. cheers Pat
- 295 replies
-
- 4
-
-
- amatsukaze
- halinski
- (and 2 more)
-
Nice progress Phil, some nice detail you are adding cheers Pat
-
Only a very knowledgeable person would pick up those differences Gerhard; you did very well with the info you had on hand at the time. cheers Pat
-
Superb workmanship Jason, the head of this beauty is a joy to behold. cheers Pat
-
Great progress Dan, she is coming al;ong very well; the careful sanding has sure provided great dividends for you. cheers Pat
- 295 replies
-
- 6
-
-
- amatsukaze
- halinski
- (and 2 more)
-
The barge looks superb Chuck, a testament to your skills. cheers Pat
- 269 replies
-
- 7
-
-
- Queen Anne Barge
- Syren Ship Model Company
- (and 1 more)
-
Nice work Gerhard, your Cairo is progressing very nicely. Any update is a good update - it took me 14 years to complete my first model Life simply gets in the way sometimes. cheers Pat
-
ancre Chebece 1750 by Jeronimo - FINISHED
BANYAN replied to Jeronimo's topic in - Build logs for subjects built 1501 - 1750
Simply stunning work Karl, that is another very fine example of miniature joinery - a joy to view. cheers Pat