BANYAN
-
Posts
5,958 -
Joined
-
Last visited
Content Type
Profiles
Forums
Gallery
Events
Everything posted by BANYAN
-
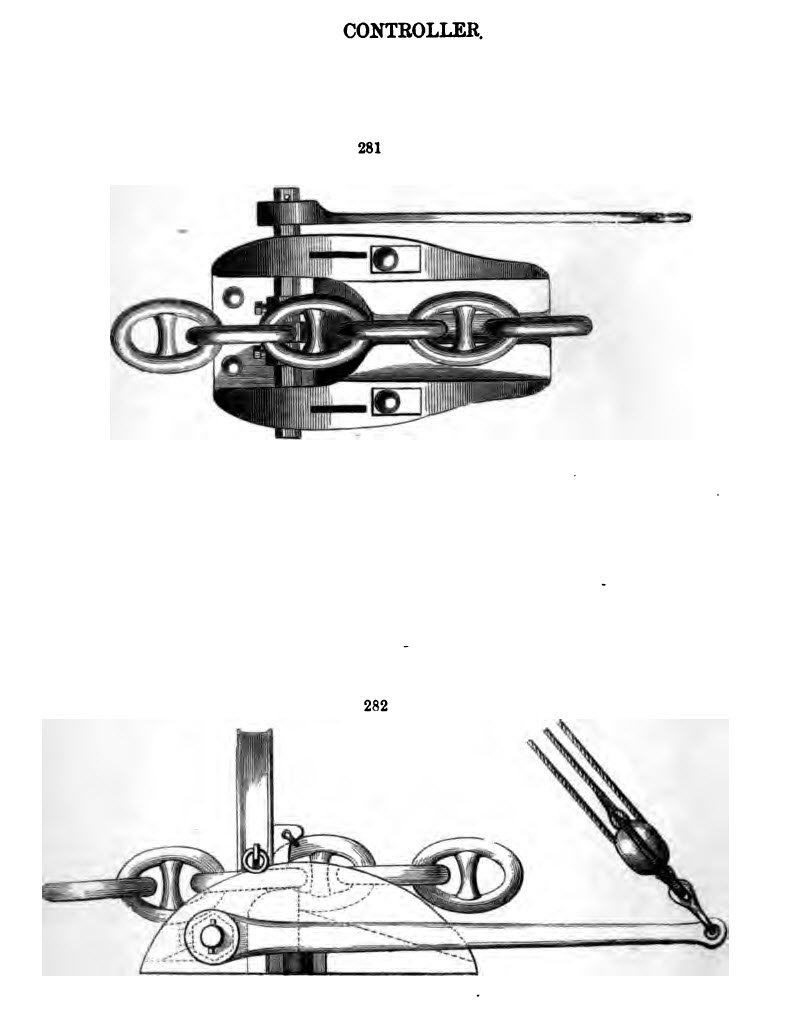
 Hi Keith, could these be a more modern version of the 'compressor/chain stop' used in ships from the mid-19th century. They used a cam arrangement to lift or raise the cable; when raised the bottom created a smaooth surface allowing the cable to run, when lowered it formed a depression into which a link would fall then be 'stopped'. As a final 'safety, a guillotine could be lowered/screwed down to lock the chain in place. The mechanism was controlled by a tackle fitted to the lever in the early days. Attached is a versions from the 1850's manufactured by Browne and Harfield (patented by them). The general shape of your sort of alludes to something similar. Have you search chain controller or chain compressor in the yacht chandlers web sites? Probably have but just in case. cheers Pat
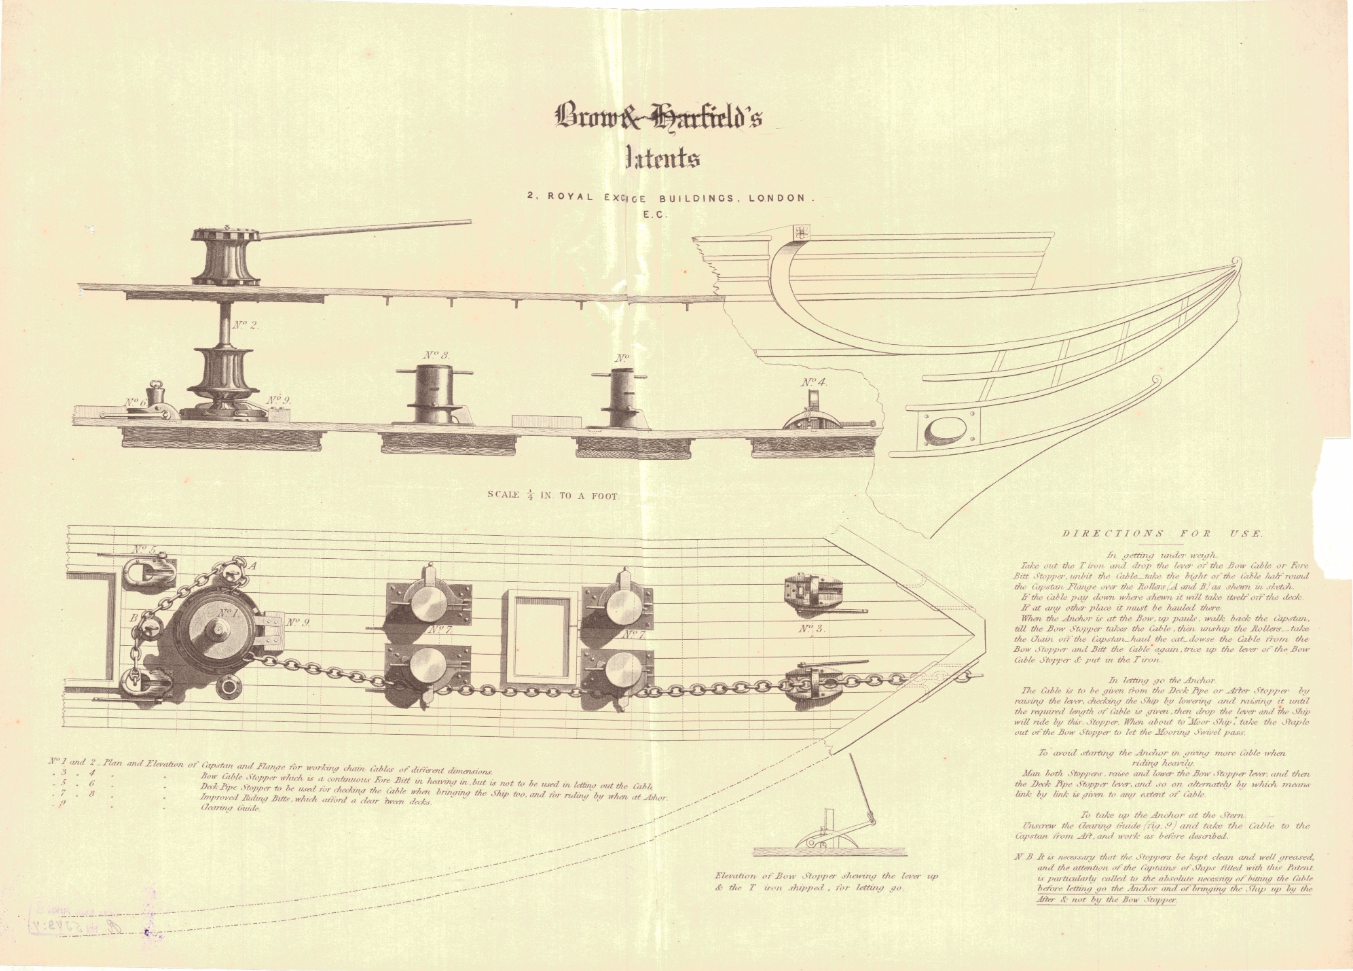
-
Geez that looks good Keith, really neat. Ah, I'm not the only one then (forgetting things that is!) cheers Pat
-
Looks like you are well and truly on top of this Keith (pun intended ). I very much like the idea of the slot with sliding cams to help retain the rail in place and at the correct displacement against the bulwark. In hindsight I also wish I had thought of painting and masking the hull before adding the cap rail, as painting that proved a source of some exasperation cheers Pat
-
Beautiful work as always Doris, your craftsmanship and the quality of the work continue to inspire. cheers Pat
- 1,035 replies
-
- 2
-

-
- royal katherine
- ship of the line
- (and 1 more)
-
HMCSS Victoria 1855 by BANYAN - 1:72
BANYAN replied to BANYAN's topic in - Build logs for subjects built 1851 - 1900
John, Michael, Carl, Keith, Druxey, Eberhard - thank you all for your very kind comments and encouragement; but as we all know we are our own worst critics Thanks also for the advice re turning acrylic; I have noted that all away. I think my issue is turning speed as I have put the 10K rpm mod onto my lathe to get the higher turning speeds required for a clean wood finish. The lowest speed is mid 1-2 k rpm, which is probably still too fast Anyway it is done now and I am onto to completing the pivot gun as best I can. Still some research required on the subject of 'ship's cranes as I need to make that decision very soon. The Contract called for 'two cranes' for ash removal. Still not sure what way to go, as I would have thought a 'goose neck' davit would have been the go, but as the Contract was specific for the 'fish davit' I think they may have specified it as such. That said, a full blown crane seems a bit excessive and there is nothing showing on the imagery. Cranes were around at the time and I have found two 'possible' illustrations/drawings of such items in the NMM (for this specific period) but they seem too big. As far as I can tell, a simple goose neck davit over the hatch would have done the trick? Any ideas? cheers Pat- 1,013 replies
-
- 2
-
-
- gun dispatch vessel
- victoria
- (and 2 more)
-
Hi Steven, a pity the paper doers not provide better evidence (and discussion) for your build. This seems a common theme in some maritime subjects where authors all disagree with each other rather than getting together to try and find common ground and then develop the 'thesis' etc from there Ayt least you now know you can discount that paper. Happy New Yeatr cheers Pat
-
Niiice; you'll be done before you know it Rob. Happy New Year cheers Pat
- 1,208 replies
-
- 1
-
-
- great republic
- clipper
- (and 1 more)
-
Allan, I am currently building at 1:72 but am finding it more and more difficult to add the level of detail I would like (although EdT seems to be able to accomplish it ) All future builds will be at 1:40 for the reasons already given, PLUS there is a much larger 'after market' for some bits and bobs you may wish to purchase rather than scratch build. cheers Pat
-
HMCSS Victoria 1855 by BANYAN - 1:72
BANYAN replied to BANYAN's topic in - Build logs for subjects built 1851 - 1900
Thanks John, this is what they should have looked like . Happy New Year to you both and wishing you a safe and fulfilling 2020 cheers Pat
- 1,013 replies
-
- 6
-
-
- gun dispatch vessel
- victoria
- (and 2 more)
-
Another warm welcome from down under Matt. I'me sure that the help of our members you will be able to complete your next ship model. cheers Pat
-
Great to see this stunning model back gracing our screens Michael. happy New year and the best of everything to you and yours for 2020. cheers Pat
-
HMCSS Victoria 1855 by BANYAN - 1:72
BANYAN replied to BANYAN's topic in - Build logs for subjects built 1851 - 1900
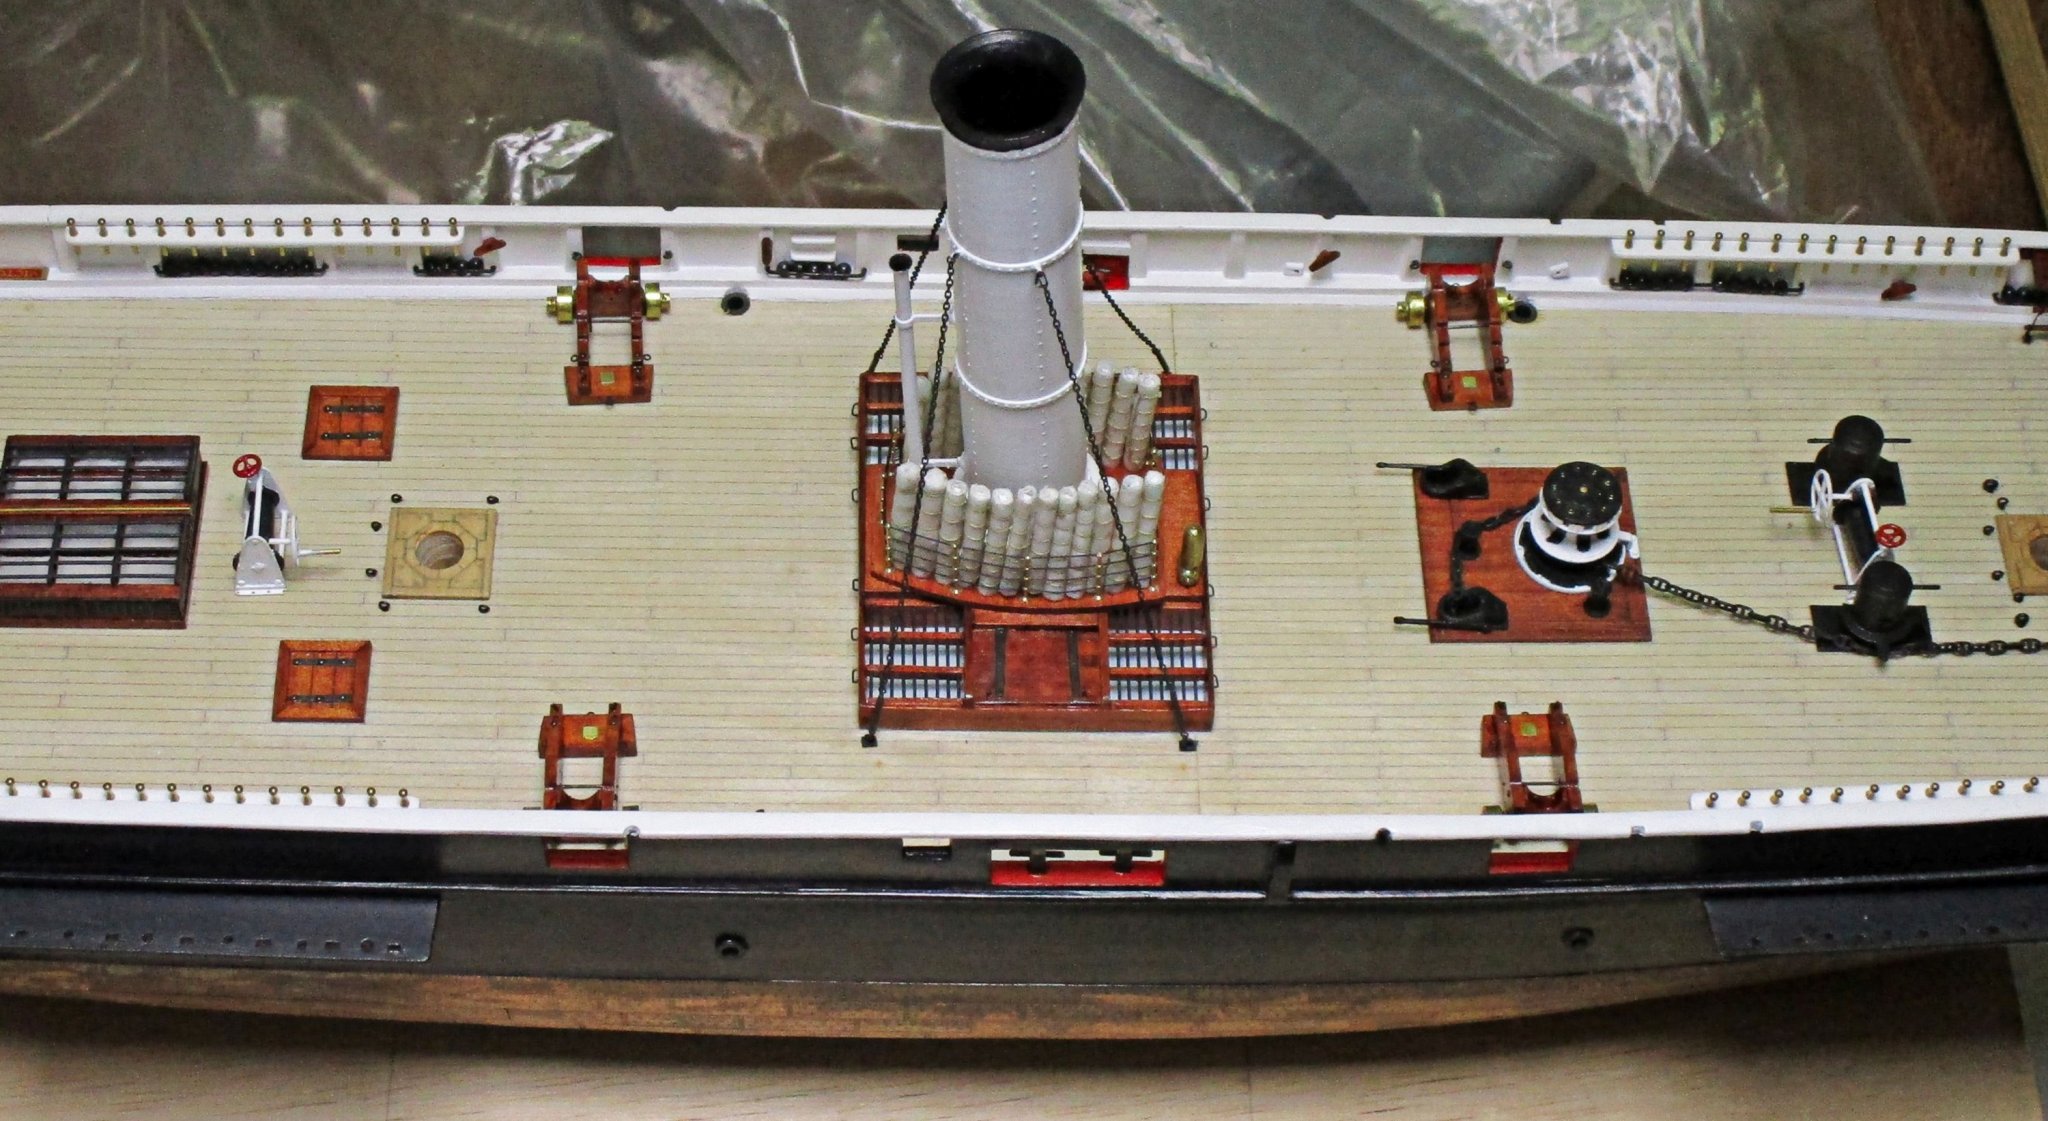
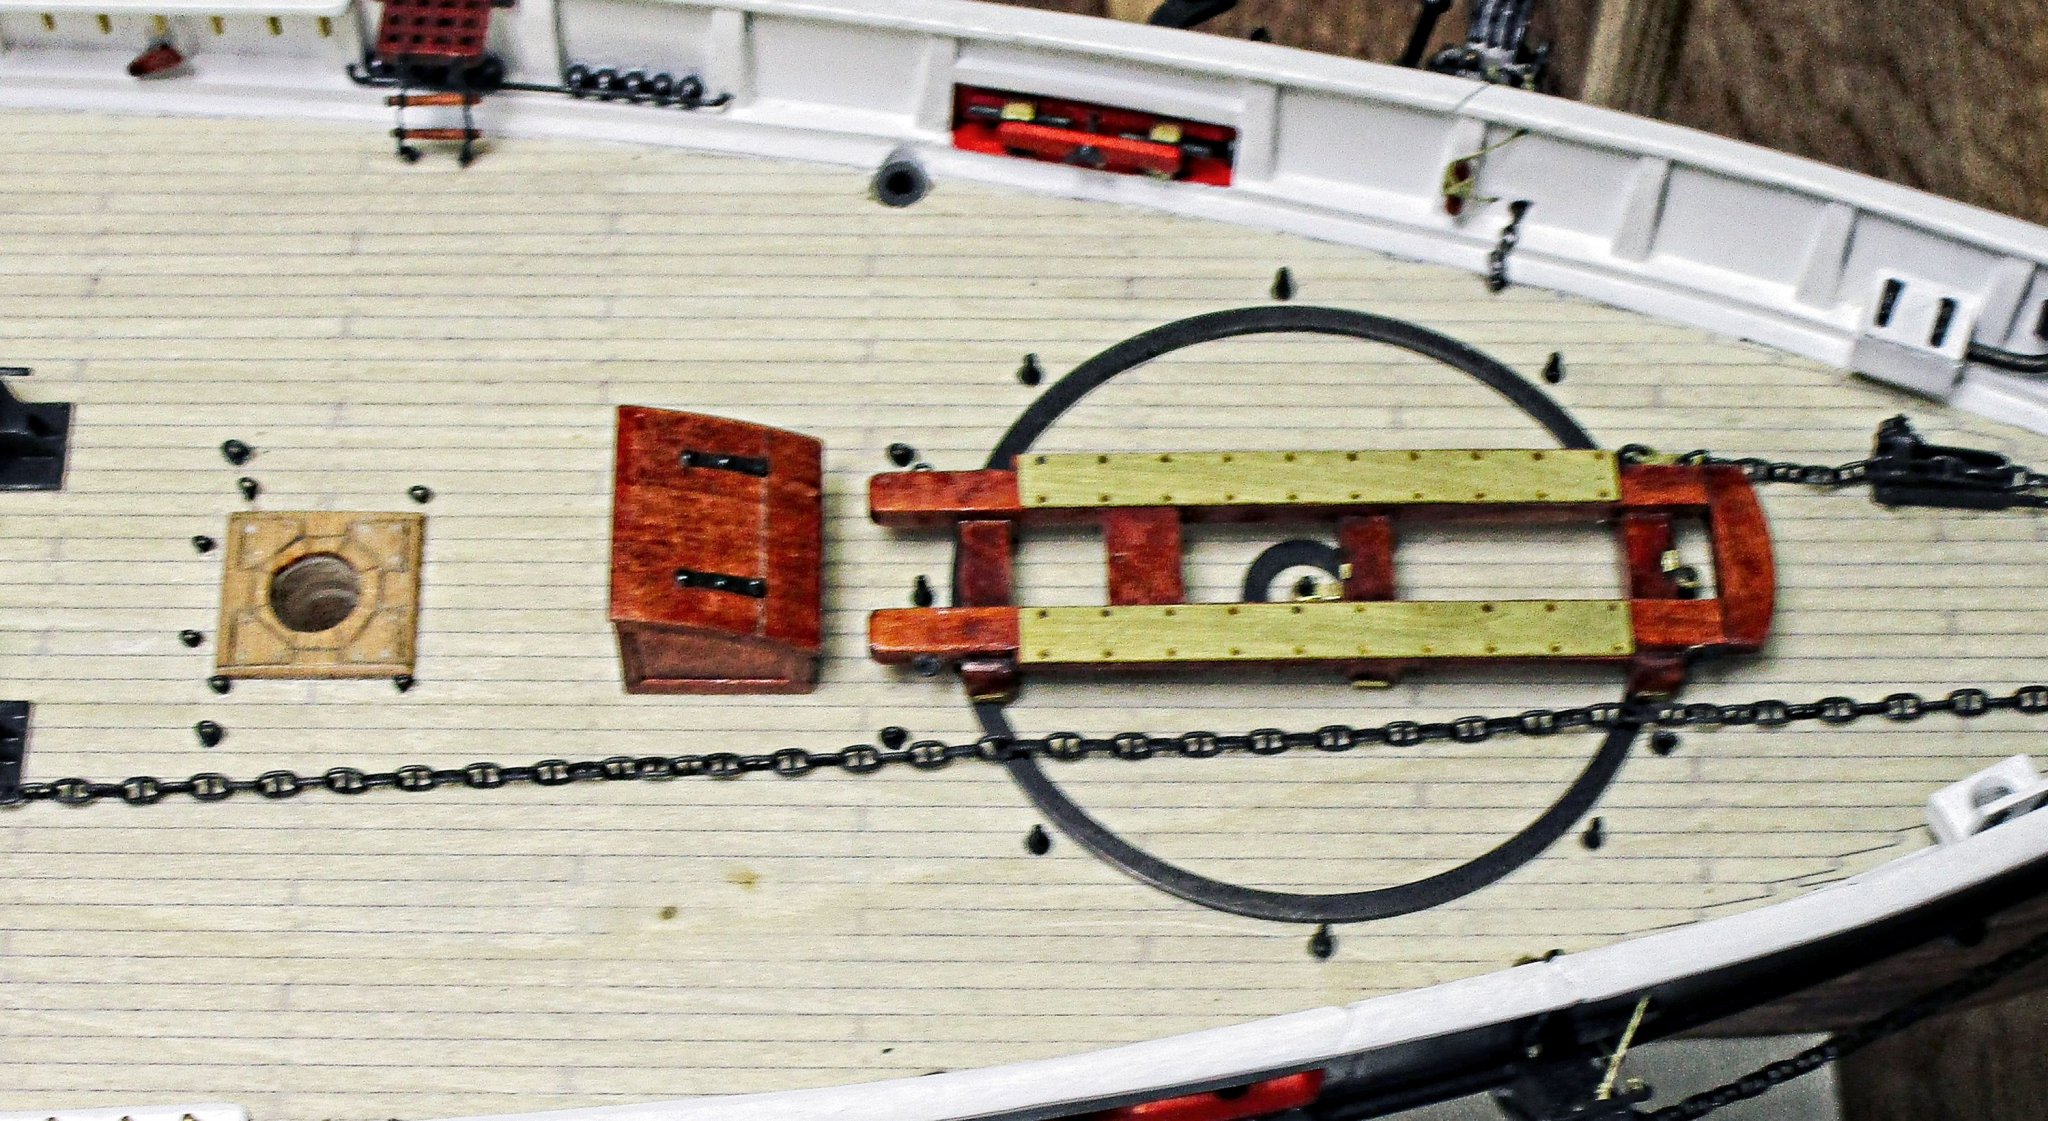
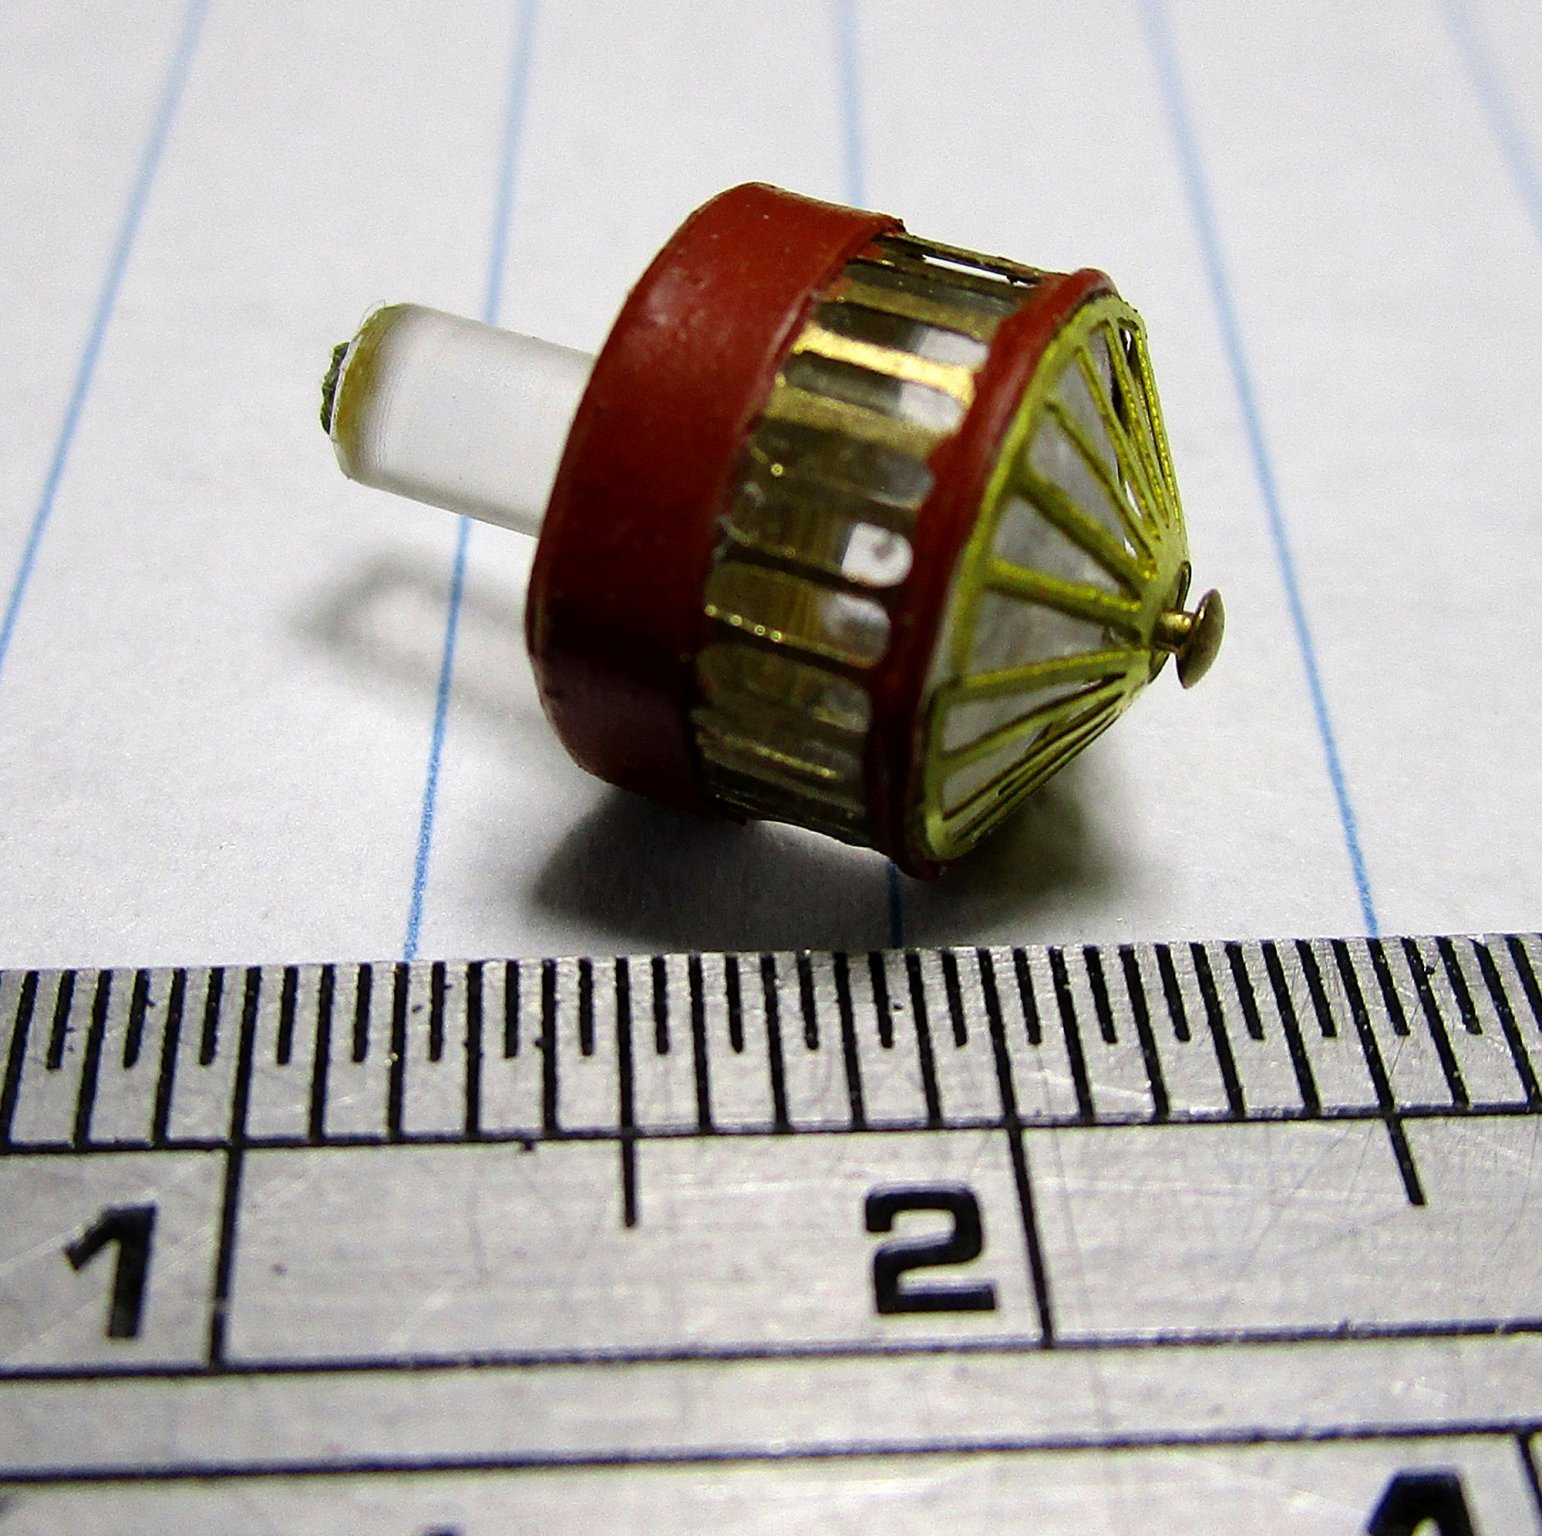
Hi all, after a short (ish) sojourn I am back at the modelling desk; a long list of 'honey please do' jobs and continued research (on the rigging) interrupted by the festive season is my excuse The following shows the additional work that has been done. The progress photo (before fitting the circular skylights) shows the broadside gun carriages loosely sited in their future position. I cannot progress these until we finish printing the 3D barrels but unfortunately my mate helping me with that, has a few health issues and that must take priority. I have the trunnion caps, tackles and breeching ropes ready to go once we are in a position to print the guns. the pivot gun slide has also been made and all the pieces for the carriage which sits on top have been cut but not yet assembled. The circular skylights were made from turned acrylic rod (8mm) and PE which I drew up and I had etched here in Melbourne. The photos show the 'prototype skylight which has since been cleaned up a little more. Al (alpayed on this forum - building the Danmark) turned these for me as I was doing something wrong and the rod kept melting on me. These formed the base with the spigot being used as the locating pins and a small hole was drilled in the top while still in the lathe to accept a brass pin. This pin is intended to represent a small rod and cover in the actual item that could be raised to allow ventilation through the skylight. The sides were photo etched with the brass vertical bars etched deeper so that when the top and bottom were painted to represent the wooden parts, it looked like the bars were recessed. The side were rolled and formed on a dowel then silver soldered for strength before painting. The conical part represents the bars over the top but at this scale it proved simply too difficult to include the wooden framing. Overall I think they came out ok, but I am tempted to redo the tops as I could not get the 'exact' diameter of the formed cone to sit on top of the side pieces. to the eye it looks fine, but a close inspection, especially through the camera shows they are not sitting uniformly on top of the side pieces. cheers, and a very happy, healthy and safe 2020 Pat


- 1,013 replies
-
- 17
-
-
- gun dispatch vessel
- victoria
- (and 2 more)
-
Great progress Gaetan, up to your very high standards of workmanship as usual. Nice photos BTW. cheers Pat
-
Hi all, I use the Beileshi with my glass and without - no issue either way but does affect the working distance. Gaetan, I was skeptical at first but they seem to be proper glass lenses and they do include the working distances per lens (by magnification). The table that came with mine state: Lens Plate Mag ratio Focus (Focal Length) 2 1.5x 20 inches 4 2x 10 inches 5 2.5x 8 inches 10 3.5x 4 inches cheers Pat
-
Happy new year to you too mate; glad to see you could put in a few more hours (especially in this heat). That cage and netting looks great! A very convincing 'trampoline' - what material did you use, it looks a very fine mesh? cheers Pat
-
Greg, I recently purchased a Beleshi Glass Lens headband (no light). While these are the enclosed type, I have found the reduced field of view does not interfere with my modelling. They also do not have a 'mounted' LED but I never use that feature anyway. I went for a 'package' deal that included 3 lenses of different focal lengths/magnification. I got these at a really good price through Amazon Australia. At first, based on the price, I was sceptical these were actually glass lenses but they are - much cheaper than many of the the other manufacturers and I have found them very good. The only issue being that because they are ground glass lenses the 'depth of field' is much more defined and dependent on the magnification selected. That said once you determine your working length/focal length they are very clear and easy to work with. I am going to invest in another pair (at that price not a problem) so that I have extra lenses and have two magnification levels to work with, without having to change out the lenses. Give me a bell or PM if you need extra info. cheers Pat
-
Great technique for attaining the bowsprit shap in the bulwarks Keith; another idea to tuck away. Look forward to seeing your cap rails in situ. I put in a couple of hours today working on my skylights; posts to follow soon. cheers Pat
-
Agree glass lenses; only way to go. cheers Pat
-
Nice to see this beauty gracing our screens again Rob. cheers Pat
- 1,208 replies
-
- 3
-
-
- great republic
- clipper
- (and 1 more)
-
You and me both mate; I don't think the workshop is a safe place for the next couple of days I have completed the 'honey please do' list so should be back into the model making seriously again in the NY. Best wishes for a great 2020 cheers Pat
-
Hi Norway (first name?) Depending on the scale you are working, you can do hand serving with a modified bow serving jig (string - as in archery - just google it, they are cheap). The better ones are the sammler types and these simply allow you to maintain and even pressure which results in a very uniform finished serve. cheers Pat
-
Hi Keith, the whole cap was made and dry fitted on the bulwarks to test for clean joints and alignment etc . The scarf joints were located away from any hard 'dip' in the cap/deck/bulwark longitudinal direction; but, fortunately there was only a very gentle dip between stem and stern with a very slight nadir (probably only about 4mm). When we dry fitted we built some 'platforms' from scrap wood (4 each side) either side of the hull on the cradle; these were shimmed as required to ensure the ply strips (sitting on the cap) would mate properly with these (made for getting the level easy when gluing up with a short dry time). We then knew that if the strips were sitting on each of the platform tops the whole lot had to be mated correctly, and that it sat parallel to the deck etc (level) . Perhaps, if you have a deeper, or more complex curve/dip) shaped chocks between the strips, which would remain level to hold the weights, and the cap might assist? WRT the curves to follow the sheer, we cheated a little and cut the lengths of the cap from wide planks appropriately thicknessed so there was no stress in a lateral dimension at all. It was just a matter of dry fitting then gluing the caps together on the top of transparent 'wax' paper laid over a plan of the upper deck to ensure all was correctly aligned and fitting as required. While dry fitting with the cap held properly in place, two alignment holes were drilled in the cap assembly (one forward, one aft ). These were located in places where once they were filled and painted they would not be evident (if the filler compressed later) and temporary pins, protruding through the cap holes, were used to allow quick alignment in situ (hope that makes sense). As you have varnished finish, the use of the alignment holes may be a little tricky unless you have a couple of spots where equipment or rigging penetrated the cap rail? When we were ready (there were two of us) we ran the glue bead along the top of the bulwark upper plank, one working each side, then lifted and fitted the assembly onto the bulwarks/roughtree timber tops using the pins as quick guides to position the cap before setting it down, we then placed the ply strips, and after rechecking level (the hull is mounted in a cradle that was already leveled) we added the map weights to provide some 'clamping' pressure for the glue. Whole thing took us 6 minutes or so from starting to lay the glue bead. If you do this by yourself perhaps a 15 minute epoxy may be better? I hope all that makes some sort of sense, and my apologies up front for any 'motherhood' - I just thought it better to spell out the whole process we used. Have a great Christmas with plenty of 'cheer' Pat
-
Up to your usual impressive standards Keith; looks very good. Don't delay the caprail. I had the same dilemmas with "Victoria'; doubts and a lack of 'strong' fitting points etc. In the end, I didn't bother with trying to pin it, just ran a bead of two part epoxy along the top of the upper plank edge and the tops of the roughtree timbers - THEN held my breath while fitting - worked out quite well and it is still very strongly attached (despite some 'accidental' knocks. I used 10 minute epoxy to give me a little wiggle time The hardest part was ensuring the rail sat parallel to the deck (and remained that way while it dried. I simply put a few, evenly spaced small flat 6mm ply boards over them so that it was evenly spaced over both sides which seems to have kept them properly levelled. Looking forward to how you make those valves; I will tuck that away as another mini-tutorial for my records. cheers Pat