

Gregory
-
Posts
3,168 -
Joined
-
Last visited
Content Type
Profiles
Forums
Gallery
Events
Everything posted by Gregory
-
 The gun ports outside the forecastle and the quarterdeck are on the weather deck. Port lids would serve no purpose..
- 355 replies
-
- 4
-

-
- vanguard models
- Sphinx
- (and 1 more)
-
Treenail holes
Gregory replied to Don Case's topic in Building, Framing, Planking and plating a ships hull and deck
Are they going to be visible on the finished model? -
Interesting how this keeps getting lost or ignored in the discussion..
-
Like these: Watch Old Parts Gears Wheels

-
Especially the ones that thought it was a good idea to randomly color some of the plates by heat treating them.. That wasn't you, was it?😁
-
The wood " bowling pin " versions can be made to look better also..
-
I'm reminded of: " Are you building a model of a ship or a miniature ship ? " Taking Jaager's comments a bit further: New Copper Sheathing ( Constitution ) Nails barely visible..
-
What scale? .3mm Sounds kind of thick?
-
I will be watching.. I Don't have any experience with Caldercraft, but I think they are a cut above some kits i have worked on. I like the look of walnut, but you will find it's detractors among some ' purists '.. I wonder how it responds to " Chuck's edge bending method " ?
-
Just start a topic in the General Ship Model Kit Discussions
-
Looking forward to your build.. You have several months to ask questions and prepare.. Don't wait till the build starts.. I wish more members would ask questions like you have during your Bounty build..
-
Who's a beginner? I think your experience with the Bounty should move you up a notch or two..
-
Any plans for your next ship?
-
A Very nice Bounty! I think you may have set a record for completing a kit, not counting James H. and his Vanguard prototypes..
-
Miniature Desk-Top Laser-Cutter
Gregory replied to wefalck's topic in Modeling tools and Workshop Equipment
Have you seen LightBurn It is a very robust cutting program with layer support. it supports many different controller boards. It has limited editing features, but You can import multiple images and align them very precisely on the cutting grid. It also has a very good tracing tool for defining cutting outlines of objects that are not vectorized. -
Have you tried contacting the SS United States Conservancy?
-
I have had both of the kits Chris mentions in my possession, but didn't manage to build either one, so I don't know how valuable my opinion will be. You can see looking from the builds that the BJ kit is POF and offers more options for finishing such as showing exposed framing. The main parts are CNC and require a lot of finishing. A lot of detail requires fabrication, and most of the wood is bass, so if one does not want to do a lot of painting, they might choose to acquire some. after market wood. The instructions and plans are first rate. I decided the kit was above my skill level at the time, and sold it. The Mamoli/Dusek kit is fairly typical European, double planked, POB. The plans are good and the instructions minimal. The lines and deck layout match real well with several different drawings I have seen. There's a companion way added that I haven't seen on any of my other references , so let me know if you are interested and want more detail. It has a lot of useable metal fittings that clean up well. There use to be a sewn sail set available that didn't look too bad. I don't know if you are familiar with the Mamoli " coppering " approach, but they include little green wood tiles as a solution. If someone were interested in producing a model with a " folk art " look, they would be worth considering. Otherwise it should be easy to use aftermarket copper tape or tiles if you want to copper. Life got in the way of me proceeding with the kit, and my infatuation with America waned, but it is something I would consider again after I get some other projects out of the way. I would choose Mamoli over BJ, because of building method. I take it you have looked at the Mamoli builds here at MSW. I know the new Dusek released kits have laser cut bulkheads so it may require less fiddling now. Let me know if I can help with any other info. P.S. I just looked at the new Mamoli/Dusek kit at ModelExpo , and they have added some PE parts and a roll of copper tape. Should make for a better build.
-
I can't speak about Amati, which probably has a good reputation for service, but you can be sure if you have any problems with materials from Vanguard, it will be taken care of.
-
"Sand Pebbles" motor Sampan from 1966 movie
Gregory replied to JRB's topic in Nautical/Naval History
A retired LT ? -
I think I need a picture..
-
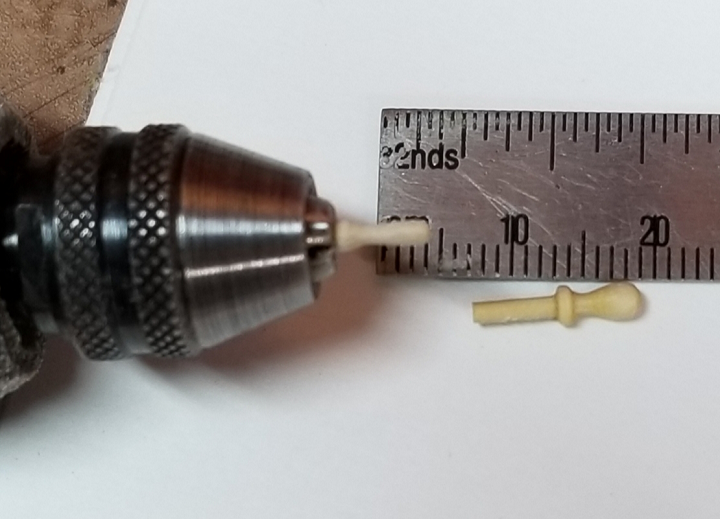
I'll be the first to say Chuck's method is far superior to mine because it makes the planks lay flat on the bulkheads.. I only offered my flat bend as an example that does not benefit from extended soaking, steaming or boiling which is sometimes offered as a workable method. I might use it for a couple of planks high up on the bow, but once the form requires bending in 2 dimensions, Chuck's method rules the day..
-
Chuck sorta got on to me for using a power tool..😁
-
That really looks a cut above the box art for Ballahoo.. Nice work!
- 1,039 replies
-
- 1
-

-
- ballahoo
- caldercraft
- (and 2 more)
-
Here is a good example from JesseLe
-
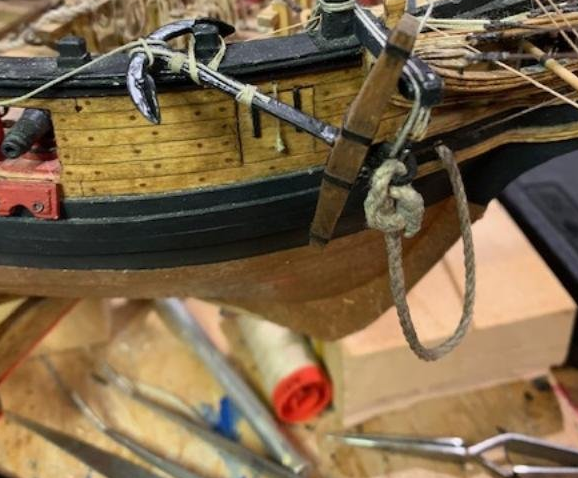
The plans you show are severely lacking in the amount of anchor cable required, and it would not be coiled on the weather deck as shown.. It is stored below the main deck. How it gets there will vary.. My Bounty references do not show it, but at the least it would pass down through the hatch near the windless, or further back near the capstan...
