


Mike Y
-
Posts
1,437 -
Joined
-
Last visited
Content Type
Profiles
Forums
Gallery
Events
Posts posted by Mike Y
-
-
Carl, I'm not denying the history or suggest to remove Cromwell from all the books. I just don't want him anywhere close such a intimate thing like a model that you put hundreds or hours and elbow grease into
") In the same way as I would never build a model of Herman Göring's yacht.
In the same way as I would never build a model of Herman Göring's yacht.
And, as Brian mentioned, I am lucky to have a choice - the ship was captured, slightly modified and renamed, it's not too late to pick the version to build.
So back to the modelling!
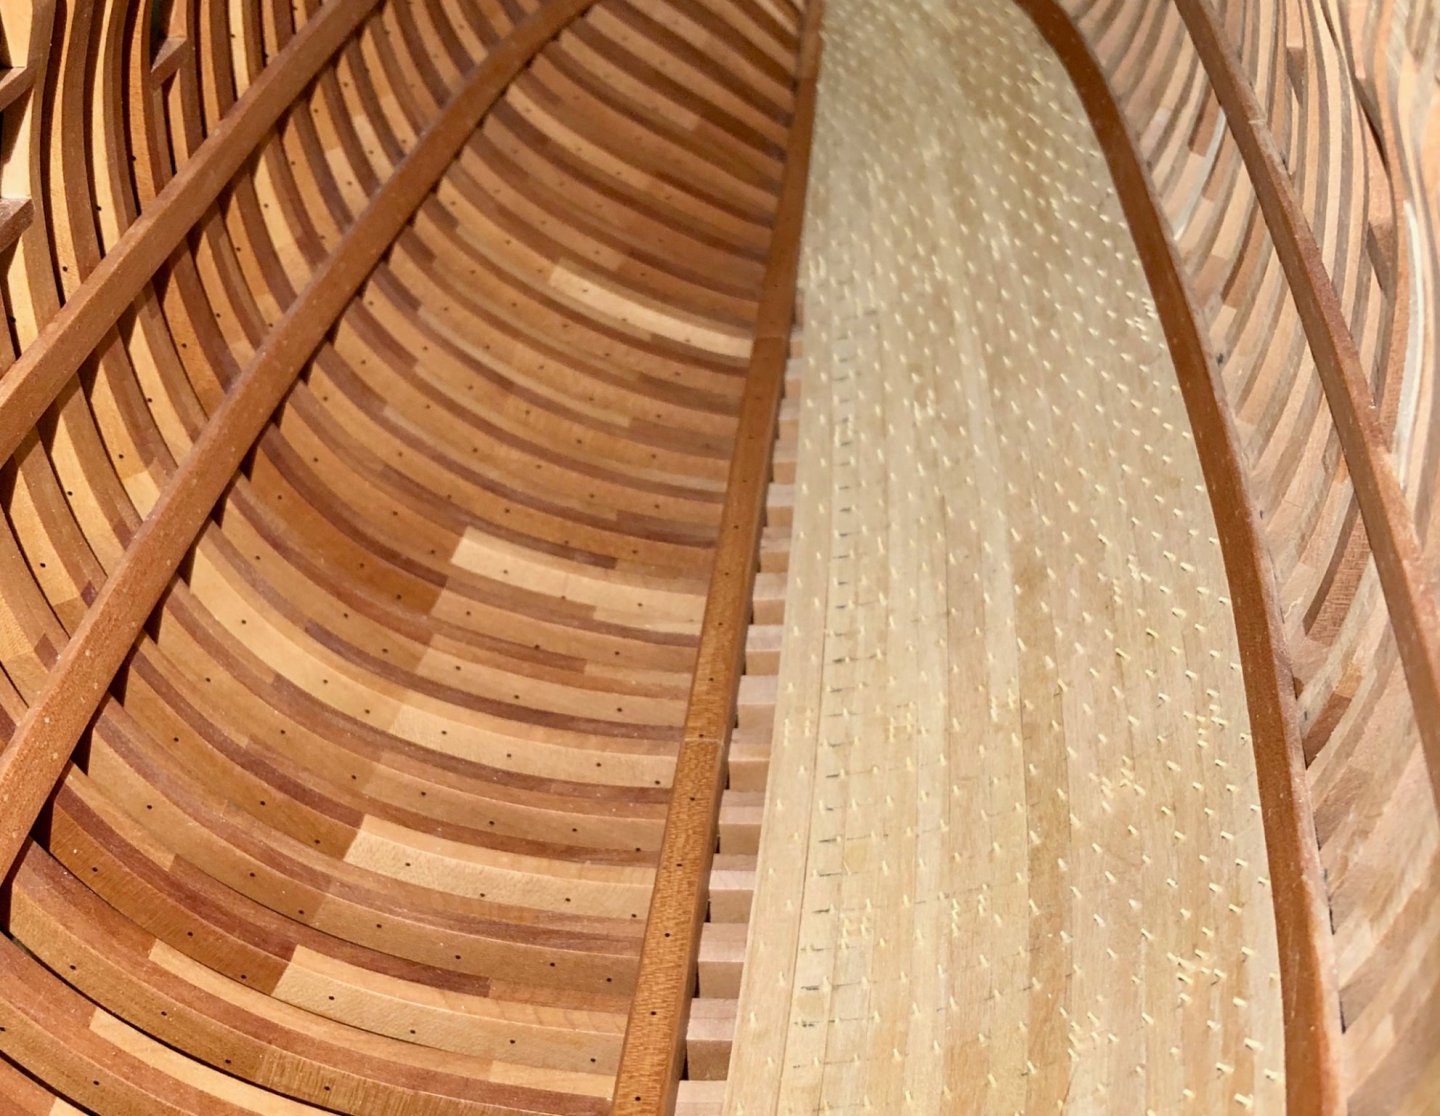
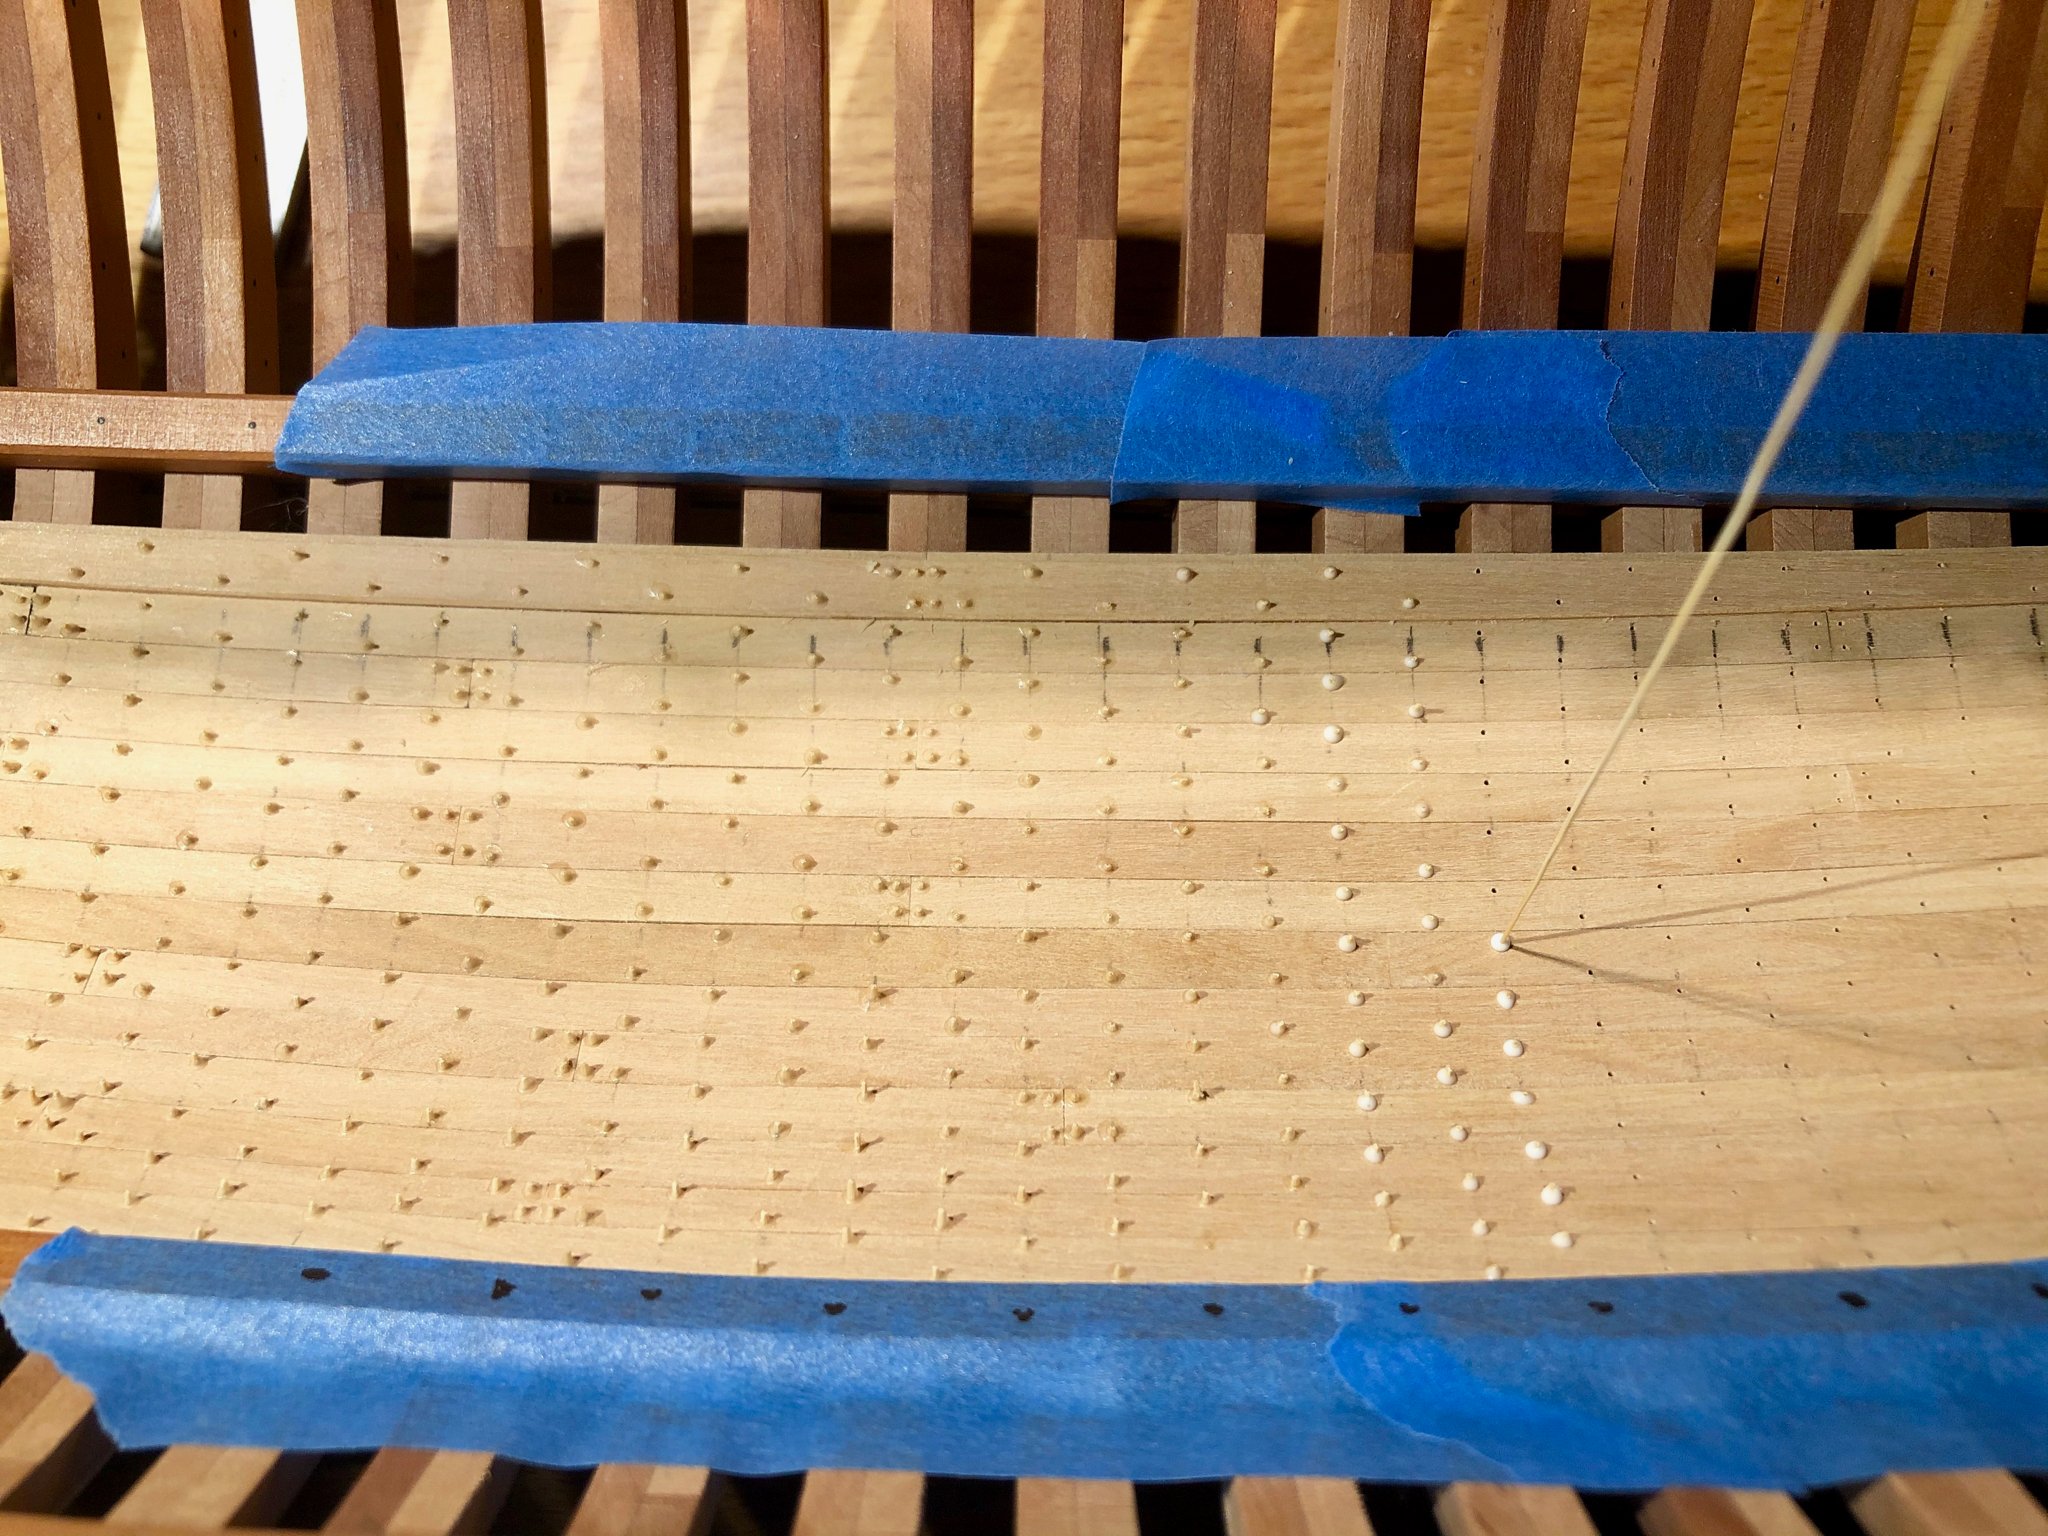
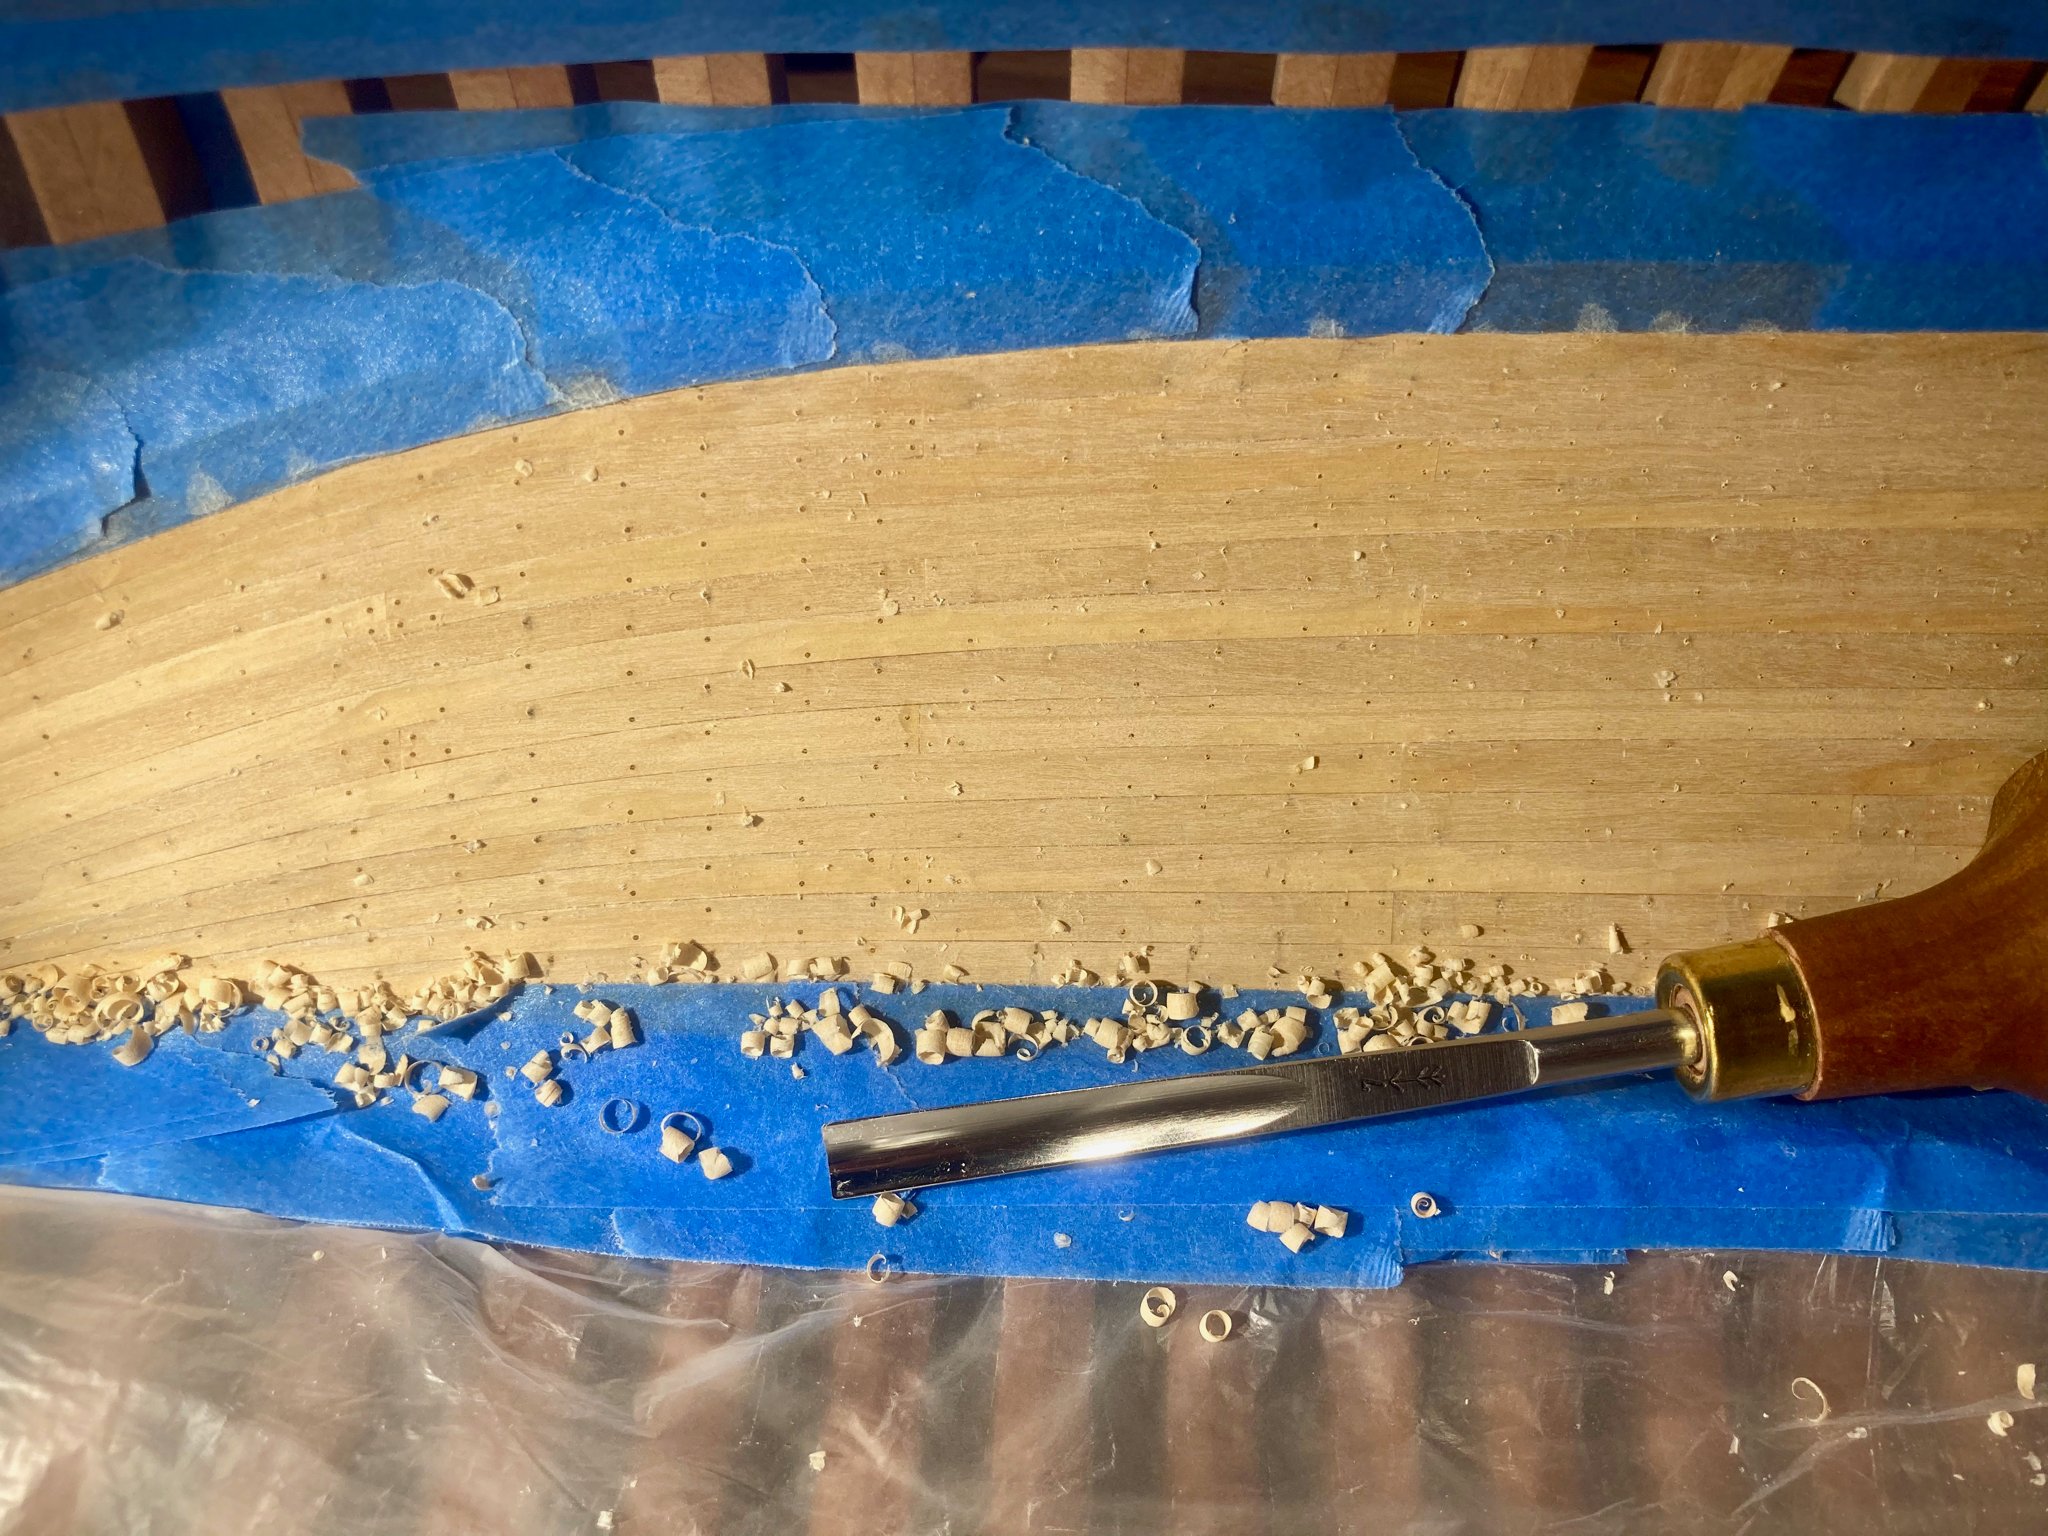
Roughly 1200 holes were drilled, the Buzzr did its job perfectly with zero broken bits! 💪
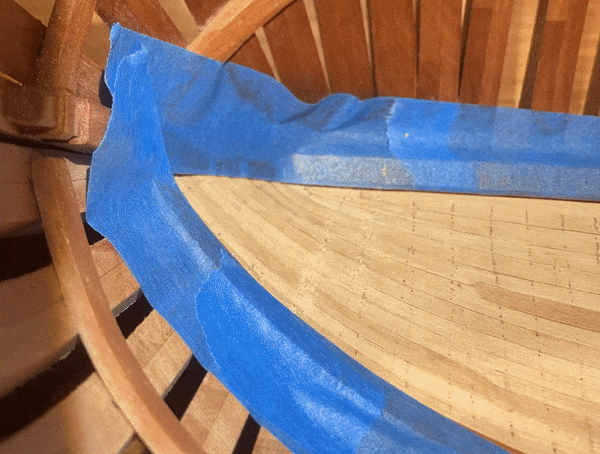
Bamboo treenails were glued in

Resulting in a pretty satisfying sight
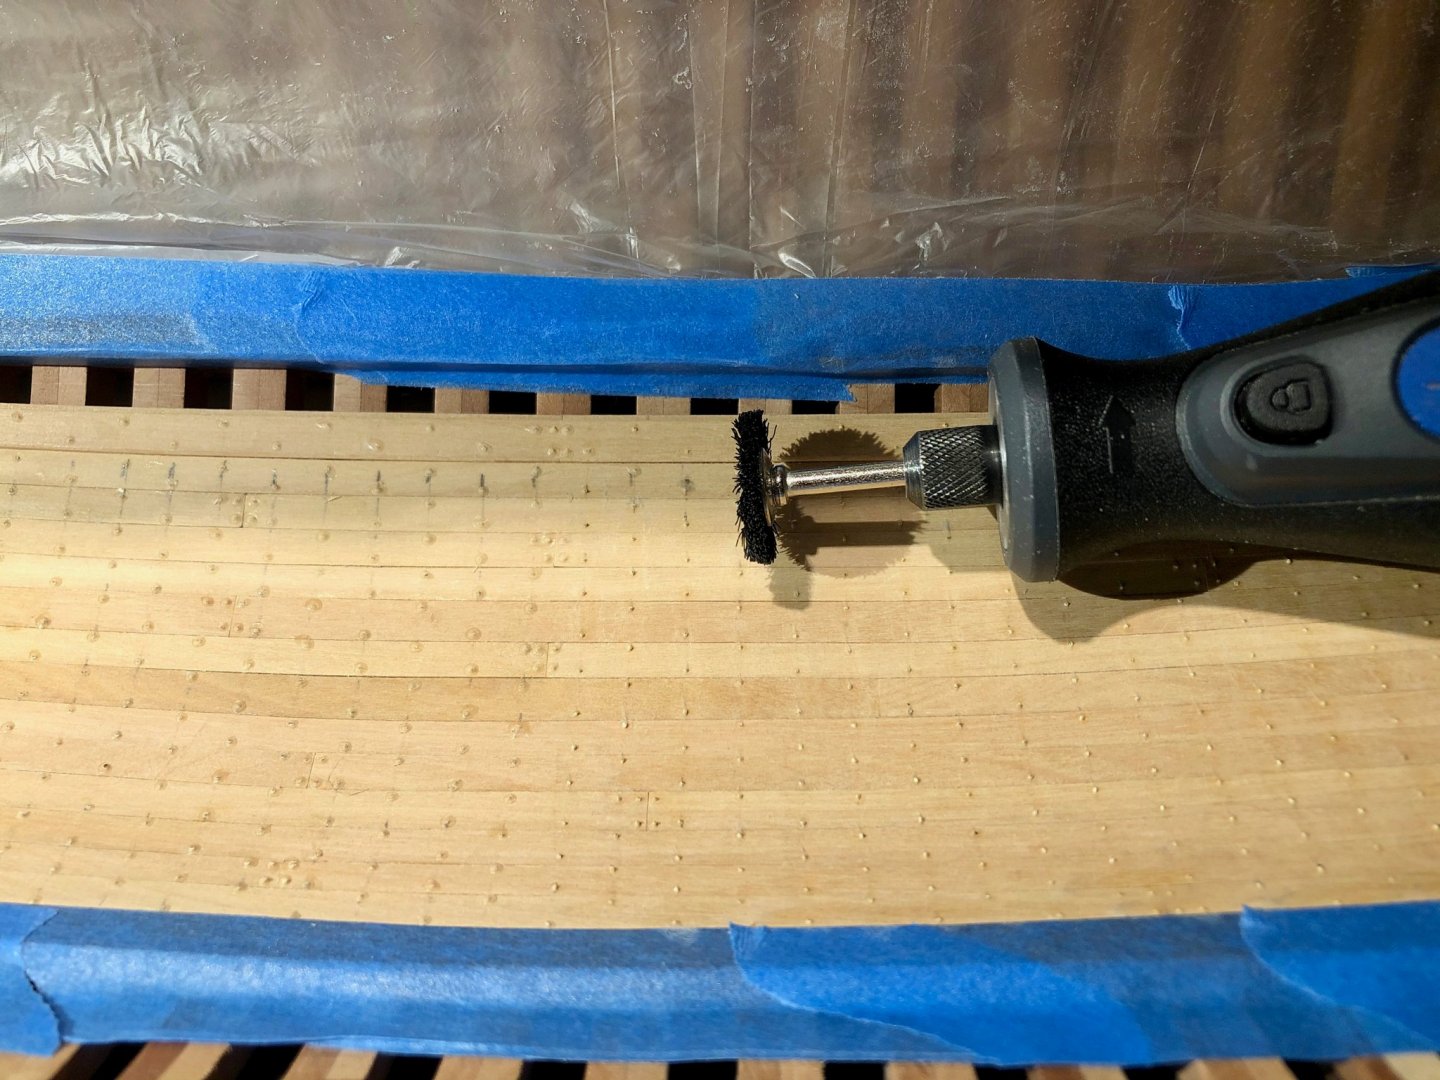
Pointy bits were cut off and most of the glue was removed with a dremel with nylon bristle brush. The hull was covered in plastic since this process is quite messy, small bits of glue are statically charged a bit and stick to everything.
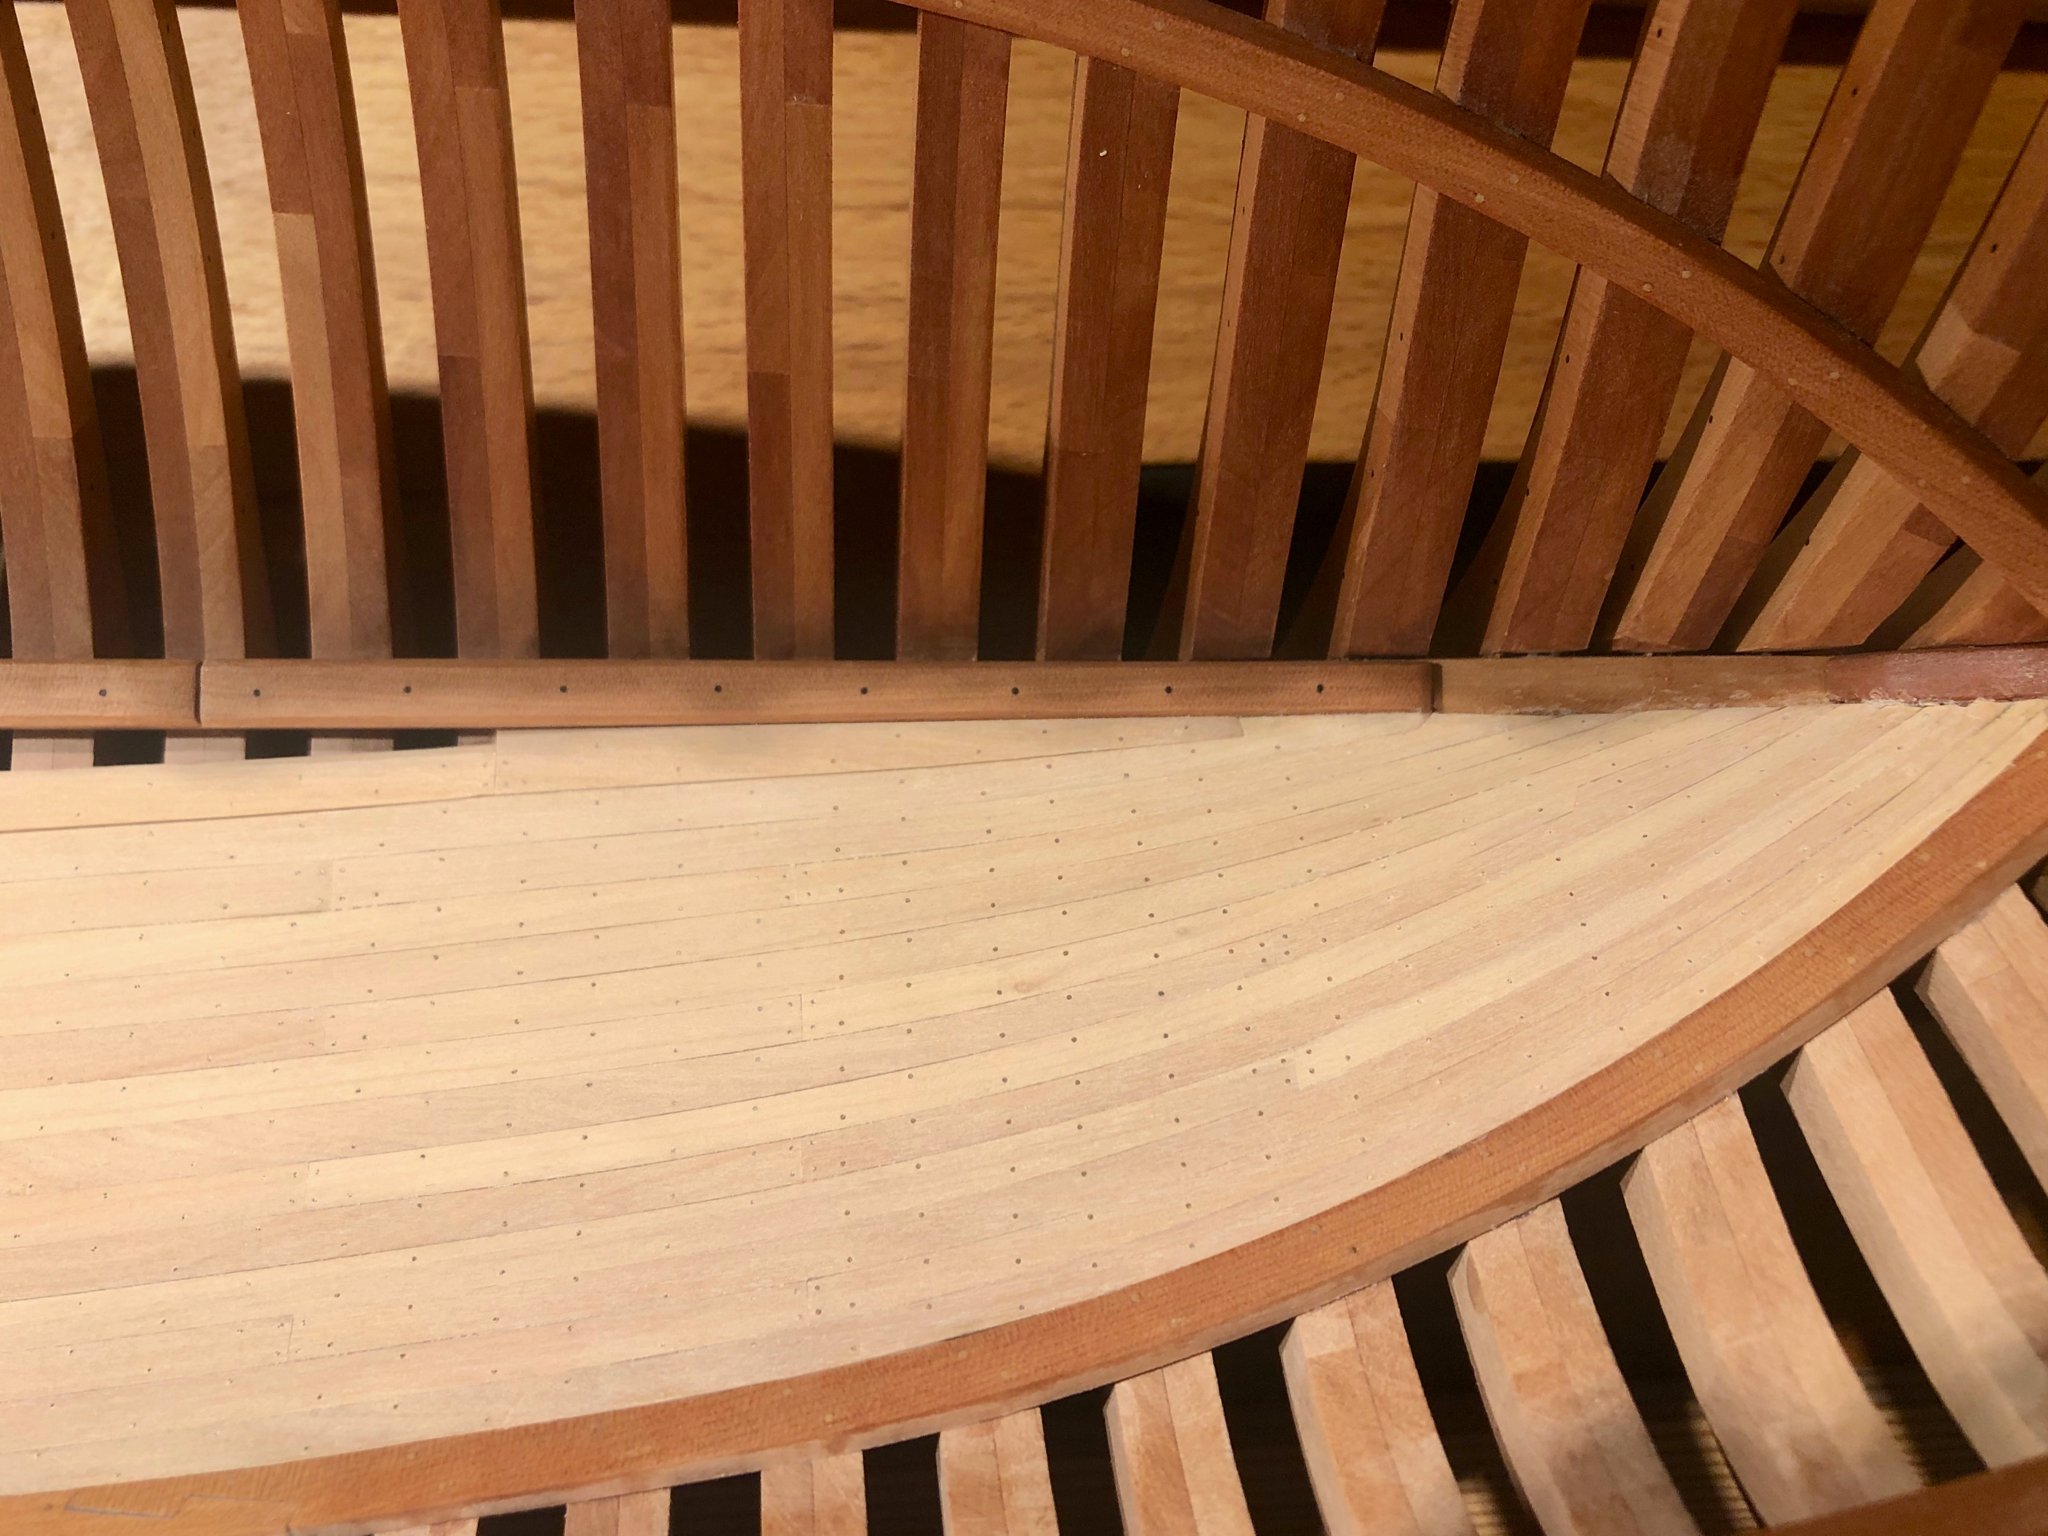
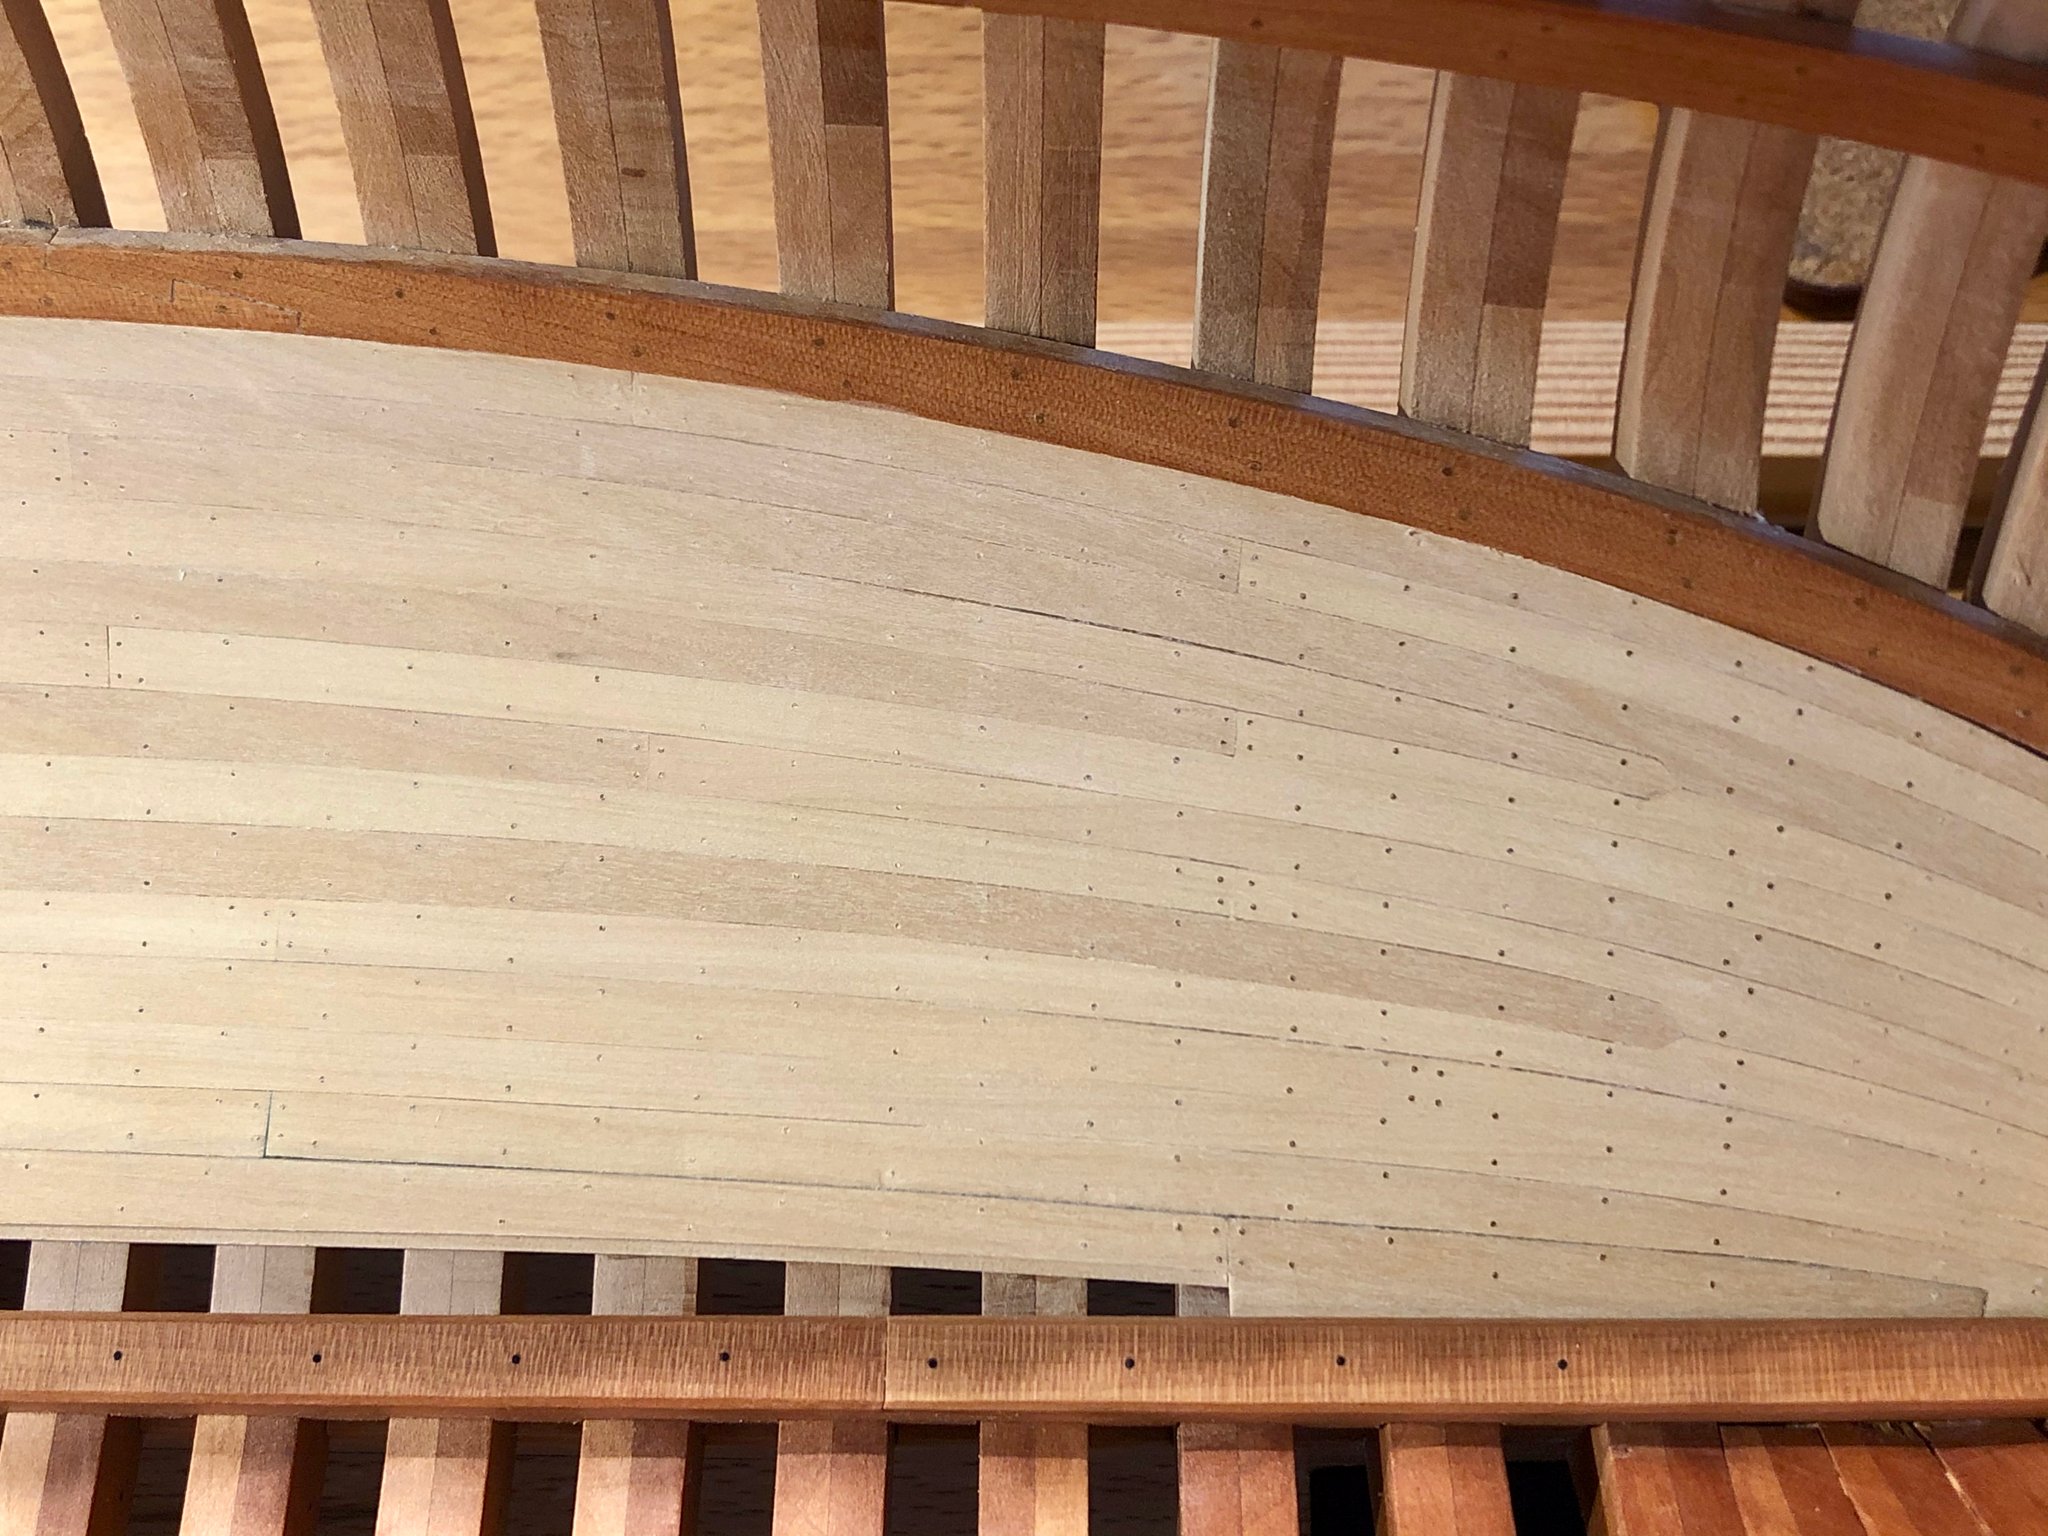
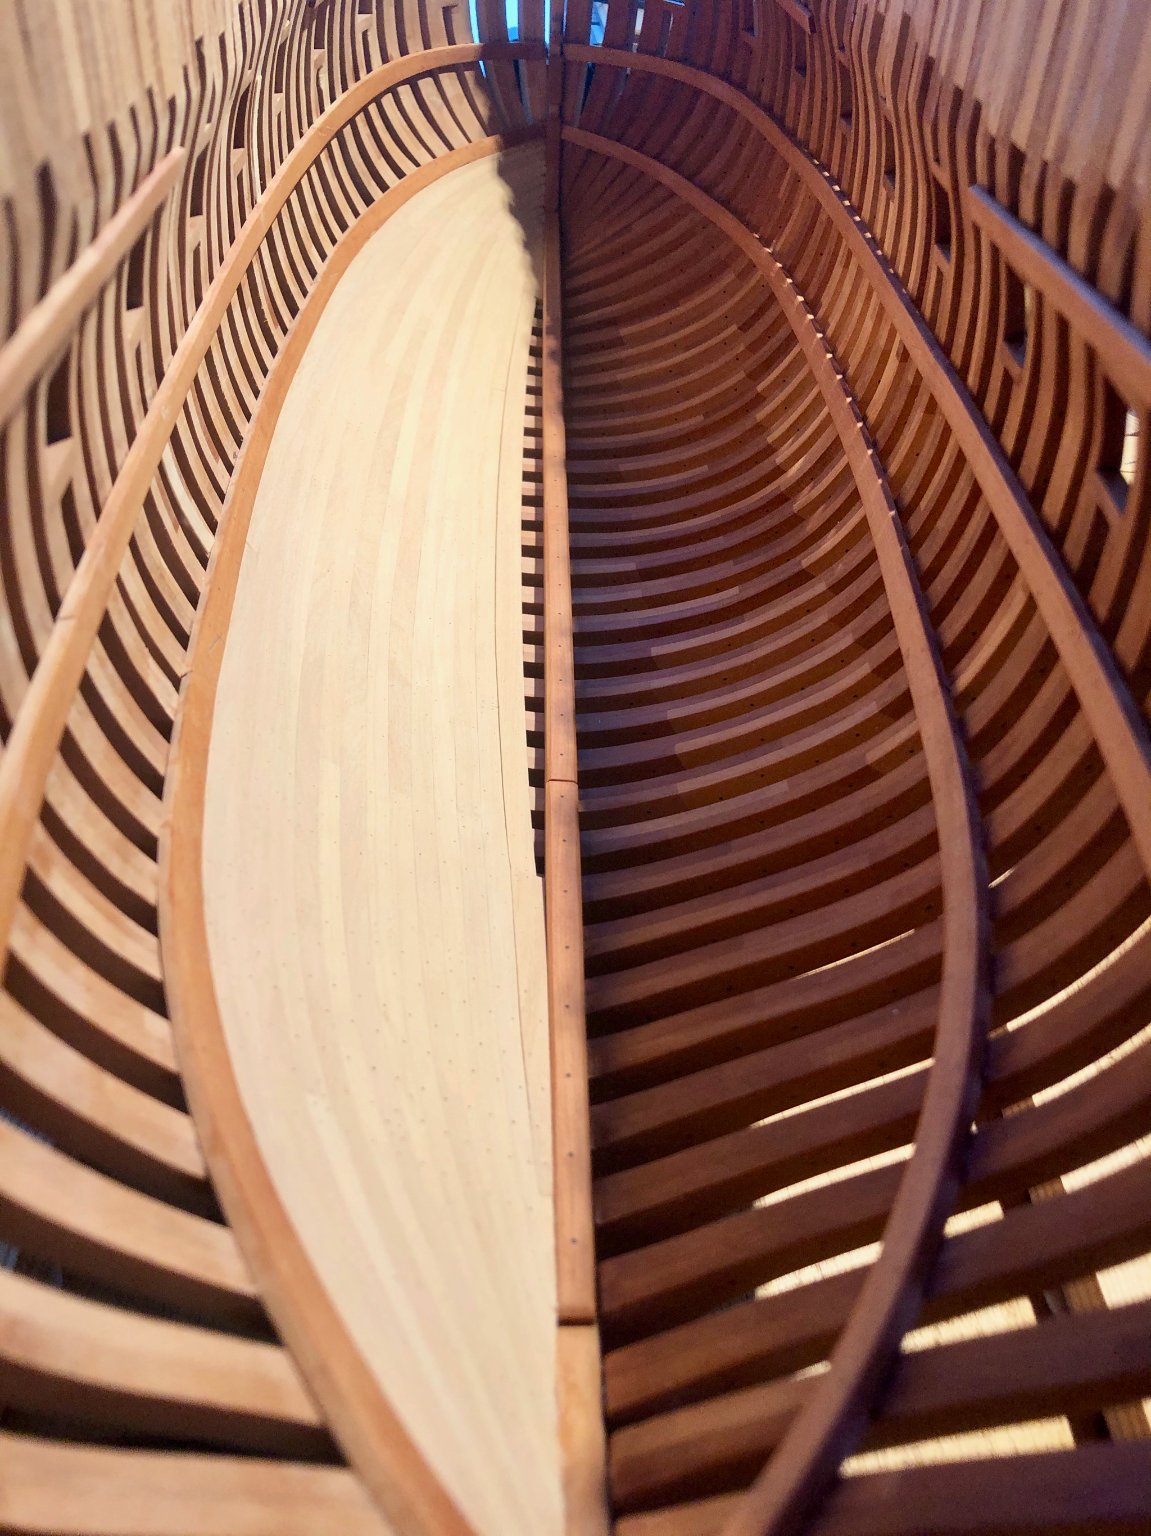
Now the best part - sanding and fairing. I really love this one, turns an ugly uneven surface into a neat and clean one (unless there are gaps)
Hahn jig is really convenient for such work, since you can actually lean on it and rest your hands on it without damaging the model. That allows you to work precisely and for a longer periods of time with elbows resting. I can really recommend constructing support like this even if you do not use Hahn's method.
Nevermind my corona haircut


Wide gauge chisel (Pfeil #7) came in handy for removing the remaining glue residue in hard-to-reach areas, as well as fairing the planks. It's surprisingly easy to control, can definitely recommend this tool.
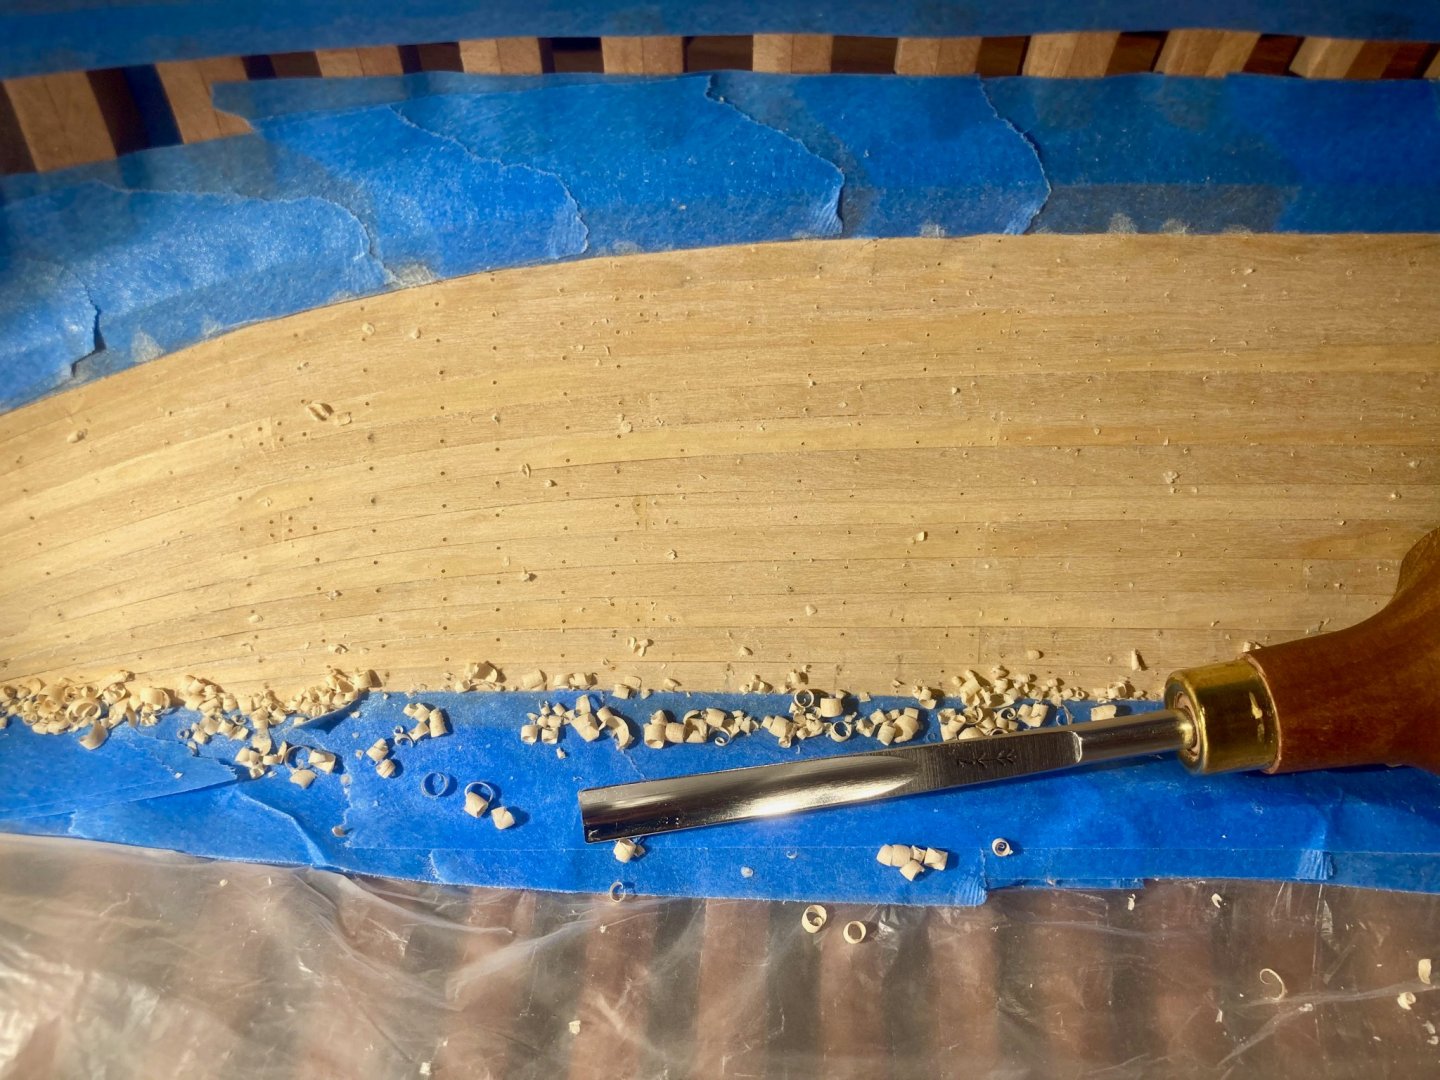
The rest was done with a combination of sanding, scraping and chiseling. Final sanding grit was just 400 instead of a usual 600-1200.
Here is the end result. Notice how the treenail color is quite different, even though they were all cut from the same wood that looks identical from the outside. I know the the nail pattern is not entirely correct, as an excuse - it was marked up a year ago!
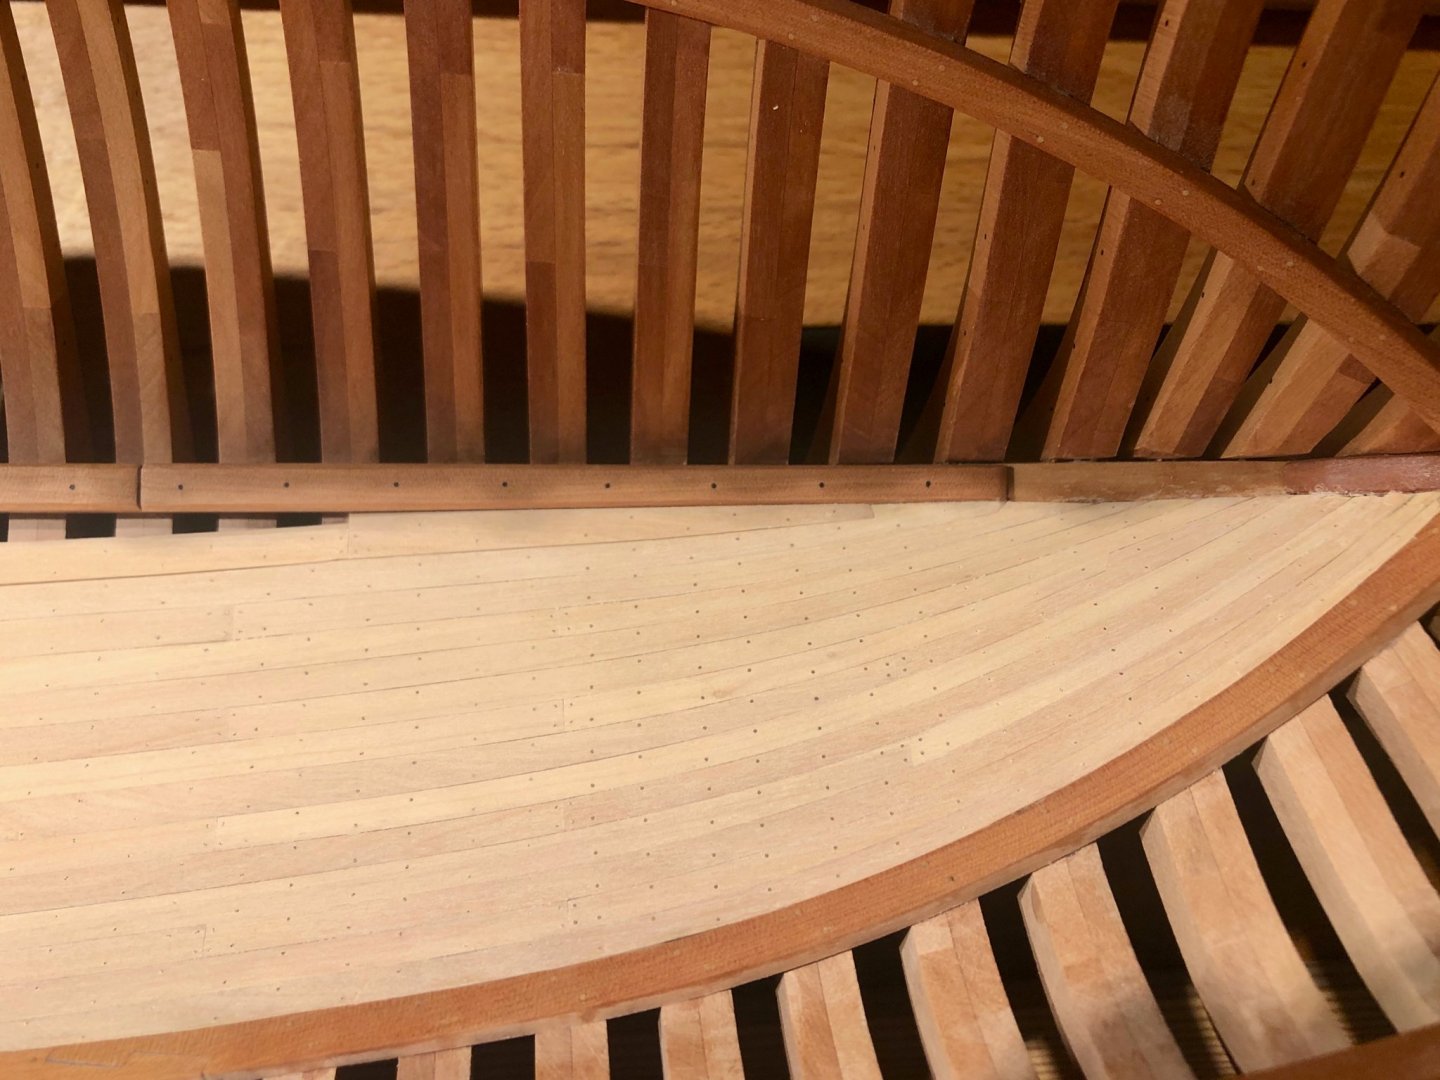
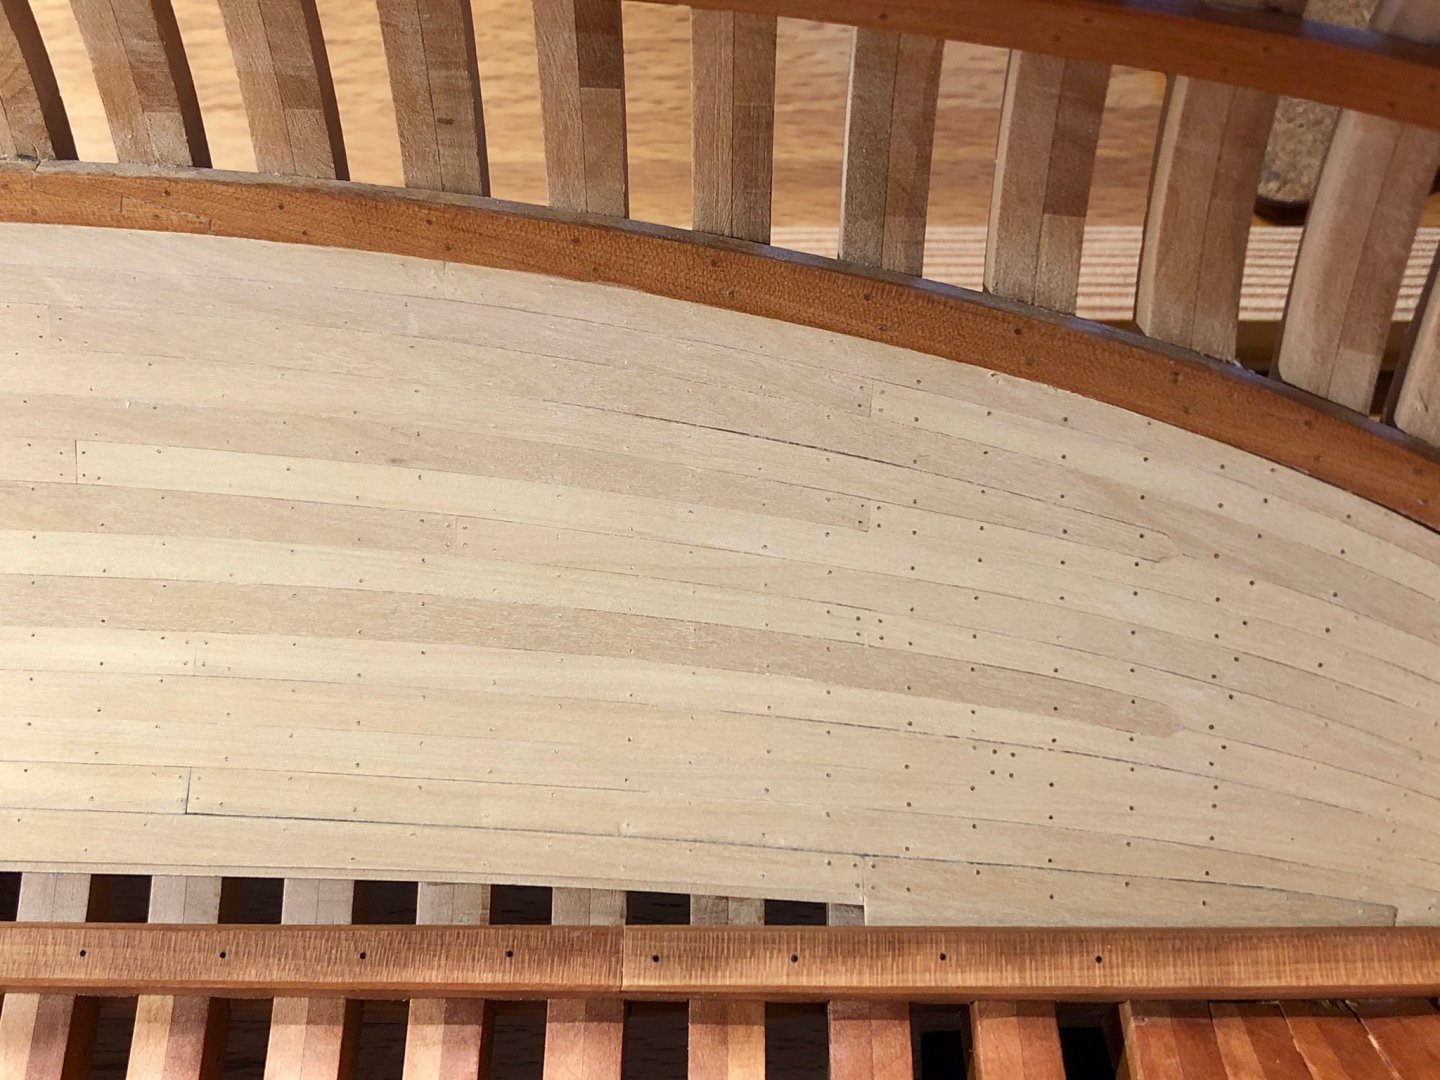
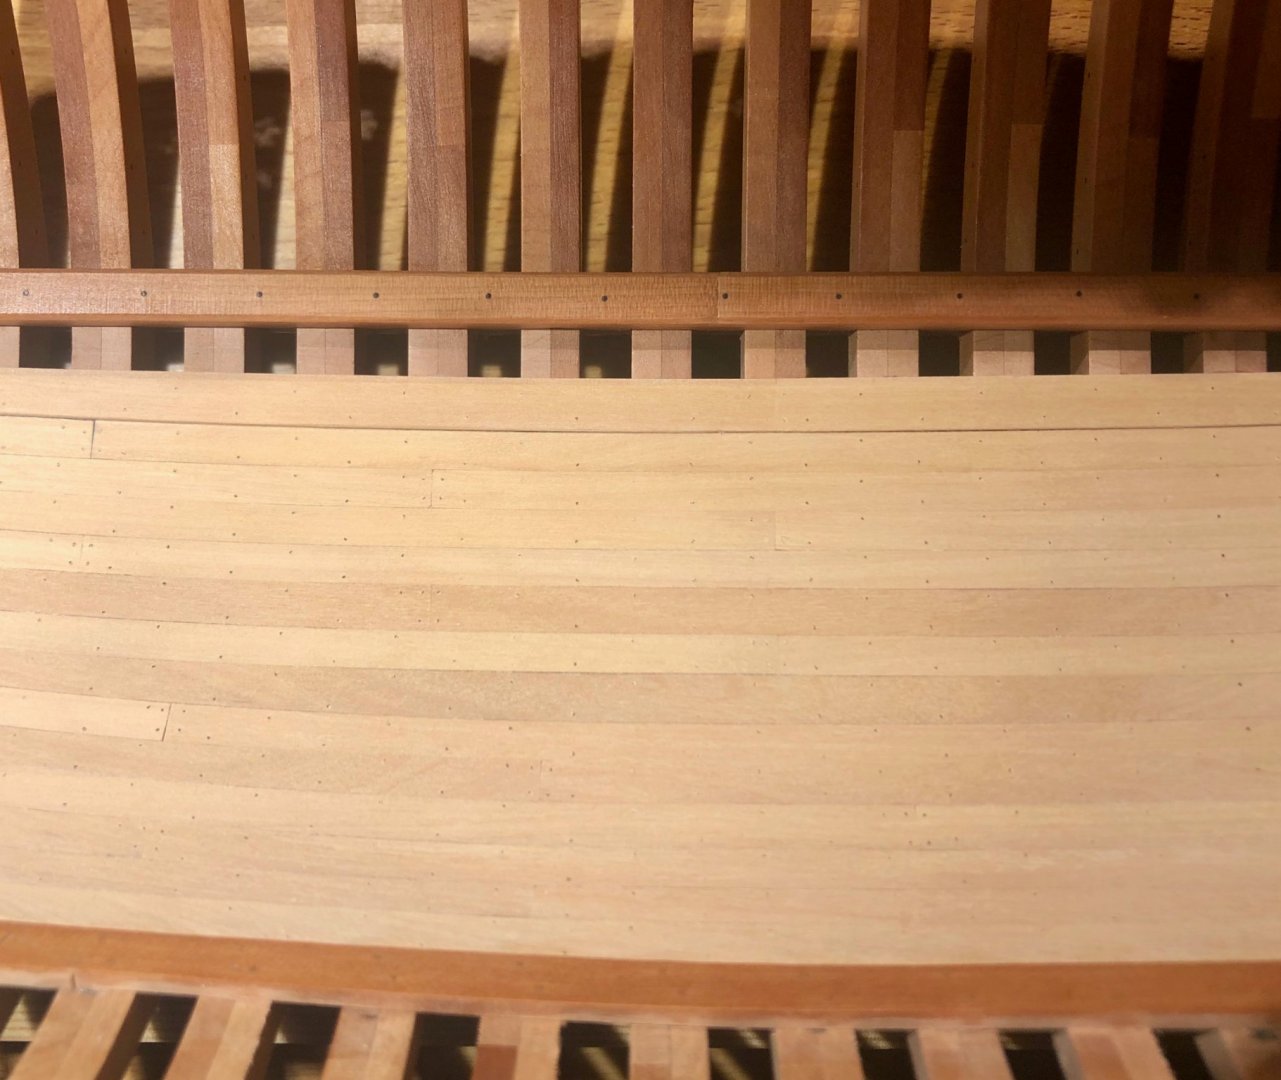
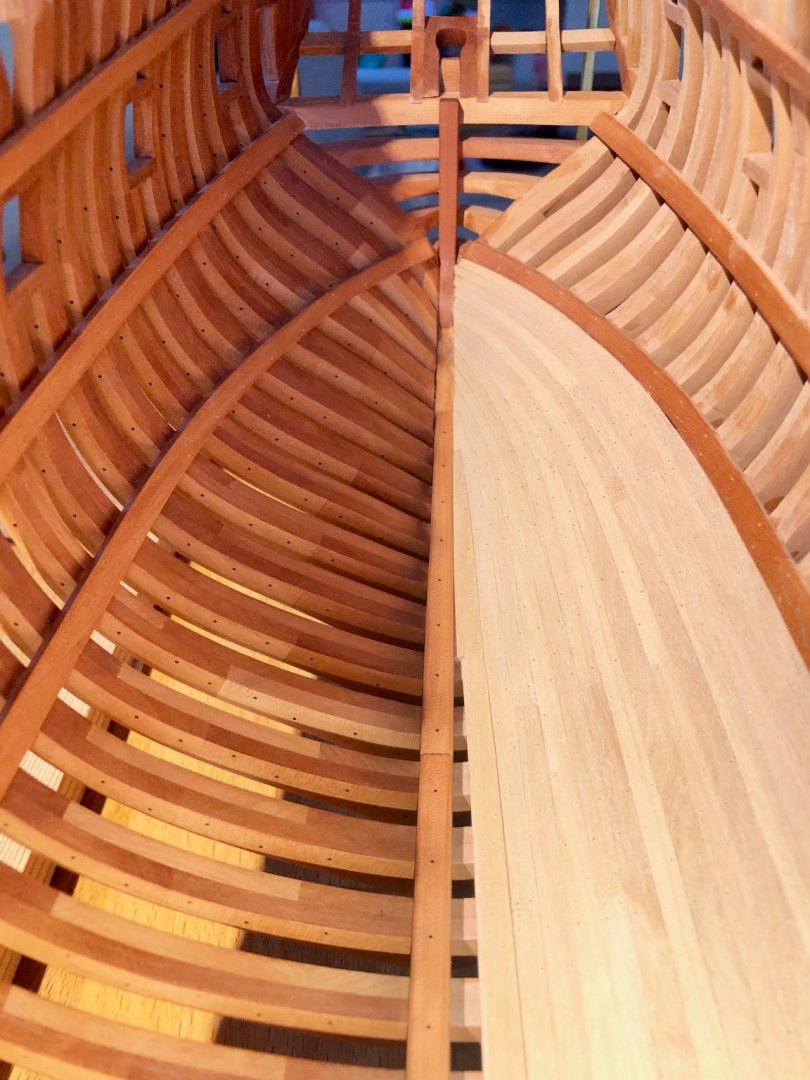

It's definitely not perfect, there are a few tiny gaps and dings, but it's good to practice on an internal planking (that would be barely visible afterwards), to build up skills for the more exposed areas.
Now it's time to apply some finish (at least to get an even treenail color), but I have no idea which one to use - these planks are actually the first boxwood parts on the model! All my finishing experiments were on pear, cherry and walnut, and the results are very wood-specific. I definitely do not want to turn this boxwood dark green-ish or dark yellow, ideally want to keep the color as light as possible. My guess is that oil is not the way to go, but some kind of sanding sealer would be better. Will make some samples and try all the main finishes I have before using them on the model.
Feels a bit wasteful to spend quite a lot of boxwood for these experiments, considering its price and availability... But I wasted less than budgeted on whoopsies and redos, so there is a bit of a reserve
-
11 hours ago, dvm27 said:
A Euro cent must be a lot bigger than our US penny!
It's actually smaller than a penny (16.25mm for a euro cent vs 19.05mm for a penny).
(Pardon, crawling back under a pedantic rock).
What giampieroricci is doing is incredible, can't imagine that accuracy on such a small scale, looks like an ultimate challenge! 😲
-
I have a shameful confession: since the beginning of the build, I've never actually read who Oliver Cromwell was further than a basic summary. "Some aristocratic British dude, whatever, I like the model". In hindsight that was not the smartest thing, it's like picking a rare name for your child without googling it first 🤦♂️
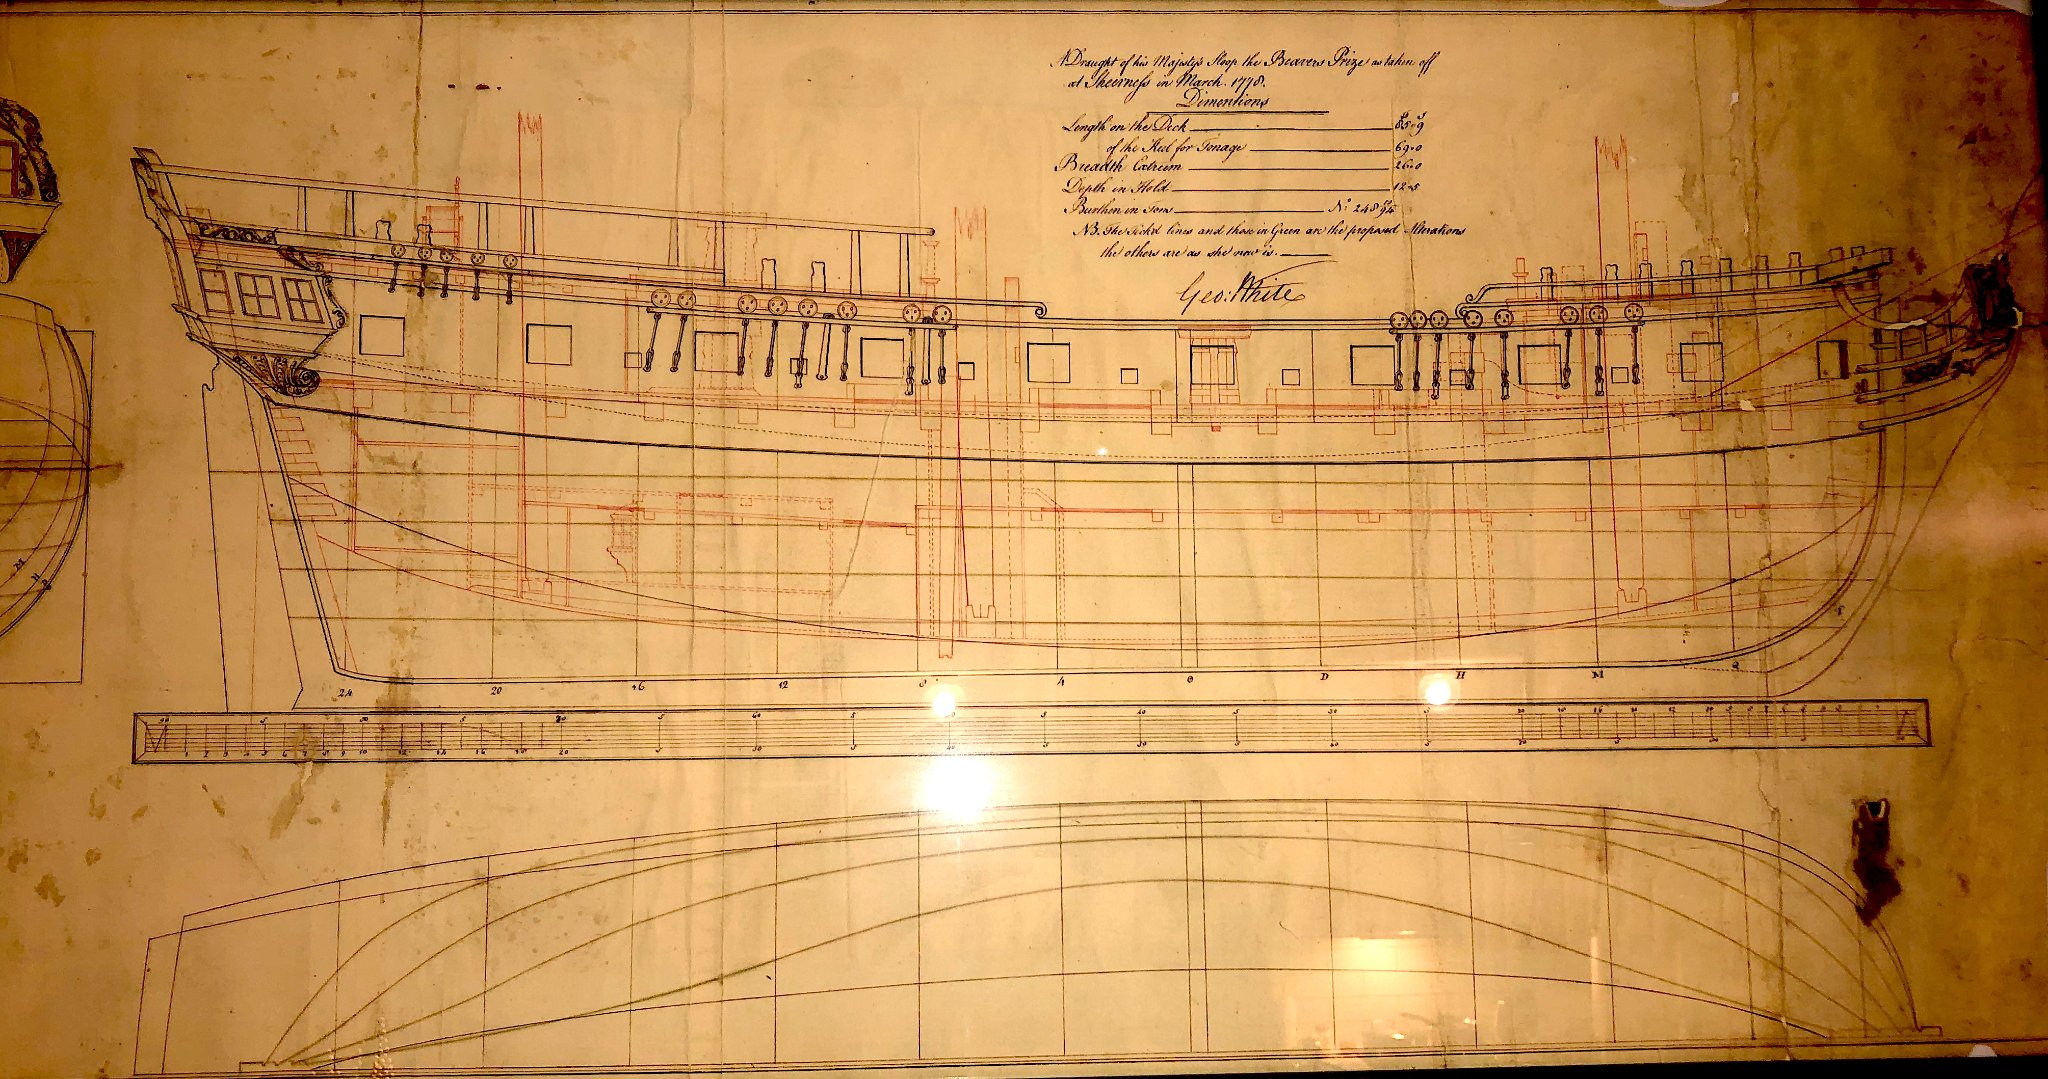
Over the last year I found more and more articles about him and his legacy, and it started to smell pretty bad. History (and the present) have had enough brutal authoritarian tyrants, and Cromwell was a pretty dedicated one. I started feeling shame and disgust when opening my own build log, like it's a dirty word that may be actually offensive. I hereby apologise to Irish for my ignorance..Luckily, there is a way out without deviating from history - that ship was renamed once it was captured by HMS Beaver. The new name was very creative - "Beavers Prize" - probably to make sure nobody would contest the origin of the vessel It's great! It has no relation to any historical figures, a bit humorous and may work as a conversation starter The spelling is not so obvious (Beaver's Prize is also used), but I would use the simpler spelling with no apostrophe, same as on the original NMM plans.
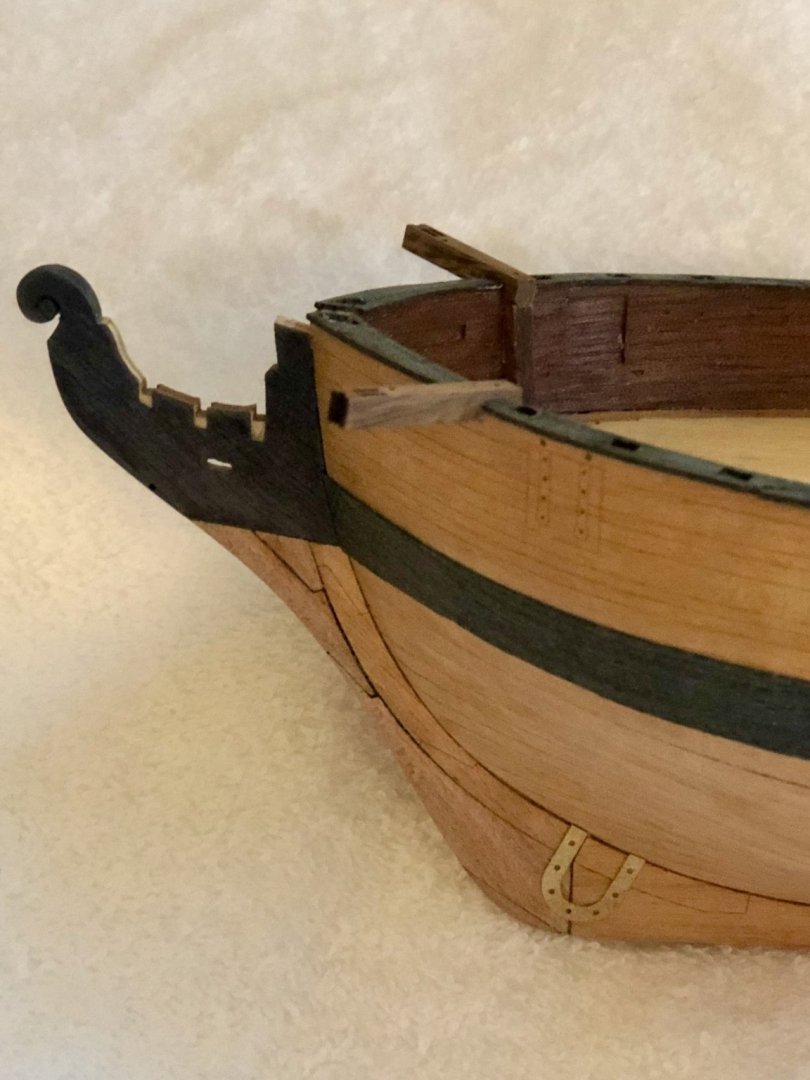
So from now on this log is renamed accordingly. Horrah to the Beaver!There are a few modifications that need to be done. When captured, it was measured and the plans were drafted. While there, some improvements were suggested and then implemented:* Second double-level capstan (I guess capstans were like clamps - you can never have too many)* Improved lower deck layout* Fore mast moved ahead a bit* New galley stove installedQuote from the Hahn's book "Ships of The American Revolution":
It's great! It has no relation to any historical figures, a bit humorous and may work as a conversation starter The spelling is not so obvious (Beaver's Prize is also used), but I would use the simpler spelling with no apostrophe, same as on the original NMM plans.
So from now on this log is renamed accordingly. Horrah to the Beaver!There are a few modifications that need to be done. When captured, it was measured and the plans were drafted. While there, some improvements were suggested and then implemented:* Second double-level capstan (I guess capstans were like clamps - you can never have too many)* Improved lower deck layout* Fore mast moved ahead a bit* New galley stove installedQuote from the Hahn's book "Ships of The American Revolution":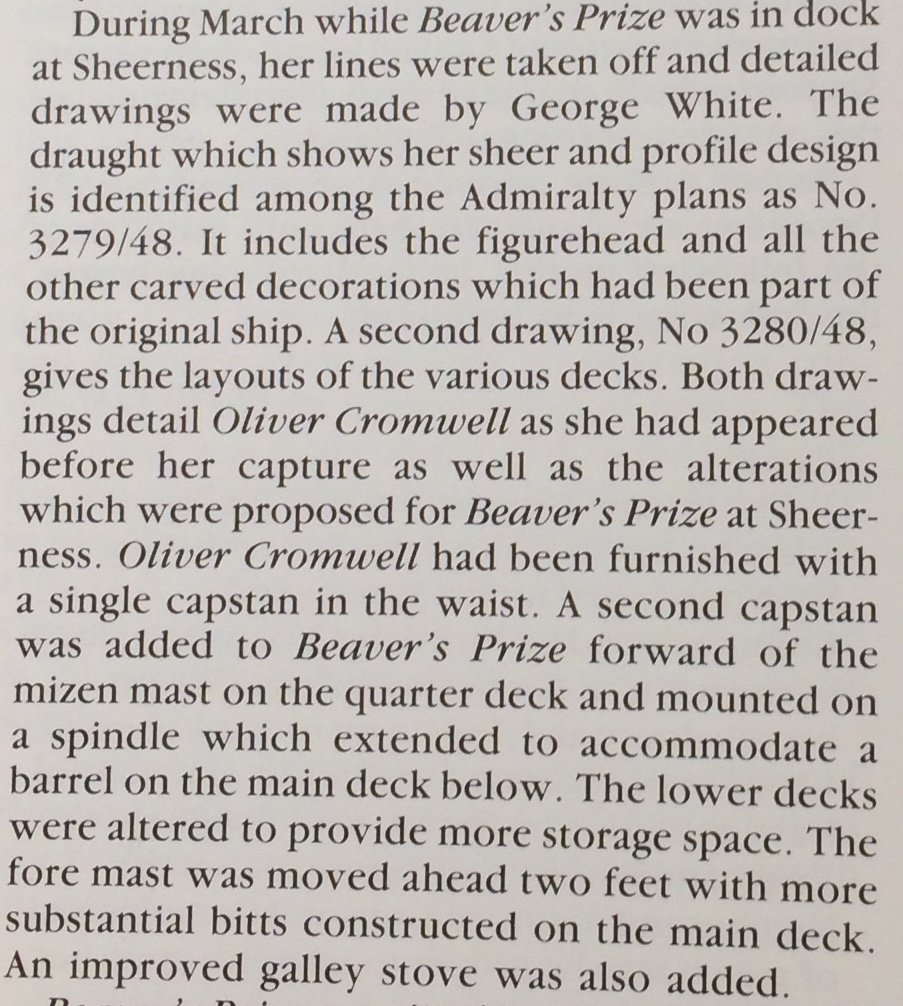 Suggested changes are drawn as a dotted line on the NMM plan:
 I really like that changes, especially the second capstan - it would make the quarter deck a bit more interesting.P.S.: the actual construction is going well, all treenails are in place and I'm sanding and scraping the internal planking. Will post photos once that phase is completed.
 -
-
-
Hi Hans,
Hope things are ok for you!
Have you figured out the transom geometry?
- FrankWouts and mtaylor
-
 2
2
-
Nice to see it taking shape! Everything is so crisp and neatly shaped, I am in awe
Glad to see you back on track!
- mtaylor and uss frolick
-
2
-
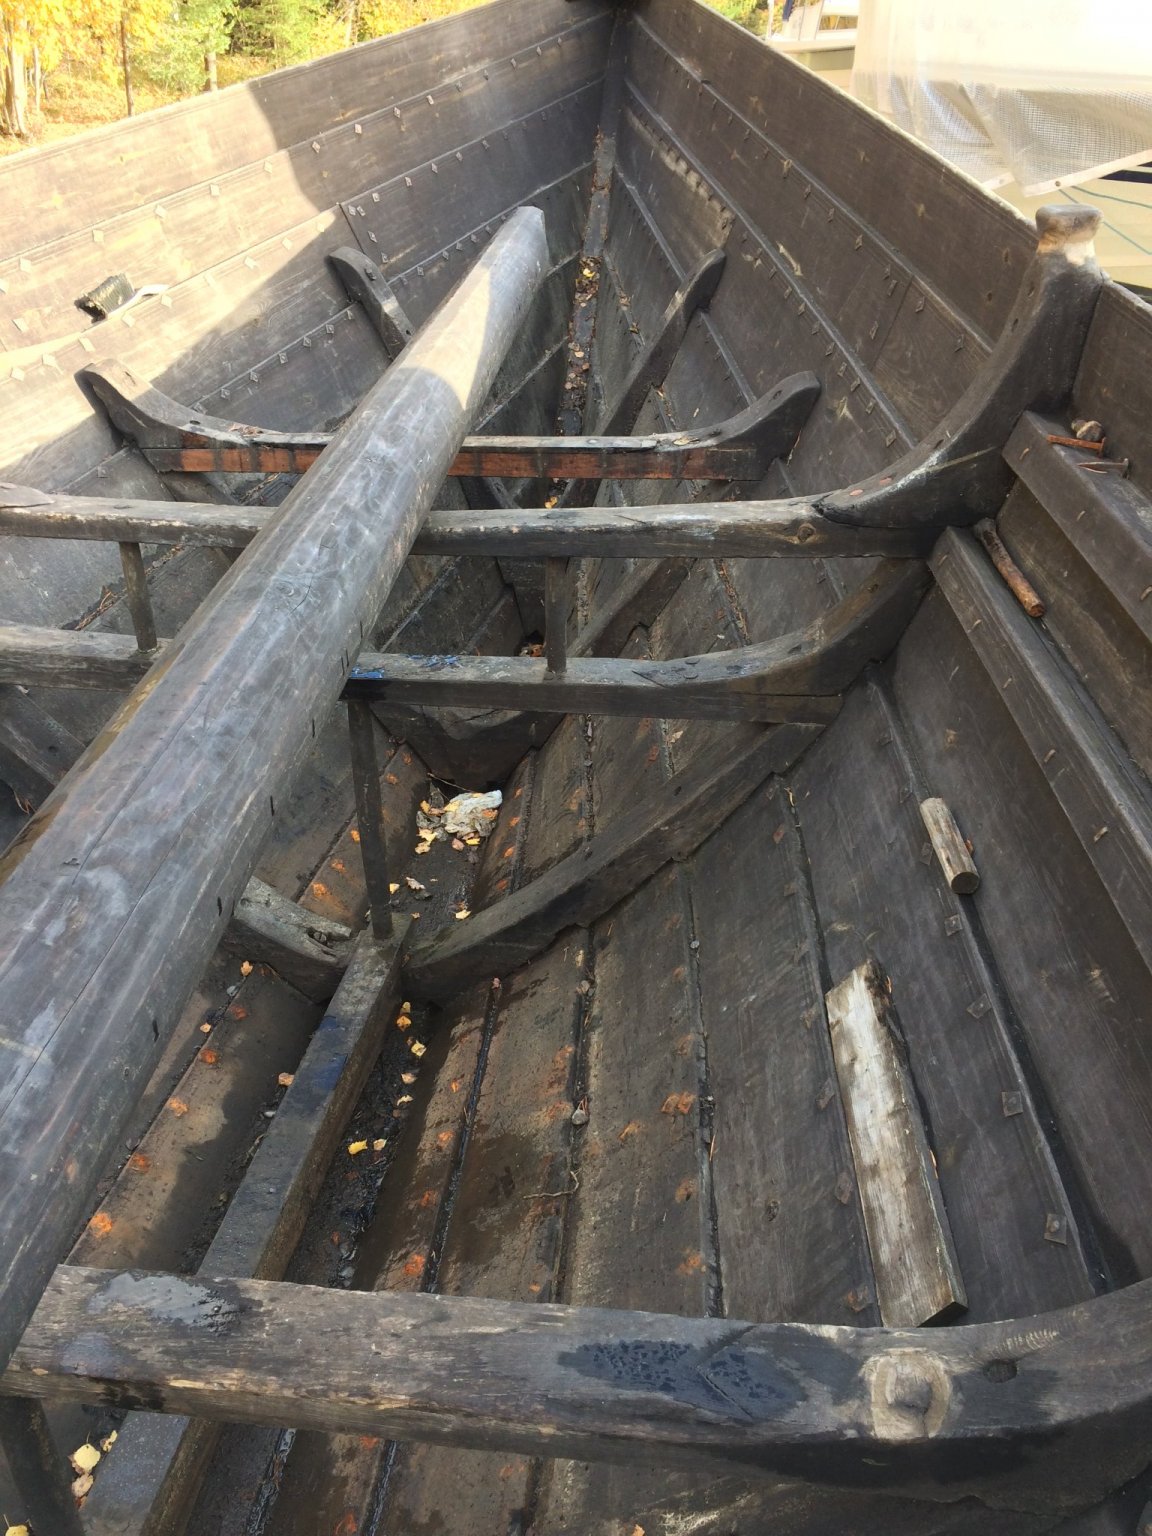
And here is the current state of things:

- JpR62, VonHoldinghausen, bruce d and 10 others
-
13
-
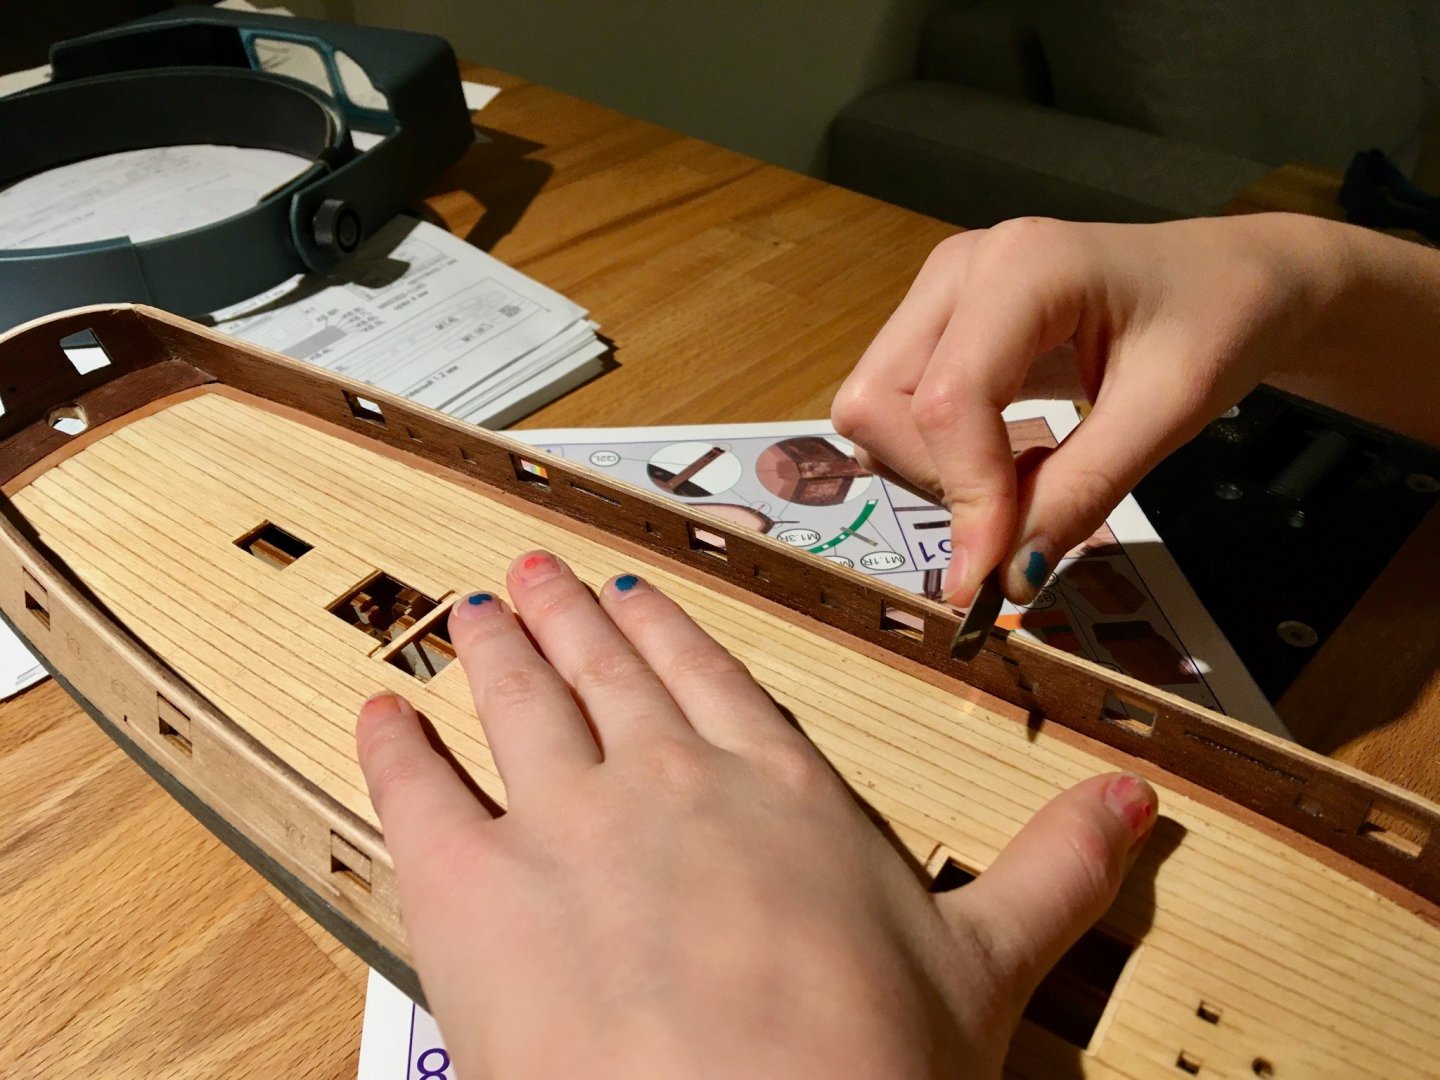
Time to install top railings. Daria learned how to use a blade for scraping to turn rounded edge to a flat one:
Installed:
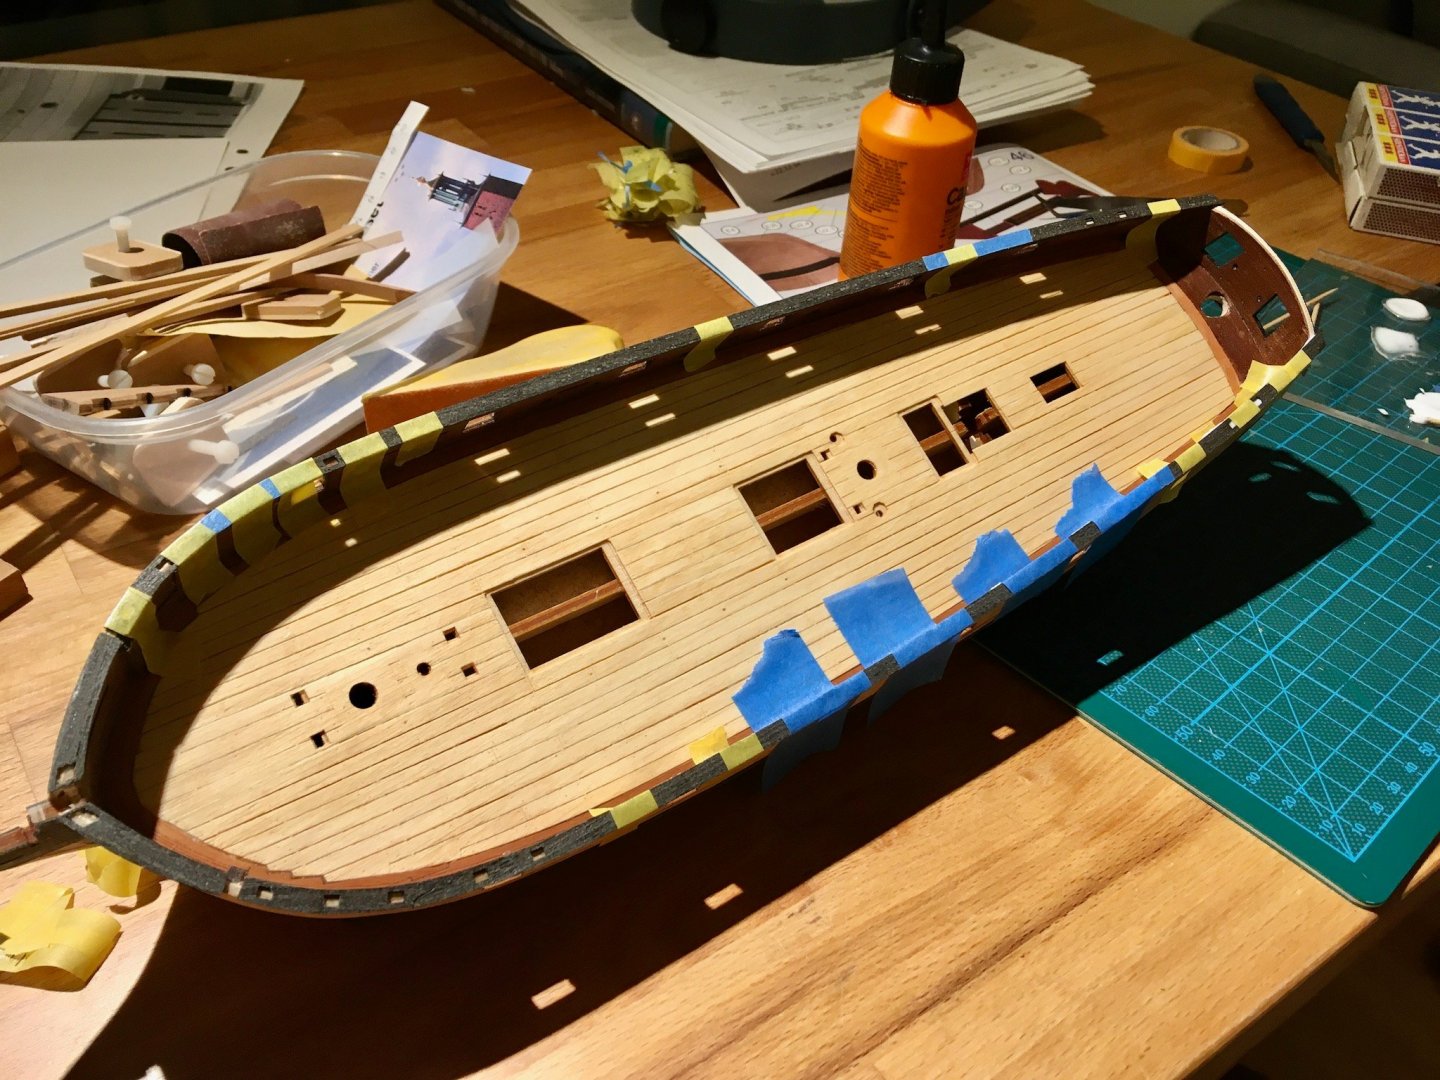
Also added an extra layer of wood for whales, etc.
.... And then we had a long break
....
She finally got a rabbit that she was planning for a long time, we started mountain biking together, and her baby sister needed attention too, etc etc (excuses, excuses).
Modelling was a bit on a backburner for a while.
... A year later we got back to it.
- Hm, daddy, I think we haven't been building our ship for a while?
- Say no more! 😎
Now time for some fiddly things. "Fashion piece" imitation. I am proud that she could fine fit such a delicate part on her own (very thin and prone to splitting).
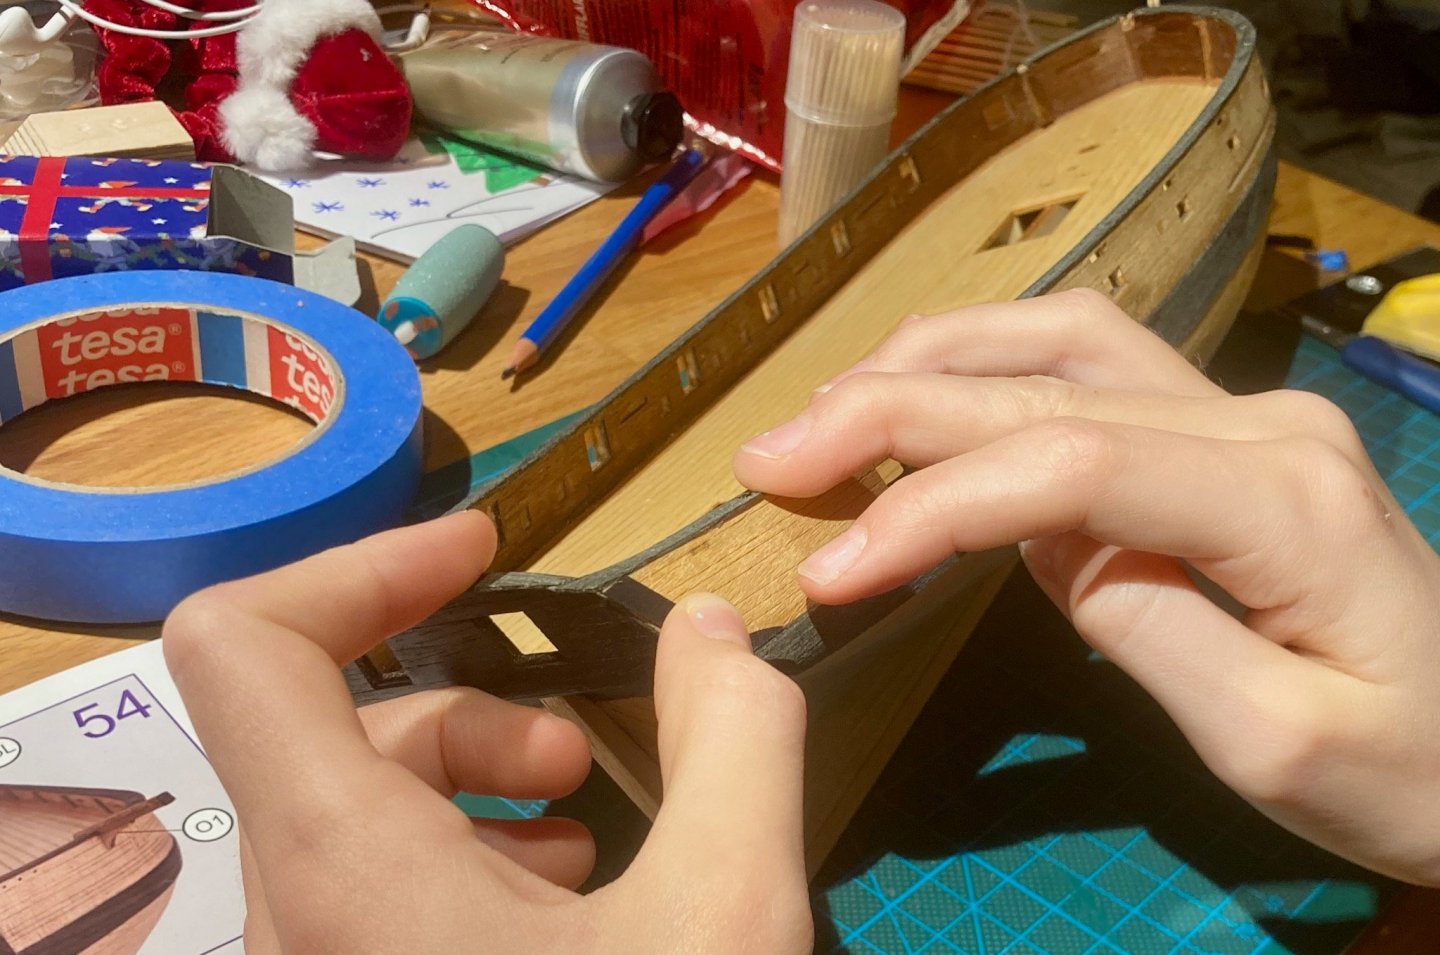
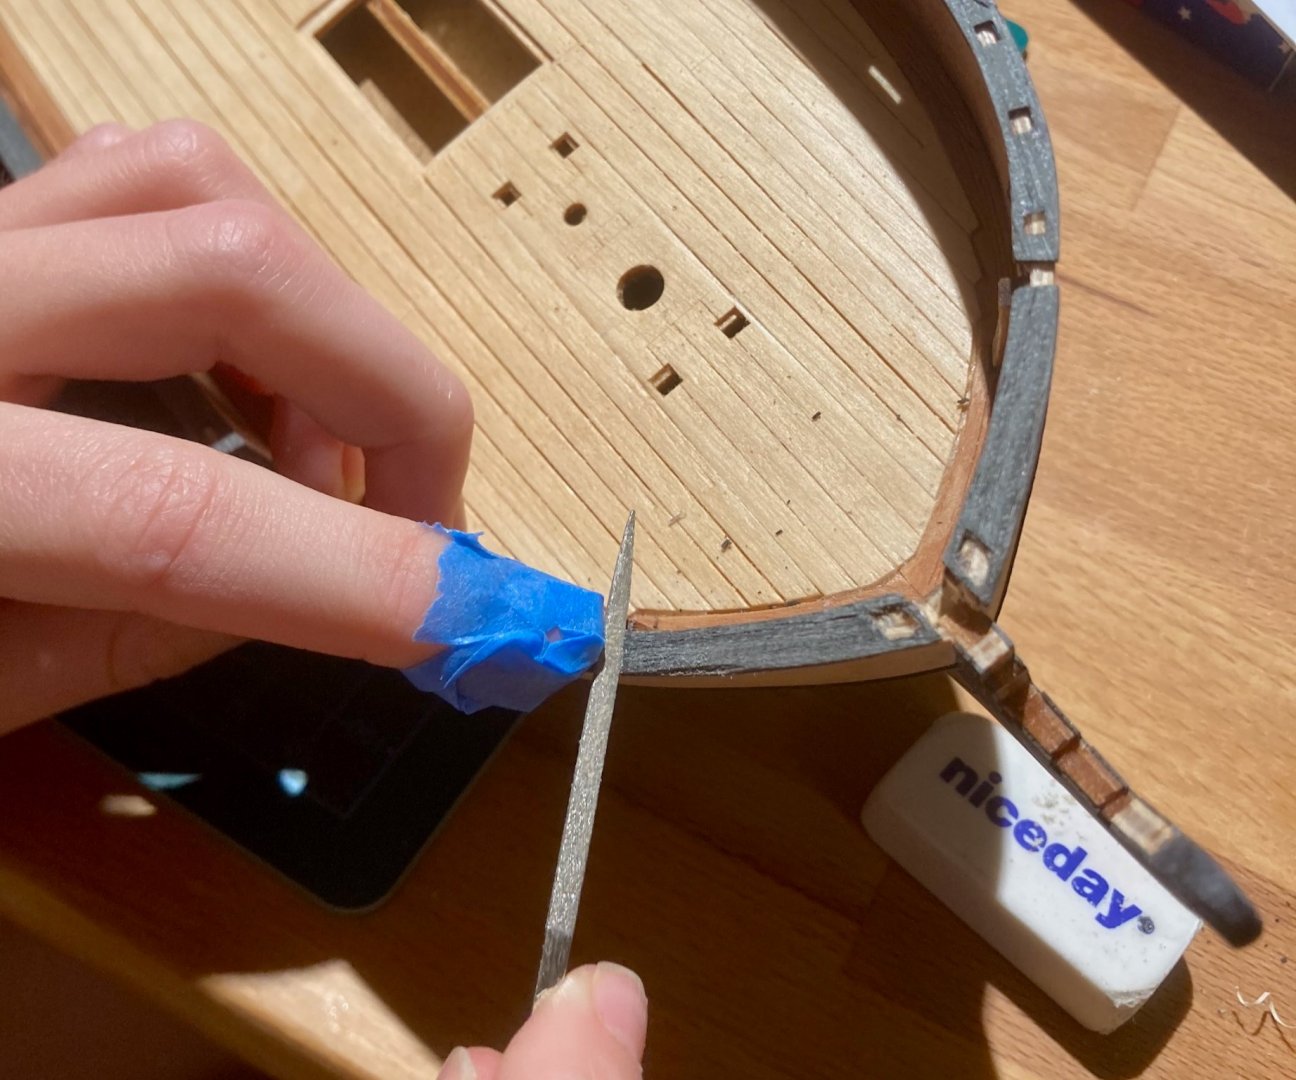
Catheads. She does not like the feeling of a file rubbing on skin, but masking tape helps with that
She wanted a timelapse:
-
I would seriously challenge the idea of a shop vac for our hobby (assuming you are not doing a full scale woodworking on a side). I am using a regular household vaccuum for 4 years already, though a bit of a fancy variety (Bosch ProSilence, HEPA filter included).
It's quiet. The airflow is more than enough, I rarely use it on a highest setting. It's quiet, nothing is ever getting clogged, no dust is spread inside. Its guts are clean as new, and dust bags are cheap and readily available. I also used if for small-scale woodworking, from cutting quite a lot of wood on a table saw to thickness planing.
It's way cheaper than a shop vac (100-120 EUR/USD), way smaller and quieter.
Since it's quiet - you can easily run it on a low or medium-low rpm during the entire modelling session. I use it all the time when sanding by hand, which actually produces quite a lot of fine dust right next to your mouth. Would you run the shop vac all the time while working on some parts? Unlikely, since it is ungodly loud. This gently kitty can be run all the time.
And if I'm wrong and you really need a massive shop vac and a cyclone - it can be always repurposed as a regular household vac, no loss
P.S.: the hose of this vac has the right diameter to fit Proxxon tools with no special adapters. I hope that the US version is not using a different hose though...

- bruce d, Rik Thistle, mtaylor and 2 others
-
5
-
Yep, these days not sending a short mail "your order is shipped, tracking number is XYZ" is so strange, since literally 95% of the shops do that. It's like ordering a pizza with no order confirmation. Maybe it's coming, maybe it's not. But please enjoy the surprise, eventually your parcel will suddenly show up (assuming your post office is reliable enough, otherwise you are out of luck with no tracking).
P.S.: still love SeaWatchBooks and will order more from Bob, just this one particular nuance is so frustrating for some
 Imagine ordering things to business address with no tracking? Maybe it was delivered to somebody on reception 3 weeks ago, but that person forgot to pass the package.
P.P.S.: best wishes to Bob and thanks for providing a very vital service for the community!
-
Just a few cents
The best way to think about it is "put yourself into others shoes".
First problem is simple and technical: it's impossible to find your build log link. Even in this topic, where some may be encouraged to have a look - there is no link in your signature. I honestly thought "oh, sure, let's have a look and maybe I can help a bit" - but no, it would take too much clicks just to find it.
See https://modelshipworld.com/topic/23663-how-do-you-add-links-to-your-build-logs-under-your-signature/
Second - make sure your question is asked clearly, and preferably with photos. Keeping correct terminology is pretty hard, especially for a beginner, so just using words is not the best idea. For example - I found your topic on deck cutouts, but it's pretty hard to really understand without any pictures. What are these "cutouts"? How are they located in relation to masts and so on?
A lot of people would either guess what you mean or just move over to another question, because it takes too much efforts to decode.
Third consideration is a bit harsh, and I am not sure how to put it in a very neat terms - but first big heap of initial modelling knowledge is acquired mostly by reading other logs. Majority of newbie questions were already asked bajillion times, there are FAQs, manuals, tutorials and so on spread over MSW.
Even with best intentions, it slowly gets old to explain the very same thing for a dozen times, so people loose motivation to help.
I cringe when I read some of my first questions, I want to travel back in time and slap myself "just read the manual one more time before asking!". Using this moment to thank everybody who was helping!
Ignore the particular vessel, just pick the build log where the build process is shown, not just the end result. Some logs are very educating, you will learn a lot from reading them. Basic techniques are the same. Do not hesitate to go to scratch build logs - there are fewer of those, but often they are very detailed and educating.
The balance is delicate. Please do not be shy to post your updates and your logs! Everybody is welcome.
But think about it like a giant dance event. You come through the doors and you are in a crowd with thousands of people. They are open and a lot are keen to teach you and dance with you. But first you need to watch a few tutorials on basics, and then just start a small talk to get familiar with some of them. Make yourself friendly and available (see - build log signature). They are under no obligation to help you, but also there is physically no time to dance with everybody. You need to stand out of the crowd just a little bit, to make sure you will be noticed.
Good luck, and hope you will find your way and join one of the friendliest and constructive communities in the internet!
-
JP, hope your build progresses nicely!
Just a small word of caution in that critical moment - check the alignment of the top part of your frames, next to the cutoff sections. These areas are thin, and would be very visible once the hull is flipped over. Luckily cutoff sections can be moved around a bit to compensate for it, but it needs to be done before frames are glued to the jig. Some strip of wood would help to check the alignment.
I was not so careful during that step and still see the results of that mistake..
-
Be gentle with the clamping force though, if overtightened - the guide rods will bend, and jaws would not be parallel anymore, vice will start to wobble. Don't ask me how I know
Great value for money anyway!
- Rik Thistle, mtaylor, Canute and 1 other
-
4
-
Pat, very interesting idea, thanks for sharing the link!
Heard about the dental tools, but always postponed the purchase due to their price. Maybe it's time to go for another ebay hunt
Carl, thanks for the generous offer, I'll keep it in mind! No need so far, and it mounts to the full-size Dremel, which is too bulky and aggressive to be brought close to the model, I'm a bit scared of it after using the mini dremel tool..
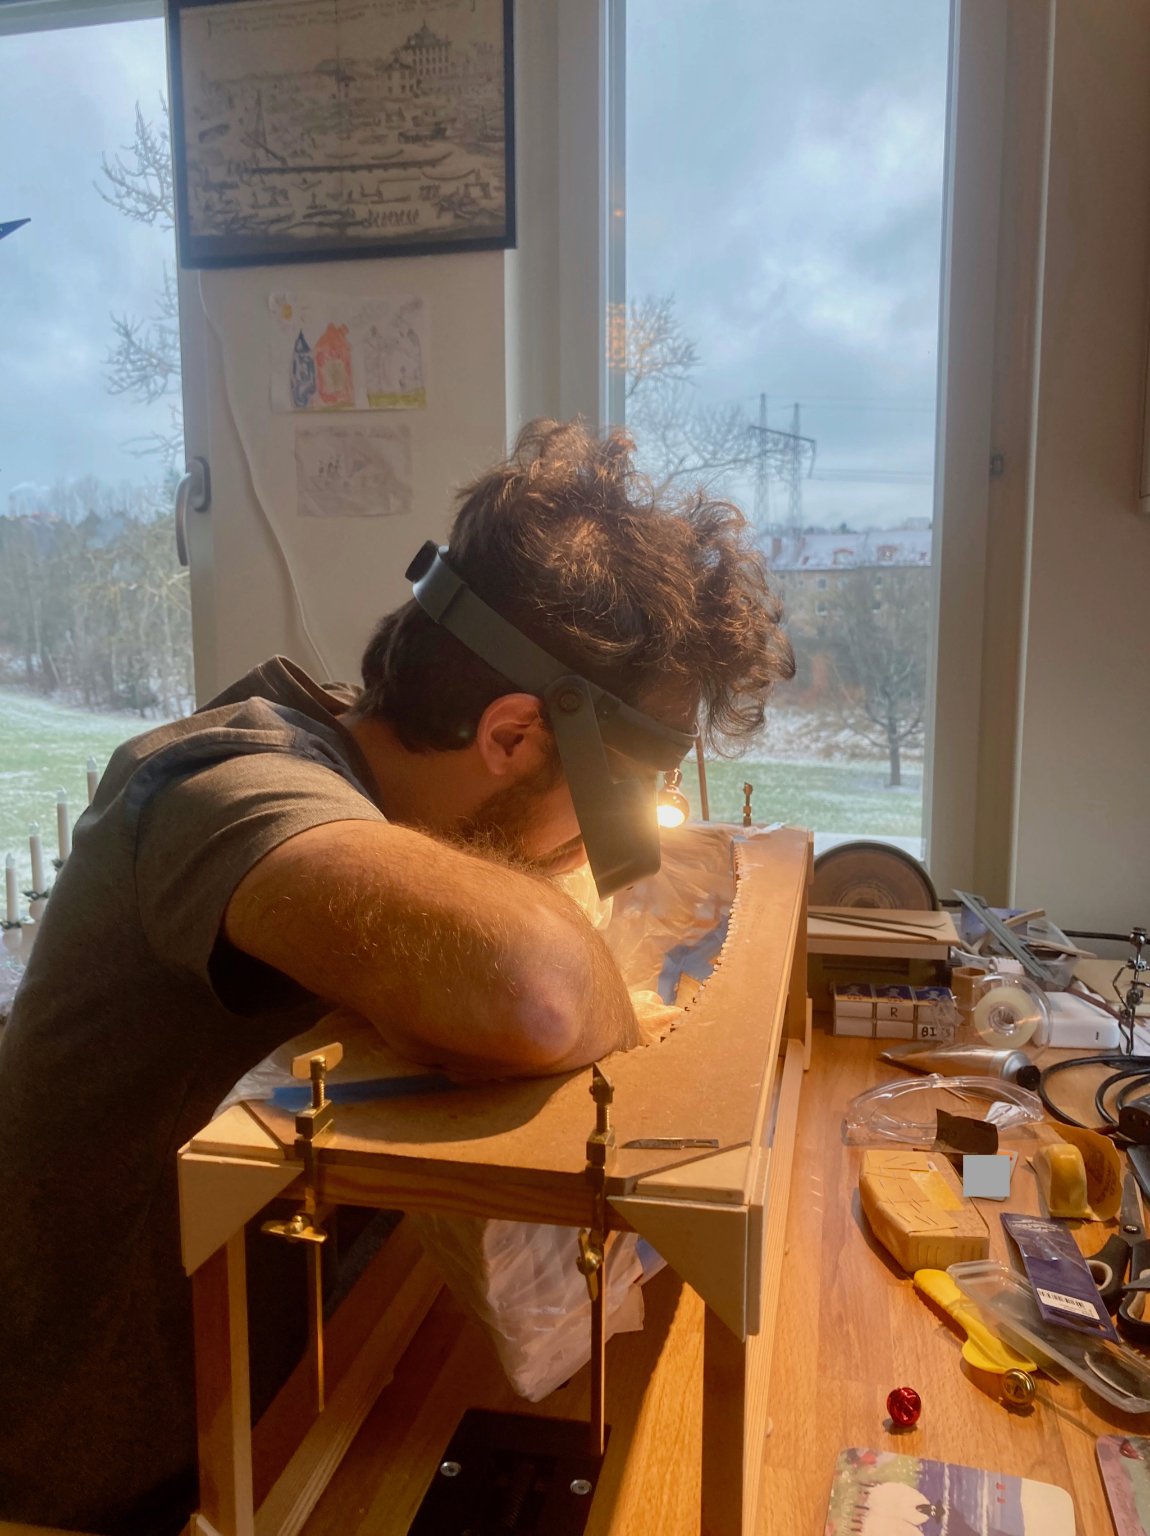
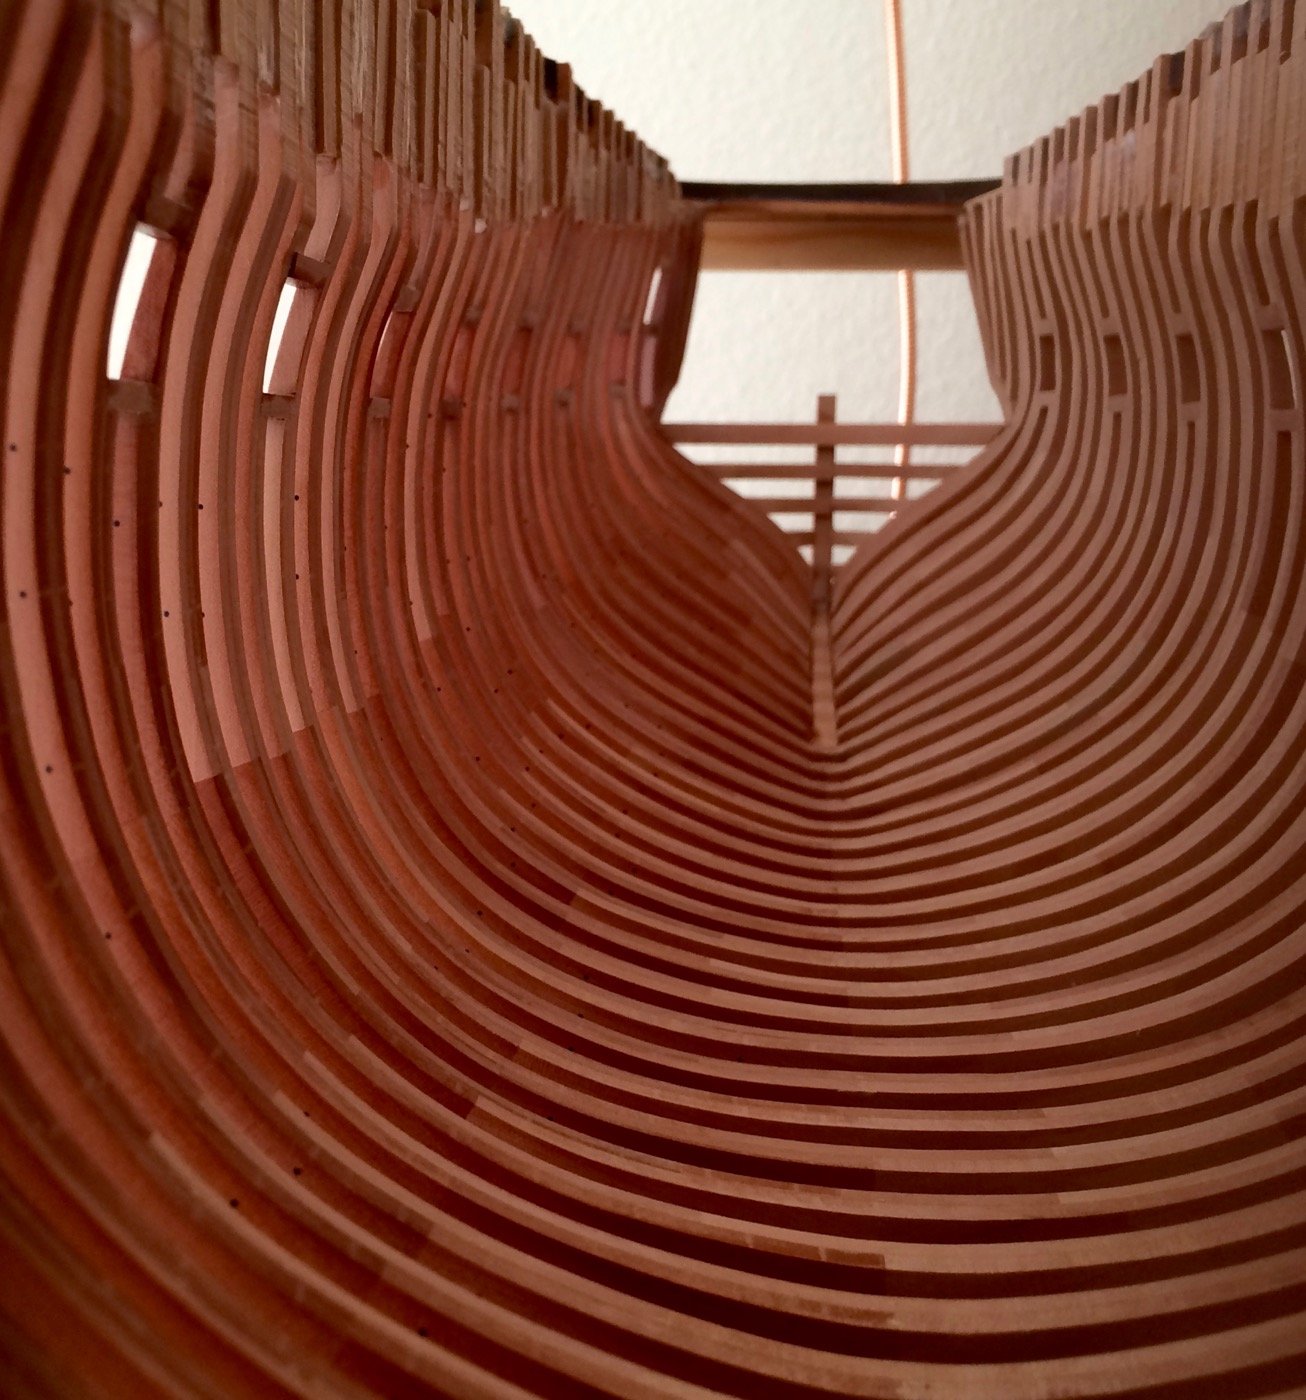
I've now realised what made my life more difficult than it should be - it's a small downside of the Hahn building method. The top of the hull is higher and narrower than it should be due to dummy parts that attach it to the jig, so it really limits the angle of the tool that you can use inside the hull.
(The photo is quite old)

It would not be an issue once the hull is cut free, but that would happen way further down the road.
At the moment my handmade drill seems to work just fine, already drilled and treenailed a quarter of the inner planks. To be on the safe side and avoid overheating I simply switch it off after every row of holes and move over to drawing bamboo through a drawplate for a few minutes. That way I keep a roughly 1:1 ratio of holes-to-treenailing-stock, and switch tasks to break the monotony - otherwise it's too easy to phase out and make some dumb mistake
- cog, VonHoldinghausen, dvm27 and 8 others
-
11
-
11 hours ago, Jaager said:
You have access to one of the first line species and in a form that is readily usable. From some build logs it seems that Pear is not difficult to source in Europe. I trust that you appreciate your good fortune with that. And also value those who do the work to mill it for you. In North America, it is fast becoming a situation where it is rare to source any milled stock other than the totally awful Balsa or the merely terrible Basswood. Its cousin Linden/Lime is about 100% better, but that is not really available here. Pear in any form is difficult to find and the price is prohibitive.
Hm, sorry, I did not know it's so hard to get it in US
With Hobbymill and Crown closed, I thought you can buy Pear, Alaskan Cedar and Castello Boxwood sheets from Syren, but now when I check the site - it looks like it's down to Cedar only.
Well, maybe ordering from Europe is not such a bad idea, on a large enough order the shipping cost would not be so significant, and there are no import fees into US, right?
- Anthony Hearne and mtaylor
-
2
-
-
-
-
Jaager, may I respectfully disagree about the need to mill your own wood? It's very nice to have your own bandsaw, and it's a good skill to have - but if you do not have the space or desire - it's not so expensive to just buy milled wood. I'm building 1:48 scale with Hahn method and the cost of swiss pear for framing blanks (where more than a half goes to waste) was 150 EUR, and I've ordered plenty of extra pieces just in case. And I was told this is not the cheapest supplier (though I am very loyal to them due to their quality).
It's not peanuts, but definitely not too expensive. You don't _need_ to invest in all the machines to mill your own lumber, or find somebody with them. Ordering sheets and wide strips of pre-milled wood would be just fine. Especially since you can spread the purchase over many years while building.
I am building POF in the apartment with no workshop, and just want to say it's definitely possible with a limited set of miniature tooling. Please never drop that idea just because you do not have a space for a large bandsaw
Of course a 74 gun in 1:24 scale would be a whole different story..
-
Thanks Gaetan, nice to know!
Sometimes I wonder how everybody else drills the treenail holes inside the hull? Most of the build logs omit that process, just showing a thousand neatly aligned holes
I can't believe that it's all drilled by hand with a pin vice, especially since it is too long to reach some areas on the extremums of the hull.
-
It’s mostly pear, castello boxwood and cherry, you will find plenty of older topics about pros and cons of all these woods. Cherry is the cheapest, pear in between, castello box is the most expensive of them all. There are a dozen of other woods, but they are even harder to get.
there is also a dedicated topic with a list of wood suppliers, smth like ”where to buy wood”.
One thing for sure - you would not want to go back to ”kit wood” after using that stuff
- mtaylor and Landlubber Mike
-
2
-
Hope now you will spend more hours in your cozy work area
Glad that you are back to this build!
-
Richard, interesting idea for the next generation of the tool! I'm pretty sure this one would break before I finish the model
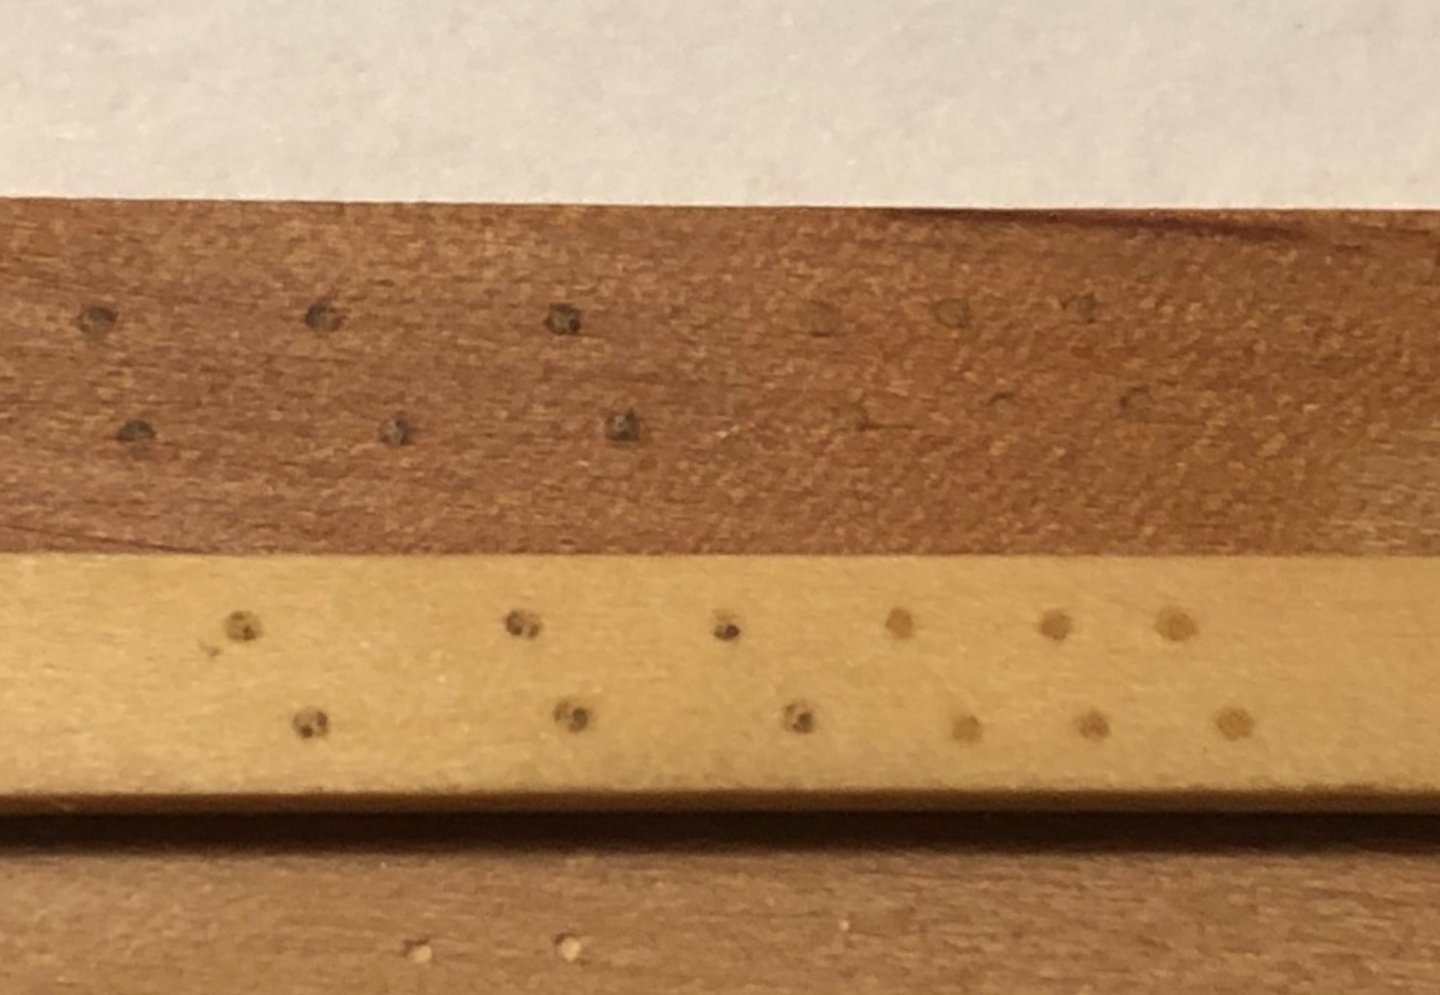
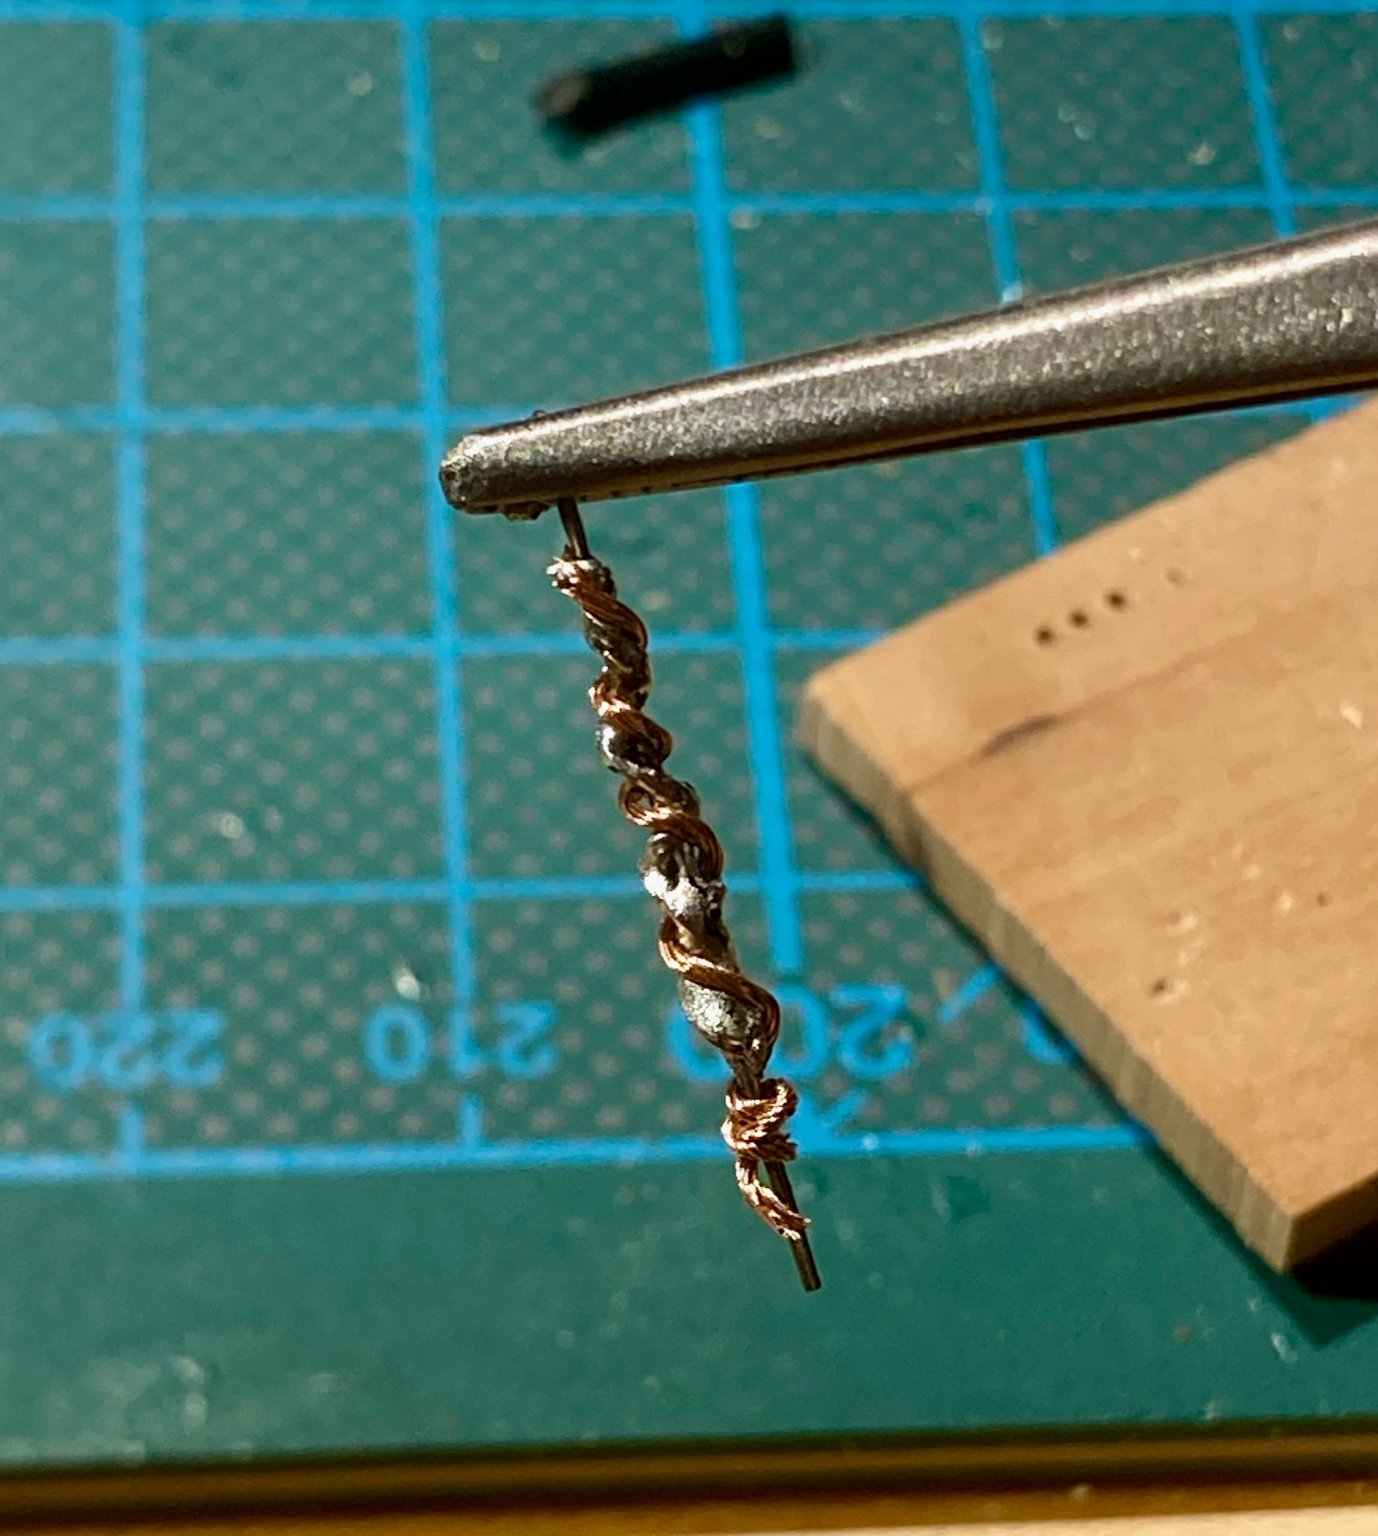
Had a few late-night drilling sessions in .45mm size (#77, third smallest hole in Byrnes drawplate). This corresponds to 7/8in in real life.
First problem: tiny drill bit is too tiny for any collet. I tried wrapping it with masking tape, aluminium foil, etc - all was fruitless, it was spinning once bit bites into the wood.
I turned the internet upside down trying to find a proper chuck/collet or a set of bits with larger shank. That was fruitless, but I found a great advice on MSW from Von Stetina in 2013: https://modelshipworld.com/topic/4348-micro-drill-holders/?tab=comments#comment-125198
You basically wrap a wire around a bit, which provides enough grip. In my case just a wire was not enough, but if you add soft solder on top - then it works like a charm! Looks like a horrible feat of redneck engineering, but it works
Due to a low rpm of my drill a minor wobble induced by this abomination is not an issue at all.

So after all a set of tiny holes was drilled.
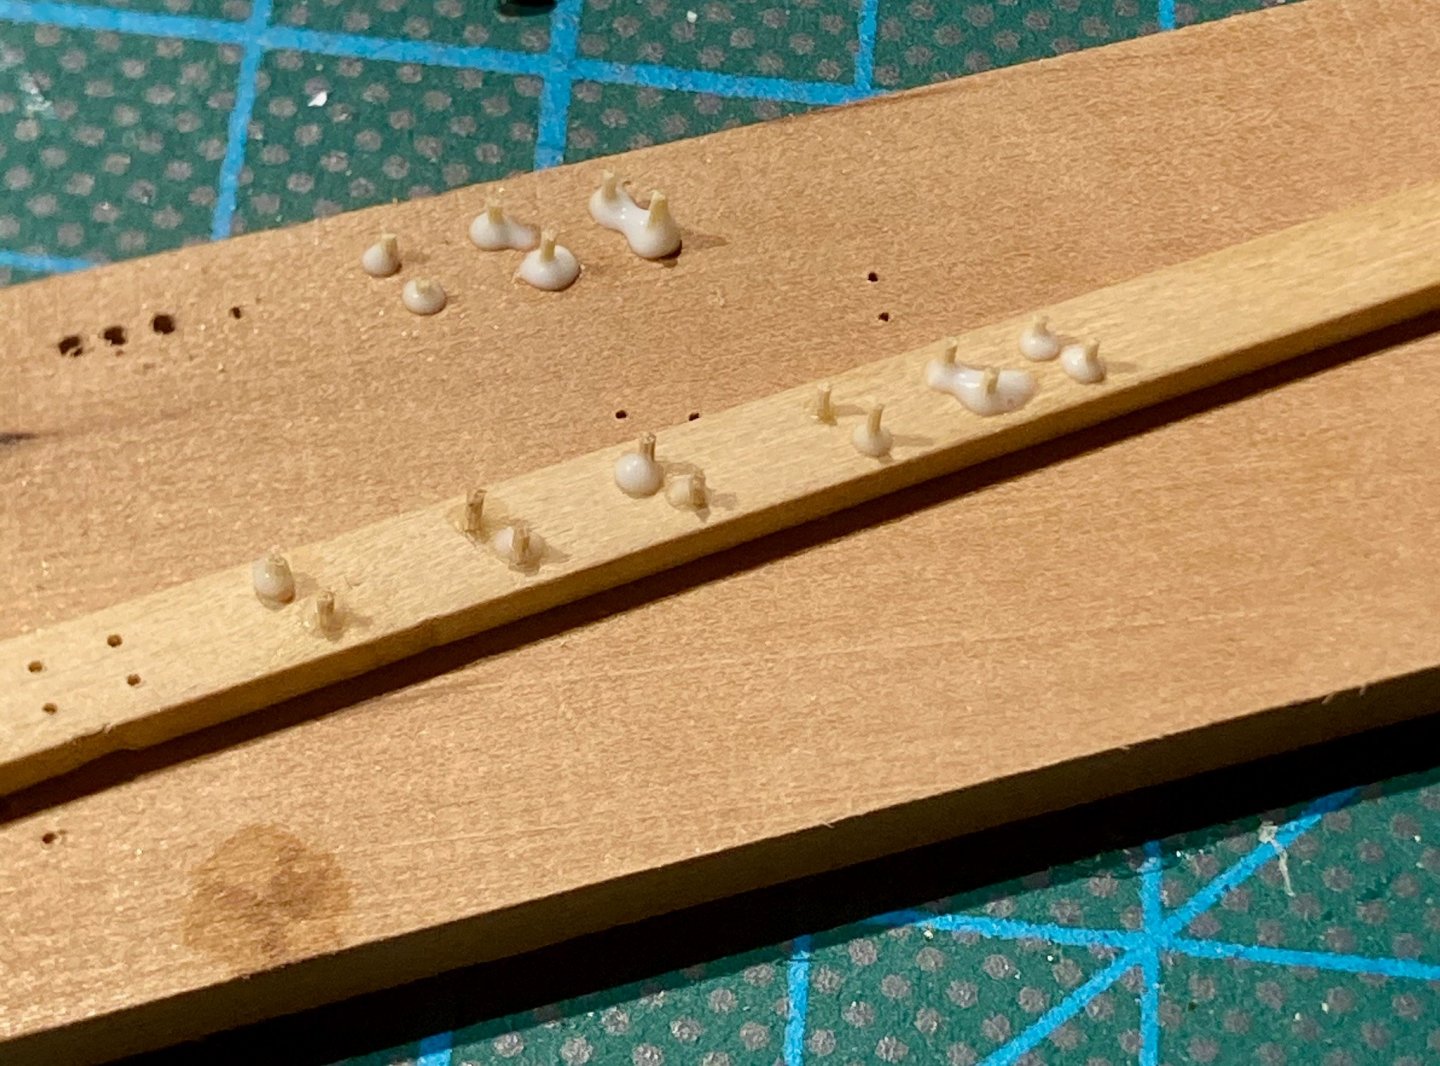
I tested it with both bamboo and boxwood treenails. It is much easier to draw bamboo (I managed to do it all the way to second hole in the drawplate without breaking), with boxwood it becomes even more delicate.
Results were quite different when oil is applied, bamboo has some dark blotchy spots, while boxwood is evenly colored.
Here bamboo is on the left side, boxwood is on the right. Top plank is pear, boxwood is in the bottom.
Will probably go with a compromise - using bamboo treenails for internal planking and boxwood ones for external planking and deck planking.
If somebody asks - will blame the crew for the poor maintenance of their living quarters 😜
- GuntherMT, GrandpaPhil, mtaylor and 5 others
-
8


Beavers Prize 1777 by Mike Y - 1:48 - POF - Hahn style
in - Build logs for subjects built 1751 - 1800
Posted · Edited by Mike Y
Alan, putting glue into each hole would be quite messy and complicated, every second counts here since it's quite a lot of treenails.
The holes are a bit oversized to allow for glue (otherwise it is very hard to push, and such a thin treenail breaks easily). The oversizing is small though - instead of a "proper" diameter of "the third smallest hole on Byrnes drawplate" I use the second smallest hole.
The end of the treenail is dipped into a small puddle of fresh glue and inserted, then trimmed with scissors immediately. In 5min glue get slowly sucked into the hole, I had no issues with treenails falling off even in areas where I need to shave off quite a lot of wood afterwards.
No chamfering of a lead corner, instead I make sure to "open up" the hole by gently poking a round tip of a wood scriber into it. It does not change the diameter of the hole, just opens up the entrance from loose fibers and other obstructions.
It takes a bit of practice to "sense" a hole when there is a glue drop obstructing the view. But after a while it gets easy and relaxing.