popeye the sailor
-
Posts
16,007 -
Joined
-
Last visited
Content Type
Profiles
Forums
Gallery
Events
Everything posted by popeye the sailor
-
 I believe California is very close to sea level.......one of the thing I missed in Florida as well {it too is close to sea level}.
 -
looking good Sjors........the masts are coming together you'll be ready to do the shrouds before you know it those are called cross trees Mick
- 1,873 replies
-
- 3
-

-
- occre
- san ildefonso
- (and 1 more)
-
hello Kimberly, I have the same kit.......I am a big fan of the old lindberg {lindberg line} brand of models. when I began working with wood, the admiral told me....{with much opposition, because I have the Revell United States}....that I was to build "no more plastic kits". we were in a craft store and I was looking around in the model dept {sad to see how few wood kits there are}, when the admiral stumbled onto this one. I knew it was a plastic kit......didn't say anything. she as well, loves the old pirate ships, and she wanted to get it. I just left it as "OK...but remember who wanted it" :D }. yes, the sad truth.....it's from the old Pyro molds. what I have uncovered, I will not post, because it comes from another site. the ship went by many names.............. La Vestal Flora La Flore La reconnaissance .....there's a few more in the mix somewhere. sunk......raised......scuttled......raised........she had her ups and downs. the ship does have all the bones to be a pirate ship......from looking at Cracker's ship, some rigging has been ommitted. I did read that there is one problem with fitting a deck.........I'll look back in the info I found {maybe do a test fit for you, to see if this is true}, and let you know what I have found. by all means.......I will be very interested in seeing what you do with this kit......I won't be building it any time soon. your build may give me some really cool ideas. are you going to replace those plastic shrouds? I hope to see more are you sure you don't mean "brake fluid" Duffer. that's what I use, and it even removes chrome.
- 118 replies
-
- 2
-
-
- jolly roger
- lindberg
- (and 2 more)
-
thanks Bob......yea, it was a feat trying not to get glue ooze on the planks thanks as well Frank......you use that paint too huh?!? I have a friend on another site that has been experimenting with Jo Sonja and Chroma paints on plastic. he's proven {believe it or not} that it is doable other parts that are not in the kit, are the doors for the cabin bulkheads. I've made some.....what I'm working on at the moment. a bit more progress here.......and I'll head back to the Goth thanks for the good word Bob and Frank
-
Bismarck by NBP - 1:100
popeye the sailor replied to NBP's topic in - Build logs for subjects built 1901 - Present Day
that's some serious detail here!!! definitely need to see more progress! is there more under the bubble wrap?????? look forward in seeing more! -
let's hope your vision as better than my camera :D thanks a bunch! thanks Adam.......just a perk from the position of the lamp now that the corrections are done......I can move on thanks for the good word Augie and Adam
-
up here in the north-east, our hobby shops carry Plastruct products......the same stuff as Evergreen. flat stock, round and square stock.......just about anything you can think of. I use either the Testor's green tube, or CA to cement it to wood. perhaps you could even try to look these products up on line. the exhaust shrouds came out great! super cool pictures as well!
-
Cutty Sark by NenadM
popeye the sailor replied to NenadM's topic in - Build logs for subjects built 1851 - 1900
different model manufacturers depict different views on detail.........can't really explain why.......if one person sees it a certain way, they all should. take plastic for instance........some have really crappy detail, while others are highly detailed. with wood, you have some lee-way, but you need to keep in mind how high the bulwarks will end up. the dead eye and pin rails are already there. the rise that is there, will have to be used for the decorative border you want to do. it would probably be best to use the 4mm for the cap rails........5mm would probably be too much, and hinder the dead eyes. you would have to do a check fit, to see what is best.- 4,152 replies
-
- 1
-
-
- cutty sark
- tehnodidakta
- (and 1 more)
-
I've seen this one done in wood....and it's quite nice with all the brass. but......this I feel is a bit harder to do.......all of the ornamentation is painted. you've done a superb job with it.......all of the minor aspects shine. very nice detail.....well done!
-
you may just have an answer for that old Lennon question........how many holes DOES it take to fill the Albert Hall :D
- 1,873 replies
-
- 2
-
-
- occre
- san ildefonso
- (and 1 more)
-
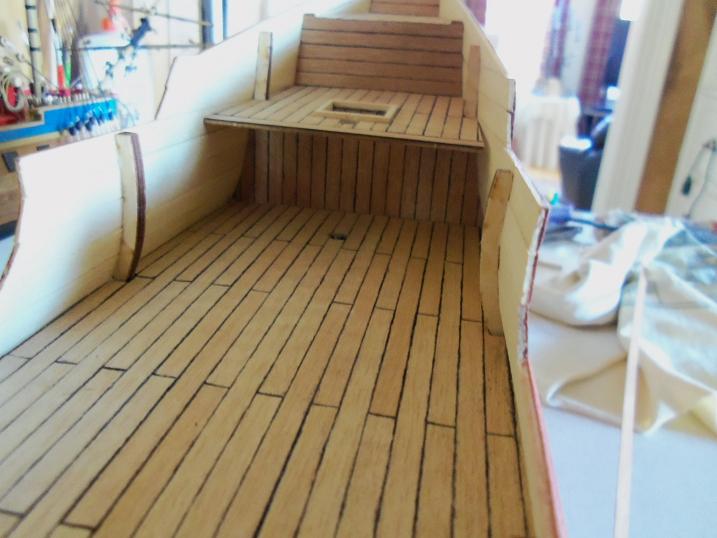
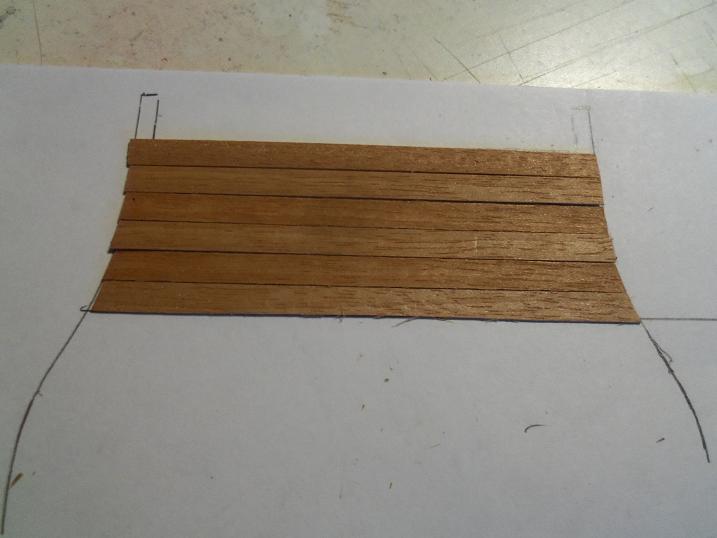
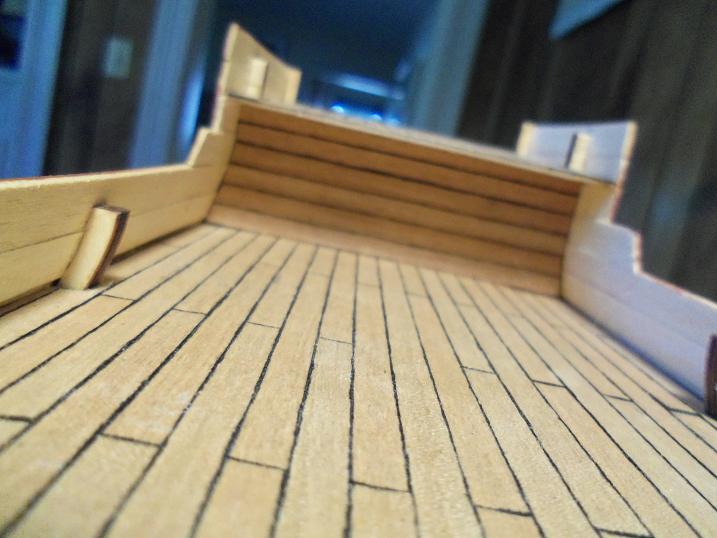
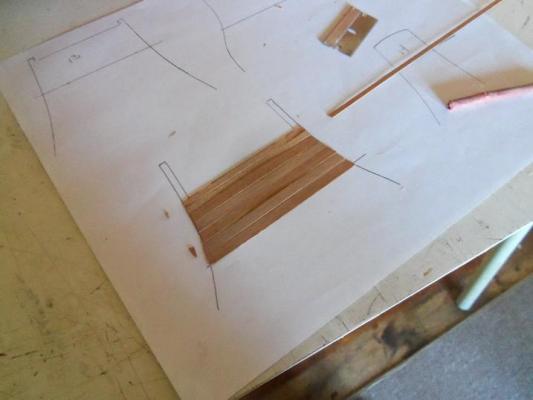
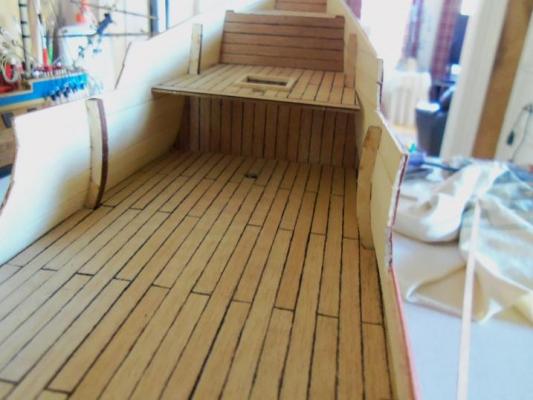
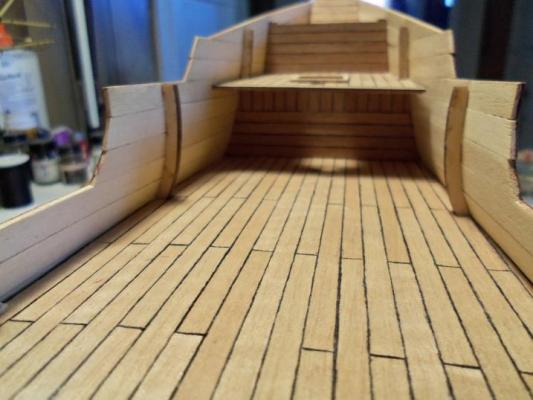
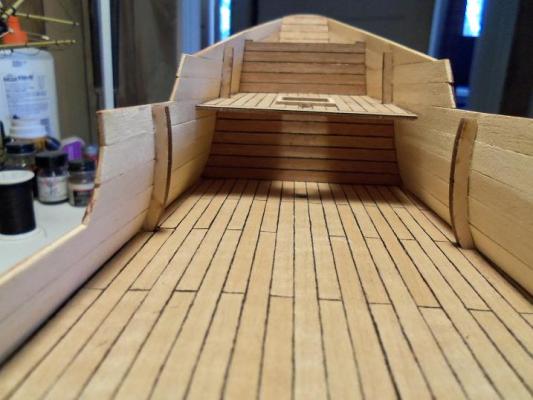
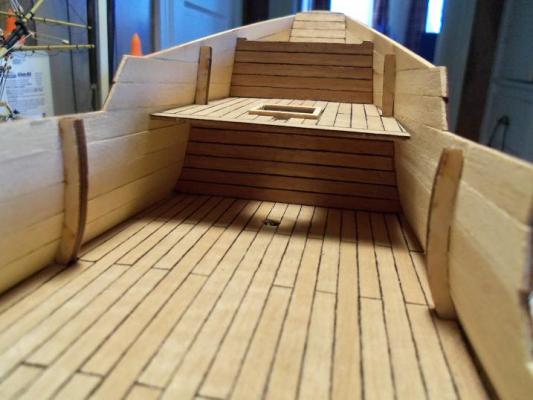
I finally got those recessed cabin bulkheads corrected........and yea......it wasn't easy. it went quickly though......and that was a plus, dispite having to sand them to shape and all. using the templates I traced earlier, the aft bulkhead planks were cut. this one was made a bit easier, because of the opening in the deck above, trading the plank from one tweezer to another. then, the fore bulkhead......... the two on the bottom have already been shaped a little. the top plank needed to have 1mm removed from the width. now I can stain the interior. from there, I can the support posts for the aft deck, cap off the ends of the upper decks {to hide the ends of the plywood platforms}, and install the cap rails.


-
are those Humbrol colors?
-
that's the beauty in doing two builds.........one you could be rigging......the other you could be sawing wood. you get the best of both worlds. of course.......if you threw in the Aggie......there'd also be a slice of heaven!
- 1,873 replies
-
- 1
-
-
- occre
- san ildefonso
- (and 1 more)
-
I did a bit of looking Bob........the hull looks more like the naval gray.......not quite sure of the name or F.S. number. I couldn't get a good look at the deck, but chances are it's a wood with a gray tint.......lighter gray inner bulwarks and structure
-
the rim ring looks really good Clare.....did you consider making them in photo etch? very nice progress
-
I bought one for the admiral.........so far I've used it more than her :D adding the extra materal would look good on the larger sails.
-
the Aggie will be next.........that's what you got it for! of course......you can always ignore the other guys ........and send it to me :D
- 1,873 replies
-
- 1
-
-
- occre
- san ildefonso
- (and 1 more)
-
with most of my builds, the hull is painted, so all I had to do is sand - fill in the bad spots - and sand smooth. the Gothenborg is the only one I did a second planking on, and that one was to be a single plank. Tom was so sorry that I had to do it....but it's like I told him.....it was only because of all the glue blotches, that I did it. frankly, I was glad to have done it.....I love the way it came out. I'm no expert either.......how some folks do it, is sheer magic. I hope one day, to be as good. Russ hit the nail on the head.....everyone has a method that they feel comfortable with. I hope your first planking goes good......but if you do have to do a second planking, try the thin strips, I think you'll like it much better. they behave better and trimming is much easier.......and incorporating the wales in the second planking step give the hull a really nice look.........they don't protrude so much. so, take your time.......and careful planning........you'll have her planked in no time
-
very interesting.......not even a trace of it in the earlier ship........what a difference a few years makes
-
I don't know how this one escaped my radar..I should have seen it on the right side of the forum page {like I did this morning} I never had good luck with battens......I'd end up off somewhere. one thing good about them, is you'll get a good idea of how much tapering you'll need to do. I start just the way you did, even with the deck line. it creates the sills, in the event you need to do scuppers. for the following planks, I'll cut to fit the bow rabbit, beveling the end, so it will sit flush to the stem. from here I let the plank tell me how it wants to lay. laying the plank in place, any material that starts to encroach the preceeding plank is trimmed off. the edge is then beveled slightly so it butts up better. should a plank not follow the line, and leaves a gap, then the gap can be filled with a stealer, or a jogger, which ever works best. I'm sure your books cover these two processes. if your unsure about tapering, don't use full planks......this way you can concentrate on both ends, bow and stern, one at a time. you've done a nice job with the frame so far.......you'll do just fine with the planking I have no doubt
-
you did a super job with the yard and sail..........it looks very nice onward and upward
-
very well done Andy! more than enough room for this fine lady
-
you must see ratlines in your dreams.........and now you play 'catch up' with the S.I. you doing a super job on both of these ships
-
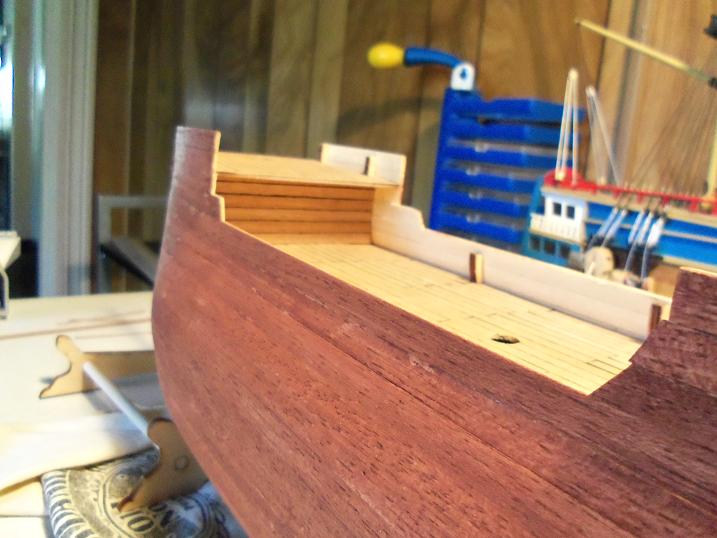
oh....crap!!!! I put that structure in the wrong ship!!! :D :D you would have to read the goings on in SkerryAmp's mayflower log to get an idea of what I was thinking. I wanted to do the wales, but I don't want them done in this color. I also have a bit of painting to do, but was unsure how to go about it. so, I took the bull by the horns and did it.......now I don't have to worry about glue blotches from the wales and rub rails. I need to finish the last two cabin bulkheads {change the direction of the planking}, before I can stain the interior. you should have seen the mess I made......in the first picture, you'll notice a cap on the table.......it's from the bottle of mahogany stain. I stirred it to be sure it was mixed. folding up a rag, I held it loose to the bottle, so the stain could saturate the cloth. it did alright.....it went all over my table!!!! so, as I was staining the hull........I was sopping up the excess on the table. then the admiral tells me that it was 11:00PM.......I should be asleep by now..........wake up is at 3:30 AM. made for a very interesting work day so, for now the trawler is off the table, but there are a few things I can do in between everything else. I want to do a little on the Half Moon......but I also want to get back to the shrouds {Sjors will get mad at me if I don't}. so much to do... thanks randy for the good word....I always wondered what the Billing's mahogany looked like