


glbarlow
-
Posts
4,129 -
Joined
-
Last visited
Content Type
Profiles
Forums
Gallery
Events
Everything posted by glbarlow
-
 My model has both those names depending on what day it is.😁
- 221 replies
-
- 1
-

-
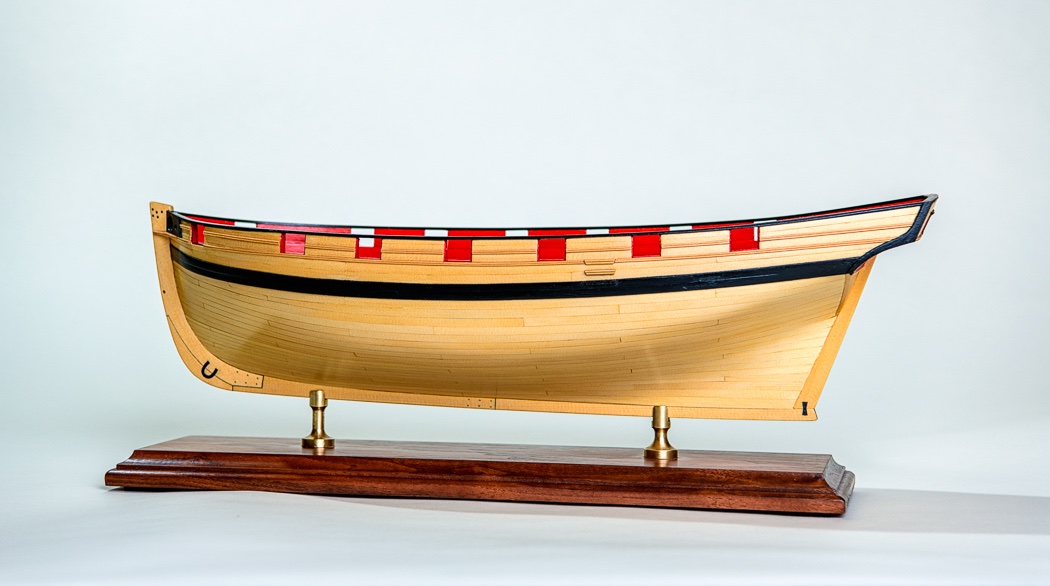
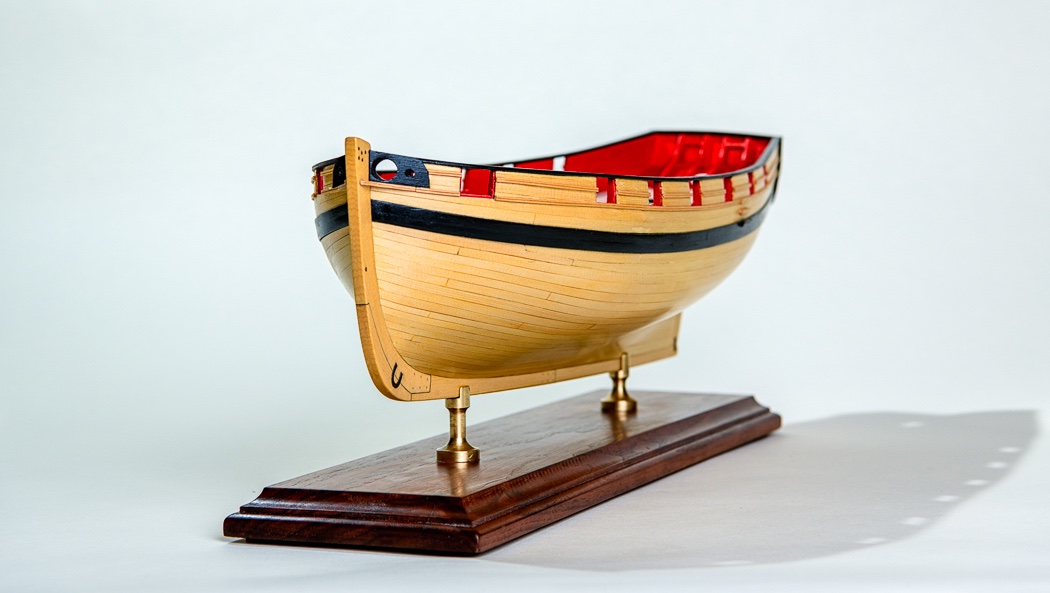
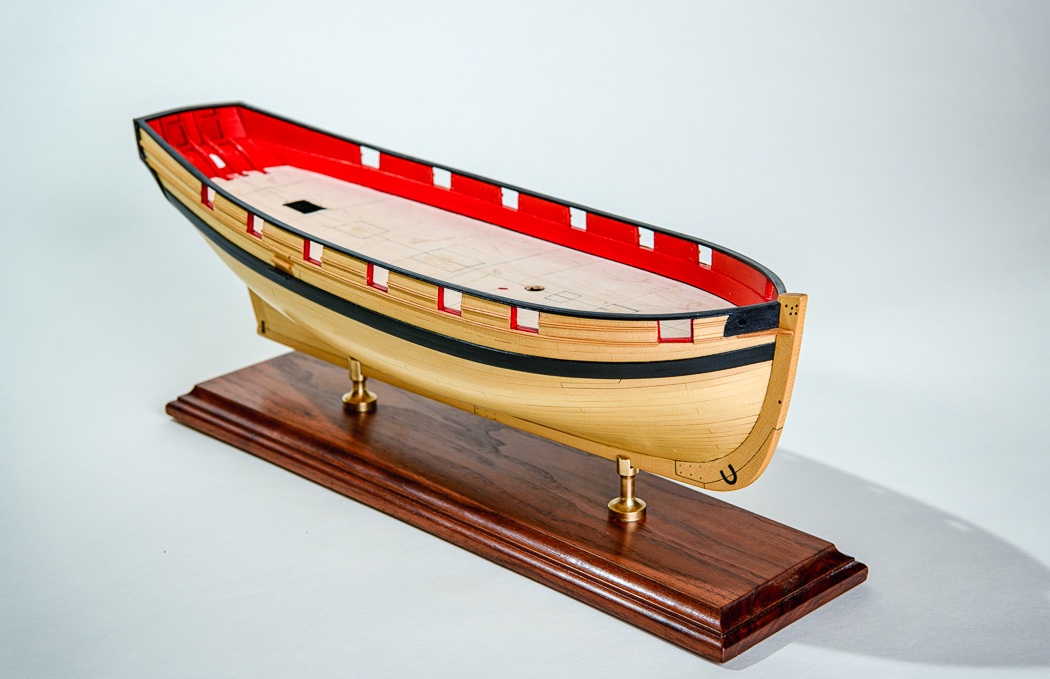
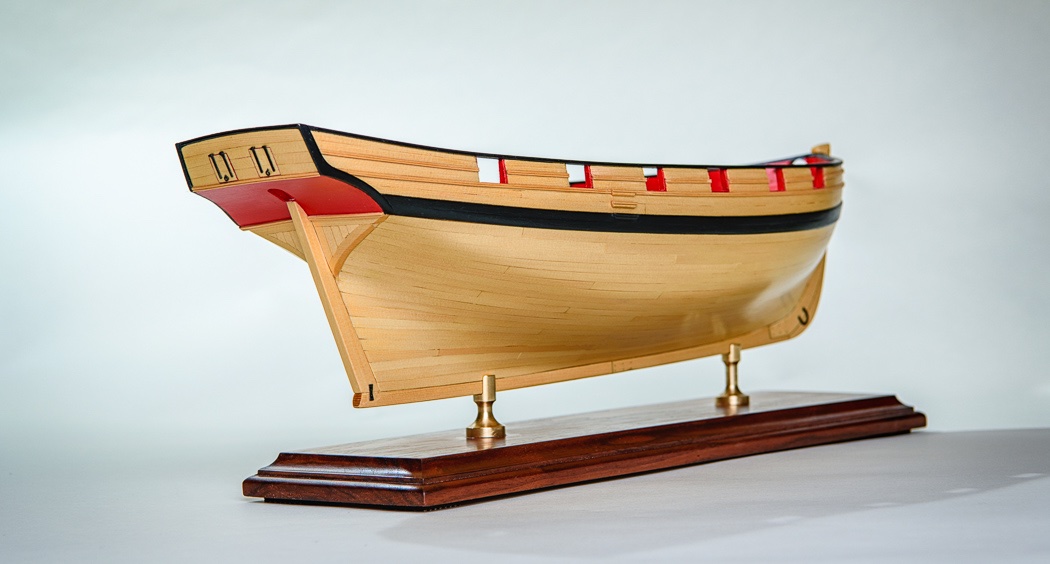
- queen anne barge
- Syren Ship Model Company
- (and 1 more)
-
Thank you. It may get another coat before I’m done. I’m glad I didn’t tree nail it and the WOP seeping between the seams does a nice job of distinguishing the planking runs. I came to like the little bit of variation in the wood color. The only thing Annapolis would want with it is target practice, but it’s a nice thought. 😁
- 778 replies
-
- 3
-
-
- cheerful
- Syren Ship Model Company
- (and 1 more)
-
We had our dachshund Sam for twelve years, I miss that dog.
-
The poly does transform the cedar, I’ve lost track of how many coats it has at this point.
- 778 replies
-
- 2
-
-
- cheerful
- Syren Ship Model Company
- (and 1 more)
-
Thanks guys! I thought I’d get my good camera and flash gear out for today, it does beat iPhone on the messy workbench photos for a change. I haven’t exercised my other hobby in a while.
- 778 replies
-
- 2
-
-
- cheerful
- Syren Ship Model Company
- (and 1 more)
-
You have it, but I recall it goes by a different name, unfortunately I don’t recall what that is. It’s clear satin polyurethane if that helps.
-
Generally hulls aren’t stained. They are either partially painted or have wipe on poly applied. Take a look around the sire too see. But again, it’s your model to make what you want of. It’s about enjoying your work, that’s all that matters.
-
Thank you everyone. I really appreciate the kind words, comments and likes.
- 778 replies
-
- 1
-
-
- cheerful
- Syren Ship Model Company
- (and 1 more)
-
Congratulations on the new release - I'm going to hold out for Sphynx but wish you the best on orders for this new and different model. I doubt there is anything like it out there, here's hoping it's a big hit!
-
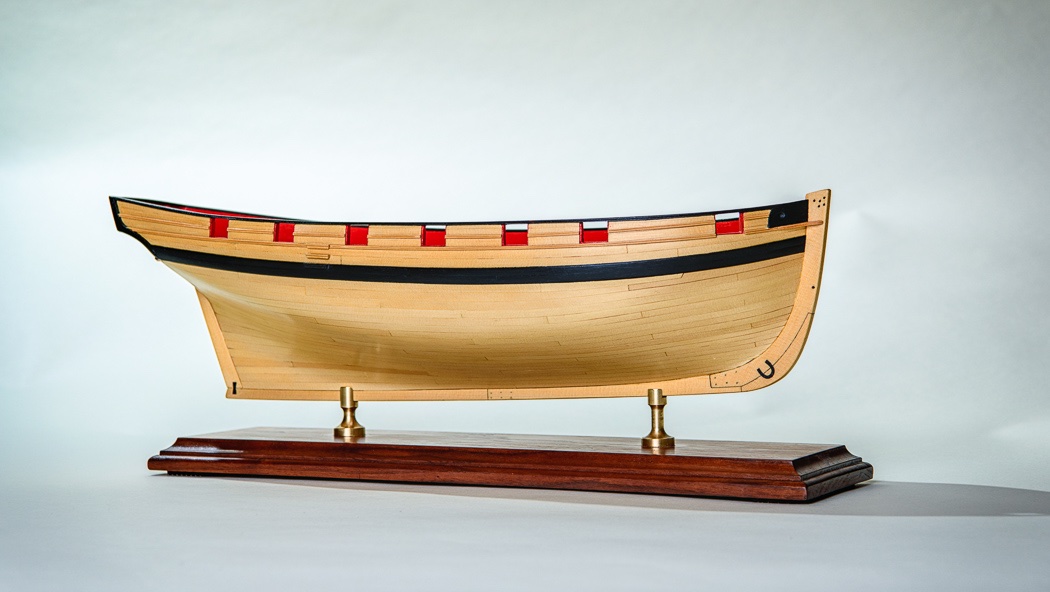
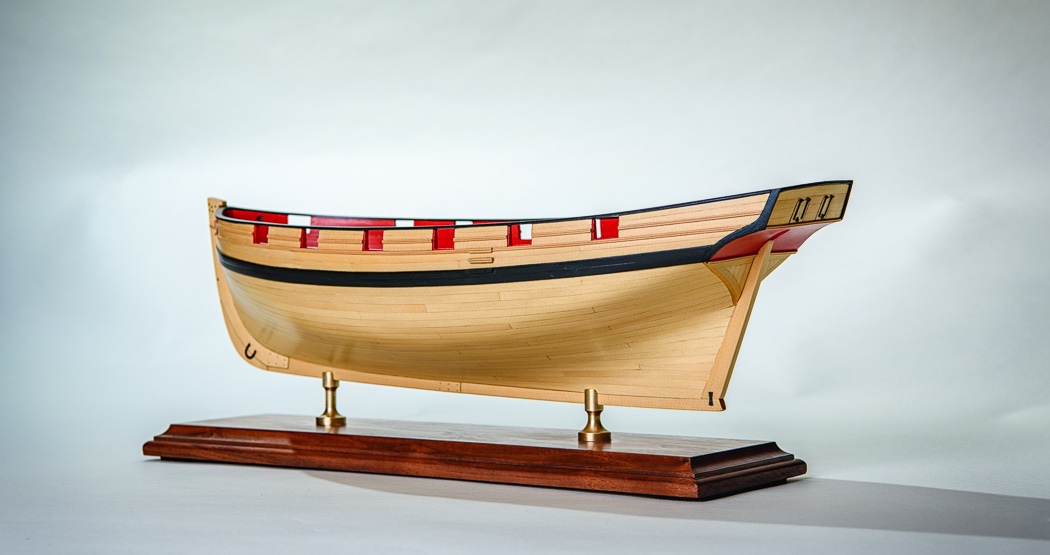
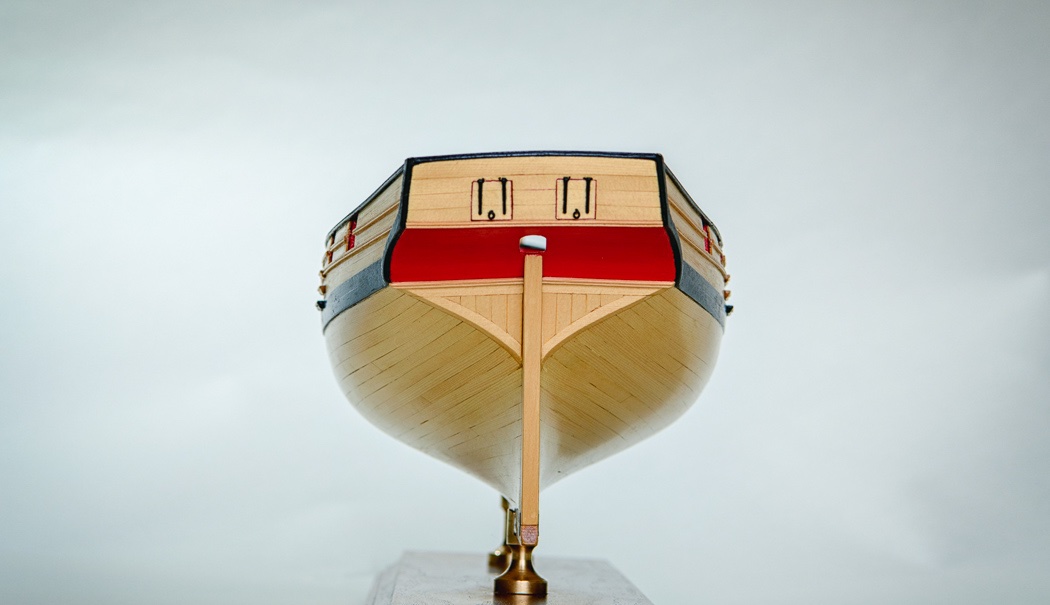
After 5 months of work I’ve completed my Cheerful’s hull. I thought I’d pause a minute and share a few photos (sitting temporarily on its future base) before moving on to the deck. I’ve written in this log about the many things I’ve learned from this semi-scratch build, so many things I’d never done before. I have many more such challenges ahead, I’m looking forward to what's next. Thank you for all the likes, follows, and comments, I appreciate them all. The fun continues.

- 778 replies
-
- 19
-
-
- cheerful
- Syren Ship Model Company
- (and 1 more)
-
I just ordered my own barge, had to hurry while it was still in stock.
- 221 replies
-
- 5
-
-
- queen anne barge
- Syren Ship Model Company
- (and 1 more)
-
Seems like that’s a UK thing not a US one. I buy lots of modeling related stuff from the UK and have none of that.
-
It’s not something I’d do, but that doesn’t matter. This hobby is about yo and your model. You can ask and get input but at the end of the day it’s your choice and your decision. ...but maybe sanding off was a good idea🤪😂🤣
-
Well, that’s a statement...
-
Many of us already have one, plus Jim Byrnes deserves full retail for providing such a superior product.
-
The quality of the boxwood I bought a while back from the Lumberyard was so bad I sent it back. Hope you have better luck.
-
I’m buying billets of precut thickness and ripping what I need with my Byrnes saw. It’s kind of rewarding to mill your own. But even the billets are getting harder to find. You won’t regret buying the saw, it’s a great tool for more than milling planks.
-
You’ll enjoy the challenge of Cheerful.
- 221 replies
-
- 2
-
-
- queen anne barge
- Syren Ship Model Company
- (and 1 more)
-
Help for the Noobies
glbarlow replied to drjeckl's topic in Using the MSW forum - **NO MODELING CONTENT IN THIS SUB-FORUM**
All of us started with little experience, as others said sometimes “nice work” is enough. We all hope someone’s reading our logs. A simple comment let’s us know there is.- 66 replies
-
- 10
-
-
A few quick comments: The time to create a butt shift pattern in the deck was as you laid it, I don’t think any method will turn out very well after it’s already installed. On this small ship you won’t notice much anyway after the furniture, guns, and rigging are installed, check mine out as an example. Your first planking looks rough because you didn’t taper the planks, a single plank should run from the bow to stern without interruption. That’s done by tapering the planks to fit based on measurements. I describe this some in my Cheerful and Nelson logs. I did it by following Chuck’s tutorials which you’re already familiar with. Filler blocks at the bow are always helpful in models like this one that don’t provide enough bulkheads. I shape mine from blocks of balsa. It takes no more than a modeling hand saw and an exact knife. I place the guns with a dab of medium (gel) CA on each wheel. It doesn’t take much to keep them there, I haven’t lost a gun yet. I agree on this little model the breaching rope is enough. I like to paint with a brush, I only spray the guns. I think it gives a more natural look to the wood, but to each his own. Careful with the stem, at least on mine it was soft wood, I broke it and had to repair it, I’d never had that happen on any model before. Glue will stick to areas with WOP, but it’s best to rough sand it for better adherence. WOP is oil based, there are water based polyurethane products, those aren’t typically referred to as WOP o this site. I use both depending on the circumstance. But one is not the same as the other and it’s generally one or the other. PVA and CA will generally both adhere in almost any circumstance (a little tougher on two already painted surfaces maybe). You’ll find a lot of debate on which is better for what. For your next model I’d recommend cutting out the hatches and mast openings as you lay the deck, I think it will be challenging to do that after laying the whole deck, not something I’d do. Hope some of this helps.
- 26 replies
-
- 6
-
-

-
- First Build
- lady nelson
- (and 2 more)
-
Help for the Noobies
glbarlow replied to drjeckl's topic in Using the MSW forum - **NO MODELING CONTENT IN THIS SUB-FORUM**
Once again I agree. I always try to thank everyone who comments on my log because I appreciate the time they took to do it.. That’s best done by the quote selection option Chuck and I just used because that creates a notification back to the poster that he has a reply. It’s all about being active and having conversations, not a request line.- 66 replies
-
- 12
-
-
Help for the Noobies
glbarlow replied to drjeckl's topic in Using the MSW forum - **NO MODELING CONTENT IN THIS SUB-FORUM**
Totally agree with Chuck and VHT. On my signature line below you’ll see a link to my completed Lady Nelson, by clicking on I hope you’ll find some helpful information for your own build. So the first suggestion is to use the search function to find other build logs of your same model. Often you’ll find not only answers to your questions but answers you didn’t know you needed. I use several completed logs to see how past builders accomplished certain tasks on my current Cheerful before I start that same task. Leveraging the ideas of others is one of the best parts of the forum. Were you to comment on my Lady Nelson build I’d likely reciprocate by checking out yours, this back and forth is how communities are built of people of similar interests and my second suggestion. In fact VHT and I are in a shared community which started when I searched for builders of HM Alert. The key to this is using the signature option in settings to add a hyperlink to your build log in your signature line which is then included in every post. We aren’t ignoring you, we just don’t know you’re there. With just 27 posts, and none on any other build log, how would we. I’ll go check your log. Have a look at my Nelson log. Bottom line, it’s on you to build your community, not “management.”- 66 replies
-
- 15
-
-
-
I have already determined I don’t have the patience for this model based on sanding and beveling each little crook of those frames. So I will just enjoy watching your build. 😊
-
Yours looks like an interesting adventure, it will be interesting to see how it goes. Might want to pre-check where your channels will go amongst your protuberances and ensure the dead eyes have clearance. I “painted with wood” on my Fair American, no stains though and it does have guns. I’m glad I did it then, I don’t think I could find all the exotic woods I used on it now.
