


glbarlow
-
Posts
3,852 -
Joined
-
Last visited
Content Type
Profiles
Forums
Gallery
Events
Posts posted by glbarlow
-
-
-
21 minutes ago, RichardG said:
printing the bulkheads and buying a scroll-saw.
Hi Richard,
If you’re referring to Cheerful, I’d encourage you to consider Chuck’s starter kit. He provides the plans and frame parts on his website https://syrenshipmodelcompany.com/. It’s a nice way to get off to a good start, no scroll saw needed😁that is unless your want to get a scroll saw
-
I’d never considered a fishing craft before, but thanks to @chris watton great design and seeing what you’ve done with it I’m going to add it to my list. I’m off big models, cutters and brigs for me...and now a fishing vessel or two. Maybe I’ll even go for the th pink sails.
Your metal work On the steering gear is inspirational.
- chris watton, BobG and Blue Ensign
-
 3
3
-
Thanks BE, Derek, and Jean Paul. I appreciate the encouragement and feedback.
I’m trying to provide a log that will help others just as I frequently consult BE’s, Rusty’s and Chuck’s Cheerful logs. I’d be nowhere with out Chuck’s detailed monograph, but it’s my belief logs from us of more humble skills will both help in construction and encourage others to take on building their own version of this great model.
PS: I wasn’t able to use great in a sentence for a few days there, but I’m past that now, or should I say I’m past that for now😜
-
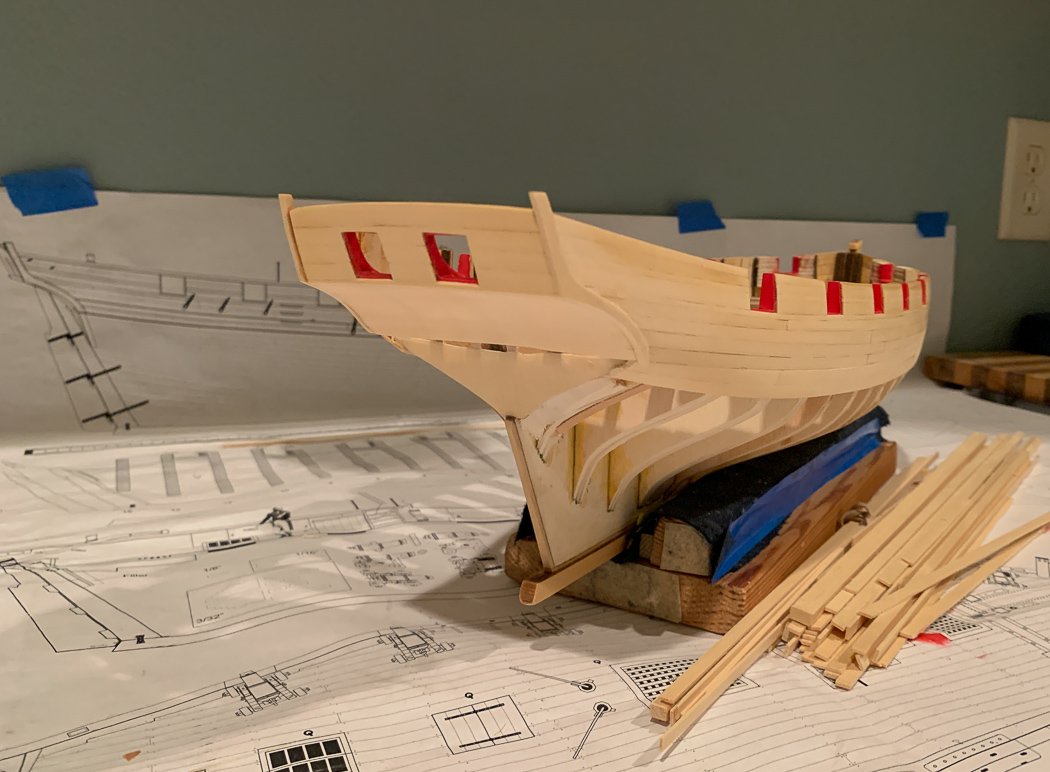
So who here besides me was expecting a train wreck after my last post. I cut the fashion pieces only to decide the plan size was too short for my ship, I decided that after they were glued on, because they curve into the ship dry-fitting didn’t help. So I remade them, more in a moment. The concept of a drop plank is simple and works great once you’ve done your first three and then it clicks - seems obvious and maybe that was my problem, trying to outthink it - figured it out eventually so let’s start:
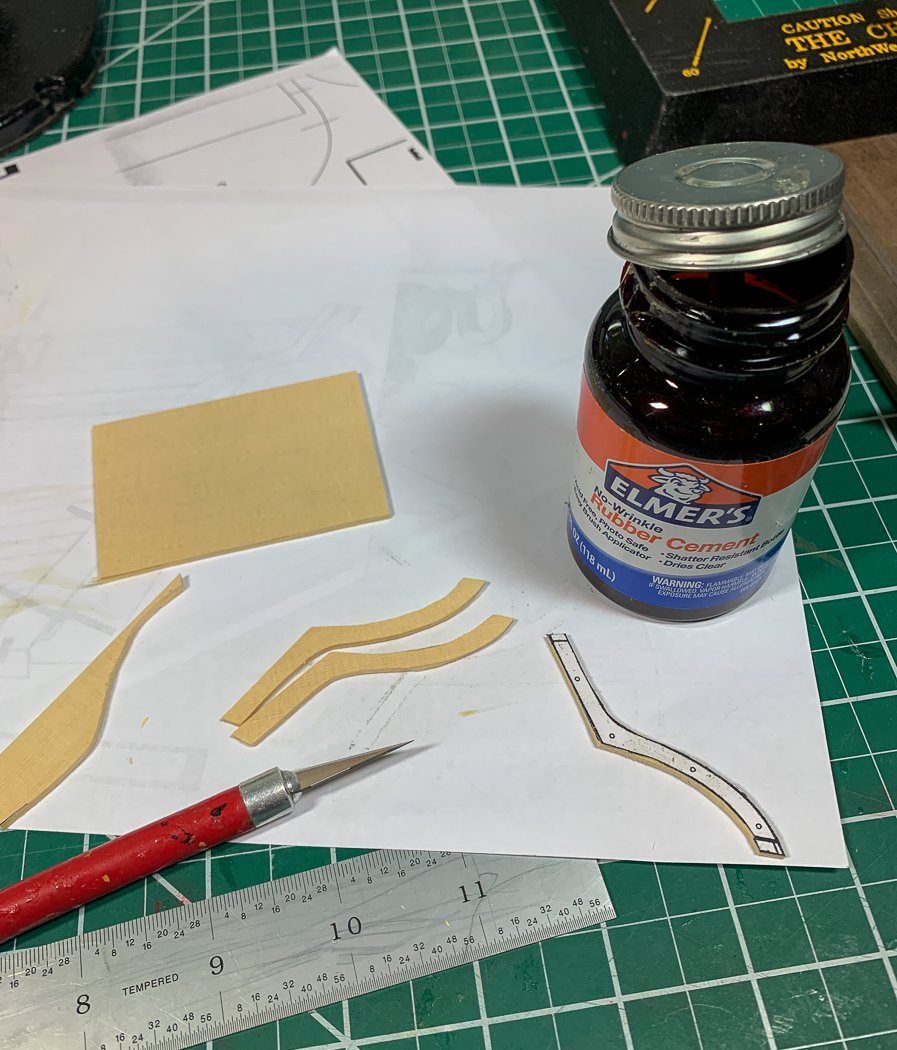
I “adopted” my process for cutting out the planks from Rusty. I made copies of a section of the plan, cut out the fashion pieces and then used rubber cement to attach them to a section of 1/16th board. This process worked well, but here’s what I learned - to be clear this applies to my model your milage may vary. I noticed right away the first ones I cut seemed to “small” so to make me feel better I enlarged the copy of the plans to 105% and used those for the template. As I mentioned those still turned out too short so as you can see in the photo I added a few marks to them extra long so I could trim to fit. I’m not going to say what iteration of cut-outs wound up on the ship, let’s just say more than four are in the scrap heap though in fairness a couple were intentional victim prototypes to try stuff like bending and curving. First-timers…
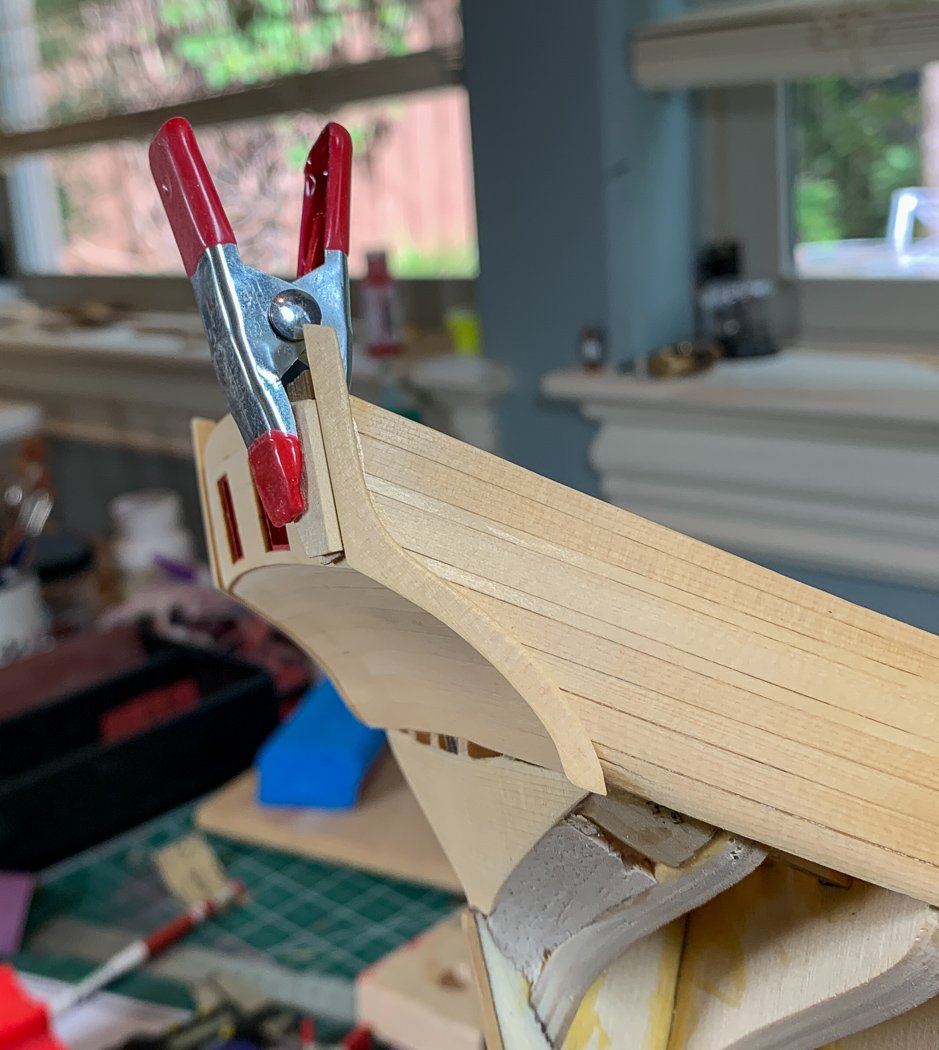
I found this simple little jig helpful. a strip of 1/32nd up against the hull for the right distance of the piece back from the transom and another scrap on top of it as a backstop to align the piece equal to the run of the transom. Yes that's a cracked plank but its the lower level of the wales so no problem - else it'd be gone.
A good place to note I ended up adding a 1/64th shim on frame 16 to get a better flow to the eventual square tuck -or maybe I'm overthinking it again, no this time I'm right, maybe.

You might note the two fashion pieces are on opposite sides of the ship, that didn’t stop me from making as near exact copies as I could as my multiple measurements (sorry Chuck, in millimeters) taken multiple times until I got them near copies. I'm not sure why I was going to the hundredth of a millimeter, seems obsessive.
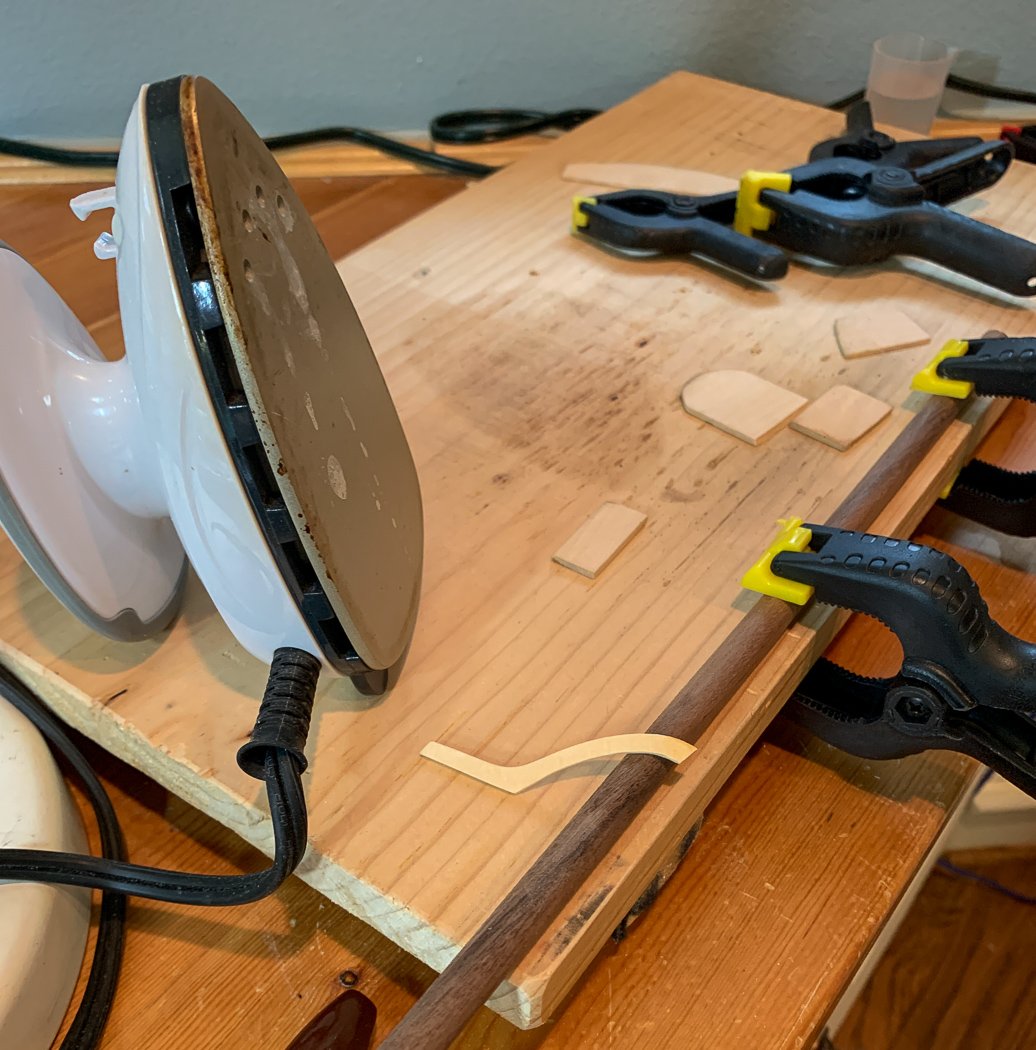
I learned from attempt one I have a bit of a curve on the lower wales plank, so to make the fit easier I modified my plank bending station to roll the fashion piece into a curve over a dowel. I did this having first “stretched” it because my counter was longer/wider/shallower that the plans - really not very much at all, but enough that bending the curve out helped. I would like to add - this worked and other than dipping it in water or wiping on a little water with a wet finger I soaked nothing (at some point I knocked my beer over, but that’s not the point). This advertisement of Chuck’s Plank Bending method brought to you by me.
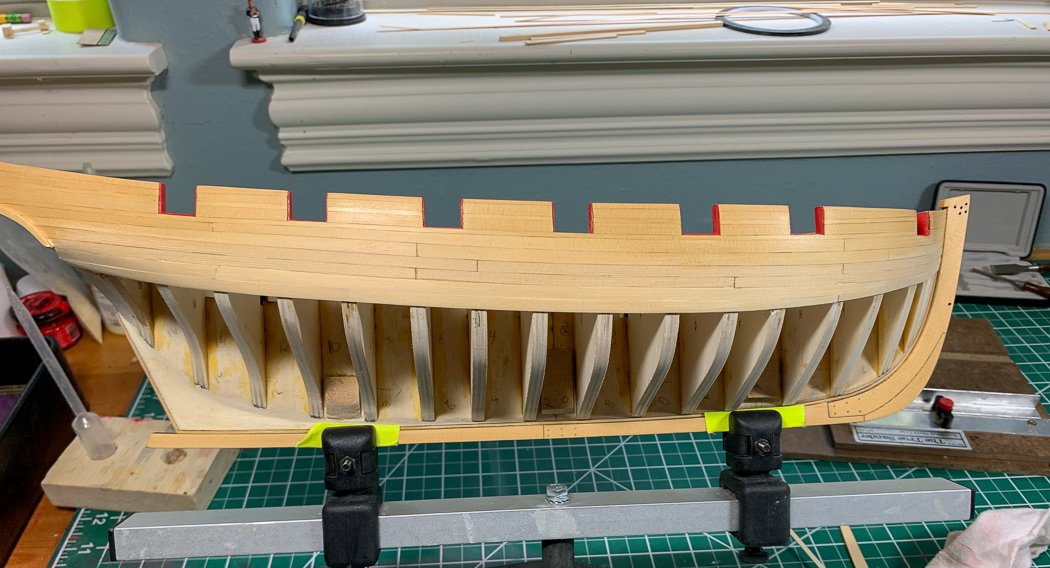
Don’t look too closely at this photo because those planks don’t exist anymore except as a waste of a perfectly good Alaskan tree. I didn’t like the fit (there is a gap at the drop plank, or would be on the next row of planks) and I just wasn’t going to compromise. On a double planked kit I know I could easily make it up with the remaining planking, but here I was concerned it would just compound as I went. The problem, for me, was the alignment of the drop plank extension. First I pushed it up too far, and then let lay down too much which makes the subsequent planks less than a clean run. I figured out, and while this might come as a surprise, to glue it down the way it wants to lay naturally…go figure. easy for you to say.
So I ripped off the below wales planks on both sides (you'd think you'd learn the second time but no. And while I was at it, see above on fashion pieces, taking those all off with the rest. I walked upstairs and told my wife - you know how I’ve been working on this ship for the last several days - well I wasn’t because everything I did is gone. At least the frame hadn’t dropped on the floor and exploded again, at least not yet - let’s not think about that…

I lightly sanded the entire hull down and will apply a new coat of poly after installing the wales and before moving on to the rest of the planking. I'll be using Admiralty Paints Ironwork Black on the wales. I did a test strip - it both looks fine with wipe-on Poly with a slight satin look or the Poly can be painted over if I want to keep it flat. I'll see when I get there.
So, anyway, I arrived to a point where I’m ready to move on. I’ll add the 2nd layer of the wales next then start the process of lining the hull, cutting more sticks, I mean planks. Did I mention I was impressed with myself for ripping the thin 1/32nd (.79mm) thick planks required as the top layer of the wales. I figured I needed 6 but I was having fun so I cut 12. I hope I don’t need them but who knows.
On we go.
- GrandpaPhil, Saburo, Mirabell61 and 14 others
-
17
-
-
7 hours ago, Blue Ensign said:
when the boat was in drifting mode
Thanks BE, that makes sense. I wasn’t thinking like a fisherman 😊
-
I was scheduled to be in Southhampton for a cruise to Portugal and Spain this September. We arranged our trip to be there a day early, I pre-purchased tickets to see HMS Victory (and still have the non-refundable tickets). Thanks to Covid, no trip - cruise canceled. I really want to walk aboard HMS Victory, maybe someday.
As to the model, I'm sure its amazing but I barely found a place to display Vanguard, so I'll just have to enjoy it through other's build logs.
-
I’m still here both enjoying and being frustrated by this build.
I just ripped off both fashion pieces after staring at them several days and have ripped off planks below the wales more than once, my first drop plank and my desire to do the best possible work hasn’t proven to be a good combination thus far. I’m hoping there is plenty of 3/16ths wood, based on the number of pieces I’ve cut and rejected I'm going to need a lot. To be clear it’s the builder not the model that’s the challenge. Seems everything I do is something I never did for a kit, so I get to learn on the job....good stuff.
Here is one recommendation I’ll pass on. My first layer of wales must be a tad low because the fashion pieces, cut exactly to the plans, turned out about 1mm short - which is why I ripped them off to make them longer at the bottom. My counter also needed the fashion piece bent out a little, no two models will be exactly the same.
Three months ago I couldn’t rip planks worth a darn, now I’ve ripped 5/32nds at 1/32nd thick, .79mm, which is thin...so yay.
So no pictures worth sharing. Patience and perseverance...
- Ryland Craze, BobG, egkb and 10 others
-
13
-
Nice work on adding the nets. The location of the chimneys seems peculiar, seems like all the smoke would blow right in the helmsman’s face.
-
It would be hilarious to put a 1:64 chair on the kitchen counter with a note that says “how many more chairs do we need”
- VTHokiEE, clearway, Edwardkenway and 1 other
-
4
-
You’re doing a great job. We all make those mistakes. I took off the same plank three times yesterday on Cheerful, just couldn’t get it right. I always try to remember dry-fitting is our friend.
-
-
-
On 2/1/2020 at 2:25 AM, ASAT said:
going to do a build log?
Lou,
My most current logs are Cheerful and Nelson, both linked in my signature line below. Next up for me on Cheerful is below the wales planking, with a single planked hull and scale length planks I’m in for an all new adventure.
-
15 hours ago, Jim CT said:
finding the PDF
My post included the link for Lady Nelson,, just click on the ‘here’ hyperlink. It and my other build logs are also linked in my signature line below. However the.pdf I’m referring to is the one created by Chuck on lining the hull which is linked at the beginning of this thread. Clicking Here should also get you there.
Welcome to MSW. One suggestion is to select, by click, hold, and drag, text and then on the quote selection block that appears to generate a reply for things you want to comment on as I’ve done with your reply. It keeps from repeating to much text but also generates a notice to the person you’re asking something of and helps them to follow the question. I use it all the time, easy and quick way to get your questions and comments before the forum.
There are lots of great people here ready to help you out. If you haven’t selected your first model I highly recommend Vanguard Models which you can find Here @chris watton is an active member of this site he maintains a thread on MSW with his latest product news Here Chuck Passaro also has great models, they are a bit more advanced, but great to visit and follow Here Find some build logs you like and follow them. I’ve learned a lot of what I know from those logs the rest I learned by doing, screwing it up, re-doing, and doing it again.
Hope all this helps, again welcome.
- Jim CT and thibaultron
-
2
-
2 hours ago, Jim CT said:
planking at some event
With the .pdf in hand I think this video was especially helpful for me too.
-
On 2/6/2020 at 9:31 PM, ASAT said:
Glenn, can you do a quick outline of what finally “clicked” or worked for you?
Lou,
I’m sorry, just seeing this now. I ported over my Lady Nelson log Here I explained in a little detail about how Chuck’s method worked for me there. I’m about to start below the Wales planking on Cheerful Here (which I started instead of Speedy) so I’ll be using it again soon. Hope you’ve found what you were looking for
-
If it doesn’t go well that plane can do a few strafing runs.
-
Incredible work Rusty, the level of detail is amazing.
- Wacom, Saburo, FrankWouts and 2 others
-
5
-
-
-
3 hours ago, BobG said:
Have you compared the water based matte poly to the Satin WOP?
Hi Bob, I have and use both, my Lady Nelson has satin on the exterior and matte on the interior, for no real reason than that’s what I did. I prefer the matte as a painting base, but I doubt there is any significant difference between the two, I’ve also painted over the satin in the past. My little experiment did prove, at least to me, that water based poly is my preferred base.
3 hours ago, BobG said:Do you ever apply steam at the same time
Yes I do also apply steam but have the iron on the lowest heat level for steam. Here again I’d do it without steam but the little travel iron produces it and I figure it can’t hurt. I let the board sit in the clamps for about a minute after heating and sometimes it takes two heating runs to get the curve I want.
I only started this method with my last build, but it makes such a huge difference in my planking I’m only sorry I didn’t find Chuck’s tutorials sooner.
- Ryland Craze, BobG, mtaylor and 1 other
-
4
-
11 minutes ago, VTHokiEE said:
Maybe I could skip the primer if I used an air brush?
The water based poly effectively is my primer, I don’t think it would cover any char though. I’ve only painted cannon and etched parts with my air brush. I wouldn’t be confident using it on the model or wood in general. Not that you can’t...
I think it varies by types and color of paint.
HMS Speedy by Delf - FINISHED - Vanguard Models - Scale 1:64 - Master Shipwright edition
in - Kit build logs for subjects built from 1751 - 1800
Posted
I’m sure a British war ship sailing the Med during a war as Speedy was didn’t store the guns, and as this is a model. It would be completely wrong not to have them.
I wouldn’t worry about the size of the ring bolts, we all tend to obsess about things that won’t matter on the completed model. I doubt your friends from three feet away will say “why are those ring bolts out of scale.”
Really nice work on those tiny guns. While historically correct I wish it had a bit larger guns just for looks and easier to rig😕