


glbarlow
-
Posts
3,854 -
Joined
-
Last visited
Content Type
Profiles
Forums
Gallery
Events
Posts posted by glbarlow
-
-
4 hours ago, chris watton said:
Initial production run will be for 40 kits.
So 39 for everyone else😊
- chris watton, Old Collingwood, KentM and 1 other
-
 4
4
-
I posted this as a reply on Derek’s log about technique I discovered making rope coils (described in post #687 and shown above). I thought it might be helpful as additional information here. I made and rejected a lot, but in the end I think they look worthy of Cheerful. So here it is:

A couple of nuances I did with my modified approach that might help: a. the loop is top side over bottom to start it, then continue that loop for a full 360 degree turn before putting over the pin on the coil jig, it’s easy to stop with the first loop but it doesn’t look as good. b. Pulling the top rope for tension (referring to post #687) is a bit of the art, not too tight, not too loose, before painting the clear acrylic. c. The smush after it’s dried is, for me anyway, what makes them more realistic. I even paint the inside of bottom the bottom loops of the finished coil with a little water so it’s not so stiff. d. The clear acrylic helps, it dries more natural than watered down glue), but it isn’t a true adhesive so the CA on the back side of the loop is essential in holding it all together. e. My jig has one size for cleats another for pin rails. The difference is the size of the loop and the length of the coil. It’s specific to 1:48 Cheerful, I’ll have to make a new one for a 1:64 model.
- marktiedens, allanyed, VTHokiEE and 8 others
-
11
-
Thanks for the reference 😁. A couple of nuances I did with my modified approach that might help: a. the loop is top side over bottom to start it, then continue that loop for a full 360 degree turn before putting over the pin on the coil jig, it’s easy to stop with the first loop but it doesn’t look as good. b. Pulling the top rope for tension (referring to my post #687) is a bit of the art, not too tight, not too loose, before painting the clear acrylic. c. The smush after it’s dried is, for me anyway, what makes them more realistic. I even paint the inside of bottom the bottom loops of the finished coil with a little water so it’s not so stiff. d. The clear acrylic helps, it dries more natural, but it isn’t an adhesive so the CA on the back side of the loop is essential in holding it all together. e. My jig has one size for cleats another for pin rails. The difference is the size of the loop and the length of the coil. It’s specific to 1:48 Cheerful, I’ll have to make a new one for a 1:64 model. I hope this helps.
I made so many and rejected so many to get ones I liked. I’d make more probably if I hadn’t run out of rope. At some point my mini-me standing on the deck said ‘enough, move on.
The detail in your rigging looks great by the way. Such detail and precision.
-
2 hours ago, niwotwill said:
watching your work while I'm away from mine
I’m glad you’re enjoying the log and appreciate your comment. I’m not sure what I’m going to do when I finish it. It’s been a great year (when not much else was great about the year) building it.
-
-
9 minutes ago, Blue Ensign said:
Great work.👍
Thanks BE, I appreciate your saying so. I have enjoyed the rigging, it’s a different beast than the building as you well know.
-
6 minutes ago, Edwardkenway said:
learning the ropes
Thanks. I just need more rope to learn from. The bosun keeps tossing my failures into the bin. 😁😟
-
2 hours ago, DelF said:
and I thought I was strange 🤪 🤣
Good point🤣
The coils took a lot of experimentation, and a lot of rope, to get better. I feel like I could still replace several of them, but I’m out of rope.
-
I like the pattern on the inside of the stern, especially with the frames showing and after it was painted, I did it that way on purpose. I also brush painted it with thin coats so that I can tell it’s planks and not a solid sheet. But to each his own, it needs to be the way you like it.
i agree with Chuck, of course, about beveling planks and evening up the back before you get to the fashion pieces.
You’re making nice progress, it’s a relief to be past thinning those outside stern frames.
- FrankWouts and Ryland Craze
-
2
-
I noticed one photo had mis run lines, here’s how they are now

- Blue Ensign, Gregory, Edwardkenway and 6 others
-
9
-
2 hours ago, Mike_H said:
find enjoyment in cutting out gun ports through splintering stripwood
There is what you describe, which doesn’t sound like much fun, and forming and framing gun-ports from wood I milled myself, very time consuming and very enjoyable.
With kits I do t need much beyond a good set of plans. But that’s why Chris makes such great kits, both for the less experienced and still more than interesting enough for the more experienced.
Only James can build these things quickly and per his post even he can’t knock out Sphinx in a few weeks. The most unimportant thing to me is how quick I can build a model, why would you want to. Cheerful has taken me over a year, I’m going to miss it when I’m done in a week or two from now.
-
53 minutes ago, Chuck said:
The rigging is coming together
Thanks Chuck, I’ve enjoyed rigging her up.
44 minutes ago, Gregory said:The coils on the belaying pins and cleats look particularly nice.
Thank you, these were a new technique for me. They worked out pretty well, they do absorb a lot of rope though.
-
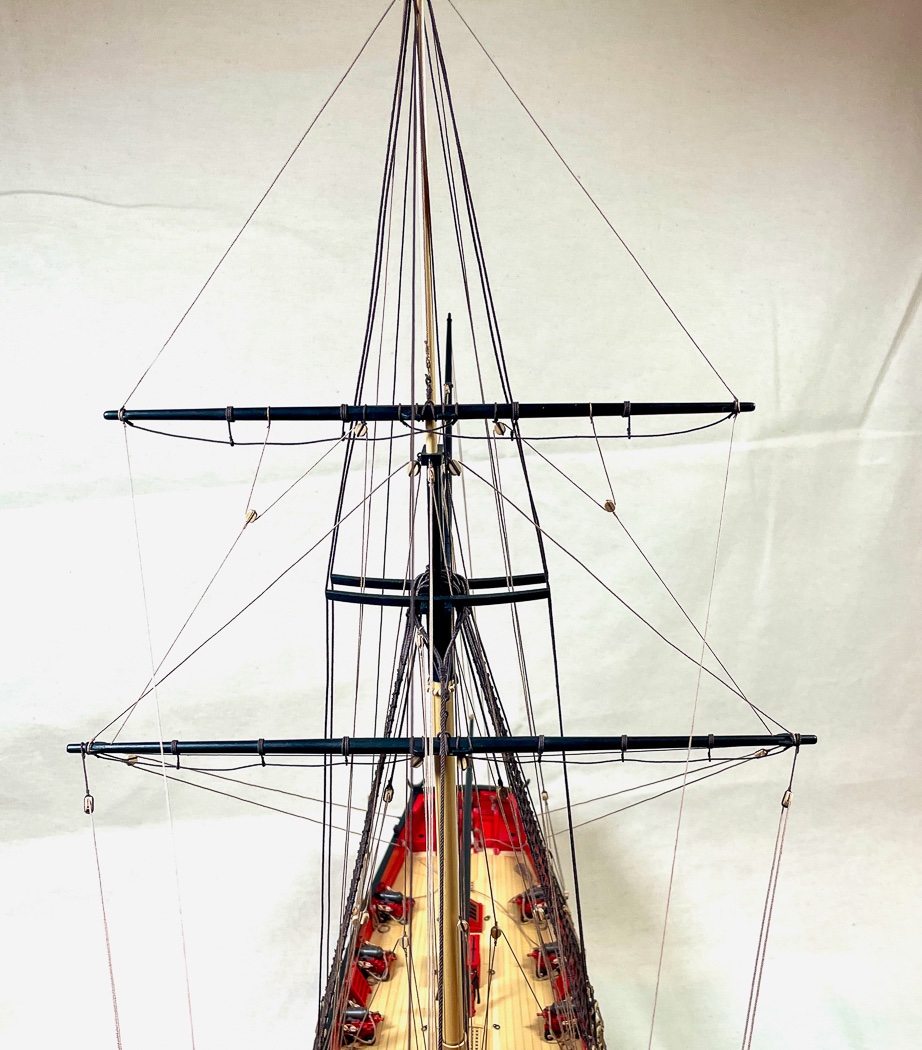
Rigging the yards
I’m coming closer to the end of my journey.
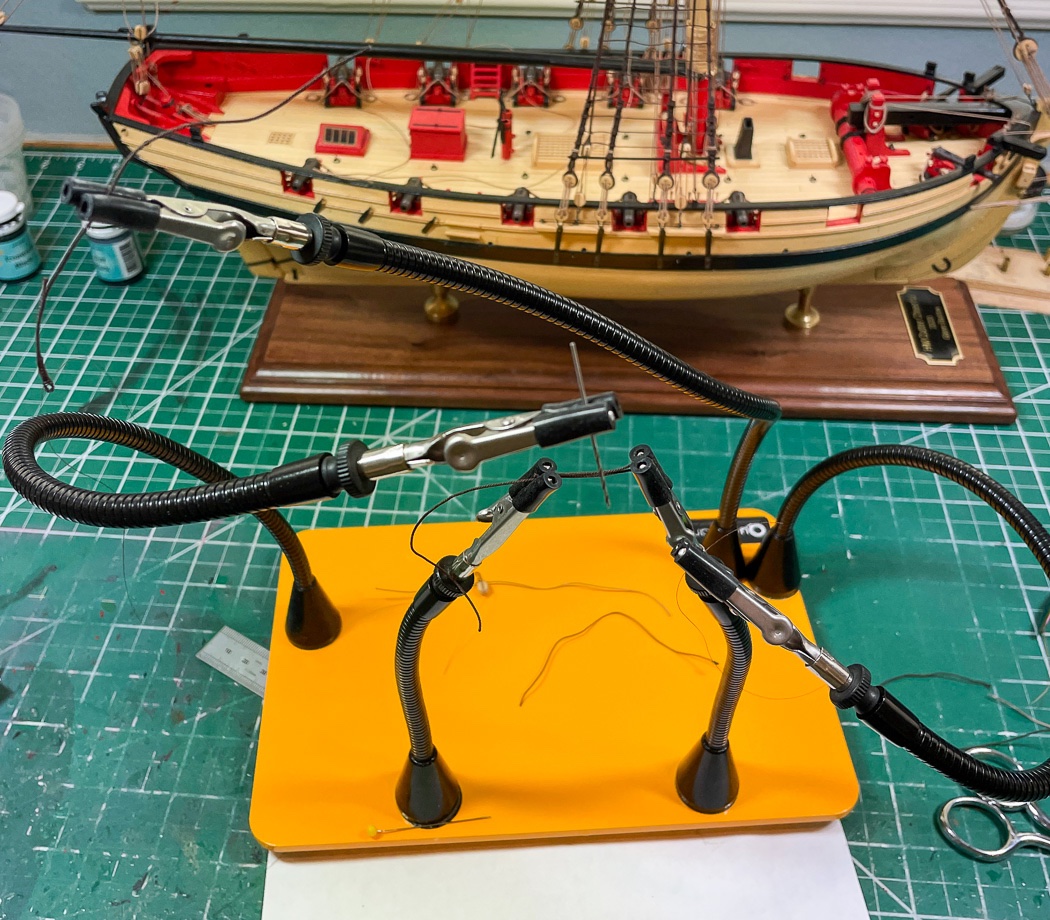
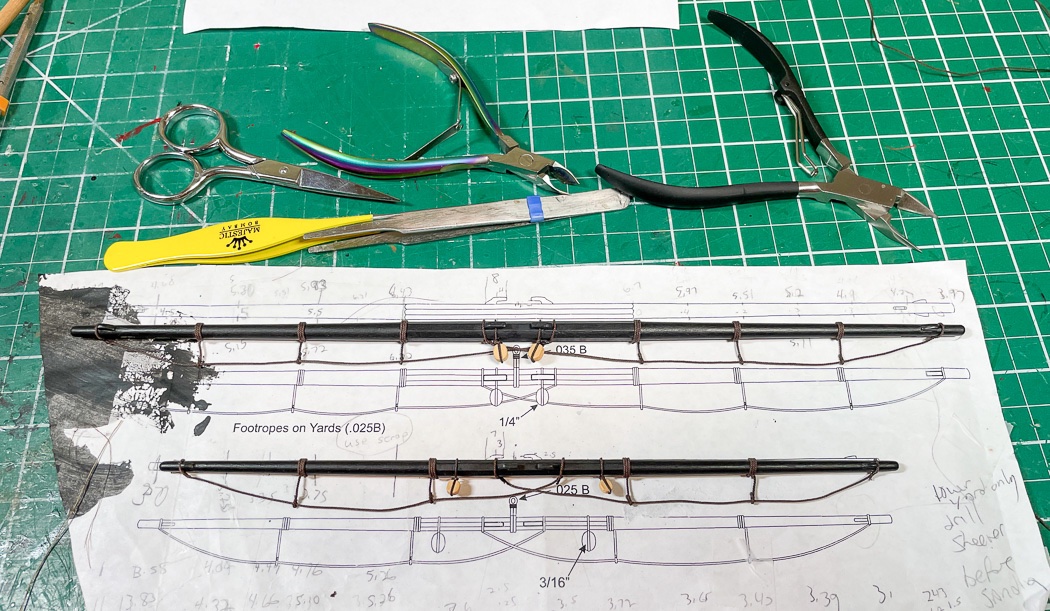
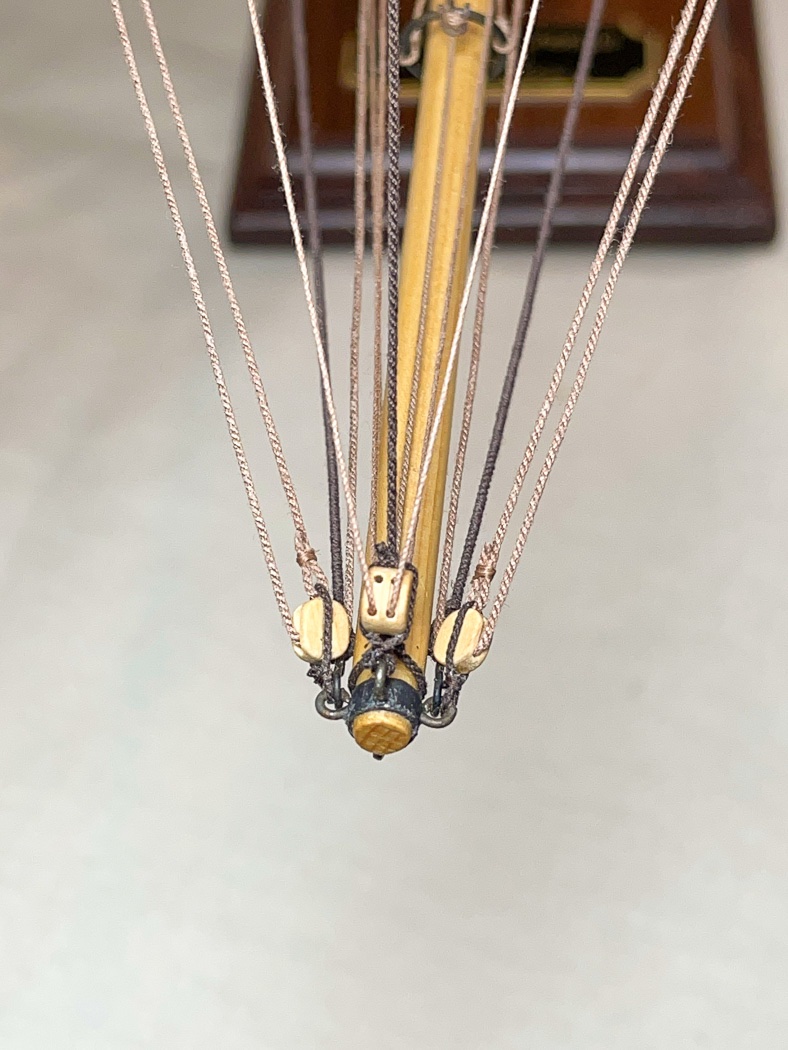
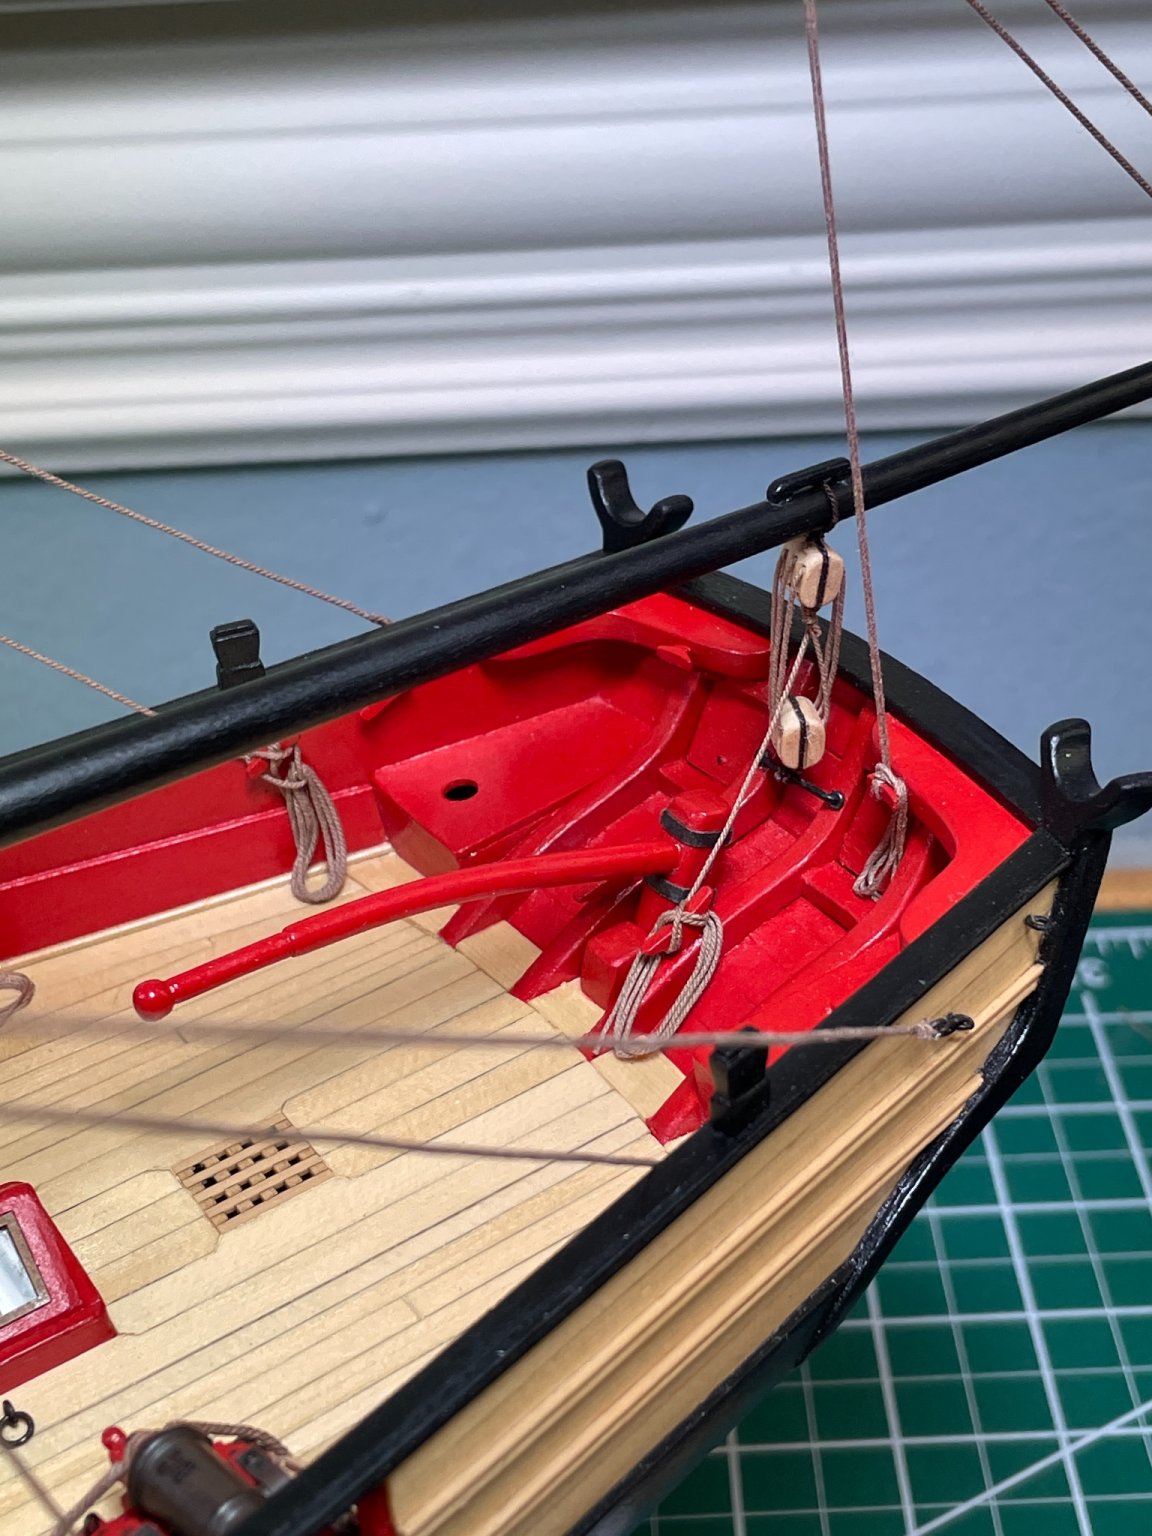
It's time to rig the yards. The first step is making the stirrups. In many kits these are removed from sheets of PE brass and drilled into the base, here I get to make them from rope, which is a bit more tricky than it might seem. I started by seizing a tight loop around a #68 bit. After experimentation I chose this bit as the tightest size for the .25 dark brown rope used for the foot rope to fit through. Too big of a loop and I’d not be able to properly position the foot ropes.
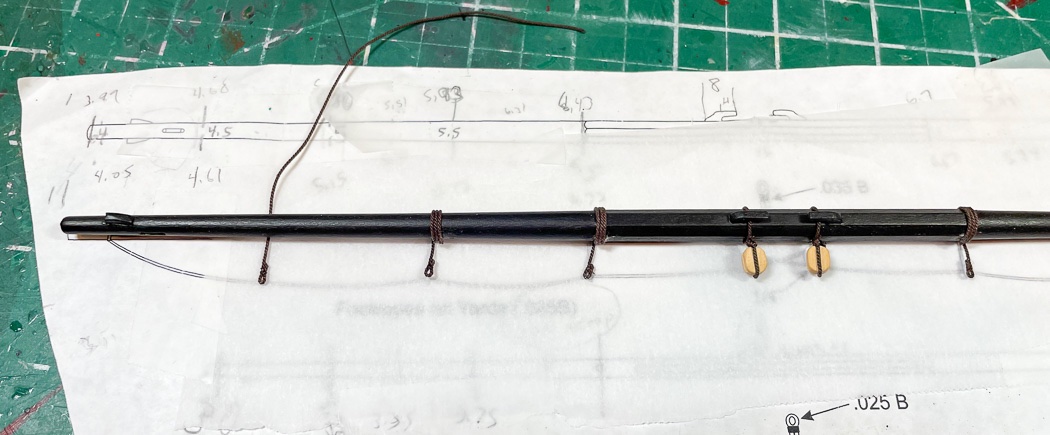
Each stirrup had to be long enough to wrap around the yard three times and be the correct length. To do this I placed a piece of parchment paper over the plans, set the length from the bottom of the yard by taping the rope to the parchment paper, then gluing it to the backside of the yard with a dip of CA applied with a straight pin. With that done I wrapped the the rope three times round using CA then cut the rope off at the bottom of the yard where it wouldn’t be seen. I stiffened the stirrups with watered down white glue. I’m sure there are better ways to do this process, but this way worked for me.
Once I had that done I seized the foot ropes to the yards. I had seized the blocks the lower and topsail yards earlier. It all worked out but was a bit trying to get the lengths right. You might note the left side of the plans, that’s the result of my knocking over the paint bottle. Fortunately the plans and my work mat were the only victims. I keep a roll of paper towels nearby, it’s not the first time I’ve wasted some paint...or glue...or whatever other liquid was nearby.
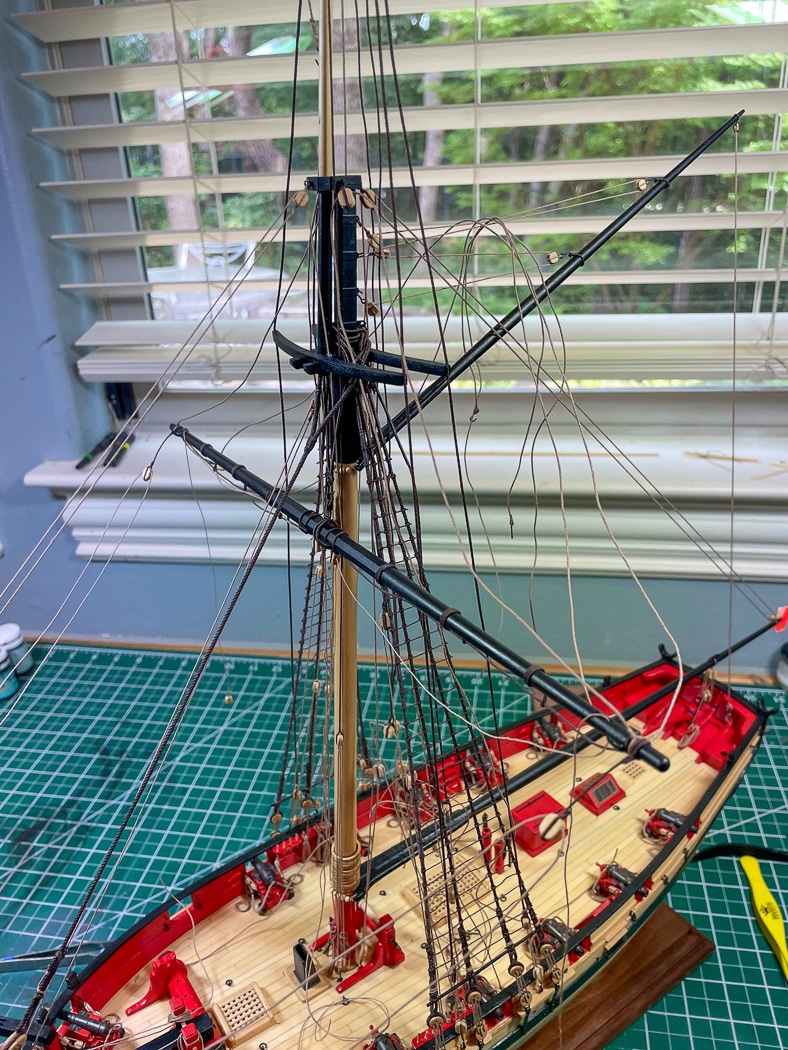

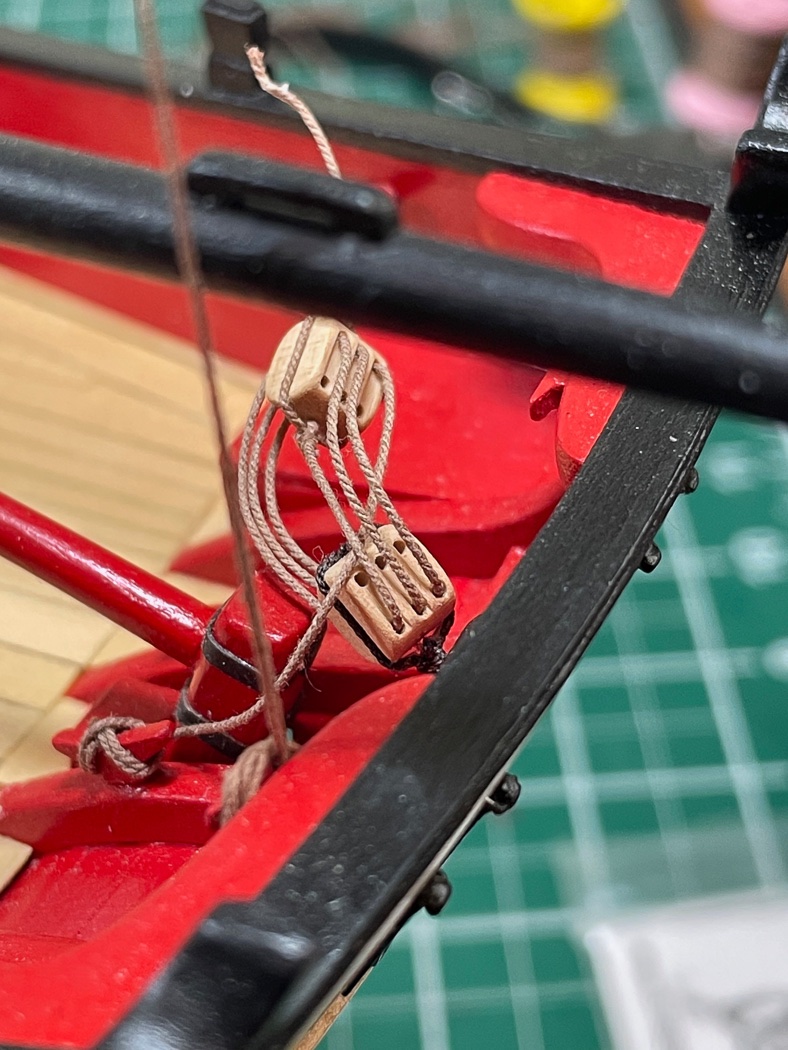
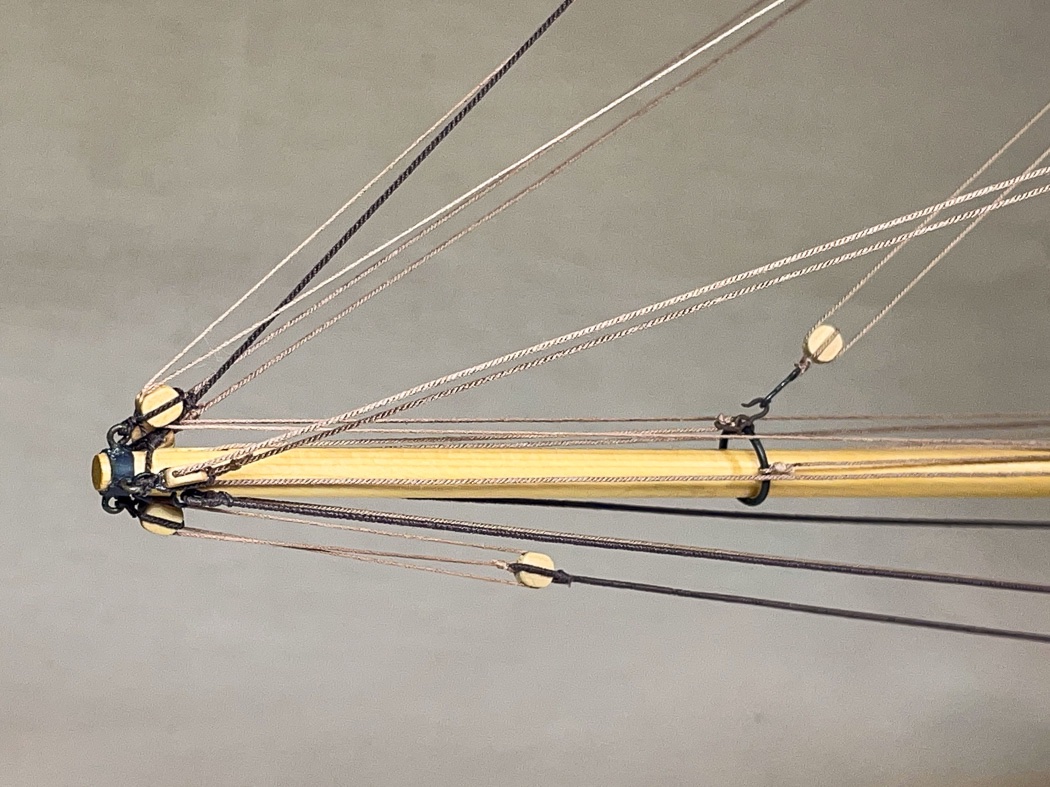
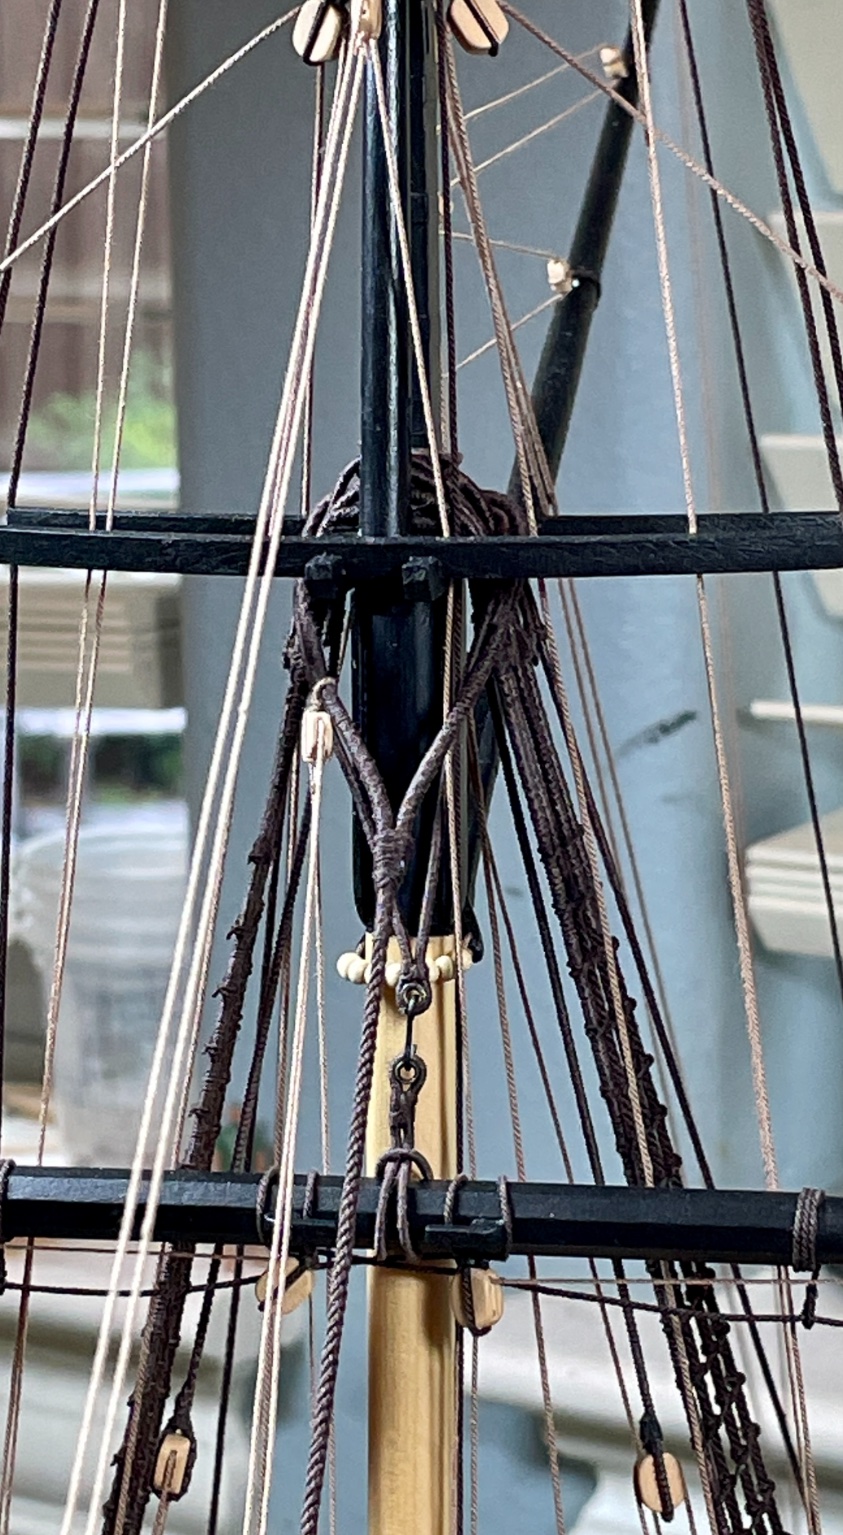
I made up the four brace pendants for the lower yard and raised the yard by connecting the mast and yard slings, it’s nice look. Once again I’ll note how much serving rope adds to the model - using the Syren Service-O-Matic makes this very easy to do. I also added the clue lines. These have a 3/16 block that connects to the top mast, then runs through the mast sheave, through the lower yard block and down to the deck.
Although I’d installed them a while ago, I did not belay any of the stays. In the photo they are folded over the peak halyard, I need the room to terminate the remaining lines to the mast and pin rail. I could have worked around them, but why. So they’ll remain up out of the way until the last steps of the rigging.

I loosely ran the lower yard fore and aft braces and lifts following the plans, again keeping the aft braces flipped up out of the way. It’s fun finding the right path for the lines. It’s a string puzzle, I enjoy sorting it all out.
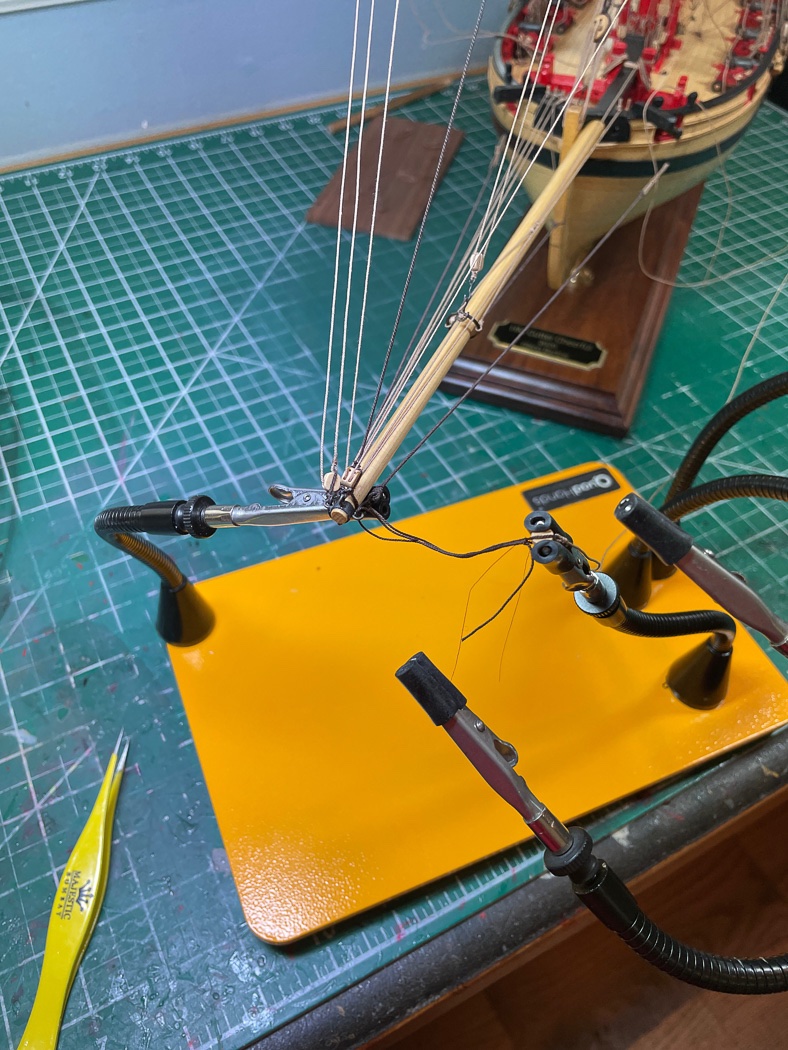
I make it a point to study the rigging plans early in the build so I know where and how various blocks, eyebolts, and hooks will go and add them early. I missed this one, the bowsprit blocks which I had added a long time ago. The lower yard braces initiate at the bowsprit block, run up to the yard pendant, back trough the block and belay at the bow pin rail. So I had to cut off and replace the blocks at the end of the bowsprit to add the tackle to the block, not super hard thanks to the Quad Hands, but a pain nonetheless.
And of course what rigging job would be complete without breaking something, as I did more than once, in this case the main sheet. So it’s a time-out to re-rig it back again.
I do all the rigging I can off the ship whenever I can. For the topsail yard that included the clue lines and braces. These involve very long rope runs. I somehow mis-managed my .018 light brown line and with no source to replenish it I substituted .012 line for the topsail yard brace. You can see I’ve stripped down my Quad hands into loop tying mode. Loops were seized in this tackle then tightened onto the yard keeping the long coils of line untangled, and not dipped into spilled jars of paint.
The topsail yard also has a sling, this one isn’t served. I also included the optional truss from .025 line for additional stability.
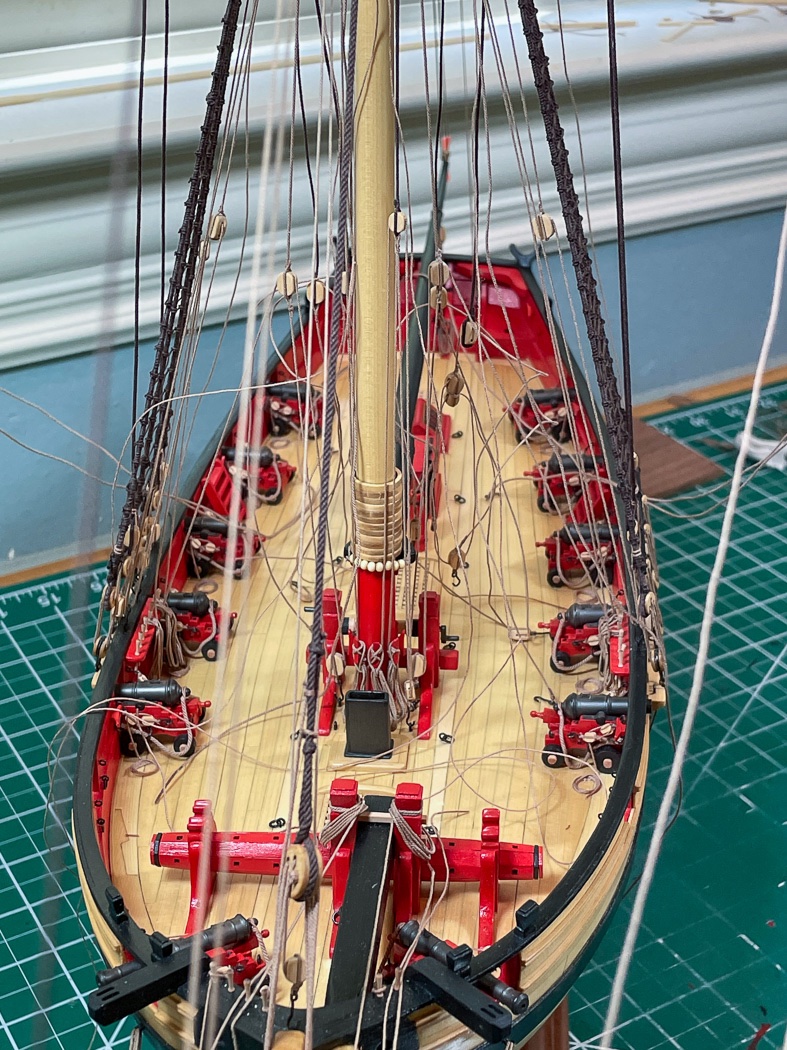
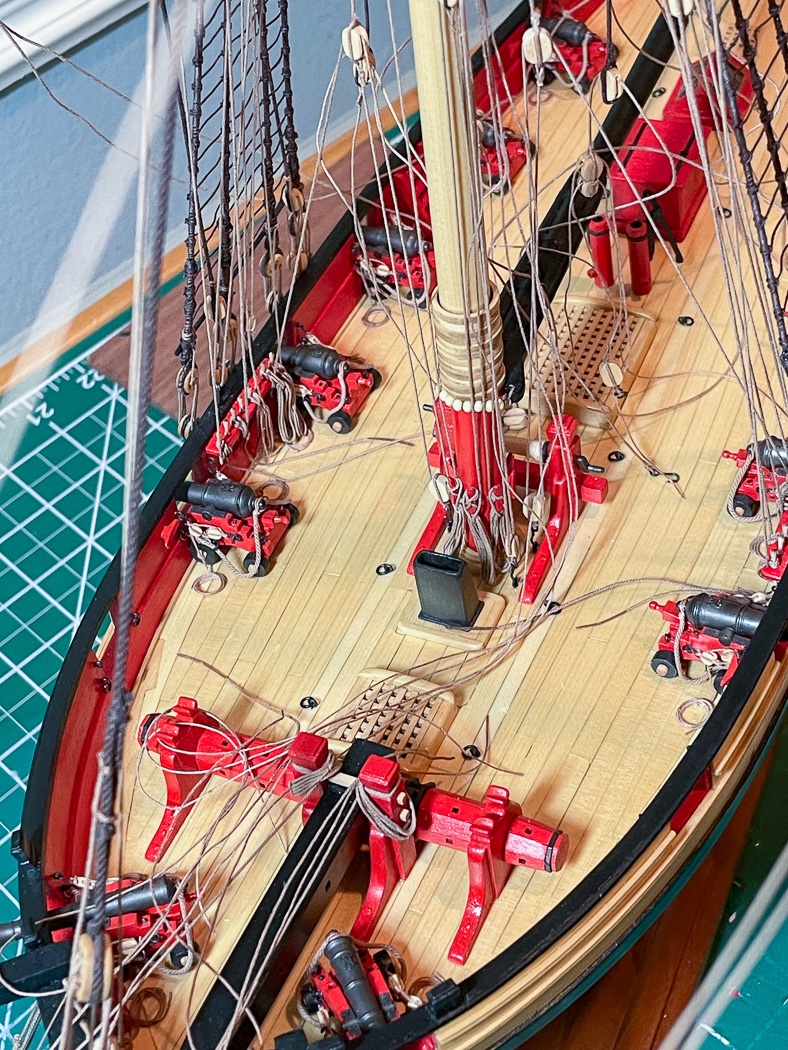
With the topsail yard hoisted with its long braces and lifts the deck seemingly is a cluttered mess, but I know each rope, there is organization to the madness. I prefer all the lines be on board at this point so I can carefully find the right and clean route through the blocks, mast and yards before belaying any of them.
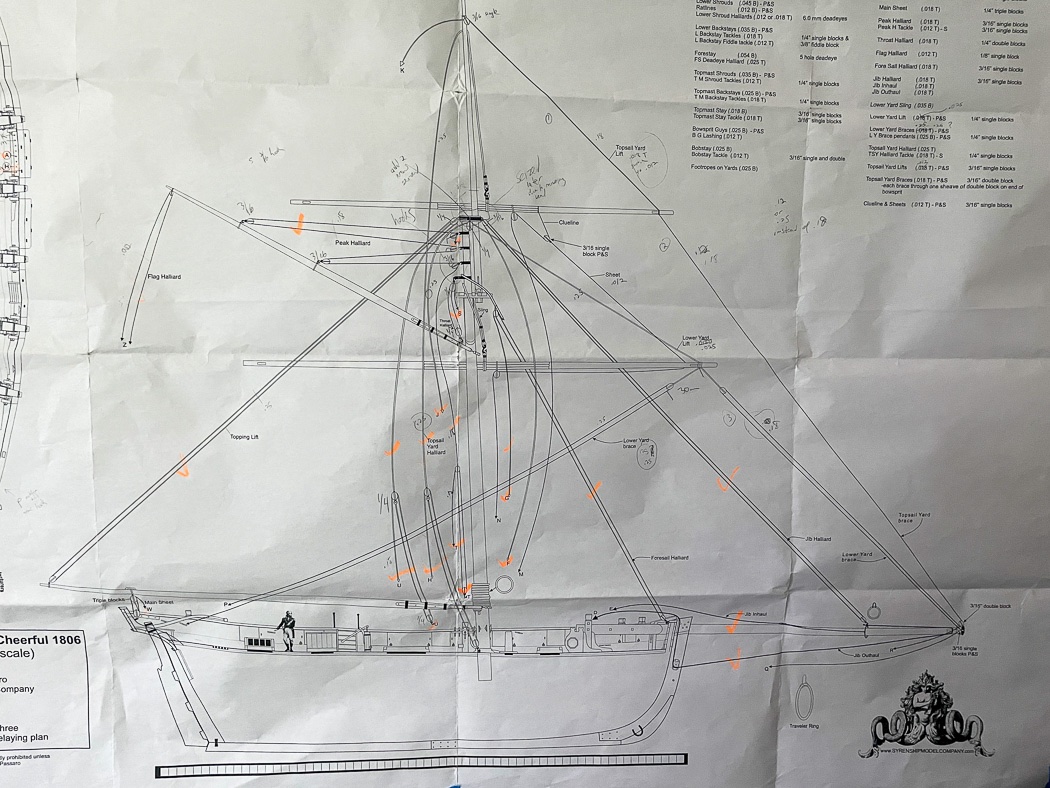
Knowing where things are and where they go comes with a lot of studying and marking up the plans. I’ve completed the standing rigging so that plan is folded and put away. The plans tell you what you need to know but that doesn’t always include the route and it doesn’t resolve conflicts with other lines. It does provide a belay plan, that’s the important piece of information along with line and block placements. (I cut off portions of the plan in this photo, sorry pirates).
With the yards and their respective lines hoisted and installed its time to start belaying. As I mentioned I moved everything aft of the mast up and out of the way, they’ll be dropped down and belayed later. The lower yard foot ropes seem short, but they match the plans, they aren’t fully pulled and dressed out in this photo. I tested mini me up there, he seemed ok with it.
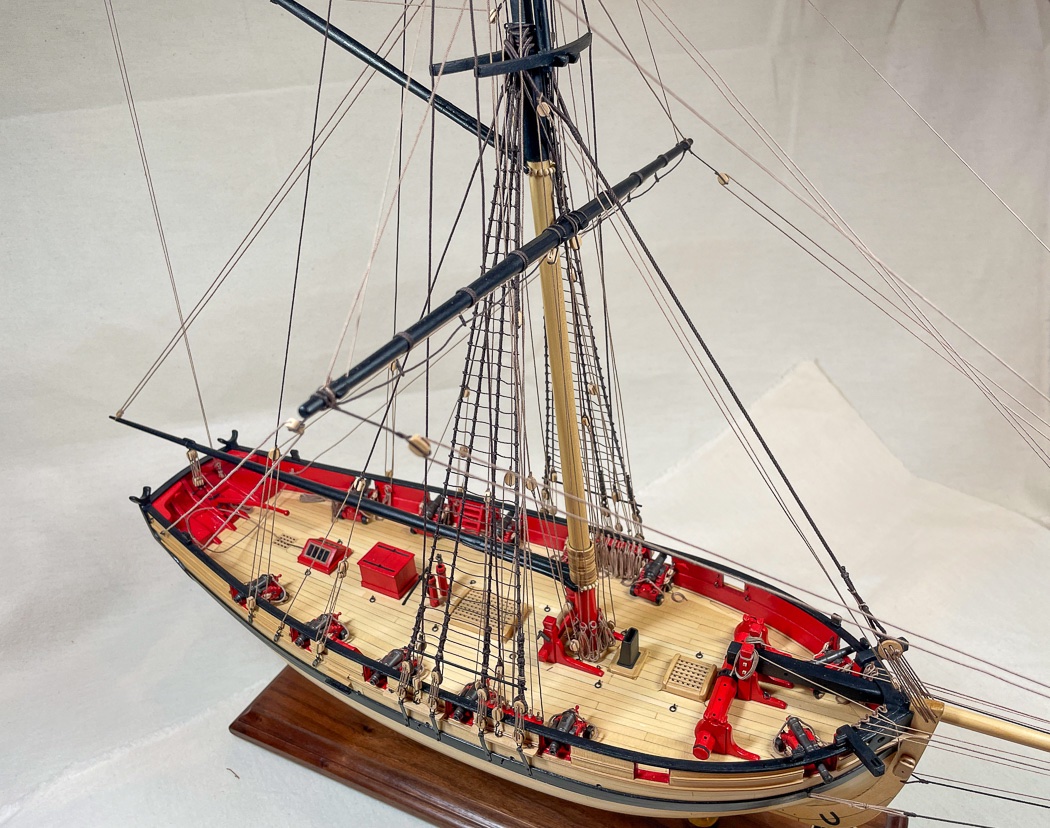
Next I leveled both the lower and the topsail yard using and belaying their respective lifts (one per side of each yard for four total). I want to get that right and the yards steady before anything else, I did careful measurements between yards and use of my bubble level. With that done I next want to finish anything attached to the mast cleats, including rope coils, this includes one end of the clue lines, these can be worked from either end, the other belays to the pin rails.
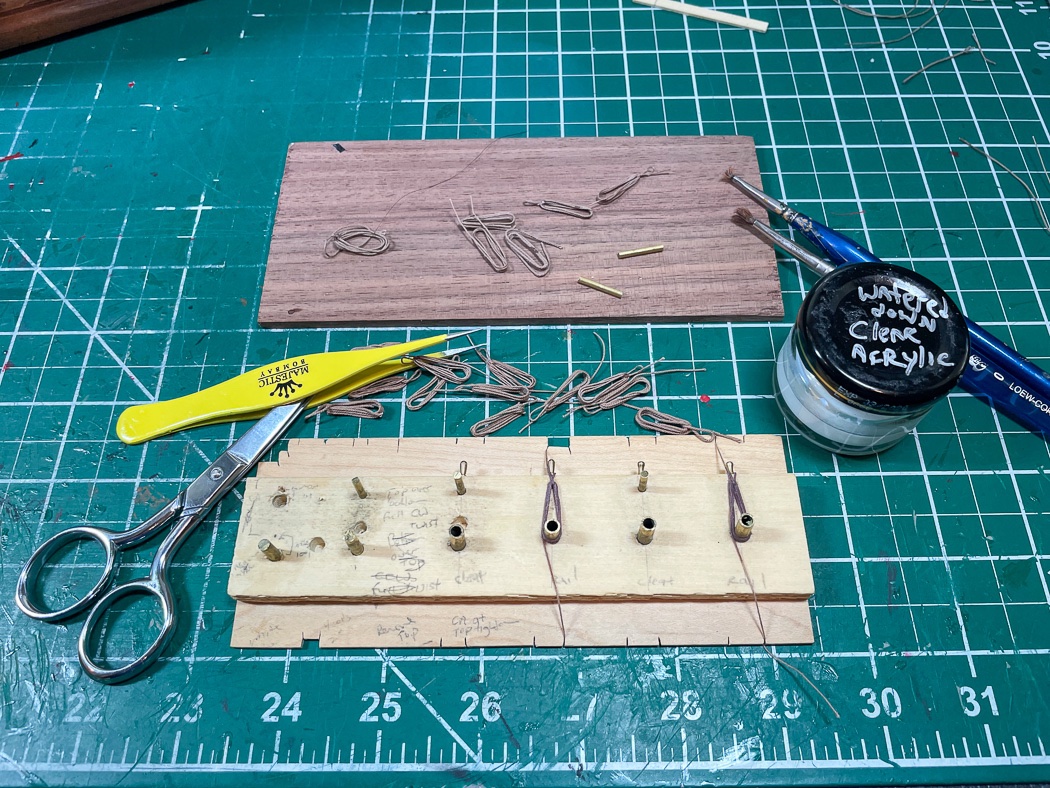
With a lot of lines belayed at this point it was time to go into rope coil mode. I ended up spending a full afternoon making and placing coils. Not just because there more than are a few, but each one I made I decided I could make the next one better, probably explains why I ran short of .018 rope. I find watered down clear matte acrylic works better for coils than the watered down white glue I use for finishing belay points and seizing lines.
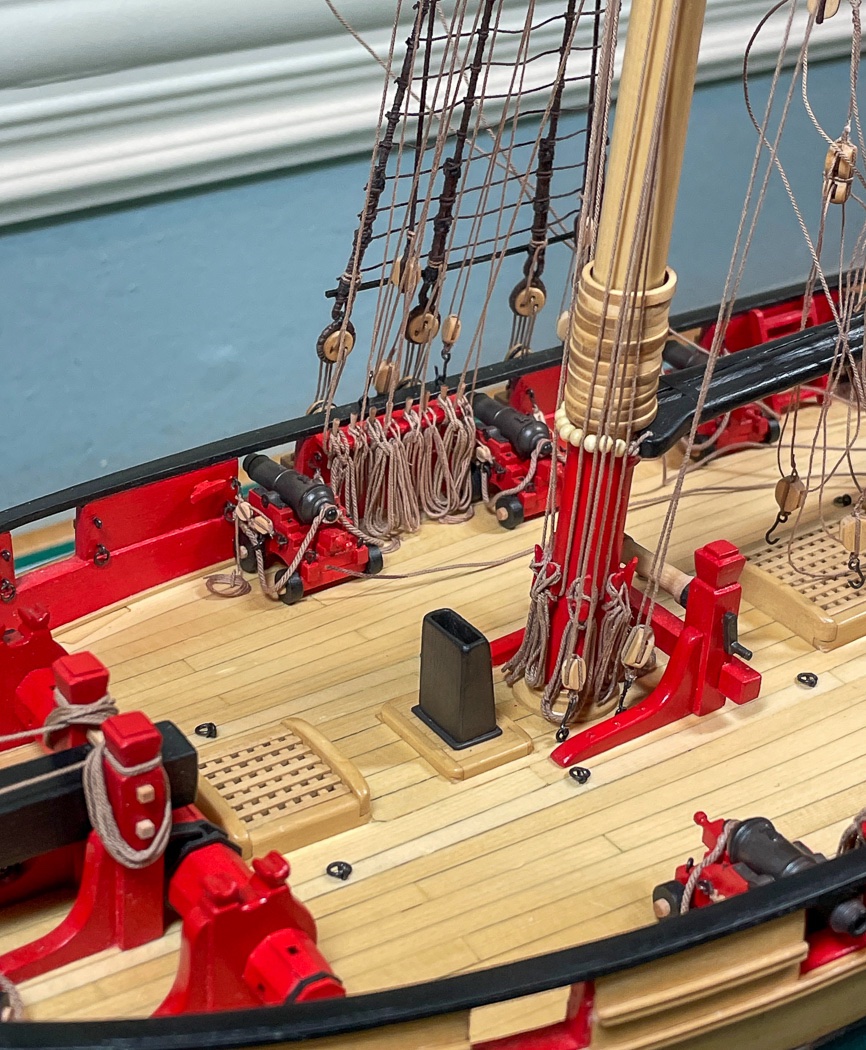
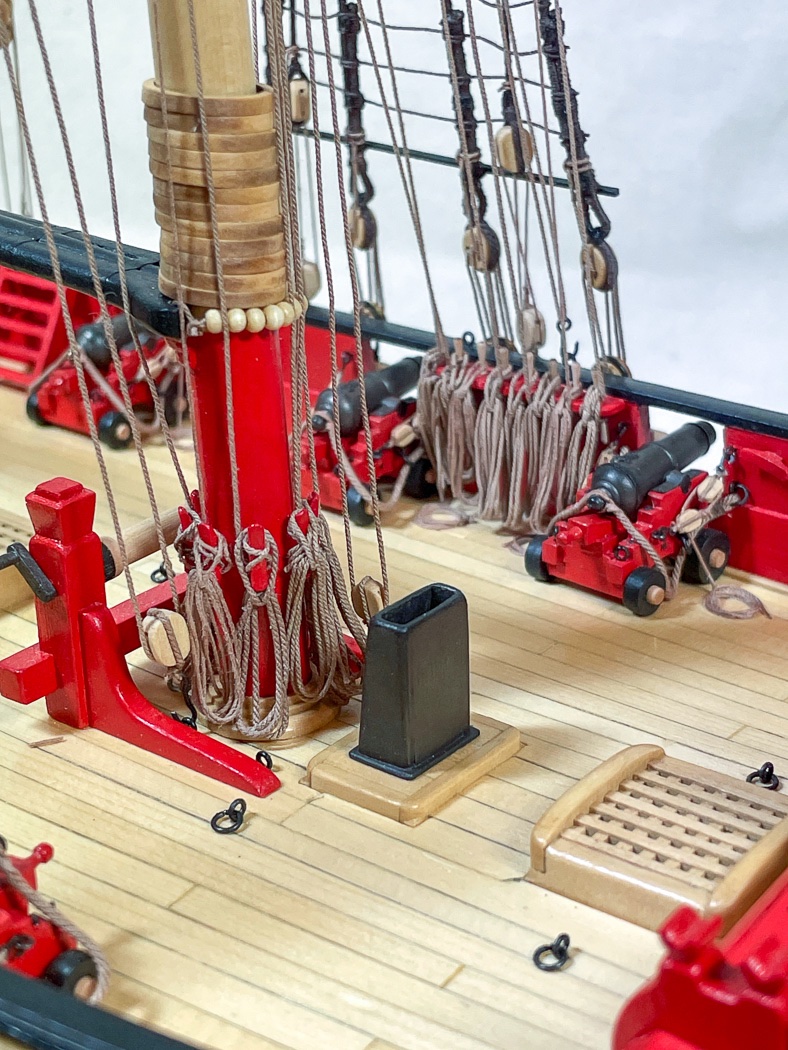
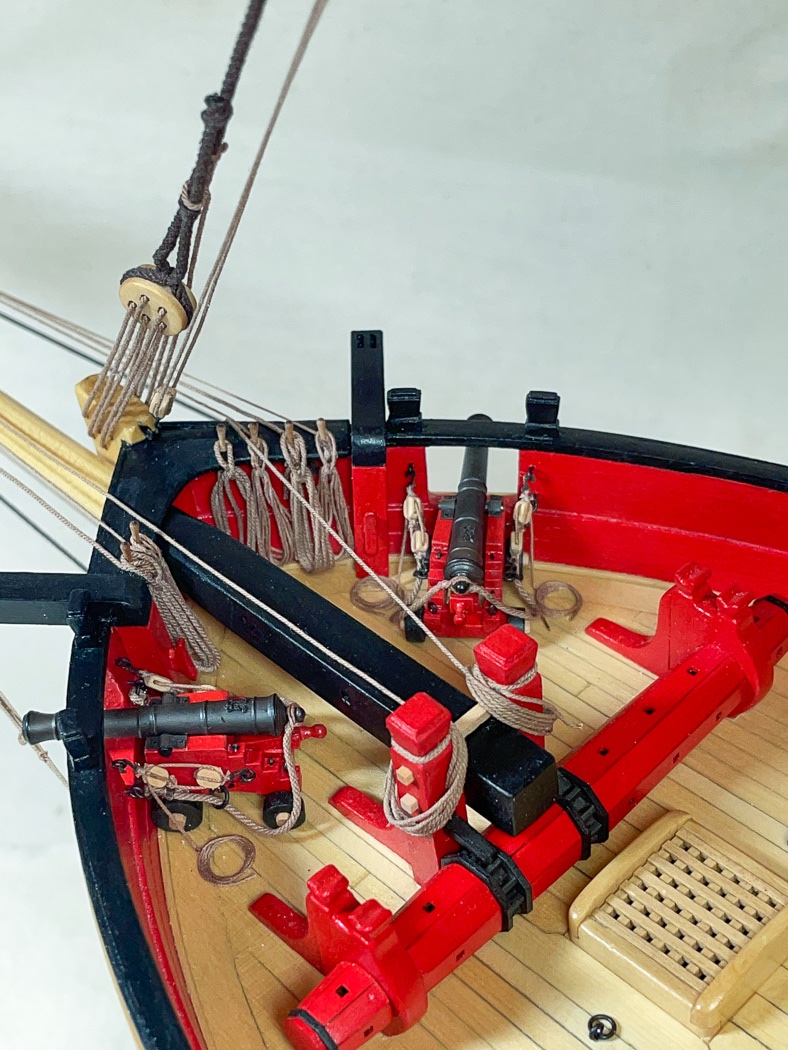
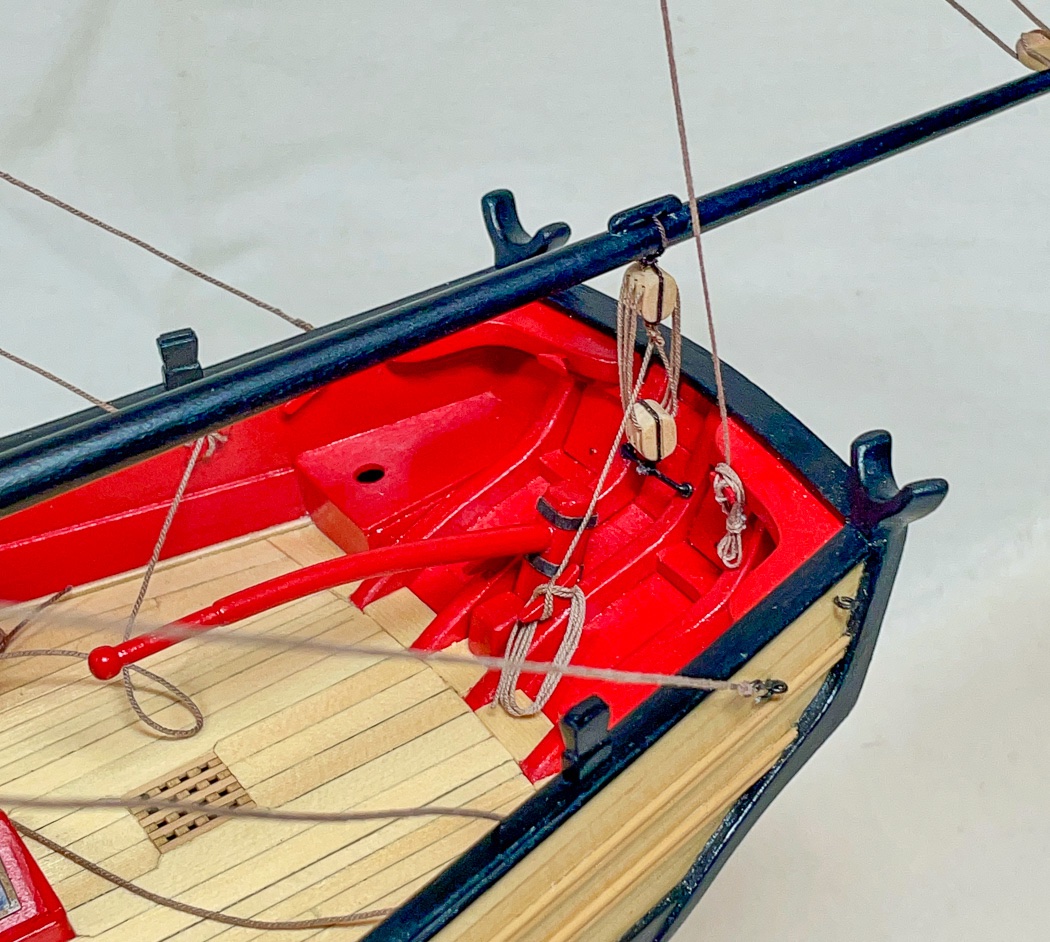
Everything fore of the mast is now rigged, belayed, and have rope coils in place. I like this method of coiling rope I described in an earlier post. I added coils to the unused belaying pins just to fill it up, and because I went a bit crazy making them.
The fore end of a cutter bowsprit is a busy place, lot of ropes descend here from the mast and belay back to the bow pin rail. maybe not frigate like, but kinda fun.
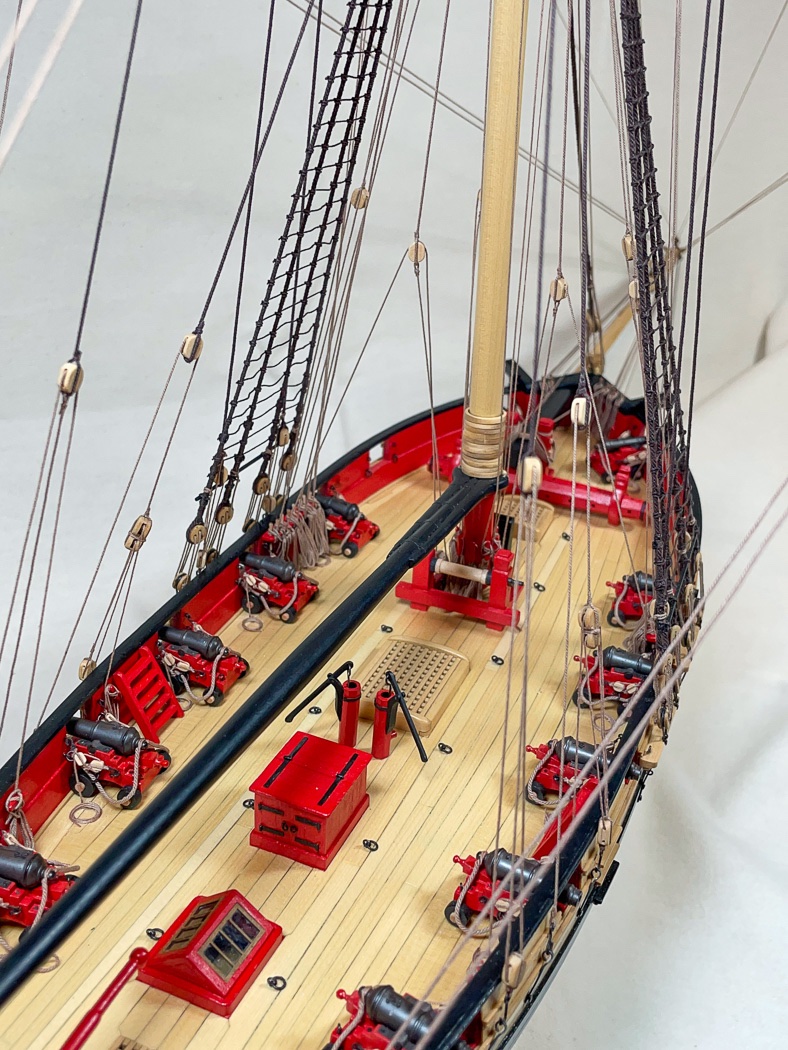
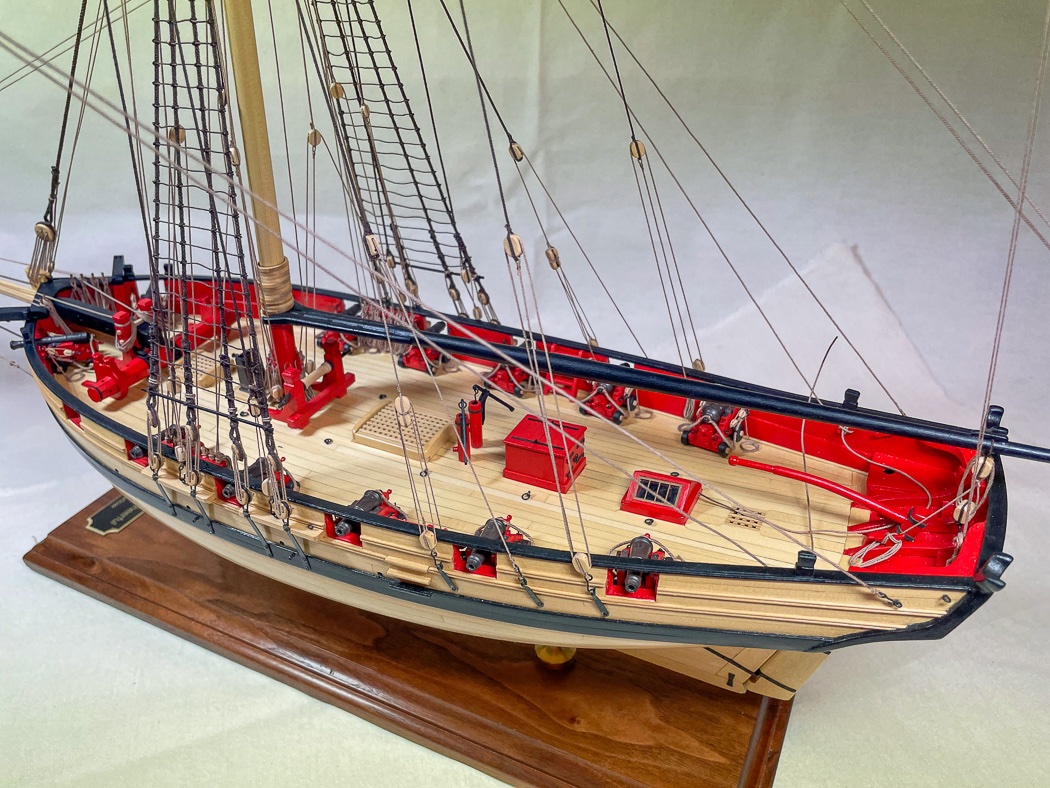
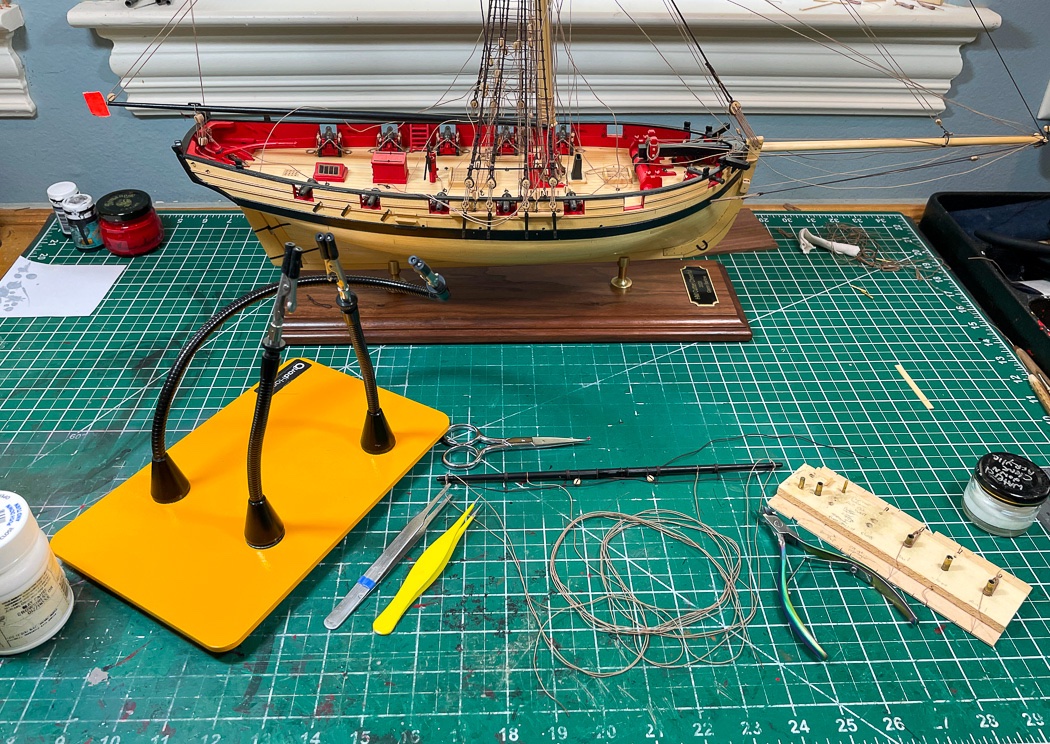
Finally it’s the aft stays and braces turn to be belayed I hadn’t finalized the aft lower yard brace in the photo, it was time for dinner, I went back to it later. Room to work get’s tight, not so much there are so many lines, there just isn’t much space in between them to access the belay points. My eye of a sewing needle on a stick I described a few post ago comes in handy.
With that the rigging of my Cheerful is complete. Next up are the anchors.
My thanks for the likes and the comments - as always they are very appreciated.
- marktiedens, mtbediz, egkb and 18 others
-
21
-
Good call on sails, not something I’d ever want to see on a model I build.
I likely will plank the deck, primarily so I can plank less of it, if that’s possible, to expose more of that beautiful detail below.
I can’t say I agree with much of anything @ERS Rich said, building your own isn’t tedious nor is time consuming a problem. I’ve spent over a year now on Cheerful and enjoyed it all. I do agree Sphinx is shaping up to be a great build, as a kit it’s at the top of its class and I’m sure worth the price.
I know I like many others want Chris to be successful.
- chris watton, Oboship, KentM and 1 other
-
4
-
The many “expert commentators” here are a bit hilarious, it tries to detract from the completely amazing quality and beauty of the actual model. Fortunately it doesn’t succeed, the model stands out as to what a gifted expert can accomplish that the rest of us can only dream about.
- shipman, Tigersteve, JohnLea and 4 others
-
7
-
Interesting approach to the rabbit. I hope it works out for you.
-
-
-
Are you beveling the top edge of the planks and using plank bending methods for a tight fit? Shouldn’t need anything from Inside and while WOP is of great benefit, it’s no substitute for a well fitted plank.
- Ryland Craze and FrankWouts
-
2
-
4 hours ago, DelF said:
did you rig all the bowlines on Pegasus?
I did some research, don’t recall the sources at the moment, and rigged every line the actual ship would have, well beyond what was on the plans. I don’t know that I’d try that again on a model but its cool to have it on at least one.
- Nunnehi (Don) and DelF
-
1
-
 1
1
-
-
13 hours ago, DelF said:
Does that make me strange
That’s not what does😂🤣
- Gregory, chris watton and DelF
-
2
-
 1
1
-
This is no small update, congratulations!!
The modeling world got a big positive step forward today. Glad your wife is doing better as well. Now I know my Sphinx will be packed well for shipment to my door!
-
Excellent work, very impressive!
- mtaylor, giampieroricci and FrankWouts
-
2
-
1
HM Cutter Cheerful 1806 by PRS - FINISHED - Syren Ship Model Company - 1/48
in - Build logs for subjects built 1801 - 1850
Posted
Looks like a very nice fit. Not to early to decide if you’re painting them black or leaving them natural. Both have been done. Getting the curve by the Wales is tricky, good job!