

knightyo
-
Posts
517 -
Joined
-
Last visited
Content Type
Profiles
Forums
Gallery
Events
Posts posted by knightyo
-
-
-
-
Hello Kai,
Since you enjoyed the Hornblower books, I would like to recommend the series by Patrick O'Brien which covers the same era, if you haven't already read them. That series of books is so enjoyable to read that many people read the entire series annually.
Alan
- Keith Black, mtaylor and JeffT
-
 3
3
-
From one Oregon introvert to another, welcome aboard!
Alan
- mtaylor, Keith Black and Vlax
-
3
-
-
I do it the same way as portrayed in the video, but the tool that works best for me is the edge of my steel ruler. It takes a little while to get the knack, but once you have it, you can create them very quickly
Alan
- Keith Black and mtaylor
-
2
-
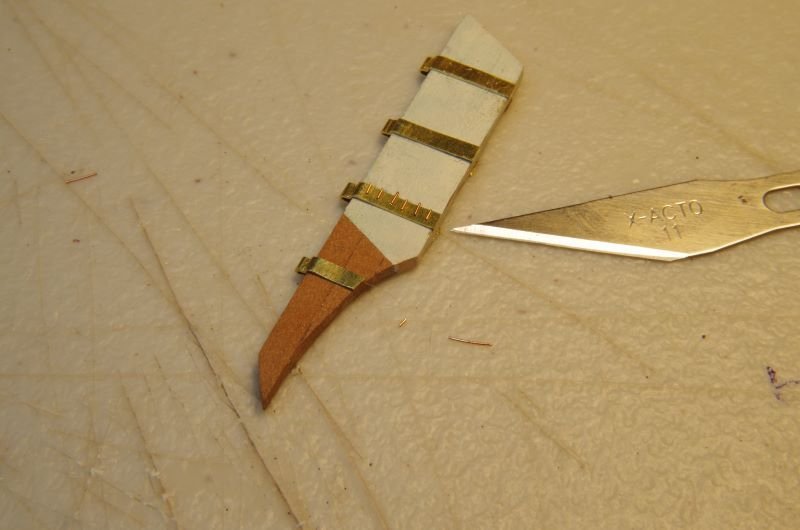
Metalwork around the rudder has been slowly taking place, and the straps are loosely placed on the rudder. They will be further shaped to the rudder and blackened before being permanently affixed (no idea how I'm going to permanently affix these. The wire bolts won't really have any strength long-term, so am really pondering this one). I had quite a learning curve in learning how to uniformly fashion the straps; many, many scrap pieces throughout. The photo also shows the bits of 30 ga wire that will be made into bolts. I'm just laying them down on the strip in the middle to see how the thickness of the wire will look from a scale perspective. I'm thinking of having 2 bolts per plank. The rudder is basically made up of 3 planks.
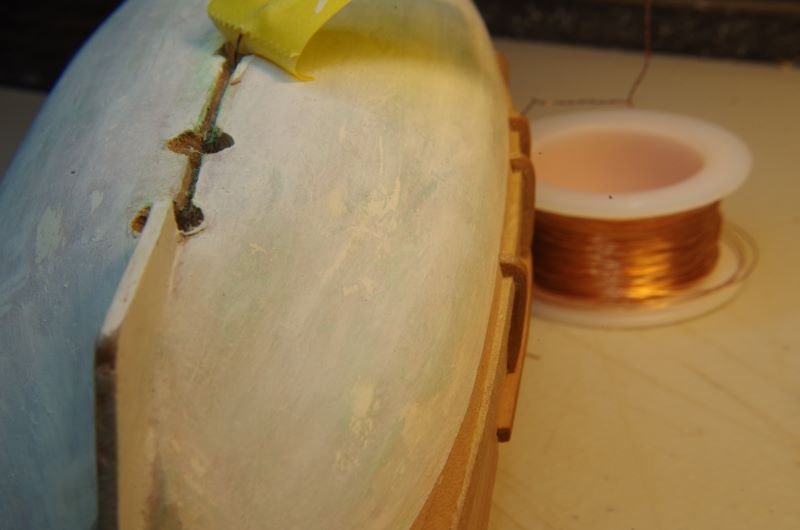
I've also been experimenting with the finish on the hull. Goal is to try and make the finish appear to be as "real/aged" as possible, so there are a lot of green/brown washes on there now in addition to other white washes. The plan is to have shellac on the model, and I'm thinking of extending that down all around the acrylic on the hull as well to give it a bit of a wet/shiny appearance. Still debating that one, however. The gouges in the hull are for the brass tubing in which the lighting will run through from the ship down into the stand where the power source will be. When the tubing has been installed, the keel will be replaced and everything tidied up.
- Knocklouder and BLACK VIKING
-
2
-
8 hours ago, Louie da fly said:
Mark, that's two coats of standard cheapo acrylic from a school-style set for doing pictures with.
That's actually perfect. If you decide that you've sanded too much off, it's easy to reapply. I applied/removed acrylic to the hull of my Nina for a long, long time until I finally ended up with the look that I liked (applied different wash "layers" with slightly different colors as well. You might be able to get a pretty nice effect by applying washes of greys/greens/browns, showing not only the standard wear of the black, but also the effects of a boat that has been in the water with sea life). As Baker mentioned, it would probably be best to practice on scraps first. It's all your personal choice, however. The model is looking great!
Alan
- Ian_Grant, Cathead, Glen McGuire and 1 other
-
4
-
-
4 minutes ago, Chuck said:
One scene the wife enters and breaks a model and yells at the actor to clean up all the sawdust and mess.
That must be the intro to the fight scene.

- scrubbyj427, Ryland Craze, FrankWouts and 2 others
-
2
-
 3
3
-
2 hours ago, Keith_W said:
Darn, these Hollywood product placement deals are going to a whole new level! First it was fast food, soft drinks, and cars ... and now ship models! I'll bet Artesania is green with envy that they chose Syren and not Artesania as a subject. To make it extra realistic, you should tell Ed Harris to crawl around looking for a tiny part he dropped on the floor ...
Yes! With a flashlight whilst also swearing. Now THAT would be an authentic scene.
-
You will have to let us know when this moving comes out. It will really be fun to see the ship modeling part, knowing that you helped! It makes me wonder if any of the cast will be drawn to the hobby as a result of seeing your models, the process, etc.
(Your Speedwell is looking absolutely stunning)
Alan
- Ryland Craze, FrankWouts, Beckmann and 2 others
-
5
-
On 11/5/2023 at 10:26 PM, Loracs said:
hello knightyo, thanks for the comment. you are right. I was thinking about carving the door frames... but I fail badly at it. I just don't have the right tool for it.
Maybe I should have painted the door only, keeping the door frame brass. I'm just running out of idea, so I painted red. Likely not the best? Maybe another color that does not stand out so much? Red look like a good idea at first.... but now i just don't know! hehe! Maybe off-white?
Let me know what you guys think.
Hi Loracs,
I think your door frames are good as well! I was just thinking that the doors themselves might look better if you made them out of wood as well. Although then that would also require you to create hinges, etc. It never ends how much detail we can put into these projects.
Alan
-
On 10/31/2023 at 2:29 PM, Richard Dunn said:
it does have an unpleasent smell..it smells like **** frankly.. but it goes quickly and becomes mustyThis gave me a good laugh. I guess the good part about it is that a guy would never keep bits and pieces and assorted sawdust on his is table; he'd clean everything up after each session, resulting in a nice and uncluttered work area. The only wood I'd never work with is ebony. I've used it once, and vowed never again. Your project looks fascinating, and I do hope you continue to post your progress. I think a lot of build logs eventually get a comment the builder isn't thrilled with; it's just a function of so many different people from so many different backgrounds/demographics, etc. I've noticed my own posts are different in tone depending upon the time of day and the amount of caffeine in my system. I think the pros of having so many positive and helpful posts however, outweighs the cons of occasional posts which come across as off key.
Alan
- cajunrandy214, oakheart and mtaylor
-
3
-
I love the addition of the inlays! They look great. I'm wondering if you want to do the same type of thing with the doors? The inlays are so well done that the doors almost detract from them. I only offer this as an opinion that is probably not held in the majority. I am a master of going down rabbit holes and never finishing my projects.
Alan
-
Same here. I think I've even asked about them before, and was told the reason as to why they were no longer available. Of course, I've forgotten the reason.
Alan
- Keith Black, thibaultron and mtaylor
-
3
-
2 minutes ago, No Idea said:
I think that I would make a stencil and paint the letters on. I think it would be more subtle mate 👍
I agree with this recommendation as well.
Alan
- billocrates and CiscoH
-
2
-
Welcome from Oregon, land of eternal sunshine.
What?
Alan
- scrubbyj427, Keith Black, mtaylor and 1 other
-
3
-
1
-
Chuck, just brainstorming here, but I loved the look of the framing/shadowbox you had on the Confederacy. If you provided that as an option on the POB, that might appeal even more to builders, as it could still have the look of a fully framed model as well. Kind of the best of all worlds for a lot of modelers.
Alan
- CaptMorgan, hollowneck, mtaylor and 4 others
-
7
-
It almost feels like someone who is confident enough to tackle a POF would also be the type of person who would loft and cut their own frames. I'm thinking you might have a larger pool of potential customers if you don't supply the wood, but do offer all of the templates needed for someone to cut their own frames, with very detailed instruction on how to cut/shape the difficult areas (full-color photos/instructions, sexy book cover, etc). I'll bet you could net out higher if you sold books at 300 bucks a pop (and low time investment in printing) instead of full kits at 2 grand (and a lot of time burned in creating material).. I could also see a lot of modeler's requesting a book (or set) as a Christmas gift from their spouse at 300 bucks a pop, but would not have success in asking said spouse to drop a couple grand for a kit. If you found the right publisher and right mailing list, you might hit the jackpot. I've got a number of expensive books in my collection, but have no intention on creating the models; I just love having the books, looking at the photos, and knowing I could build the model some day if I ended up with an unexpected bonanza of free time.
If I were to tackle a POF, I could see myself paying for instructions/templates, but not the actual wood that I could cut/sand/shape myself. The wood type is a limiter as well. There would probably be people who might be interested in the kit, but only if it's in swiss-pear, etc. At this point in the game, if it were me, I'd create one or two kits and market them here and on your website, knowing that they would probably eventually sell, and then just replace them in stock one at a time as they do sell, so you could eventually recoup your investment, and also have a nice, random income source for as long as you want. I think that in theory, with the right marketing, you could go either way; it would just be far less time consuming to create books than kits.
EDIT: I would also absolutely offer this as a POB kit.
2nd EDIT: Also as a miniature navy board project. lol
Alan
- thibaultron, Nipper, Canute and 4 others
-
7
-
-
The Pacific Northwest is pretty easy living. We escape (mostly) most of the natural disasters the rest of the U.S. has to contend with, and it's pretty laid back.
Alan
- Nirvana, Canute, scrubbyj427 and 1 other
-
4
-
To me, only about one out of every hundred models looks better with figures unless exceptionally well painted/placed. Even then, it seems like figures on a model take away from it's elegance. I'm probably in the minority however, and fully acknowledge that I have strange tastes. I also admit that I've just purchased figures from Chris at Vanguard Models; not sure if I'll ever place them on a model, however; they were just too cool not to purchase.
Alan
- mtaylor and Keith Black
-
2
-
I was initially surprised at the depth of oil canning effect in the photos, but now that I think about it, with sides that are basically flat, the waves hitting them head on would definitely have more of an impact as opposed to hulls which are more rounded/curved; just such a strange ship. Greg, I love what you did with the internals in the hangar; the flag looks great in there.
Alan
- RGL, Old Collingwood, mtaylor and 1 other
-
4
Bregante by AmateurModelBuilder - Mini Mamoli-FINISHED
in - Kit build logs for subjects built from 1901 - Present Day
Posted
Hello, Gregory was exactly right. Below is a photo of my mini-Mamoli Nina. The keel parts are glued into the pre-drilled groove all the way along the keel. Since the keel will be painted below the waterline, it doesn't really matter what pattern of pieces you cobble together down there as long as they are all snug in the groove, and against each other. It also helps to install pieces which stick out too far as well, so the entire keel/stem can be sanded down as one unit after the glue dries.
Alan