DONATION DRIVE - SUPPORT MSW - DO YOUR PART TO KEEP THIS GREAT FORUM GOING!
×


mtaylor
-
Posts
26,273 -
Joined
-
Last visited
Content Type
Profiles
Forums
Gallery
Events
Everything posted by mtaylor
-
I'm just curious Peter, have you been able to do any more on this ship? I'm a bit stumped on the bowspit.
-
Hi CDW, I'm a bit fuzzy here on the gap filling. Is the thin glue melting the thin strip? Or is the thin strip being pushed into the gap and then glued?
-
Sweet looking cannon, Mark. Very nicely done. Well worth the effort, me thinks.
-
Model Ship Building Stands And Vices
mtaylor replied to LEGION 12's topic in Modeling tools and Workshop Equipment
Rich, Models with a keel or more modern ones where there isn't a visible keel? If you go here: https://modelshipworld.com/forum/18-modeling-tools-and-workshop-equipment/ and use the keyword "keel" there's quite a few hits for everything from homemade to manufactured. I posted some below. Amati make a "keel klamper". Hobbyzone has one. There's this topic: Here's a topic on a home made one: -
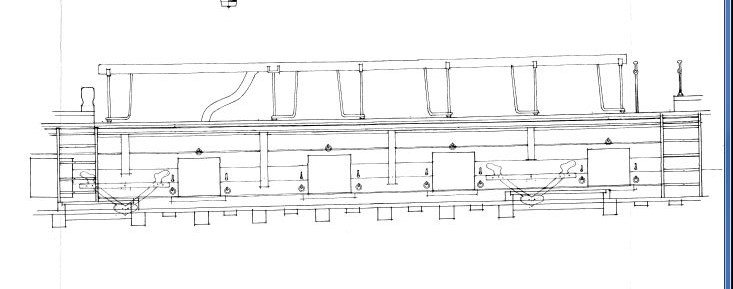
I'm not sure the front one (bottom photo) are windows but maybe a painted decoration? The rear (upper photo) I can accept that those are windows since the helmsman was more than likely there as there's no helm on the weather deck. Windows there would make sense so he could see the sails, etc.
-
If you can, the ANCRE monograph is pretty good, but there are errors. But at this stage of your build it might be a waste of money.
-
Now there's a picture I can relate to... crewmembers sitting in the hatch with their feet in the breeze. Did that on CH-34's before we transitioned to CH-53's. Piston engine with a nice roar and a big hatch to enjoy the view.
-
Carl, Add your signature name to your profile then it will appear with every post. Same goes for your build log(s). As for gluing... many of (maybe most?) put a small amount on a piece of wax paper, maybe a small plastic cup, that type of thing and they use toothpicks (small end) to apply the glue. If the end is too big, it can be trimmed down. I use this method for the glues I use (PVA and CA). It also works for epoxy.
-
Hi Peter, By all means start a build log for your RC build in the scratch area (the place for RC builds), it's the best way to do it.
-
Excellent recovery Josh. When I saw the first photos, I thought for sure it was scrapbox time.
- 10 replies
-
- 1
-

-
- flying dutchman
- bottle
- (and 1 more)
-
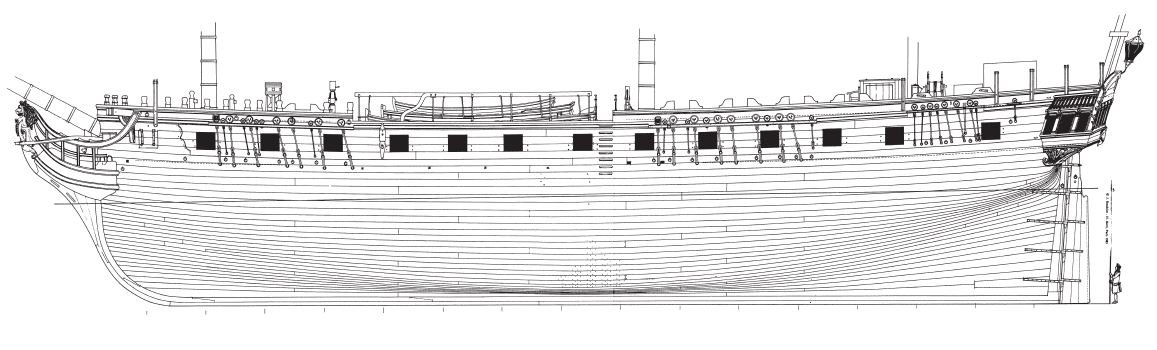
Lets try these... The hull pic is from the ANCRE website's PDF. The Rail is from the plans. It is a single rail on each side (outboard). There's one curved wooden stanchion and rest are iron. I'm not far enough into this yet to know if these rails were removable. I hope this helps.

-
Here's a belated Welcome to MSW, Pieter. Or maybe that should be "welcome back"?
-
Wefalck, It's this one from Model Expo. There's several builds going on and completed so I just grabbed the first one that popped up.
-
I'll see what I can do, Christos. I don't use a mobile phone with good imaging so I'll scan what I can.
-
-
What Robert said is spot on Jo. We all started off as beginners and before the Internet, we were on our own. MSW does believe in mentorship... we all help each other.
-
Laser cutting questions
mtaylor replied to SardonicMeow's topic in Modeling tools and Workshop Equipment
Here's my take.... Question 1: Use whatever wood works for you. Ebony and plywood do have issues from my experience so I don't cut those on a laser. Question 2: 2mm separation is doable depending on the thickness and the type of wood. There is a kerf that gets bigger depending on power and cutting speed. Just make sure that your cut line for the laser is outside the piece such that you end up with the 2mm piece. It'll take some trial and error. Note that if the wood is too thick to cut in one pass, the kerf gets larger and more angled with the second cut. As for cutting in general, spend some time cutting and dialing in the power and speed on the types of wood and the thicknesses as everything will be different. With a shared unit, always do a test cut first since power levels may fluctuate and users may fiddle with things like focus. So you want the machine at a known point. Even if the lens is locked down, do run a test cut first. -
Adapting DRO Devices To Shop Tools
mtaylor replied to Thistle17's topic in Modeling tools and Workshop Equipment
Interesting topic and idea. I'm assuming that you're just looking for repeatability of the fence setting? -
Christos, It varies a lot in the French frigates. Some didn't have any railing, others used rope, and of course wood on the outboard side only. Depends on the ship and the period. On the plans I referenced for L' Hermoine, it shows the outboard railings, but no inboard railings. On the earlier frigates, the "walkway" between the quarterdeck and the forecastle was actually lower than the two decks. You had to step down onto the walkway. Allan, The Goodwin info is only valid for English and possibly American frigates. The French for the most part, didn't have hammocks on frigates. The crew slept in any place they could find. Due to the hull shapes, dedicated deck space was at premium to say the least. So they slept on the deck, down in the hold, on the cable stowage, just about anyplace. On the other hand, fresh bread seemed to be available.....
-
The ANCRE monograph only shows the outboard railing, Christos. The inner one on the replica may be there, as you say, for modern safety requirements. AL is known for it's inaccuracies, so make of that what you will. There's one more disclaimer... the ANCRE monograph has numerous errors from what I've read, but I don't know if this is one of them.
-
Should I build Benjamin Latham?
mtaylor replied to Dr PS - Paul Schulze's topic in Wood ship model kits
Are you going to stay with kits or scratch build? If kits, I think that would do it. For scratch build, depends on how much scratch work you wish to do. If you intend to mill your wood, then a table saw such at the Byrne's. If a lot of machine work, then a mill or lathe. For the most part, with scratch building, I had (until I got a laser cutter) just a mill, small table saw, scroll (jig) saw, and lathe. Each has it's uses so figuring out what the next tool to buy is up to you after you consider what you want to do first. My most used have been the scroll saw and the small table saw. -
Thanks Iran. I was wondering about heat dissipation and possibility of water entering the hull. I did see one model years ago where the builder either had working bilge pumps or it was just cosmetic and sucking in the pond water to discharge for effect. Never did find out as there was always a crowd around him.
-
QUICK-FIND INDEXES to BUILD LOGS FOR KITS
mtaylor replied to Dan Vadas's topic in - Index of all kits by brand and subject
Peter, As in all thing in life, stuff happens. People hit a point and move on to something else, family changes, death of the builder, etc. all have an impact. Some ships really can't be completed for some reason and often the builder just tosses it and moves on. And lastly, especially with new builders, they start a project that is way too difficult for them so they abandon it. What you might do, is try contacting the builder via their profile or just click on the icon for the builder and see if they're still active. Having said that, we've had quite a few builds go silent for sometimes several years and suddenly the builder is back and finishes the build. -
I think it's because most use a smartphone or (as in my case) I have a camera that I've had for years and am too cheap to upgrade. I note that many more people are now hanging backdrops behind their models and are using what appears to be better lighting so maybe your posts are rubbing off.
-
Thanks Roger. That's one idea but I have a ways to go yet before I hit that point. Early one, I did consider stub masts and may opt for that on both Licorne and Belle Poule. Might be an interesting contrast to have them in the same case??? The masting sizes are different enough to that's still on the table just because they are different. I'm still having those "ah ha" moments as I sort through things while working on Licorne as time permits.