mtaylor
-
Posts
26,273 -
Joined
-
Last visited
Content Type
Profiles
Forums
Gallery
Events
Everything posted by mtaylor
-
Warped frames
mtaylor replied to jdbondy's topic in Building, Framing, Planking and plating a ships hull and deck
JD The blanks were 1/8" and thus the frames ended up at 1/4 inch. For a look at how I did it, see my Licorne build. Some others do all the frames first then glue to the keel. I just glued them as I made them. -
Warped frames
mtaylor replied to jdbondy's topic in Building, Framing, Planking and plating a ships hull and deck
Indeed the Hahn method wastes a lot of wood. -
Phantom Henry J Gasser by jct - FINISHED - 1/24 scale - PLASTIC
mtaylor replied to jct's topic in Non-ship/categorised builds
I'm with CDW. She has the appearance and stance of one that's been down the track a few times which to me, doesn't detract at all. Those rail frames were known to twist, usually the first full power run would do it. -
Warped frames
mtaylor replied to jdbondy's topic in Building, Framing, Planking and plating a ships hull and deck
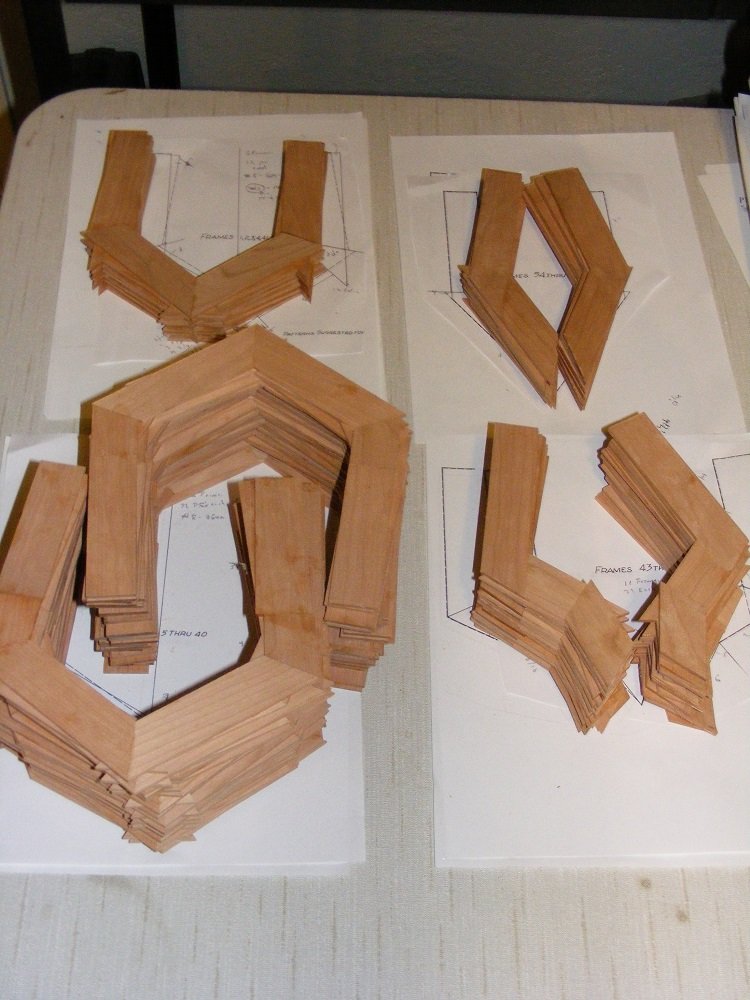
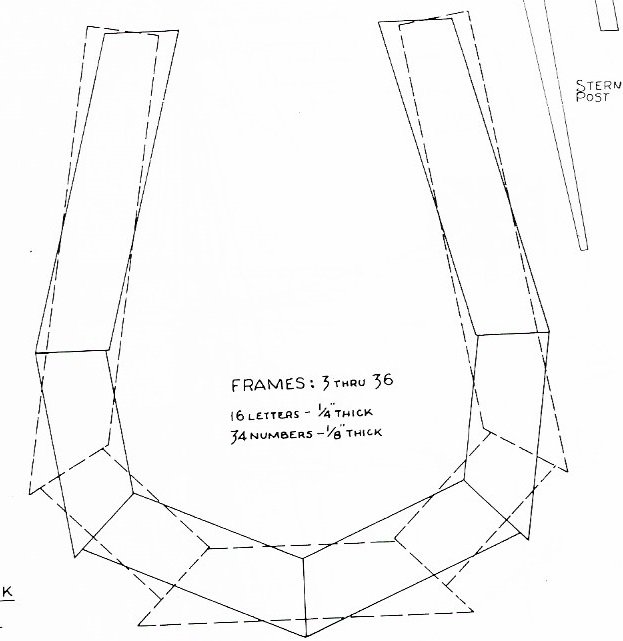
I suggest that if you're going to want frames, use the Hahn method of two layers. Each layer is made up of 3 or 4 pieces with the joins in the middle of the first piece. I hope this makes sense... The closest I can show is these two pics... first the pile of blank parts and then pile of blanks. The last pic shows how these are overlaid. I hope this helps. Edit: These are the frames I used for me Licorne build and there was a long stretch of time between cutting the frames, building them and installing them. I used cherry for my frames as I needed a lot of wood and at the time, boxwood was twice the price of cherry.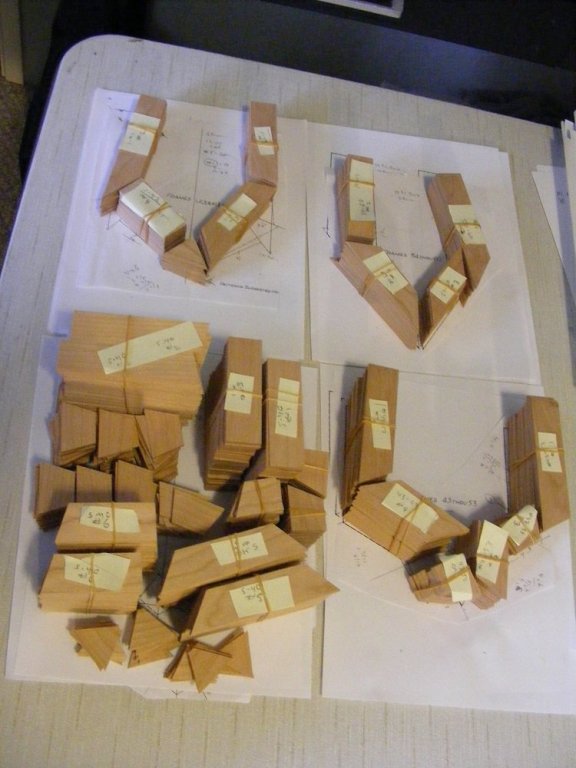

-
Most of us were using Thurston blades, but they are closing down (IRC) at the end of the month. They suggest this place as being comparable: https://www.malcosaw.com/
-
For ungluing it, try isopropyl alcohol. It may take soaking a small cloth with it and wrapping the whole thing with plastic wrap to let it penetrate. I've not used Titebond but can only report what others have done.
-
Yep... flattening my forehead. I have to admit, this lofting isn't as hard nor as easy as I thought. I stumble some but it's part of learning.
-
Wow.. there's a lot of detail there that merits close examination... I love the pump working.
-
It's a pity that there's no logs anywhere I can find, here or anywhere else. So... Can the entire keel with the stern piece be laid on the plans or are the plans a different size? It could be that (if you can) remove the stern bit from the rest of it and adjust it then reinstall. To my eye, the aft end should have aslight tip forward while yours is canted back a bit. My concern here is that if you just correct it like you're planning, something else will reach out and bite you since the shape isn't right. If the slot is vertical, than the last bulkhead/frame will also be vertical. Then again, I also believe in close counts and you are darn close.
-
An excellent tutorial in the making, Daniel. Thanks from me also as this is fascinating.
-
-
I think you're right, Druxey. Back to the drawing board. Luckily, an easy fix. I rechecked my sources and yes... it's the bevel. <smacks forehead on desk> One of the French logs that I referenced, had it as I did... an extra piece.
-
Sam, I'm not 100% sure of on if that was actually done or a convention by later authors. Logically it makes sense to make it one piece. I'll do some more digging as I get time.
-
I've also heard them called "channel locks". A bit imprecise as true "channel locks" are totally different tool.
-
If you want photo etch, Daniel (Dafi here in MSW) offers quite a bit of things at that scale for other than the Victory: http://www.dafinismus.de/plates_en.html#anker7
-
Phantom Henry J Gasser by jct - FINISHED - 1/24 scale - PLASTIC
mtaylor replied to jct's topic in Non-ship/categorised builds
Wiki says "Akron, Ohio" at their build hanger. Lakehurst on the east coast and Santa Ana on the west were the operating bases. FYI, the blimp hangers at Santa Ana, CA are still there last time I checked on line. Huge beasties. I was stationed there in the late 60's as it was chopper training base and those hanger were used for helicopters. They have two huge doors (one at each end) and after twice having an F-4 fly through the hanger, they started closing one end of the hanger. We would still get low flyovers and thought the pilots were checking if the doors were open. -
I went back to the artwork in Binho's post. I'm not so sure those are oars hanging off the side on the upper painting. I see the loop at the top but nothing that would hold the oar in place on the loop and they seem to hang too straight. In battle, I would think you'd want the oars protected even it was just by "shipping oars" inward. The lower one does show them hanging and what appears to be lashings to hold them in place. That would work well for a harbor where cargo would be loaded and off-loaded. Where is that time machine???????
-
Cutty Sark by NenadM
mtaylor replied to NenadM's topic in - Build logs for subjects built 1851 - 1900
Wonderful work, Nenad. I can see what you mean about the pumps. You're this far so I'm sure you can do the pumps.- 4,152 replies
-
- 5
-

-
- cutty sark
- tehnodidakta
- (and 1 more)
-
That's the plan, Mark. I think some serious focus has medicinal effects for calming the mind. Sam, I'll see if I can help.... there's the stem (the big curved piece), then a bunch of parts for the two pieces in red: the stern post and the rudder. Hope that helps.
-
Interesting model. I guess since it's so stealthy that there really isn't much detail work to do. And so secret, they could do say an engine on the side for maintenance.
-
Looks super, Jack. I recall doing a Daughtless way back when but mine looked factory fresh. Your's looks like it's had a few flight hours on it.
-
Point, That probably would be the best approach. Start with something small and easy and build on the knowledge gained.
-
ancre Le Gros Ventre by ChrisLBren - 1/36
mtaylor replied to ChrisLBren's topic in - Build logs for subjects built 1751 - 1800
I'll pull up a chair also, Chris. A challenging project, learning curve, and and fun. What more can we ask for? My only suggestion is about the scrap box.. make if bigger than what you think you'll need and don't toss anything into the burn bin or trash. I've found uses for most of the wood that when into mine.