Beef Wellington
-
Posts
2,249 -
Joined
-
Last visited
Content Type
Profiles
Forums
Gallery
Events
Everything posted by Beef Wellington
-
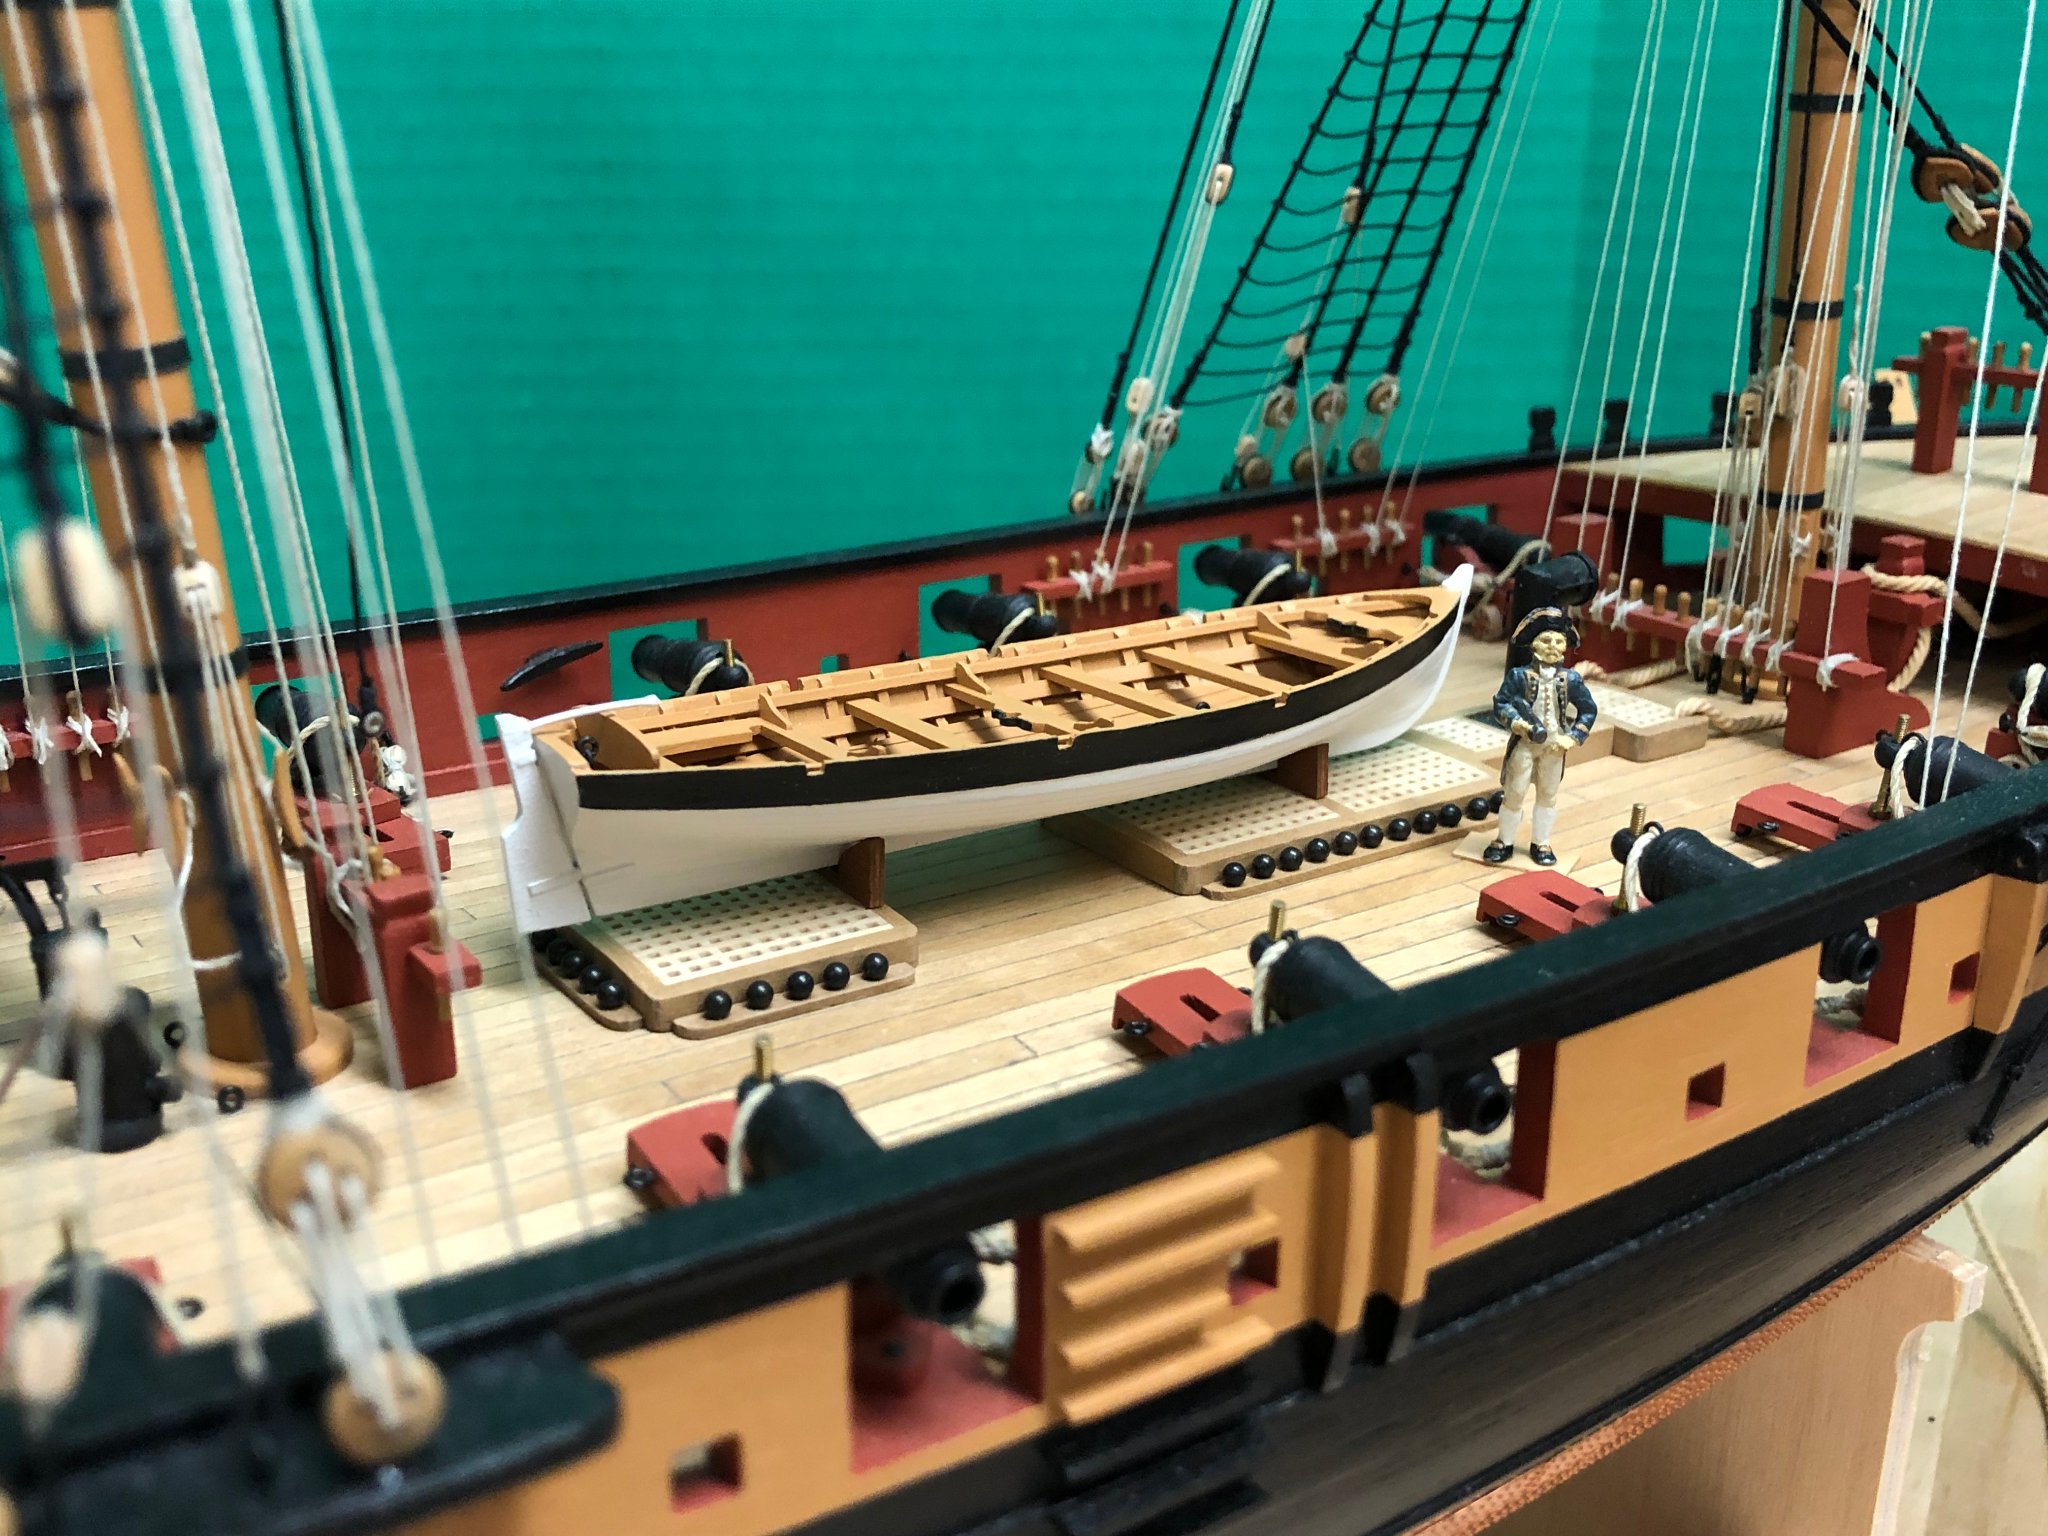
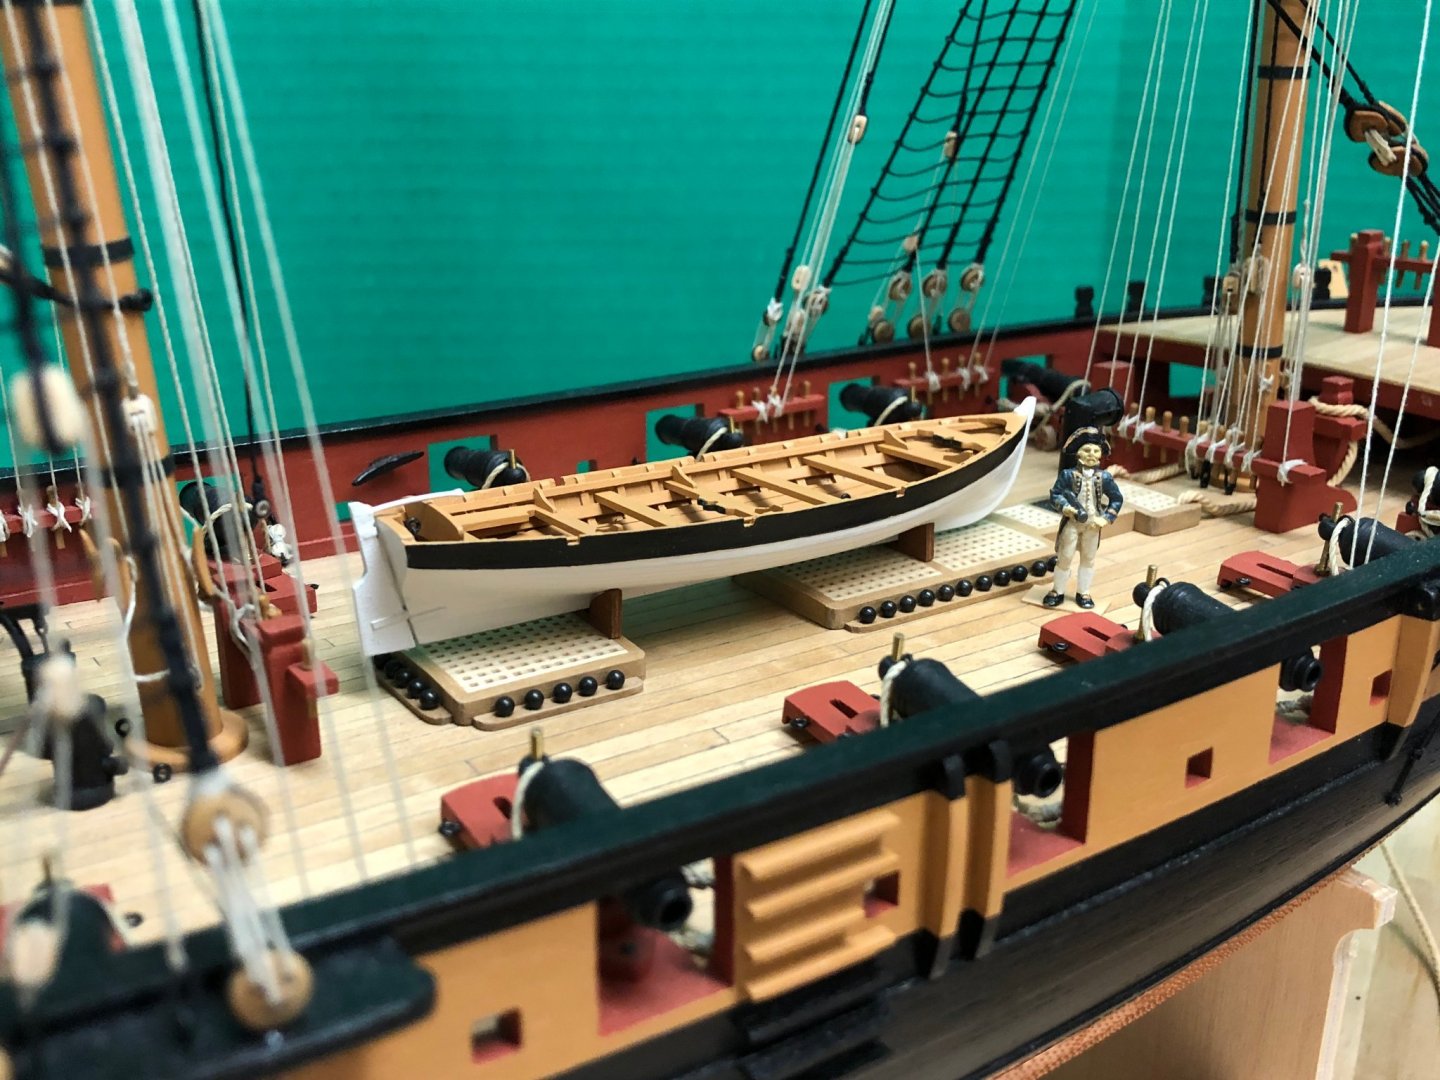
 Hi Folks, have been away from the shipyard and this site for quite some time, and I've missed the friendly interaction. Looking forward to catching up with everyone's builds soon! @Martin - welcome to the neighborhood! We got lucky and didn't lose power in the storms, hope you stayed safe. We definitely need to connect at some point so I can pick your brains 🙂 @ Sjors - Good to hear from you old friend, its been a while! Will check out your new model soon. @ Stergios - the yards were rigged from bottom to top. Not sure if that is the recommended way, but it made sense to me to do that way because the lower masts require quite a few items of rigging to be in place near the mast and it seemed that this would be harder if the lines from the top masts were getting in the way. Maybe personal preference? The cutter has finally been finished and the details of the final stages of construction are posted in my 'Jason' build log. Figuring out where to place the cutter onboard Snake was a little bit of a challenge. It seems inconceivable that a ship (sloop) like Snake would not have at least one boat, but there is simply no space to place one. I could find no examples of solutions to this in practice (recognizing that other ships may well have had raised davits), and it seems somewhat logical to mount the supports on the coamings which would also be supported by the deck beams underneath. Finally in position, its clear that even a modest 24' cutter has little room to spare. With that done, now rigging can continue, hopefully some progress possible soon...
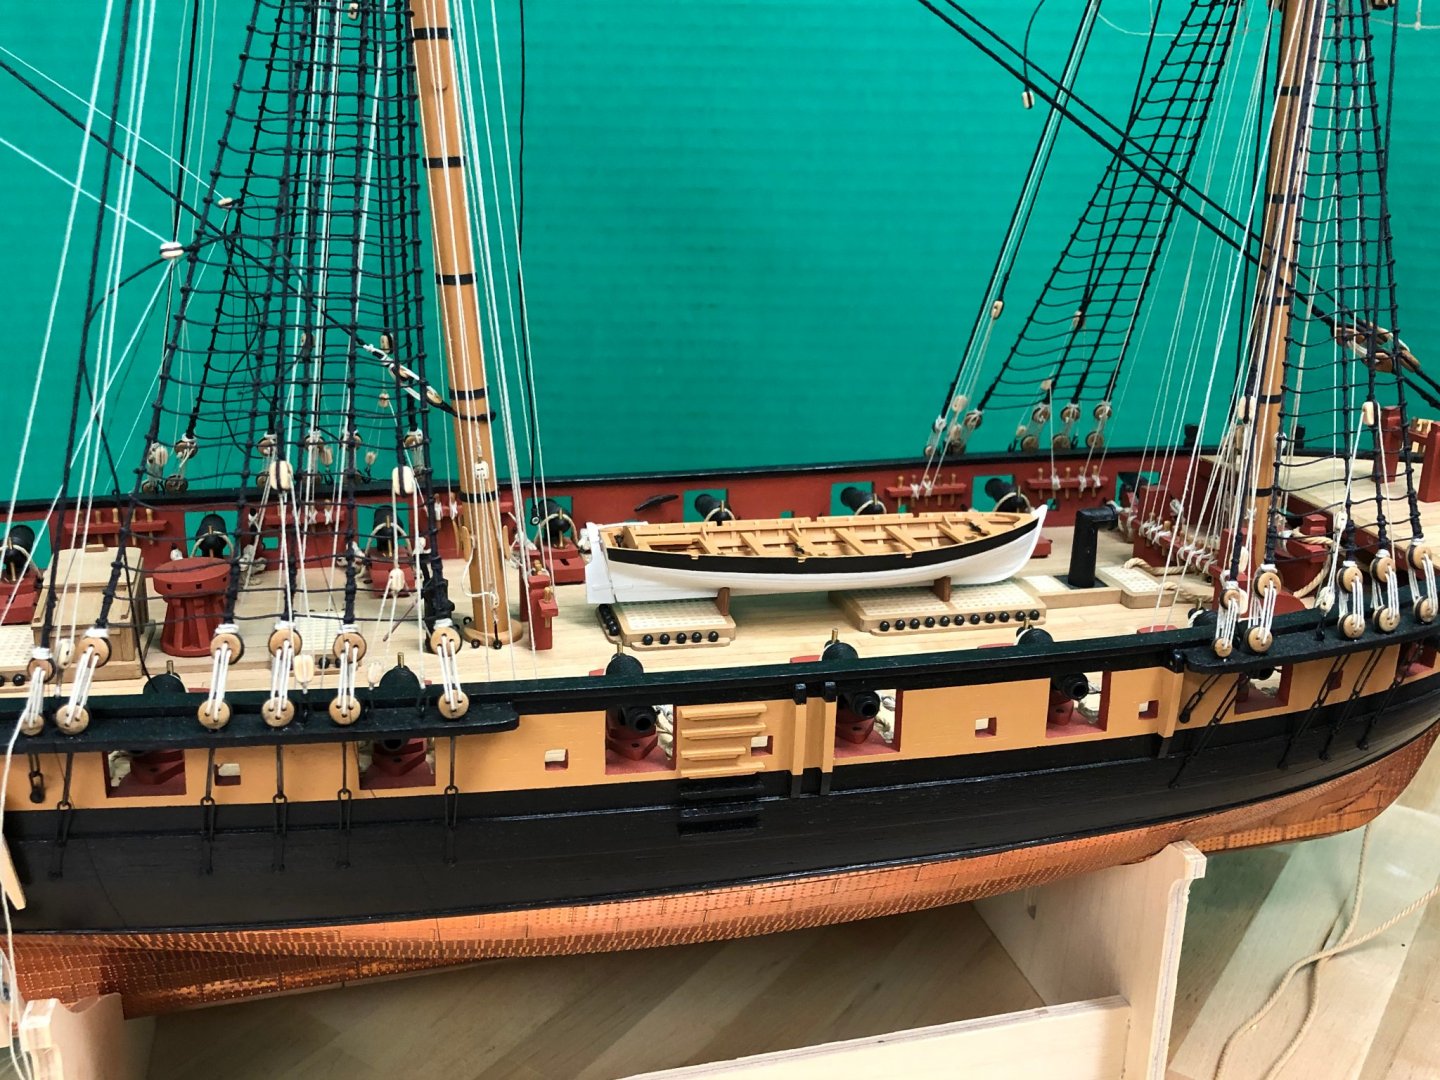
- 800 replies
-
- 15
-

-
- snake
- caldercraft
- (and 1 more)
-
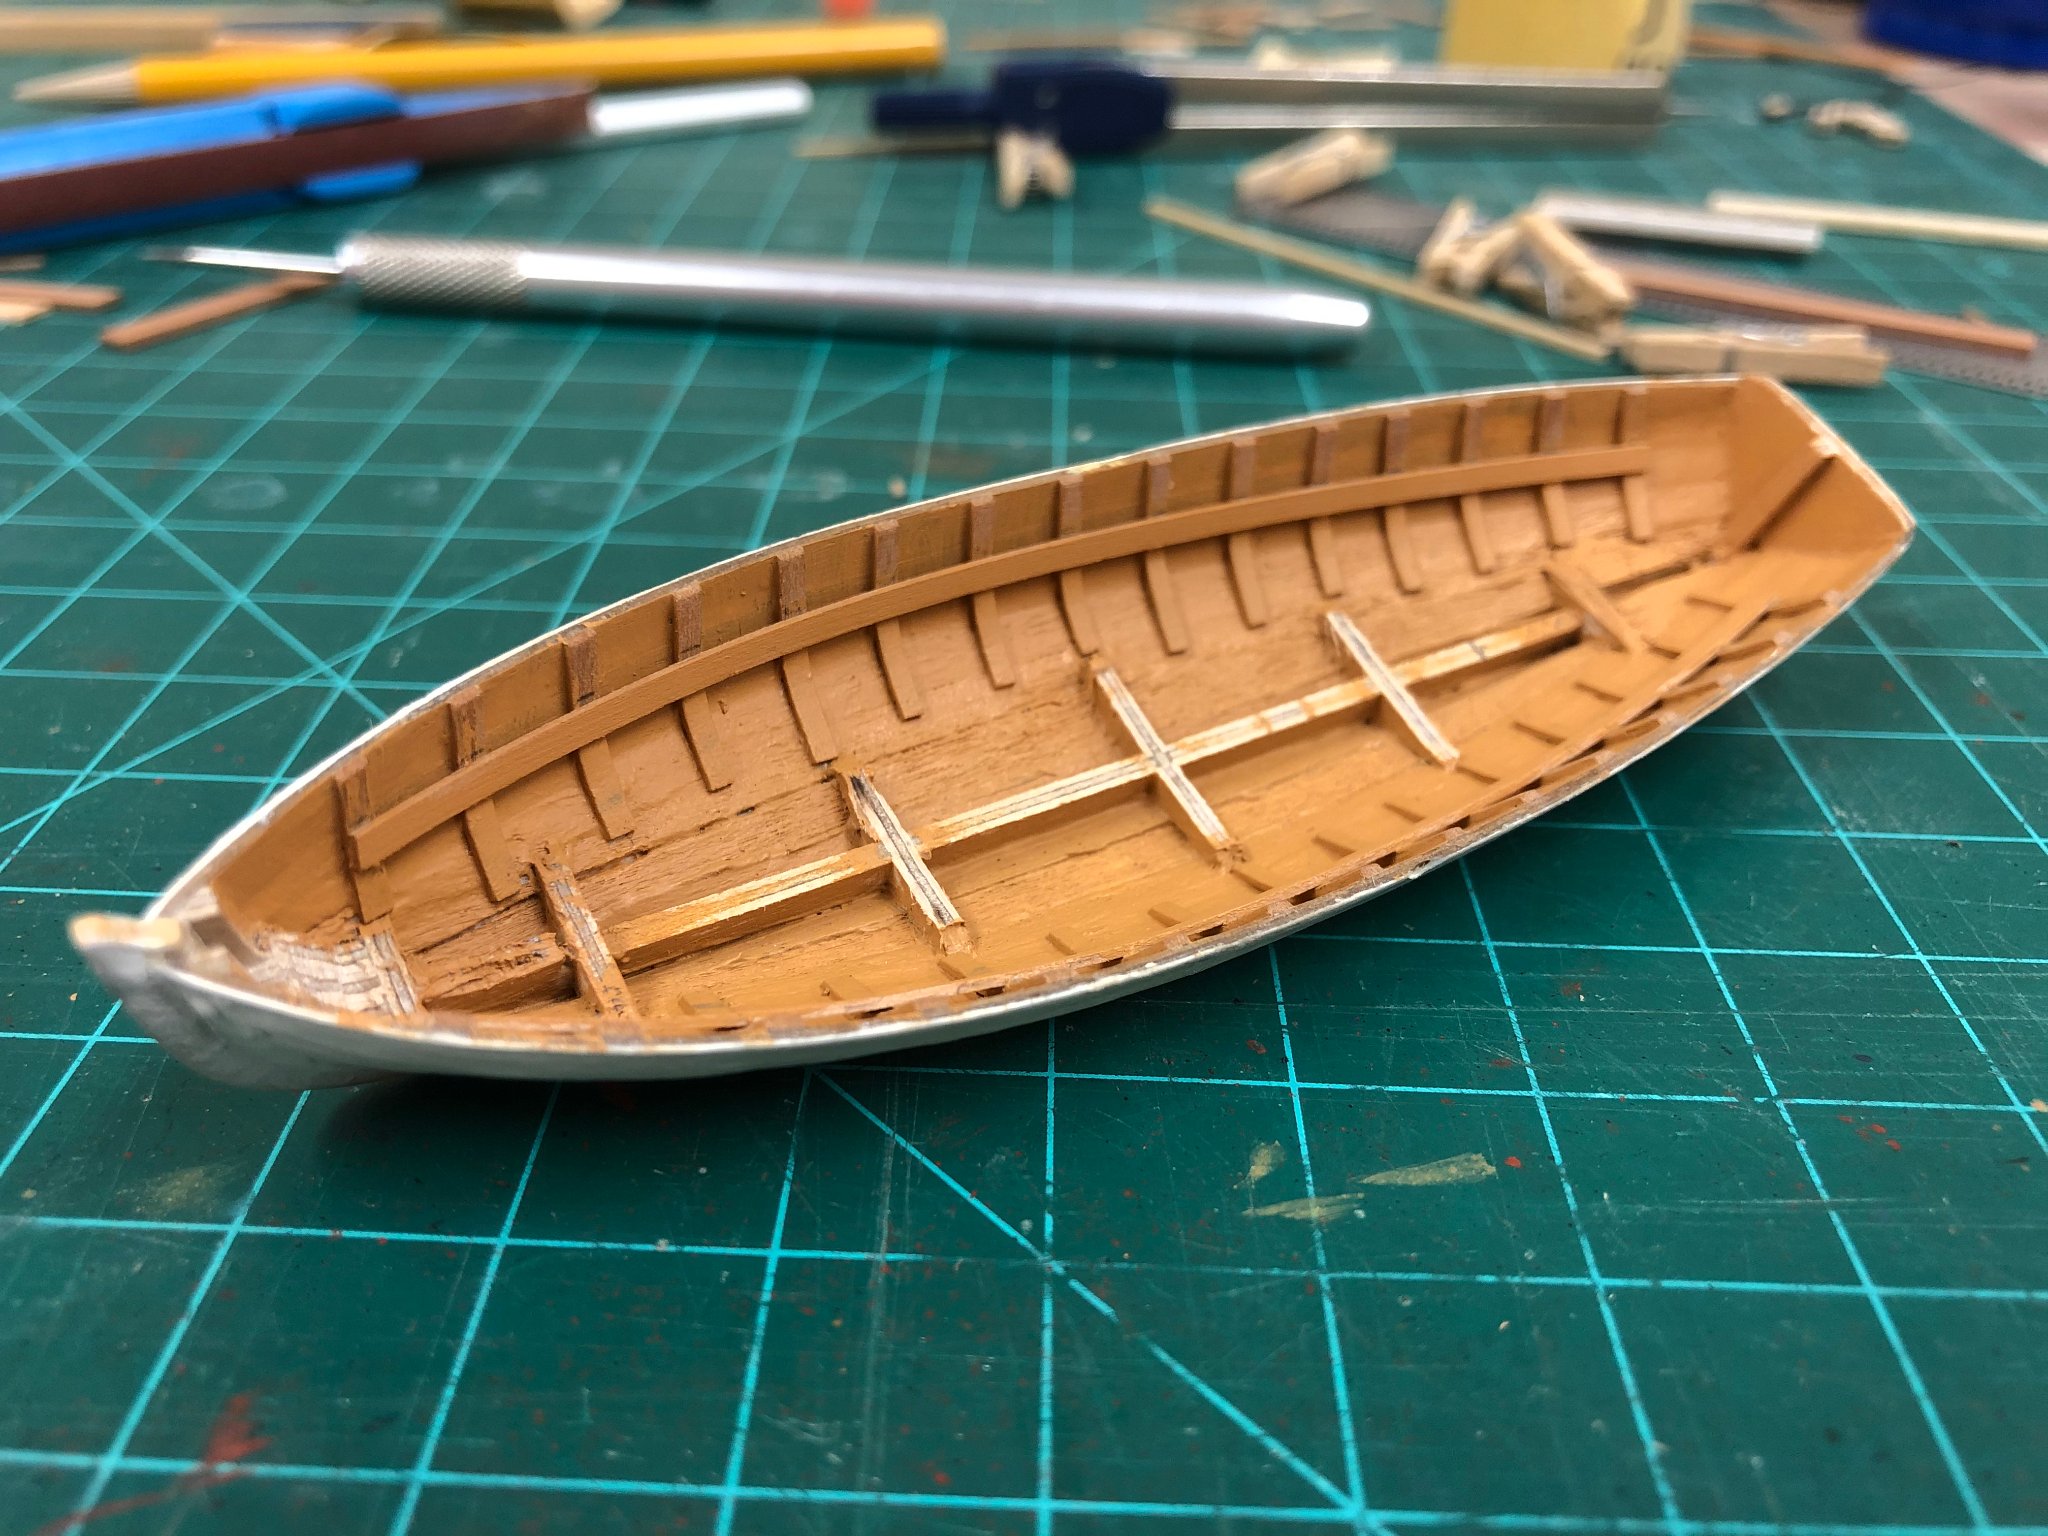
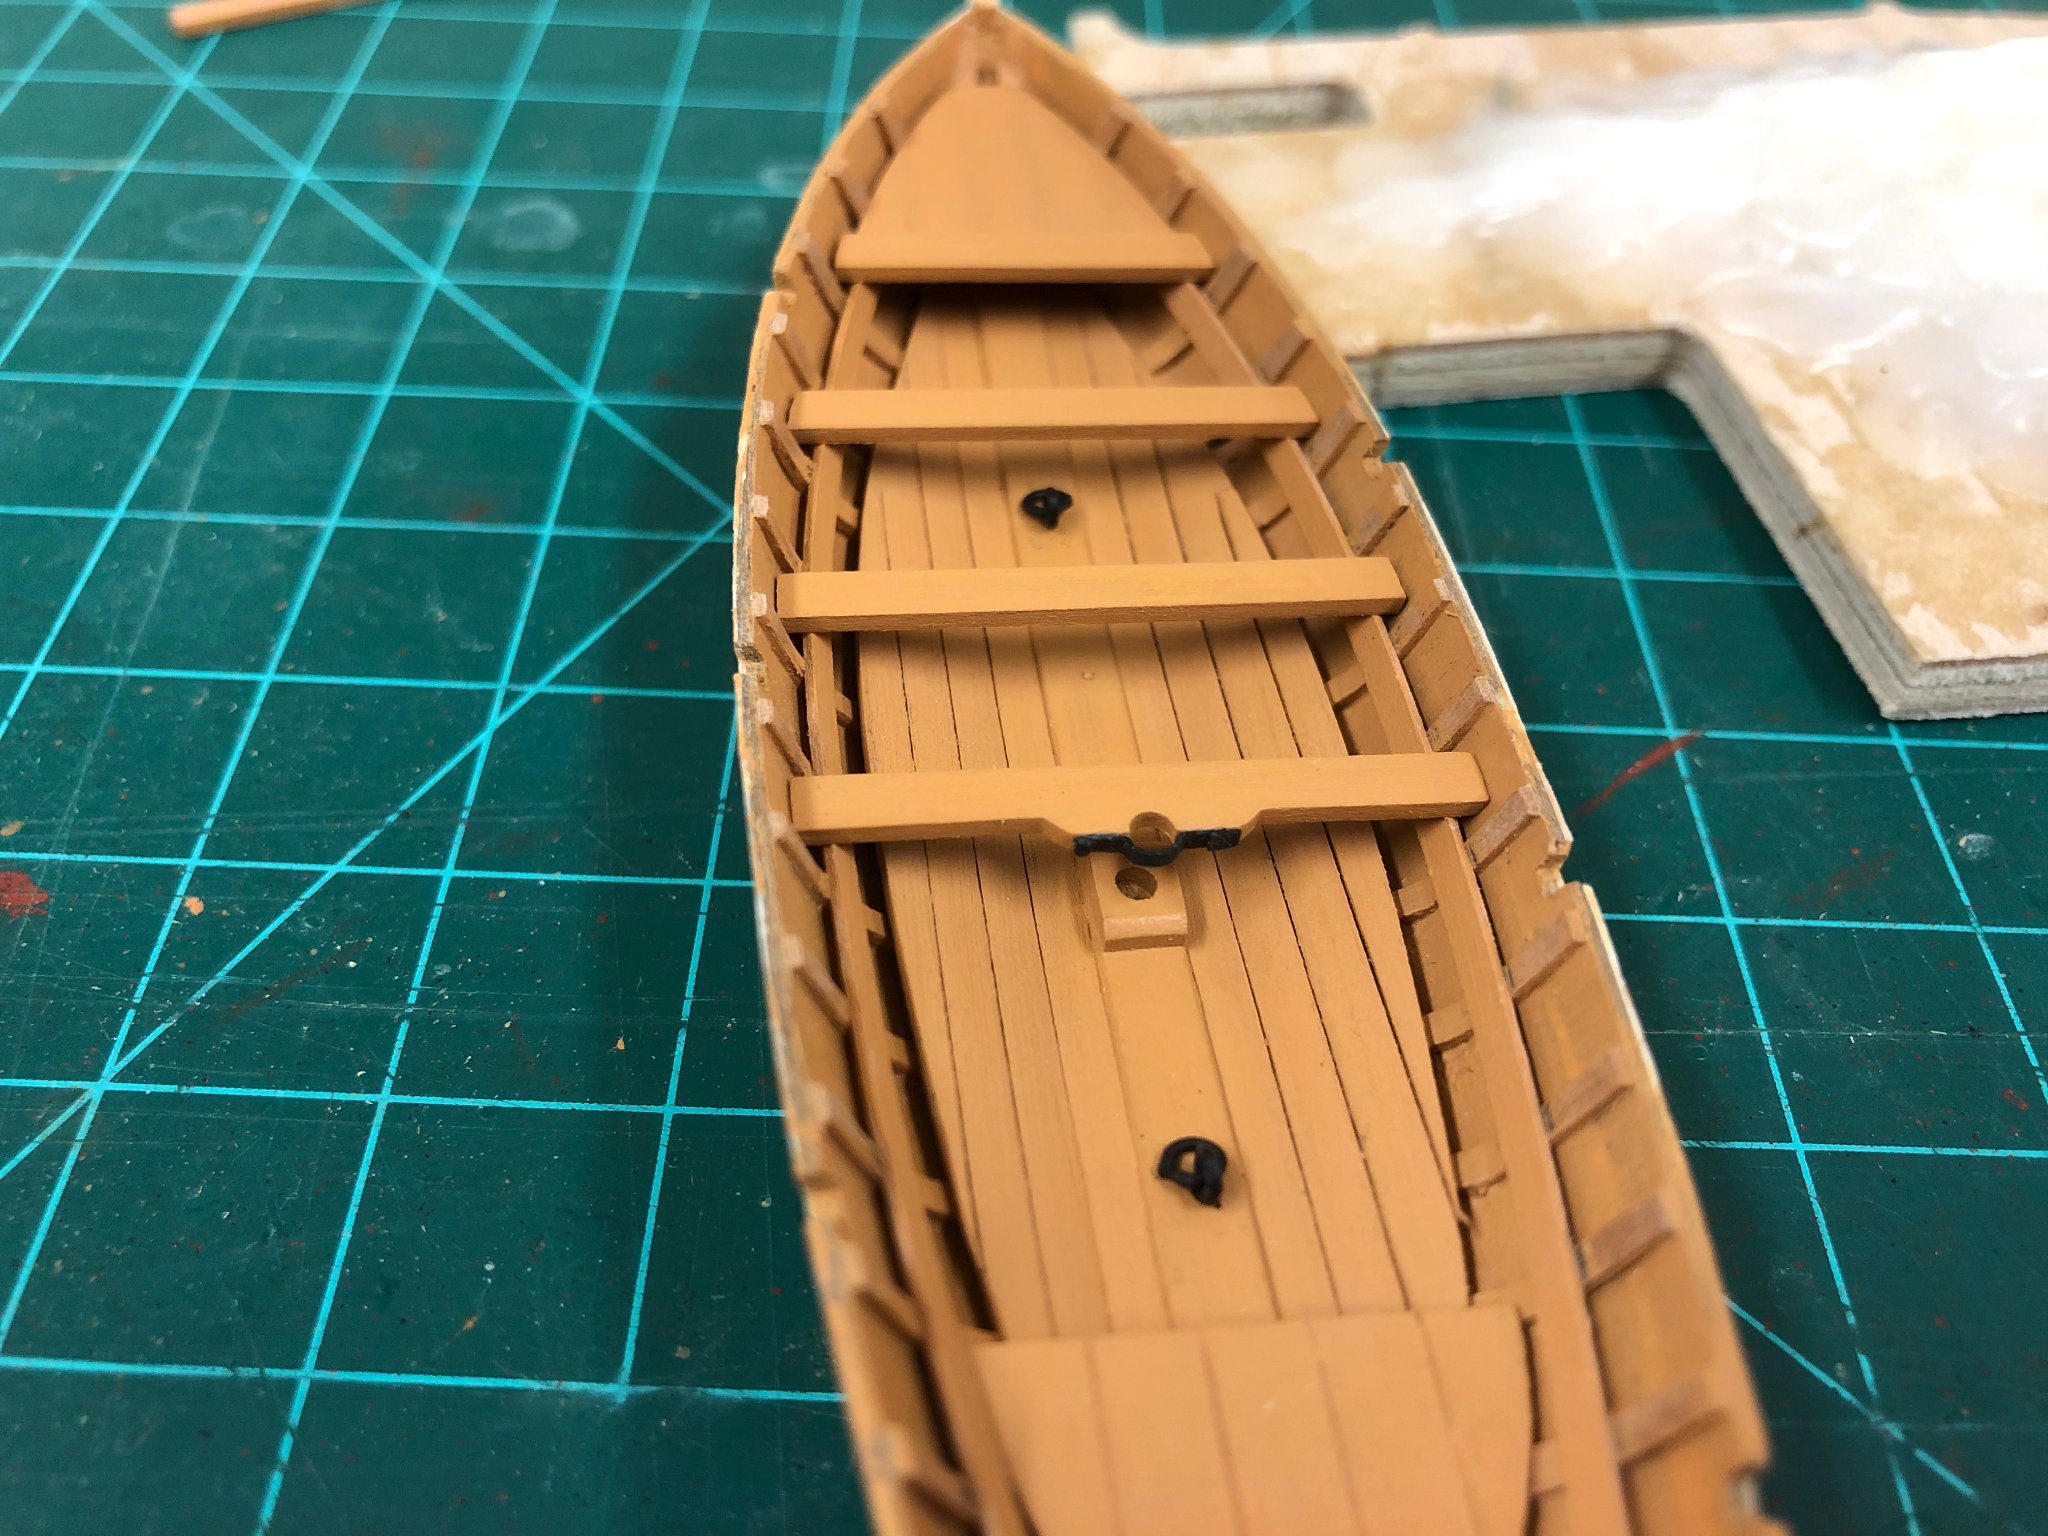
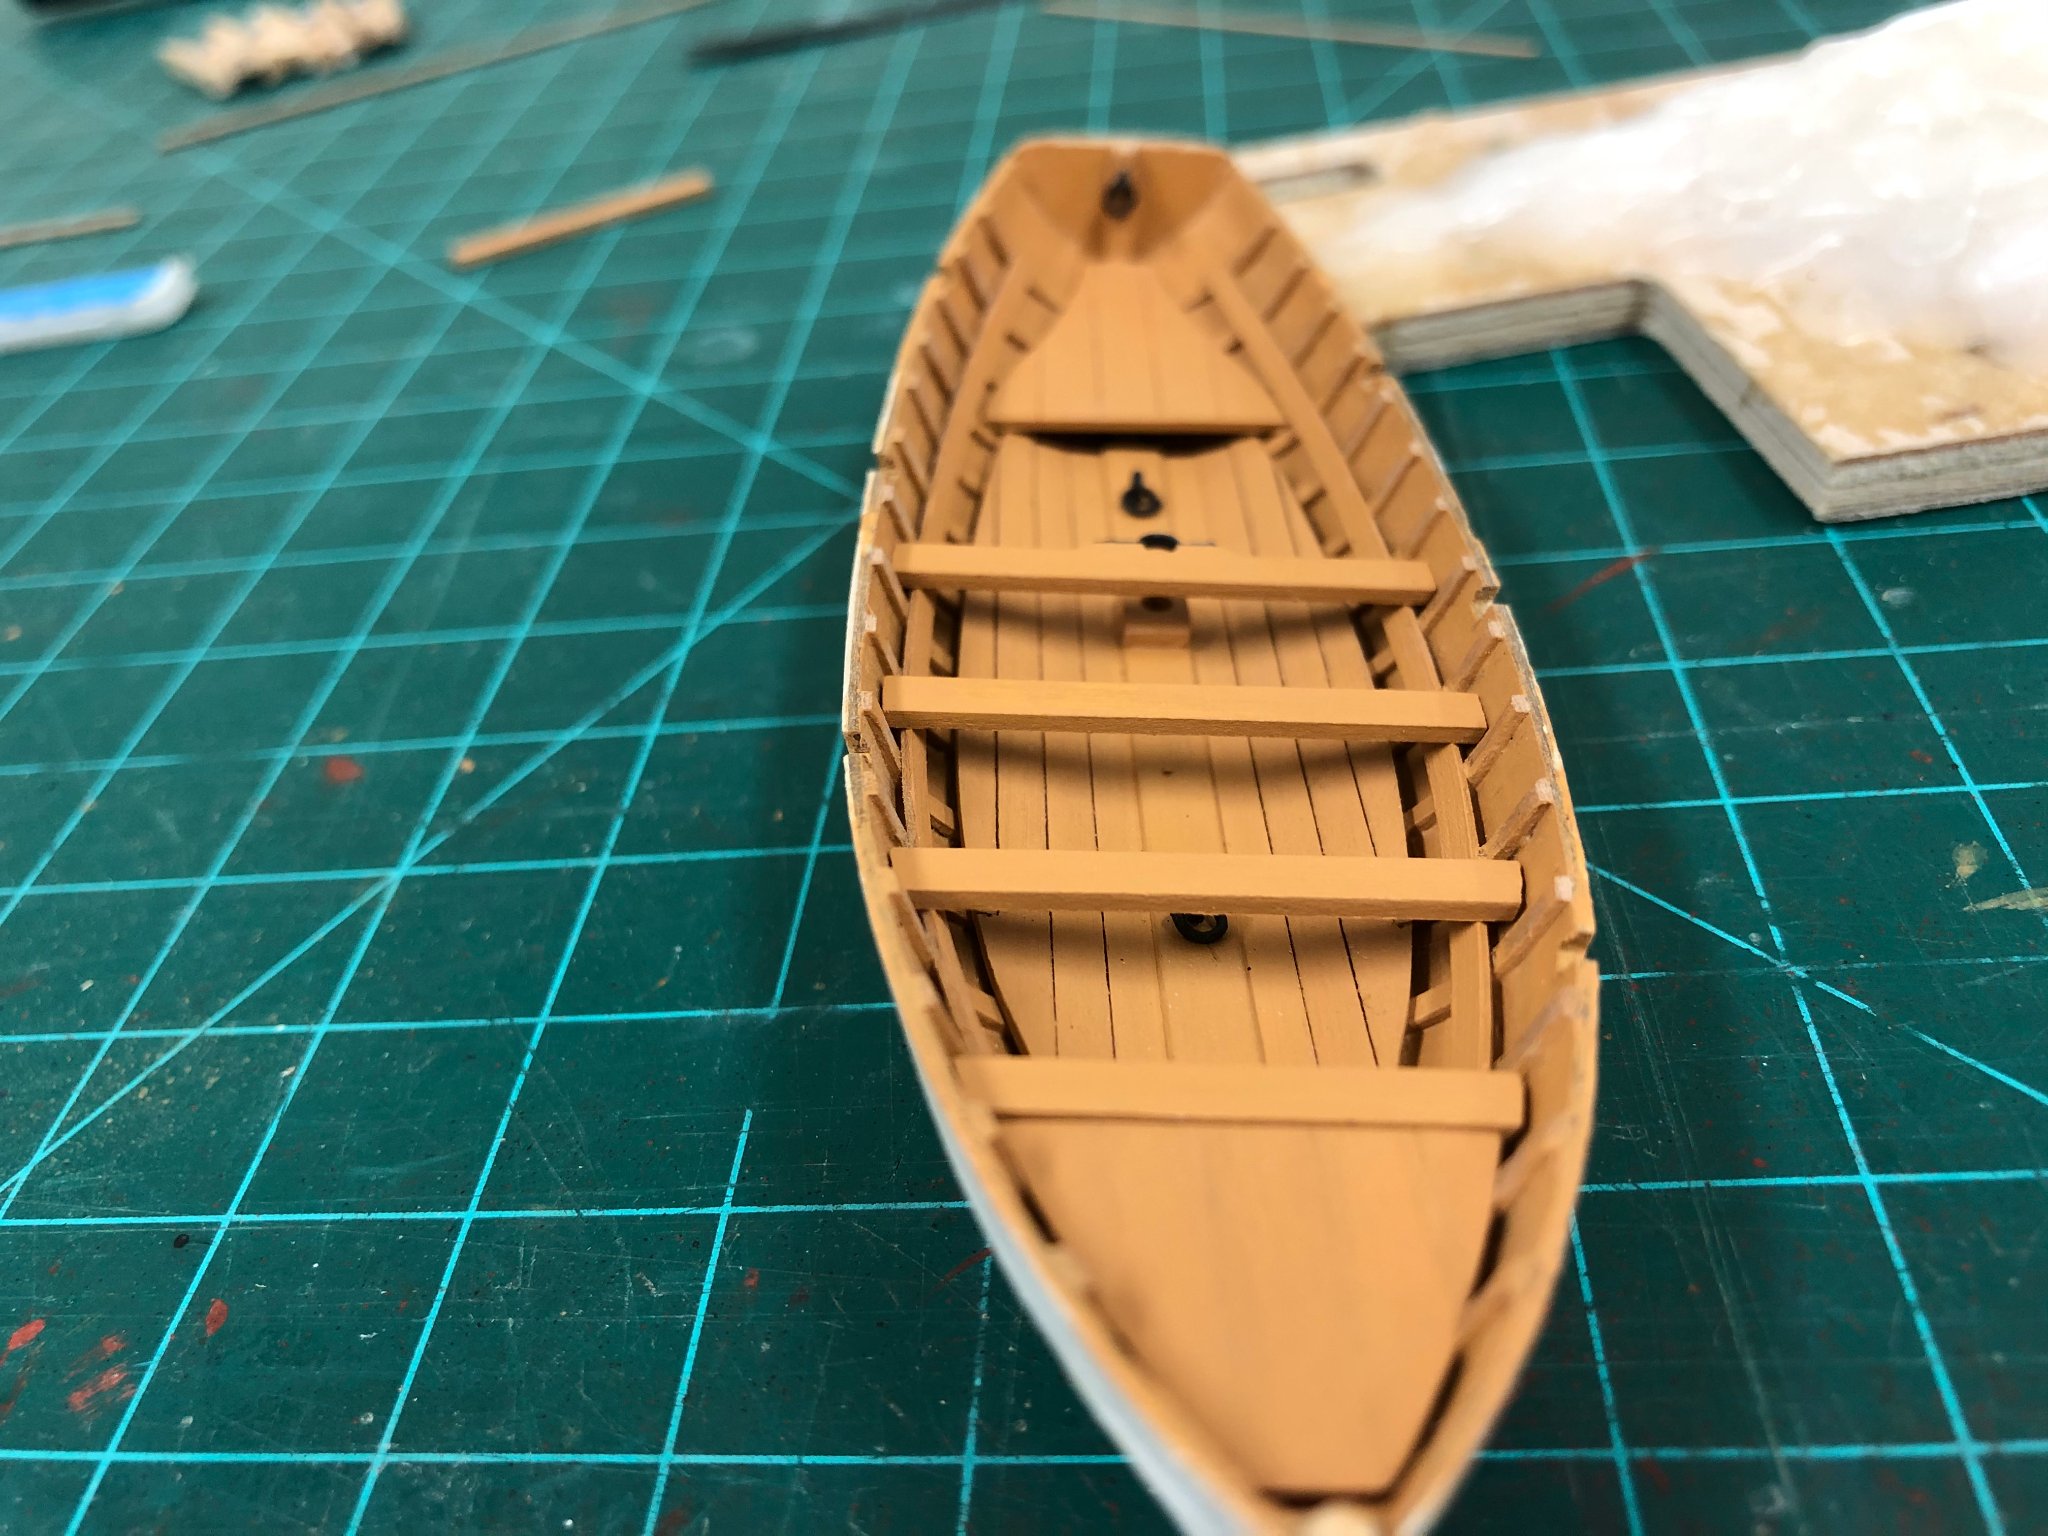
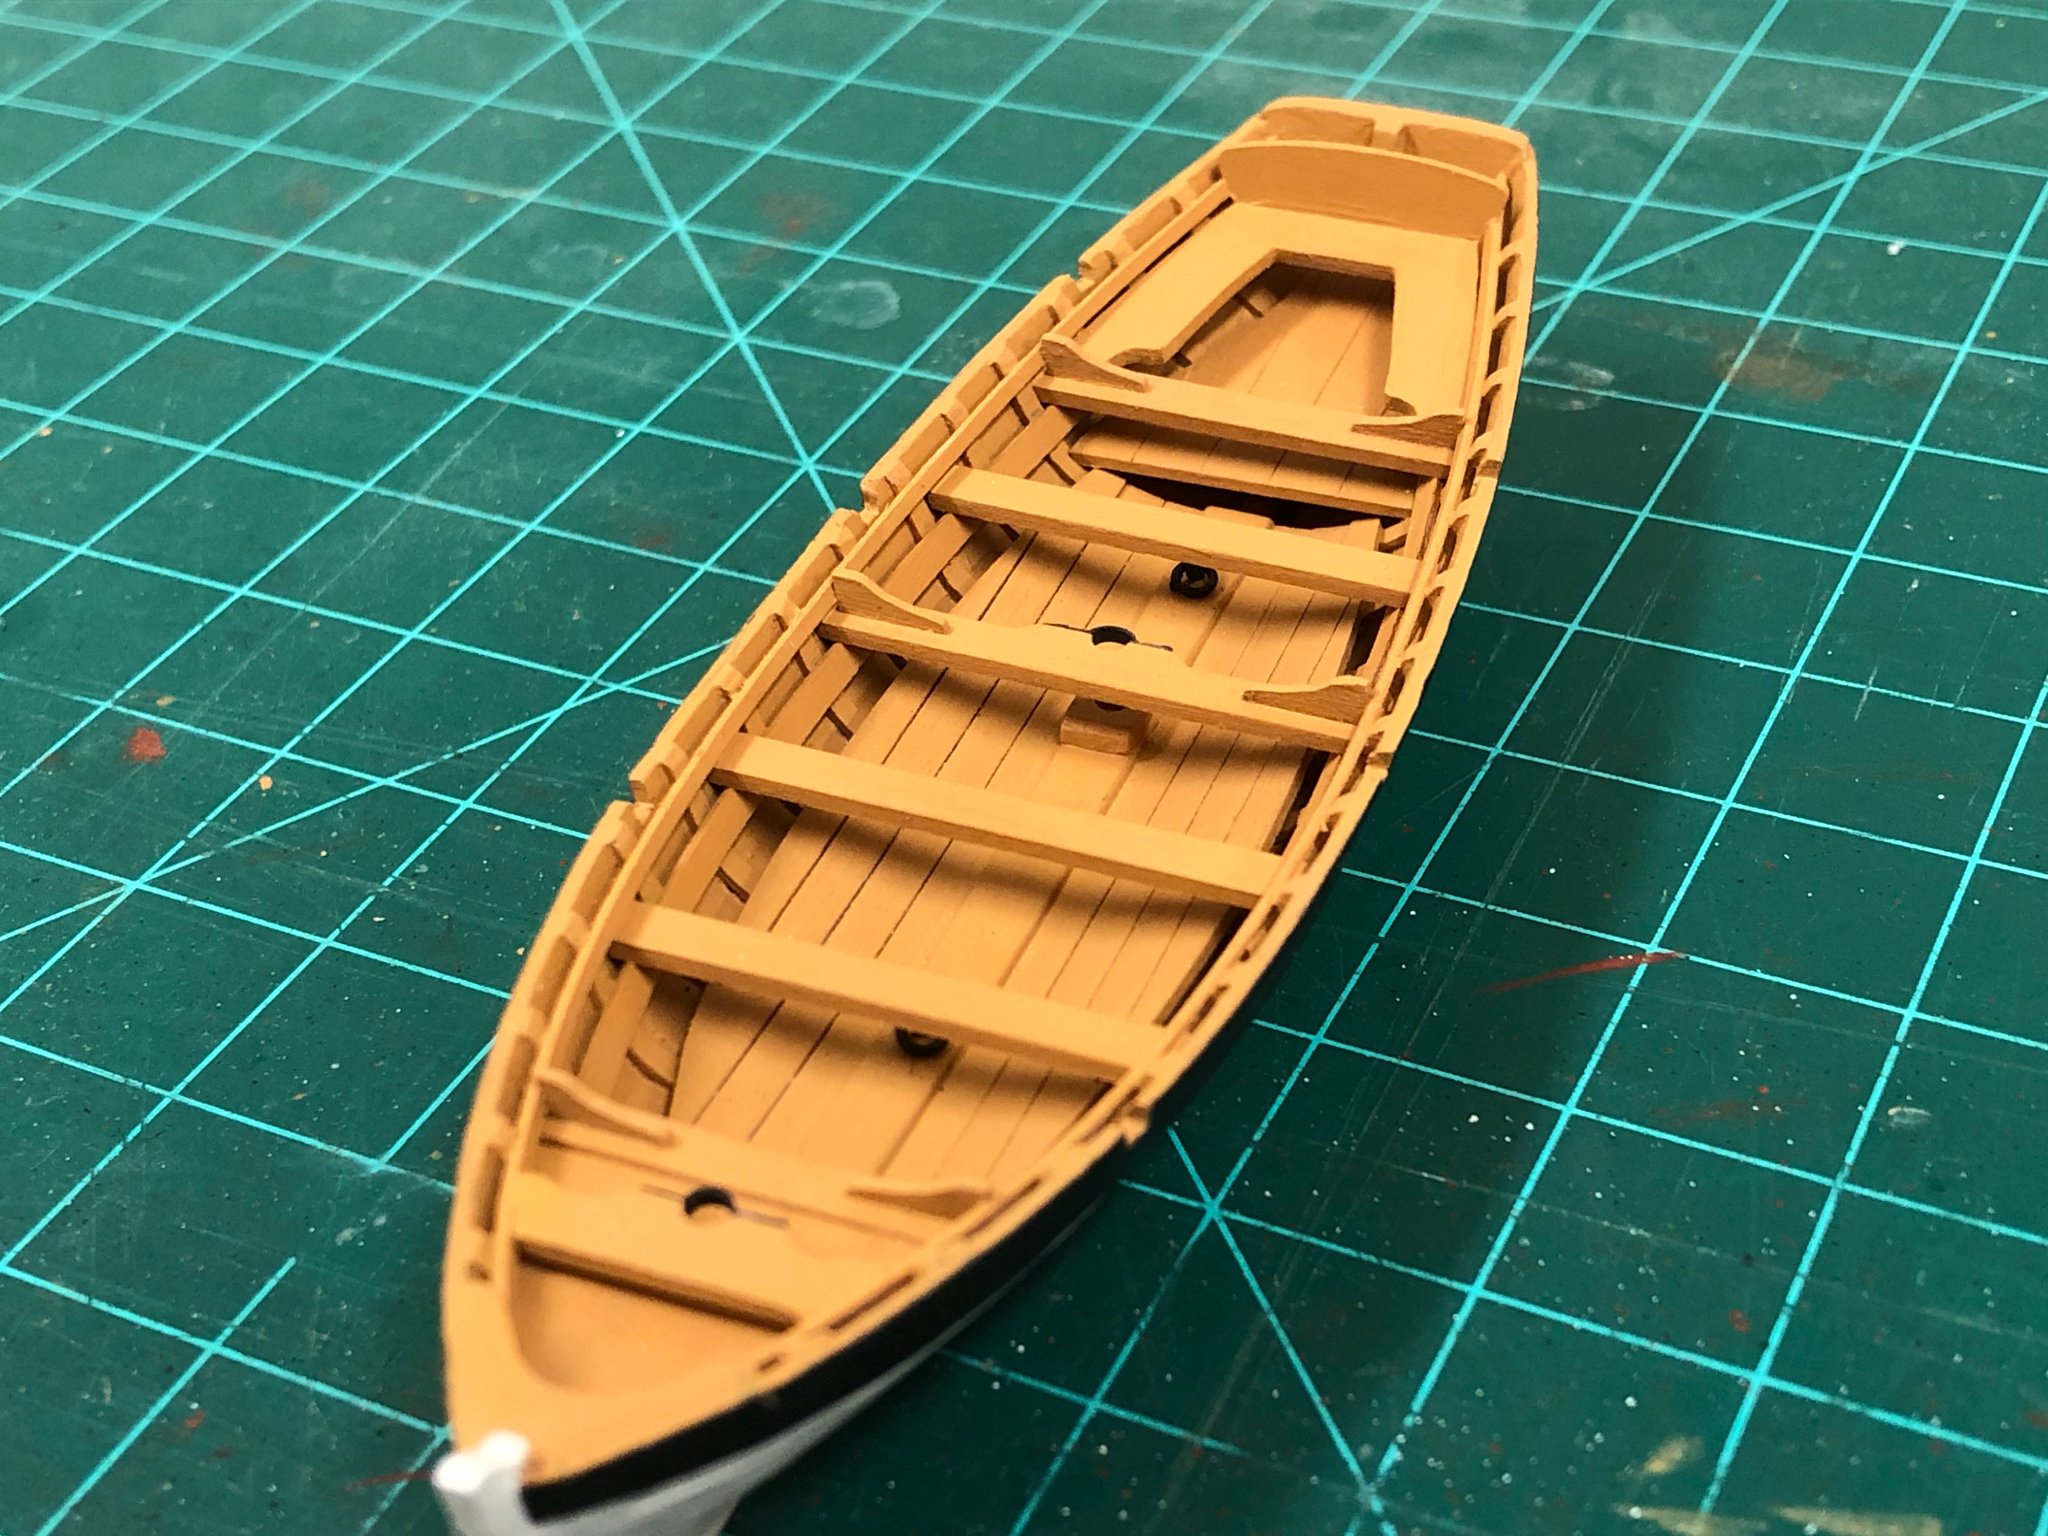
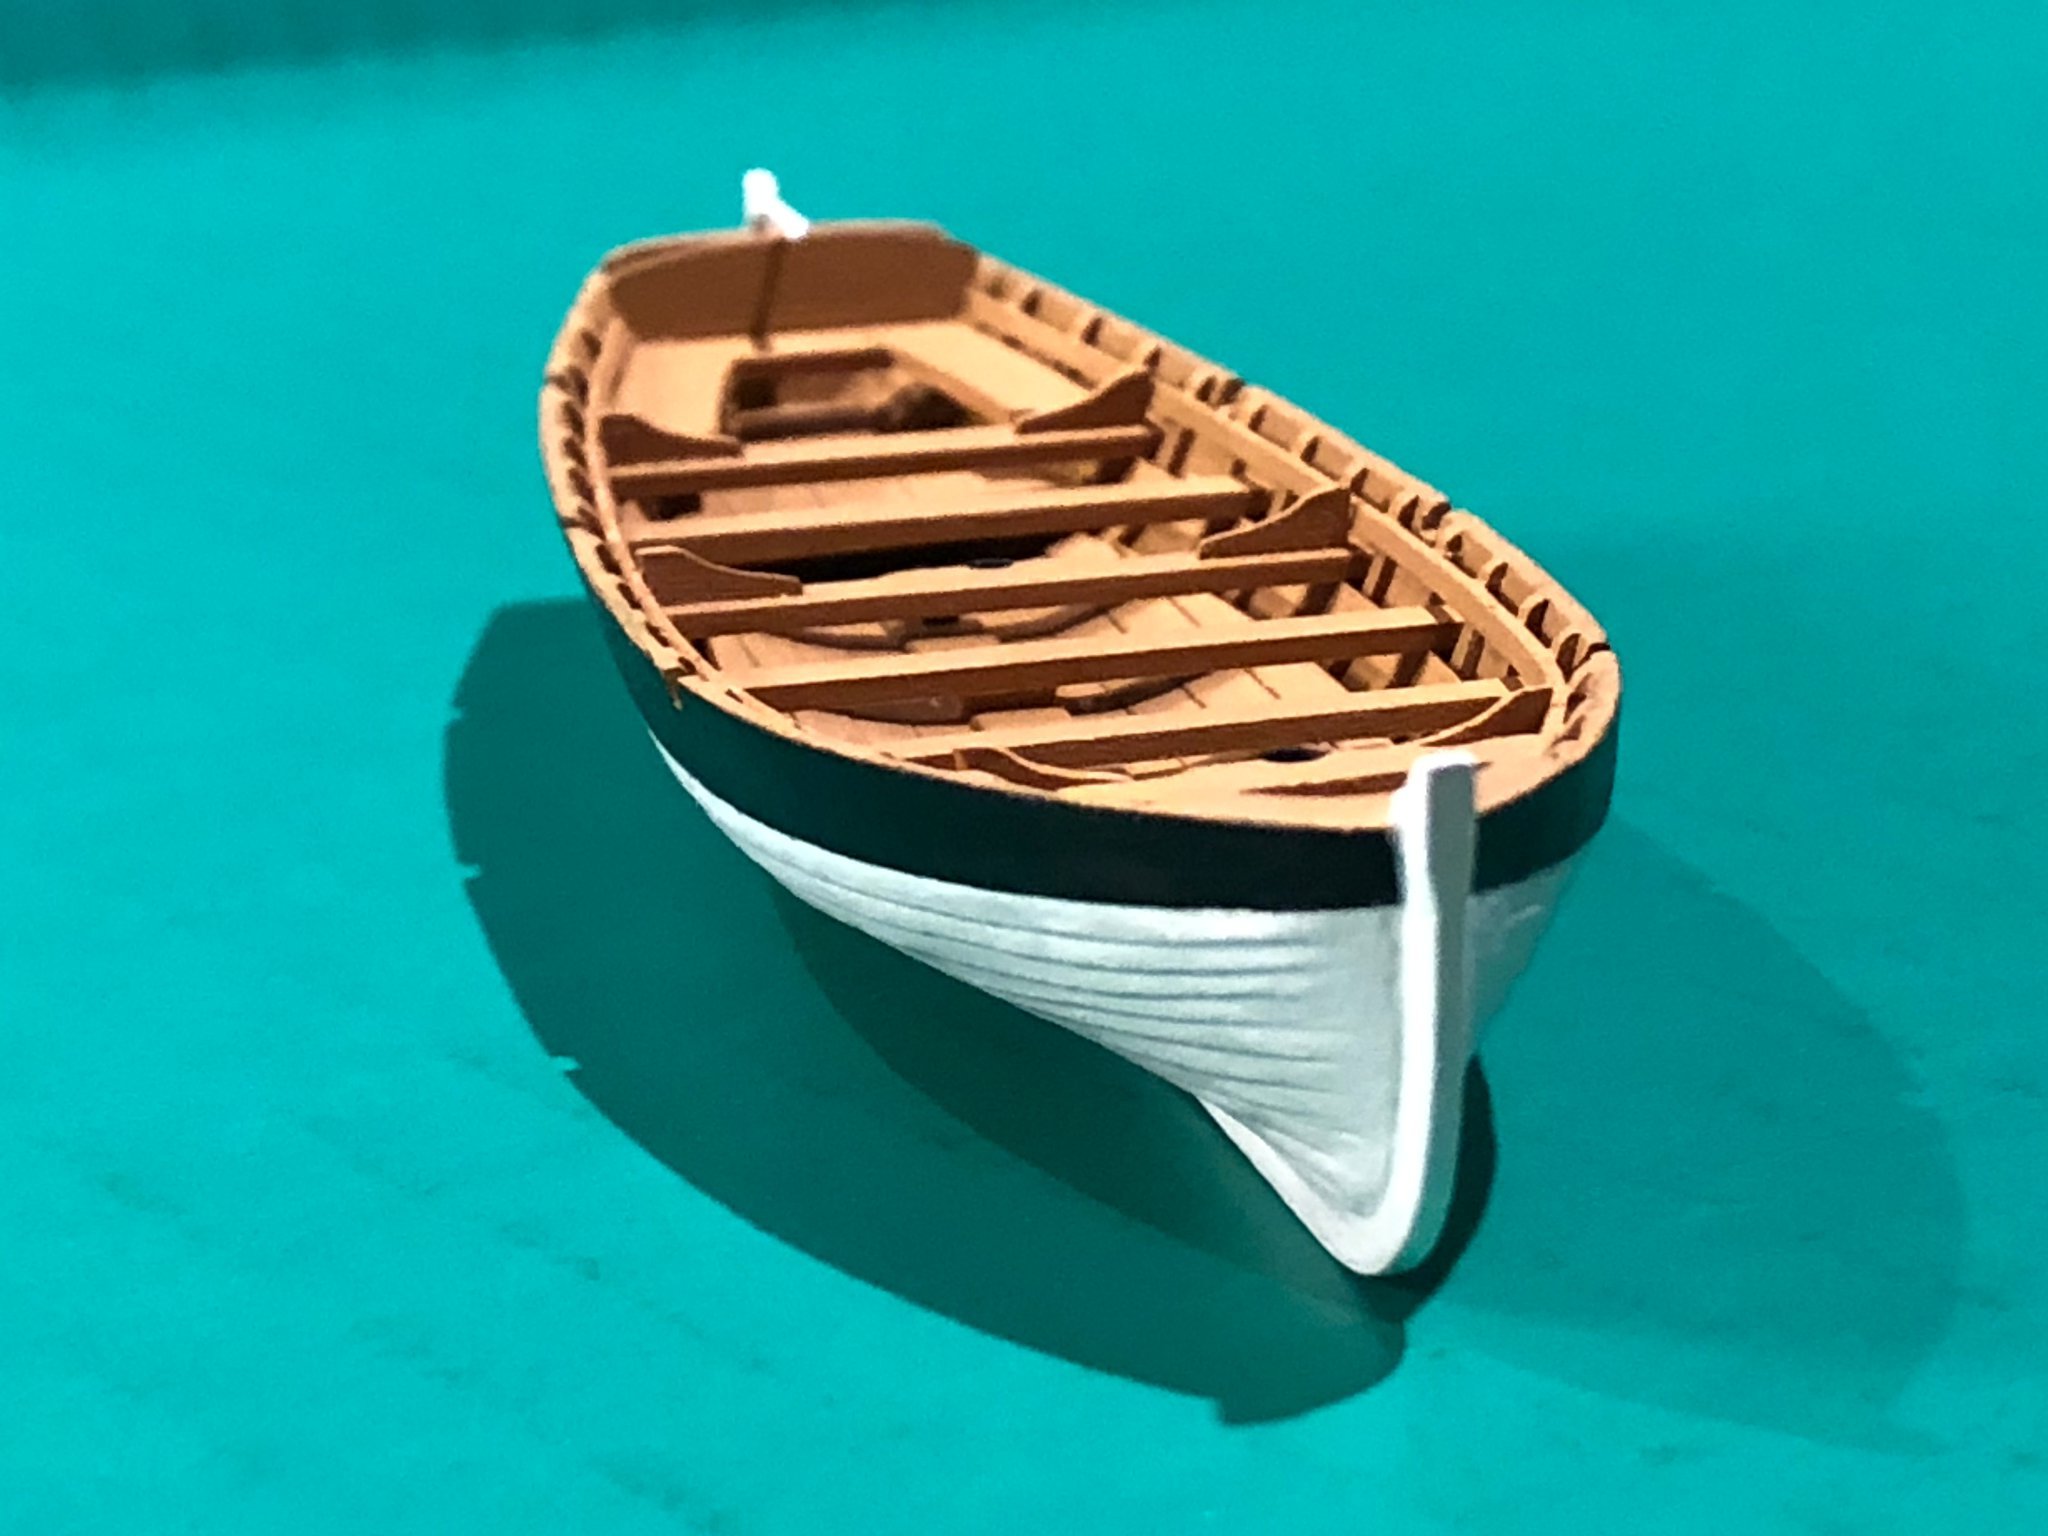
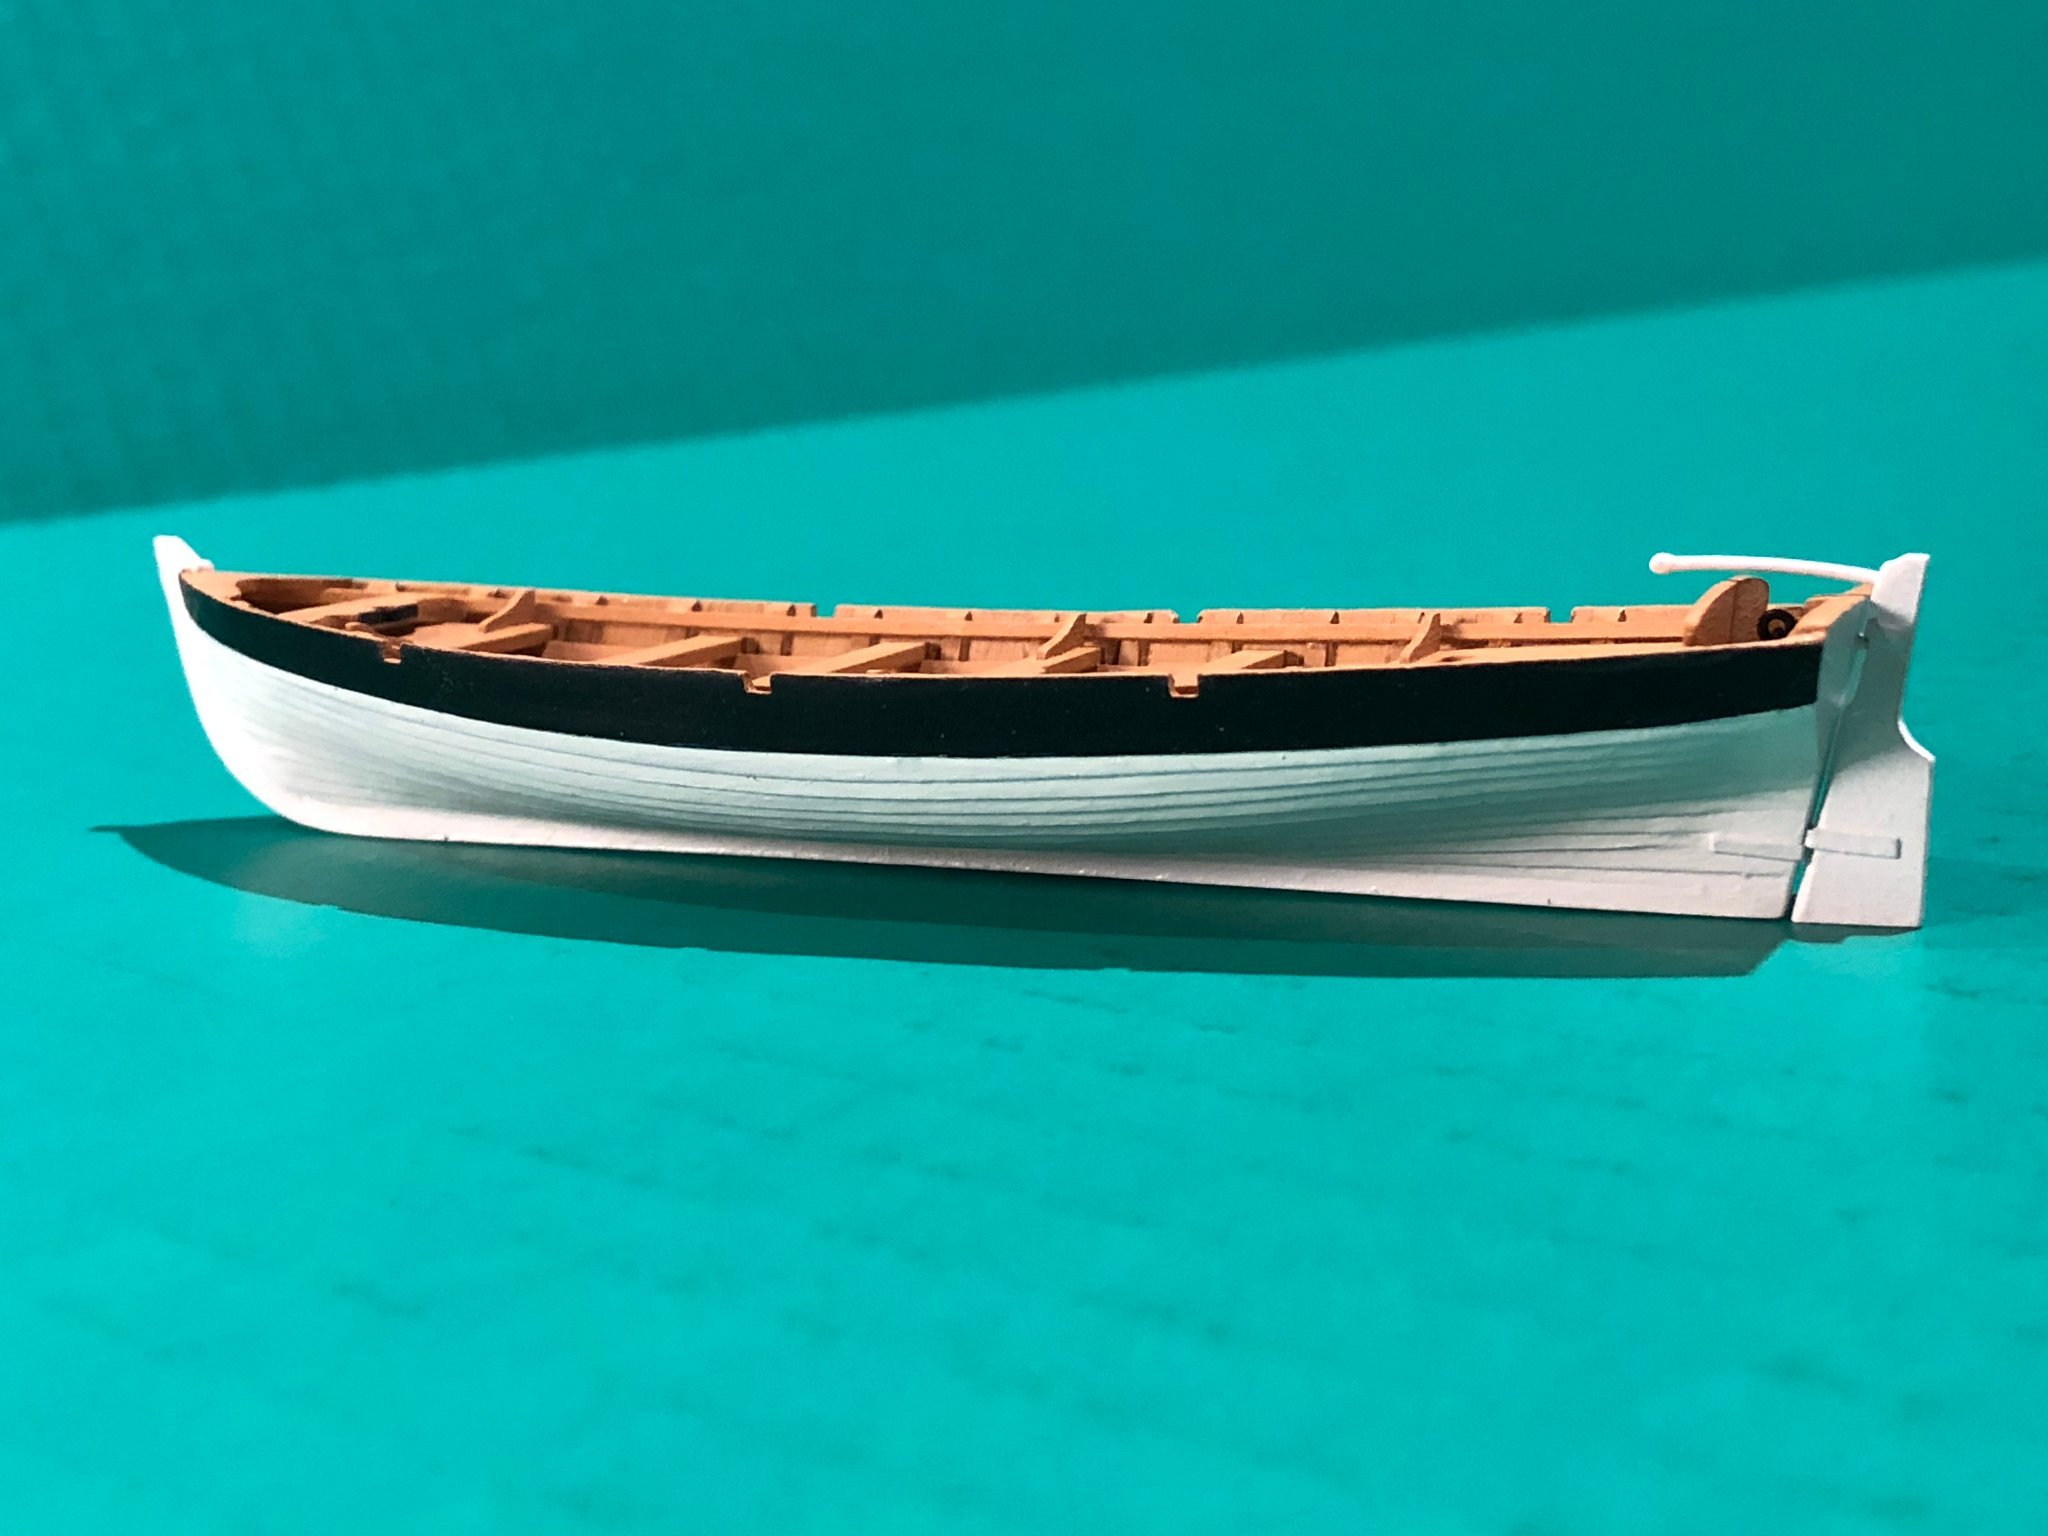
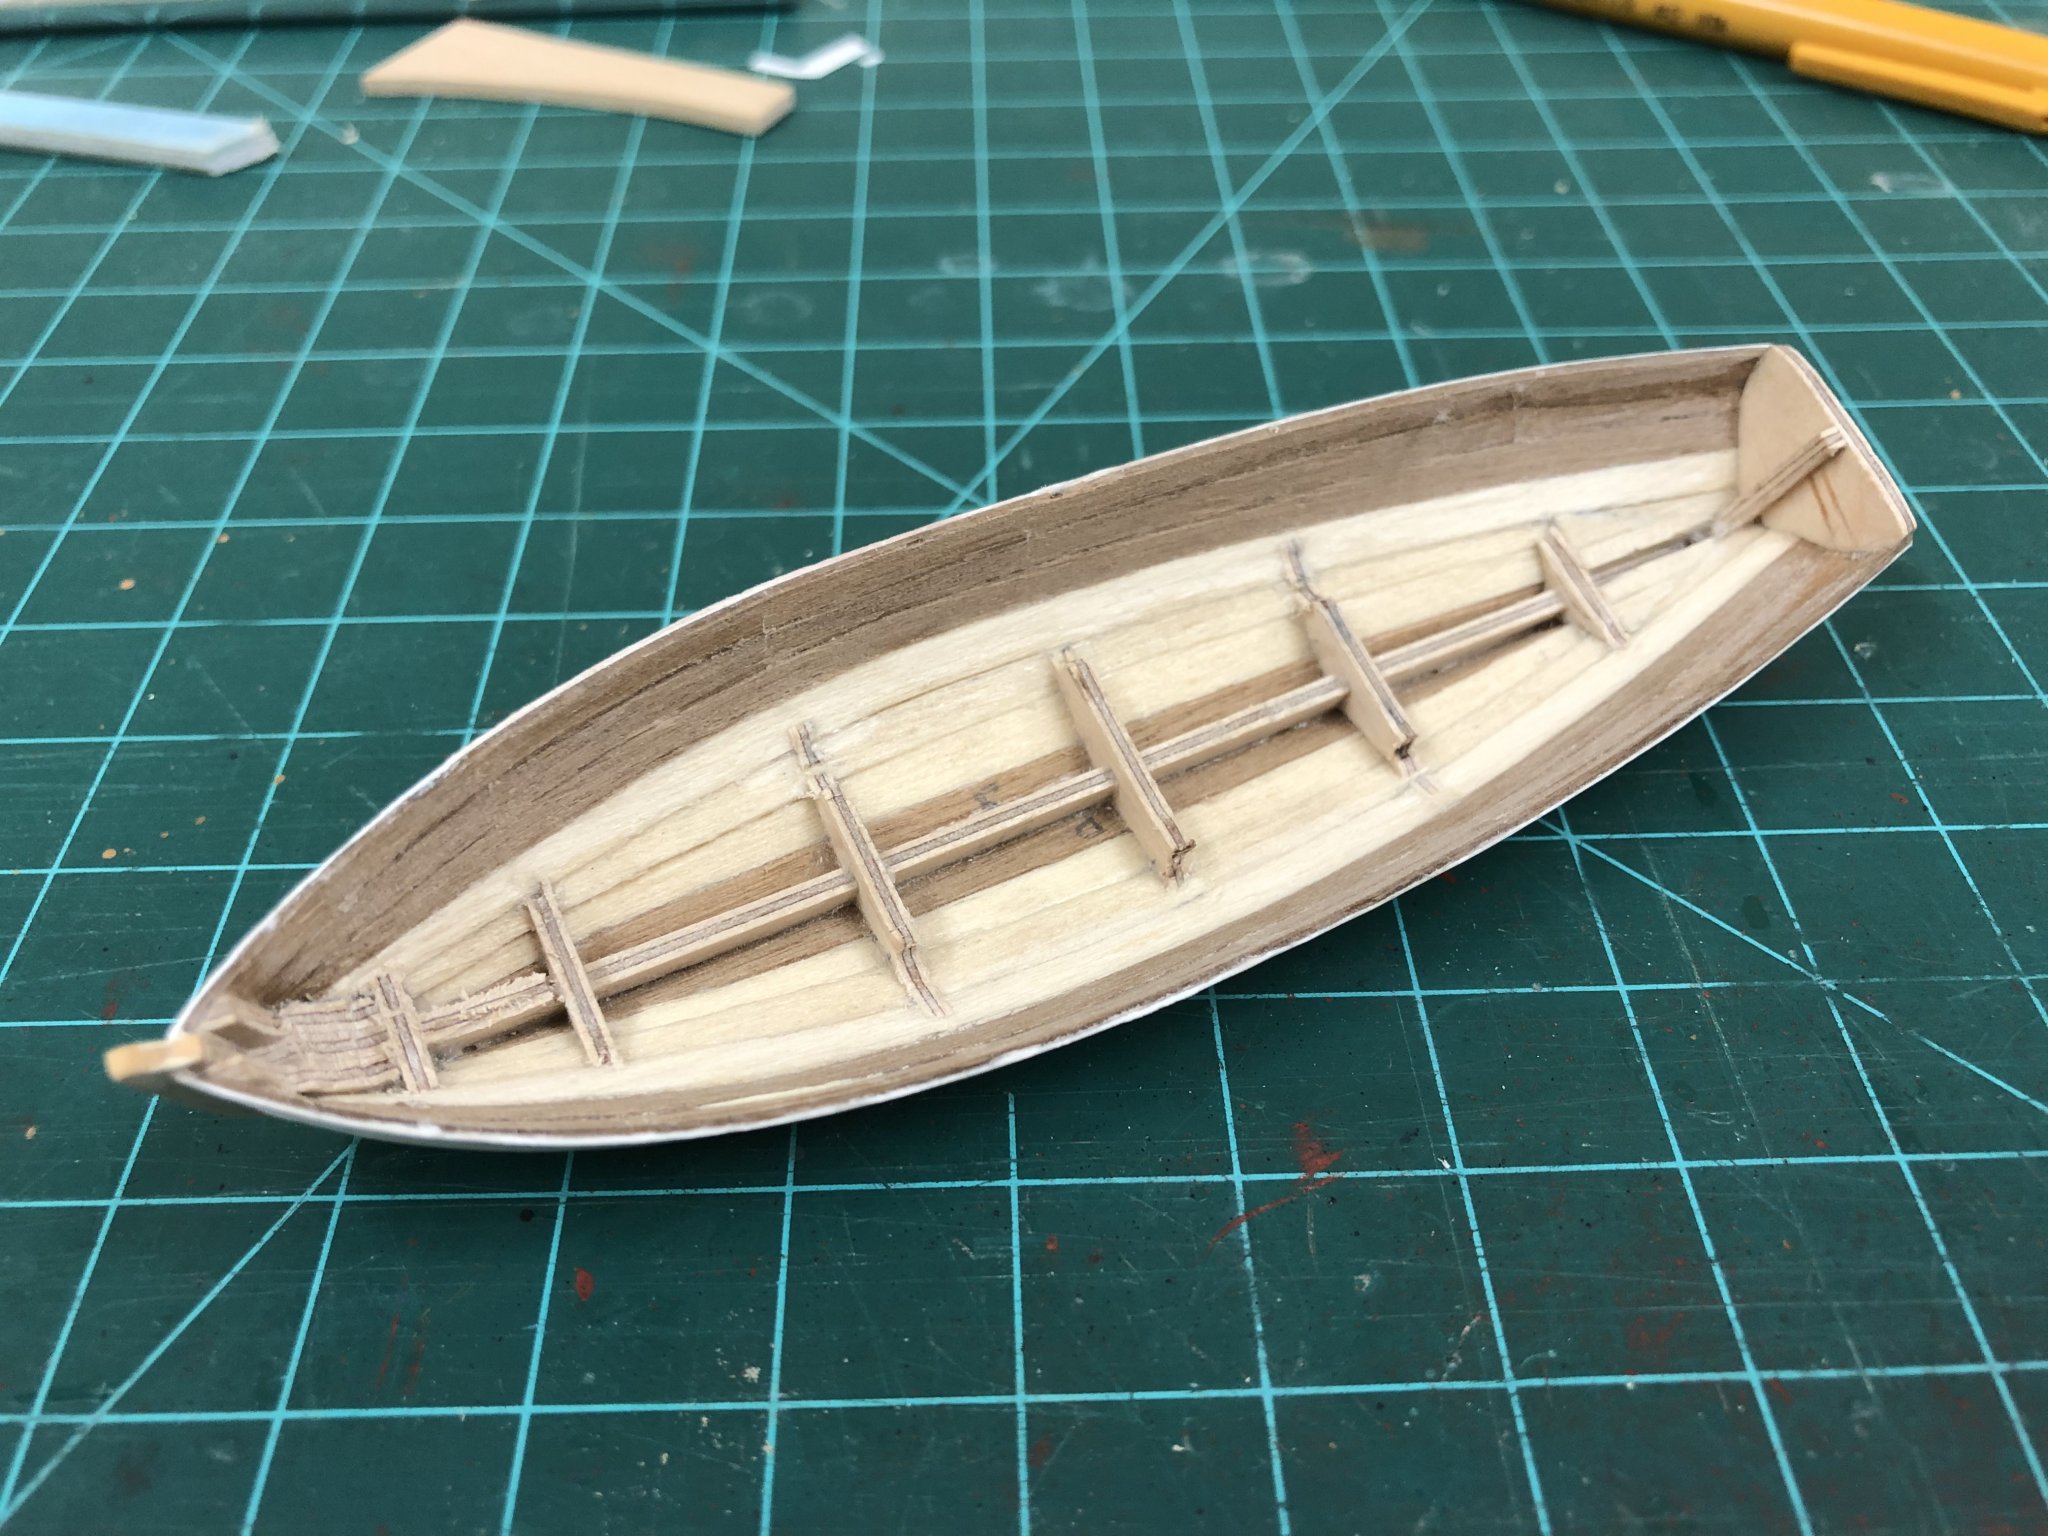
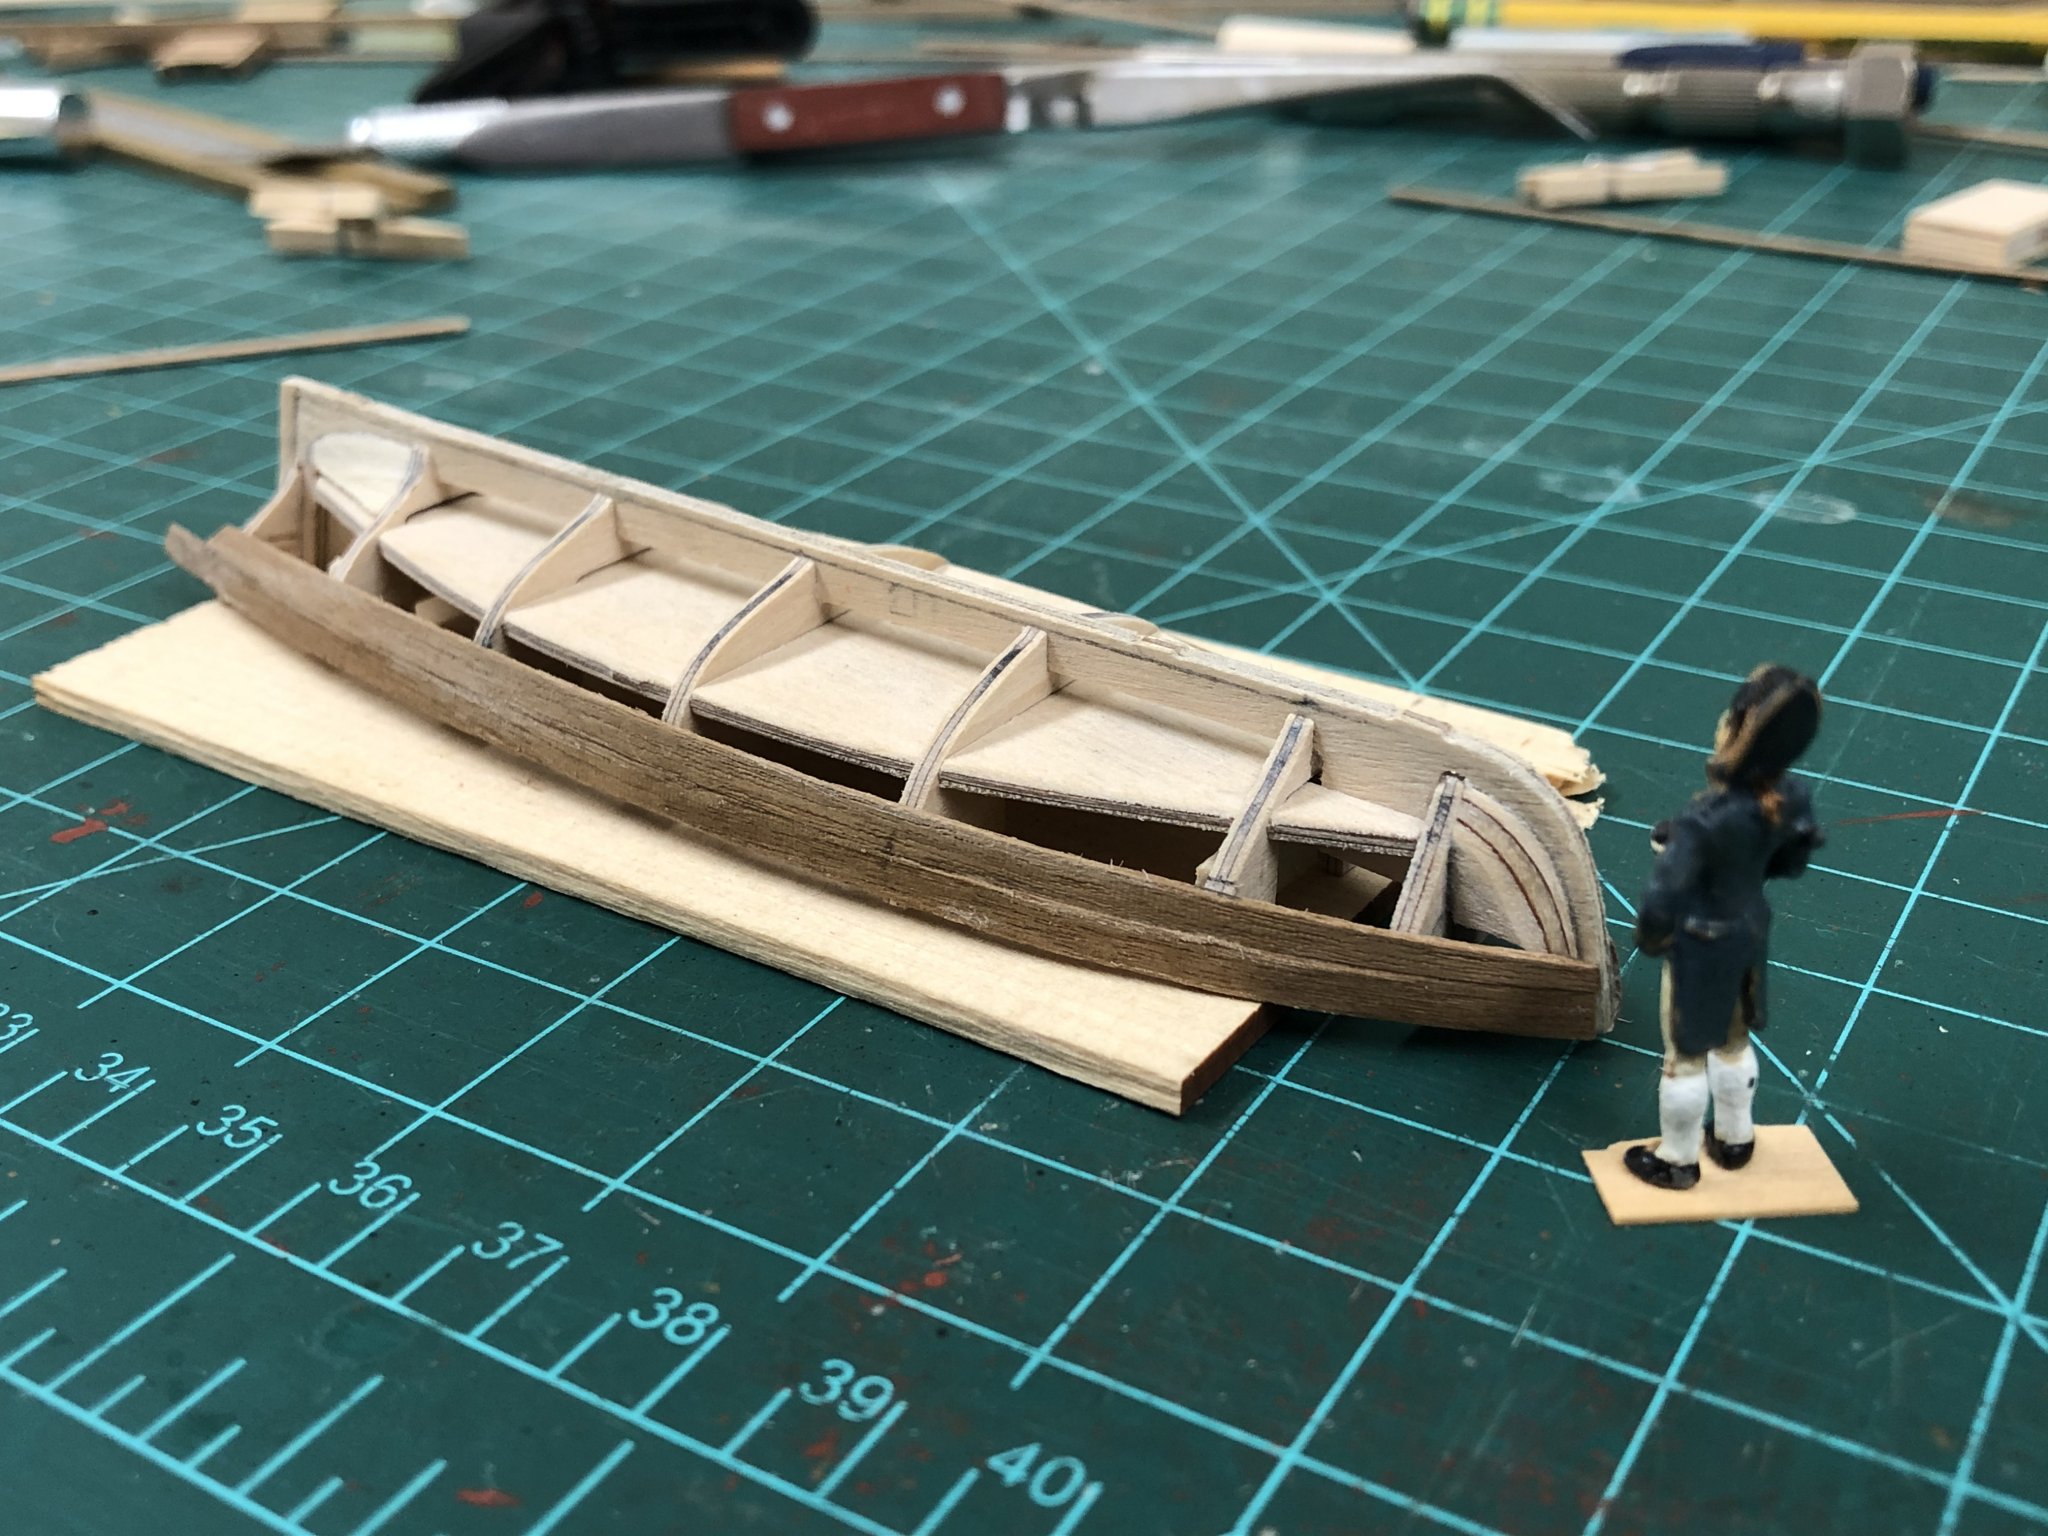
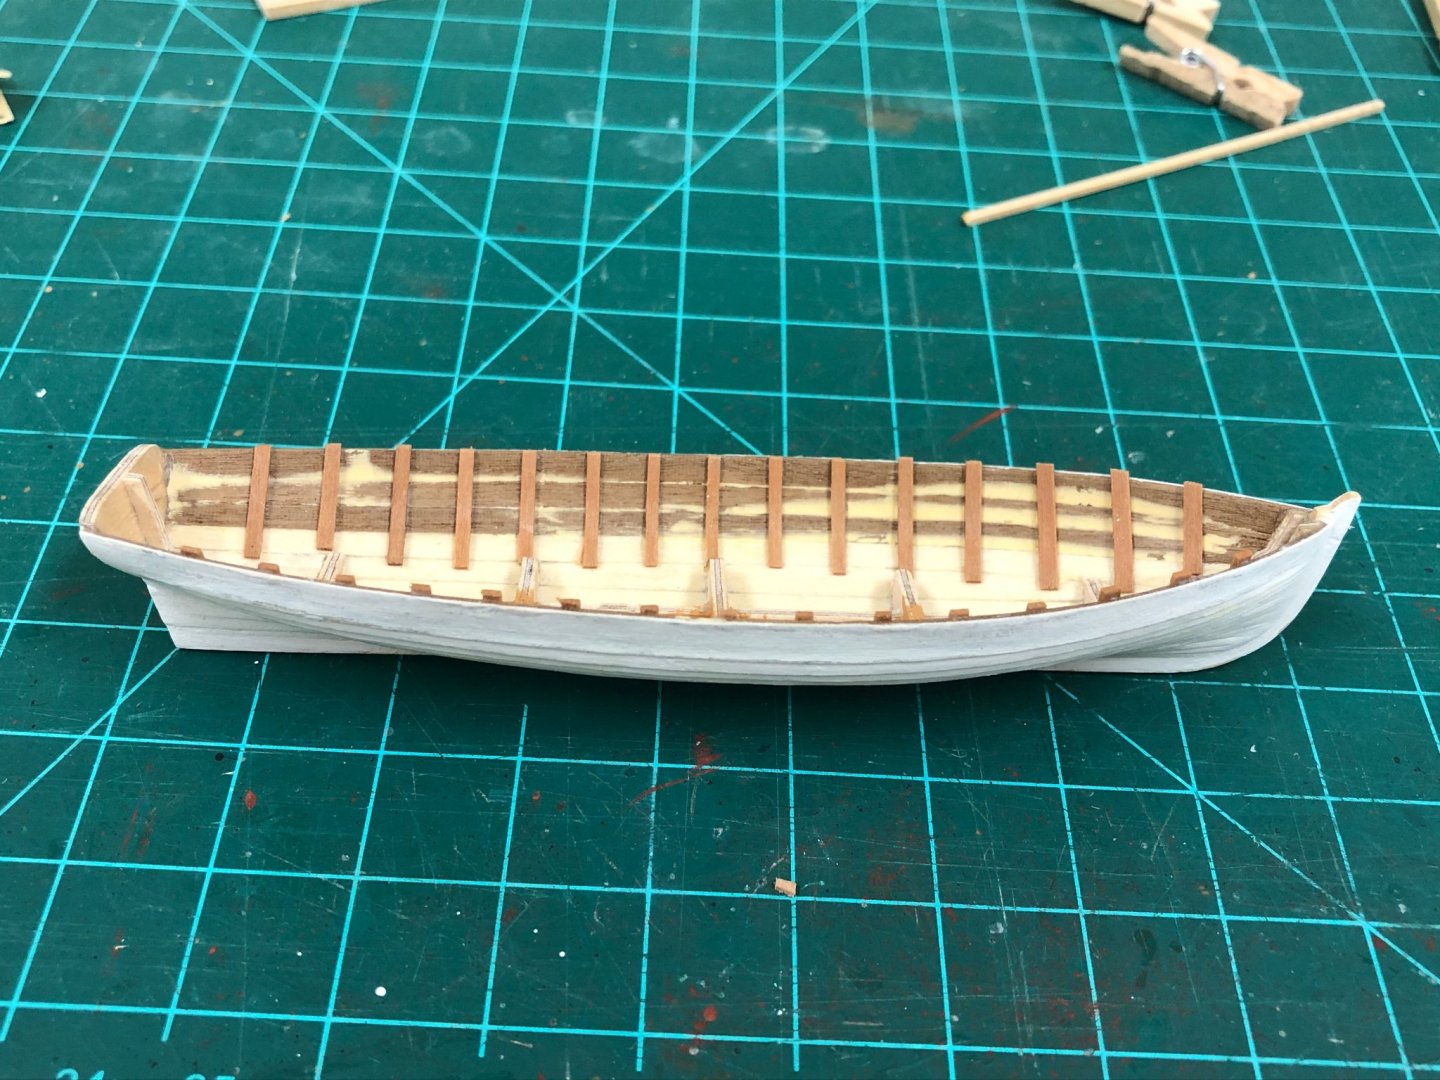
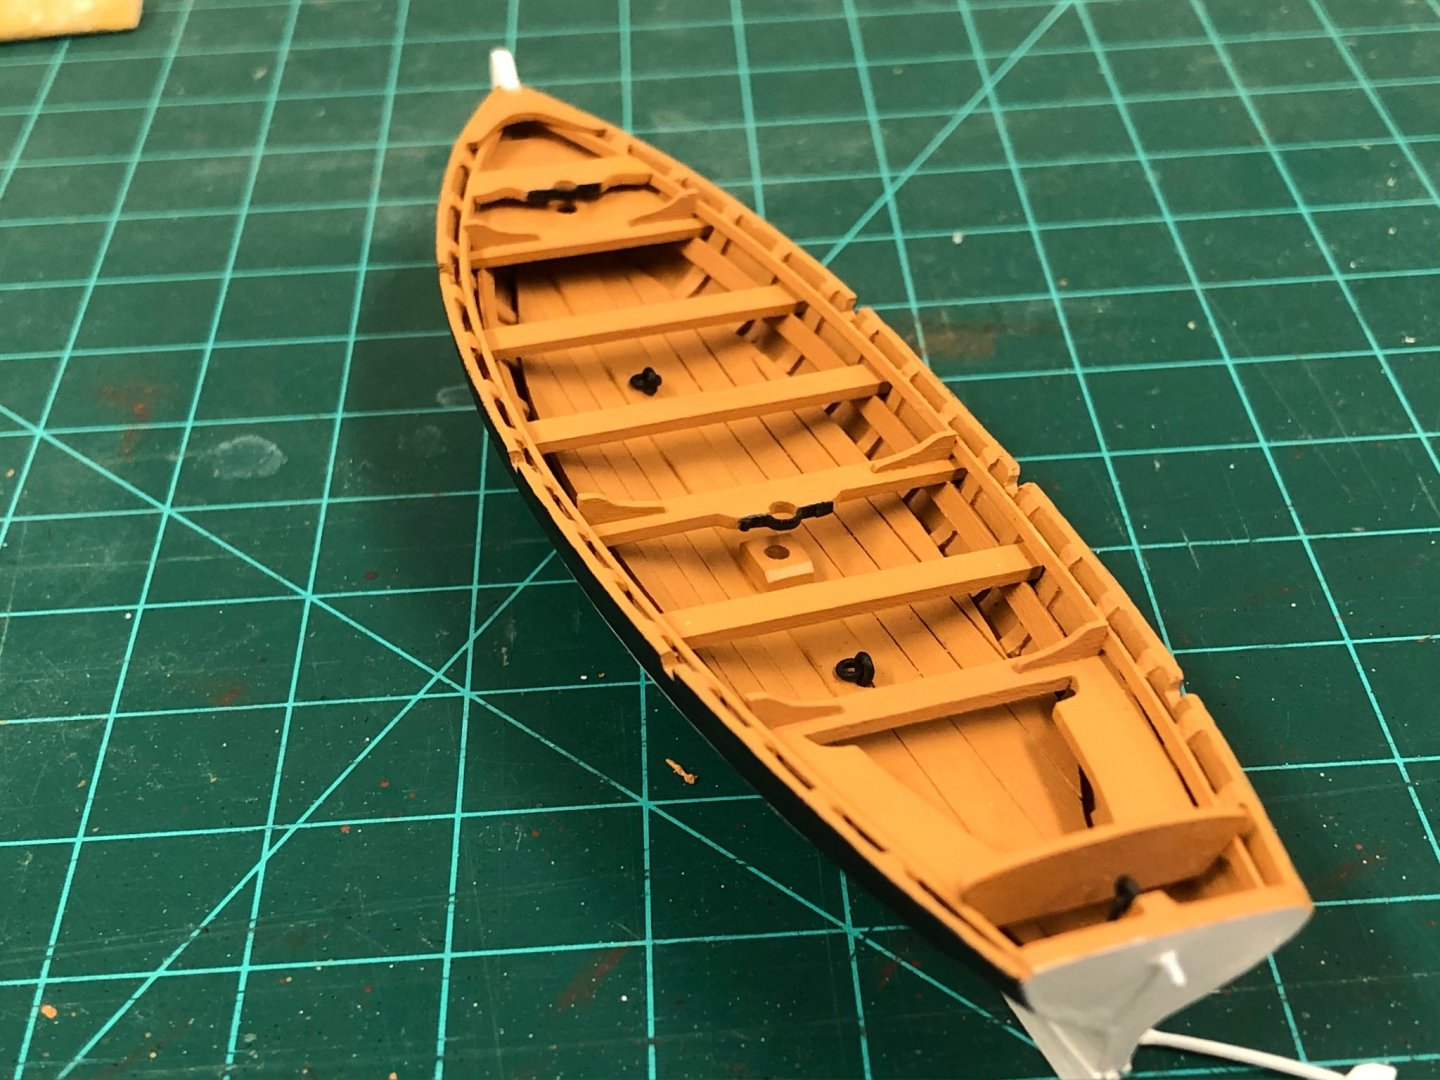
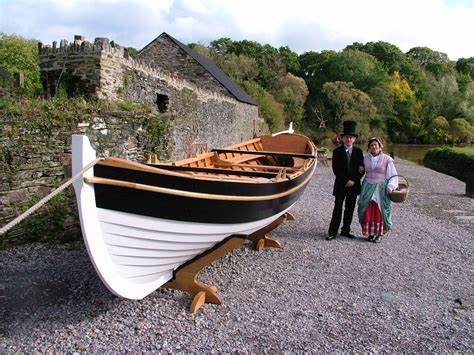
Hi Folks, Sadly been rather absent from both the shipyard and this site for some time. I very much hope to catch up soon on everyone else's fine builds here soon. Time to get a little more up to date, the cutter is pretty close to completion aside from a little fettling. Frames were added to the interior using strips cut from some scrap 0.5mm pear wood. These were soaked and pre-bent in situ prior to gluing with PVA: The frames were further reduced down to the keel former to try and get a bit more depth the boat. To my eye, applying planking to the false deck puts the board too high, especially as there is very little room to play with considering the various structural elements still to go on. A template for the footwaling was then made up to determine the shape. Once the placement was determined, the rising plank was added (again cut from some 0.5mm pear sheet) I wanted to try and allow the footwalling to have an element of curvature which would be natural on the real boat. A relatively straightforward way to achieve this was to apply wood strip to thin card to match the template which maintains a lot of flexibility (Straight strip was used rather than the more complicated curved planking on the plan). Once dry, the assembly was easily glued on top of the keel former, the footwaling then follows the interior curve naturally. With those element in place, it was possible to add the platform under the sternsheets. The Diana plans show these as a grating, but to my eye again the kit supplied grating is too large, so plain boards were installed instead which also appear to be used. After the main and fore mast steps, thwarts and ringbolts I assume would be used for hoisting the boat had been added, the bow was closed in using a cover as suggested on the plan - this also helped disguise the rudimentary construction at the bow. The rowlocks were cut, interestingly these are not symetrical between port and starboard, and one seems to sit rather awkwardly in the sternsheets. The sternsheets were made up and installed, again having used a template to finalise shape, together with all the other details including mast thwarts, gunwale and knees. The colour scheme follows a slightly simplified version of that shown below which seems suitably utilitarian. Looking at this, and comparing once the black was applied, suggests to me that I made a mistake in the tapering of the clinker planking. The black area covers both the wash strake and upper strake, and judging from these pictures it appears that these are of somewhat consistent in width, especially toward the stem. I had tapered these proportionally as well, hoping nobody else notices...


-
Blackening brass advice
Beef Wellington replied to Bossman's topic in Metal Work, Soldering and Metal Fittings
You don't mention how you used the blackening solution and how much you diluted. I've found results to be much more predicable with a more dilute solution, and using a nylon brush to apply while agitating the surface. Once the reagent is spent on a small area (turning from blue colour to brown), then the brush can be simply washed in water, dried on a paper towel, and a fresh brush load applied. I've had much less predictable results using a larger 'bath' to submerge items in. -
Very nice, simple utilitarian beauty at its best!
- 195 replies
-
- 2
-
-
- lady eleanor
- vanguard models
- (and 1 more)
-
Looks great, keep the updated coming! Ballahoo looking good as well in the sun.
-
Ben, I think your coppering looks really good, and you've got a nice curve at the waterline batten as well which really helps enhance in my view. Obviously personal preference on pristine vs patina. I had cleaned the copper plates on my Snake with metal cleaner once finished similar to you, mainly to get rid of any skin oils from fingerprints as these seem to accelerate the oxidation process and become pretty noticeable pretty quickly. I've been surprised at how slowly the surface has oxidized, but that may be a fact of it sitting out of sunlight.
-
HMCSS Victoria 1855 by BANYAN - 1:72
Beef Wellington replied to BANYAN's topic in - Build logs for subjects built 1851 - 1900
As others have said already, thats a fantastic looking gun and carriage. I can only imaging the amount of work that went into this with the 3D printing and all but the results speak for themselves. Love the overall deck shots, as well 🙂- 1,018 replies
-
- 5
-
-
- gun dispatch vessel
- victoria
- (and 2 more)
-
I edited my reply after you quoted it. Just want to make sure you saw updated option 1 which would still look very good, and be by far the least painful option. I wish you the best!
-
Hi, yes you have Snake bulwarks! Now that you show it, it should have been obvious from your prior posts (and I feel bad for not noticing!) but so easy to miss for those of us building Snake because it looks 'right'. The larger gun port size is to accommodate the carronade armament rather than cannons, looking at your earlier pictures it seems they unfortunately, but correctly, supplied cannons. What to do? I think your options are limited to the following: Simply install the cannons in the larger port. If you look at my Snake log, you will see that I installed cannons in the first port which seemed to be practice at the time, this gives you a sense for how this would look. strip off wood and redo, I completely understand how painful this would be (if its any consolation I had to do that partly on my 'Jason' build to move upper deck gunports, it can be done with patience, but would totally understand your frustration. This might be messier if you used CA glue (which I think you did) rather than PVA glue which can be softened with isopropyl alcohol. Strip off wood as per above and paint - this would give you more options to fix less 'perfectly' or comprehensively, but....you end up using paint.... Change the armament to carronades. There would plenty of justification for this given this large class of ships would have only had cannons for a short period of time on a few of the very early built ships. A carronade armed, 2 masted Cruizer class would probably be more historically relevant/accurate. However, you would need to source some carronades. It could be worth contacting CC and explain the situation, they may be willing to provide these, their customer service is typically good. They also provide more upgraded turned brass aftermarket kits, however these are very expensive, especially for the whole ship.
-
Really like the look of your stand there Eamonn, I to like the knots....but "down with that sort o' thing"...
- 1,039 replies
-
- 2
-
-
- ballahoo
- caldercraft
- (and 2 more)
-
Subtle but noticeable difference...looking good BE. Looks like a fun little project. Good decision on the deck by the way, much more in tune with a working fishing boat.
- 195 replies
-
- 2
-
-
- lady eleanor
- vanguard models
- (and 1 more)
-
Hi Rob, yes the strips were just cut straight. I was fearful these would need to be spiled but that did not prove necessary. When damp, the cardstock was very forgiving to place, each was only around 2.5mm wide.
-
Hi Rob, I'm always amazed at your very thoughtful and methodical approaches to things using the CAD drawings, I really want to learn that. Your cutter framing is looking fantastic. You'll have a really solid foundation there, and the photos always seem to belay the small scale of these things, feel like all fingers and thumbs. All the best!
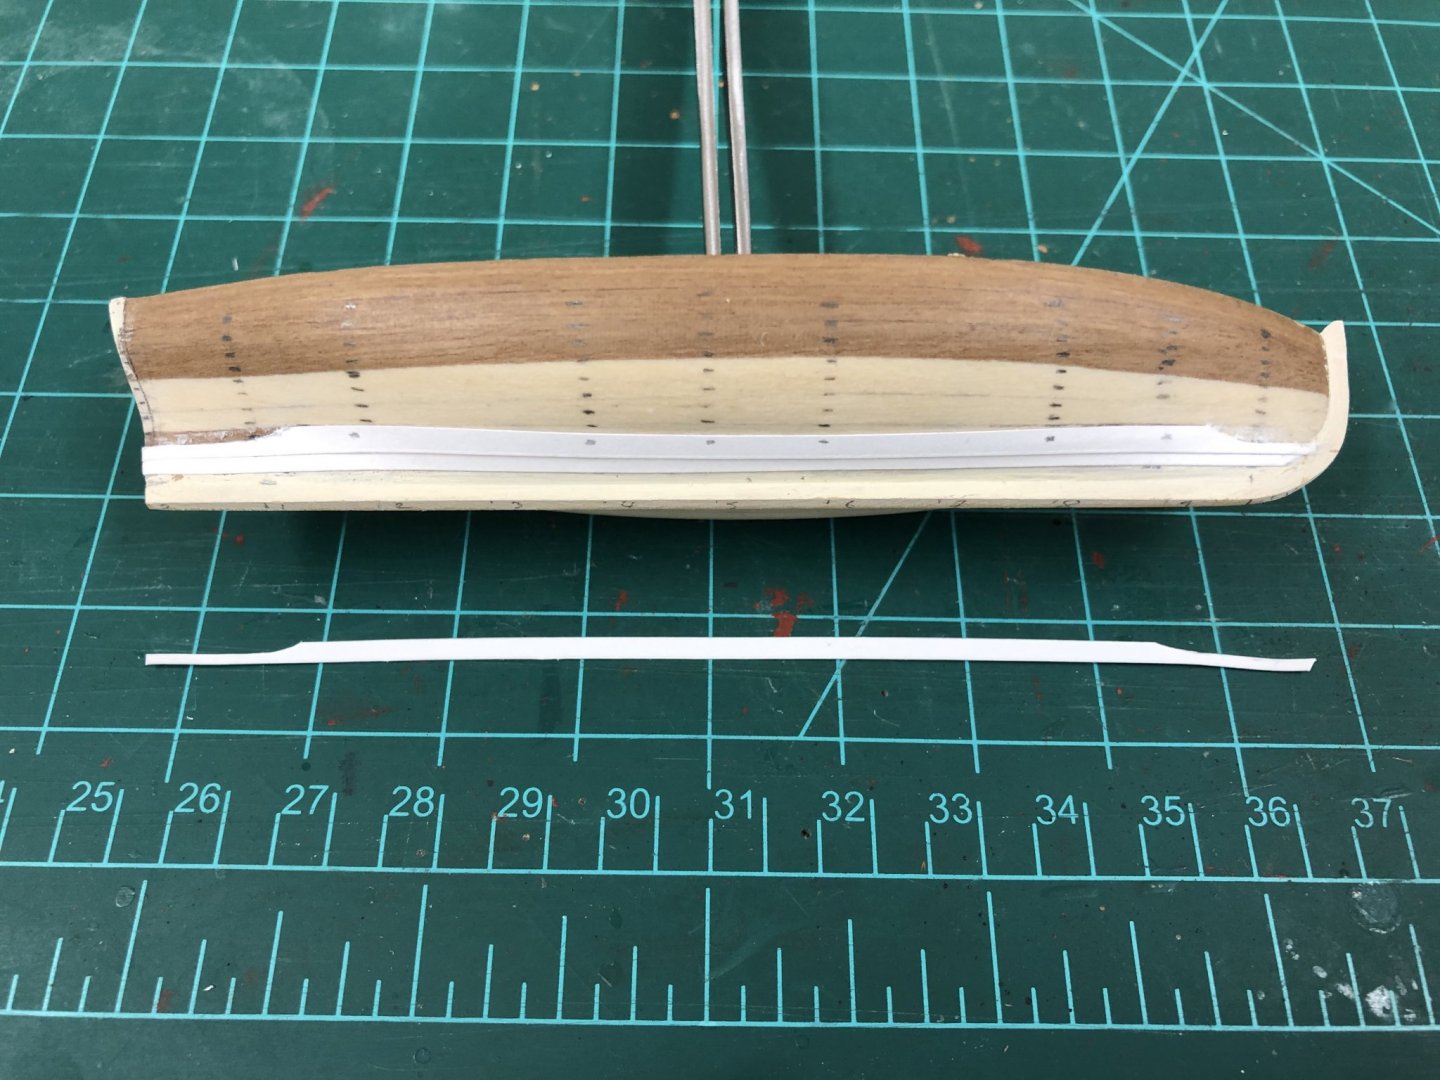
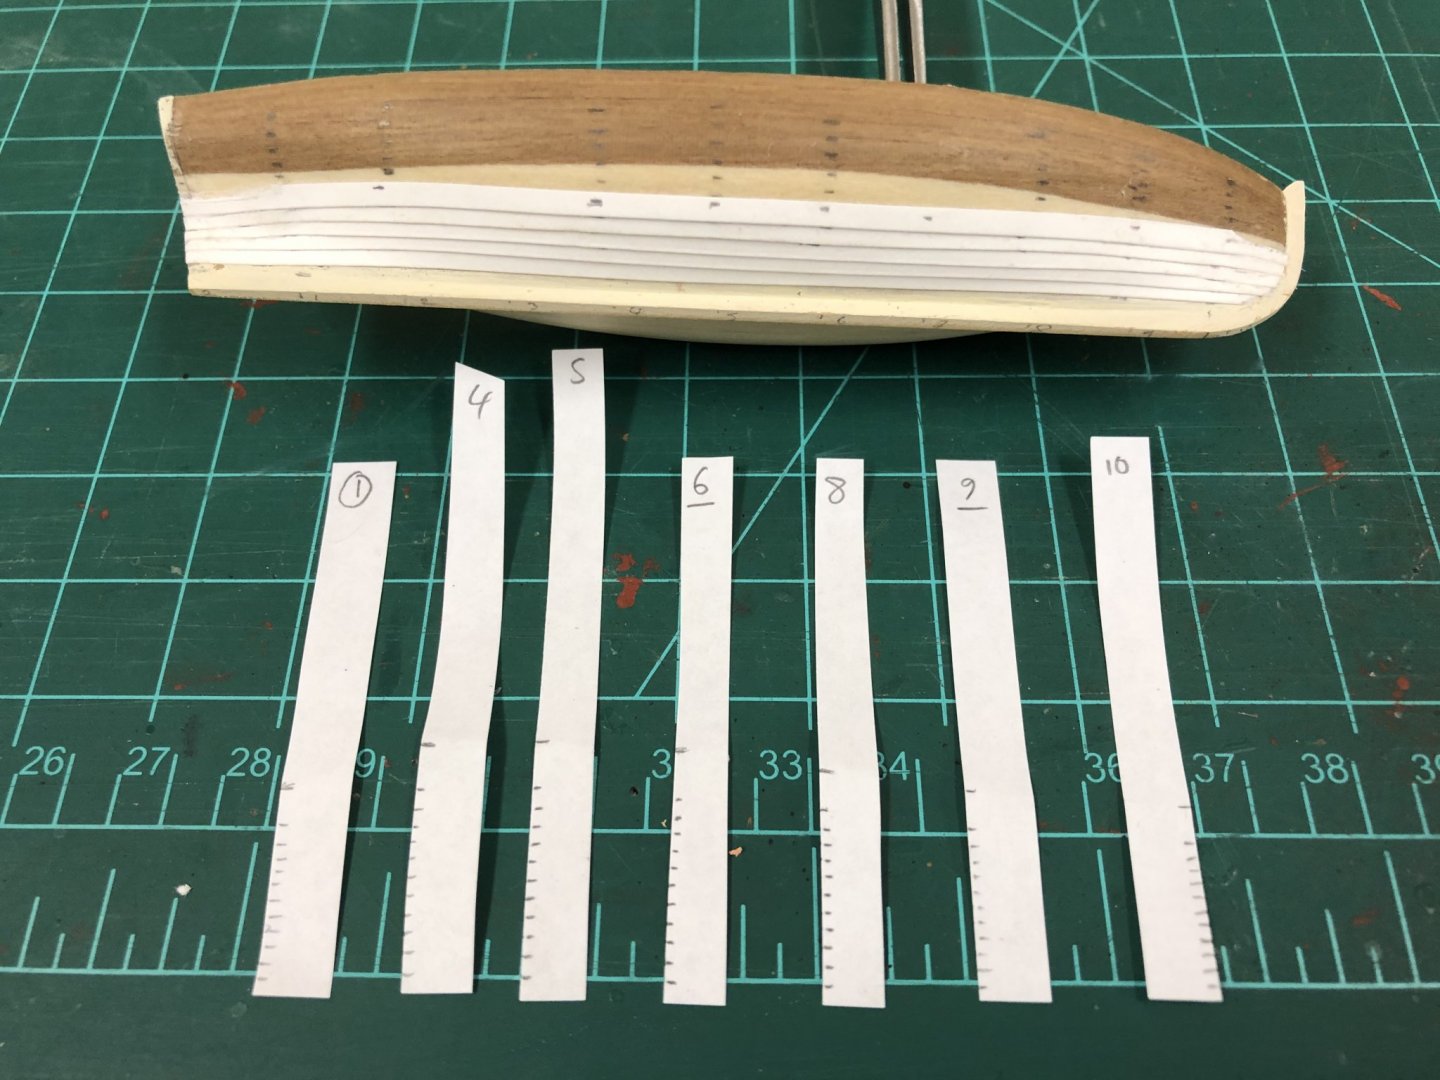
-
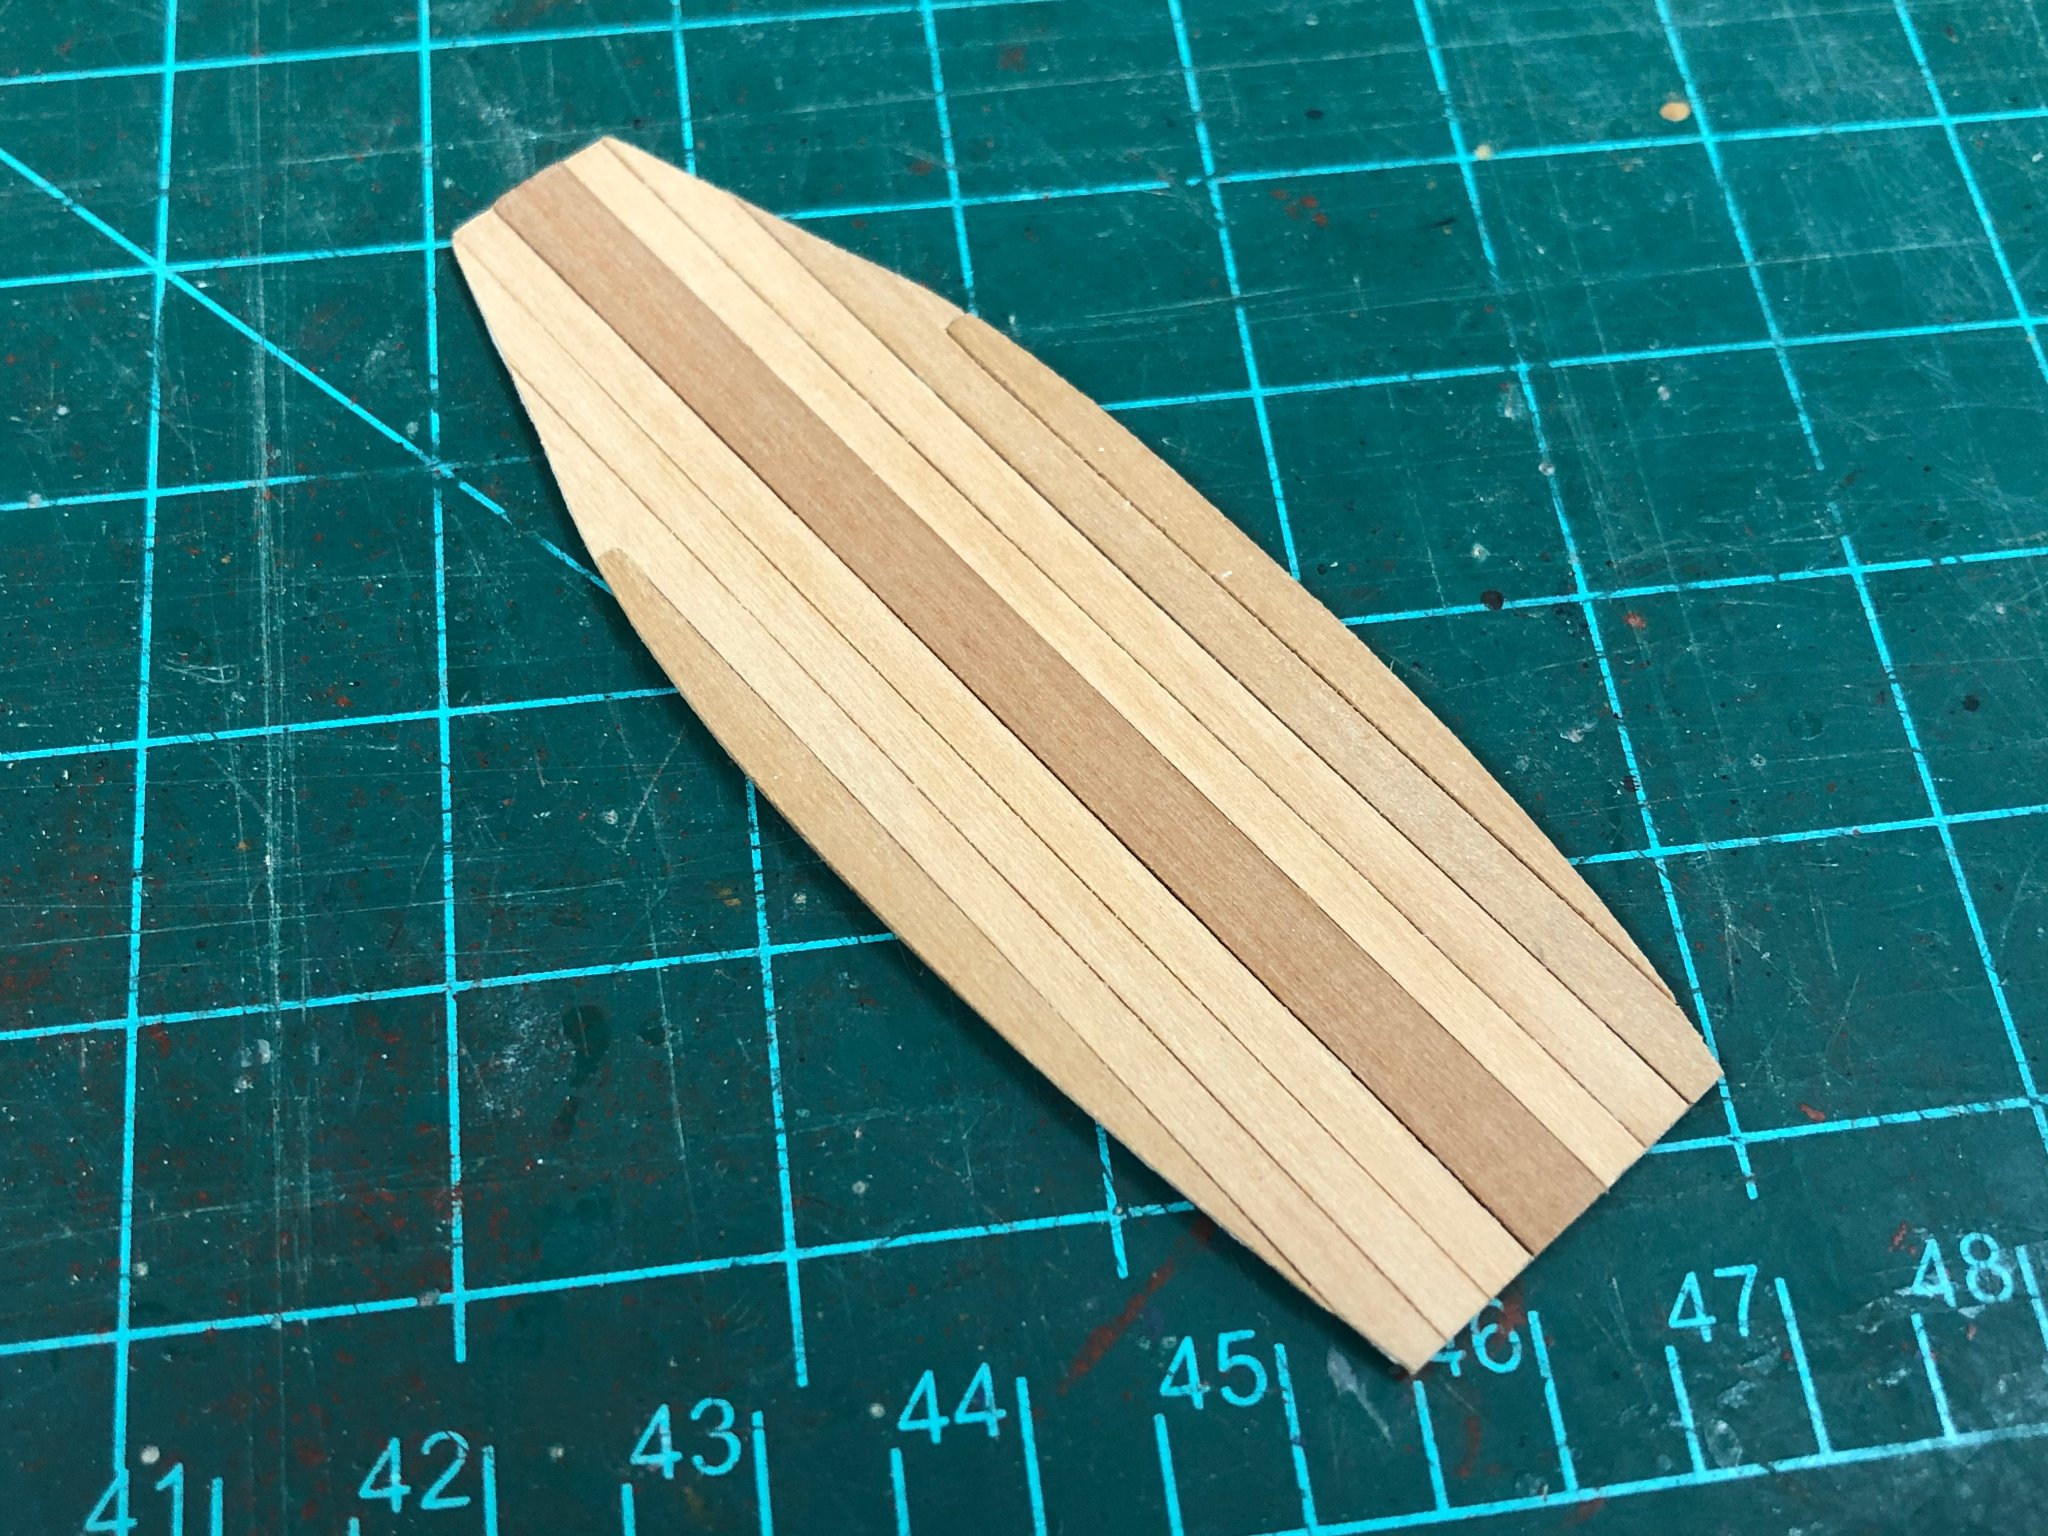
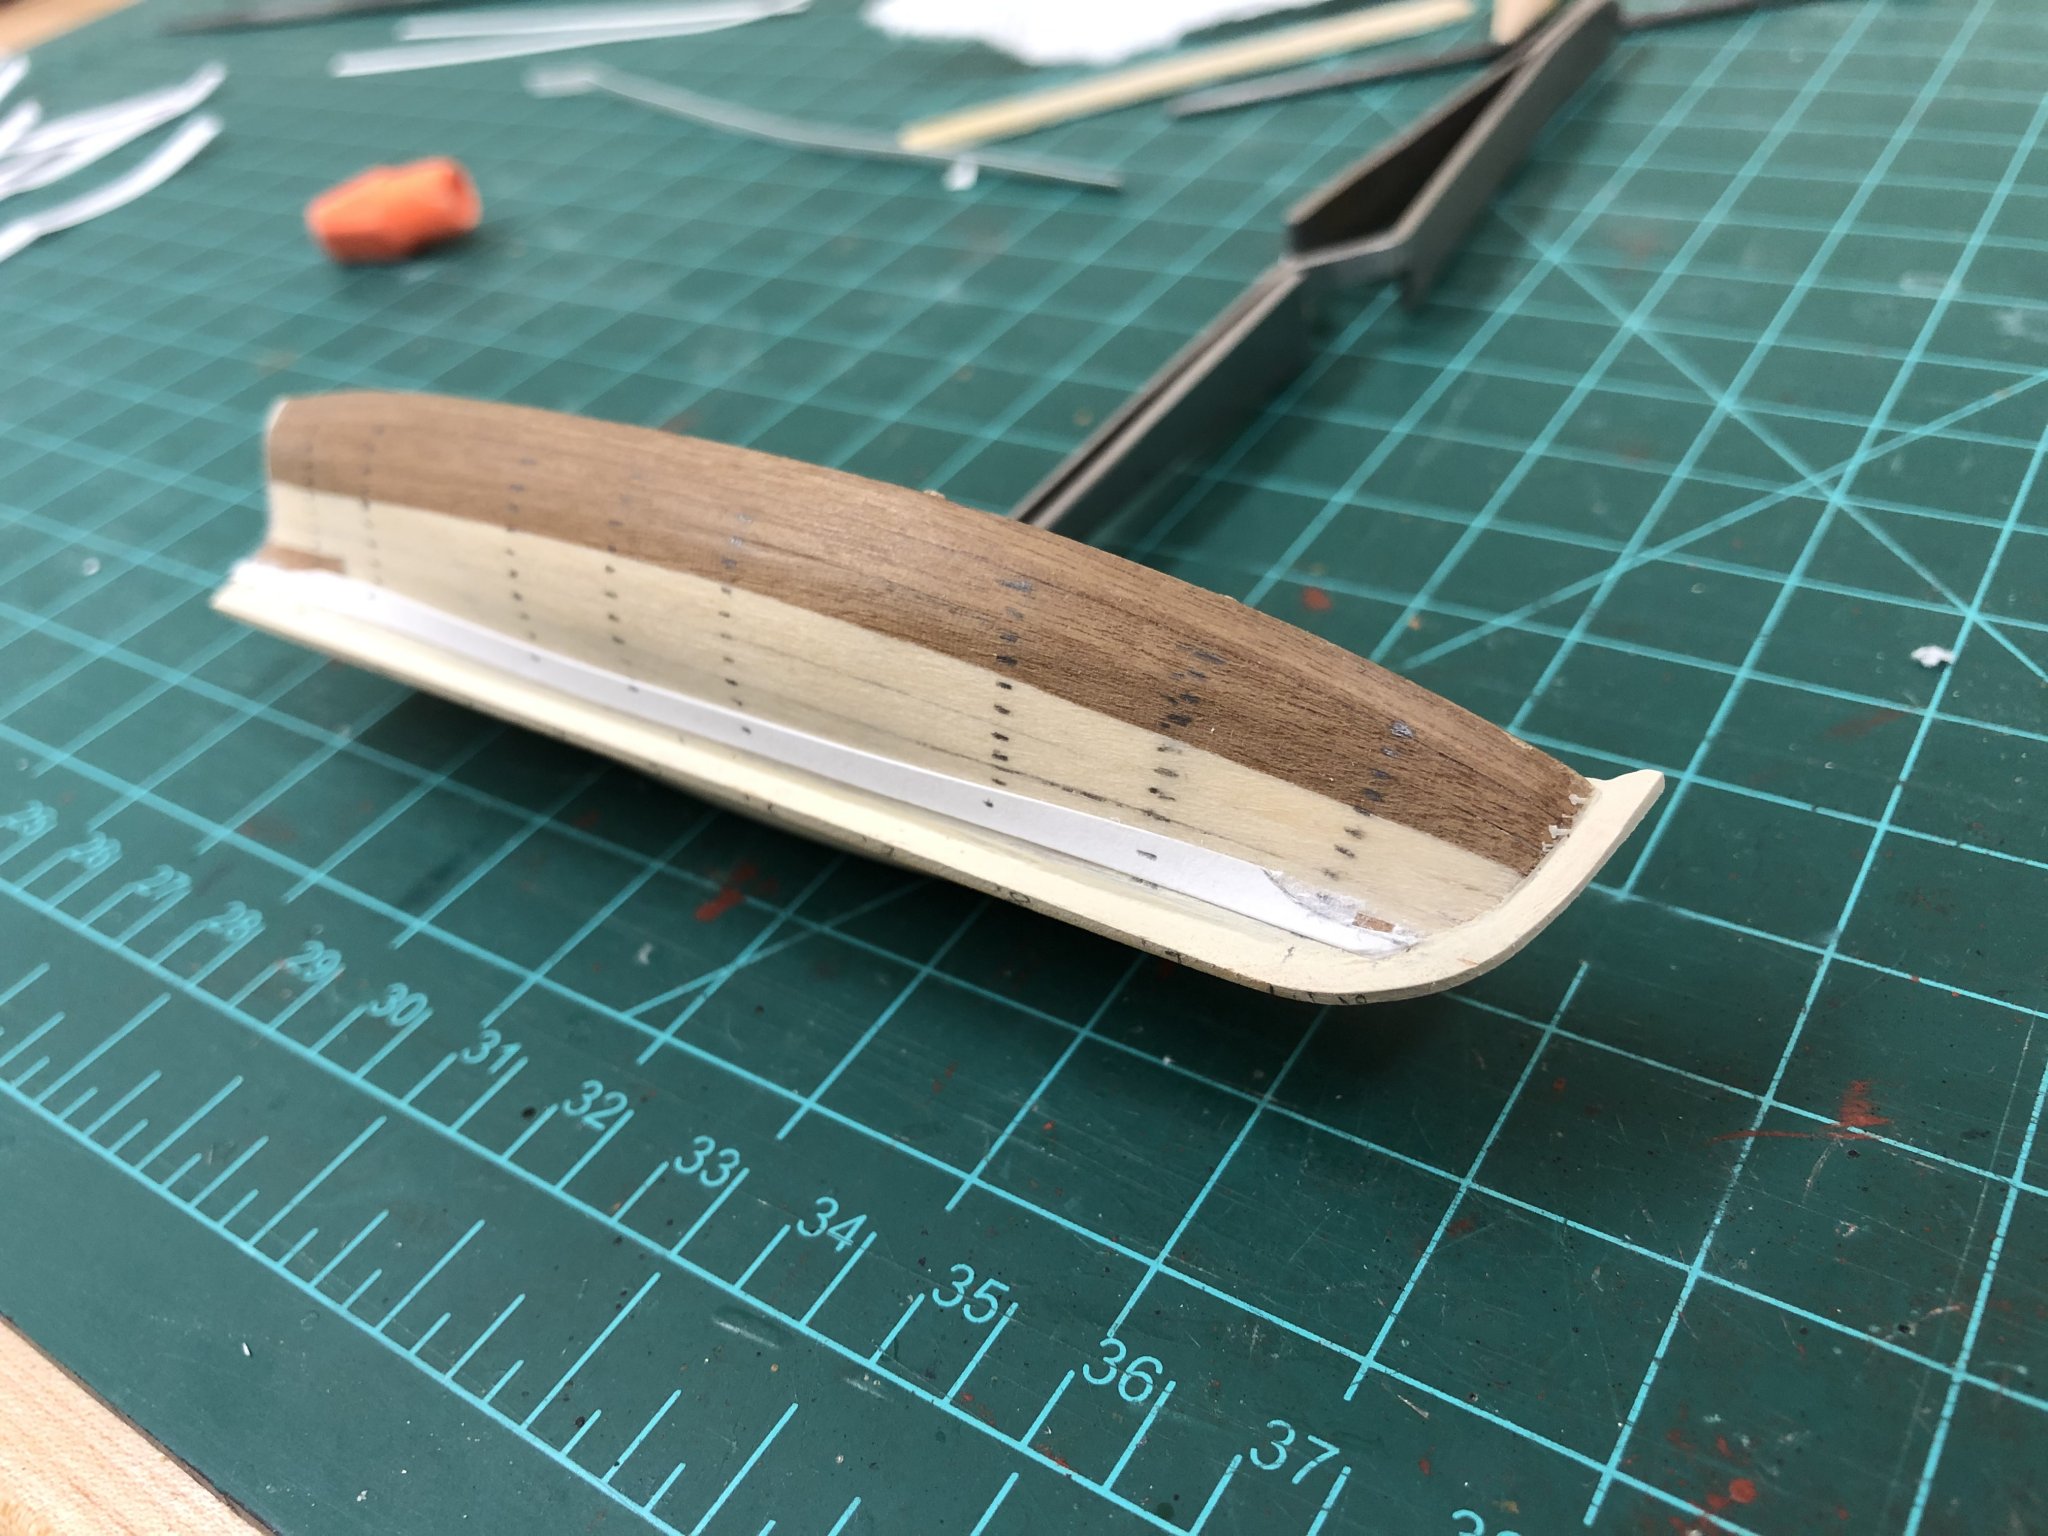
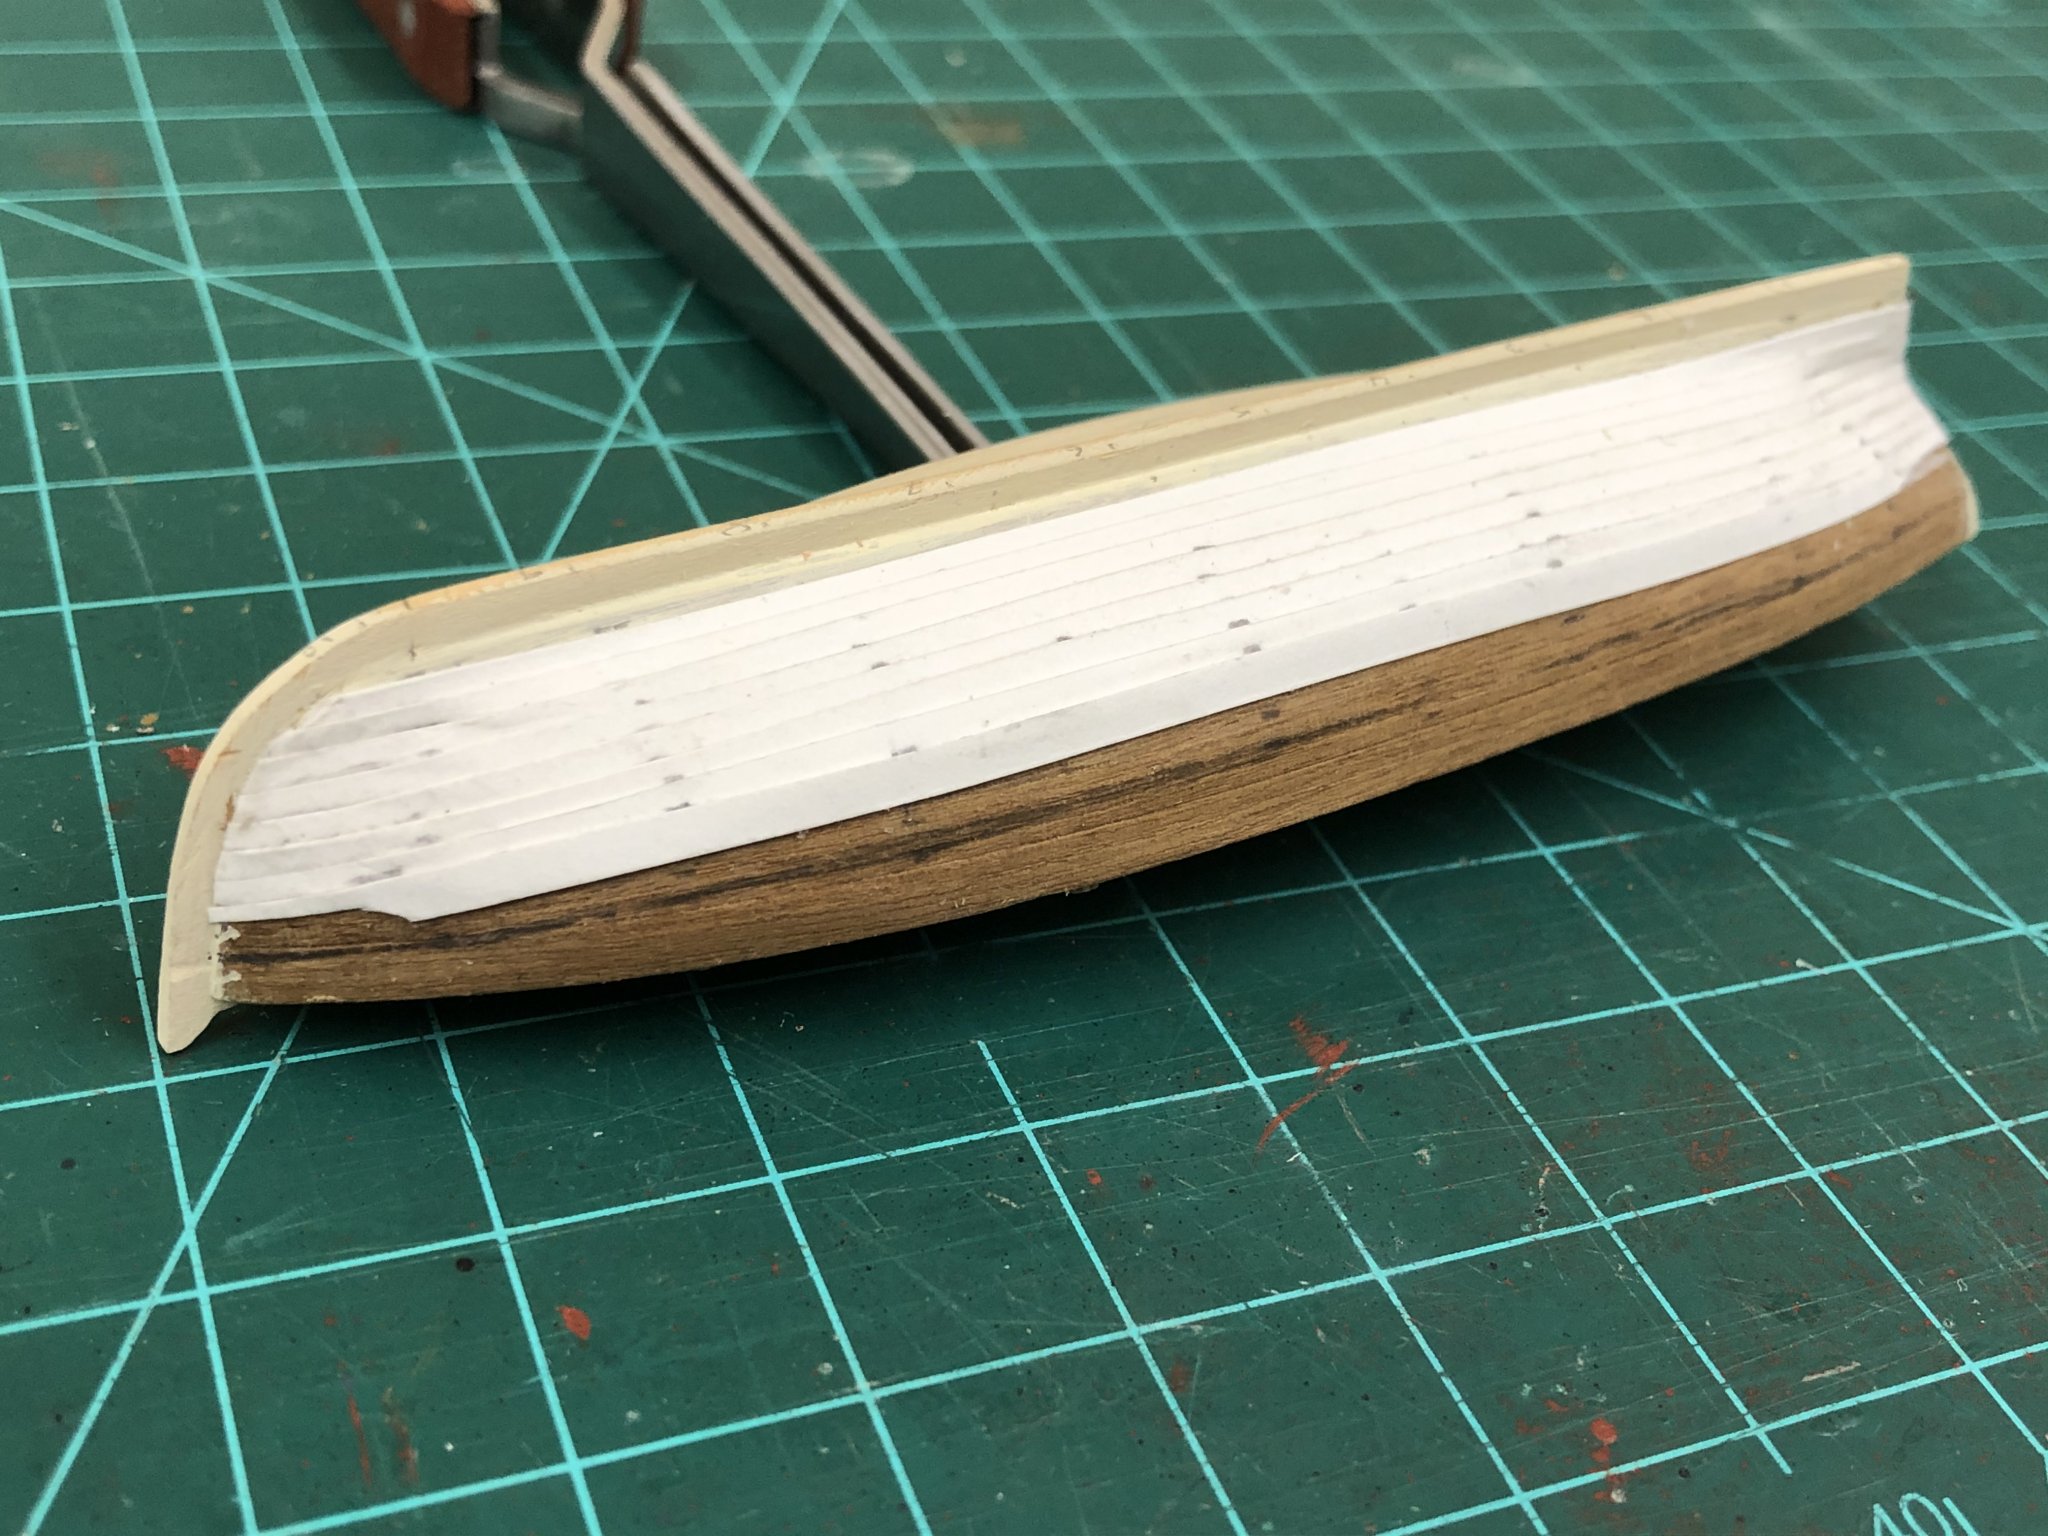
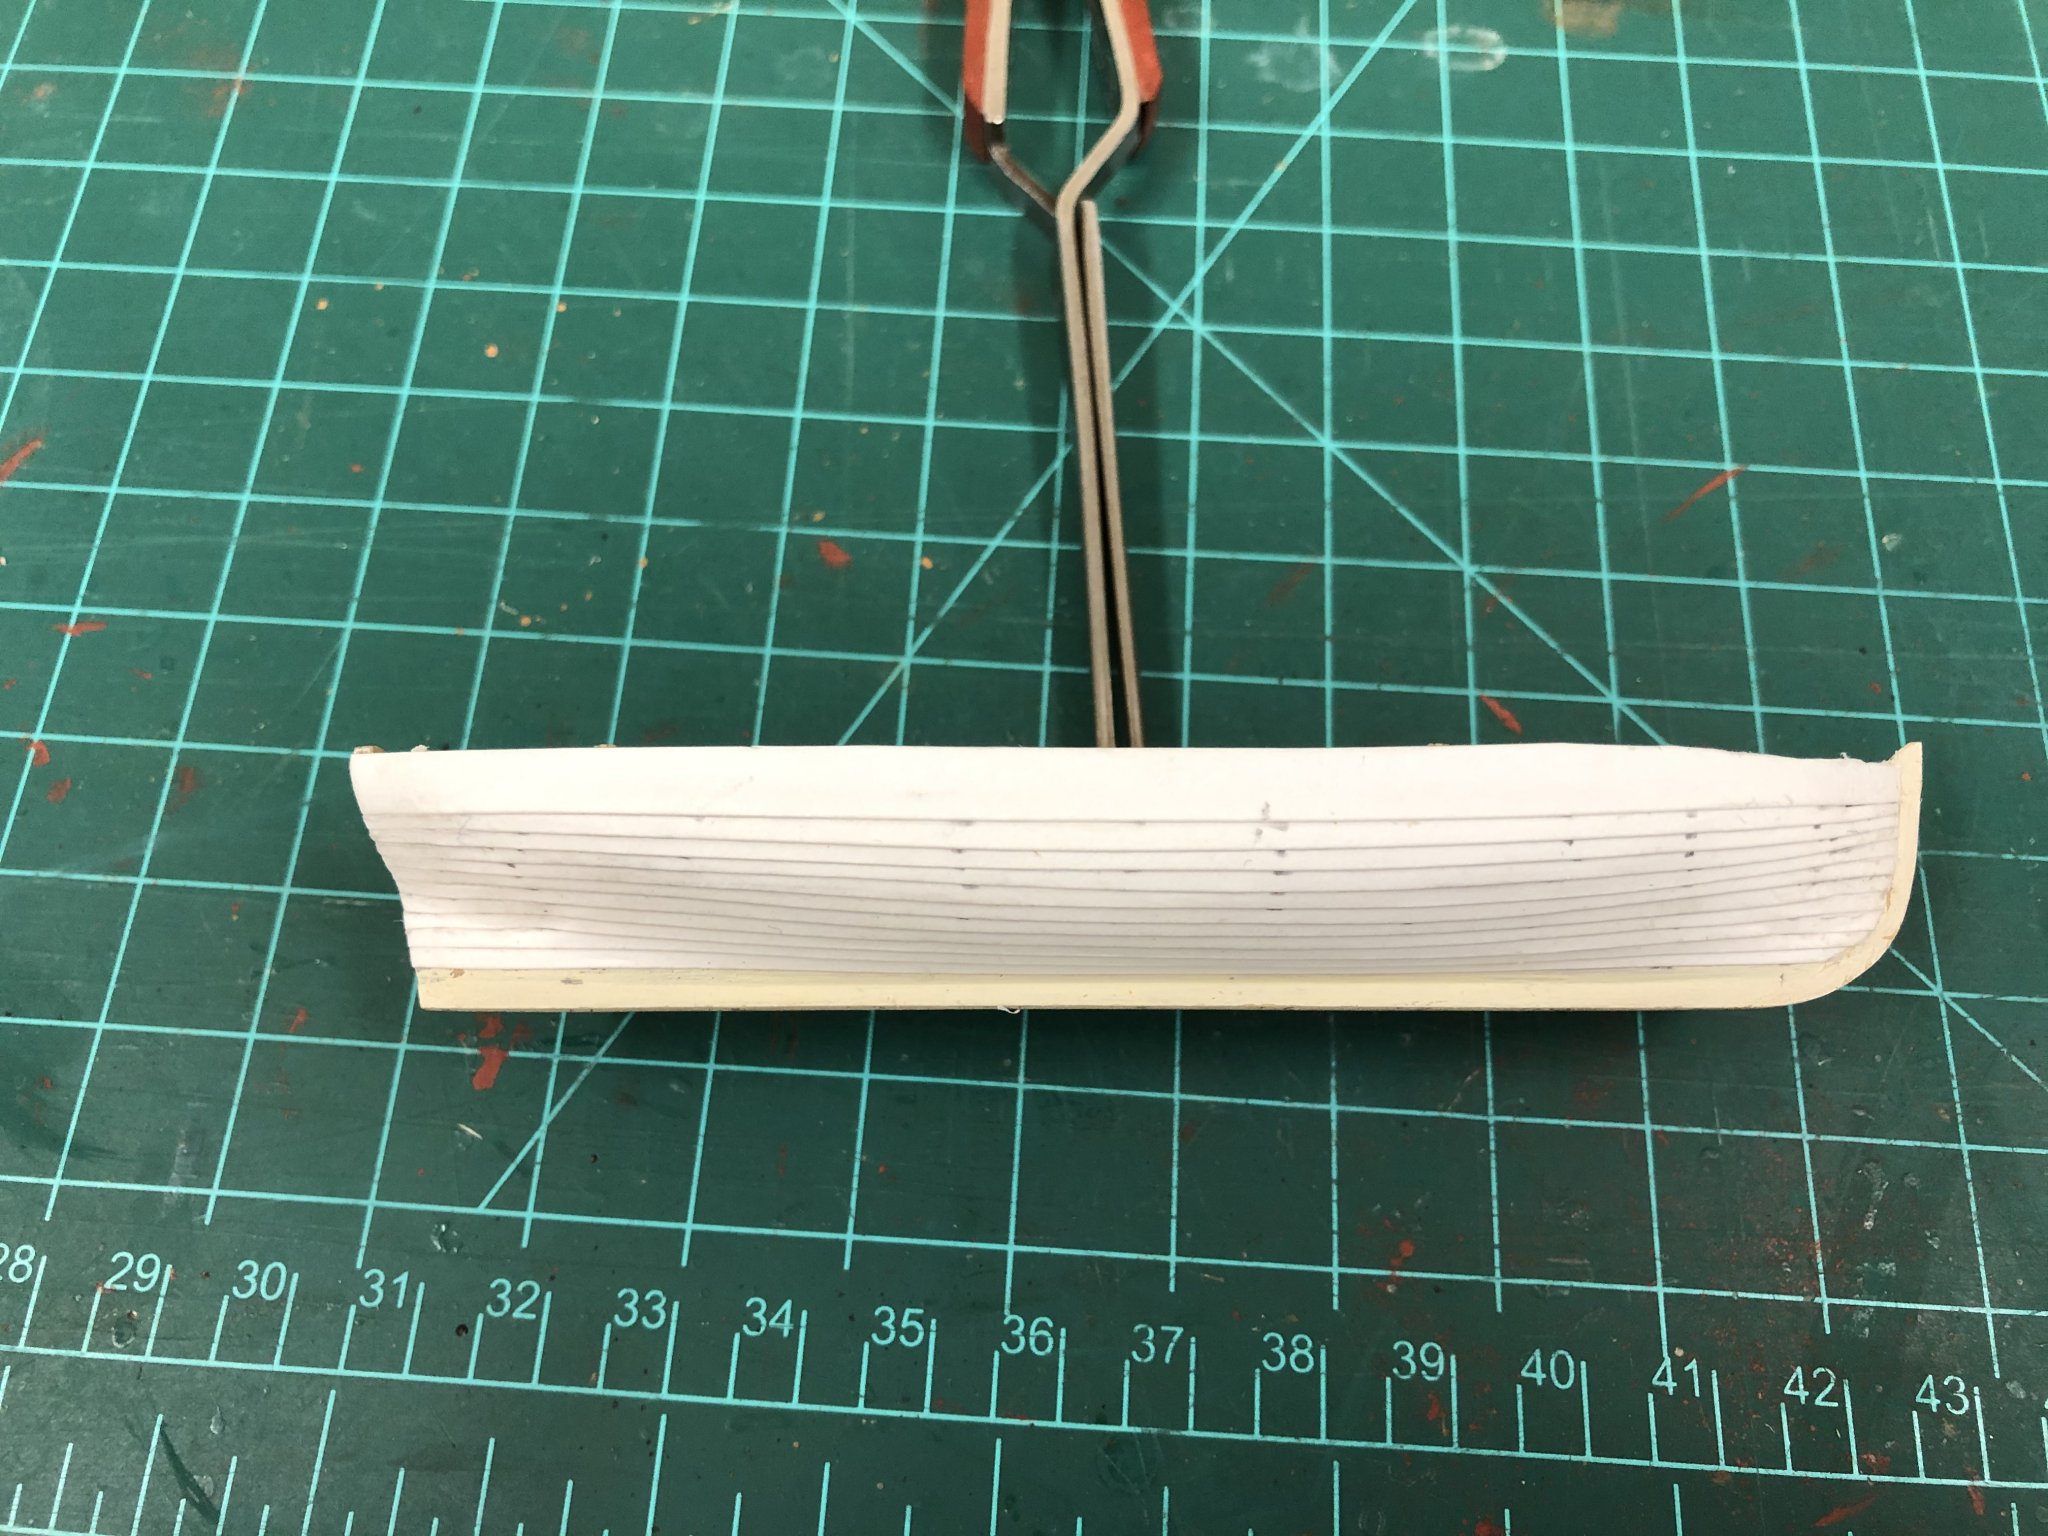
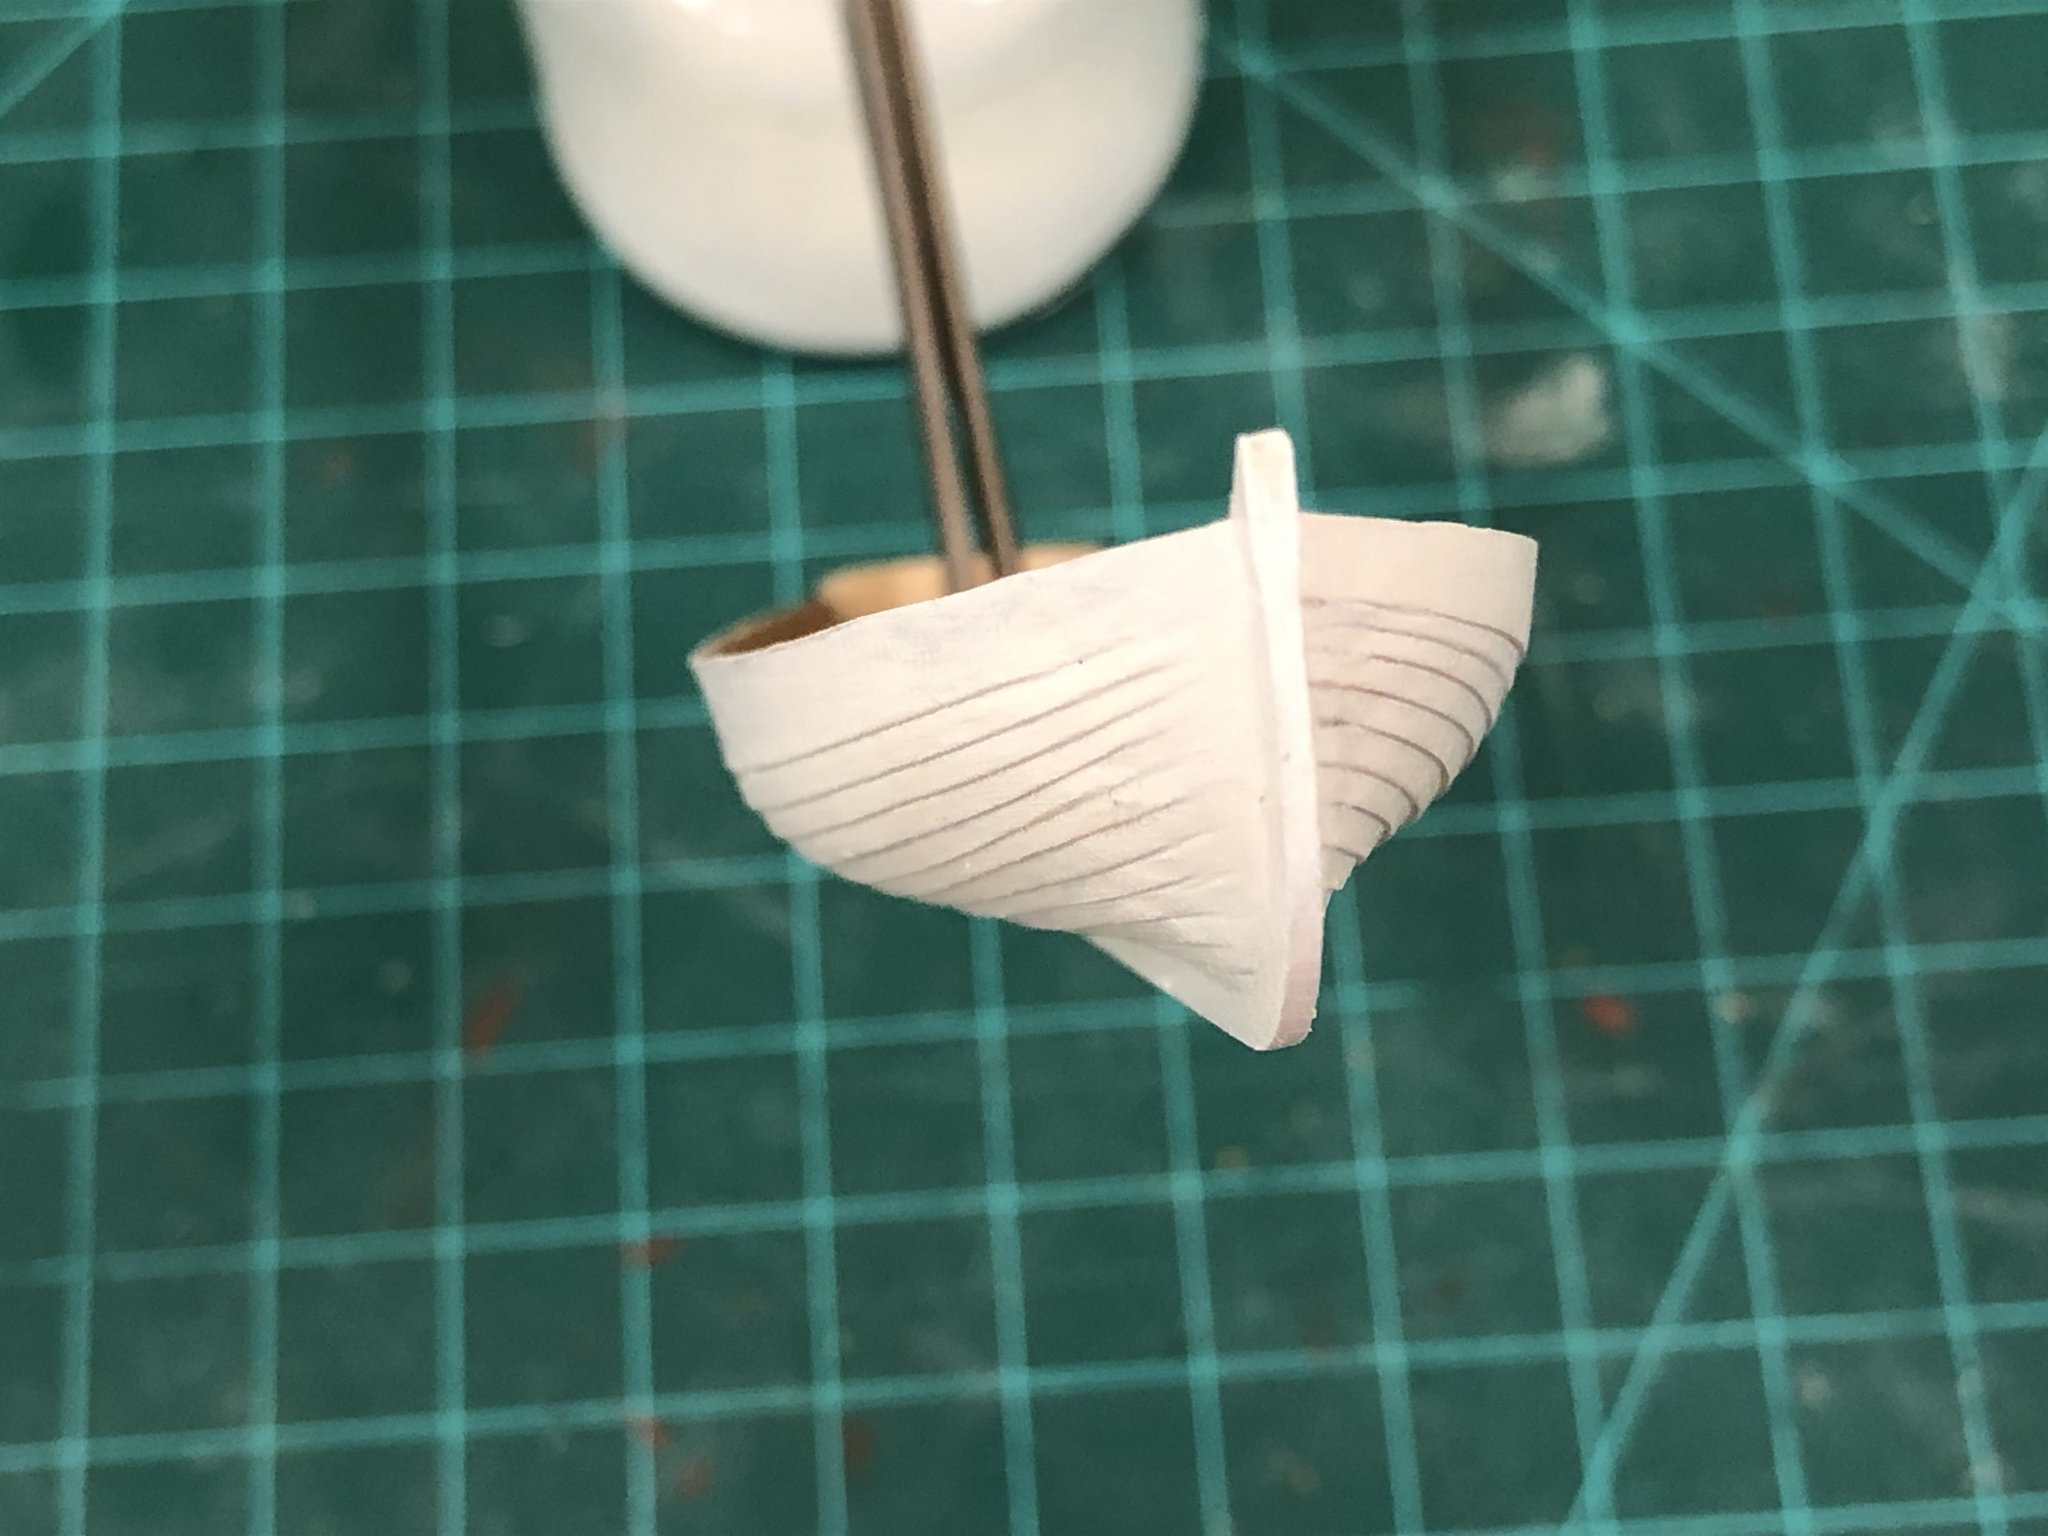
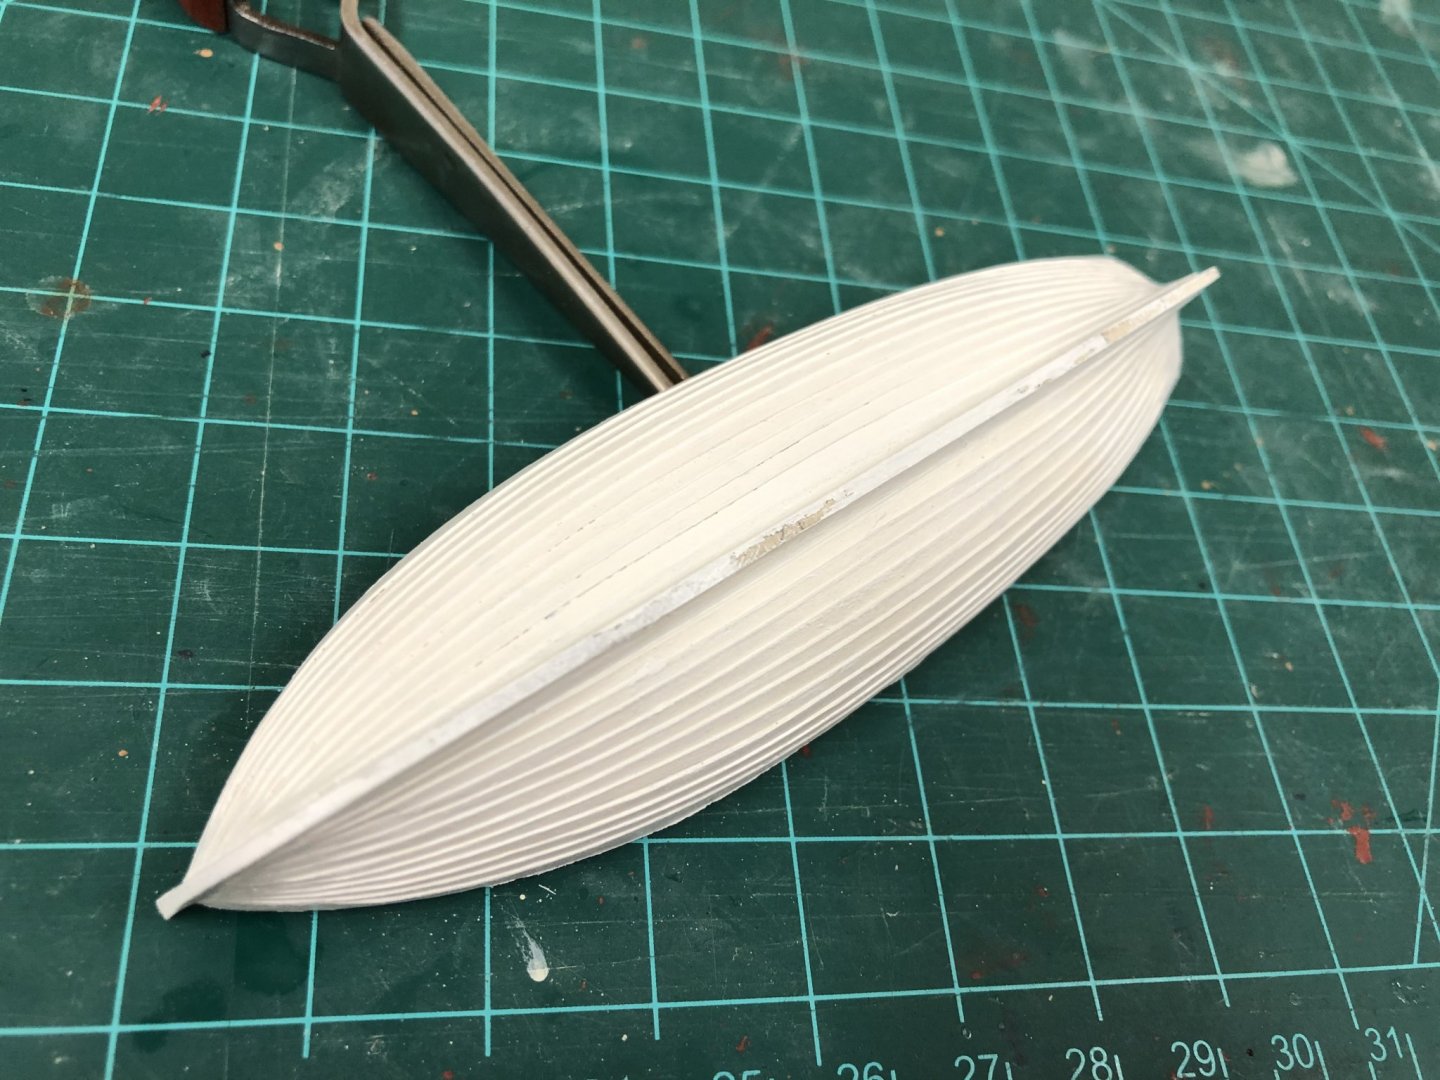
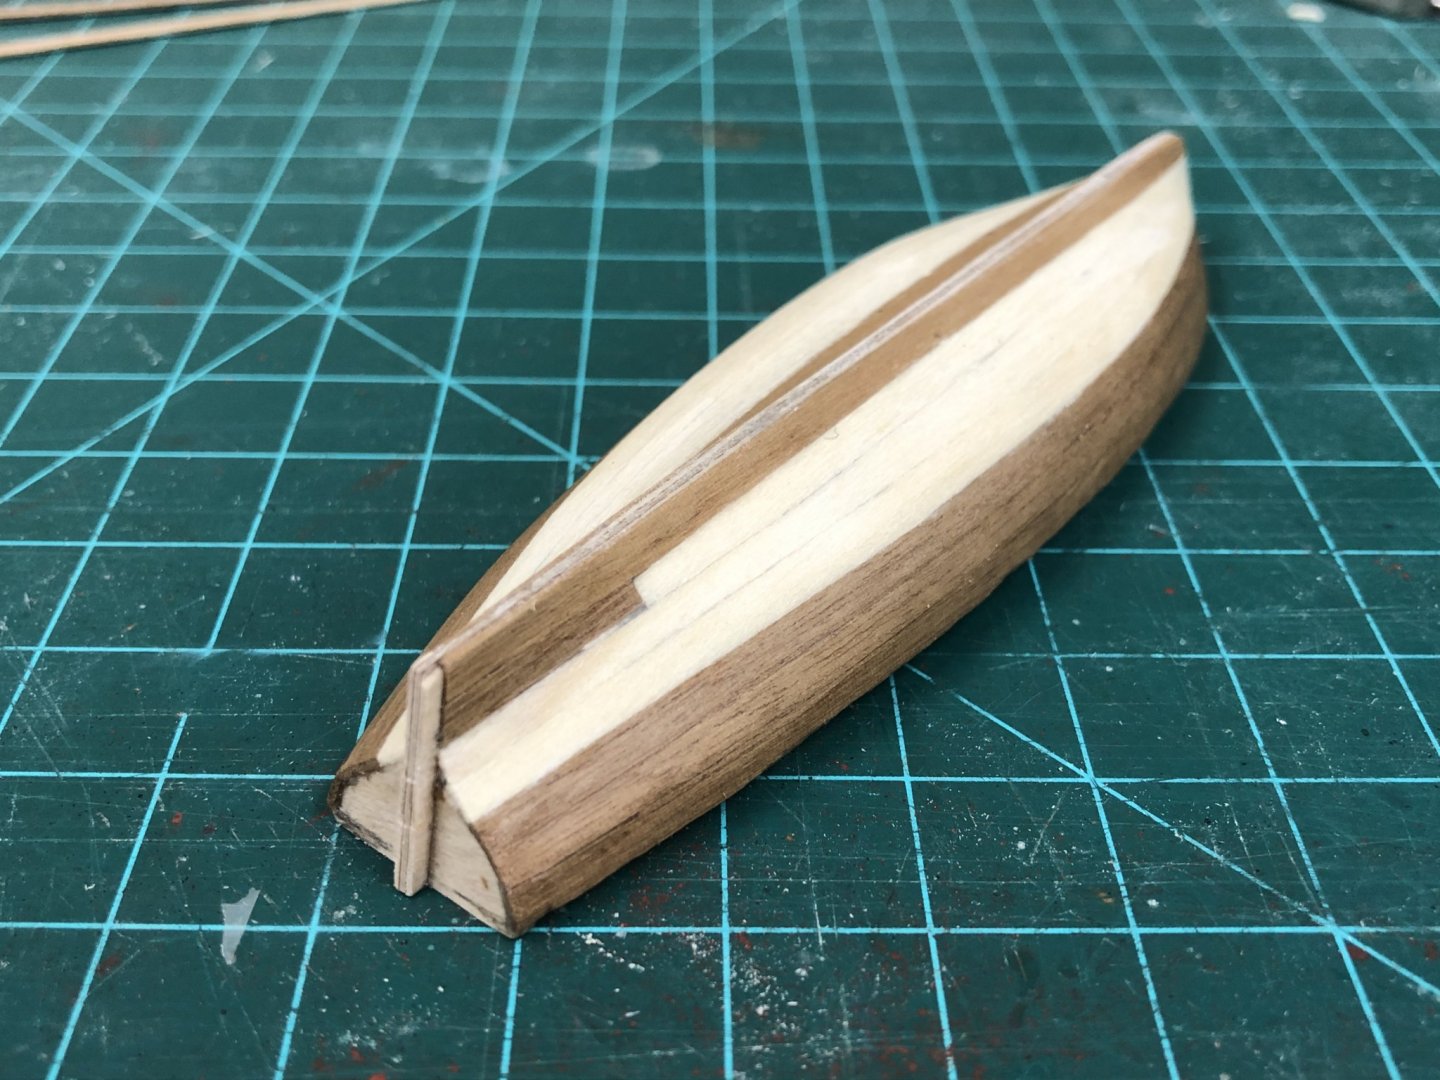
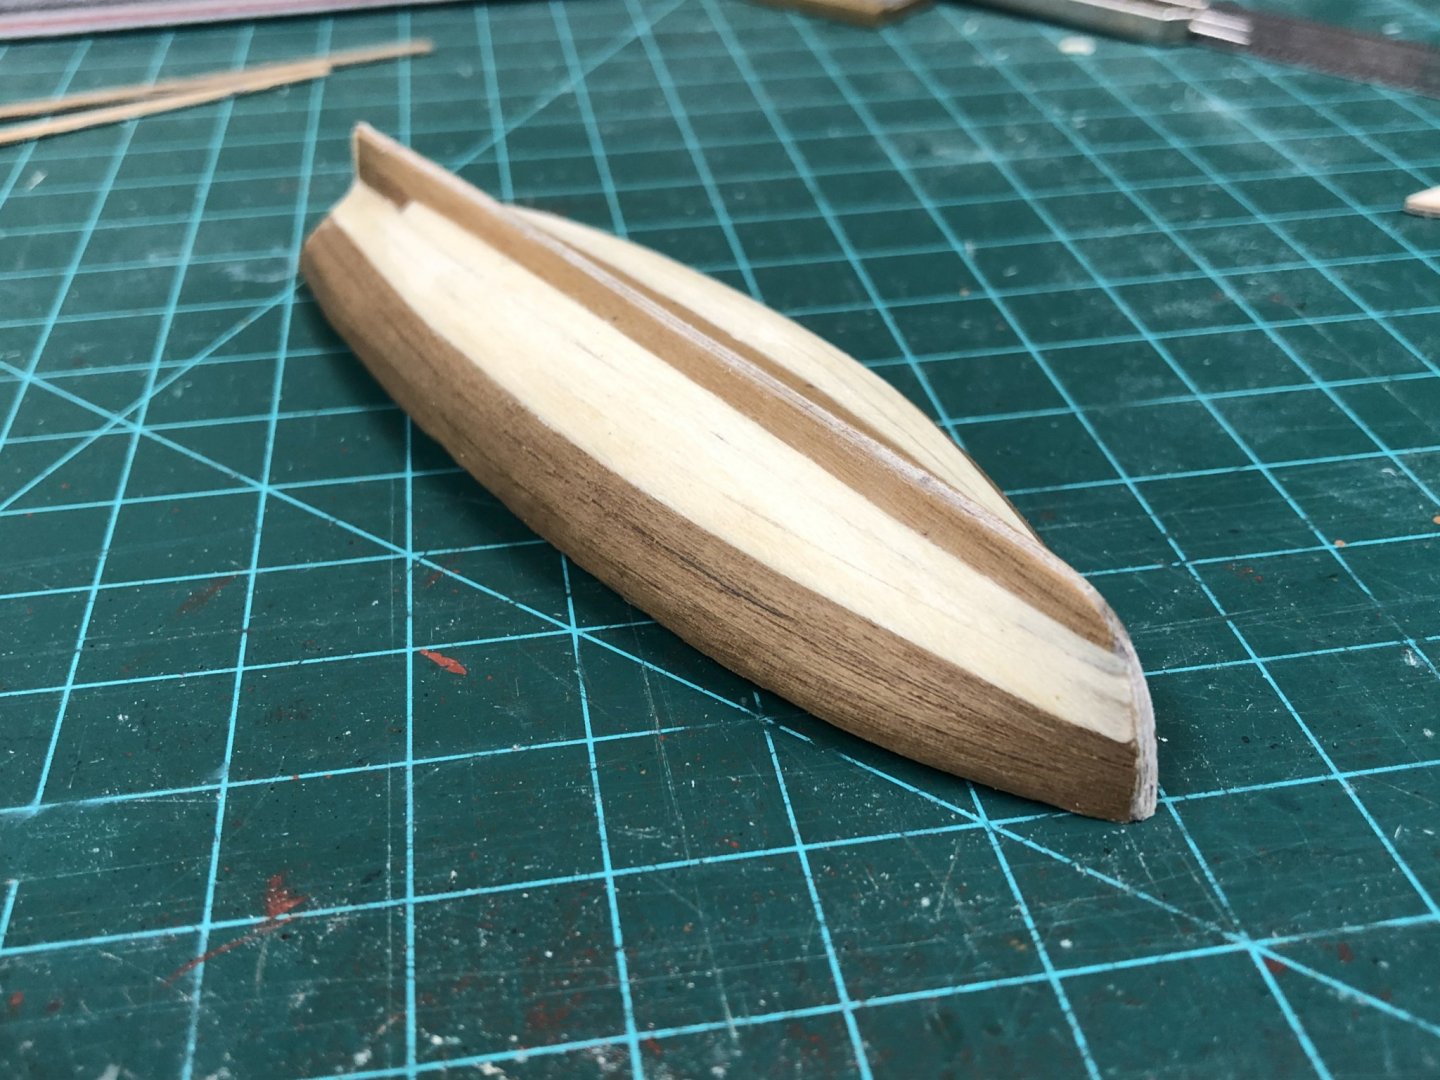
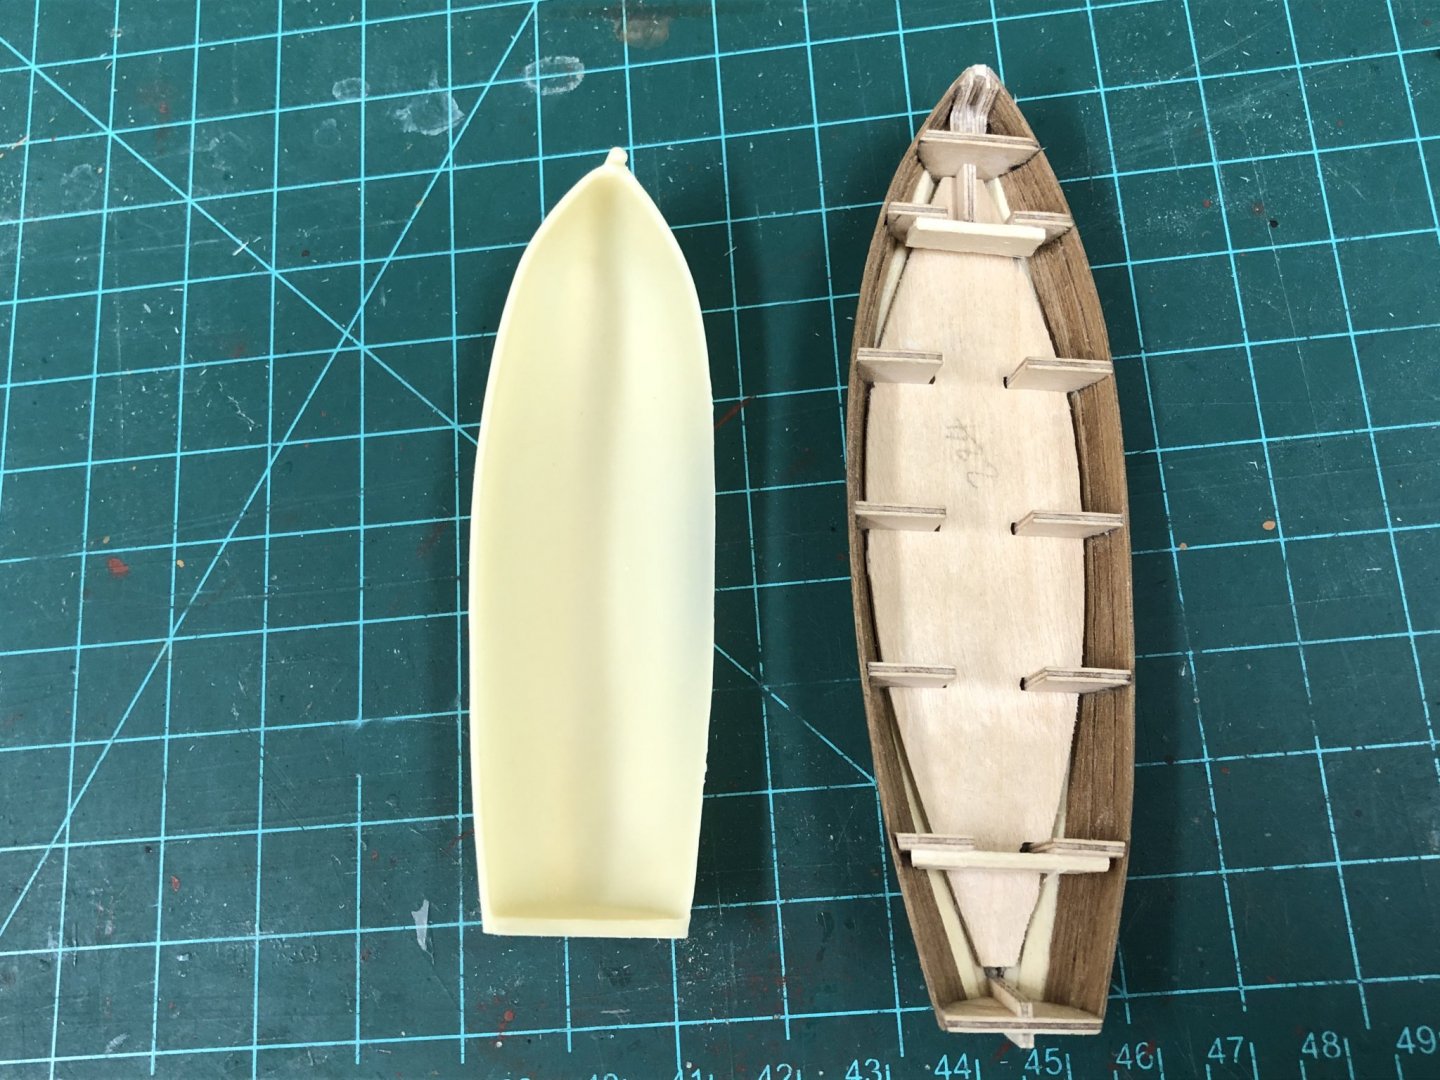
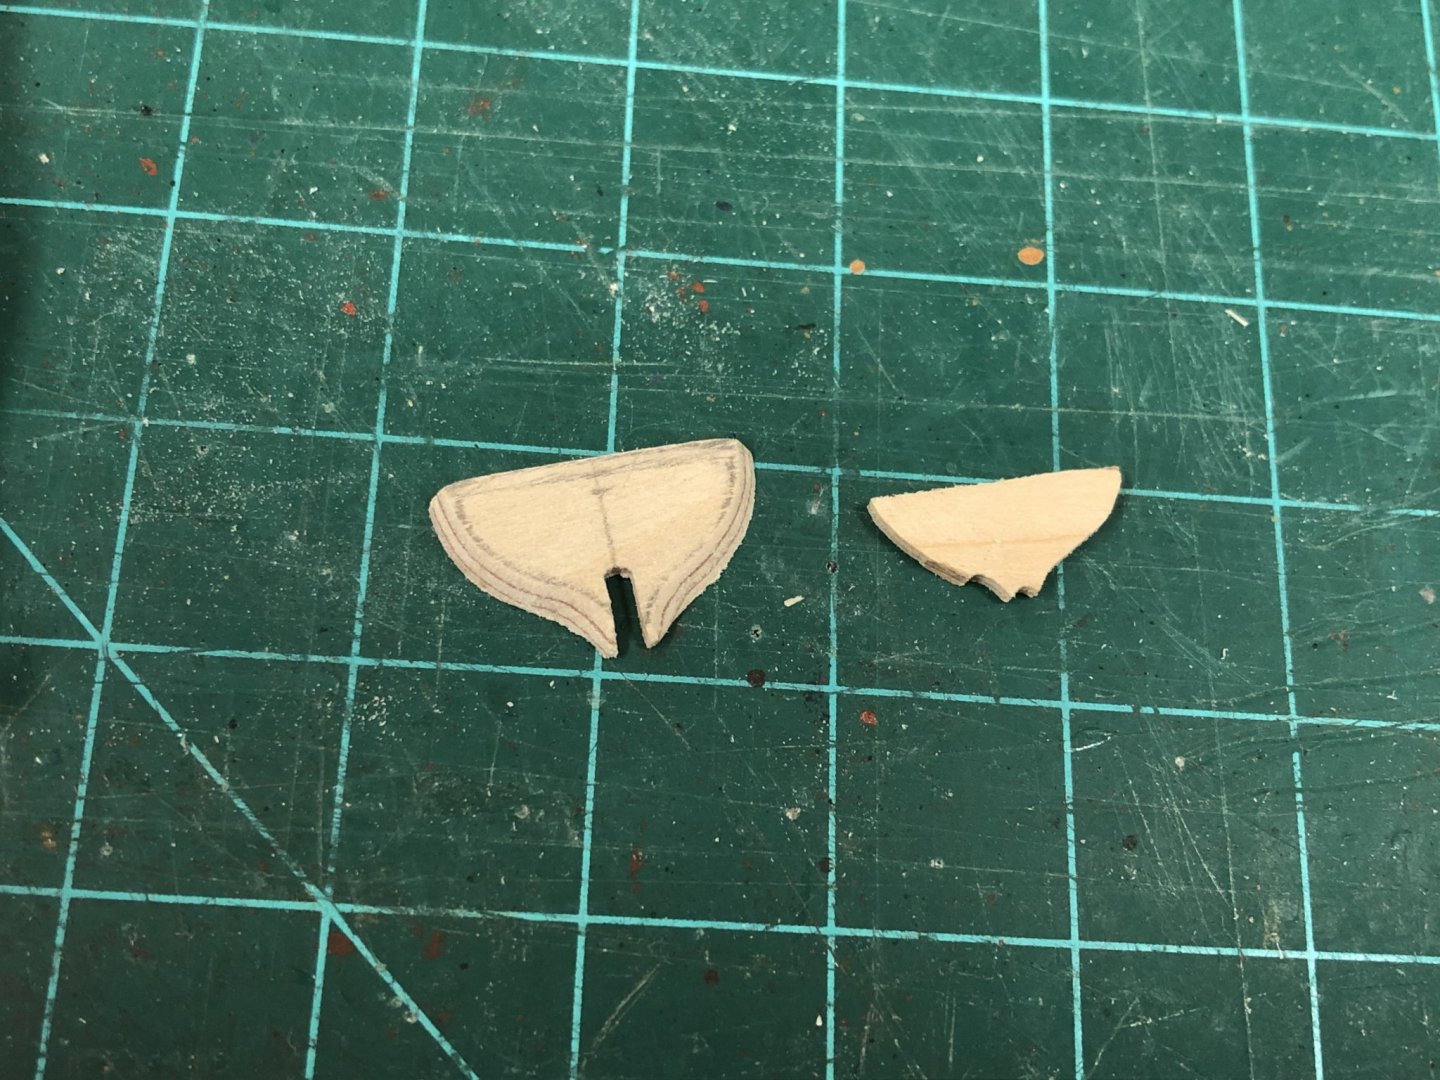
@mugje - just to be clear, the resin hull shown is an 'aftermarket' mini-kit supplied by caldercraft, its not included in the kit. What I'm attempting to do is leverage the kit supplied items as best I can. Cutter Progress: Part 2 Keel and bow section was cut out of some spare wood and glued in place, and once the basic hull was completed, a decision was needed on how to add a second layer of planking, kit instructions specify to use another layer of 0.5mm walnut. I really wanted to try and replicate the clinker hull planking shown in the AOTS Diana book, and to do this a used some cardstock instead of wood to cut individual strakes. Fist challenge was to determine the width of each plank on the hull. This was done using 'tick strips' at about 10 points along the hull. The lowest (non-clinkered) garboard strake was simply omitted. The end of the cardstock strips were cut down (rather than truly tapered) to allow the planking to terminate smoothly at the front bow and stern which is how I believe the planking is done in practice. Each strip was cut to about 2.5mm thickness, the benefit of cardstock is that when coated with dilute PVA glue it becomes very manageable and can simply be bent to shape rather than the spiling that would have been necessary if wood had been used. Once the hull had been marked out to 'prove' the planking separation, these were not referenced again. Once a strip had been installed, the lowest point of the next strip was placed using the tickstrips. This process was simply repeated, with time allowed for the glue to dry sufficiently for the surface to harden. Dilute PVA was used quite liberally to ensure a good bond between the wood and card as the hope is for this to add additional structural strength. The final 2 strakes were completed with one wider strip as the uppermost strake is non-clinkered and would not be visible. Extra height was added for safety as this can be easily cut back once glue has dried. Once both sides had been completed, each was given a few more coats of dilute PVA for added insurance....why not?! With the exterior planking work completed, attention could be turned to the interior and the potentially catastrophic step of removing the frames. This actually went smoothly, but has to be approached with patience and a light hand. The kit base was removed as well as the actual flooring should be a little lower I feel. The frames were cut back a little more than is perhaps necessary, but this will allow flexibility as to where the floor is, and hopefully prevent them from being seen. Practically, it also allowed the interior planking to be sanded more effectively. The hull in this state clearly needs a light hand, but is surprisingly robust despite my fears. Once an initial sanding had been completed, some light wood filler was used to fill imperfections and deal with some of the slight clinkering of the topmost walnut strips. Once sanded back, dilute PVA was once again brushed on....yes, paranoia perhaps, but can't hurt. Finally I was able to add an initial coat of white point to the hull to get a better idea of how this turned out (In this case Valejo 'off white' as it was all I could get from Amazon in a reasonable timeframe). This highlighted that some finish work will be required in some areas where the eye is drawn to surface imperfections, but one thing I've learned is that the cardstock planks can be effectively sanded, probably due to the application of dilute PVA glue. Definitely some fine tuning still needed and far from perfect, but its hard not to be pleased with the result for a first attempt.


-
Hi Stergios, I'm assuming you are referring to the fore topmast preventer stay, it goes through the front 'hole' in the bowsprit 'bee'. The plans are really not clear at all on this and seem to have it be attached to other rigging elements. Photo below of how I did this, if memory serves it is called out in Petersson's "Rigging Period Ship Models" on page 18. This also shows a fore topmast preventer stay as well, I wonder if this is something that is not necessary on Snake because of the different sizes of the ship (?).
-
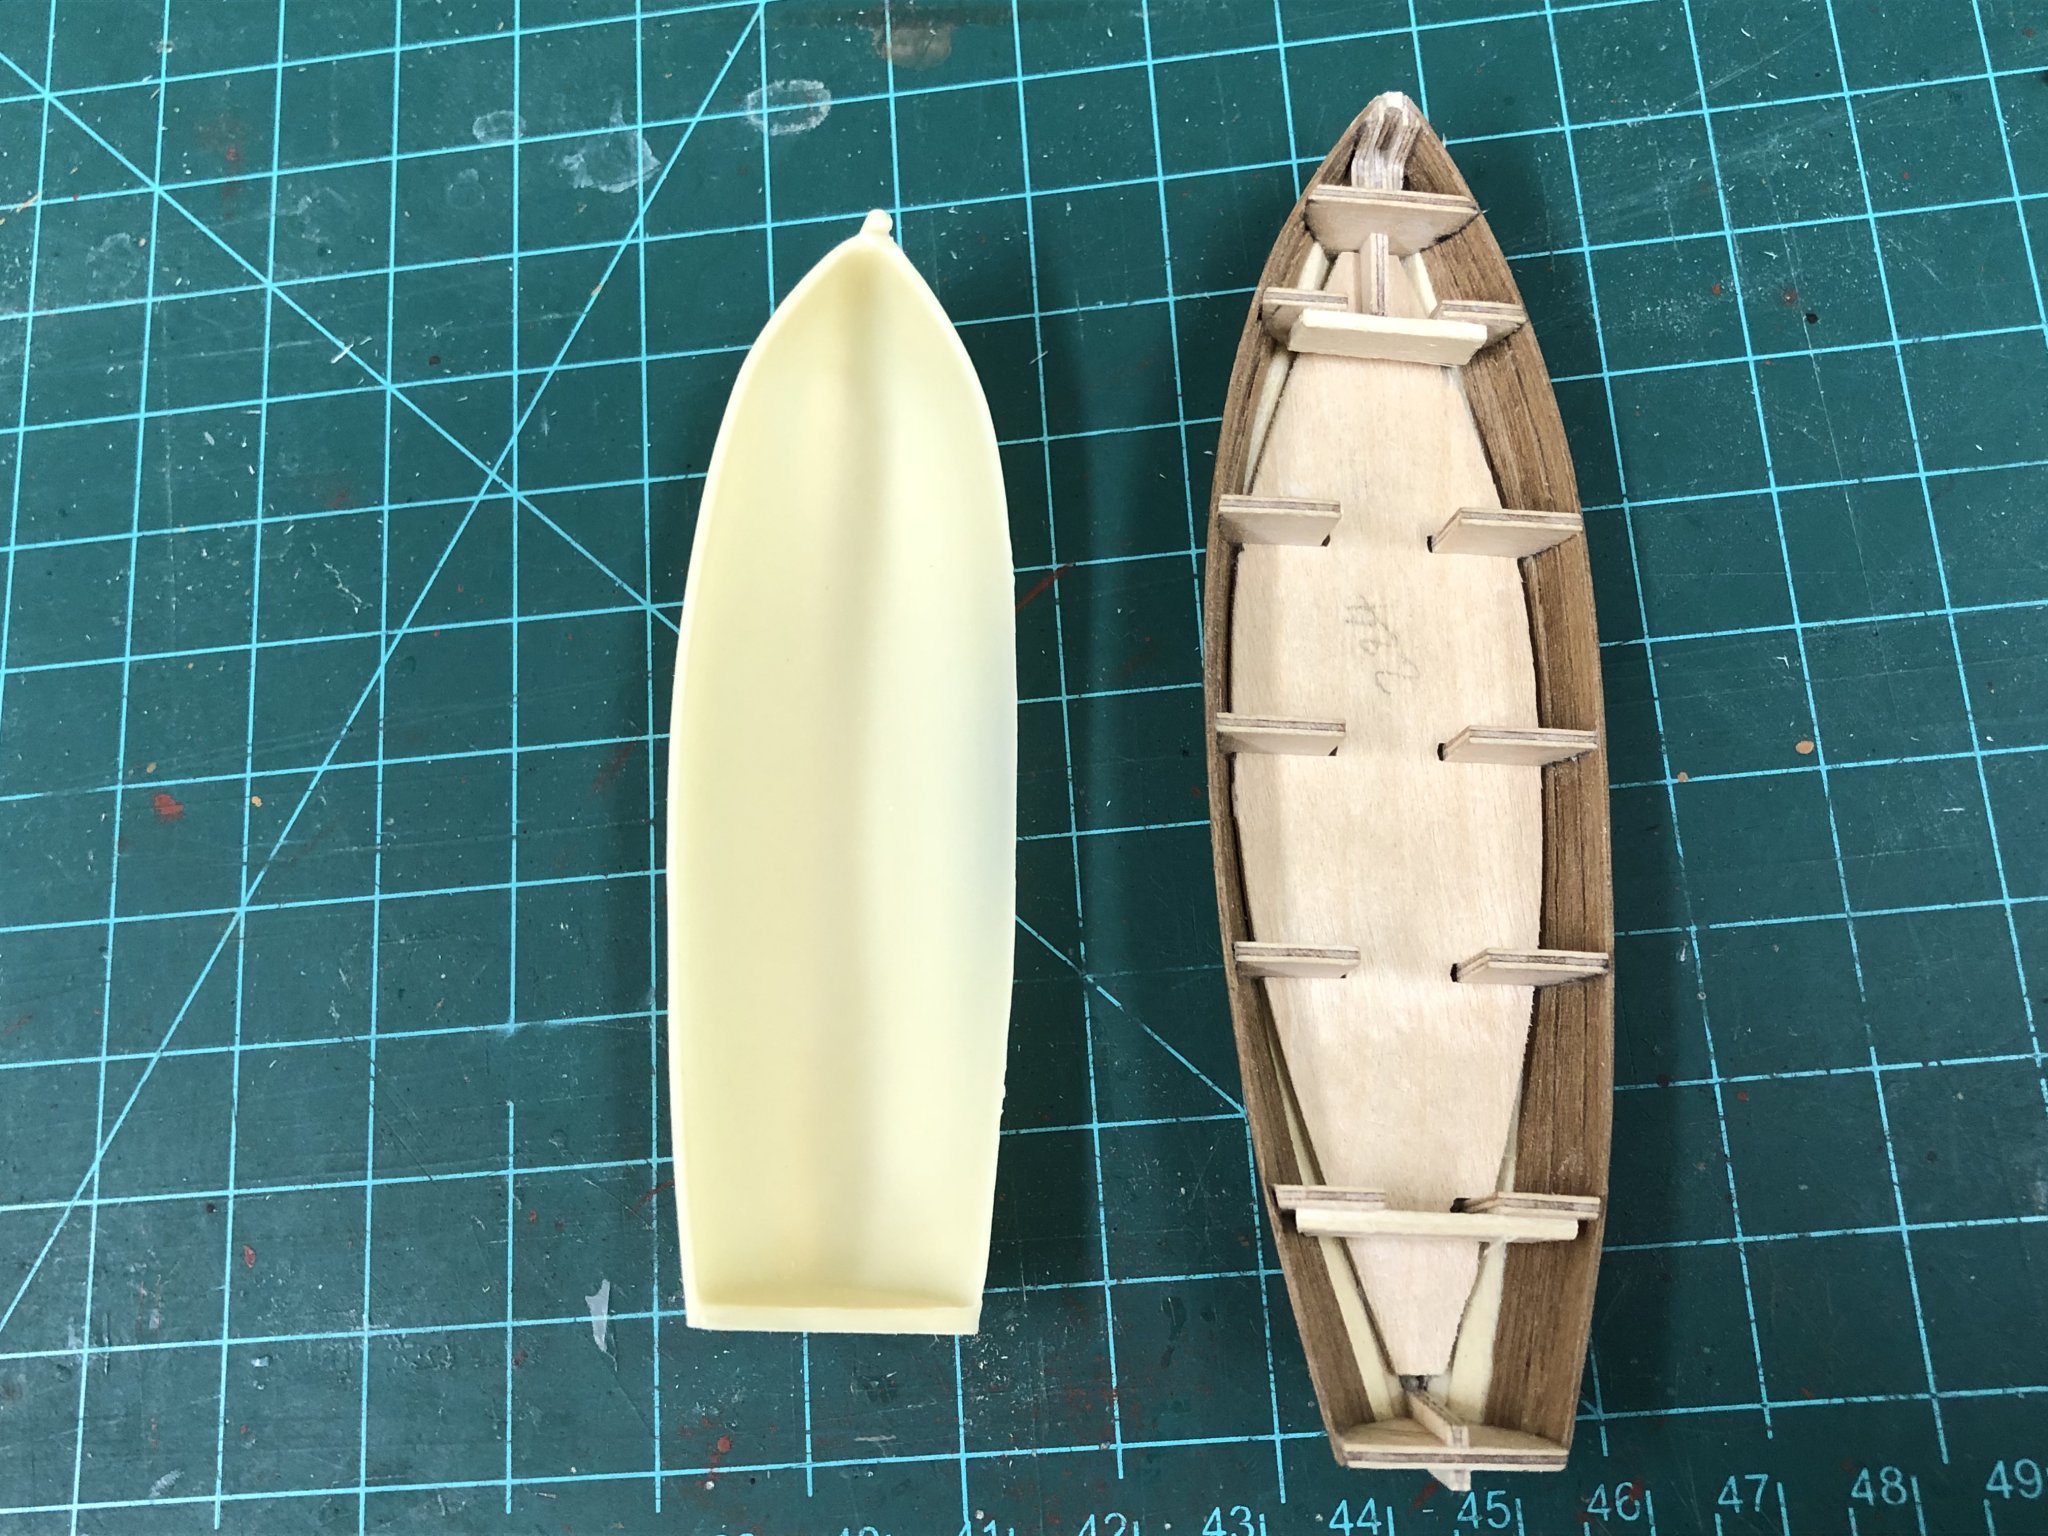
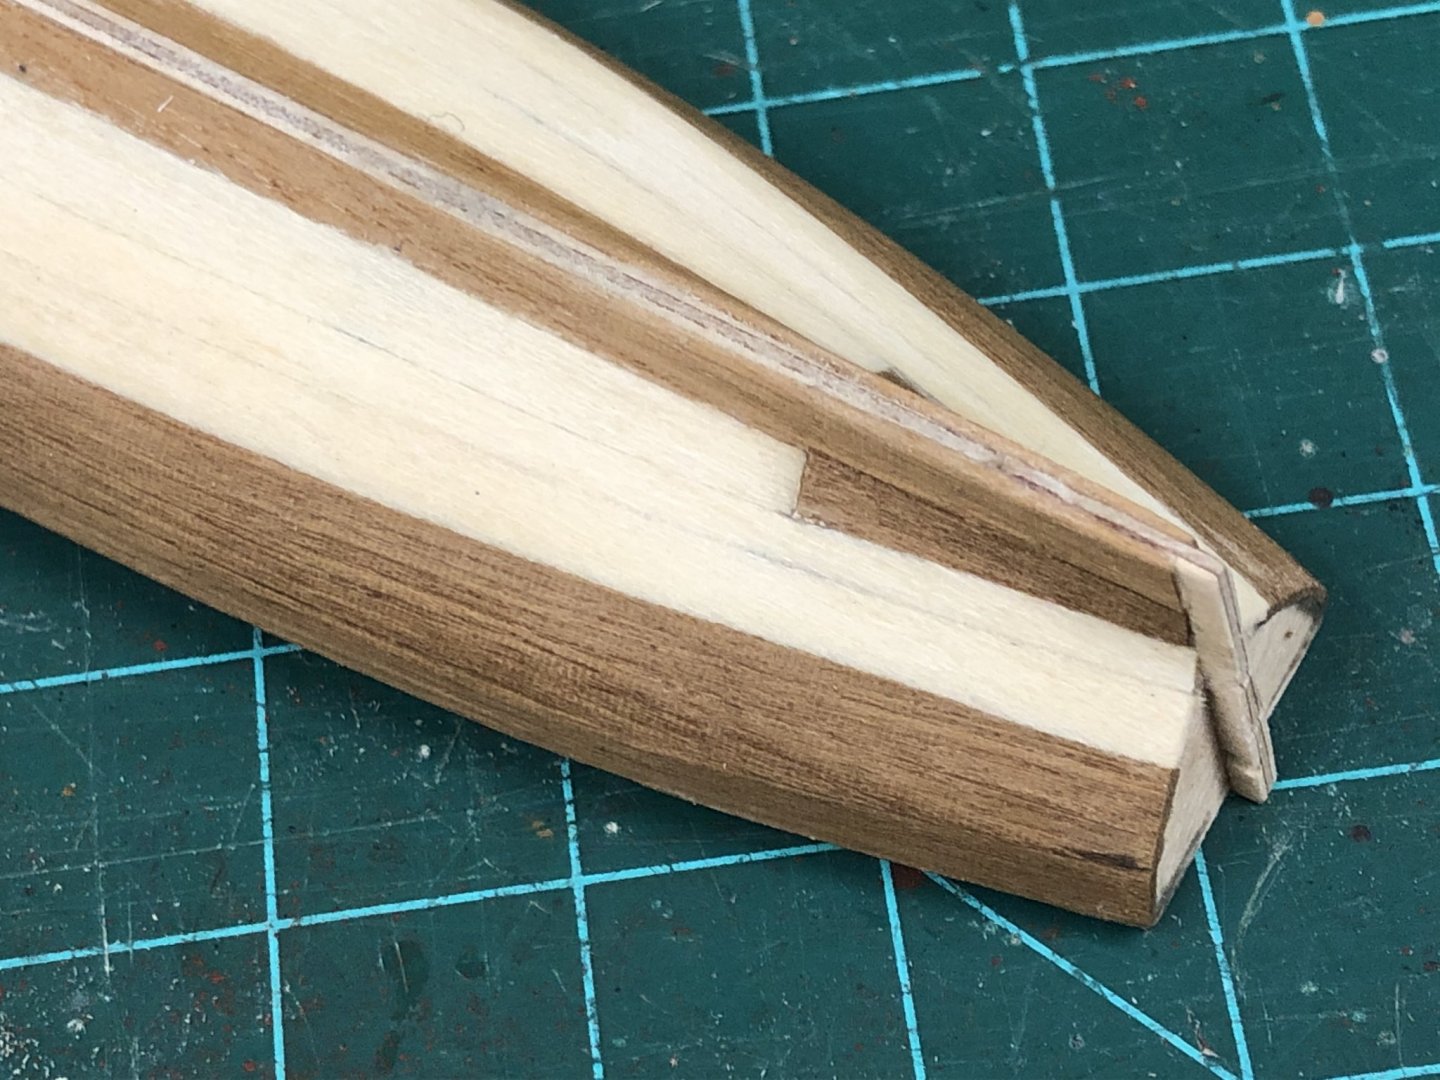
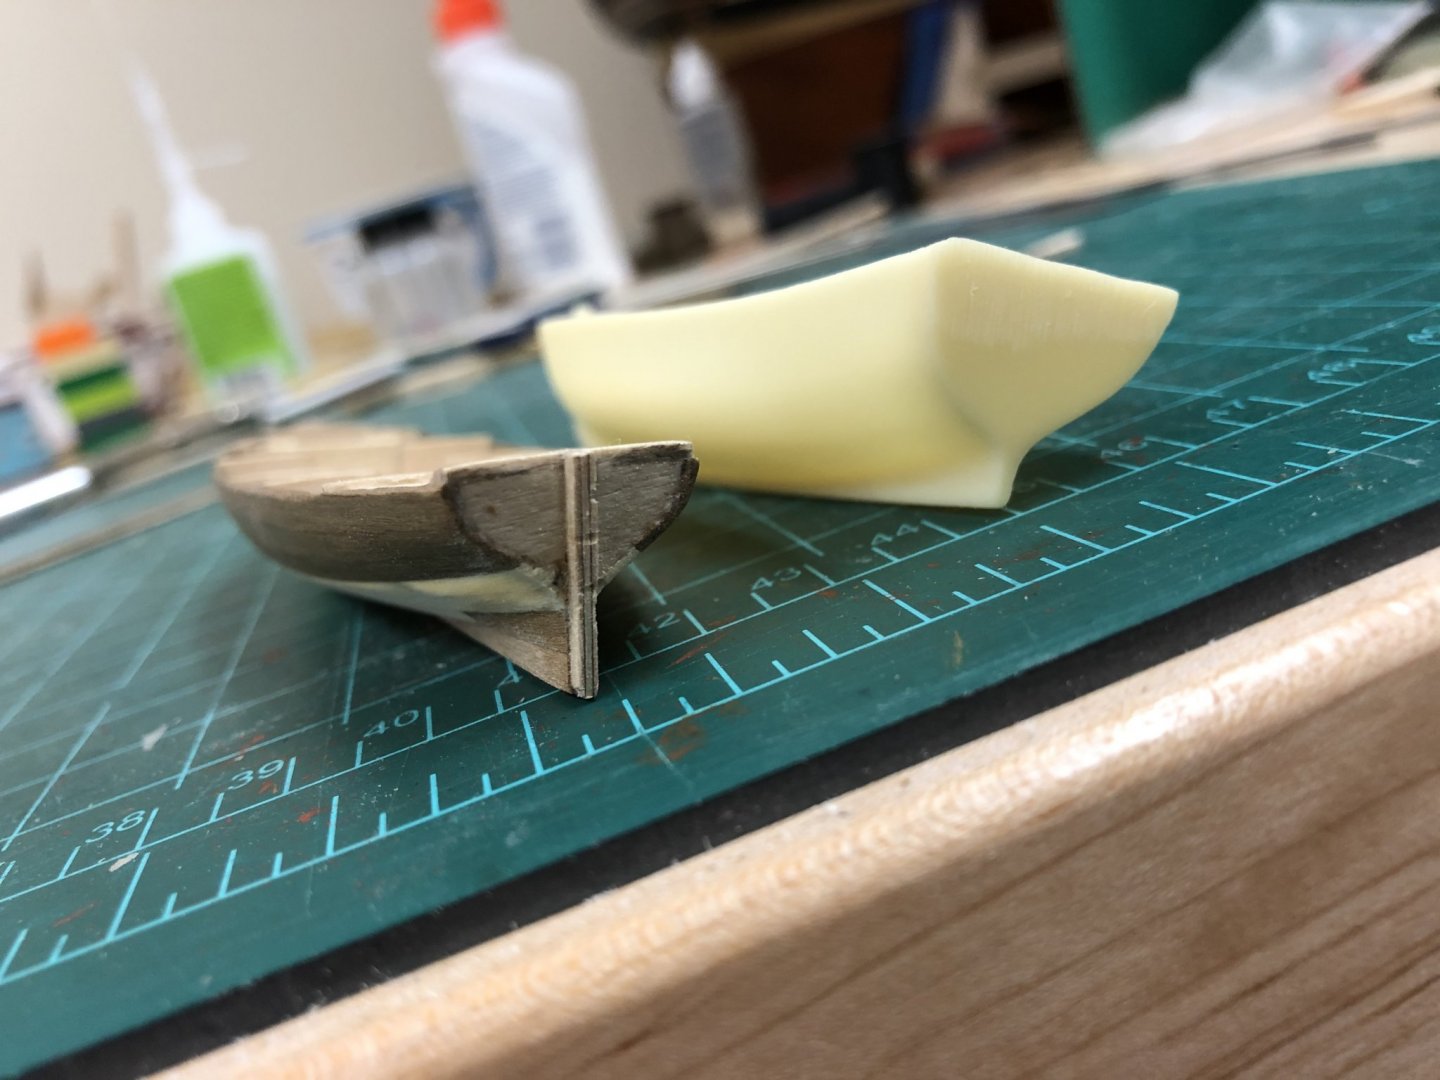
Thanks chaps for the ongoing interest and support. Continuing to feel my way through this. I really wanted to make the kit materials work, but had to go off on my own which was educational, and more fun than I expected. I managed to get only 3 strakes of the walnut strip, with tapering, on before it became apparent that no more could be done - even with these some clinkering was unavoidable even with the thin strip. The thin 0.5mm walnut strips (all of varying thickness and closer to 0.65mm thick) don't edge bend at all to be able to use that technique and luckily some ~1mm thick wood sheet was found from which spiled planks could be cut (not sure what it is, CMB had supplied this when I ordered maple, but it clearly isn't and my guess is its limewood sheet, its pretty soft). You can see the curvature required below. The keel former was cut back to provide a slight rebate for the planking at bow and stern, fiddly and a bit messy but seemed to work. Glad the more structural work is behind me. The garboard was installed before the planking was closed up, don't think the shape is fully correct for actual planking practice as this was not tapered at all, but it allowed the last 2 strakes to fit easily enough. The other benefit was that the final strake had a straight side which made shaping that much easier. Glue was only used very sparingly on a few strakes and frames where necessary to keep the lines true. After each strake was positioned, the surface was sanded lightly and diluted PVA glue brushed on to the whole to hopefully add some additional strength. Finally, here's a comparison of the hull form to the resin Cutter mini-kit supplied by CC, I bought this way back with the kit. This looks much more like a launch rather than the sleeker Cutter's lines and overall proportions very different. To my eye the stern fascia is probably a little big proportionally but need to consider that the keel strip is not yet installed which will change the proportion, but will probably reduce this a little by thinning down the planking thickness there. Rather than put on a second layer of planks, I'm considering using card stock as a second 'planking' layer to represent clinker planking. It needs something because when the interior is sanded down the hull could be wafer thin...to quote Mr Creosote. Any thoughts or experiences with this? Next steps will be to cut and install custom bow and keel pieces, and remove the bizarre sternpost aft of the stern bulkhead that doesn't seem prototypical.

-
Nice to see the update Stergios. Don't think there is any problem not adding the additional stays in place, just be careful to ensure you put them on before any of the running rigging for the yards goes on that would go over the standing rigging.
- 1,144 replies
-
- 1
-
-
- snake
- caldercraft
- (and 1 more)
-
Hope everything arrives safely! Where is your new home Martin, I'm in Simsbury...not too far, but there again, nothing is in CT 🙂
- 467 replies
-
- 1
-
-
- fly
- victory models
- (and 1 more)
-
I think the problem with any single piece deck no matter how perfectly it is laid out or marked is that the large natural wood grain crosses over the planking boundaries unavoidable advertising that its a single piece. Personal preference of course, but I find it very hard to unsee once its been noticed. Laying individual planks, even if less perfectly, seems (again to my eye) a better way to go as the grain and slight imperfections seem to blend and disappear. Interested to see which way you go.
- 195 replies
-
- 4
-
-
- lady eleanor
- vanguard models
- (and 1 more)
-
Just in awe of your work Thomas, and thankyou for showing the details. These would be amazing at twice the size, what you've achieved at 1:64 is just incredible. Definite eye-candy, pleasure to watch your continued progress.
-
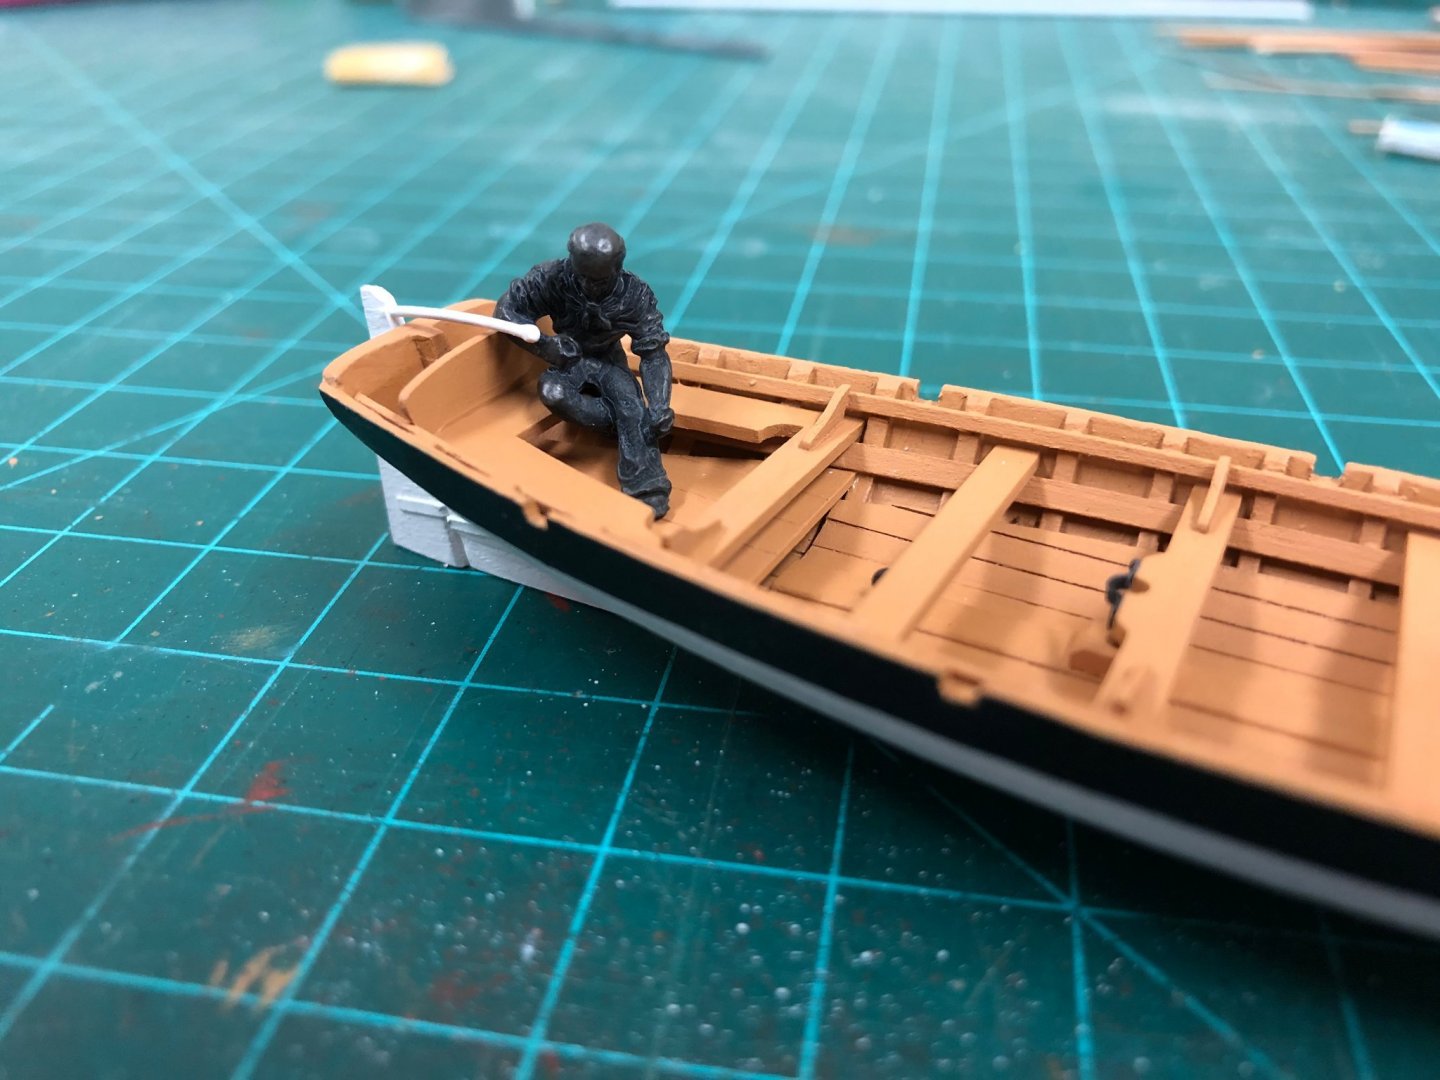
Thanks gents for the continued support and kind words. @ Eamonn - Honestly feel like I bit off more than I can chew here, but the end does seem within reach now which is a good feeling @ Carl - its a mind game! The rope tends to stretch a little after installation, so its a constant matter of installing, but not securing, and tying off in an order that doesn't cause a problem by taking away access....feels like playing Jenga. Before I continue with much more rigging I need to get going on a ships boat that I'd like to install. None are provided in the Snake kit, so I'm high-jacking one of the ship's boats provided in the Diana kit. I'm therefore keeping the building of these boats in that log (link below) to avoid confusion as it comes from that kit, even though hopefully a finished product will eventually appear here....
- 800 replies
-
- 3
-
-
- snake
- caldercraft
- (and 1 more)
-
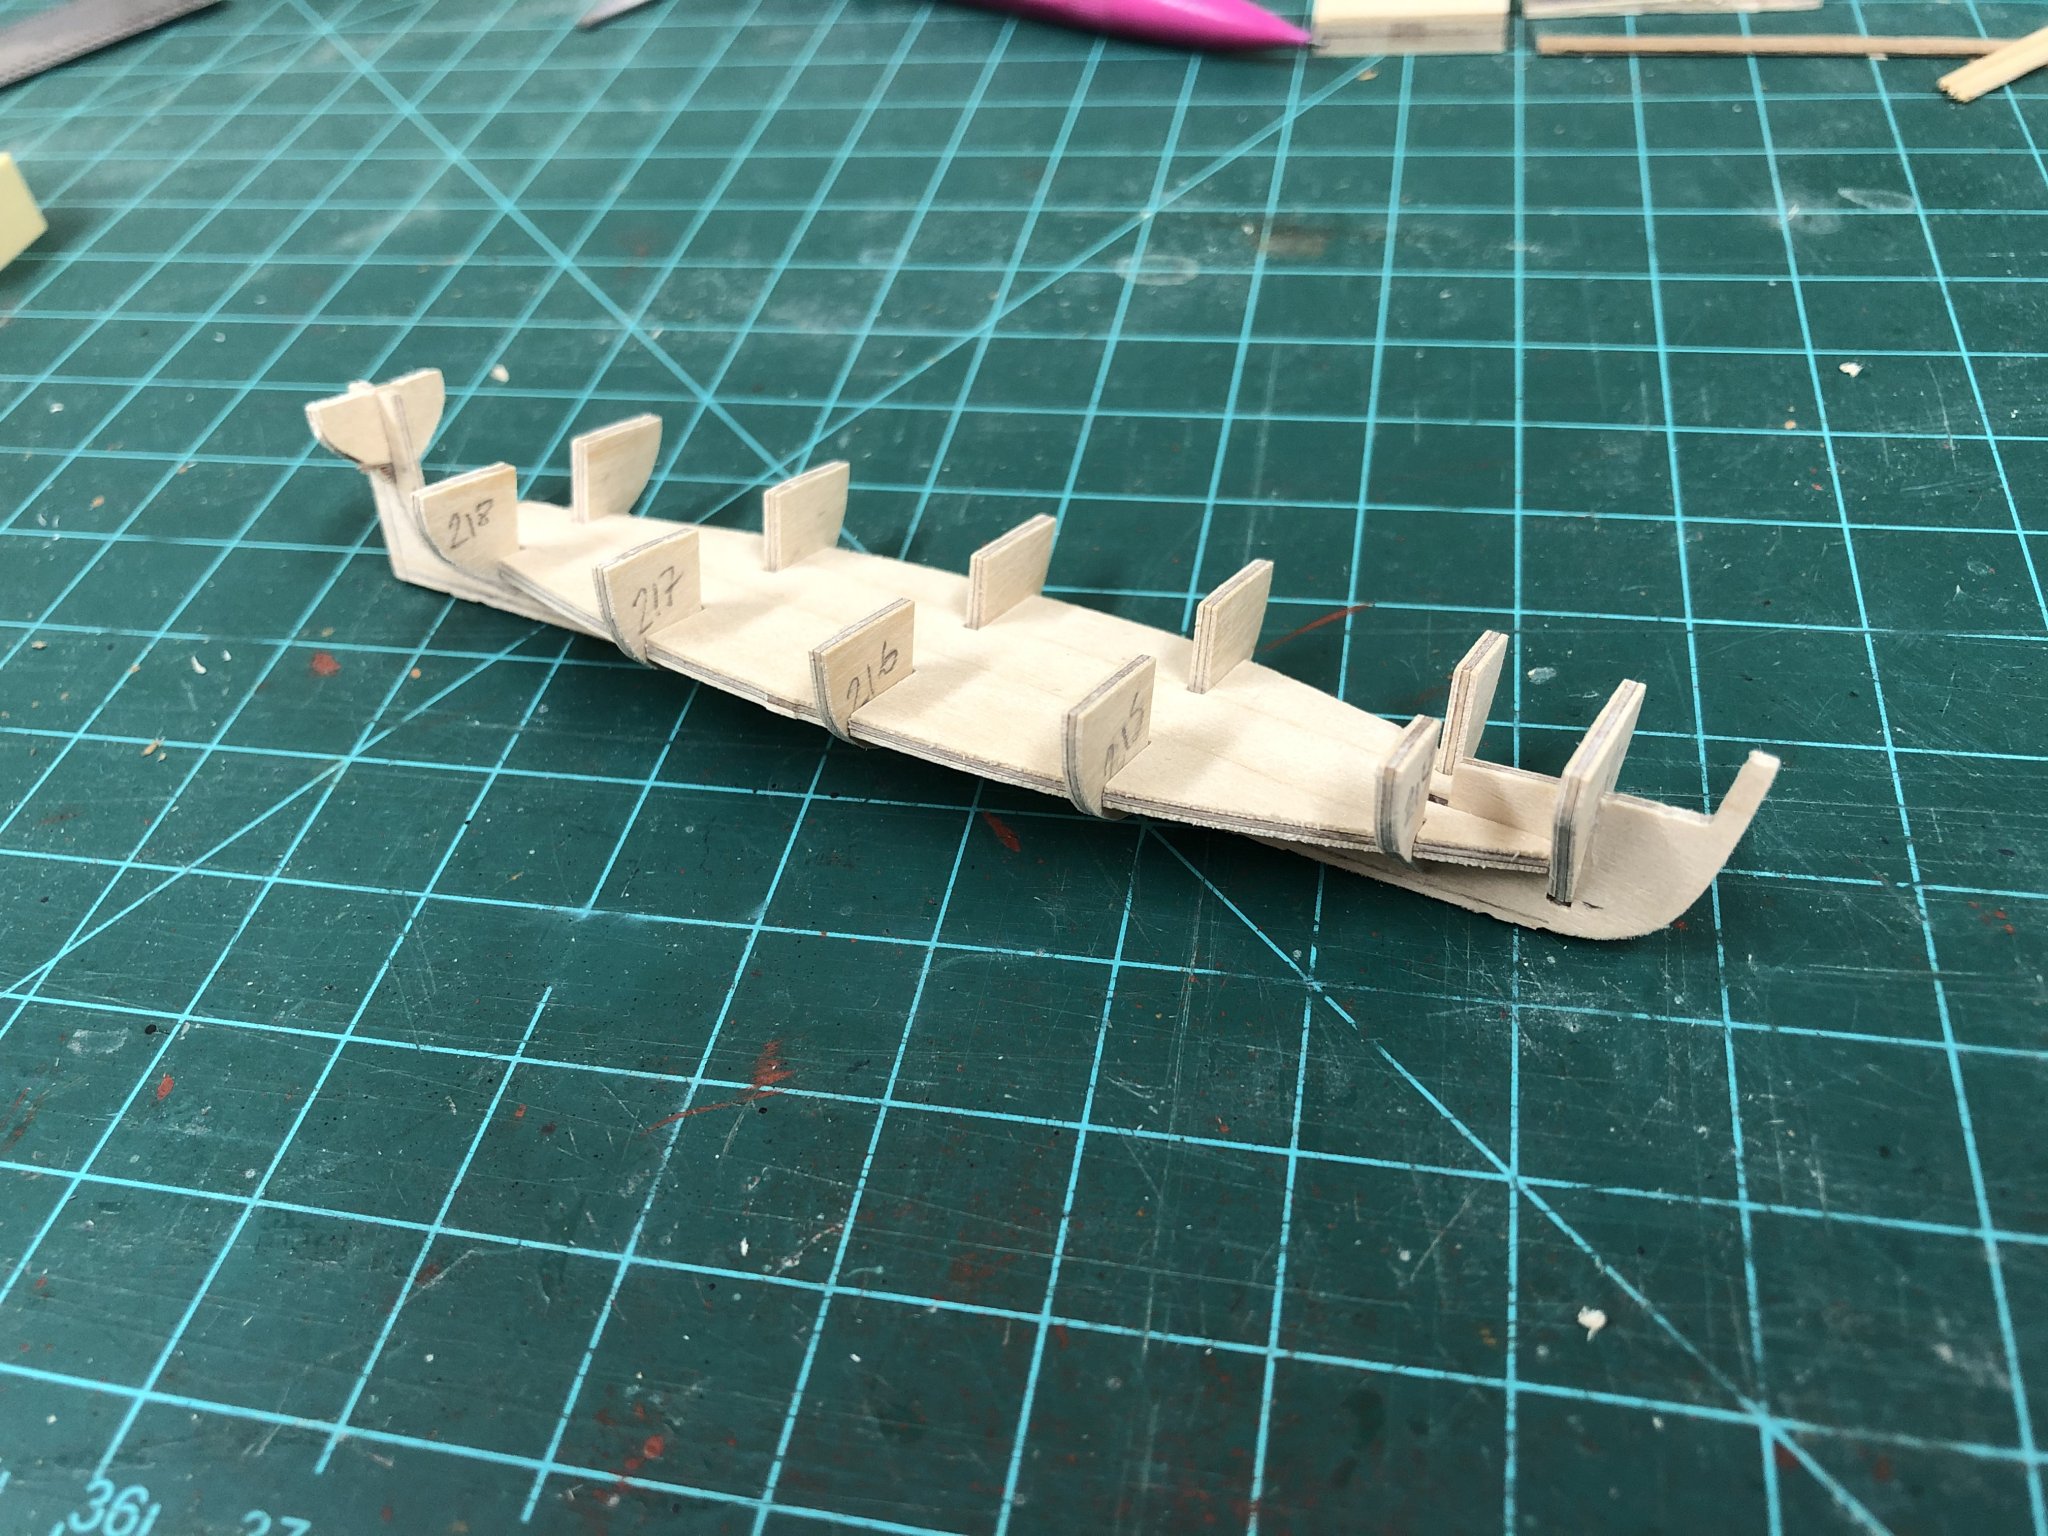
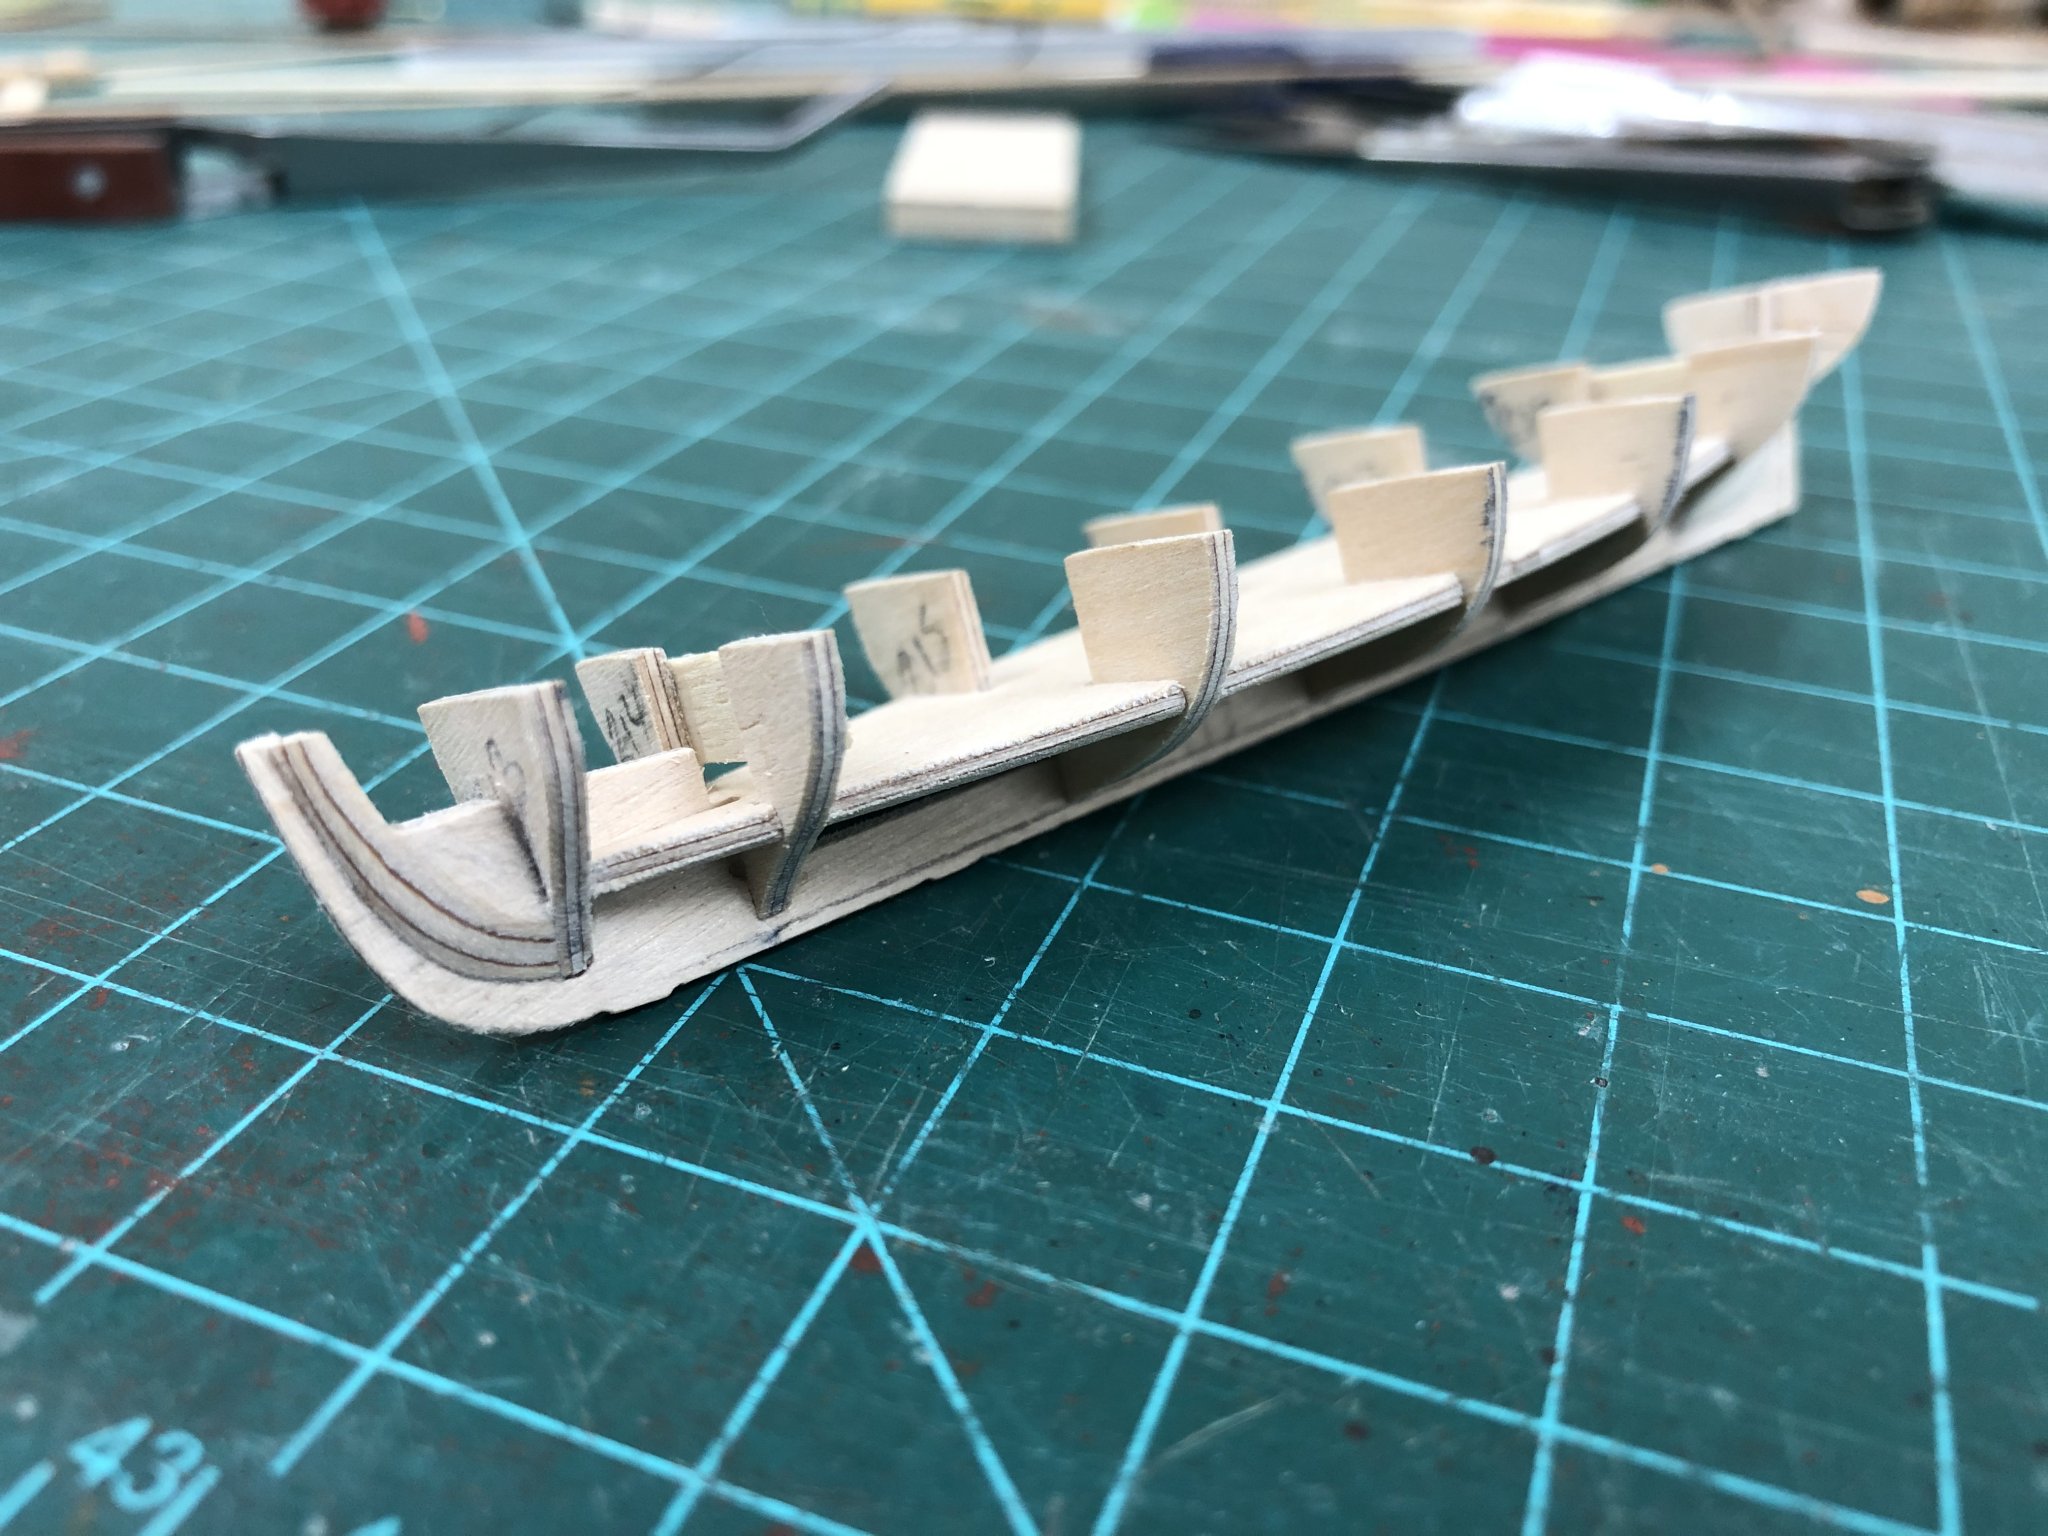
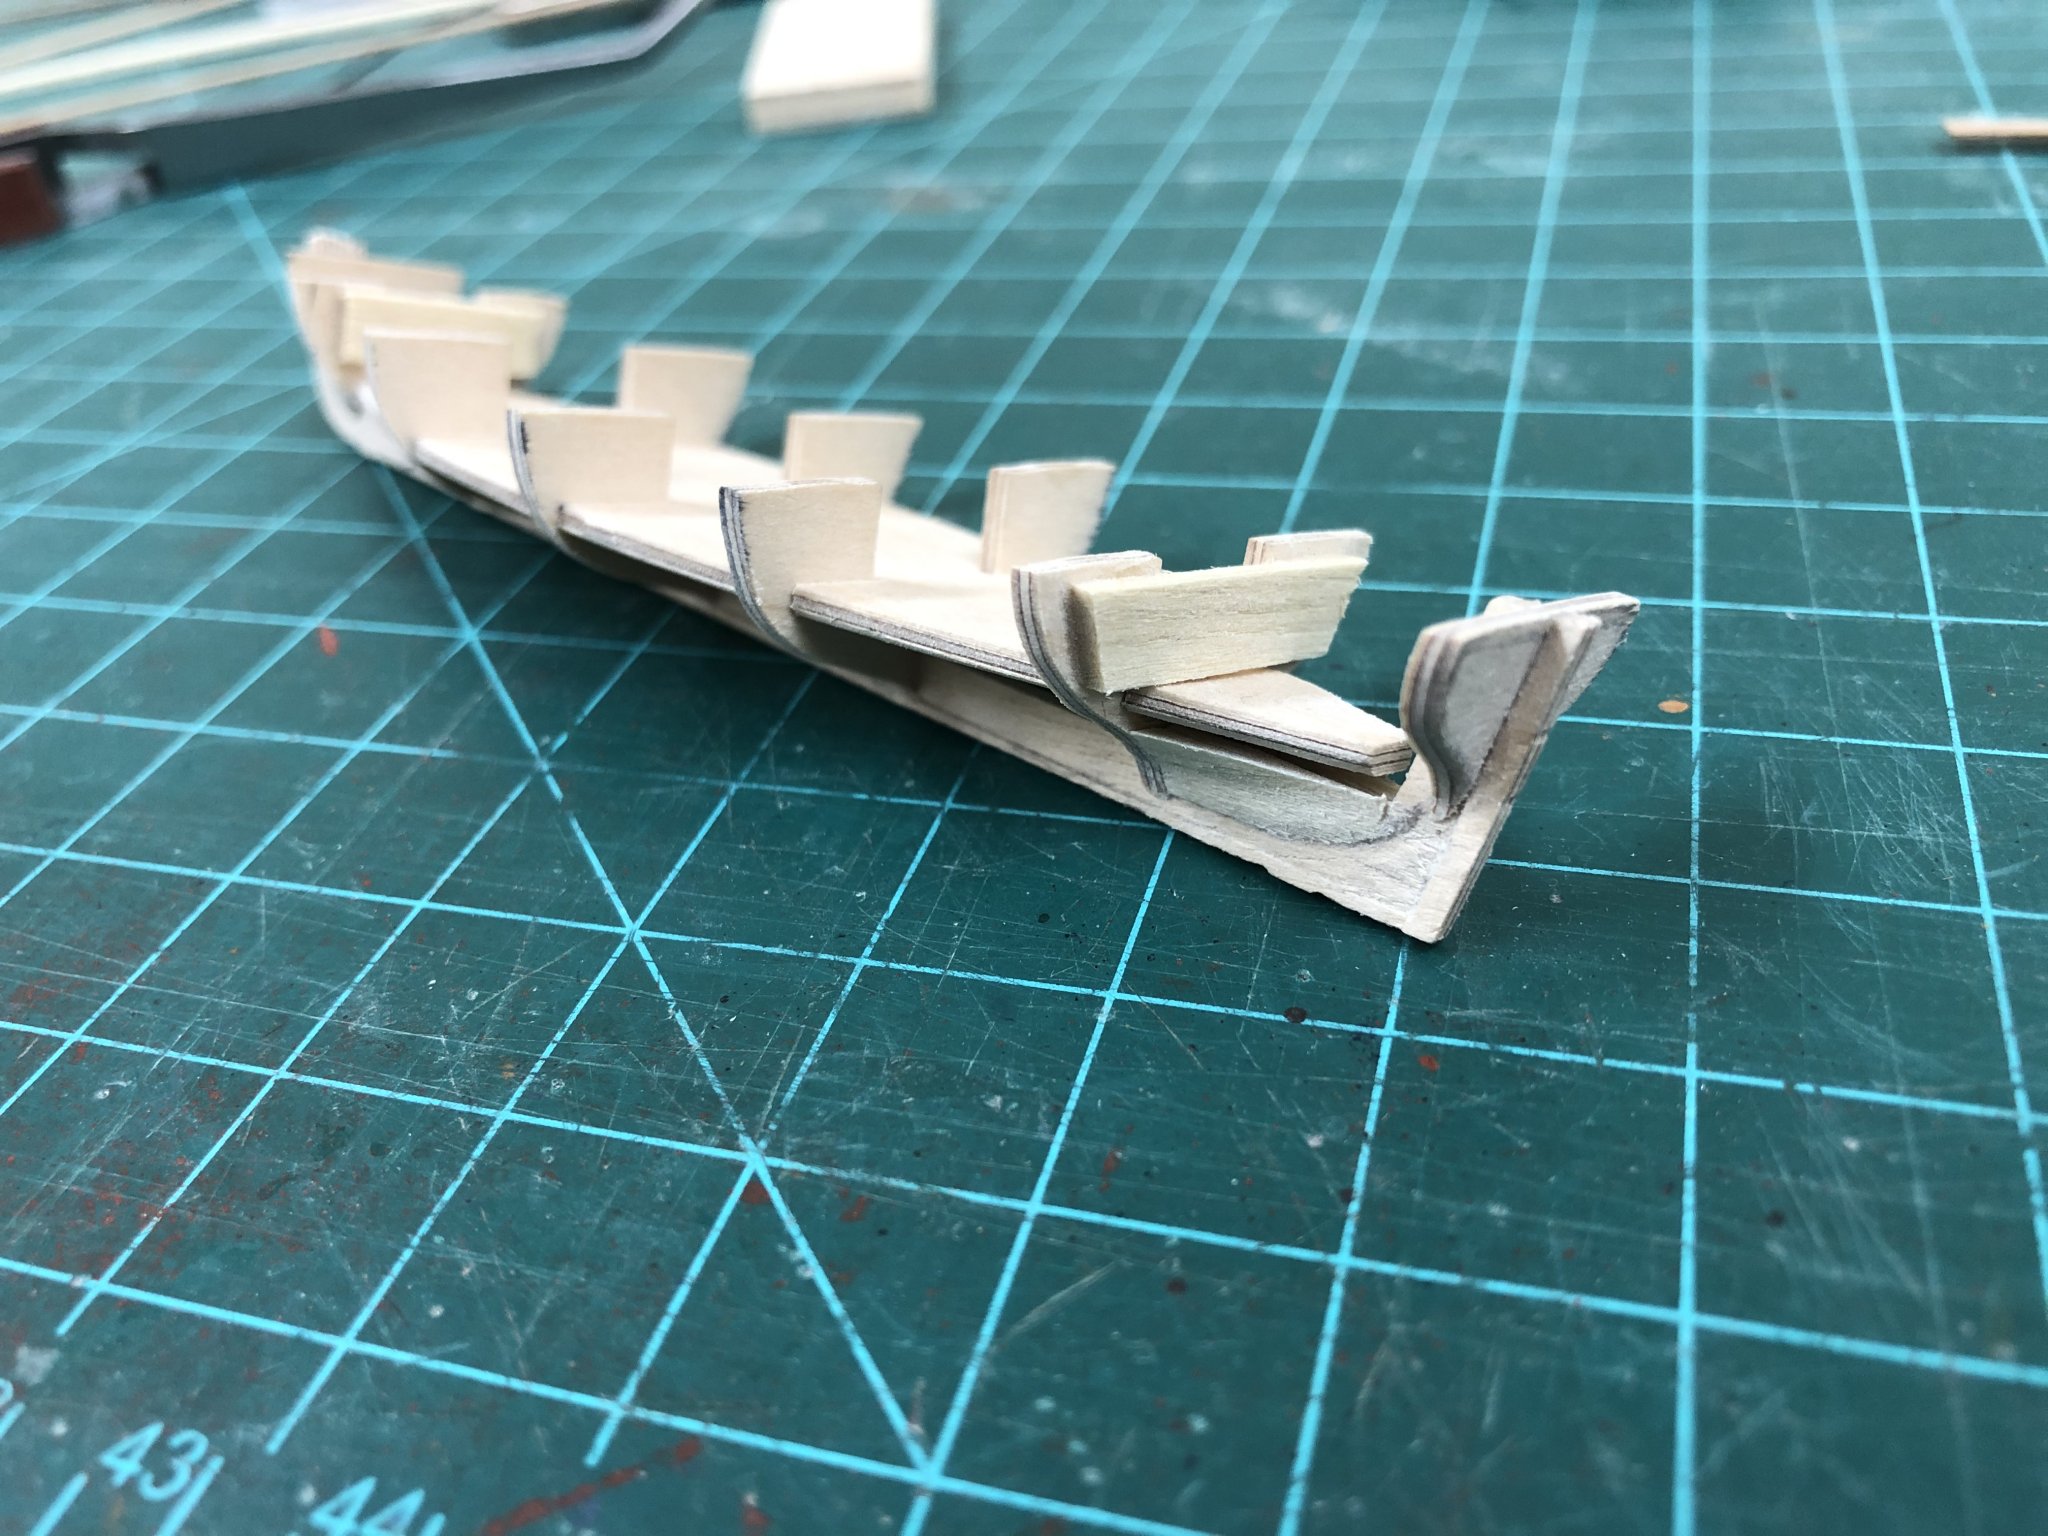
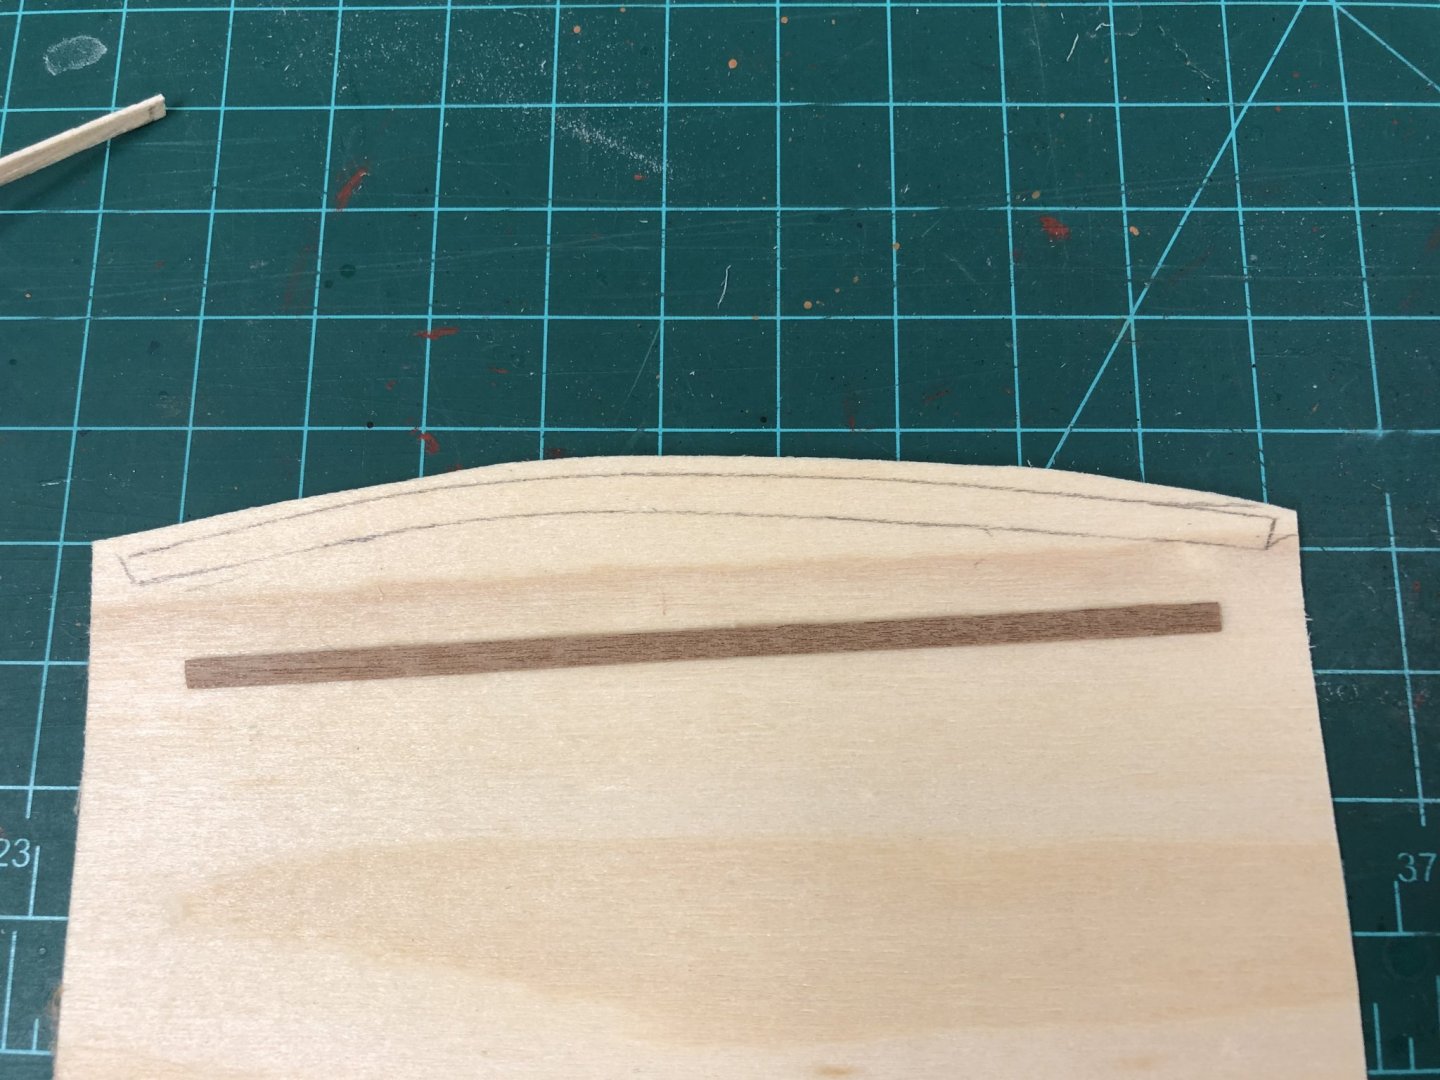
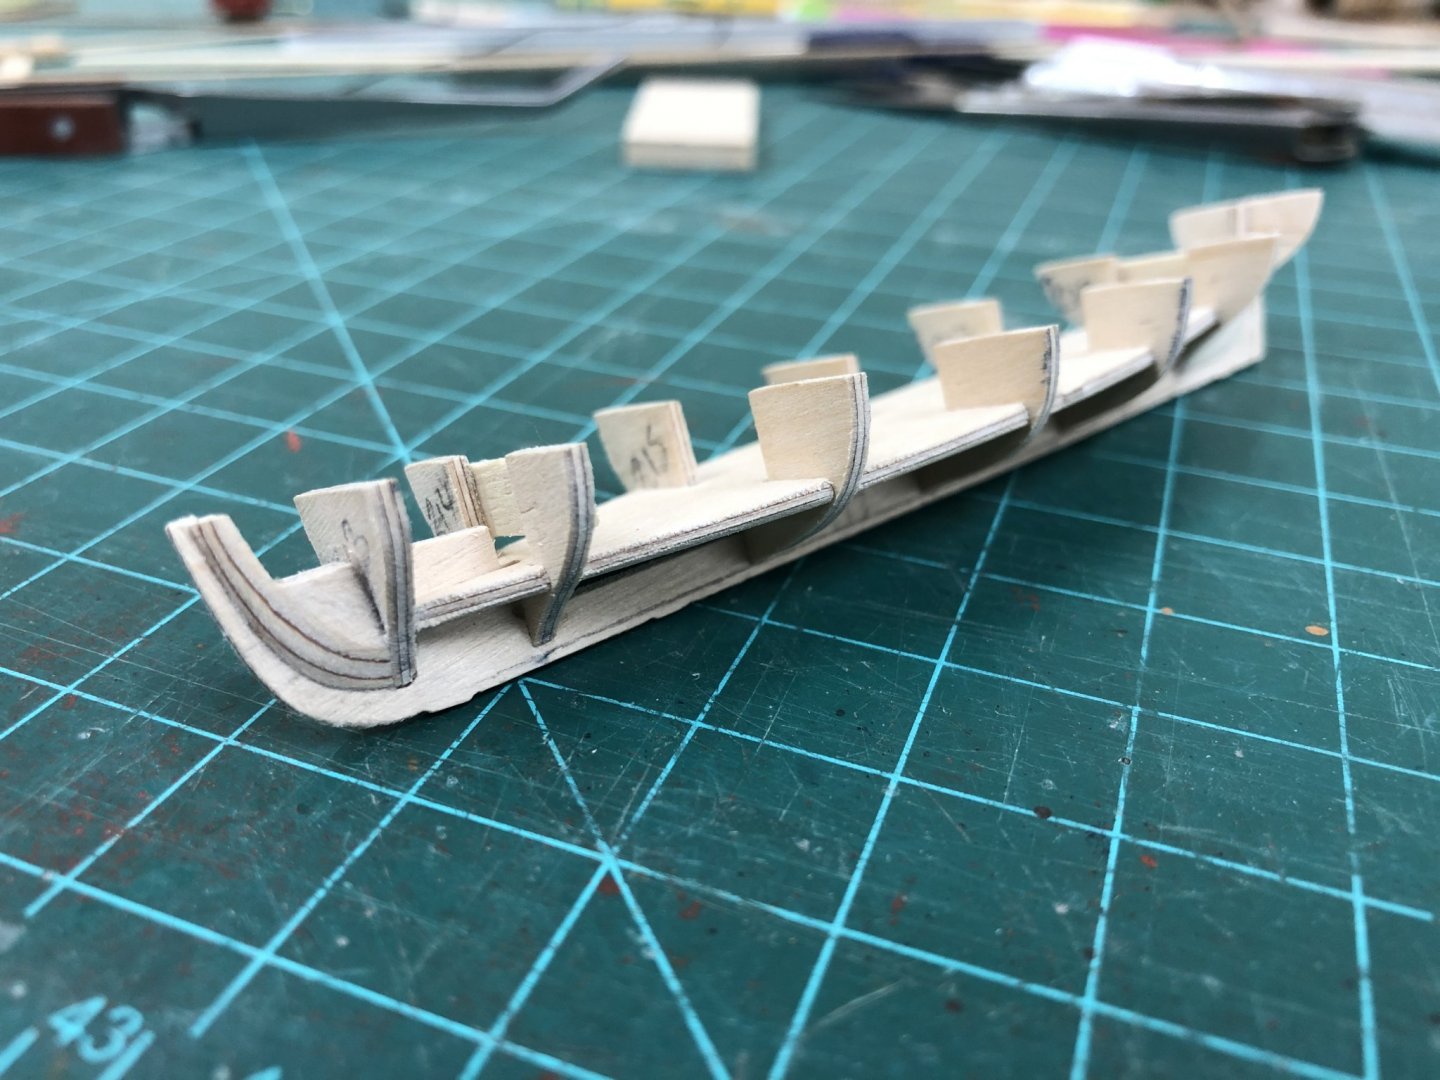
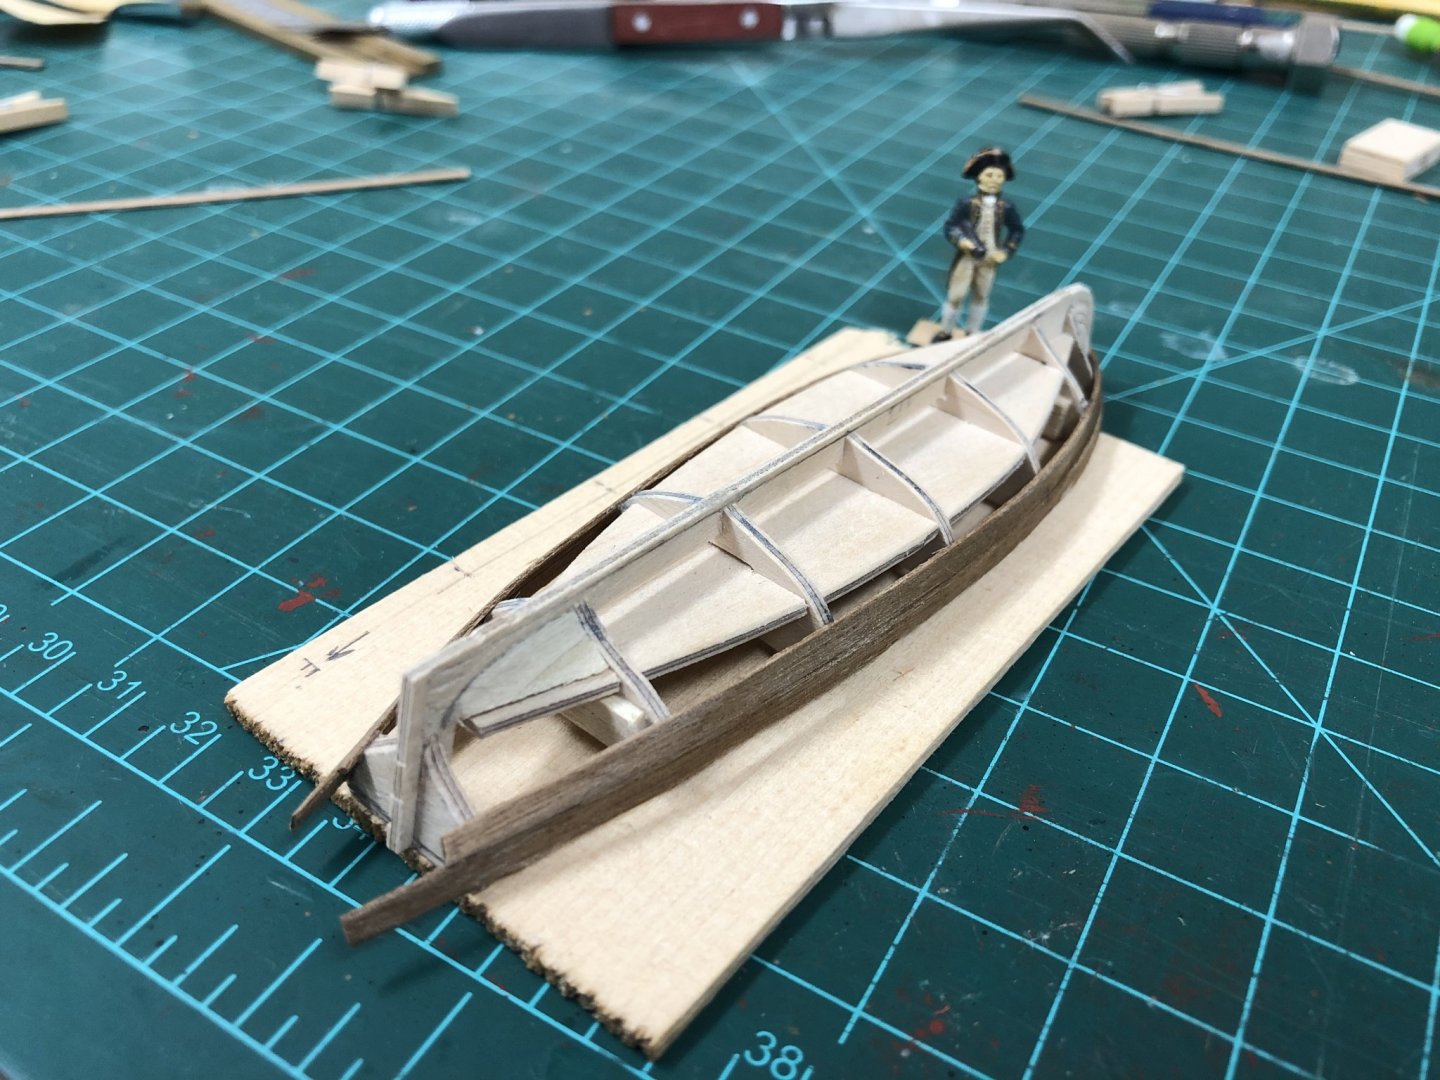
Sorry for the delay to recognize the kind comments and likes! 24 Foot Cutter: Work has started on the 24' Cutter. I'm recording my progress in this log as it seems more logical coming from this kit, however, I hope to mount this boat on my other build, Snake. I leaning toward not mounting any ships boats on Jason, at least directly, so this seems a good opportunity to stick my toe in the water on these smaller boats without risk of serious catastrophe if things don't turn out as planned...I'm determined to make the best show of these as I can building from the kit, so we'll see. Many other build logs seem to show the finished article so I wanted to try and record progress as I stumble in the dark. The frame parts fit together pretty easily, however what is not clear is how these would ultimately go together to end up as a cutter. The instructions essentially say 'plank this as you did the main hull' which isn't too much help. The first decision was to figure out where the frames should be set in the keel former. Looking at the profile and the lines, it seemed the best option was to sit the frames approx. 1mm above the keel bottom. This will mean that planking will be pretty much flush with the keel former so an external keel will need to be added. Straight away the stern fascia looked far too small so a replacement was made from the same 1.5mm ply. The formers at the bow we reduced and beveled as best could be estimated envisioning the final hull shape and how the plank will sit, and some limewood shaped at the stern. The instructions do indicate the floor should be glued in position, however I want to leave the option open to remove this as it seems to sit a little high (should be at same hight as the keelson), and put the floor planking (footwalling) in as low as possible once the hull is completed. Profiling the frames also indicated another challenge, the 1.5mm play is rather soft and pliable, and very thin in places. To try and reduce the strain, some limewood reinforcement was glued to the most delicate frames. Even with this, this requires a light hand. Planking could then commence using 0.5mm walnut provided. The usual frustration here, the kit supplied walnut is poor....no more need be said. The main challenge at this stage is that the planking can't be glued heavily to the frames as these will need to be removed later on, and the keel former is rather bendy. Small amounts of PVA glue were used to keep planks in position on a few frames only. CA glue was used to attach the walnut strip at the bow. A second strake has been added so far using the same approach, only some PVA glue was applied to the strip edges to try and bond these. Once set, dilute PVA glue was brushed onto the installed planks to try and give it a little more strength at this stage. We'll see where this goes...


-
So the next obvious question is how does the figurehead get into the roundhouse?
-
Well Eamonn, the difference is far from subtle, the small things can make the biggest difference. If I had a chest of drawers, this would be in the top one!
- 1,039 replies
-
- 3
-
-
- ballahoo
- caldercraft
- (and 2 more)
-
Planking is definitely something that you can only learn by doing, and you're doing just fine, keep going. Everything can be solved. Regarding planks, there is some variety here but I was guided to go with planks around 150mm long, but these would have varied somewhat for the following reason that was not obvious to me at the time I planked mine. The planks should terminate on a beam in practice and the position and spacing of these vary from ship to ship. Most obviously, beams would go between the hatchways, not mid way through them. Not a big deal at all, but just as easy to follow practice.