
.JPG.ca33079f5815b861e67b9c2cccd37982.JPG)

Blue Ensign
-
Posts
4,287 -
Joined
-
Last visited
Content Type
Profiles
Forums
Gallery
Events
Posts posted by Blue Ensign
-
-
That’s a sweet looking boat you have there, Allan.
I would agree with your thoughts about the relative numbers and locations of the tholes.
I think the kit designs have been influenced by the drawings in the AotS book Pandora by John McKay and Ron Coleman.
The boat allocation is the same; 28’ Pinnace, 24’ Launch, and 22’ Yawl.
Only the Launch is fitted for double banking on all thwarts, the Yawl is also set up for rowing on alternative thwarts.
The boat drawings at 1:48 scale in the AotS book The Frigate Diana, by David White, seem to have the set-up correctly done.
Had I been moved to replace the gunwales on the Pinnace I would have off-set the thole positions to reflect the single banking common to this boat type.
To correct this on the kit one of the Gunwales would need a slight re-working.
I say slight without any knowledge of the technical issues/costs involved in changing the kit parts, but the lack of off-setting was the first thing I noticed on the Pinnace.
However, I suspect the finer points of single or double banking are lost on many kit builders, and even if recognised, are of less importance than just getting a nicely made boat, tricky enough with these bijou kits.
Regards,
B.E.
-
-
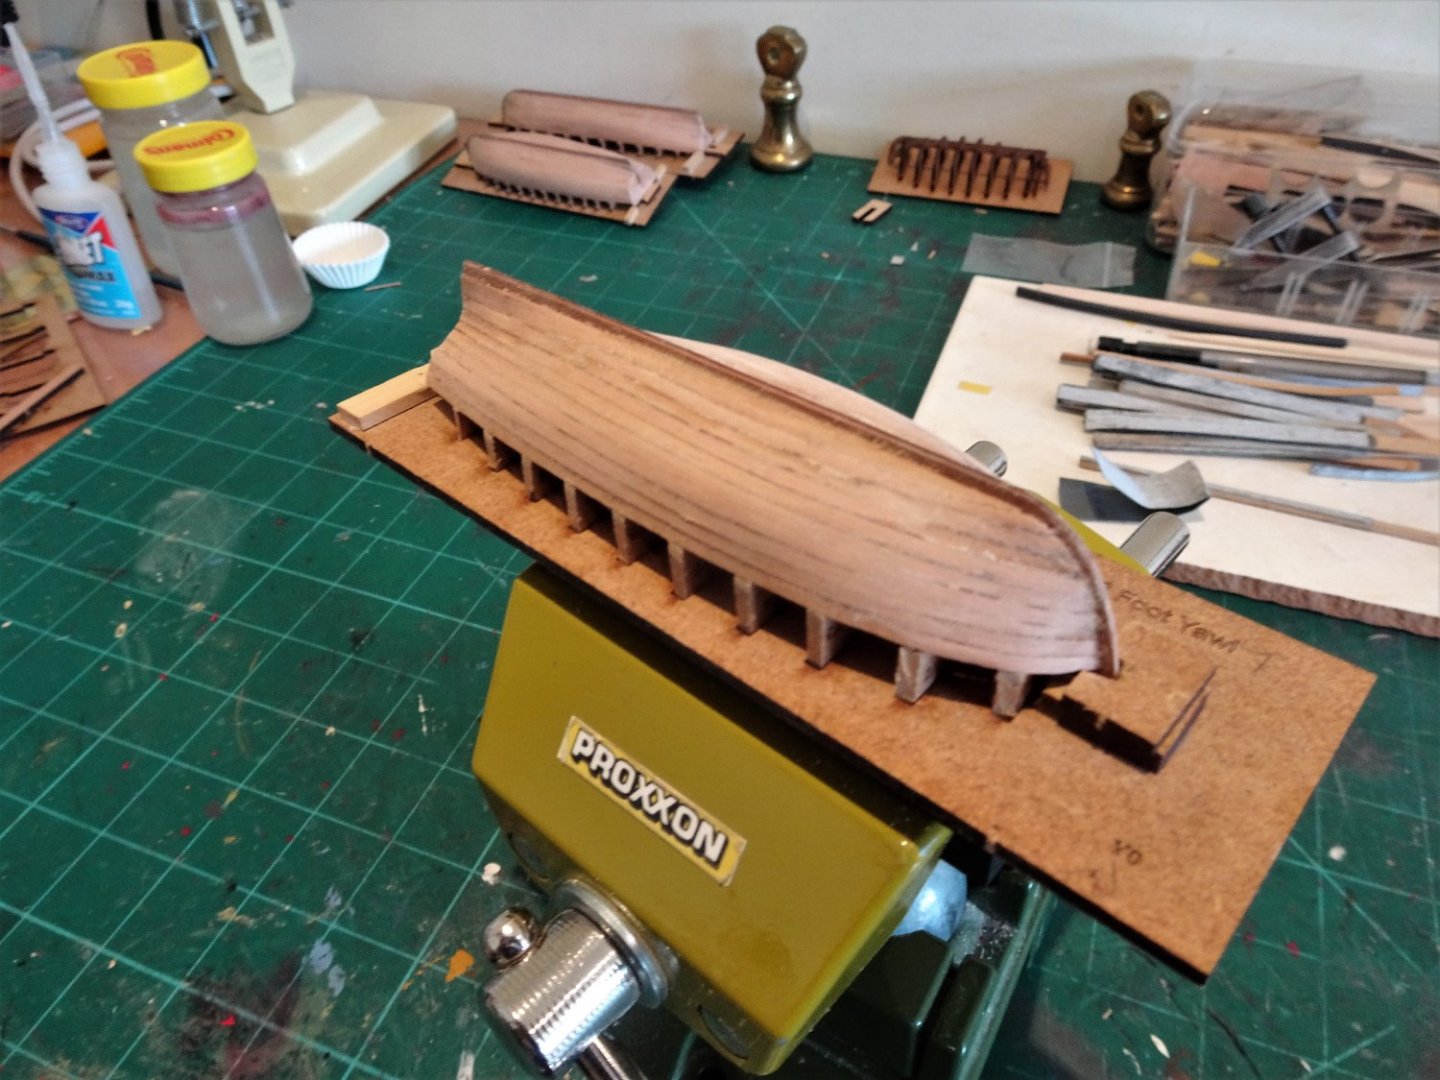
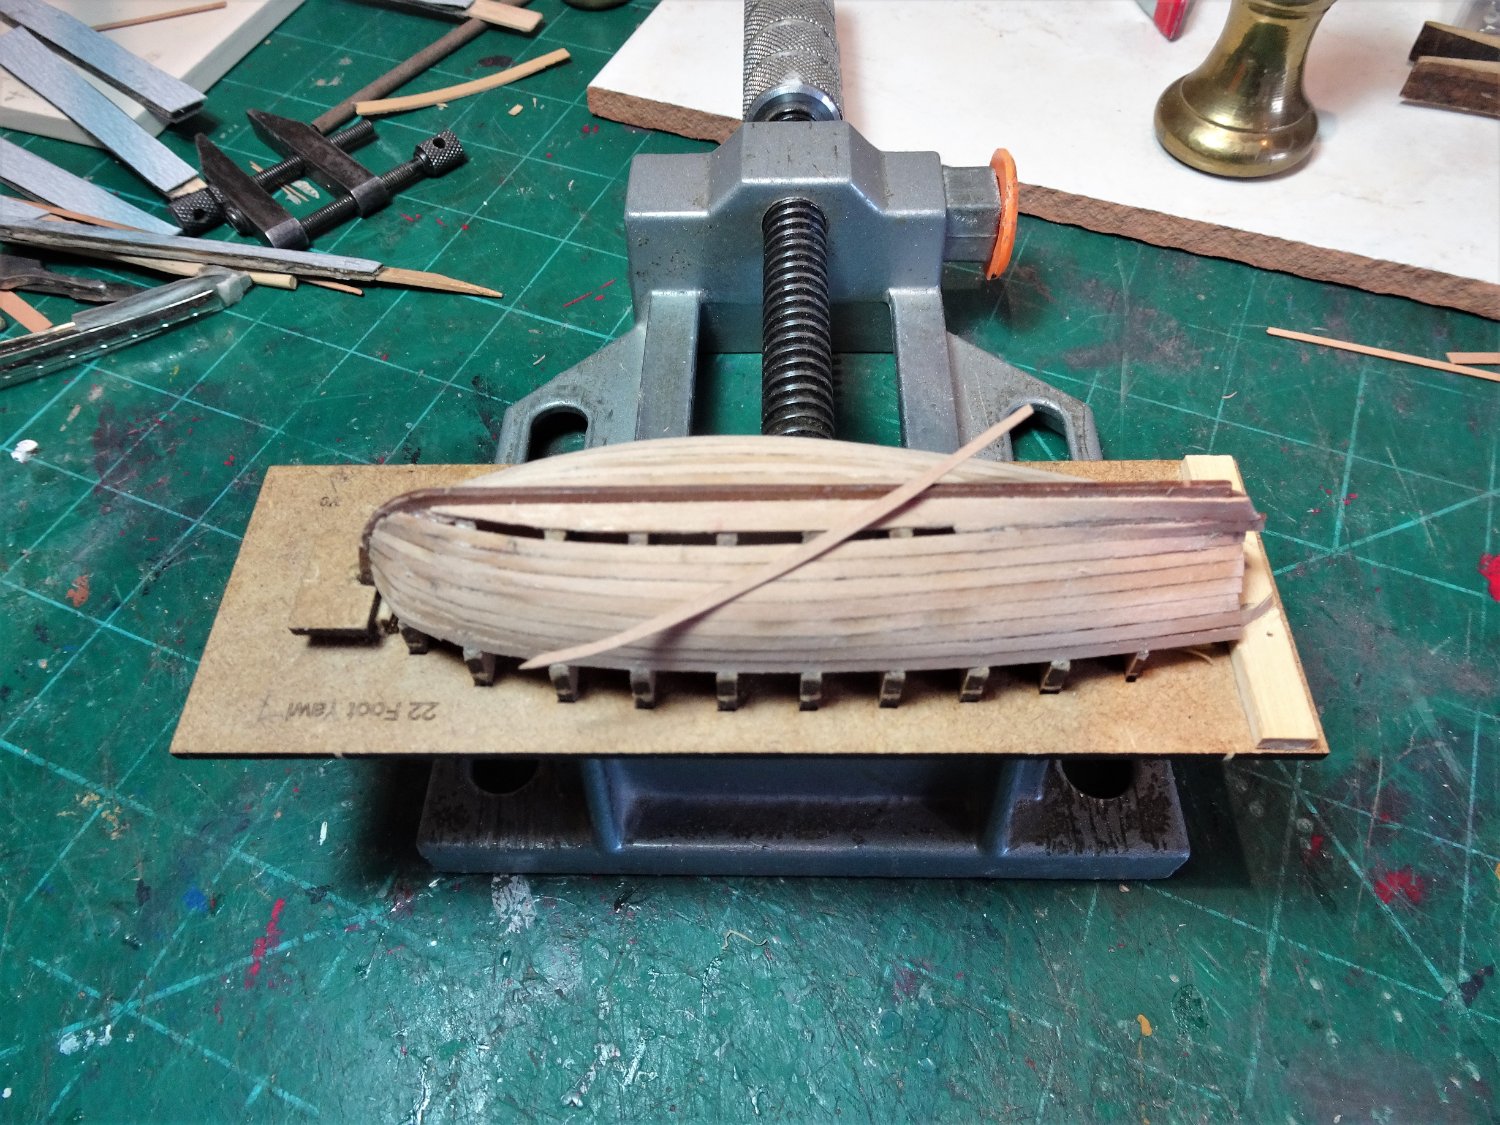
Post One Hundred and fifty-six
Completing the Pinnace
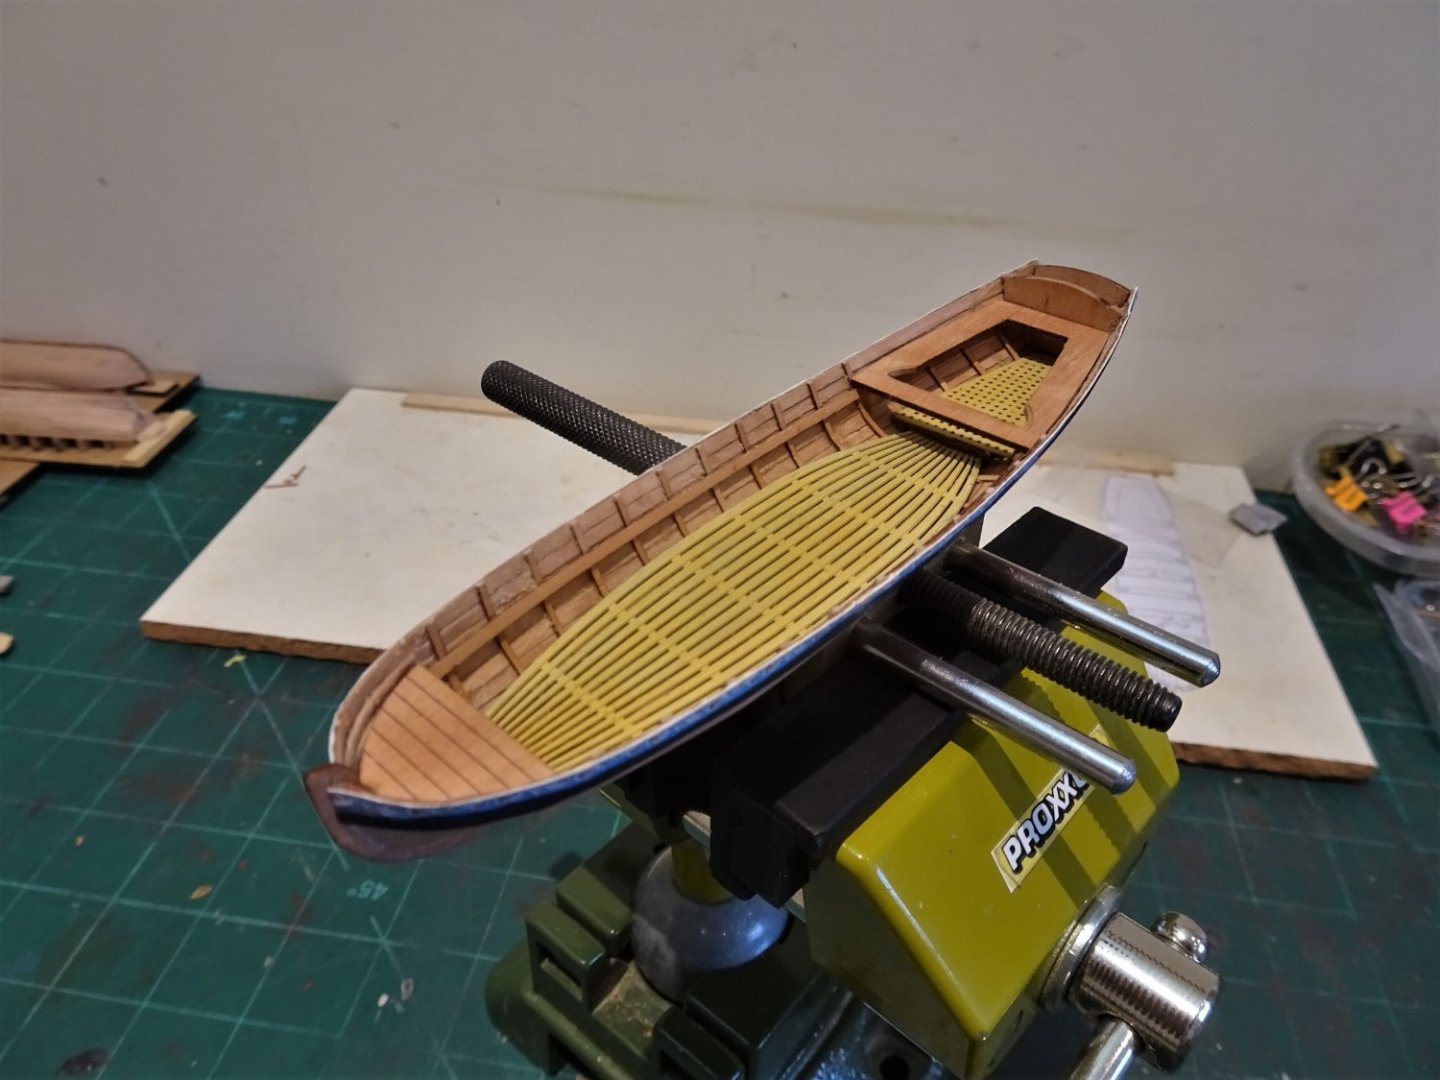
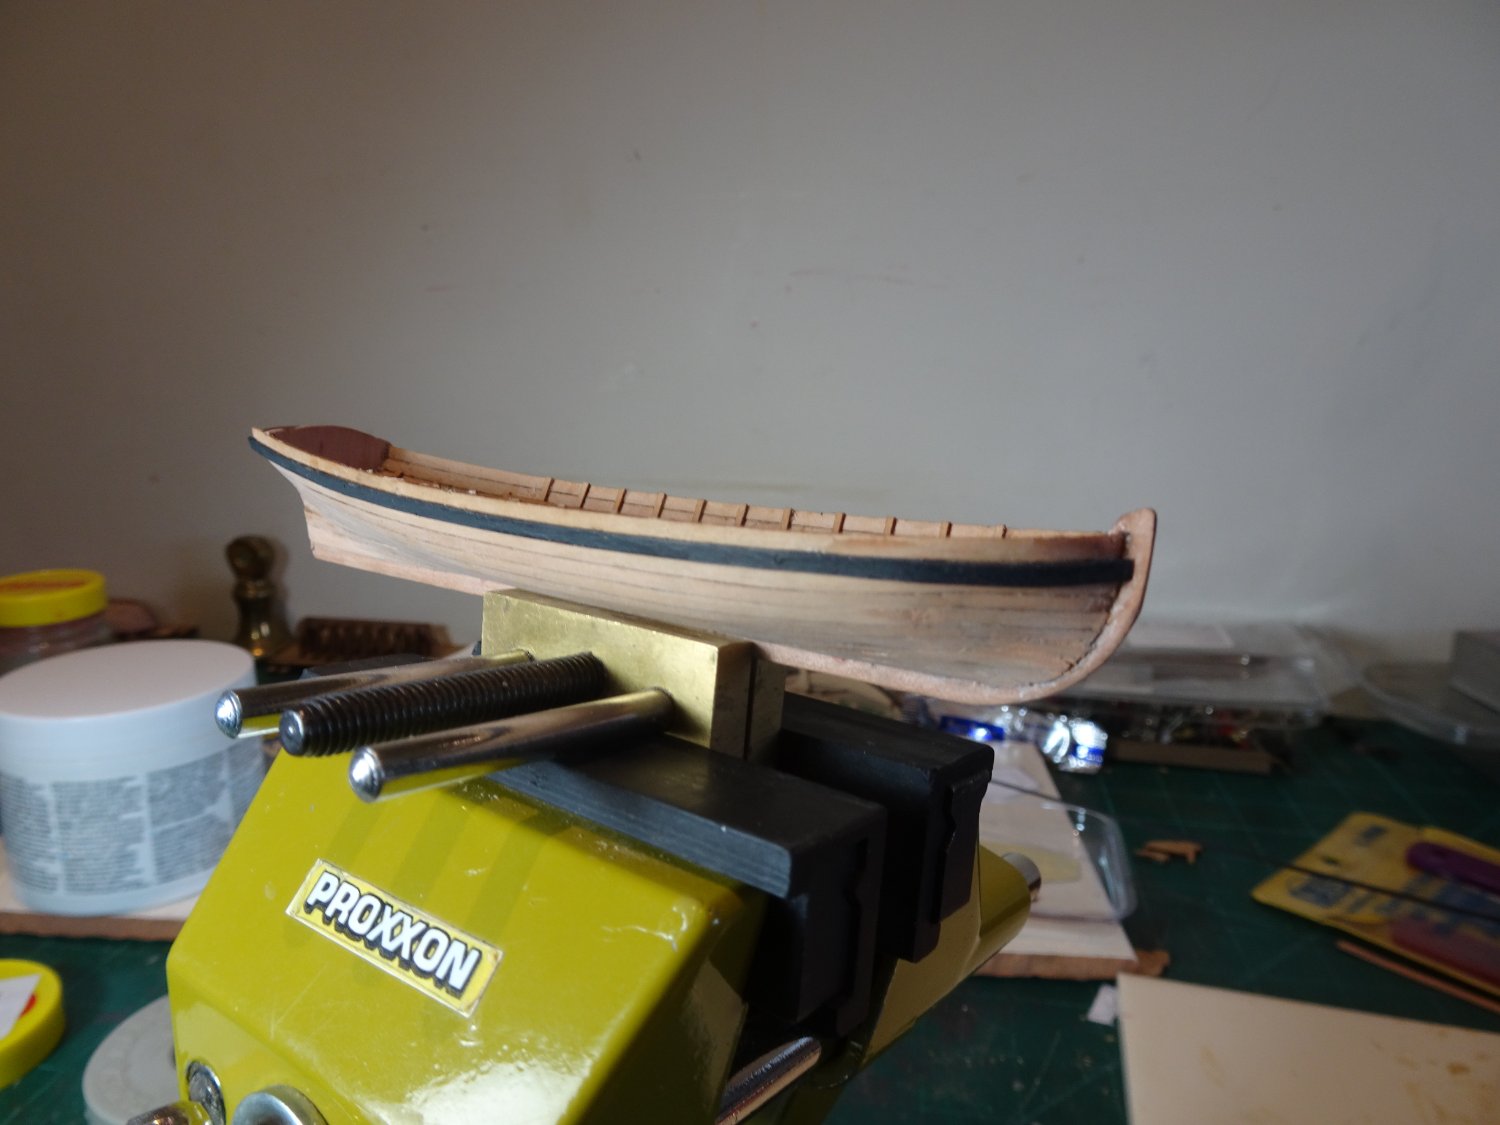
The final stretch for fitting out the Pinnace, seven days work and ongoing.
.thumb.JPG.918a60ebd3b2a71112e003a805f3f385.JPG)
7996(2)
The thole pins are brass etch of a devilish tiny size and are a loose fit within the mortices making it tricky to arrange correctly without getting glue on the woodwork.
.thumb.JPG.dacc2144aa078b3e605fc91ae95c23eb.JPG)
7970(2)
I chose to use wood slivers to represent the thole pins which I think look more natural, and they don’t need painting.
7973
The splash guards at the sternsheets and bow were pre-bent to remove stress and form the necessary curves. They were attached using pva.
I had hoped to leave the Pinnace hull below the wale entirely bright, but my eye was less than satisfied with the hull planking finish around the lower hull at the bow.
With some reluctance and not a little annoyance at my own deficiencies, I opted to paint the hull up to the waterline on the basis that a spot of ‘white’ stuff covers a multitude of sins.

7997
I used Vallejo Ivory paint which to my eye gives a better scale effect than white.
.thumb.JPG.ac616d330fcb4561e19ebd22e20edb8b.JPG)
8022(2)
.thumb.JPG.3305a1bf79a1d988435556cb03e0cff0.JPG)
8030(2)
As it happens I don’t think it has turned out too badly.
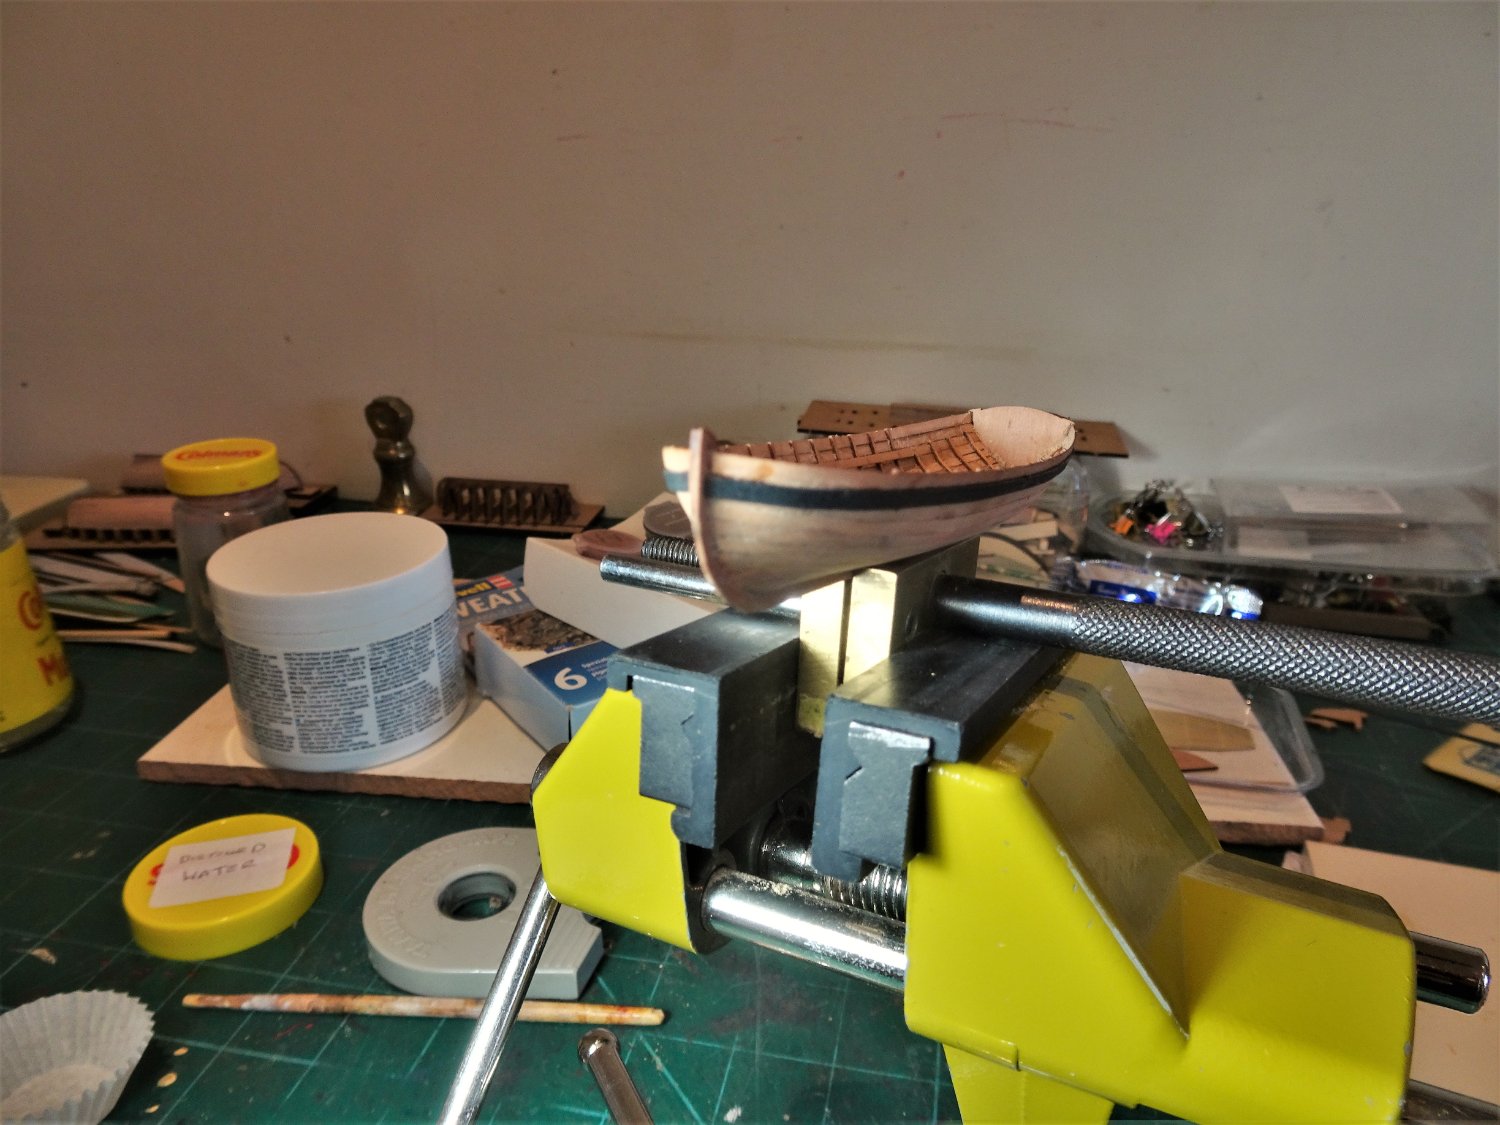
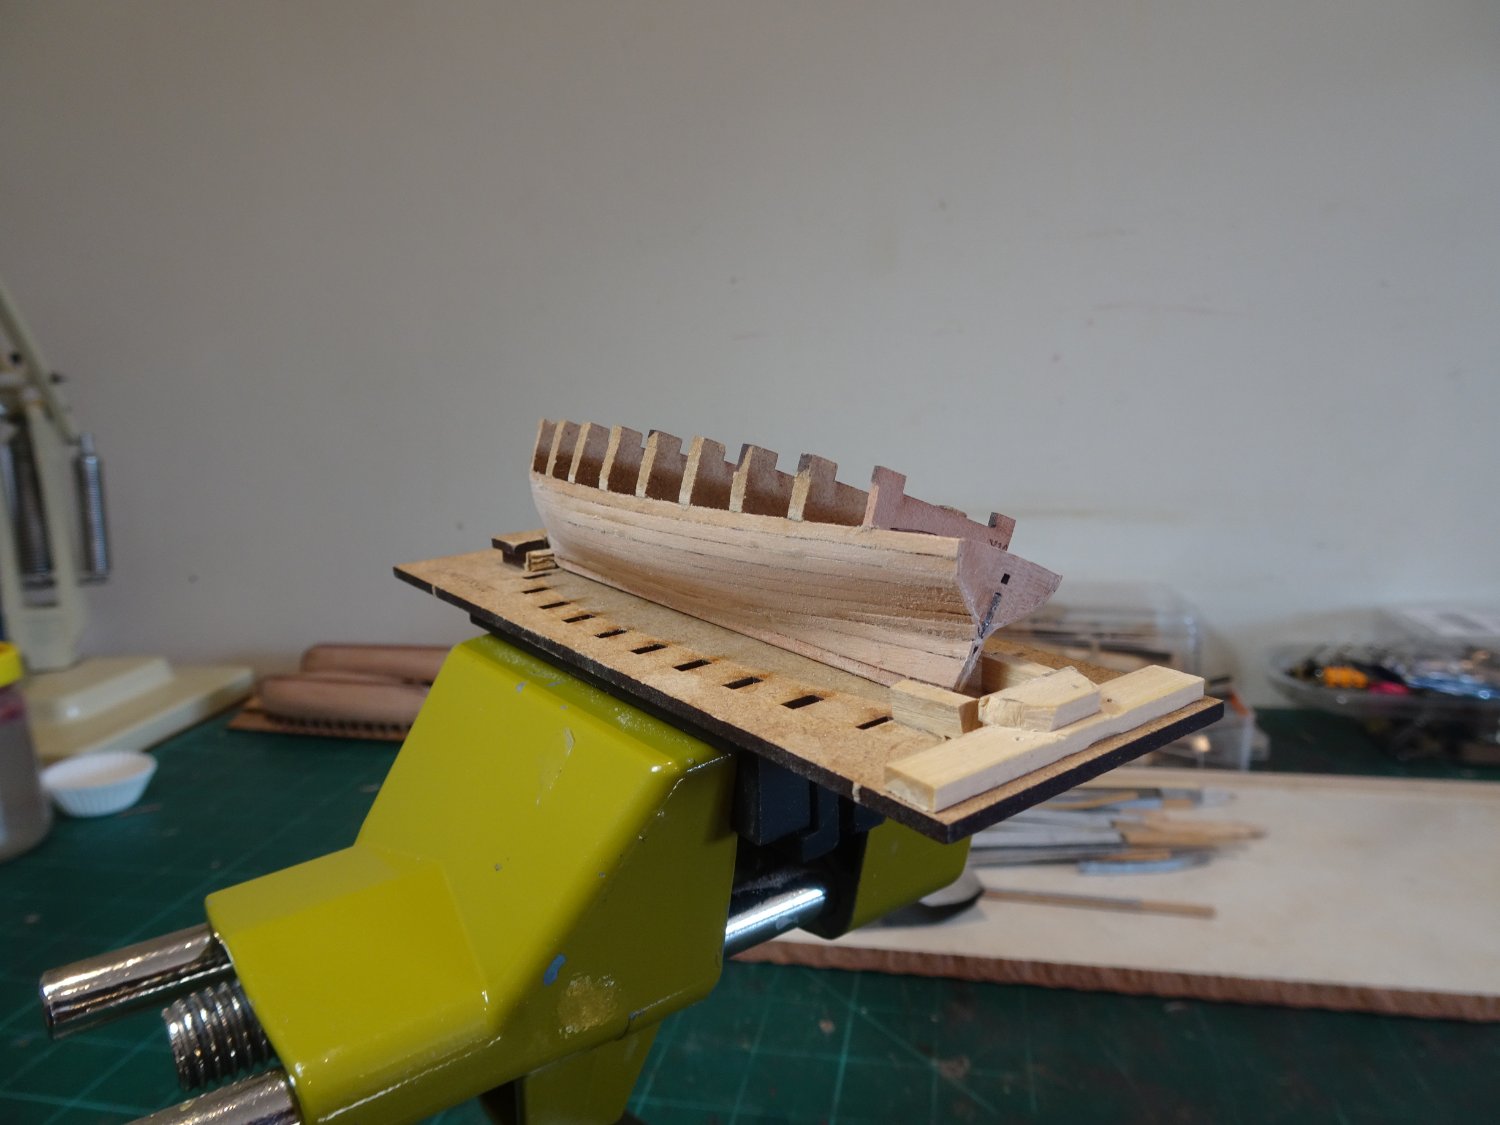
The Rudder
The kit design is a pearwood core sandwiched by thin brass etched patterns with the iron work detail moulded in.
The rudder attaches with false gudgeons and straps.
This certainly simplifies the process of rudder fitting, but for me it is a step too far removed from authenticity.
.thumb.JPG.ee5024b8495e27540758fa8f4f2f02d8.JPG)
7994(2)
Making a replacement rudder is fairly easy, but hanging working rudders on these small models presents something of a challenge.
8005
On the model a micro eyelet with 0.35mm ø brass wire silver soldered into it made for the lower pintle, and eyelets for the gudgeons.
I laboured several hours to get the micro eyelets and pins in the right position.
I used Syren fibreboard to represent the straps.
.thumb.JPG.9ac8a6f093784e60f6695ba4d5841a9d.JPG)
8051(2)
One down, two more to go, I’ll set the Pinnace aside now and move onto the Launch.
B.E.
19/08/2022
-
Hi Allan,
I do have W.E. May book and back in the day I scratch built both the Pinnace and Longboat for my Pegasus build. A scroll saw was of great benefit cutting out the tiny frames.
I am quite a lazy builder and if I can get a good aftermarket item rather than do it all myself I will, and tweak it a little if necessary.
This option came about with the range of boats developed by Chris Watton, and at 1:64 scale I doubt I would ever scratch one again.
B.E.
- hollowneck, mtaylor and Dave_E
-
 3
3
-
-
-
Thanks Glenn,
They are tricky little beggars as you no doubt know, but the boats represent £85.00 of the cost of the kit, and besides I can’t resist the challenge.
Fitting out is a time consuming business but there is a satisfaction to be had in achieving a half way decent finish, and I do like the look of a boat on a model ship.
I’m not sure about all three sitting on the Sphinx skids on a Navy Board style build such as mine, but I will try the Pinnace out.
Cheers,
B.E.
-
Post One Hundred and fify-five
Fitting out the Pinnace – Part three
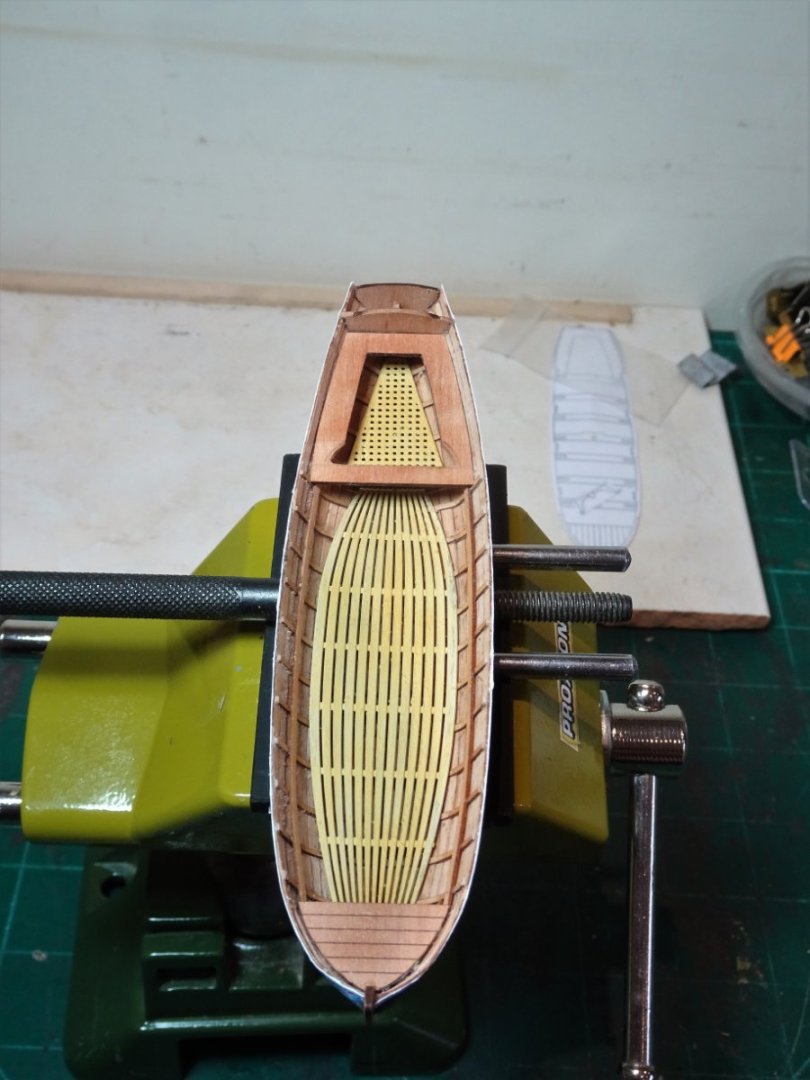
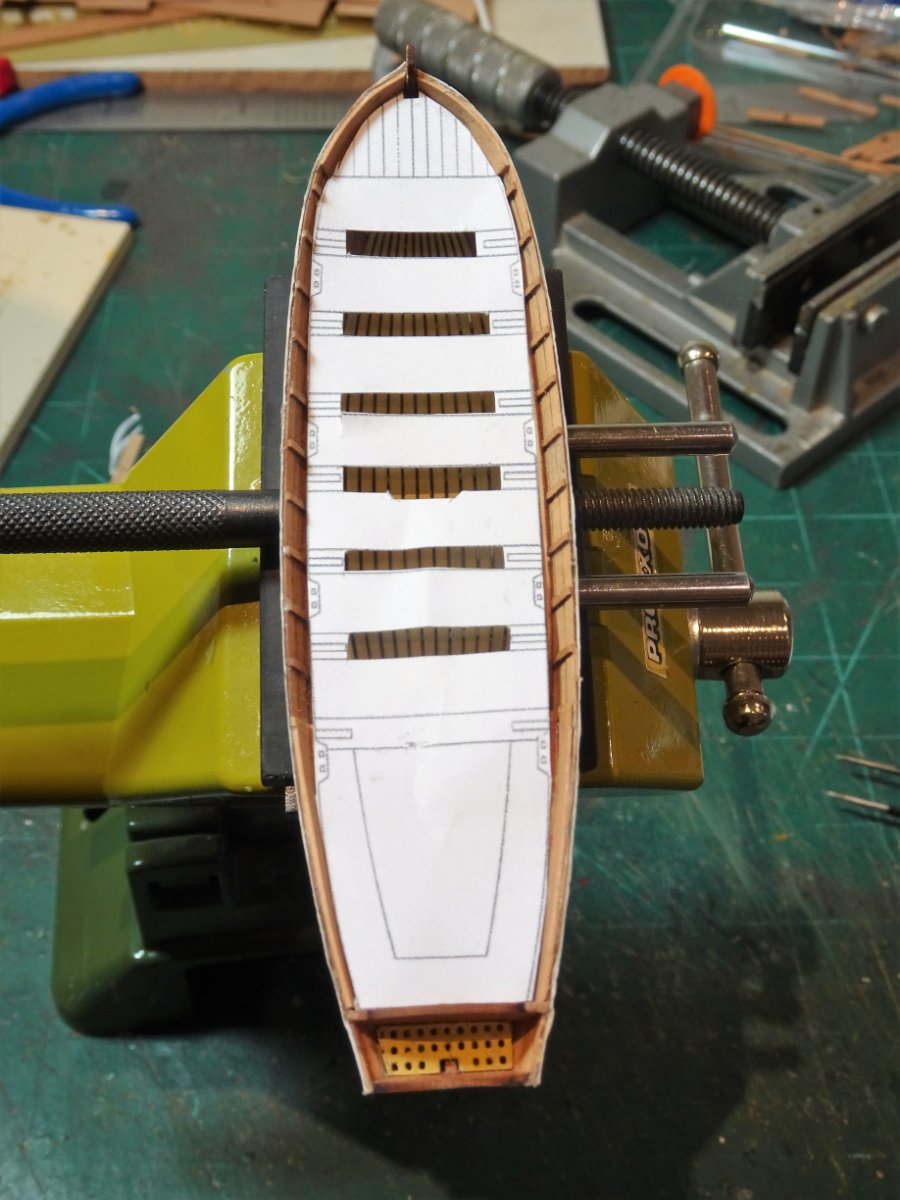
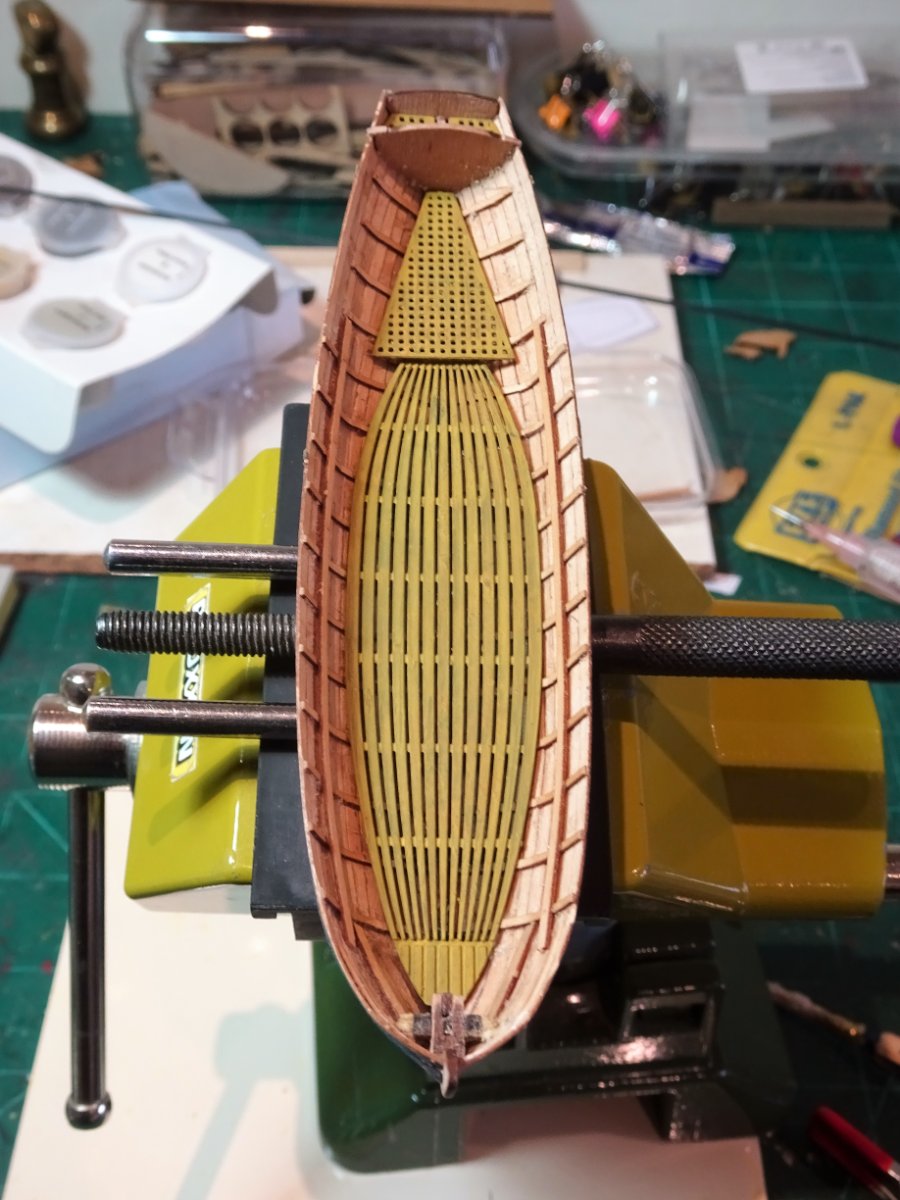
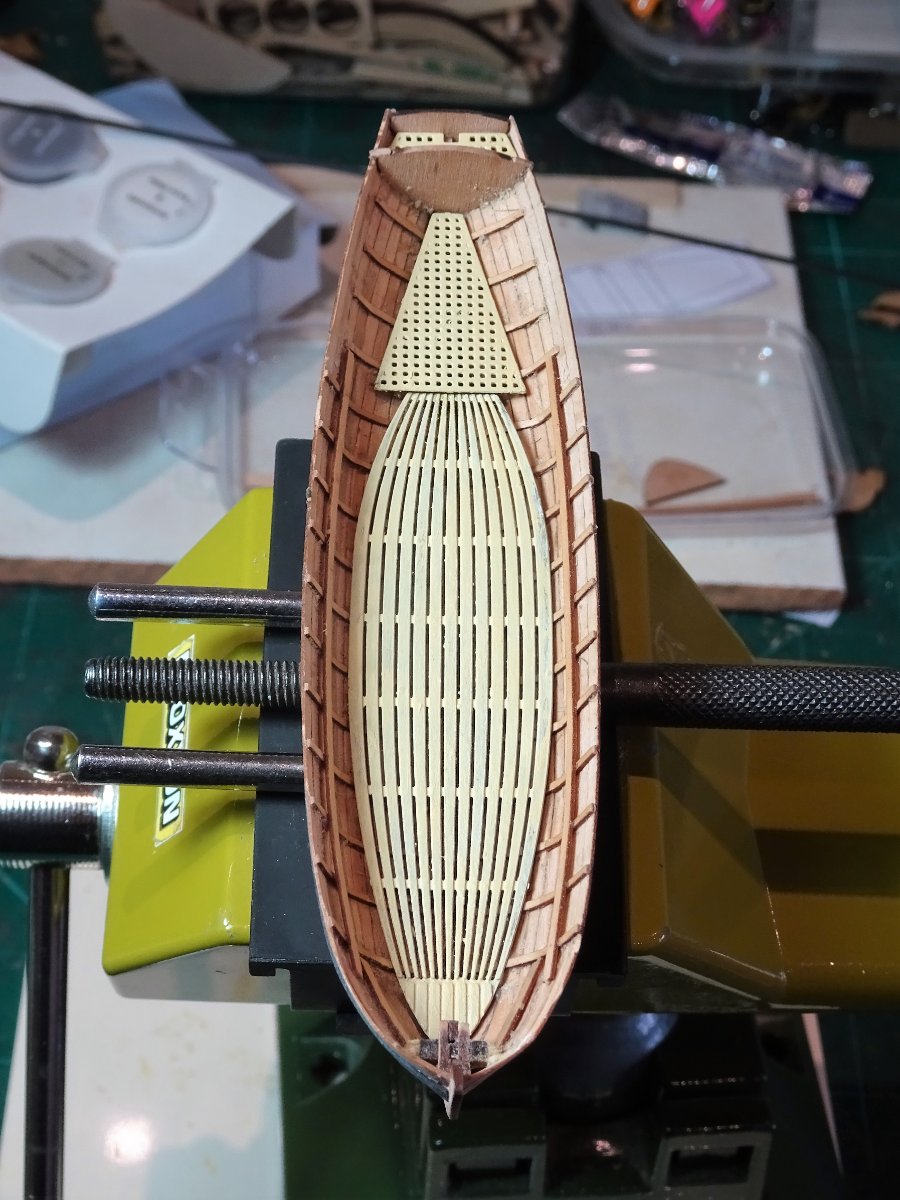
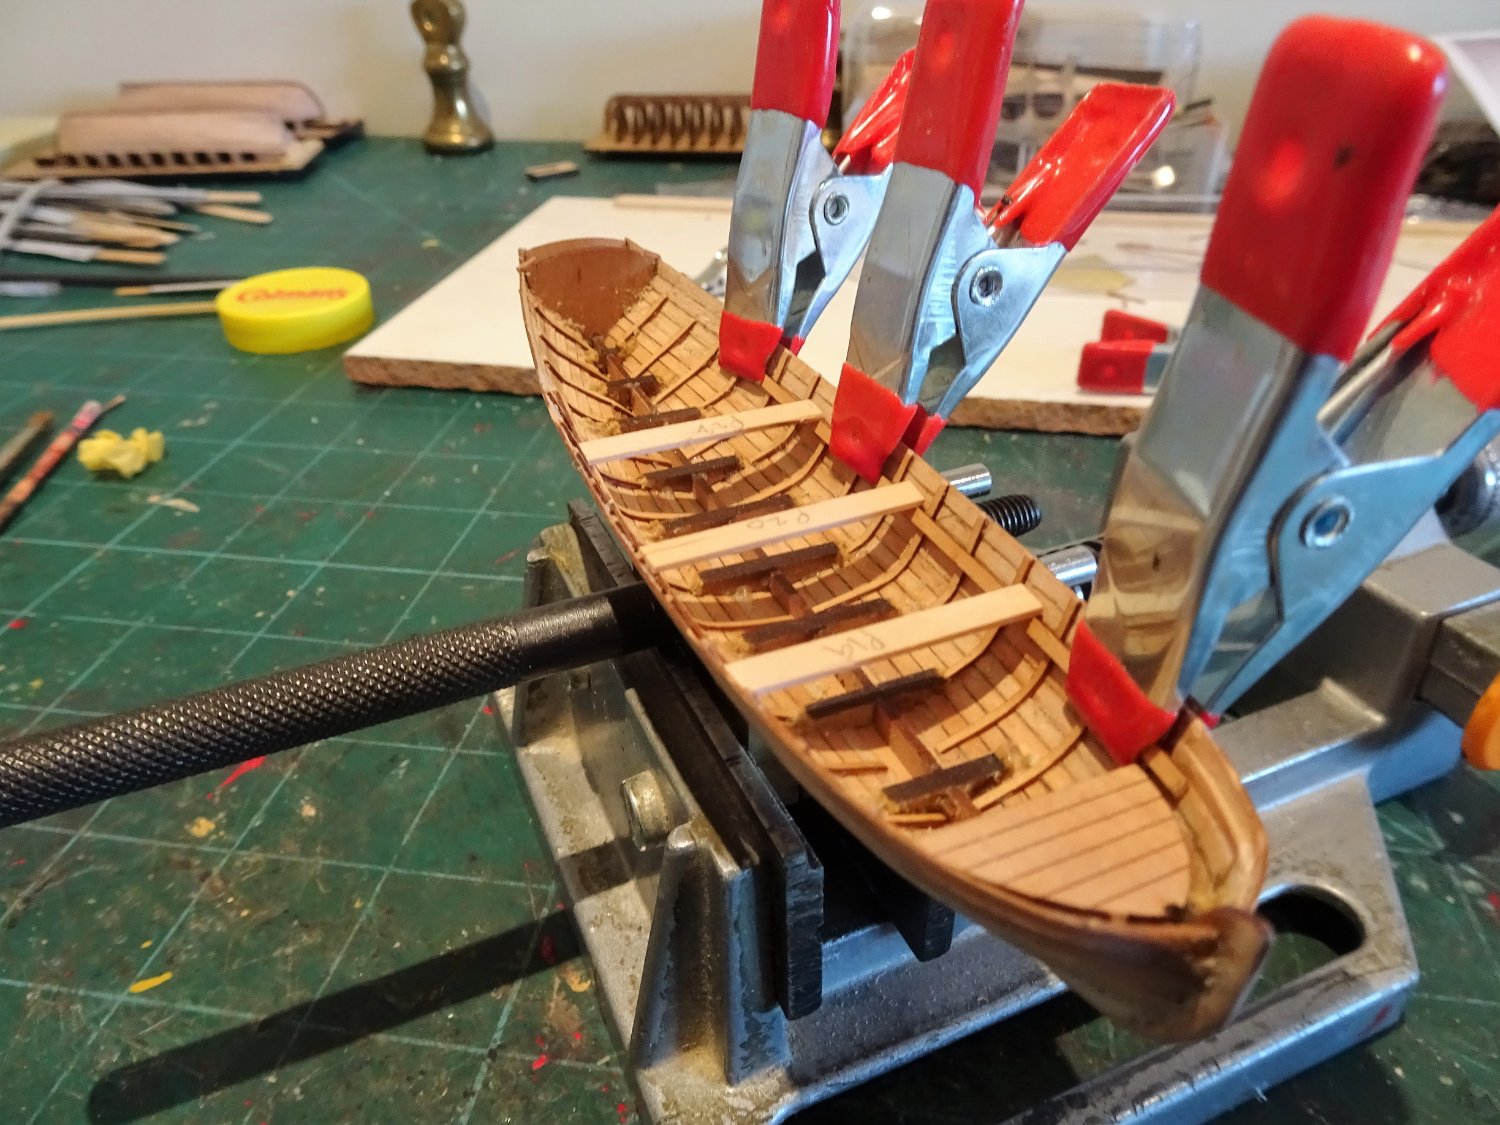
As was the practise with Pinnaces I lined the sternsheet area and added a little extra detail. The bow deck area was also lined.
7935
Before the thwarts are added the inboard surfaces are treated with W-O-P

7936
Still not entirely happy with the decking colour against the thwarts, I dry brush using a mix of Ochre Brown and Burnt umber.
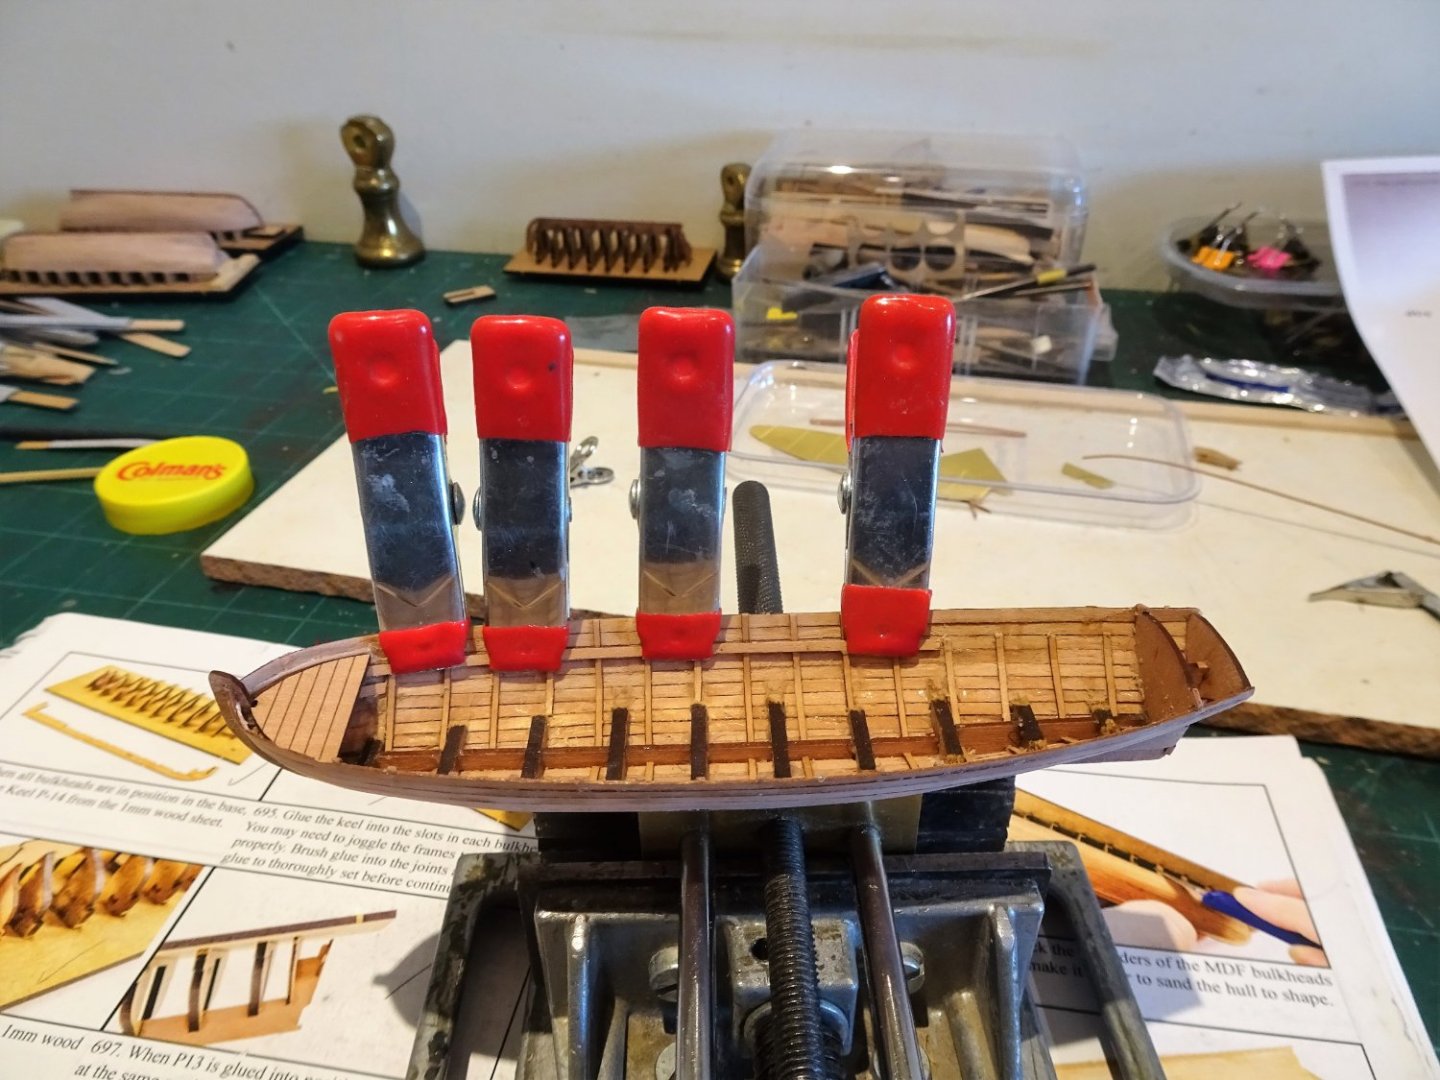
The thwarts can be quite fiddly to fit, getting the lengths just right, ensuring they are all parallel to each other, and that the spacing is even.

7929
I use a plan template to assist this and cut temporary thwarts to determine the lengths.

7941
Temporary fit of the thwarts.
7939
I think the tone of the deck boards now looks better against the pearwood.
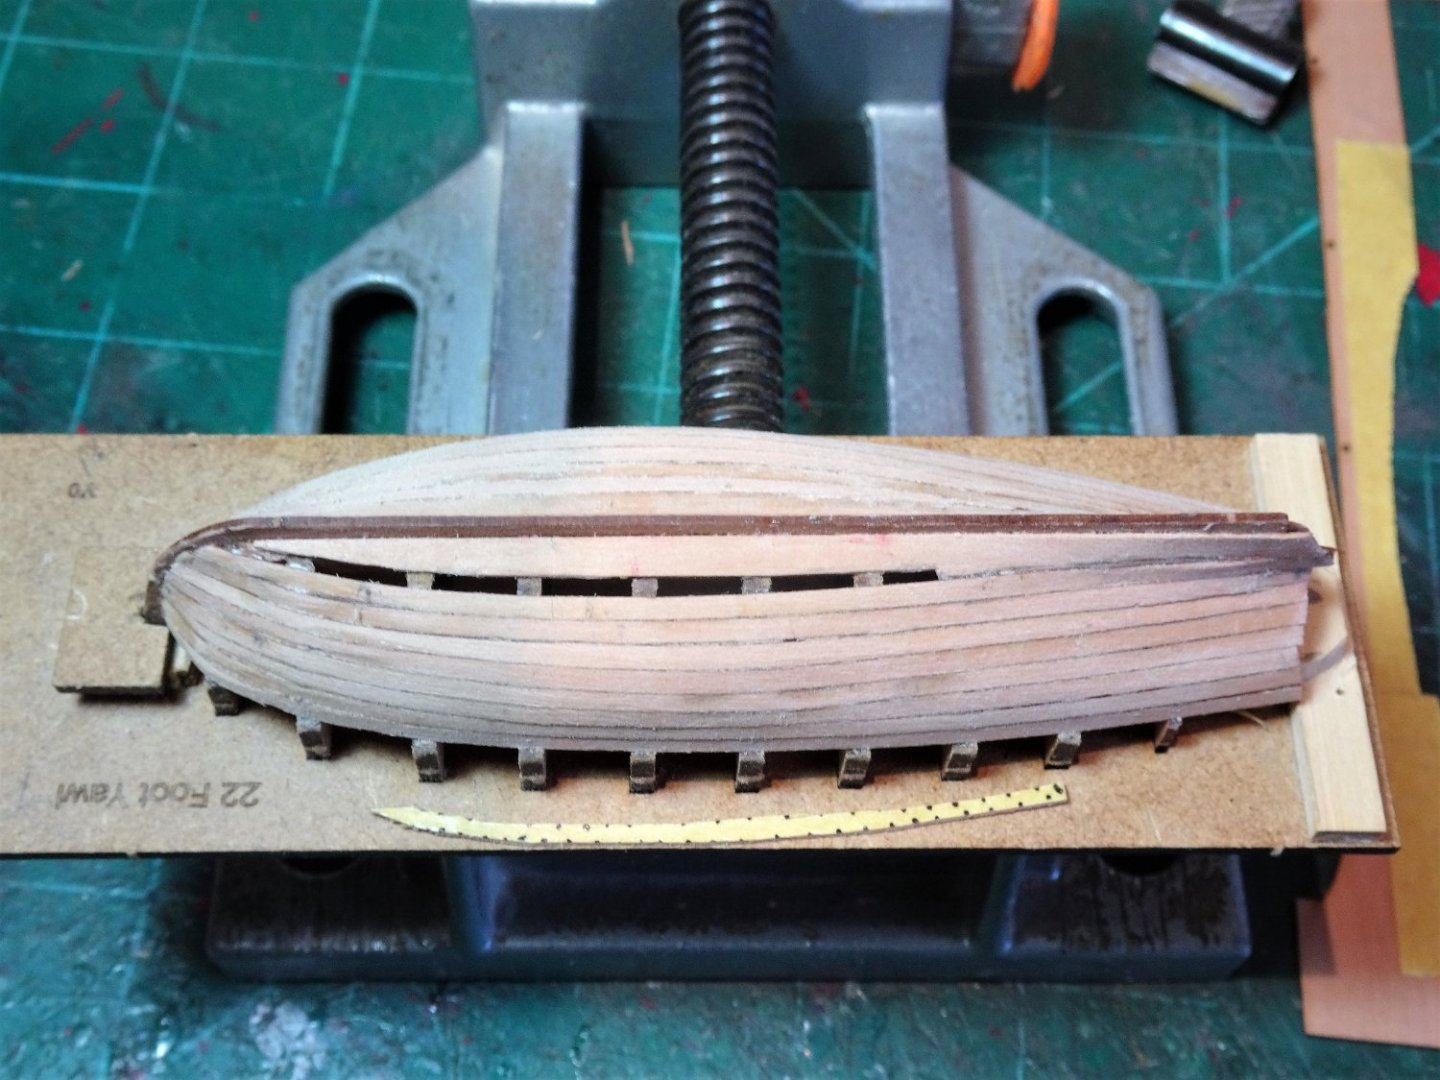
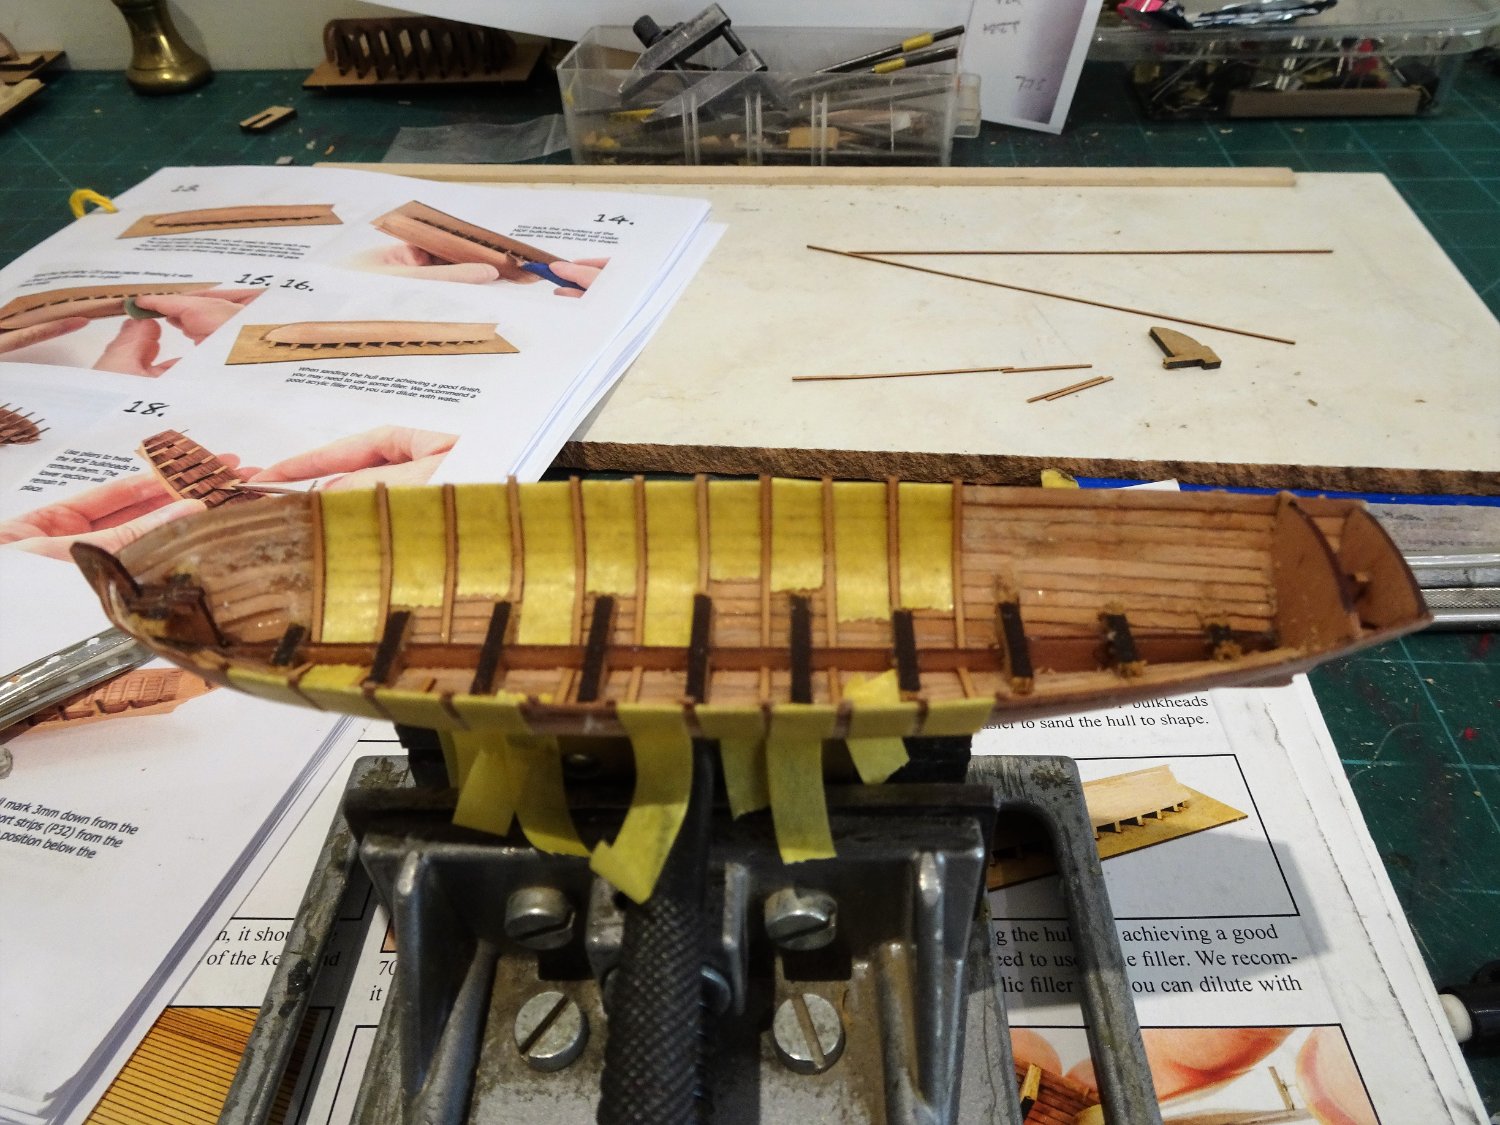
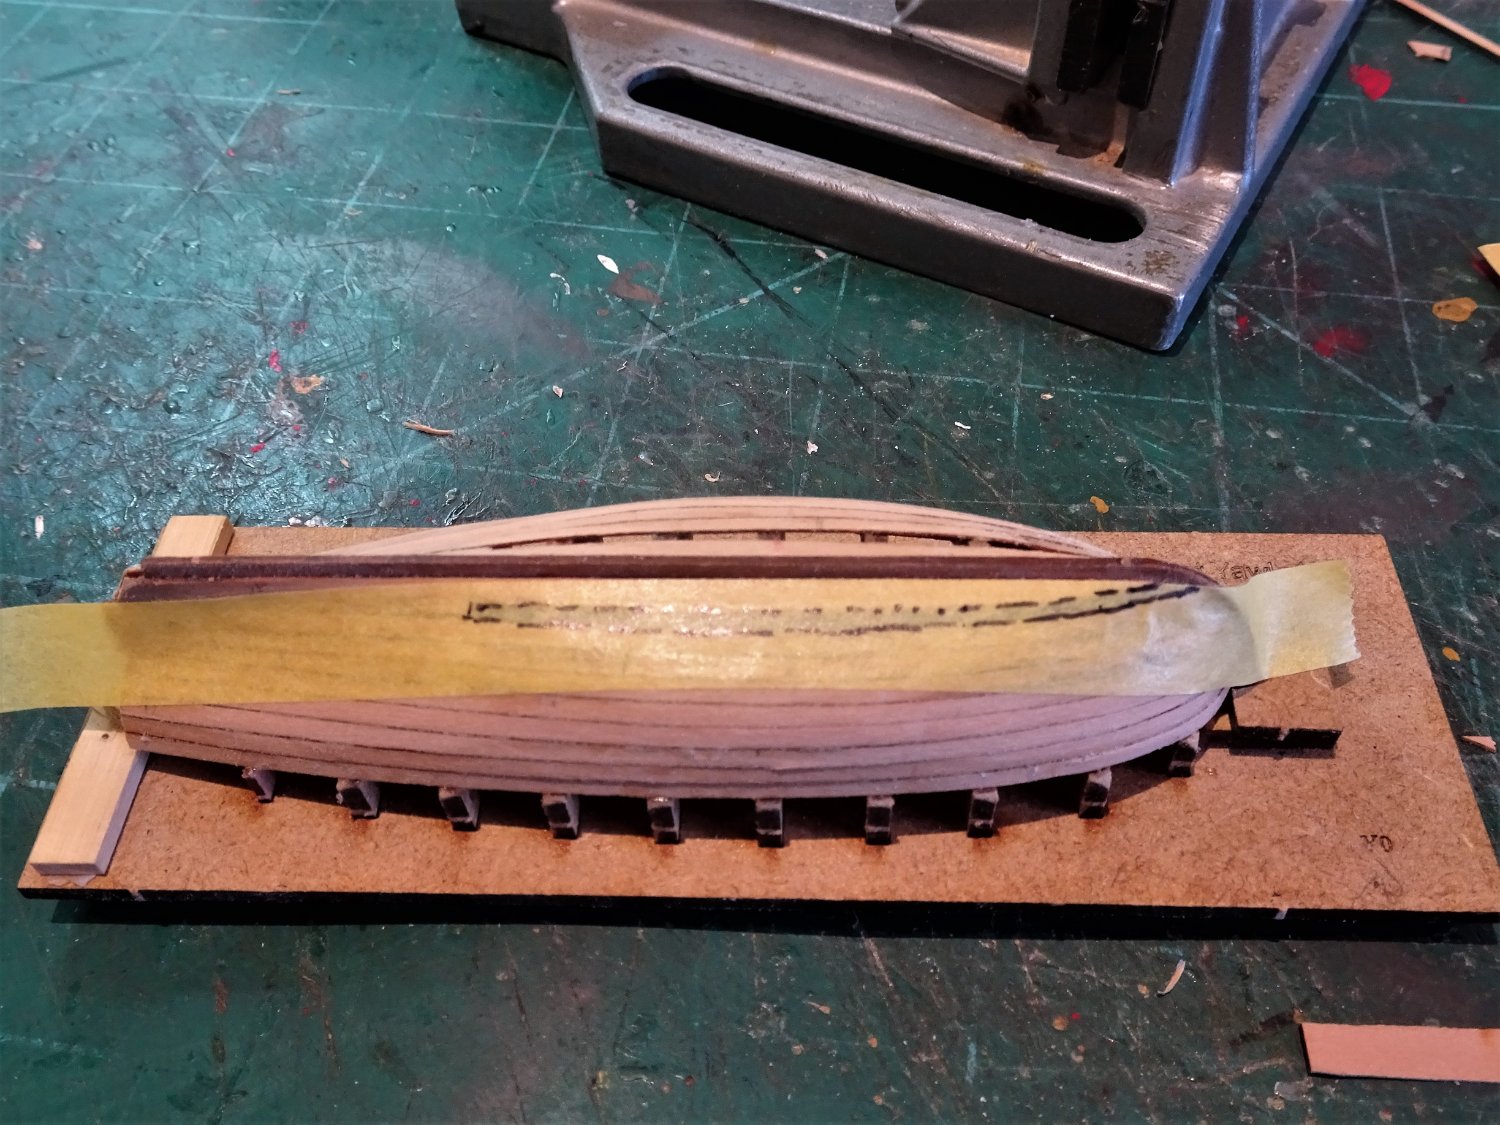
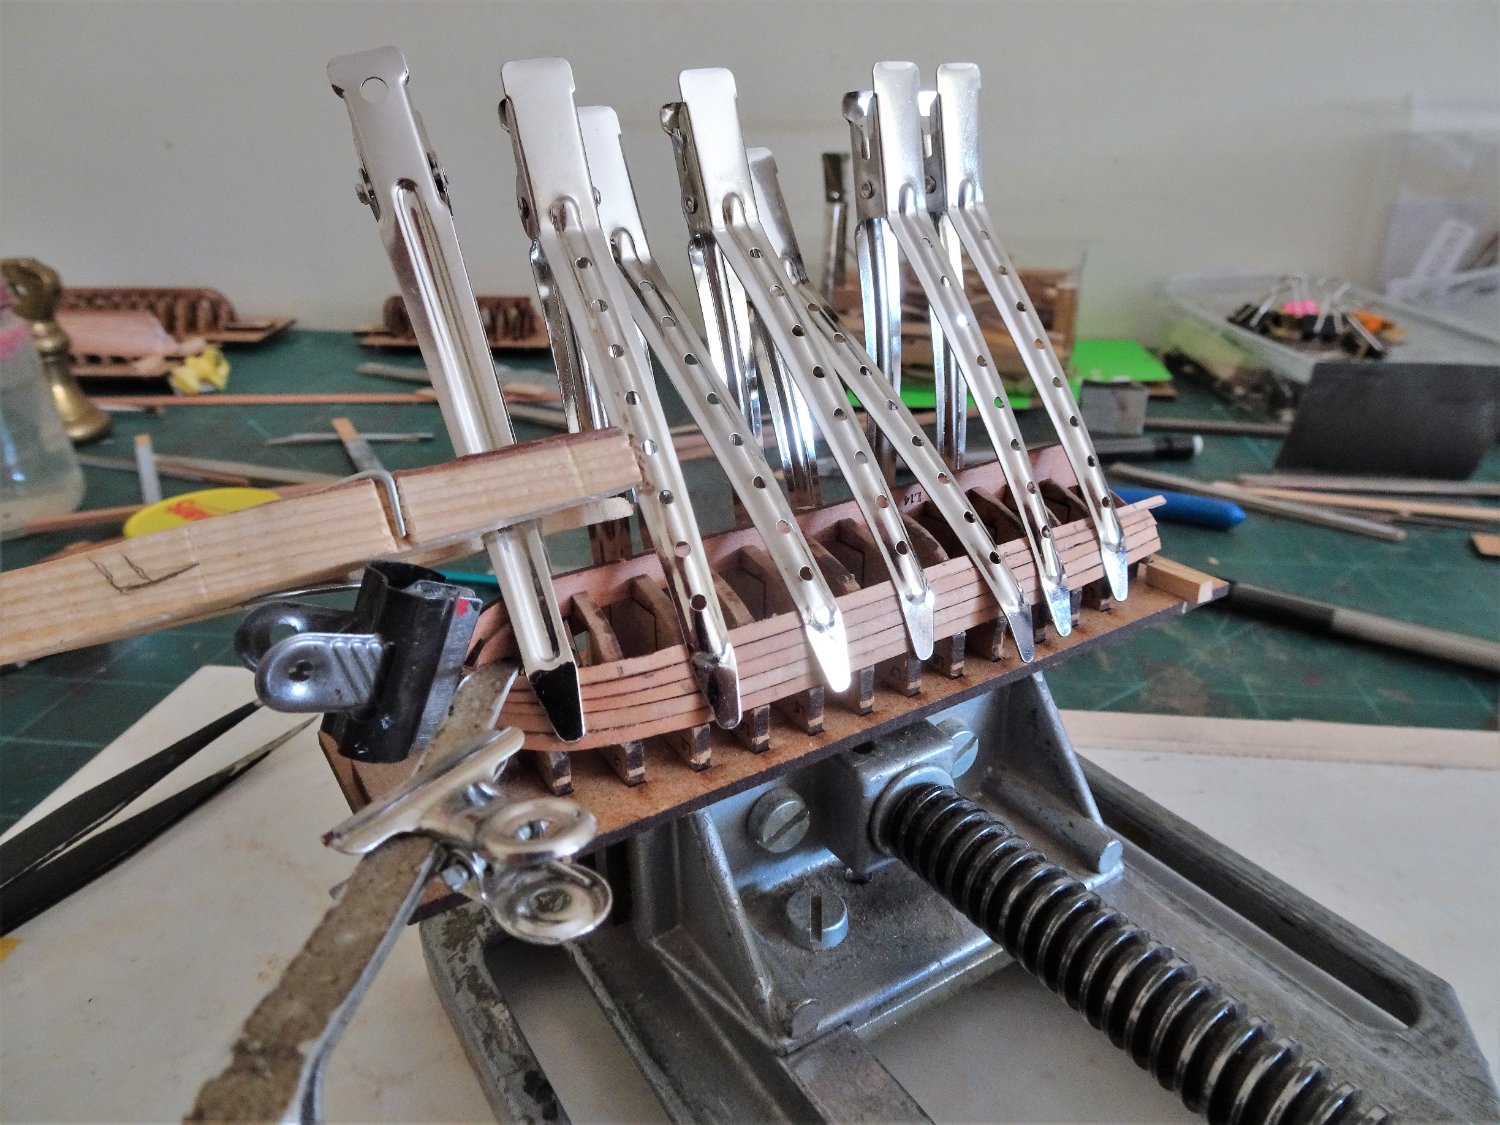
With the thwarts fitted, the last major test is the Gunwales.
These are very fine pieces and warrant careful handling.
One small puzzlement for me is that Pinnaces were usually rowed single banked which means the oarlocks and thole pins were offset port and starboard relative to the thwarts.

7950
The kit version has them positioned for double banking.
Any modification would require re-making the gunwales which I doubt I could achieve with the fineness of scale of the laser cut kit parts.
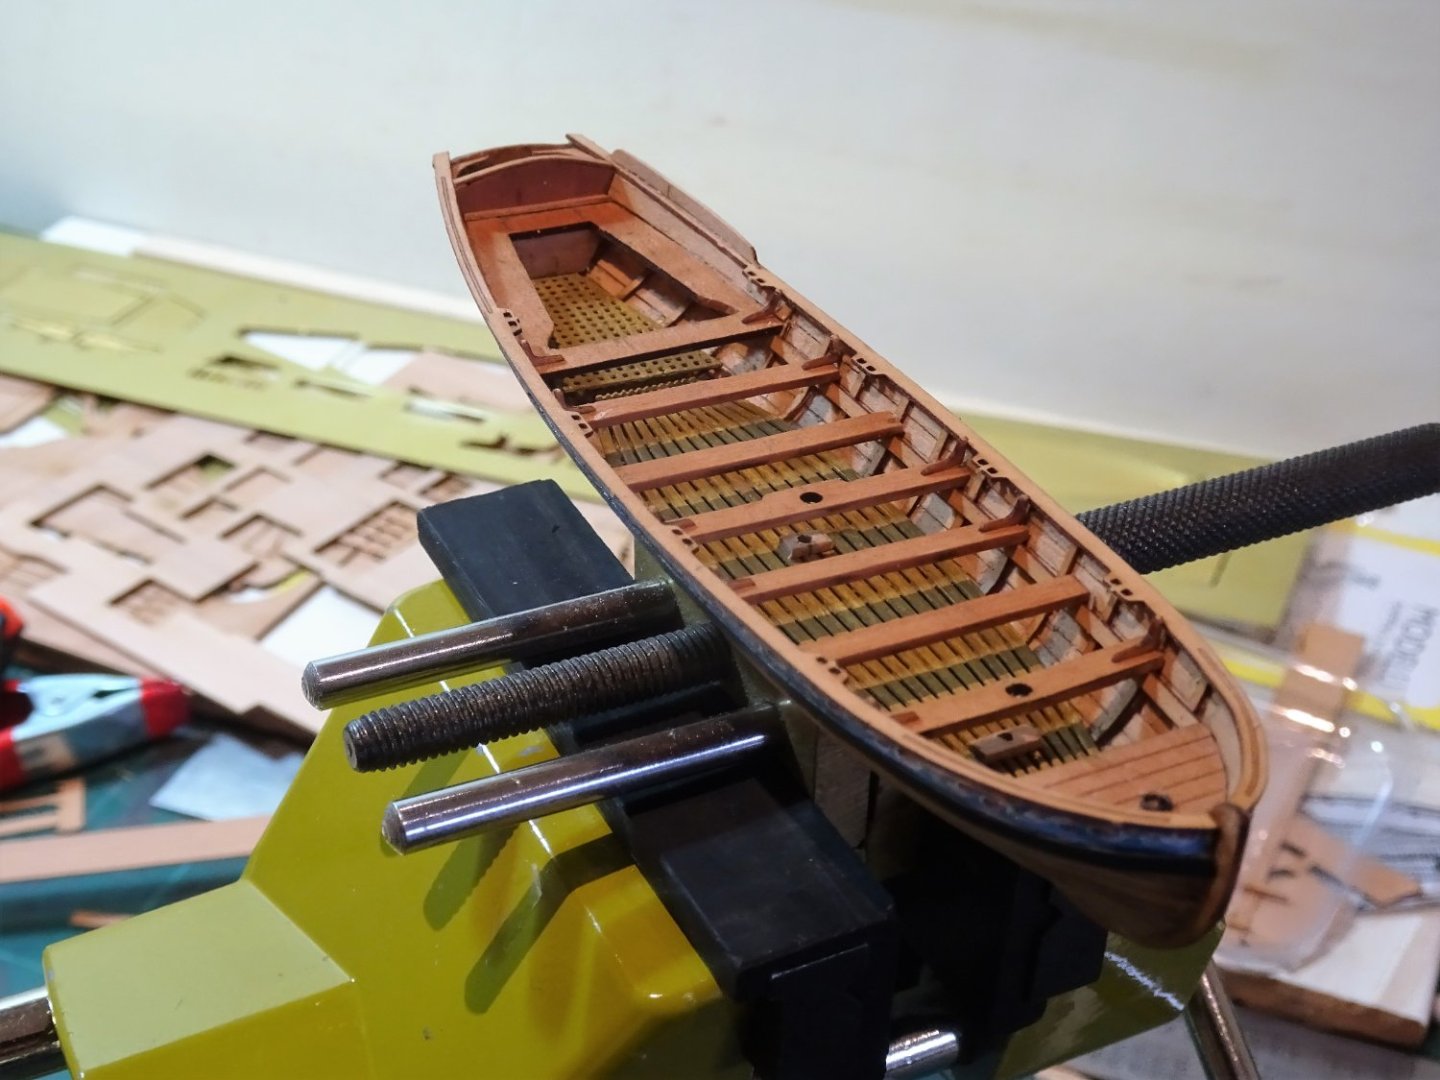
7956
Fitting the Gunwales is a tricky business, I dampened the bow ends to slightly modify the curve to suit the model, and I used ca to progressively glue the strip along the hull.
.thumb.JPG.dff958acb9591dd807aa82be8ceec6da.JPG)
7944(2)
As a pre-caution I did make a template of the gunwales lest sod’s law came into play and I was forced into scratching replacements.
Despite my fears the gunwales went on without a sharp rise in my tension level.
The next post should see the completion of the Pinnace.
B.E.
18/08/22
-
Thank you Thomas and Ron.
@ Ron - I use scale figures for all sort of things, thwart height as above, but one of my most useful is old Tom who checks my footrope drop and is also very adept at Ratline scrambling.
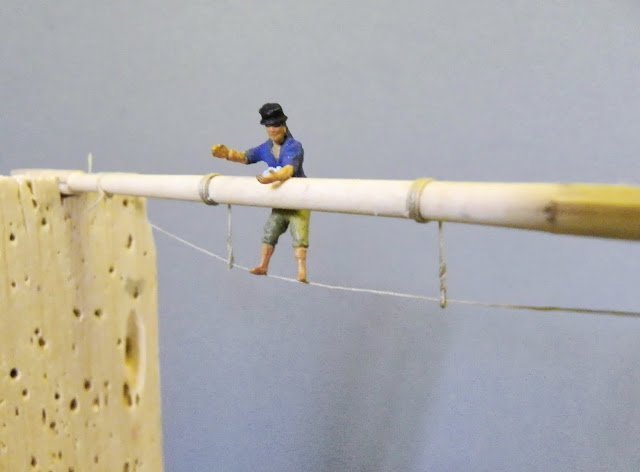
Not that he's needed on my current build.
Cheers,
B.E.
-
Hi Ron,
Re rigging the Ensign to the Ensign staff.
In a seascape setting under sail I think the Ensign would be worn at the Gaff from the Ensign halyard, rather than the staff which would normally be employed with the ship at anchor.
B.E.
- mtaylor, chris watton, Ryland Craze and 2 others
-
5
-
The question of names on ships regularly crops up.
For myself I am guided by L.G. Carr-Laughton (Old ship Figureheads & sterns)
This is what he had to say on the matter.
In 1771 an order was issued that henceforth ships should have their names painted on their second counters in letters a foot high, and enclosed in a compartment.
In 1772 the order was amended, and the name ordered to be painted without a compartment in letters as large as the counter would permit.
It has long been thought that in 1778 these names were ‘rubbed out’ again on Keppel’s initiative. This is only partly true, they were rubbed out only from the ships in Keppel’s fleet, and only for that one campaign of 1778.
The large letters continue in use until after Trafalgar, but in the closing years of the war apparently the name was painted small in a little compartment; and not long after the peace it was entirely omitted.
I don’t think anyone can gainsay you whether you decide to include names or not, for myself I will continue to include them, as I like them.
ps: Impressive drawings Chris.
B.E.
-
Post One Hundred and fifty-four
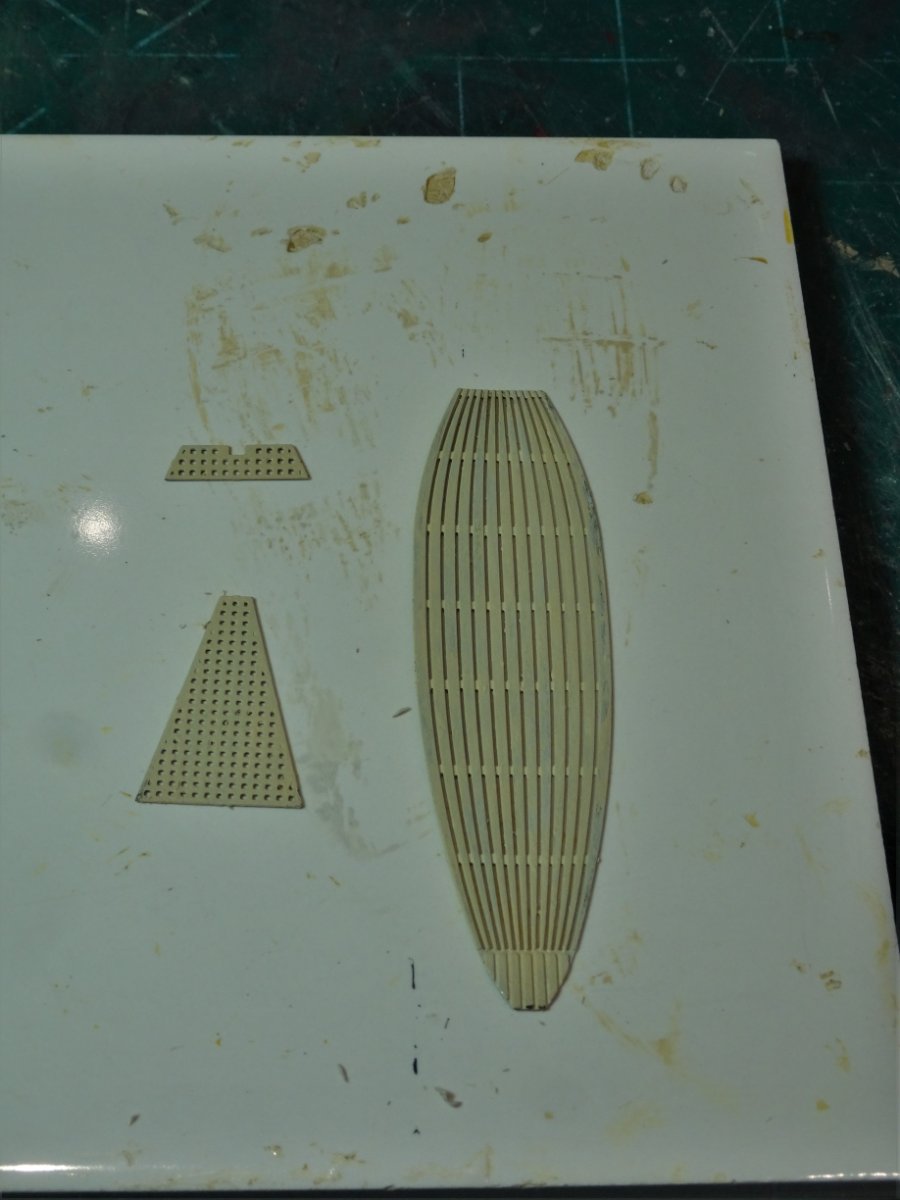
Fitting out the Pinnace – Part two
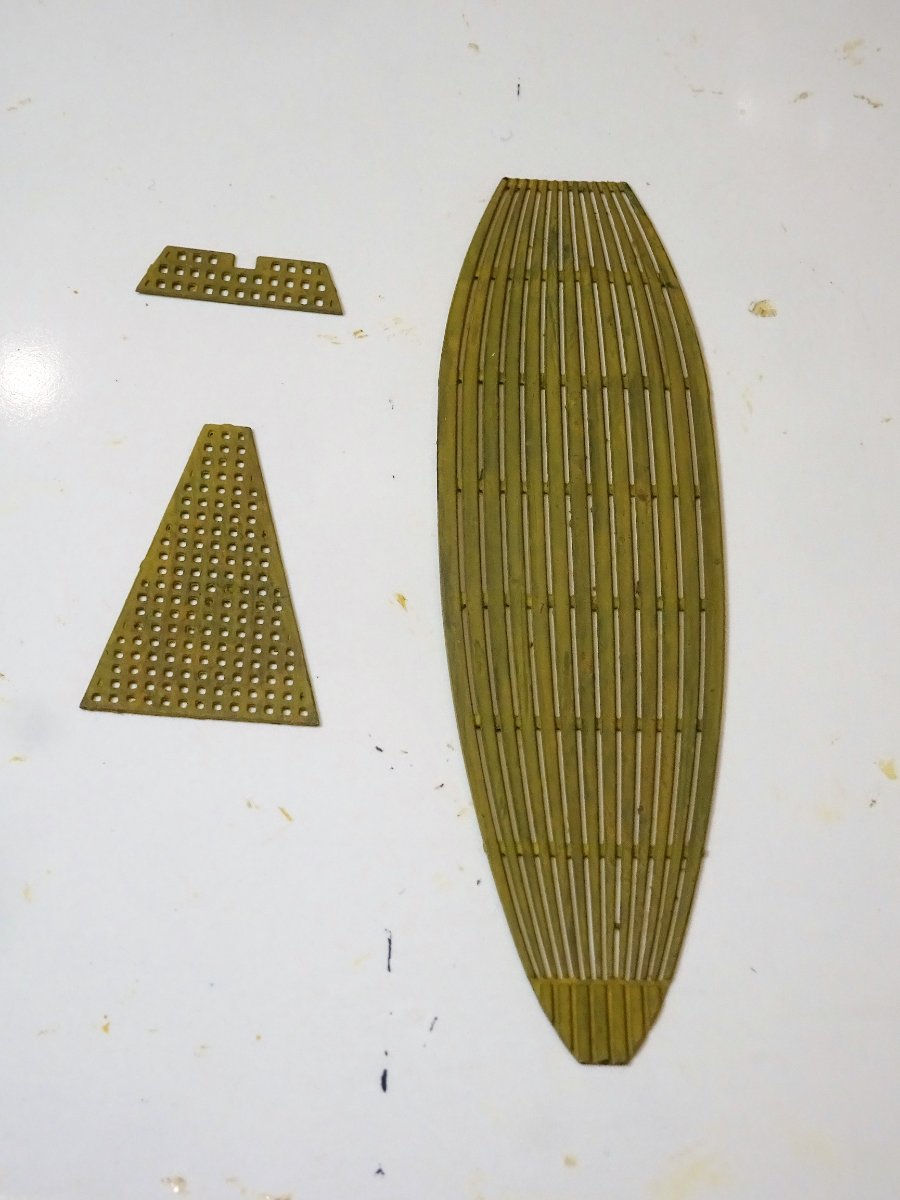
Decking and gratings
These take the form of brass etch which I last used on my previous Yawl build.
Chemical blackening after scrub with fine wire wool, and an acetone dip, helps provide a key for the paint.

7896
Base coat of Burnt umber, followed by Ochre Brown, followed by lighter shades of ochre.
I am using Vallejo paints throughout.

7898
Insitu, I thought the colour tone looked too strong against the Pearwood.
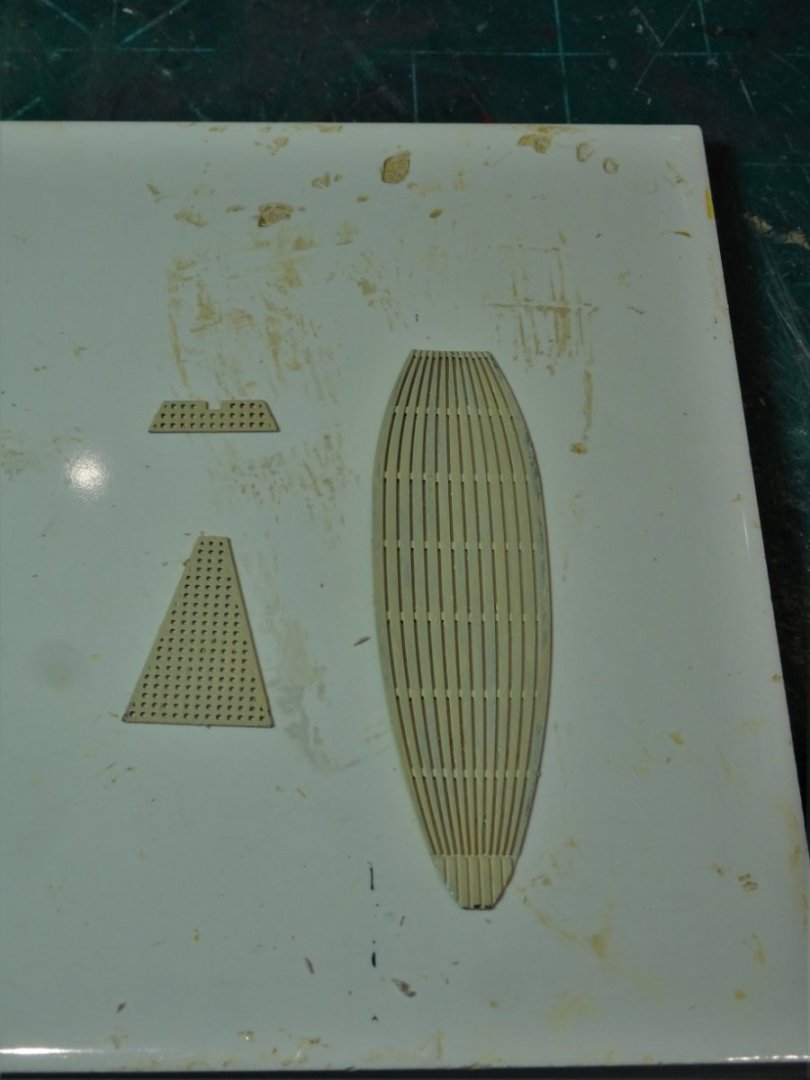
7900
I then added a further coats using White/grey tinted with a spot of Ochre brown.

7902
I prefer the paler tone, but not quite there yet.
I next fitted the wales using the last two planking strips of the provided set.

7908
These were painted Black/grey as on the main model.

7910
Sorry about my work bench, it invariably gets covered with stuff until I reach the point where I can’t find the last thing I put down. At that point I have to have a gtu, I’m close to that point now.
This is a fairly plain version of a Pinnace but I wanted it to reflect the main model in terms of its colouring and decoration.
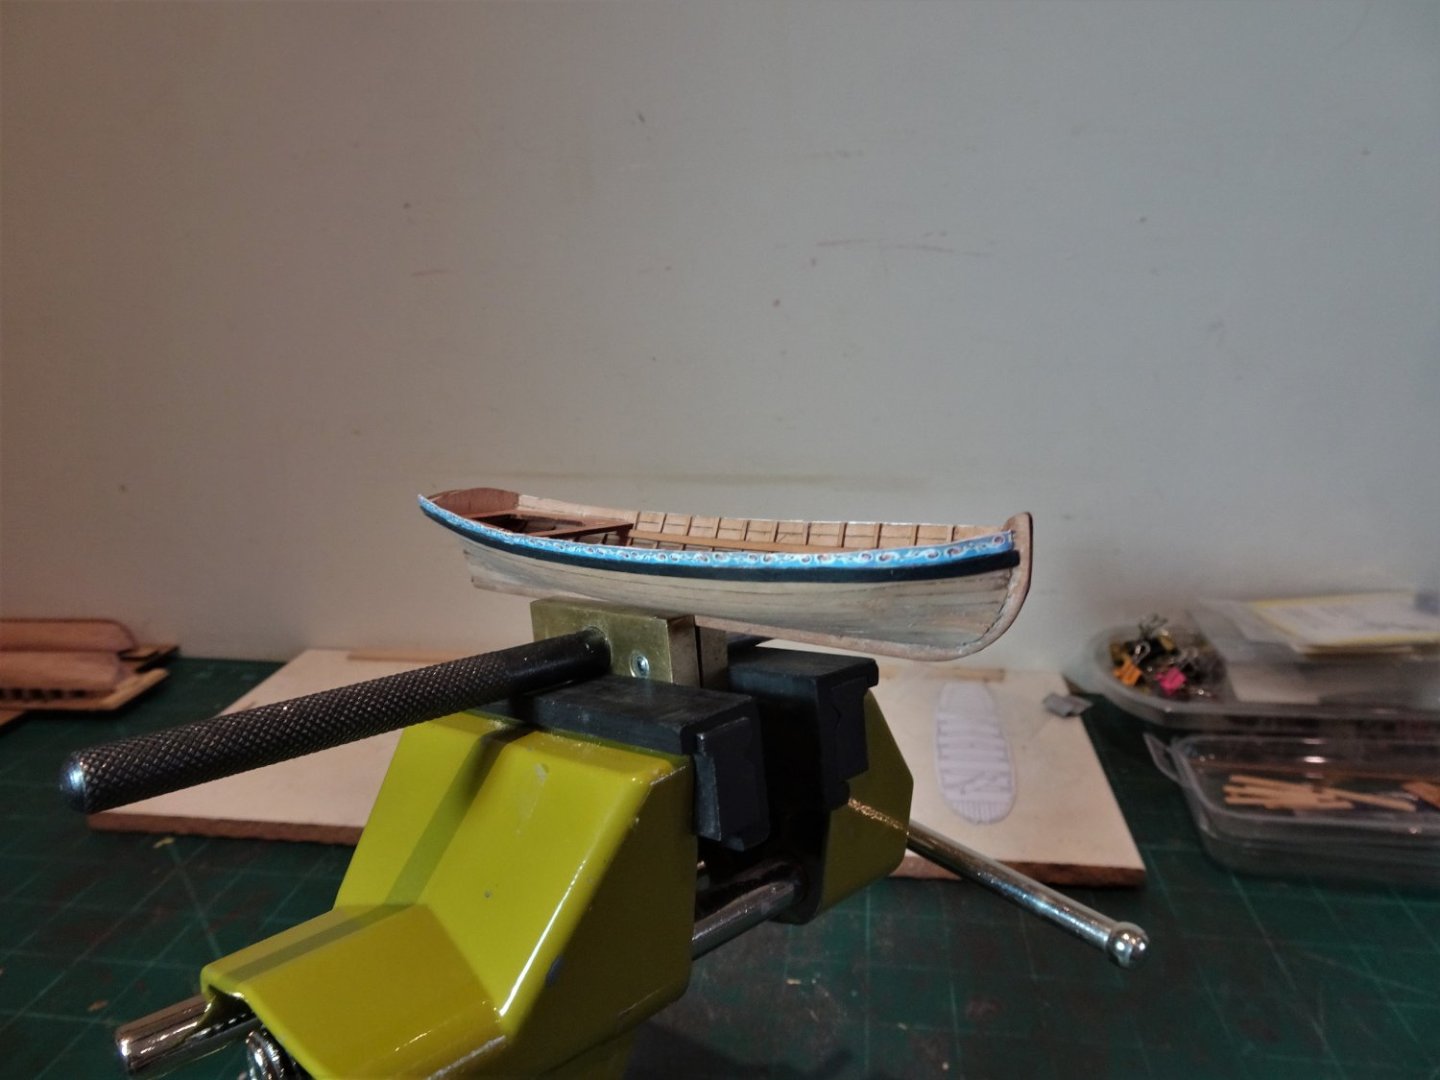
7915
I added a decorative frieze along the Topsides above the wale, but intend to leave as much of a varnish finish as I can.
7913
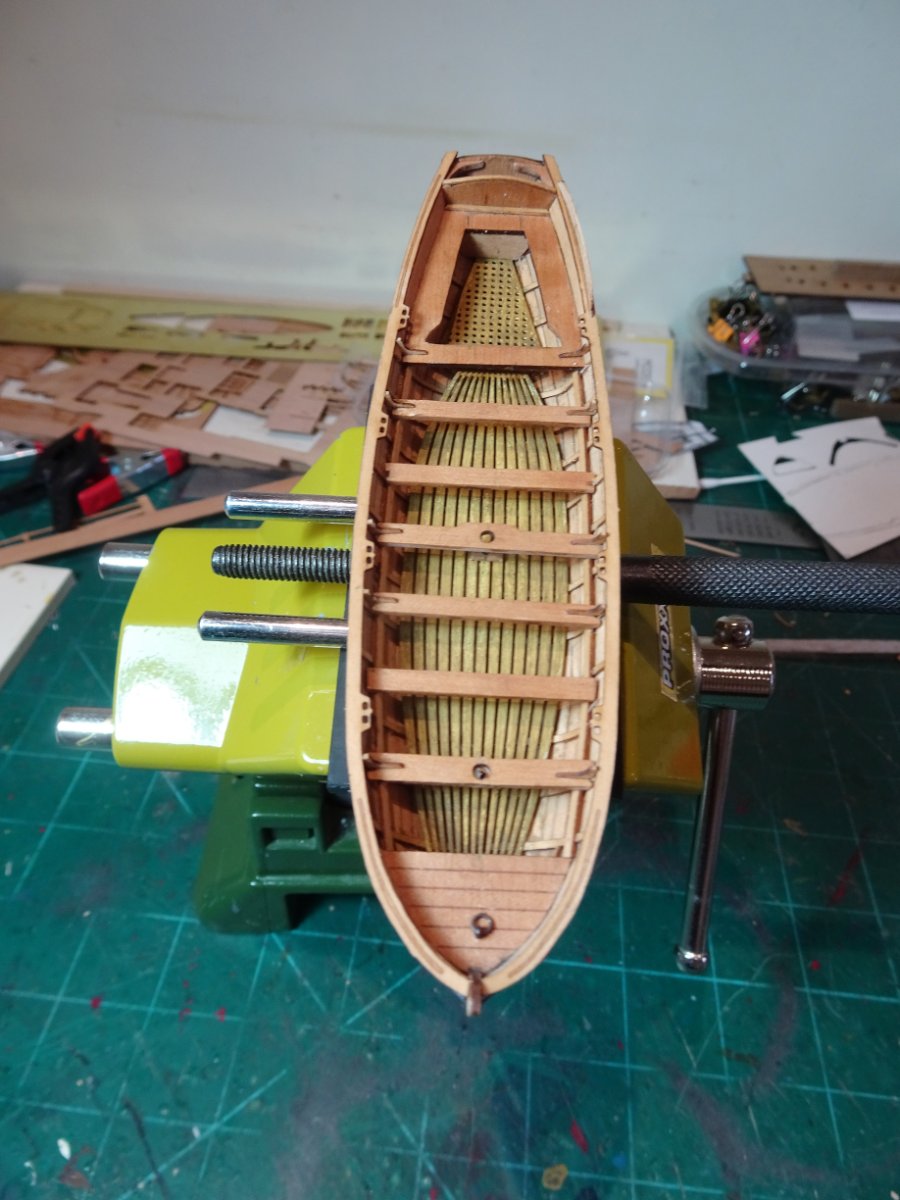
Fitting the Sternsheets which come as a combined unit took a little careful fettlin’ to get them to sit down at the correct level within the hull.
7917
A final application of sand yellow weathering powder brings the colour tone of the decking up a little.
7920
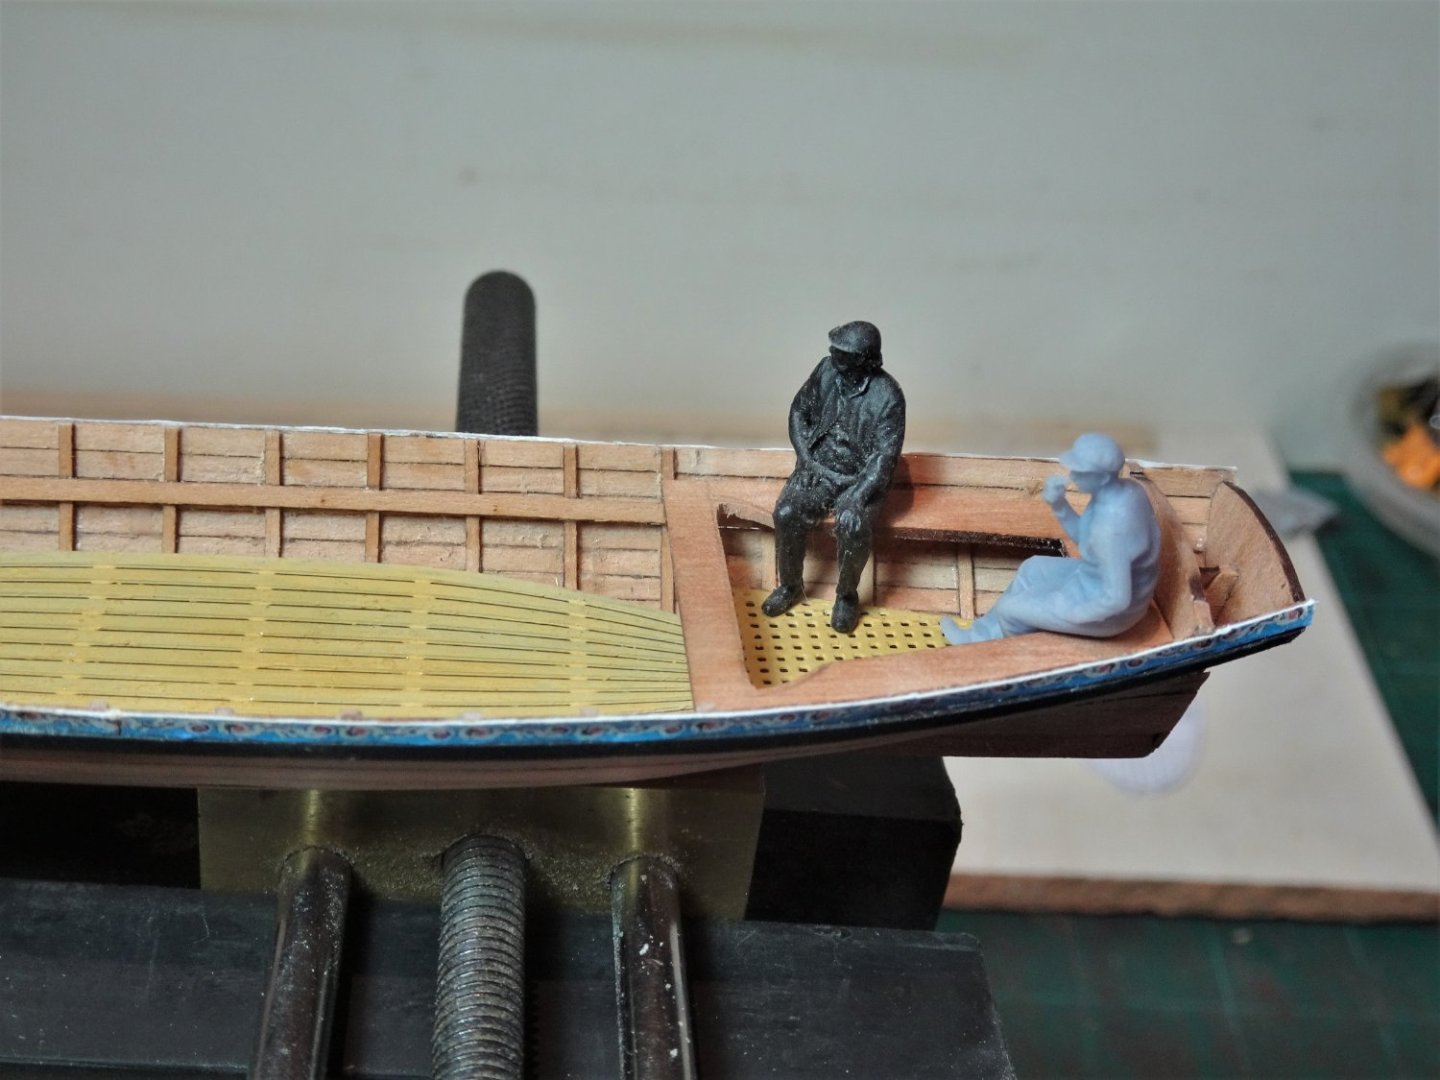
Using scale figures helps to ensure that the Sternsheets are at the right level.
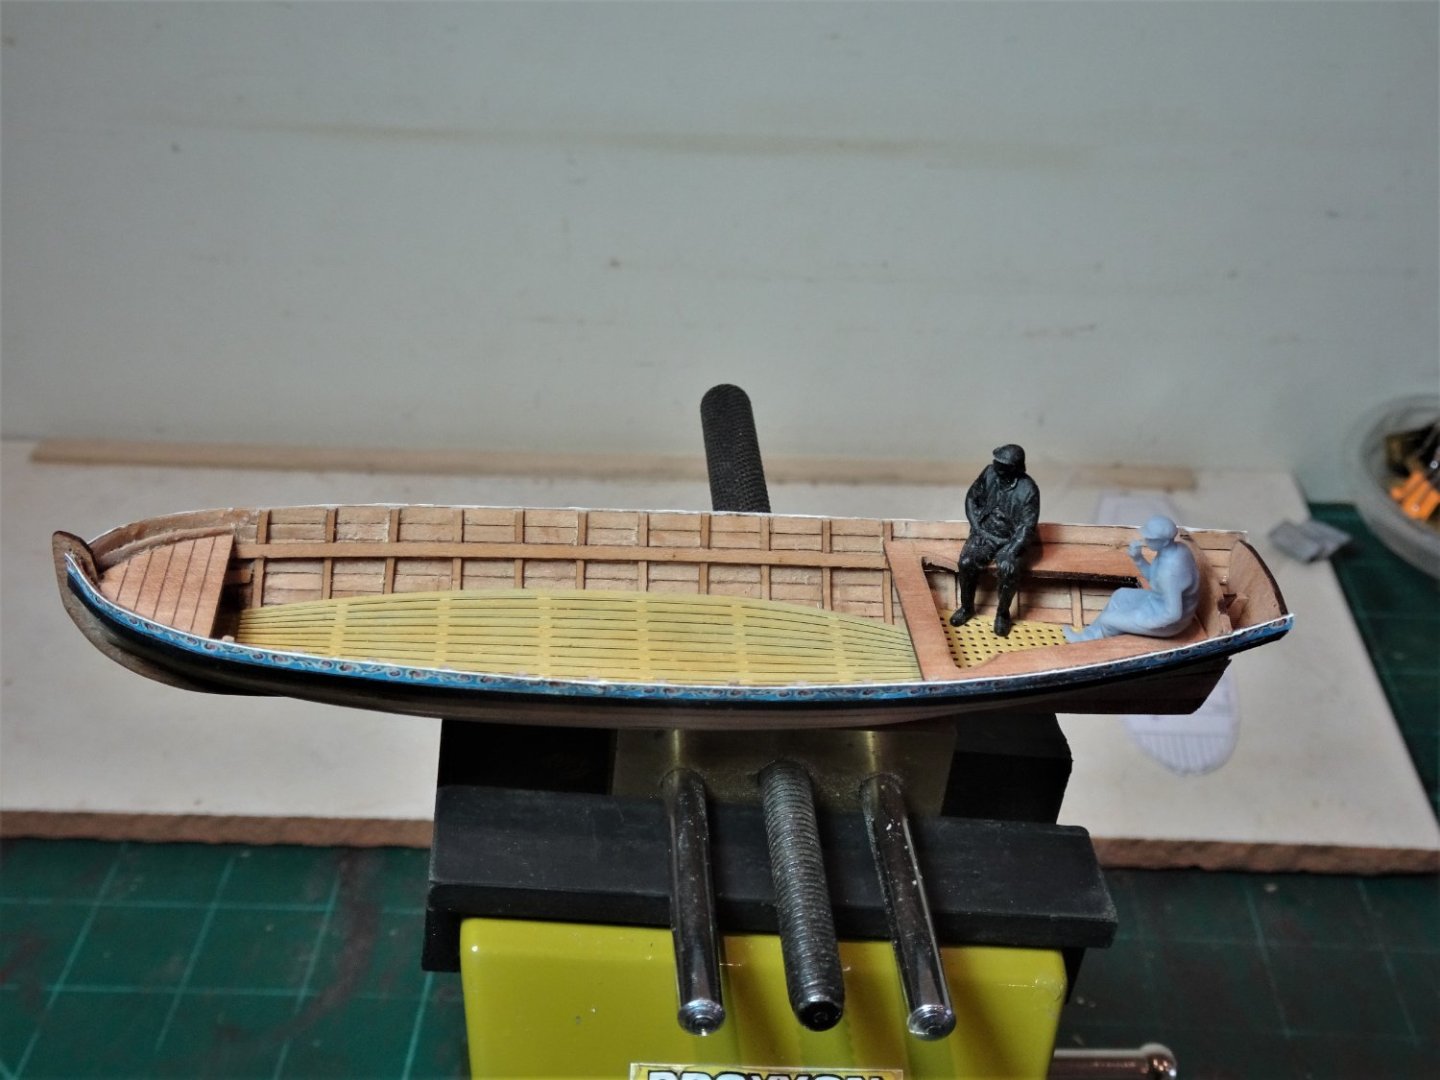
7921
I am pleased to see they are a perfect fit for the Sternsheets.
Work will now continue to add detail to the sternsheets, and attend to areas requiring a little more cleaning up as revealed by the macros.
B.E.
15/08/2022
-
Interesting stuff Ron, well explained👍
B.E.
- mtaylor, bruce d and hollowneck
-
3
-
Thank you Glenn and Thomas.
@ Glenn – it certainly doesn’t feel a easy, even tho’ I’ve done a few.
@ Thomas – I surely hope so, but there’s a way to go before I can feel relaxed that they pass muster.
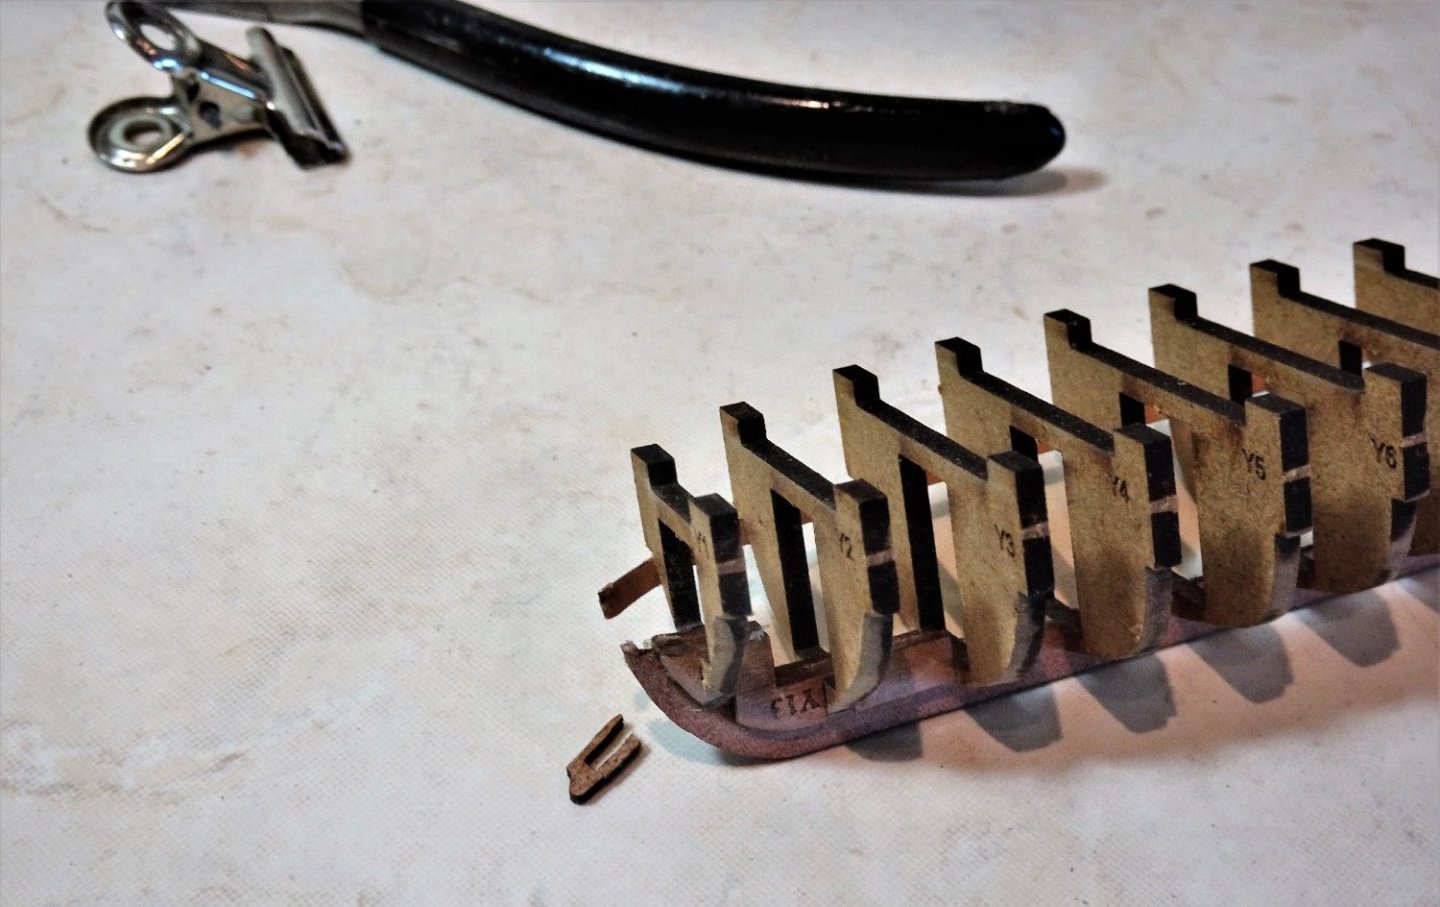
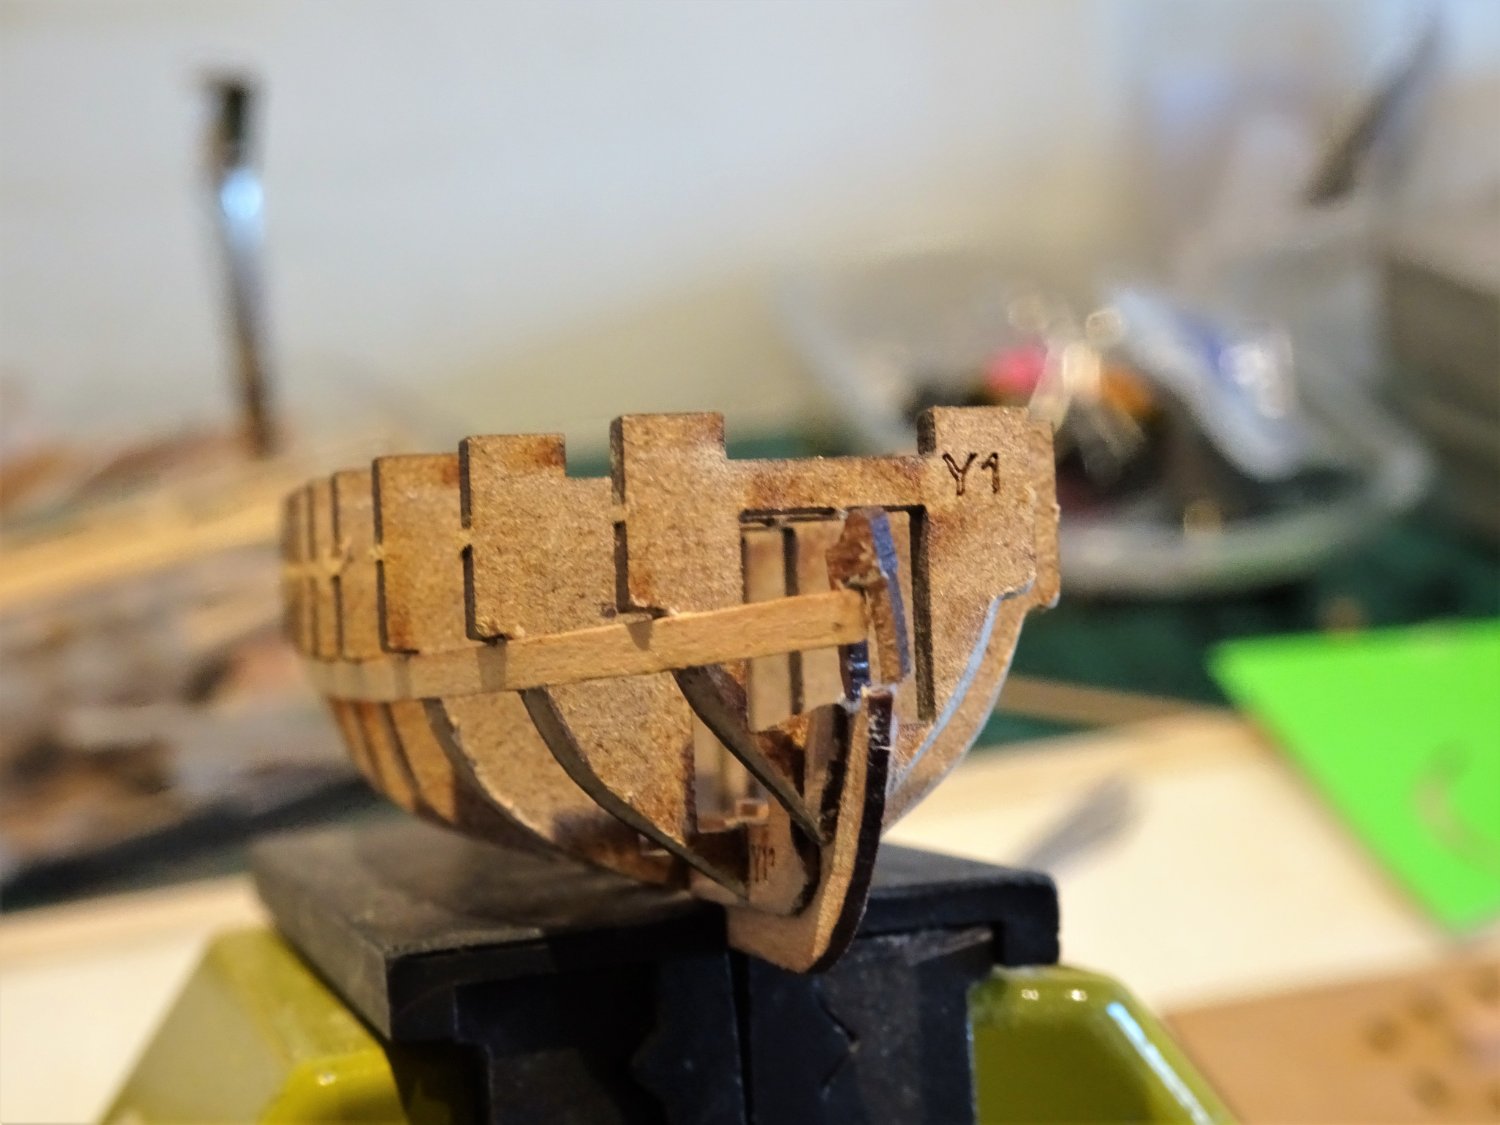
Post one Hundred and Fifty-three.
Fitting out the boats
Pinnace. – early stages.
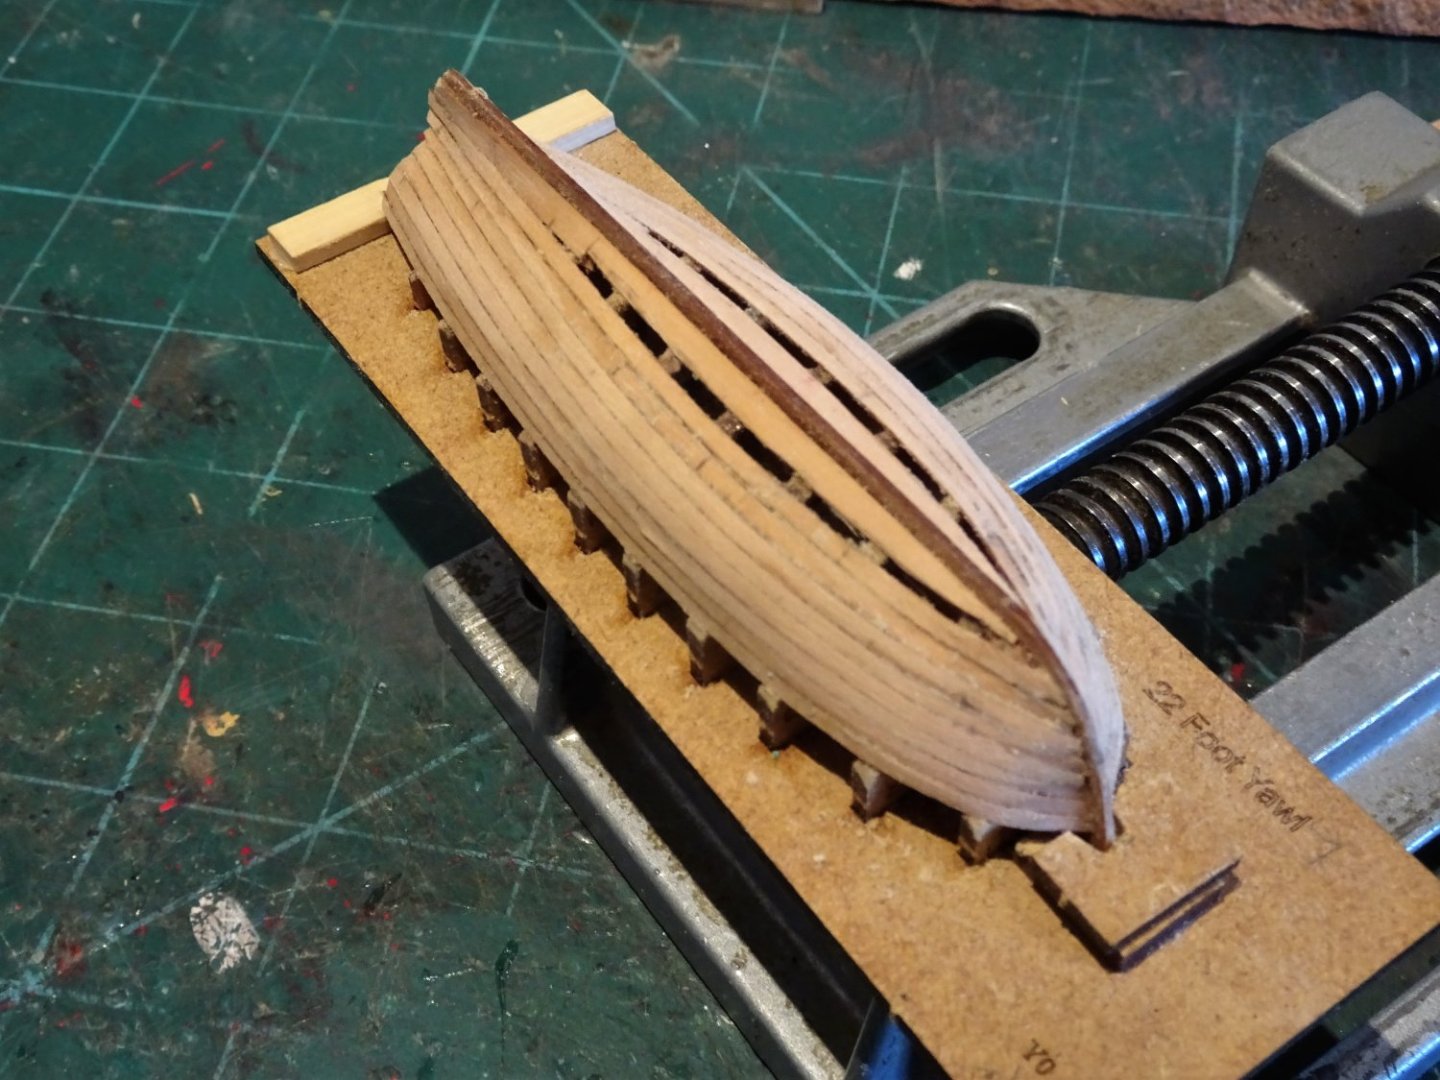
The first task is to twist the supporting frames away from the hull with pliers.
This always feels counter intuitive to me with thoughts of the planking disassembling.
Have faith, it doesn’t happen, but it always leaves me wondering why.🤔
At this point the hull is very delicate and any pressure to the topsides must be avoided.
7875
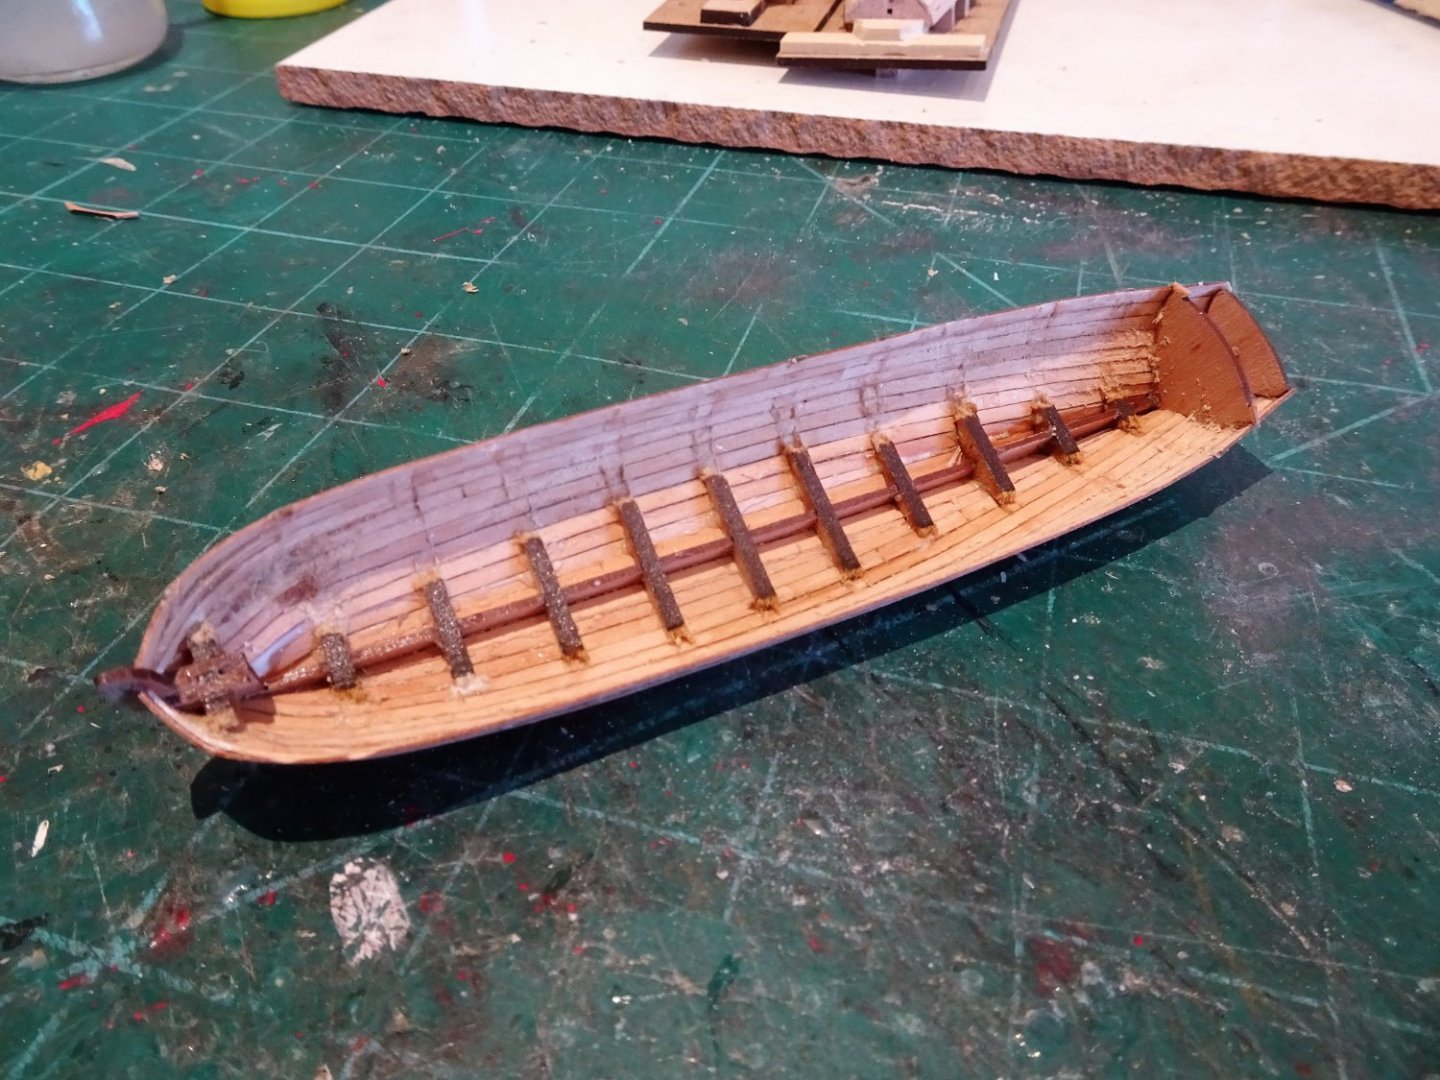
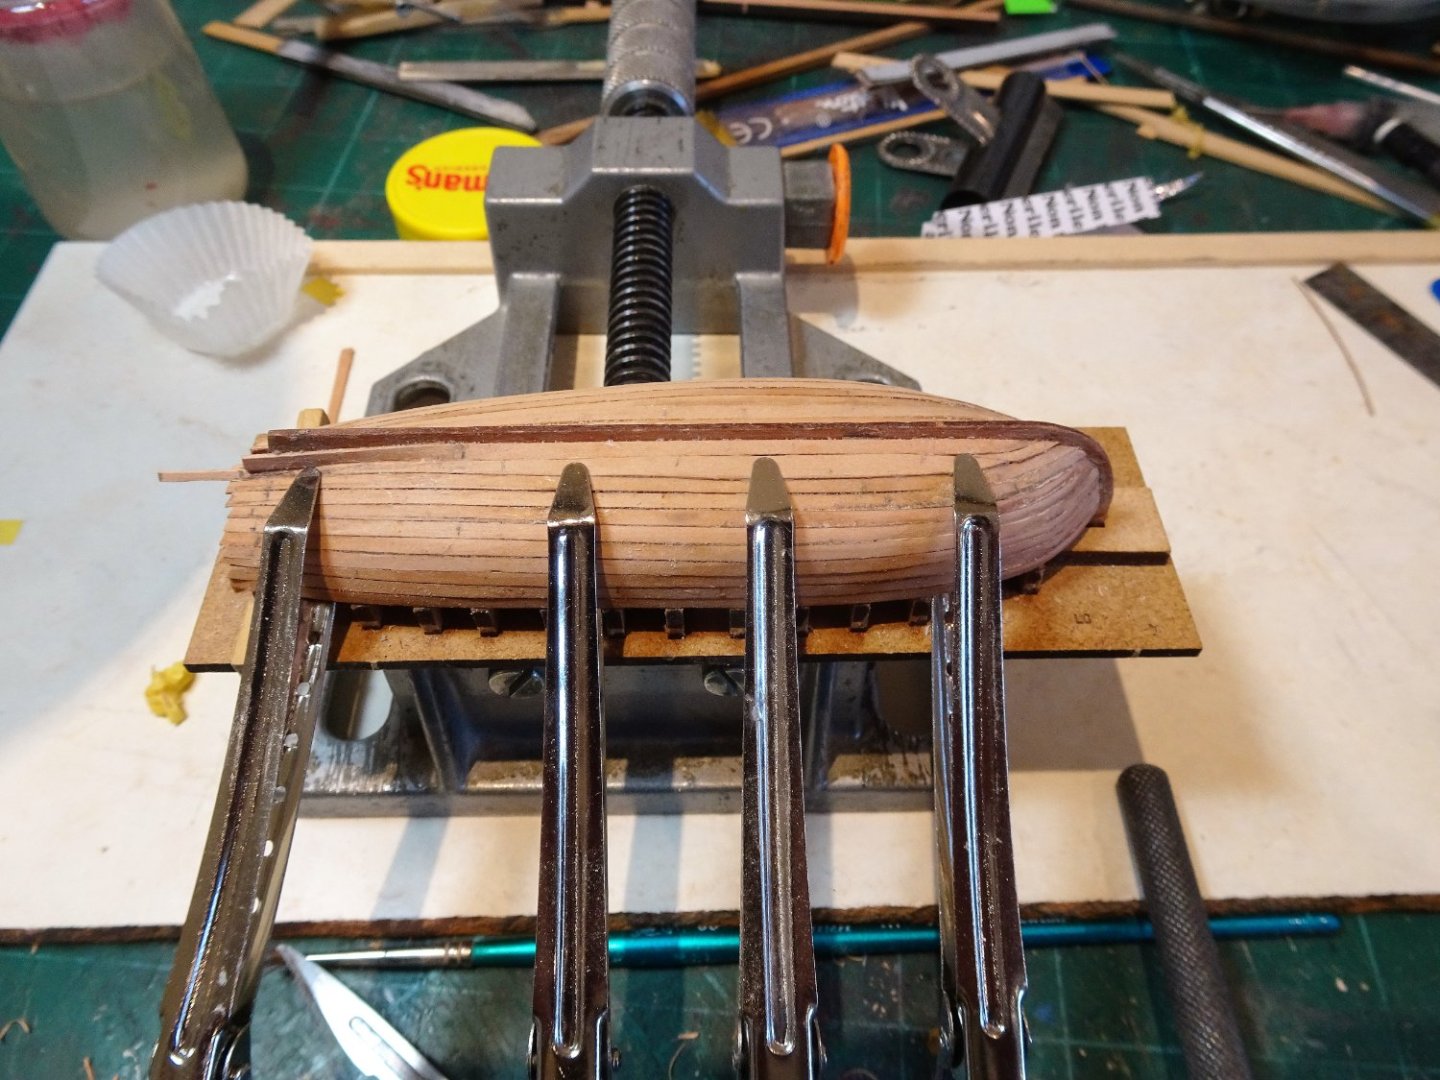
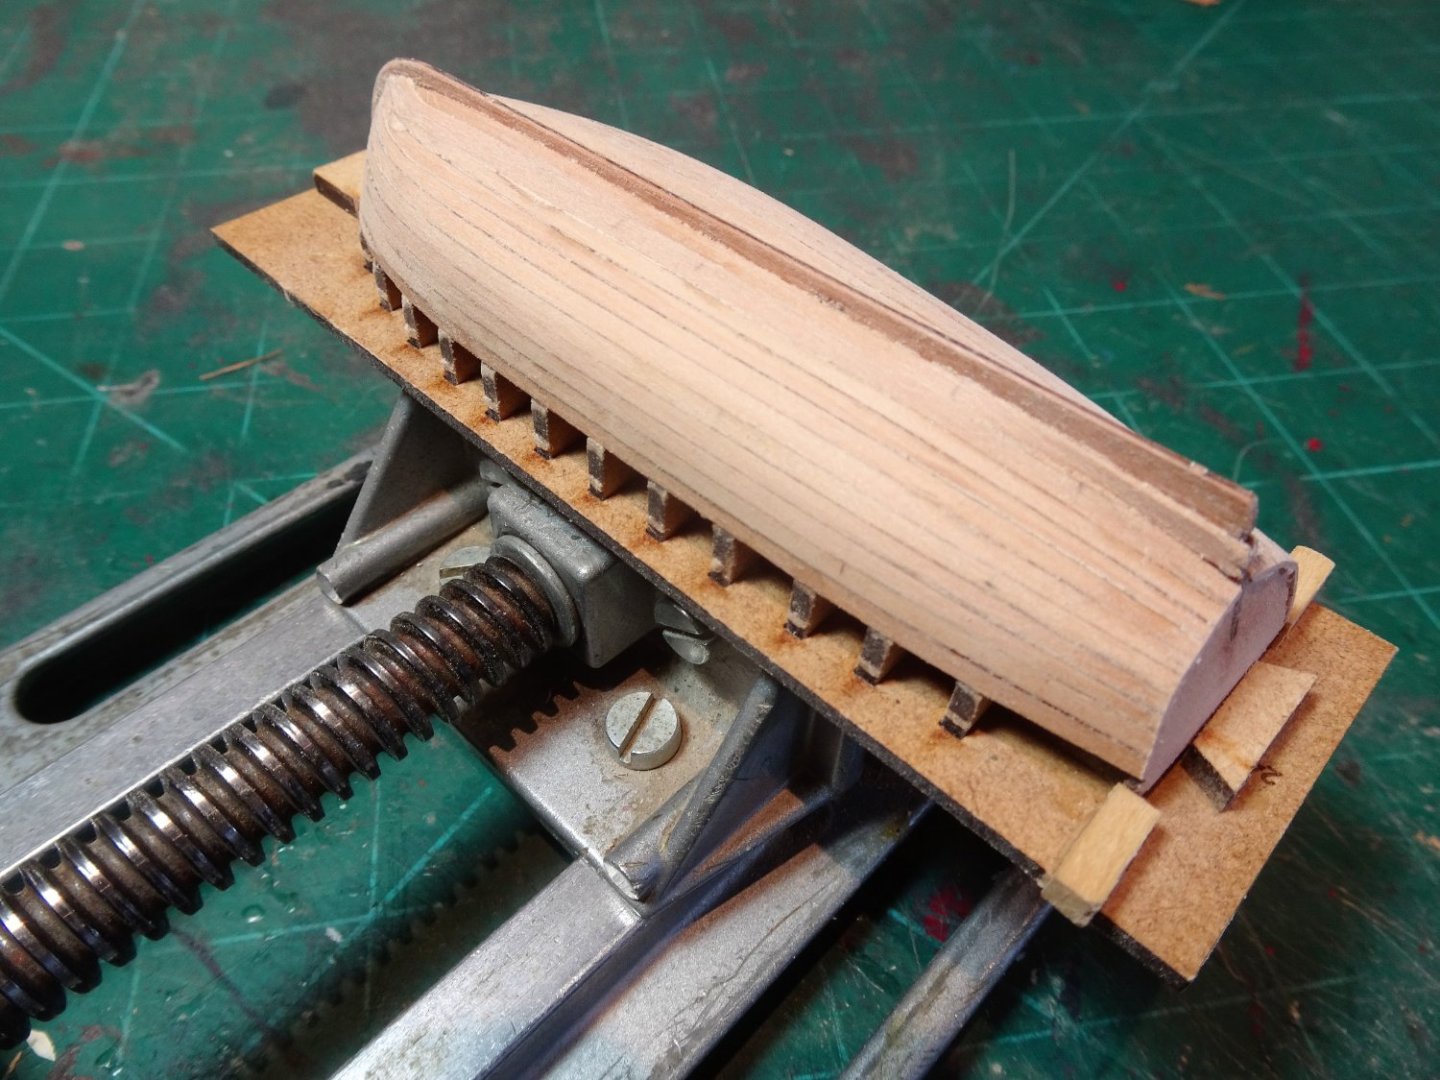
Thee task of cleaning up the internal hull looks rather daunting, but using a combination of micro chisels, and slightly dampening the glue marks within the hull, they are removed. This is a fairly slow and delicate business.
Fortunately, there are areas on the Pinnace that will ultimately be covered by the false ribs, Bow deck, stern sheets, and floor decking. The hidden areas I paint with dilute pva to add strength to the hull planking.
Some of the planking has gone almost transparent thin, and in these areas I apply a diluted pva/ pear dust combo which is then smoothed off.
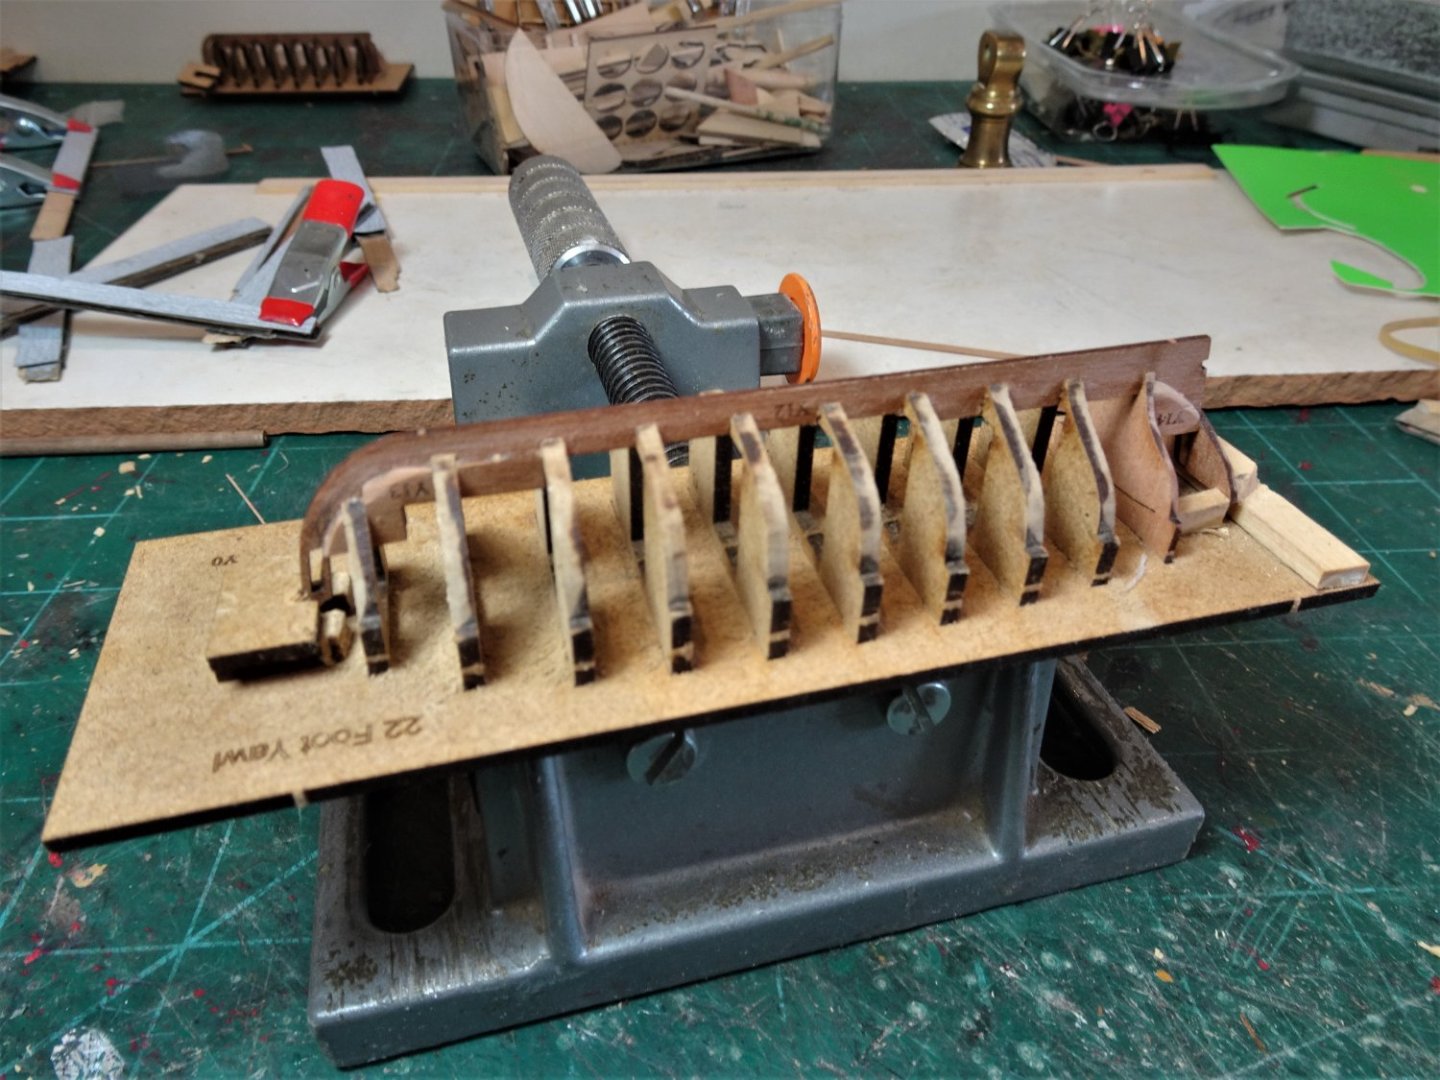
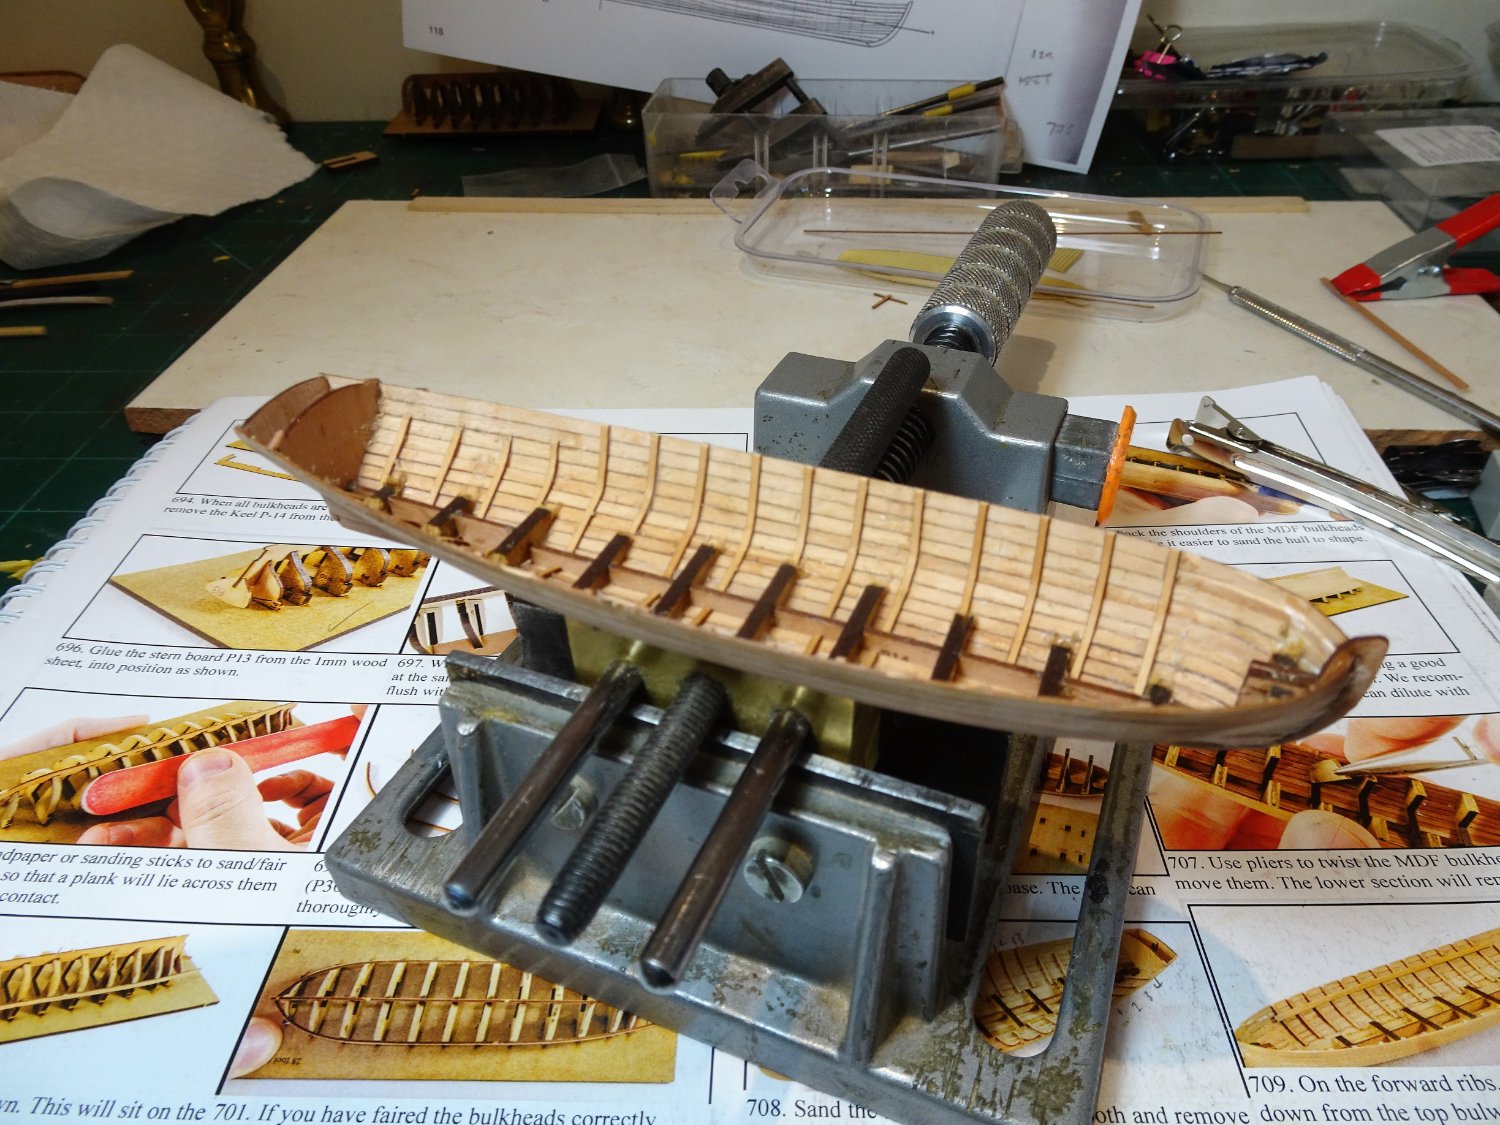
Fitting the ribs is the next task.

7879
I use 6mm Tamiya tape for spacing, which has the added benefit of supporting the hull planking and the vulnerable top strake.
Once these are in place the hull becomes much stronger.

7881
With the ribs in place the stringers that support the thwarts are fitted next.
7884
These are fitted 3mm below the top-line of the hull and to this end a simple jig is made to ensure uniform marking.

7885
With one side glued into place, the opposite stringer is temporarily clamped to check levels.

7888
Once satisfied the stringer can be glued into place.

7893

7894
… but before the glue sets hard, the thwart levels are eyed from all angles.
7895
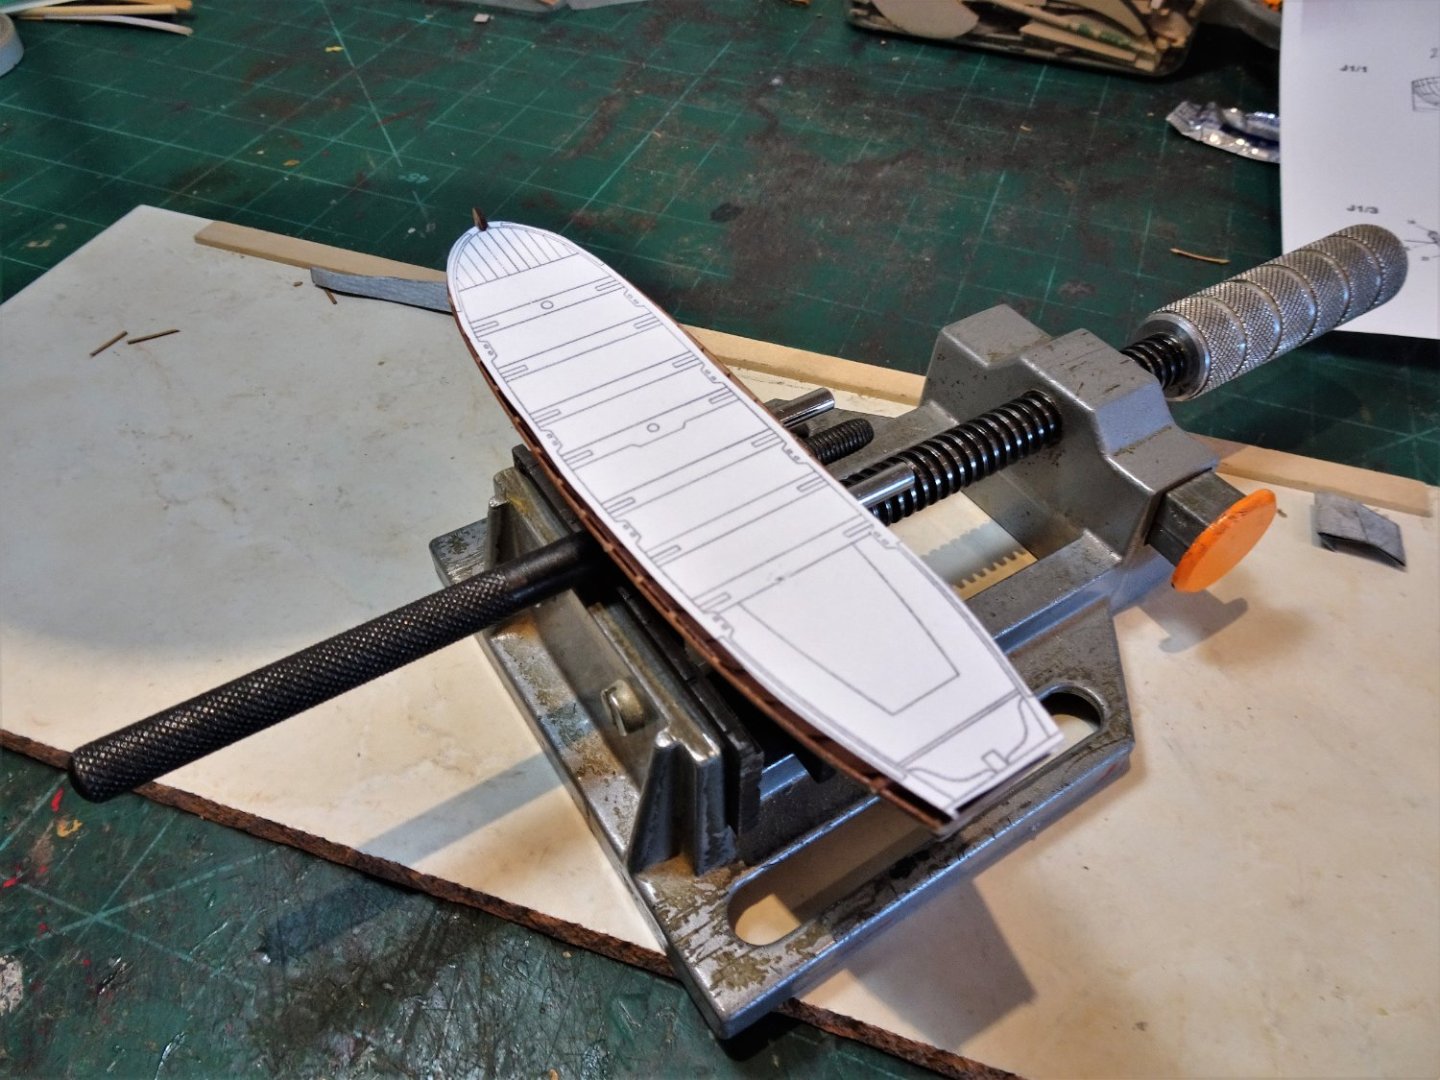
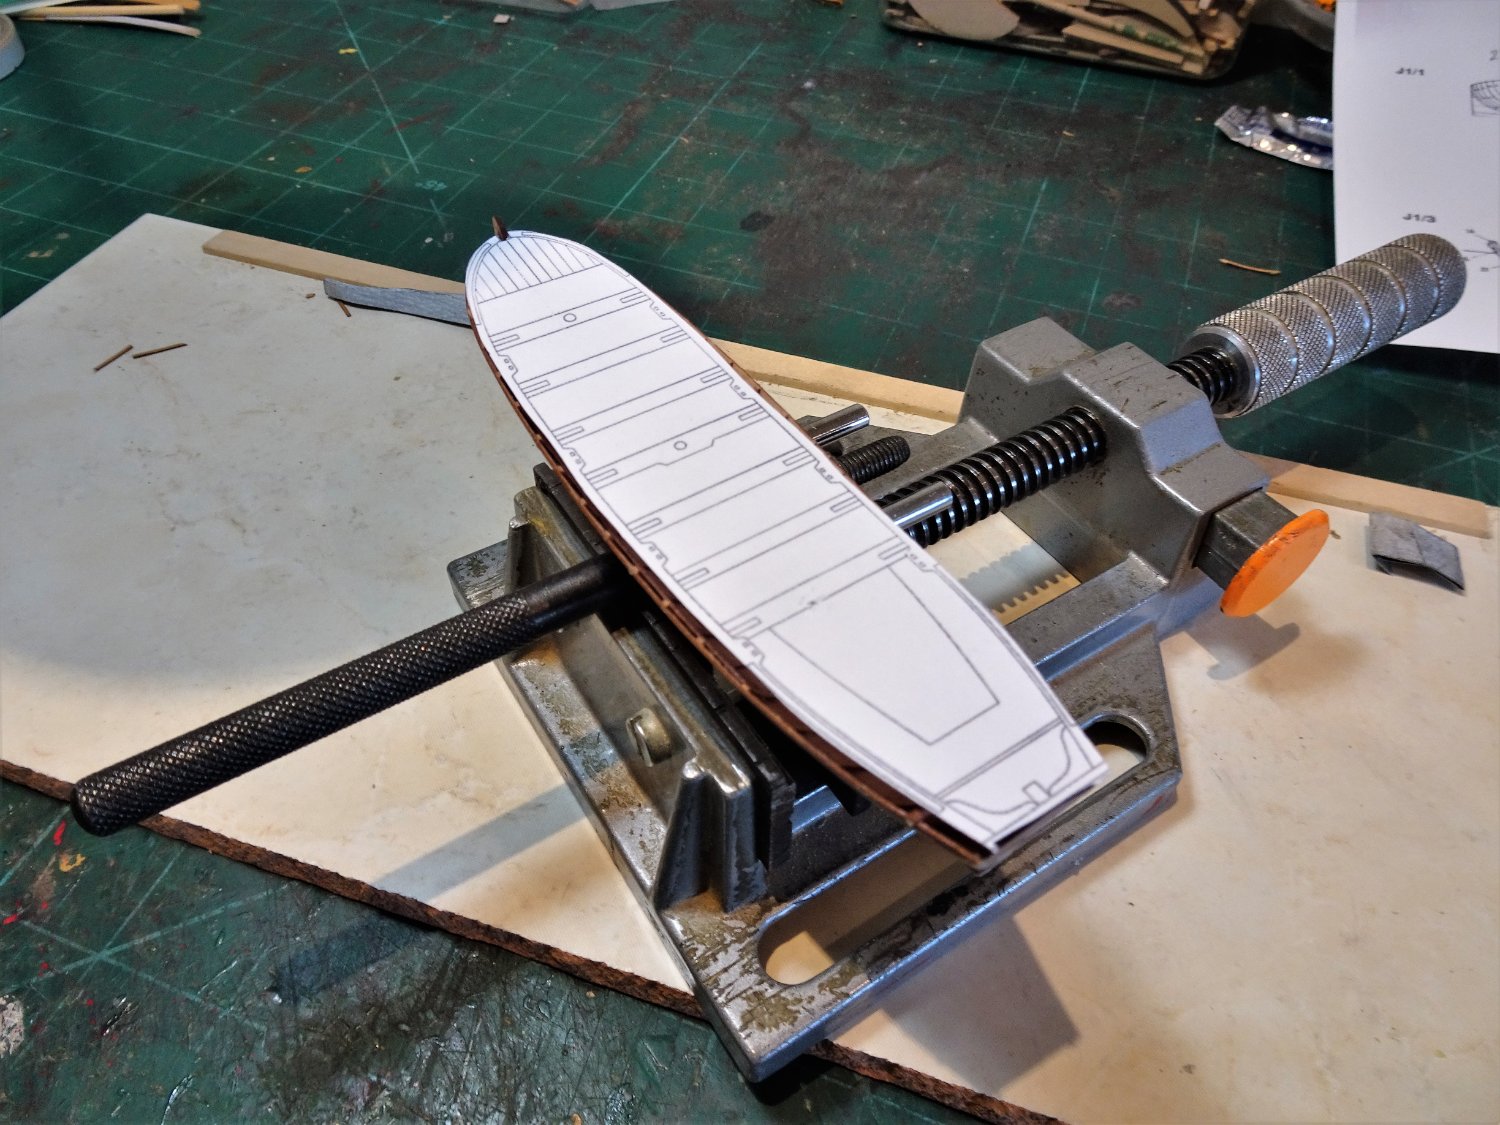
A copy of the Pinnace plan is taken as a template for the thwart positioning when I reach that stage.
There is still some work to do on the hull, a spot more of internal cleaning and minor filling, but the hull is now more robust for handling.
B.E.
13/08/2022
-
Modelspan is a lightweight translucent tissue, strong when wet, I don't think you would notice a difference between the two. It is commonly used for skinning model aircraft.
You can see the effect in my log above, but my approach was slightly different to that used by Ron. The tissue is used as a stand alone medium which is painted with tinted dilute pva, stretched and dried. Any re-wetting then makes it pliable again for manipulation.
I was working at 1:150 scale, so at larger scales using a central core between layers of Silk/Model span may be required, I don't know, my only square rigger with sails is the Seventy-four.
Regards,
B.E.
-
I'm not sure whether Silkspan is now available, there is ModelSpan in 12gsm and 21gsm, a quick search will reveal quite a few UK suppliers.
I have used Modelspan for sail making at1:150 scale, and it works very well.
B.E.
- bruce d, hollowneck and mtaylor
-
2
-
 1
1
-
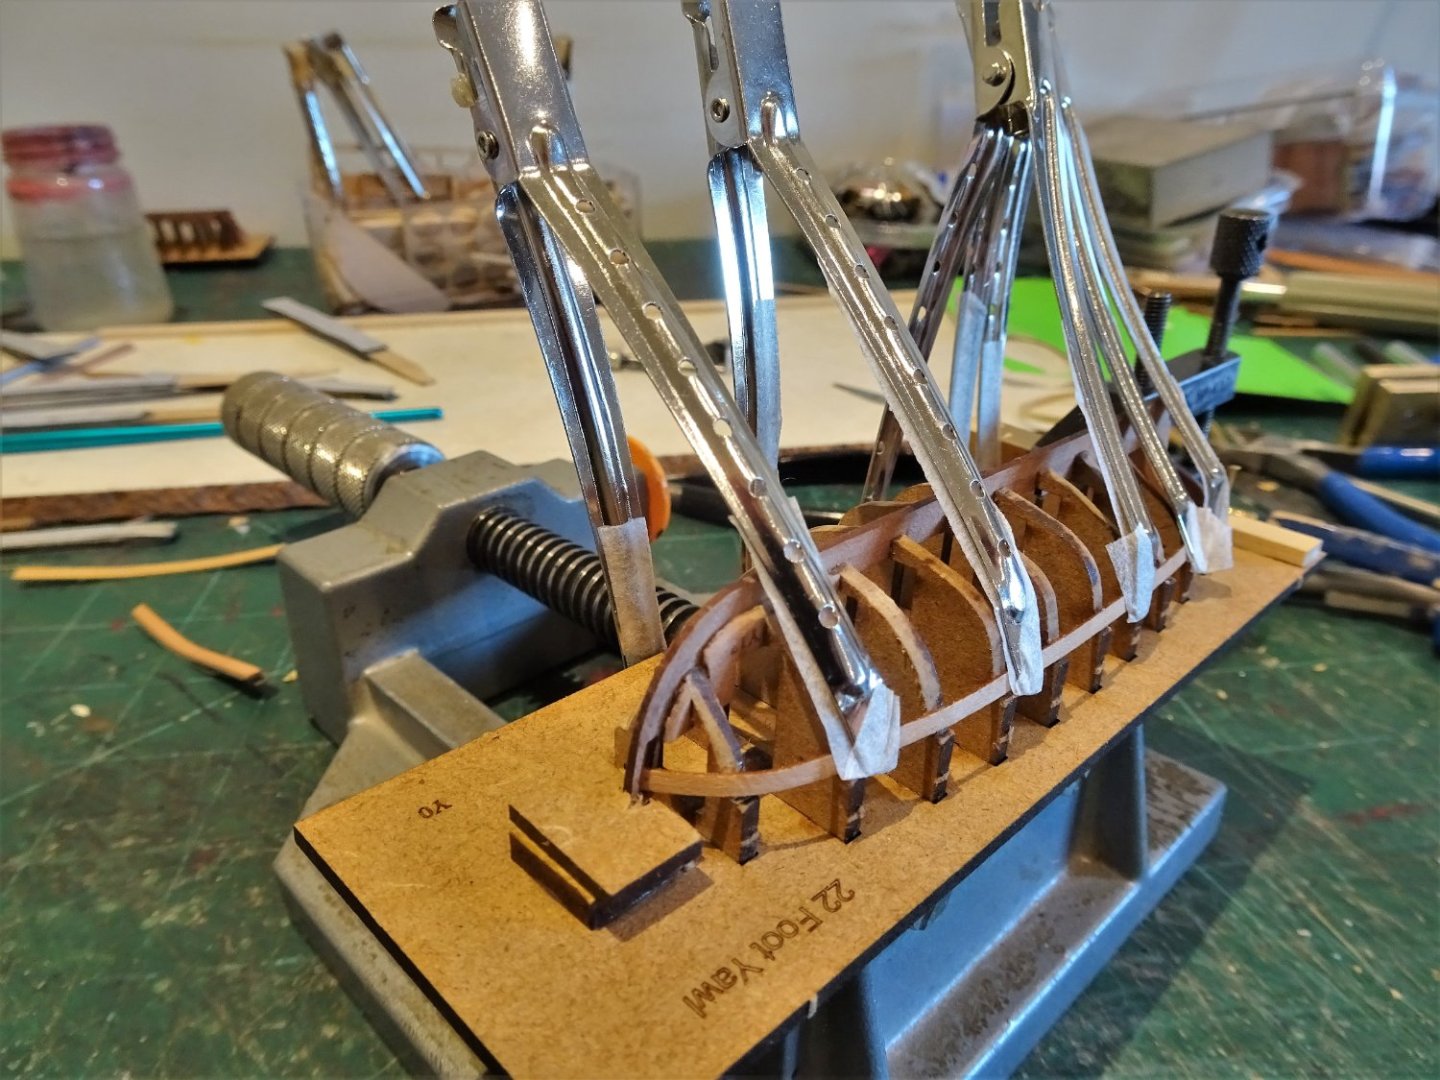
Post One Hundred and Fifty-two
Yawl – planking completion
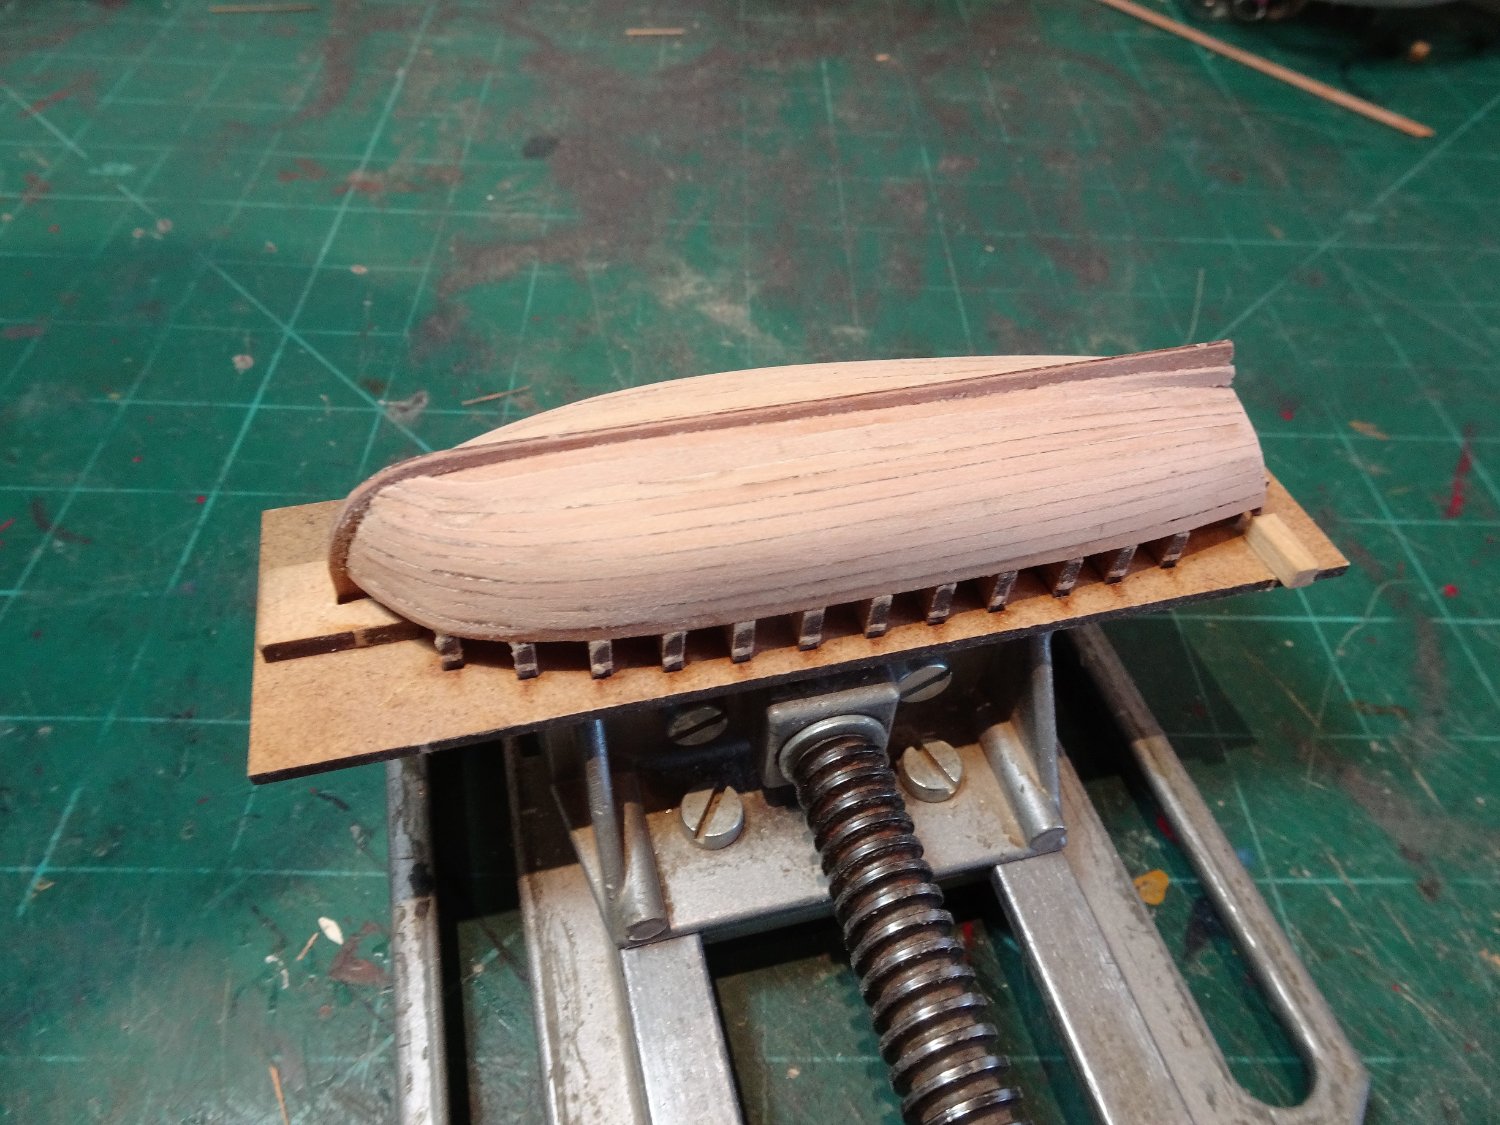
After four days the Yawl planking is completed.
Notwithstanding the stem issue, and that I have built this before, I think the Yawl is the easiest of the three to plank.
.thumb.JPG.11b842ac363c3d63c0fe1fe5cdeacc33.JPG)
7855(2)
7853
A relatively even line for the final planks.
I did tweak the Garboard planks a little to create a more even final plank.

7857
A guide-line is marked on Tamiya tape to template the spiled plank.
7859
This is cut from wider 0.6mm strip.

7860
It’s then just a question of slowly fining down to fit the space.
7862

7868
.thumb.JPG.1f19c4291af77a37aed6f06b35317482.JPG)
7874(2)
.thumb.JPG.d3aa4298733329f2fad9cb2aac717b90.JPG)
7872(2)
.thumb.JPG.0e3de3df088186d0f3897e01ce6f67f5.JPG)
7870(2)
With the three ‘official’ boats planked I have decided to defer completing the cutter which I will lapstrake.
I can now move onto the more interesting aspect for me, of fitting out the boats, starting with the Pinnace.
It has taken around 14 days to get to this stage, but feels a lot longer.
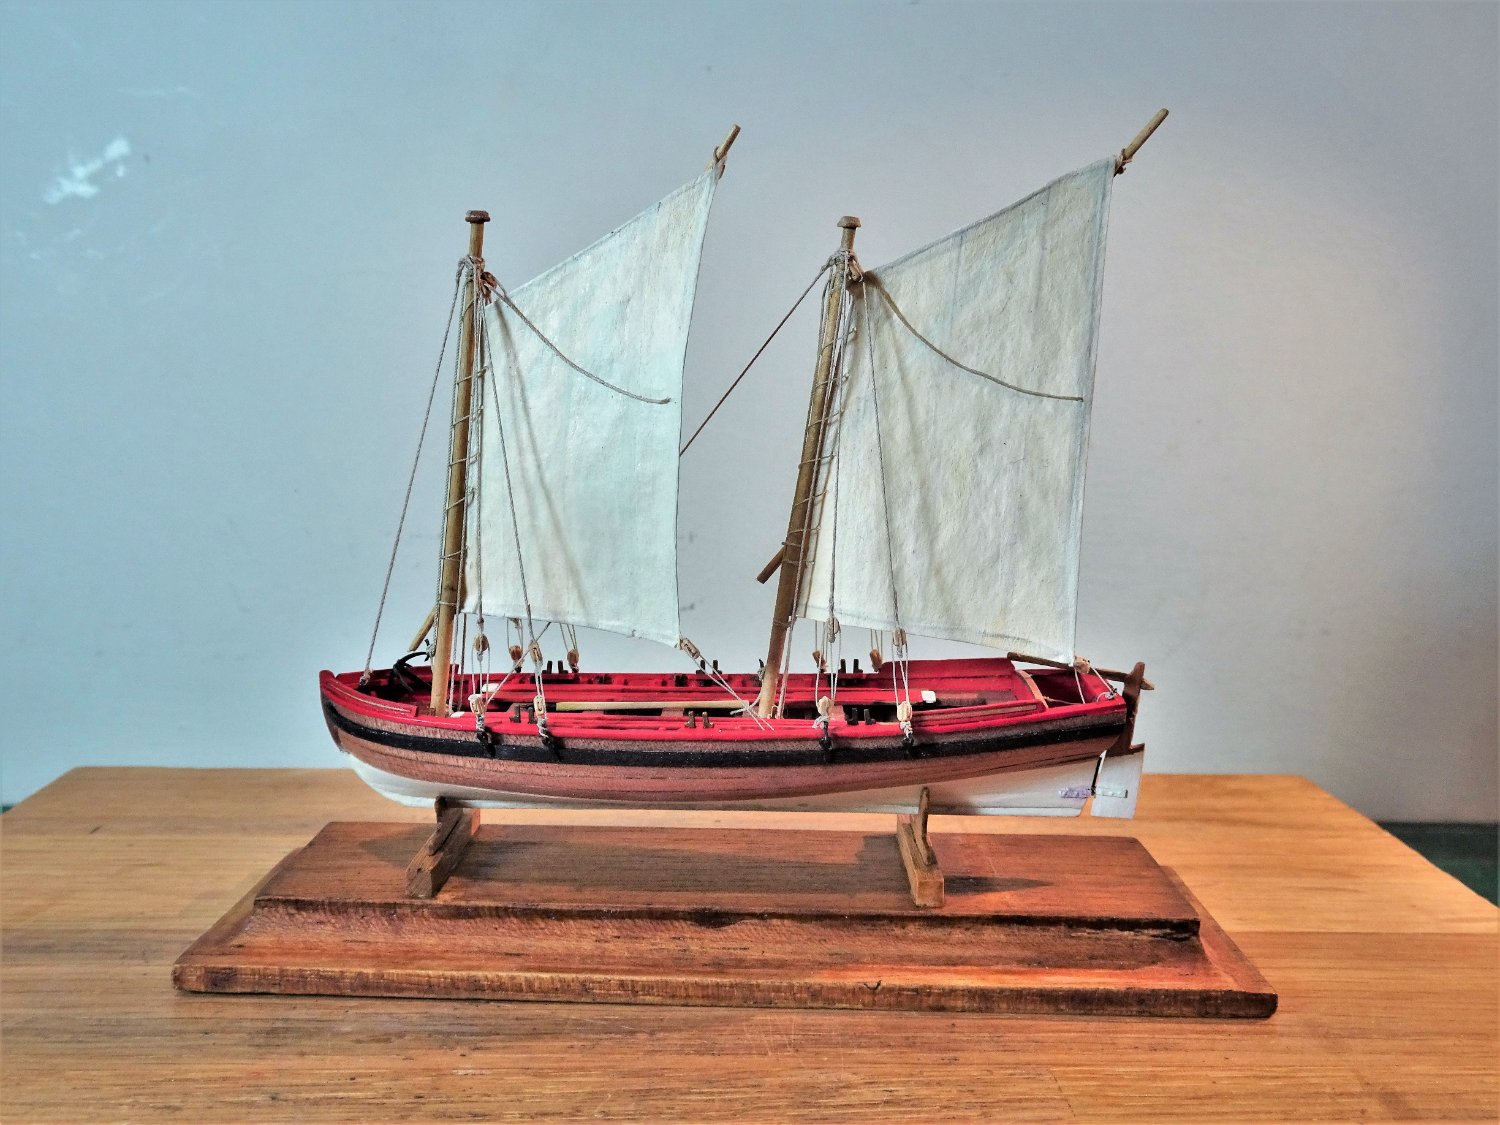
Despite the frustrations of building these bijou models I still think they offer the most authentic representations of ships boats at this scale.
B.E.
11/08/2022
-
Ha, Ha, thank you Ron,
Unlike Sisyphean I at least have the option to stop, and I may well take a break once I have completed the ‘official’ allocation.
When my resolve starts to flag with the seemingly endless task of planking these little beggars, I think of James, tasked to complete whatever arrives from the dark Forest of Dean, and to a standard demanded by the Gods. Any failure means the task is repeated, any success and the reward is more of the same.
I then feel much better.😉
B.E.
-
Looks like a great day out for ship modellers, Ron, love your Swan in her seascape setting.
B.E.
- chris watton, mtaylor, druxey and 1 other
-
4
-
On 7/26/2022 at 12:55 PM, chris watton said:
, followed by a ship's cook, as I do get asked about expanding the figure range.
I should also have cabin chairs and table available to buy soon.
If you're going for a cook, don't forget a goat for the manger.
Oh and a rat, what galley would be authentic without one.
B.E.
-
Post One Hundred and Fifty-one
The Yawl saga continues.
With a replacement stem part made from some 1mm fret, (vertical grain pattern essential), planking recommences.
For anyone interested the ‘how to’ of this repair it can be found in the log details of my first Yawl build.
.thumb.JPG.37a2c03e0fd9b2f8a39455e1ba964572.JPG)
7848(2)
I’m not sure what could be done do to strengthen this weak point, reduce the size of the rabbet a little, my replacement rabbet was slightly narrower. Perhaps increase the aft side of the stem with a slave tab that could later be removed once the planking secures the stem.
I don’t find it that difficult to make a replacement stem, but beginners may find it more daunting.
.thumb.JPG.30952a8cca8ba0e42ad60246c3a9adaf.JPG)
7850(2)
With the first three strakes fitted the stem is now stable.
On with the show.
B.E.
08/08/2022
- DelF, Thukydides, Glenn-UK and 19 others
-
22
-
Post One Hundred and Fifty
Building the Yawl.
Having built the Yawl before I am curious how this second bite of the cherry will turn out.

0627
I was quite pleased with the result of my first effort which I also rigged and added sails.
Two issues affected my first build, the delicate stem snapped, as did the stern transom very early in the build which necessitated some scratch replacement work.
7829
I have taken precautions this time around to hopefully avoid that situation.
Support pieces have been added to the hull constructions of all the boats.

7831
Note that a temporary brace is used to hold the transom in place opposite the first strake. The pressure of gluing against the transom can easily push this delicate area out of true, or worse.
7833
The first strake is fitted, using heat only to retain the bow curve, so far so good.

7835
....................... and it was all going so well!
7837
Despite my best efforts to protect the bow stem, it again detached at the very same point on as my first build of the Yawl.
I know from previous experience that glue won’t hold it against the lateral pressure of fitting the bow planks.
This is a weakness in the design of the yawl, a combination of lateral grain coupled with the very fine stem pieces created by the rabbet, almost guarantee a fail, obviously in my case.
Feeling somewhat miffed, it’s back to the drawing board to scratch a new stem.
B.E.
07/08/2022
-
Post One Hundred and Forty-nine
Building the Launch.
Another four days and another hull planked.
The planking method described in the blurb is simplified with the aim of getting a smooth surface that will ultimately be painted, not a bad approach.

7804
If a varnish only finish is required then a more structured approach is desirable, if not easy to achieve at this scale, as all shaping is mostly done by eye.
7814
Fitting the final spiled plank.

7817
The Launch feels easier to plank than the Pinnace, but even so it feels harder than my previous small boat builds (Cutter and Yawl) of only 18 months ago.
7816
A case perhaps of increasing decrepitude and decreasing dexterity.
.thumb.JPG.a11c00989a5f1f43bb25a7cedfdba9f9.JPG)
7821(2)

7815
The final fettlin’ of the hulls will be done once they are all planked.
.thumb.JPG.7ad5fef2665fd6b34208a23782267bc8.JPG)
7825(2)
.thumb.JPG.a00c5822be03627197ae91f3b22ede27.JPG)
7826(2)
Two down, two to go - onto the Yawl.
B.E.
06/08/2022
- Rik Thistle, hollowneck, gjdale and 18 others
-
20
-
 1
1
-
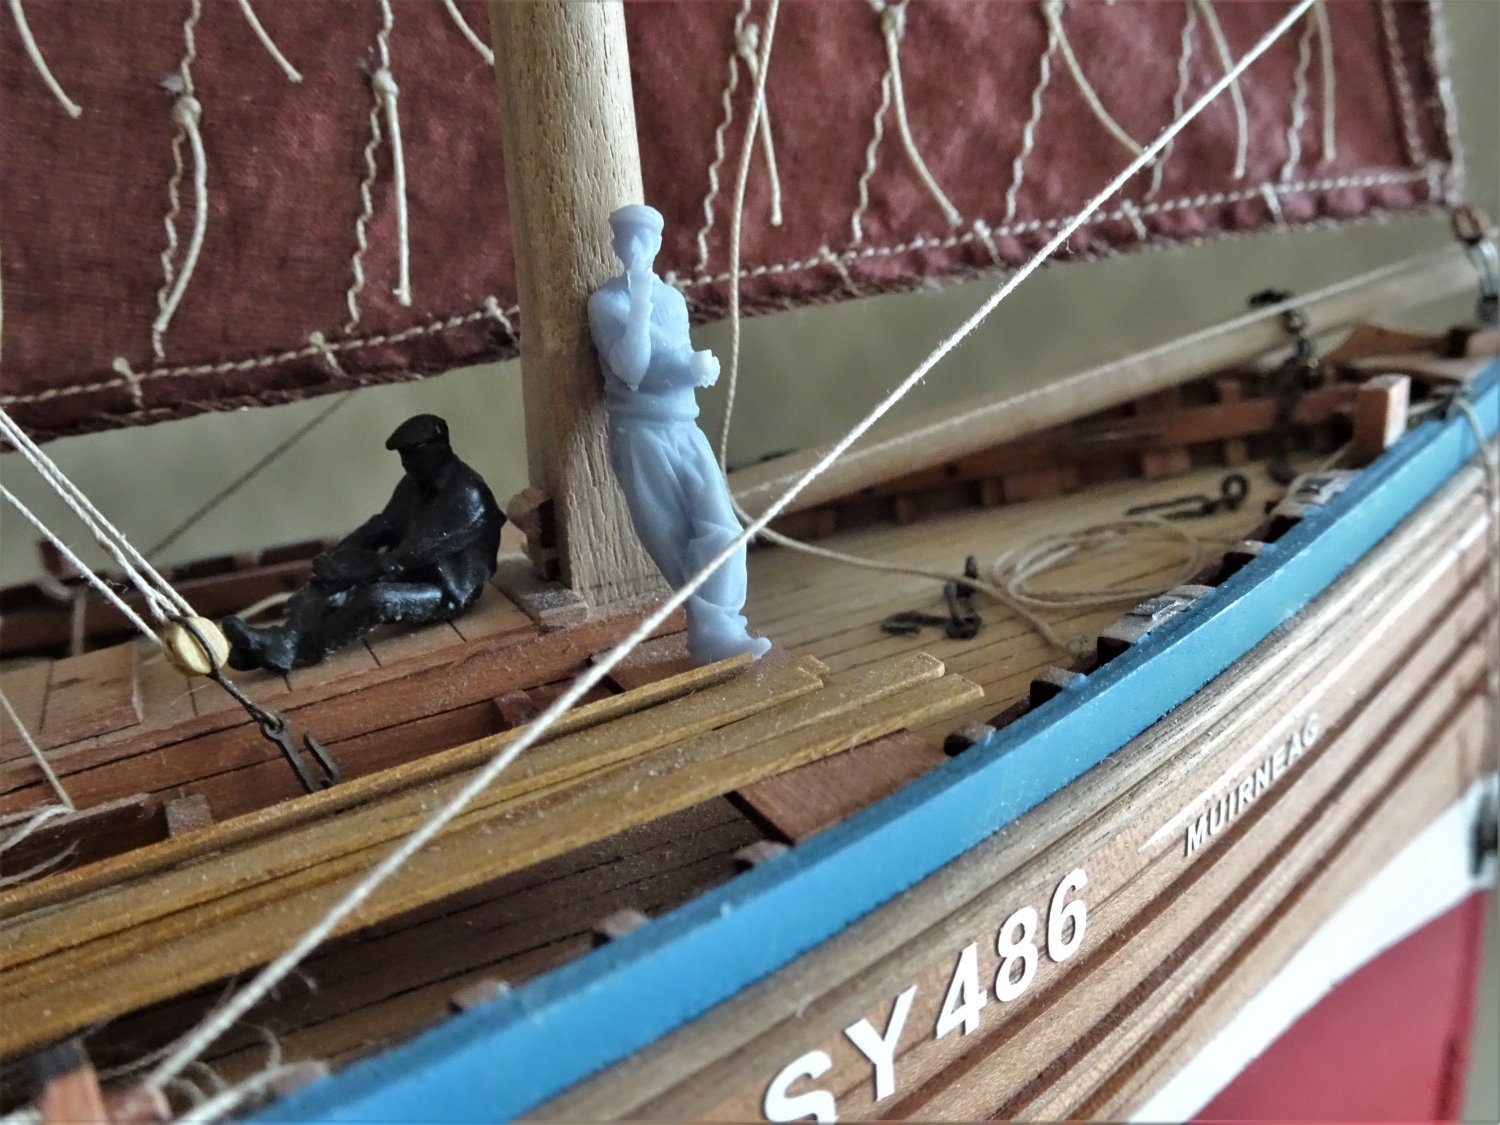
This is a heads up for Modelu scale figures.
Shipping, Fishing, and Waterways – Modelu (modelu3d.co.uk)
I have used Modelu figures to crew my Vanguard fishing boats, but in the absence of specific figures I used industrial figures.
A while ago Modelu asked its customers what figures they would like modelling. More in hope than expectation I suggested fishing boat crew members, and to my surprise they have produced a set.
.thumb.JPG.8463d1398352b67fdb25bcabb66e02c6.JPG)
7810(2)
I ordered a couple to add to my Zulu and Fifie builds.

7808
7806
A good fit to lean against the mast aboard Muirneag
7809
The figures are nicely modelled and are available at different scales. There are twenty figures in total in different poses.
B.E.
.JPG.c03b59eedc6a8640b22988494f915280.JPG)
.JPG.50e898d03e67fd60cc711df9ec681b2b.JPG)

.JPG.df9a7ad421e1ec22e589c7909dee52a6.JPG)
.JPG.50188d29bdd101a3a9ade0ba0a64033c.JPG)
.JPG.da631e6b1d8e6b92a314b9875e9fe4f2.JPG)

.JPG.6512e16cf3d9e0b6f26944f9f129b017.JPG)


.JPG.8bac6b6ccd93eef69260f3463cb3e90c.JPG)


.JPG.72f36082c0384d26d885b2ab8a2b1c98.JPG)


.JPG.203259c964beadcf355ce3cae95a086f.JPG)
.JPG.c01a5b654c8158e54c465588e17e4a9c.JPG)
.JPG.547cd707297cc65d5621bc8d18b161d6.JPG)


.JPG.c610422149fa3fa5ab651b3160010001.JPG)
.JPG.6a2985193e86f78e1810789c3ad5da18.JPG)


.JPG.b5630e02f8fb06bf4a992a73c224853f.JPG)
.JPG.809a85957168529c12c0367a21f71047.JPG)
.JPG.86aefe69c15f92aa92c6e29bd9f6b6c3.JPG)
.JPG.fe18ef8201658444ca16d311a4640543.JPG)


HMS Sphinx 1775 by Blue Ensign - FINISHED - Vanguard Models - 1:64 scale
in - Kit build logs for subjects built from 1751 - 1800
Posted
Post One Hundred and fifty-seven
A place on the skids?
Well my curiosity got the better of me and I just had to try the Pinnace onboard Sphinx.
This coincidentally is the twelve month stage from starting the build.
I’m warming to the look of the Pinnace on the skids and it doesn’t obscure the upper deck detail.
8090
8092
8086
8085
8081
8075
8083(2)
8074(2)
8078(3)
8071(2)
8070(2)
8063(2)
Nothing set in stone at this point, but I have decided that having all three boats on the skids would detract rather than enhance the look.
For me, Georgian elegance is why so many contemporary 18thc models only show the Pinnace onboard, it is the most graceful and aesthetically pleasing(along with barges) of the boat complement.
B.E.
20/08/2022