
.JPG.ca33079f5815b861e67b9c2cccd37982.JPG)

Blue Ensign
-
Posts
4,287 -
Joined
-
Last visited
Content Type
Profiles
Forums
Gallery
Events
Posts posted by Blue Ensign
-
-
Great looking set you have there Dan, they do make lovely models
B.E.
- chris watton and DB789
-
 2
2
-
Nice work Peter, she looks impressive.
I like the sail arrangement on the Gardner painting; if you use silkspan sails they can be manipulated using the clews and Buntlines.
It's been a while since I did sails on my Seventy-four build, but the silkspan is coated with diluted pva, re-wetted and hauled into shape. It then dries in the desired position.
The same applies if you want a slight billow to the sails, heat applied from behind fixes the shape.
I look forward to see her kitted out.
B.E.
-
-
Thanks Rob and Thomas.
Post One Hundred and Forty-eight
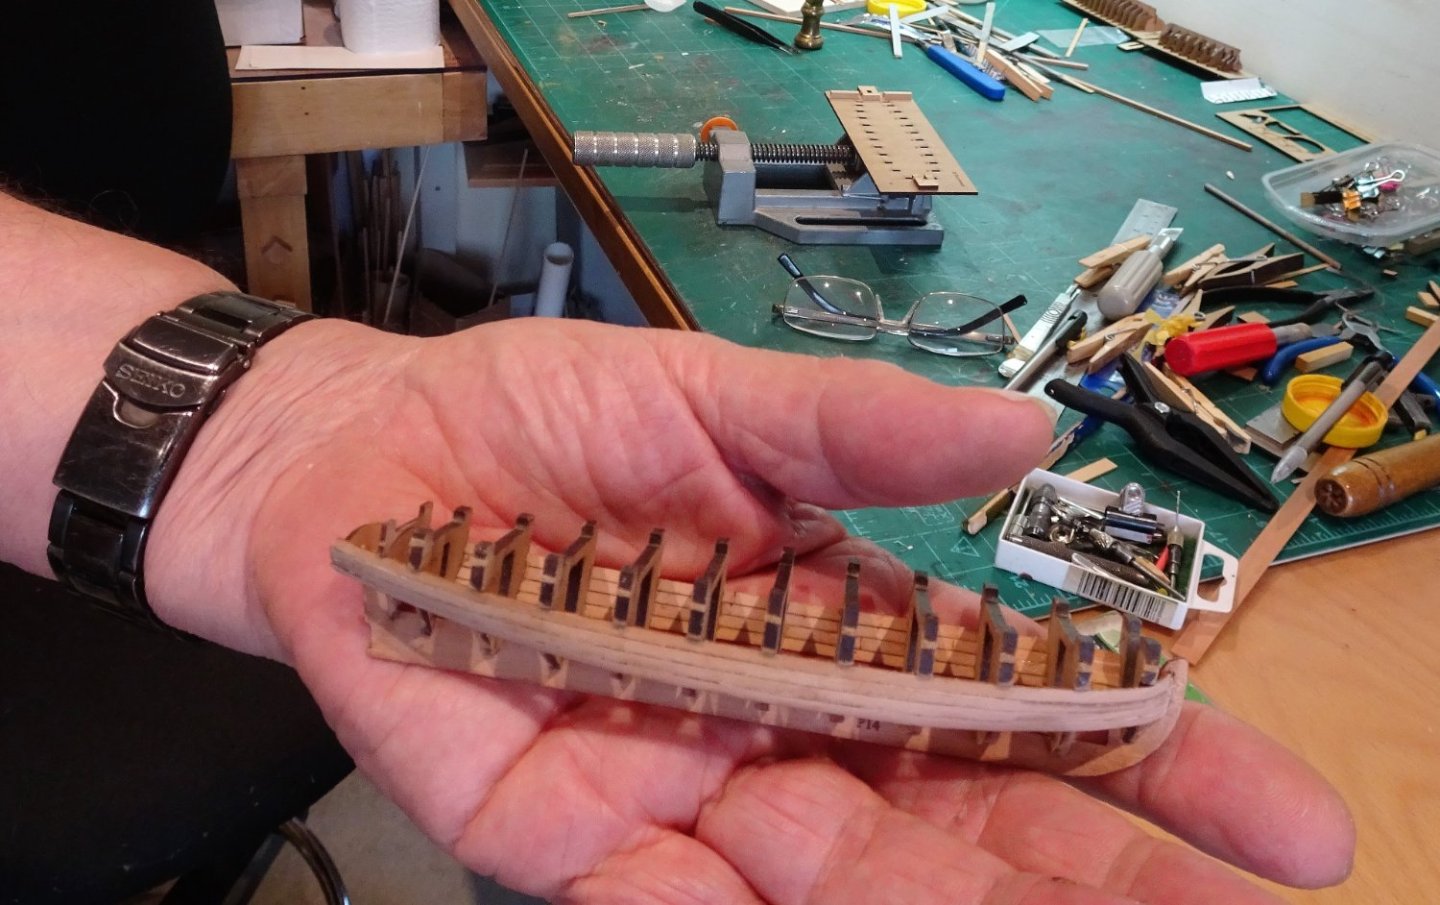
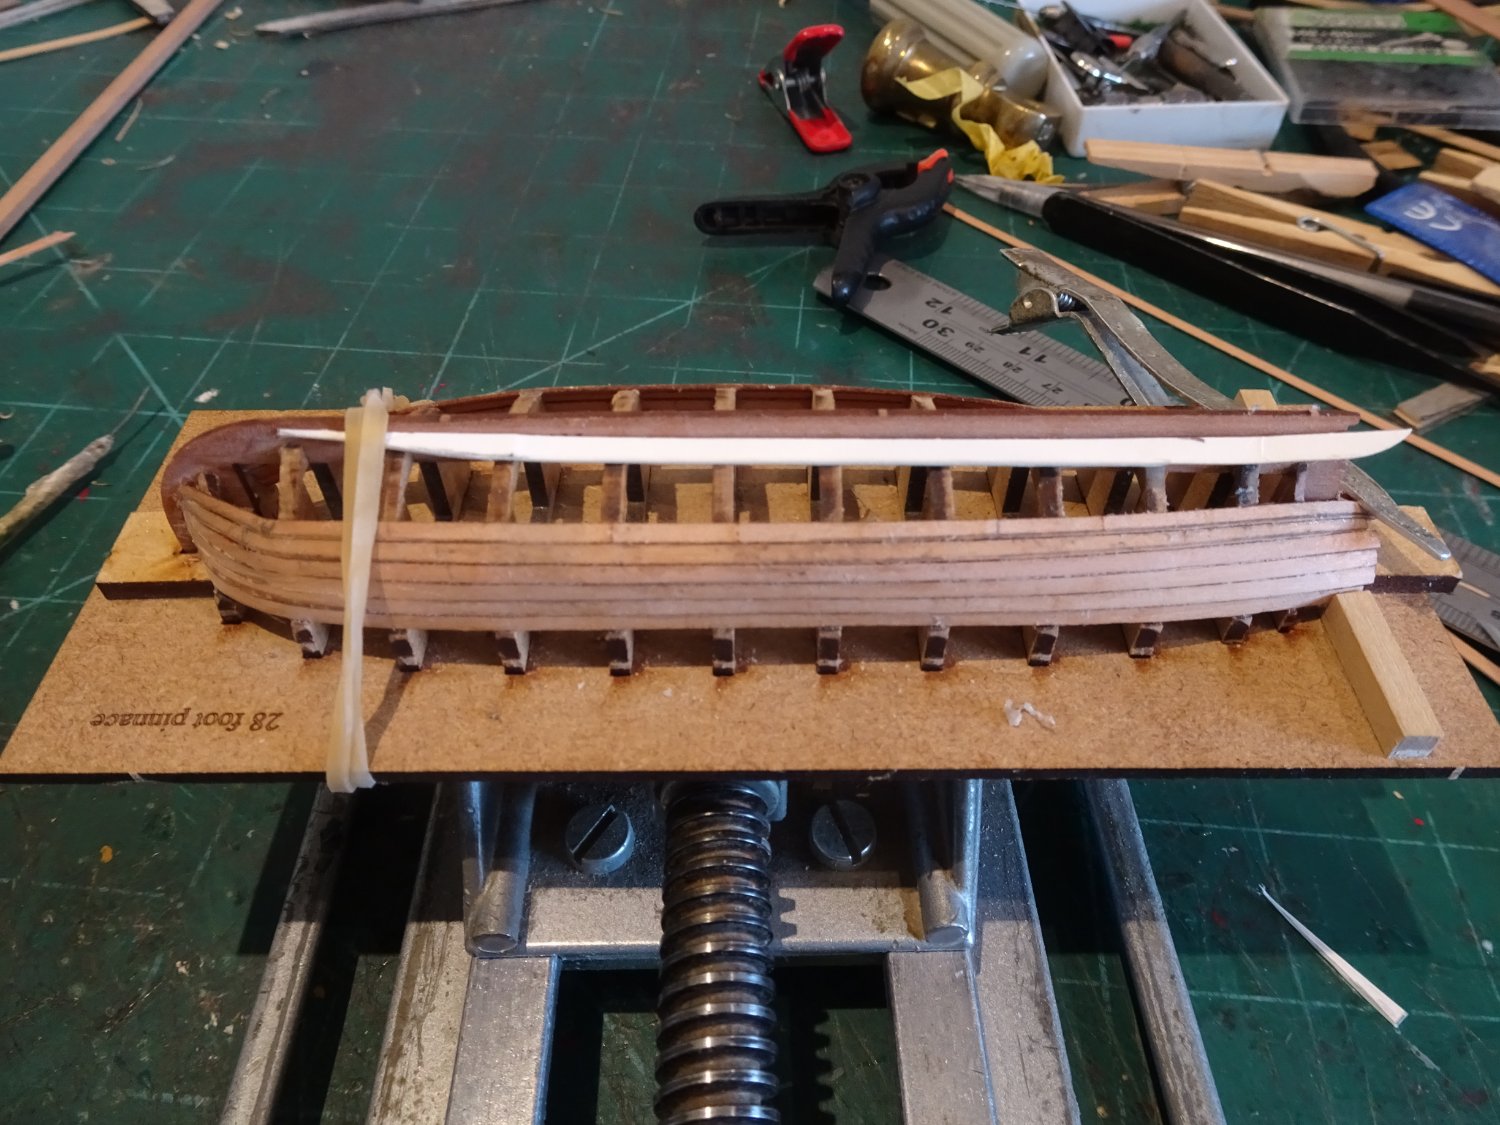
Completing the Pinnace planking.
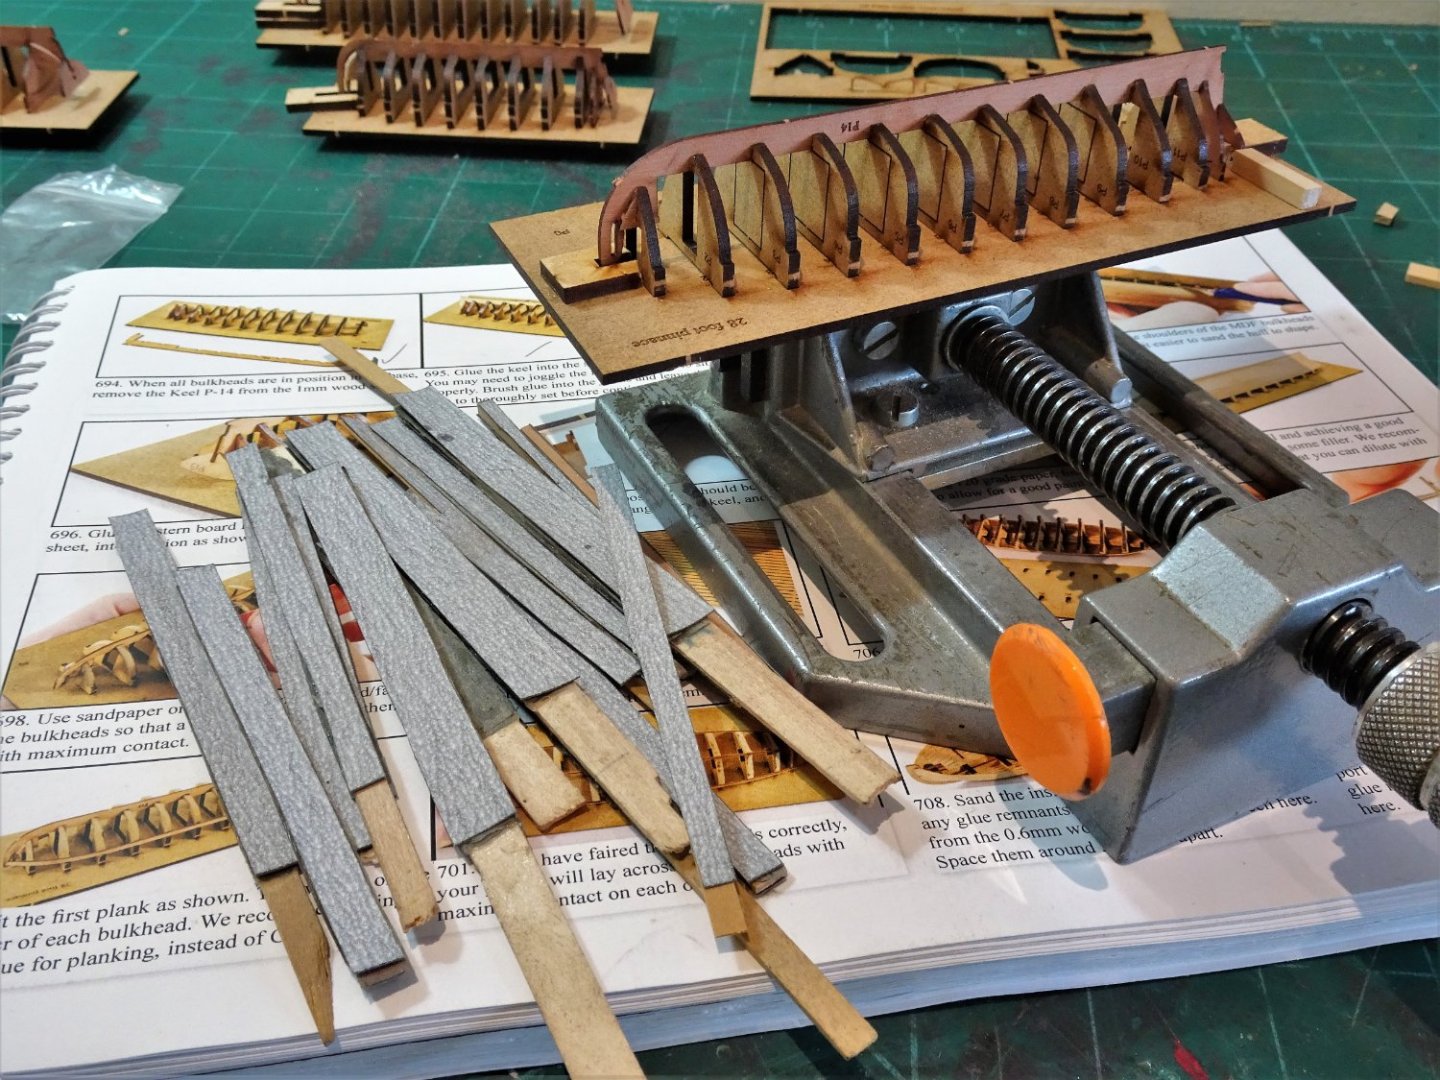
The hull shape of a Pinnace at the bow make it not the easiest to plank.
From the fifth strake these tiny strips are subject to the whole gambit of manipulation. Edge bend, taper, bevel, and bow curve. (other builds may differ)

7780
The edge bend required on the fifth strake.
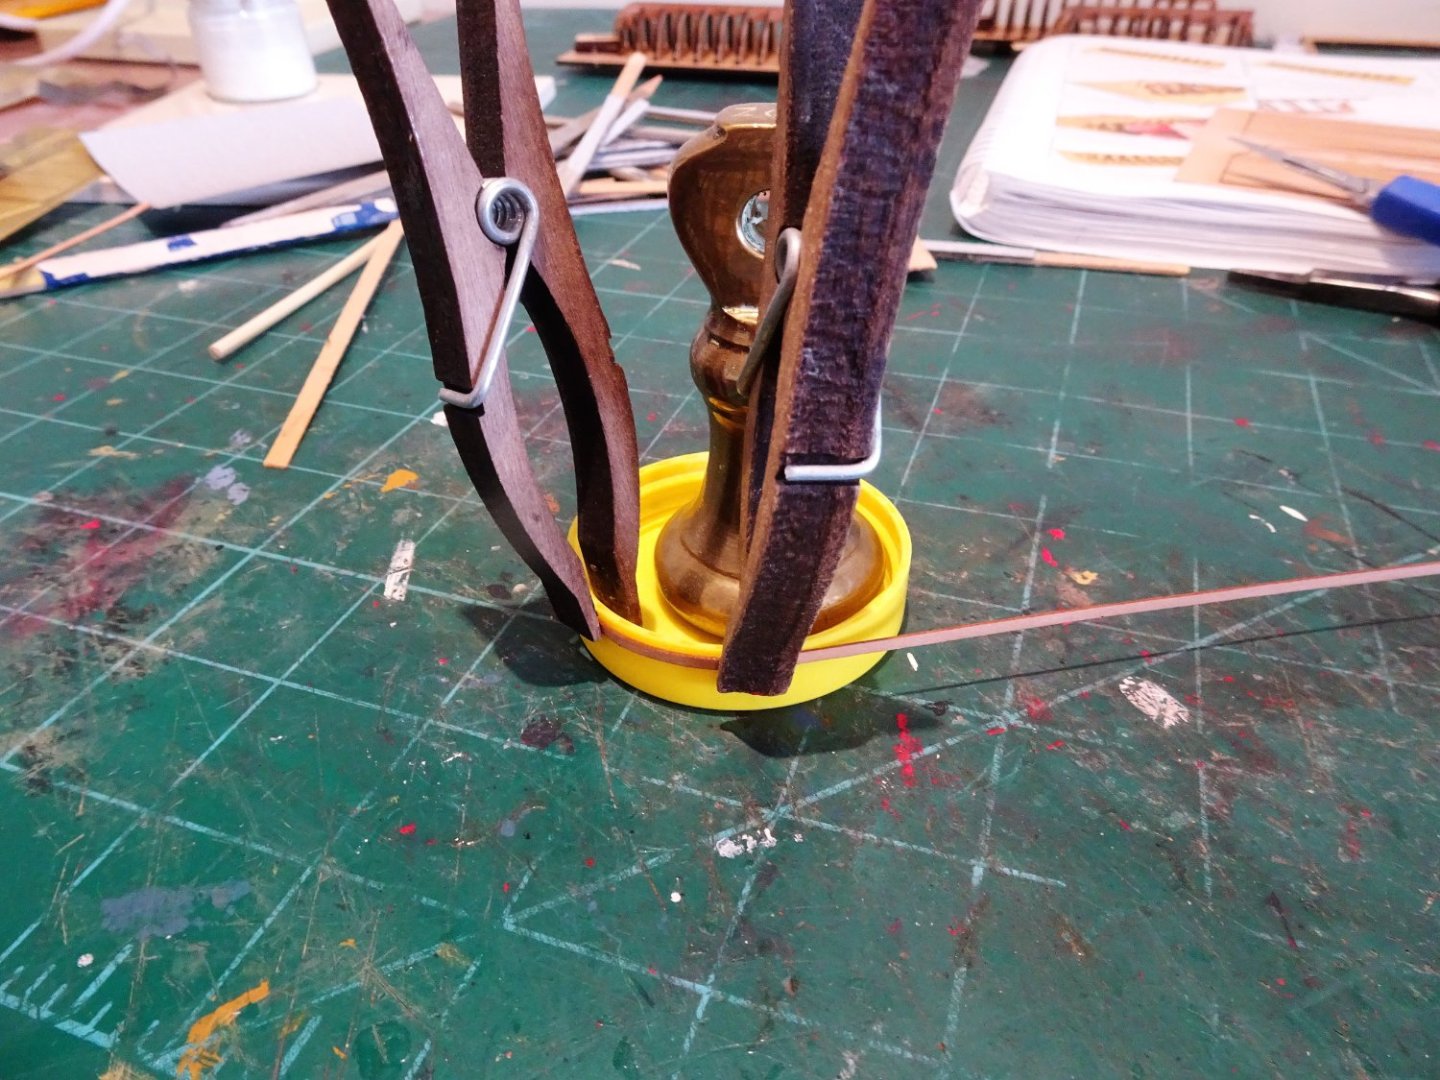
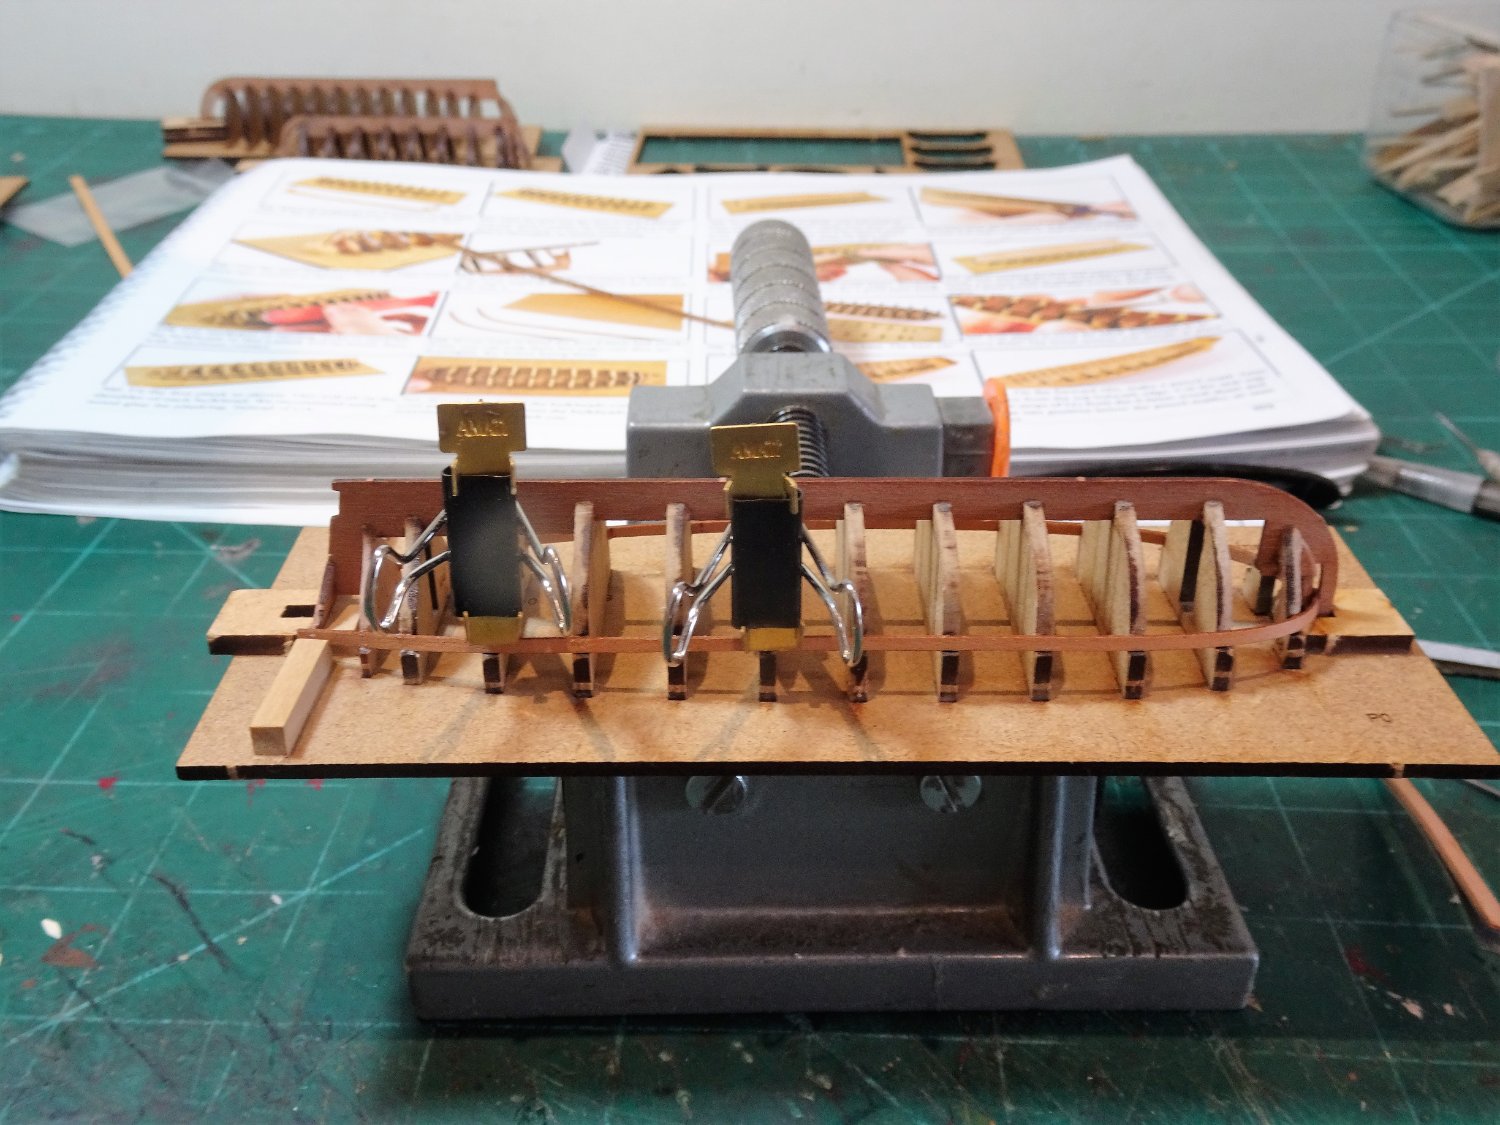
A couple of tips.
It quickens the process if the wood is dampened when applying ca at the bow.
.thumb.JPG.e67cf762704fdc0357ffa3bbf0d1e397.JPG)
7783(2)
These Hairdresser sectioning clips are perfect for clamps on these small projects. They exert just the right amount of pressure and can be bent to suit the job in hand.
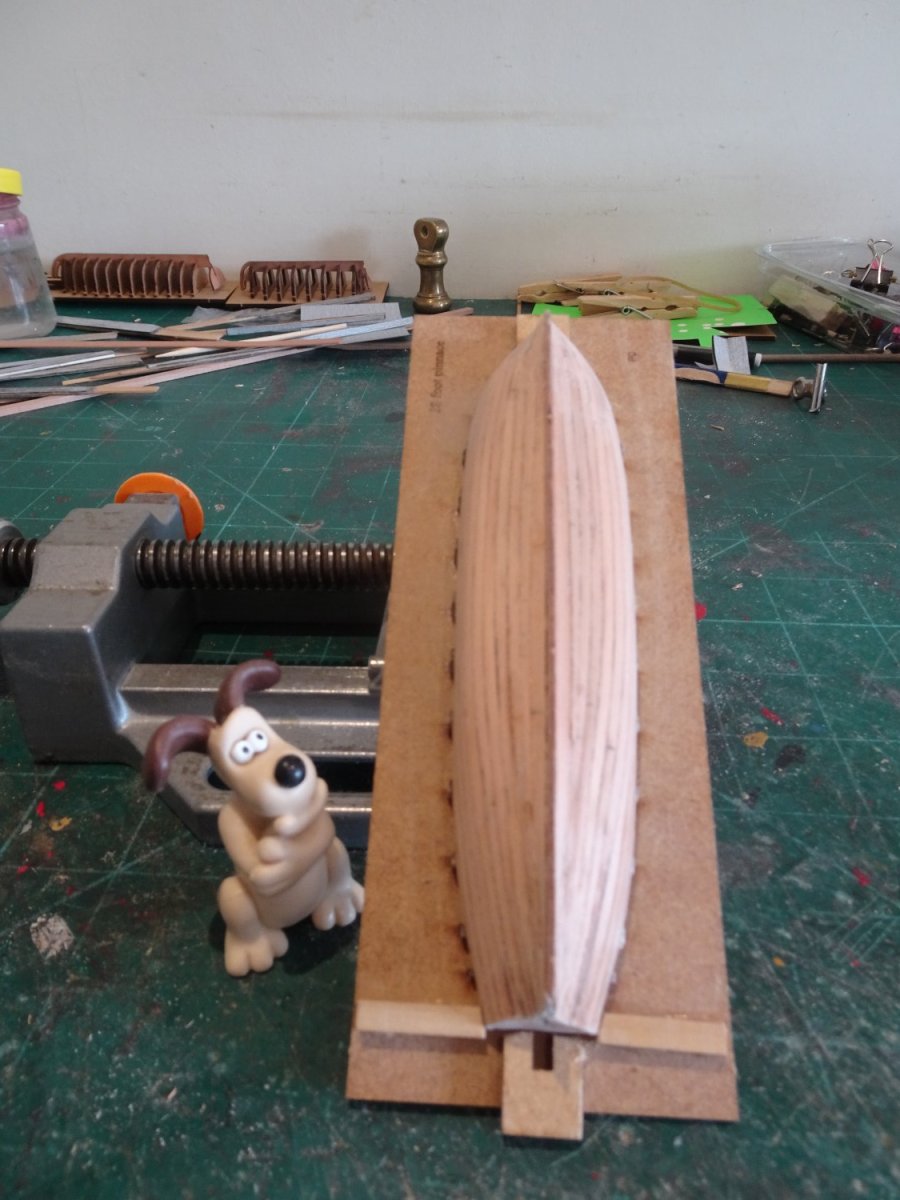
With six strakes completed I turn my attention to the Garboard strake.
Tricky things Garboards, how much to taper, where to terminate?

7784
I start with a length of card to avoid spoiling my limited supply of 0.6mm strip wood.
I am using slightly wider strips for the Garboard, but in practice it’s guesswork for me at the best, coupled with hope that the adjacent planking meets up.
The aim is to get any awkward final spiled planks to sit beneath the round of the hull.
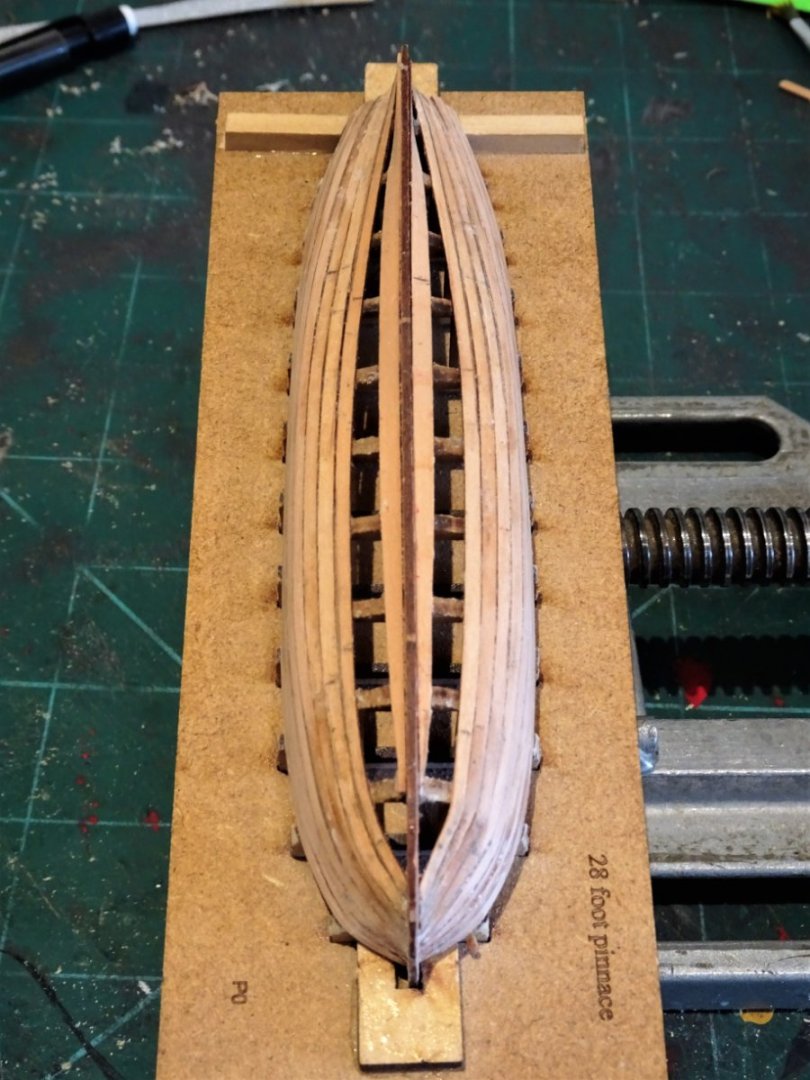
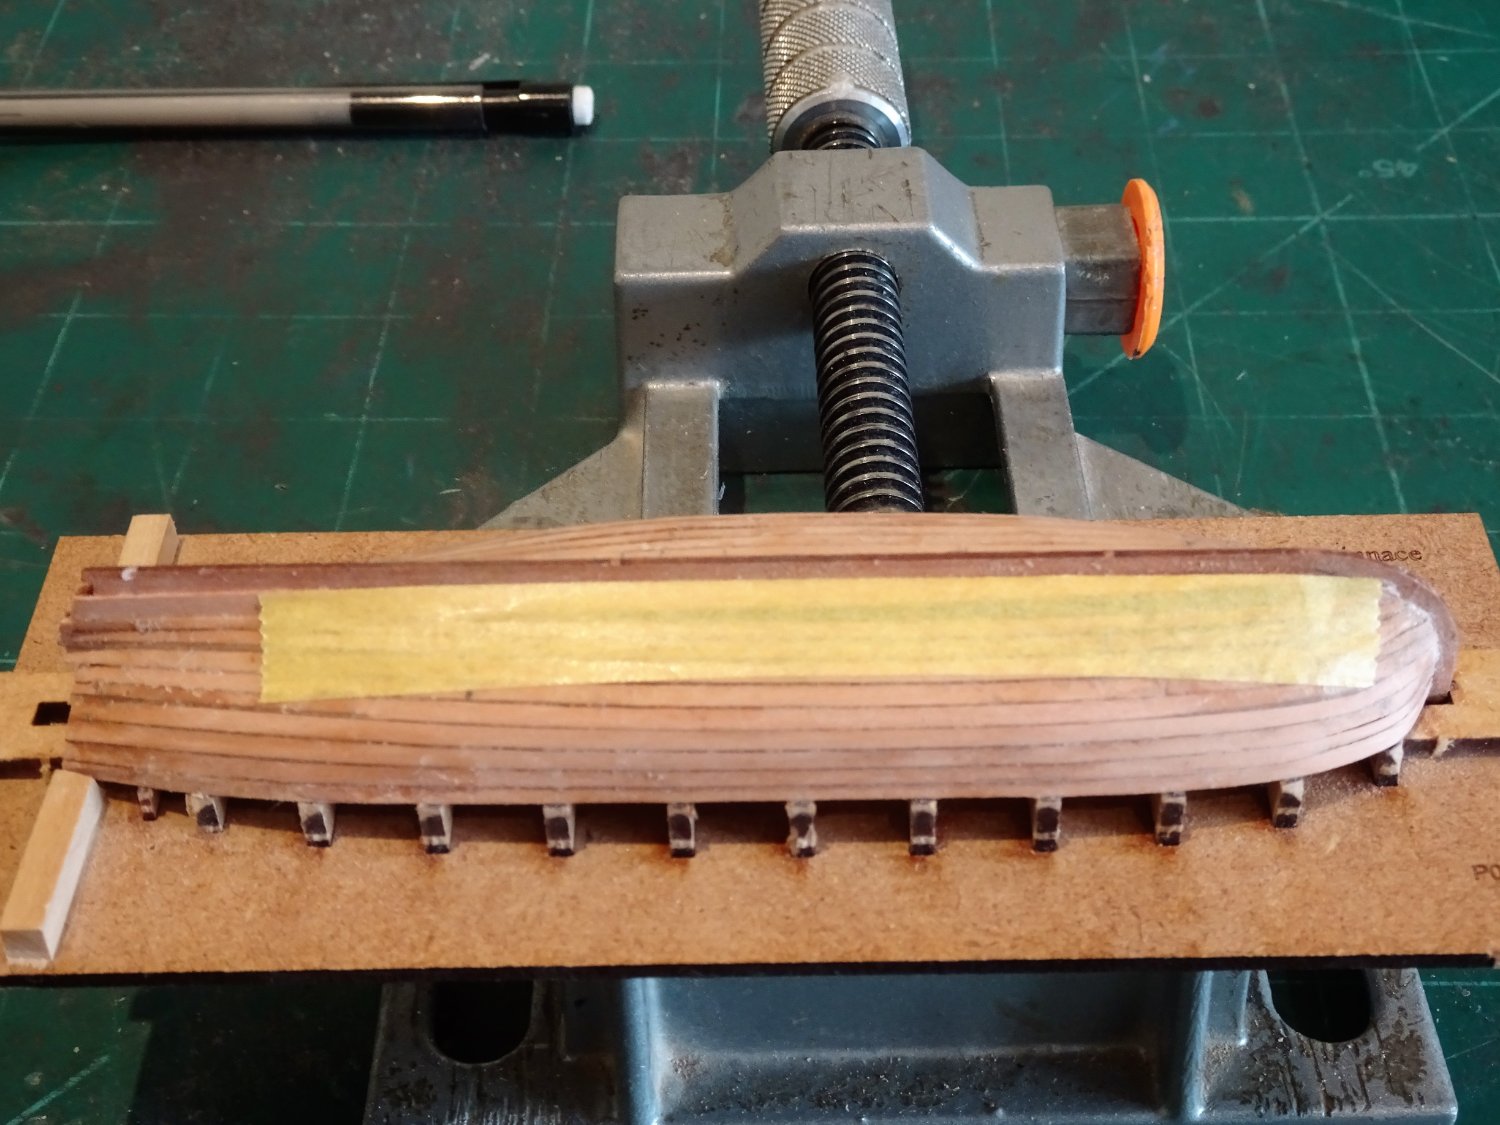
7786
Here there are two strakes remaining, and the spacing is fairly even.
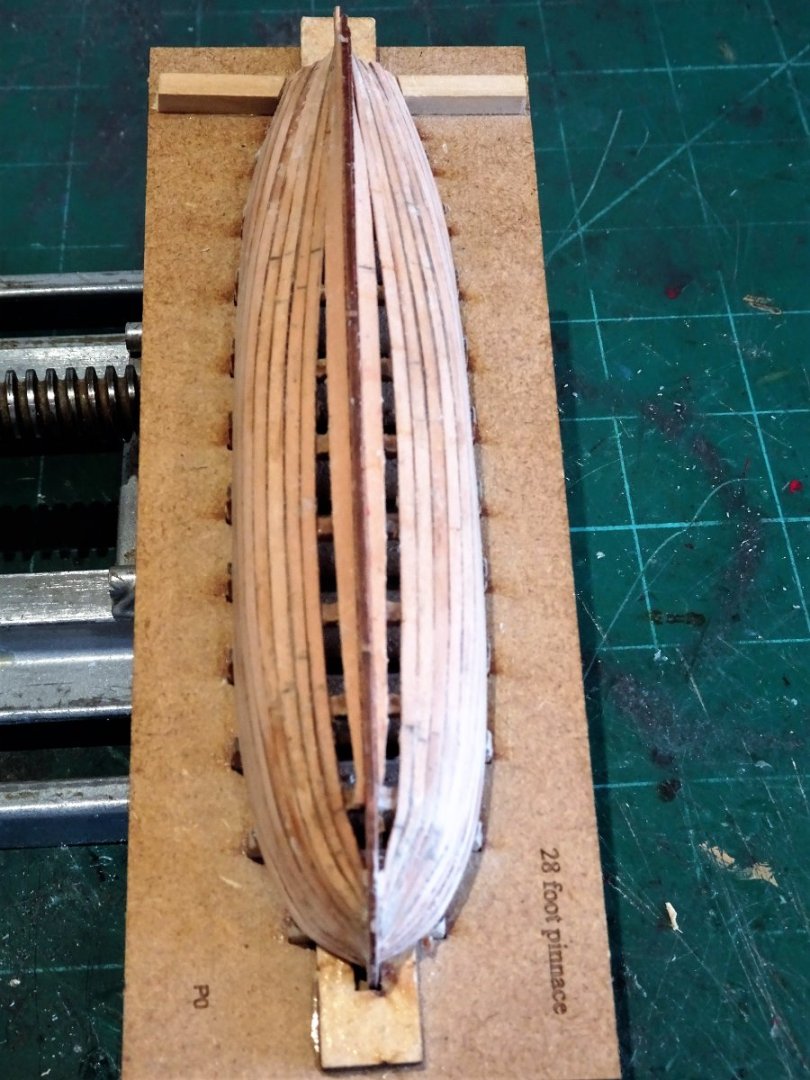
7787
The final spaces requiring spiled planks which will sit out of sight beneath the hull.

7789
Tamiya tape is used to template the final planks.
.thumb.JPG.5b0ab82a7f97237bec044e24691b6441.JPG)
7798(2)

7791
As is my practice I refer to Gromit for an opinion.
.thumb.JPG.111d9791ea0e9c7cb65973cc0c7bd0c0.JPG)
7796(2)
How does it look Gromit – Ruff comes the reply.
Have faith Gromit it will all come good in the end.🤞 🤞
Onto the Launch.
B.E.
02/08/2022
-
-
Post One Hundred and Forty – seven
Prepping and fairing the hull.
I begin with the Pinnace
Preparation is everything and I take steps to reduce the risk of damage to the vulnerable areas of stem and stern.
Of course you may get away without this stuff but I’m a belt and braces sort of chap.
.JPGp.thumb.JPG.6c50fb359fd6ab74de7b5bd5b2dc1b20.JPG)
7714(2)p
I also apply a smear of pva beneath four of the tabs to help stabilise the frames in the building board. This is easily removed later.
7724
A fresh supply of sanding sticks is made up for the fairing.
.thumb.JPG.27bf371e3a22d8dbddc7203e04ec65f6.JPG)
7741(3)
The hull is stable on its board allowing me to handle it with confidence and the fairing doesn’t take that long.
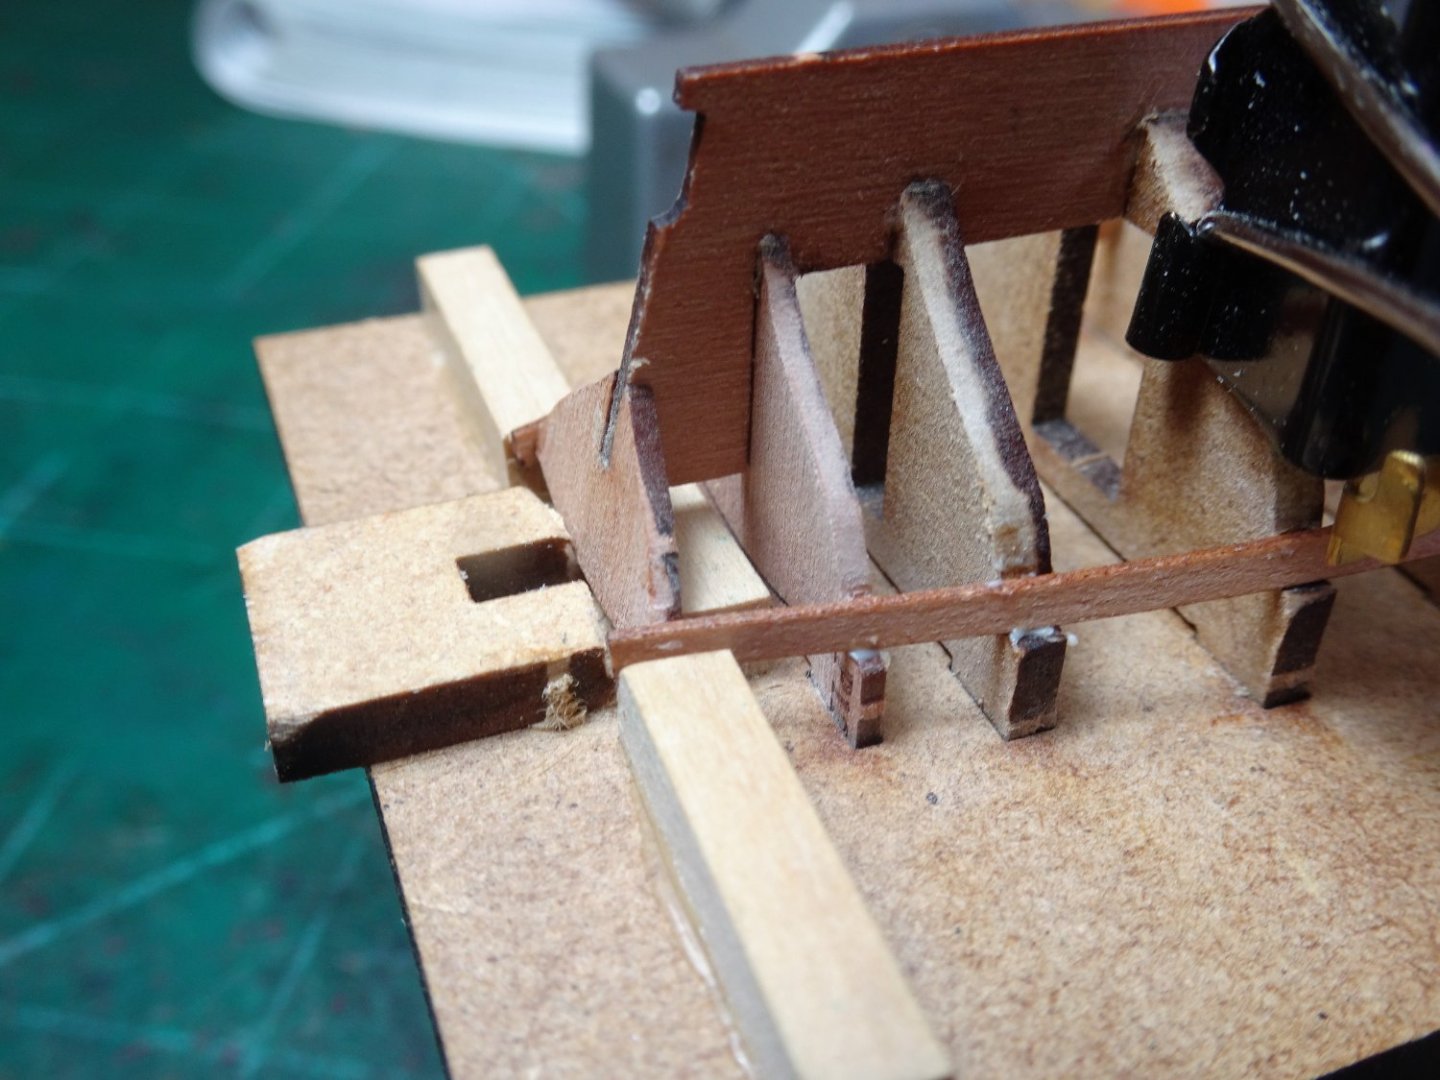
The first plank is applied against the shoulder of the frames and fits into the stem rabbet.
7747
Heat is used to form the bow curve.
7753
This probably the easiest plank to fit except that getting the first plank to just hold in the stem rabbet whilst allowing space for the corresponding plank is tricky.

7752
My approach was to get the end sufficiently in to hold and then trim back in the rabbet from the other side for the corresponding plank.
I used a spot of ca for the bow end and first frame and pva thereafter.
7751
I am surprised that the length of the planking strips only extends about 2mm beyond the stern, leaving very little excess for minor adjustments or securing at the transom.
It also makes edge bending as a planking tool, more difficult.
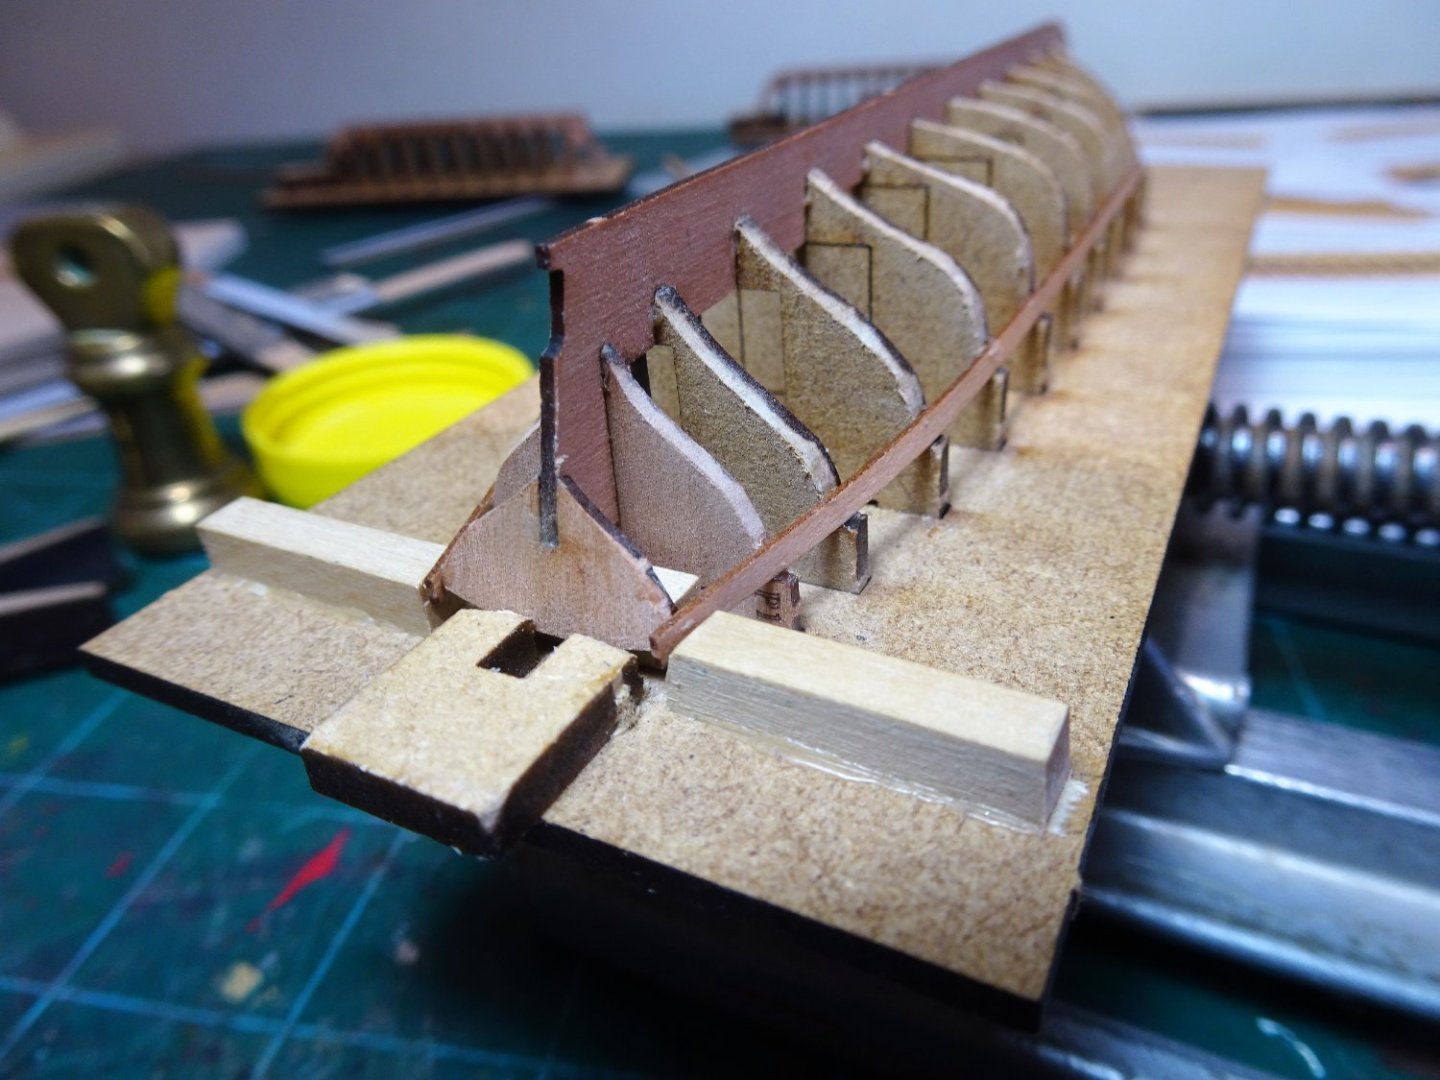
7756
The support blocks used to stop lateral movement of the stern panel are trimmed to form clamps for the plank ends.
After the first strake the planks are tapered at the bow. When I say tapered this is a very slight taper – the overall width of the planks is less than 2mm so there is little to play with.
At this scale the finer points of hull planking such as tick strip marking don’t really apply, at least for me. The start of taper can be marked but beyond that it’s down to eye and trial fit.
When it comes to edge bending the strip are too small for easy clamping, but they are fine enough to work an edge bend using fingers, but it is a high risk activity.
At this point I have already had three strip breakages but fortunately there is a supply of 0.6mm fret from the Sphinx kit to make replacements.

7757
One has to get inventive when it comes to clamping on these bijou constructions.
7759
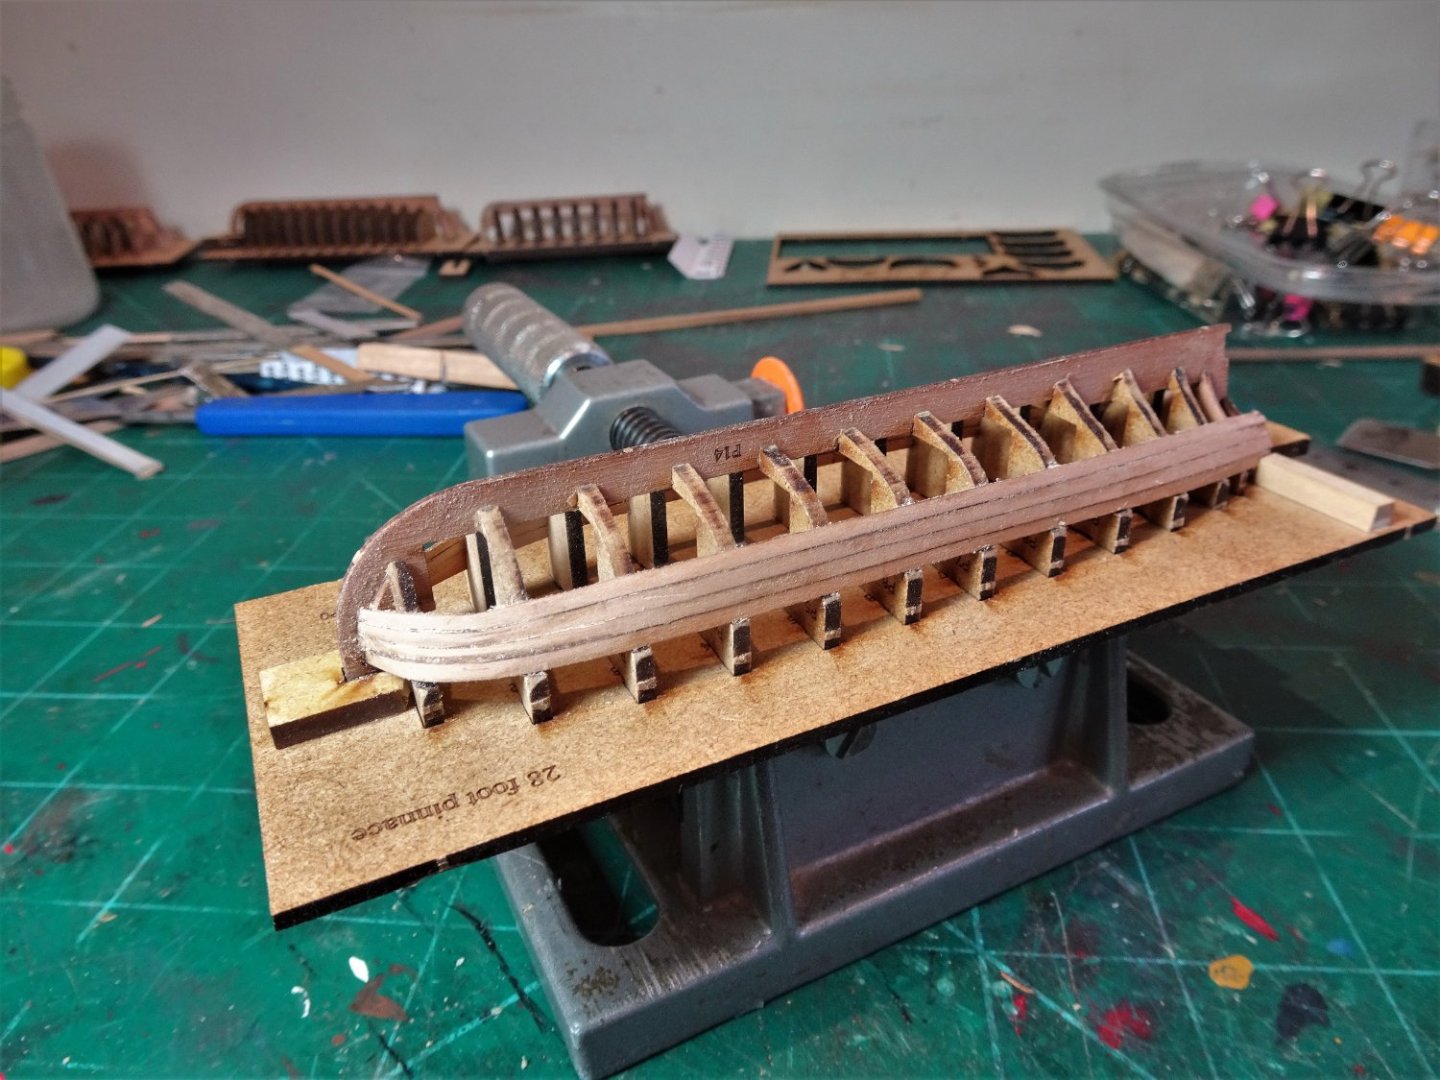
Four strakes fills the Stem rabbet, from this point on they will terminate against the stem/keel.
The stem is now more secure from the risk of breakage.

7760
With four strakes attached to the stern board it is now also secure.
7770
The hull is quite rigid now and can be removed (temporarily) from its building board if required.
I will now continue planking to completion.
B.E.
30/7/2022
- etubino, Thukydides, chris watton and 18 others
-
20
-
 1
1
-
Well done Mario, she looks good.👍
Nothing like completing a satisfying build to encourage you onto the next.
B.E.
-
-
Thank you Rob, If you knew me, relaxed is not one of my personality traits.
If I appear so, it is probably born of previous experience of building these little beggars, two scratch built at 1:64 and two of Chris's kits.
They are fiddly to make and bits can break with so much as a harsh look, and I can see that they would be a challenge for a novice builder, they're still a challenge for me now.
They do however, make up into fine little boats, and I'm quite a fan of them, so much so that only yesterday I ordered the 36' Admirals Barge to add to my collection. I will then have the full set of types.
The only thing missing from Chris's line- up is a Longboat, and should he add one I will be up for that as well.
I had a peek at your cutter and she looks just fine.👍
Cheers,
B.E.
-
Thank you Bob.
Post One hundred and Forty-six
The Ships boats.
The boat allocation for Sphinx
Chris has generously provided three boats to adorn Sphinx.
A 28’ Pinnace, 24’ Launch’ and 22’ Yawl. This follows the allocation indicated in the AotS book for the 24 gun Frigate Pandora which also had an additional Yawl and an 18’ cutter.
This is slightly out of sync with the official boat establishments, but Pandora was on a specific mission, and her establishment is a matter of record.
Despite establishment allocations for different classes of ships, Captains were allowed to petition for alternatives, so I doubt anything was really set in stone, and that wonderful phrase ‘subject to the exigencies of the Service’ comes to mind.
I am not exactly unfamiliar with these boat kits having built both the Yawl and cutter previously, but they are nice little projects and I look forward to including them with, if not on, my build of Sphinx.
I did a separate log in relation to the Yawl and cutter last year detailing my experience with these bijou kits.
I am also going to include an 18’ cutter which I happen to have lying around and have decided to set up all four at the same time.
To deal with these kits a soft hands approach is essential and a good supply of mini sanding sticks. I make mine by sticking strips of 320 paper to planking strips.
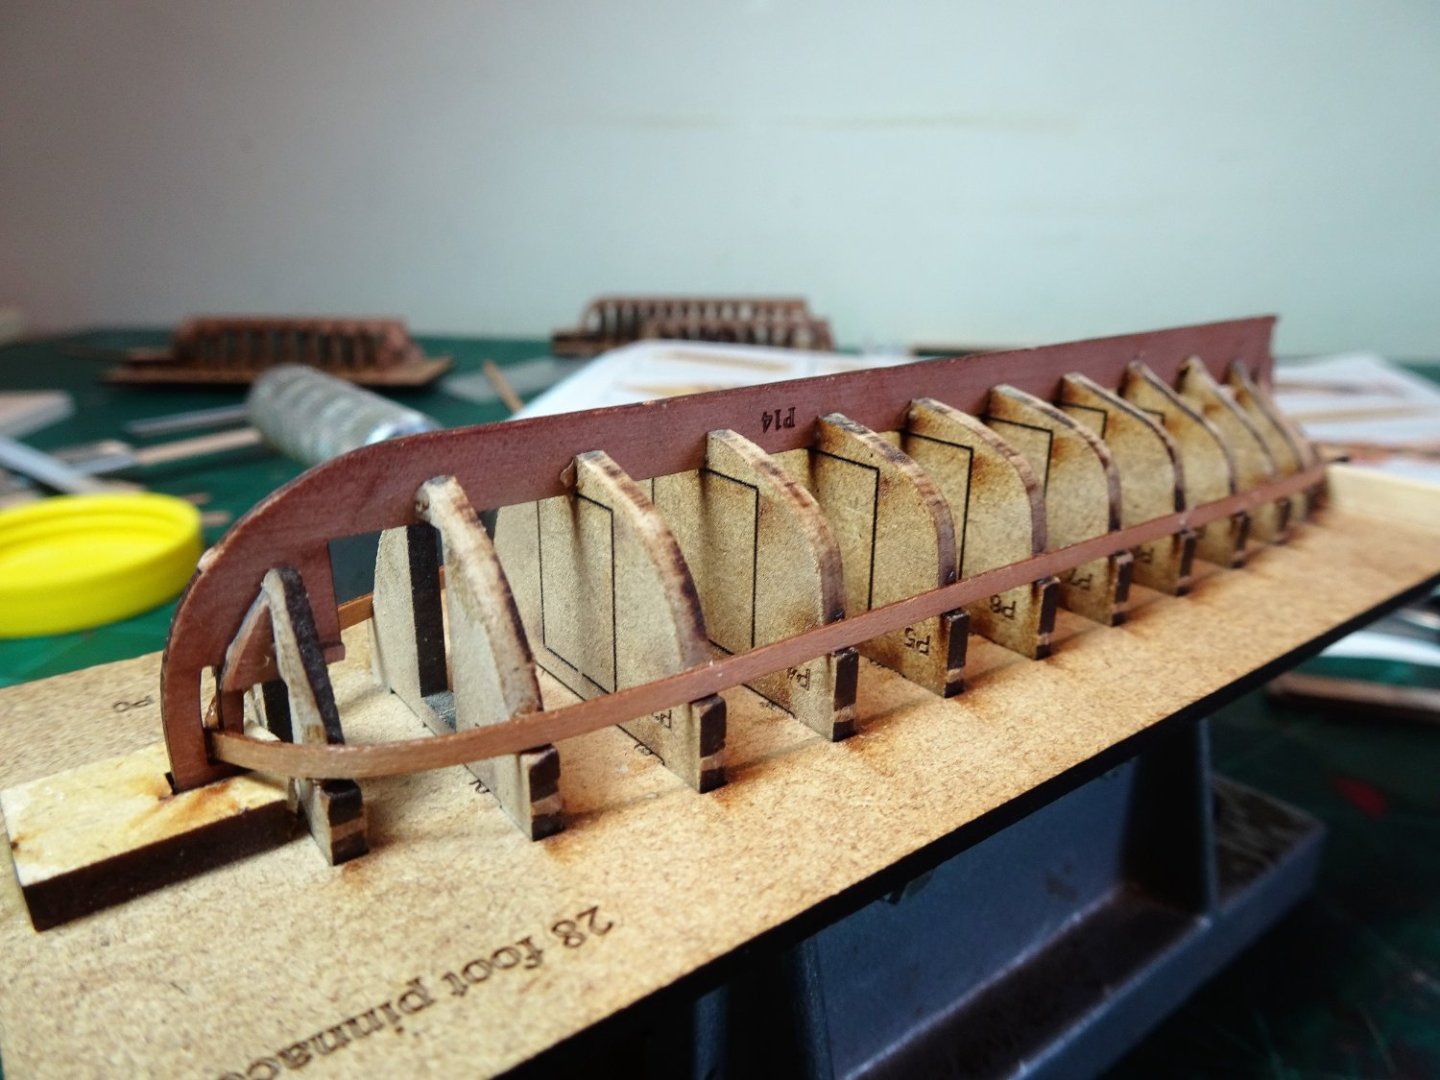
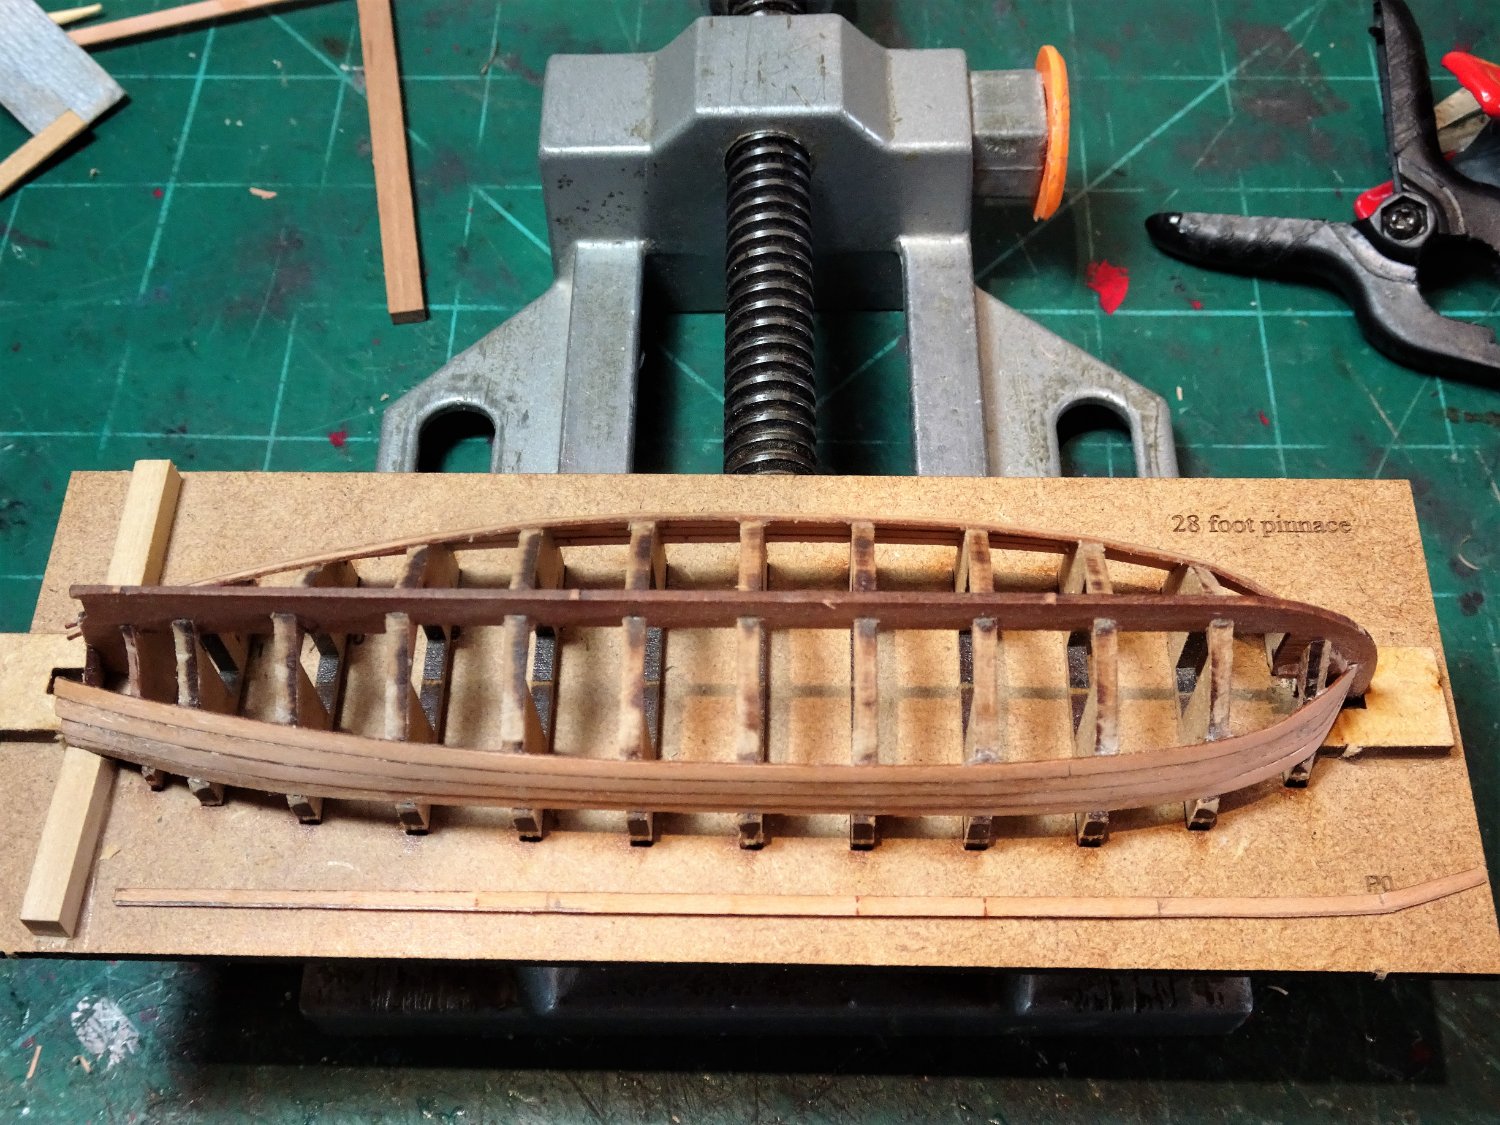
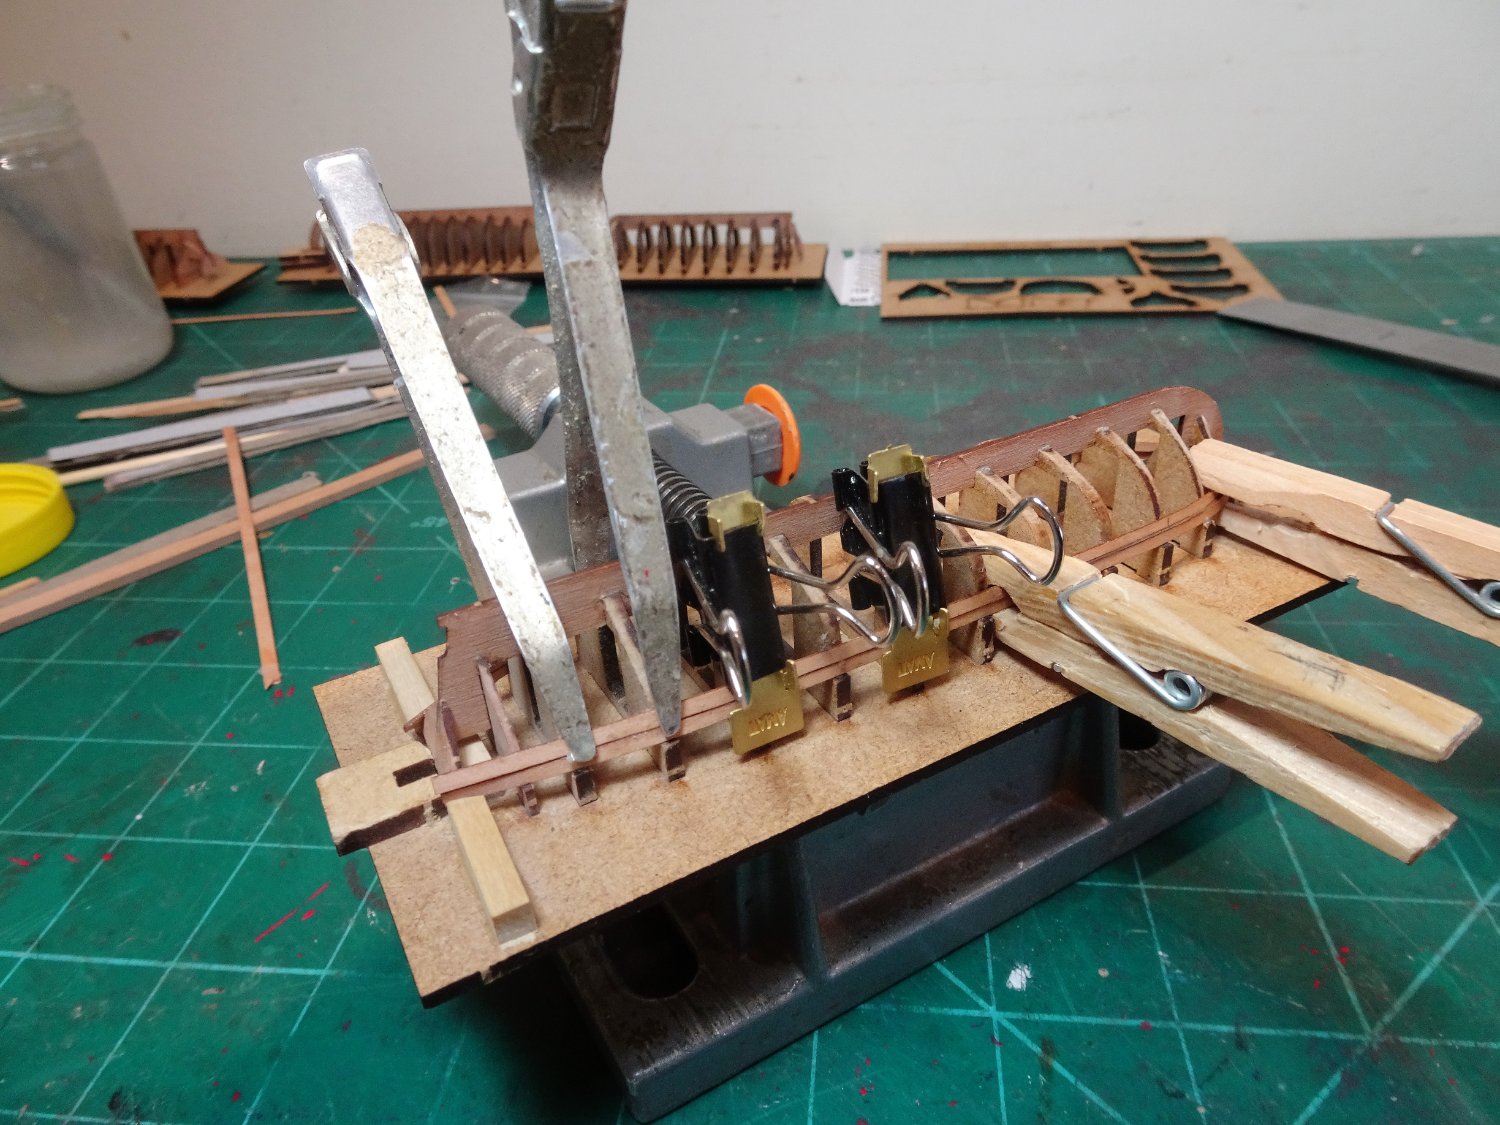
I begin with the Pinnace.
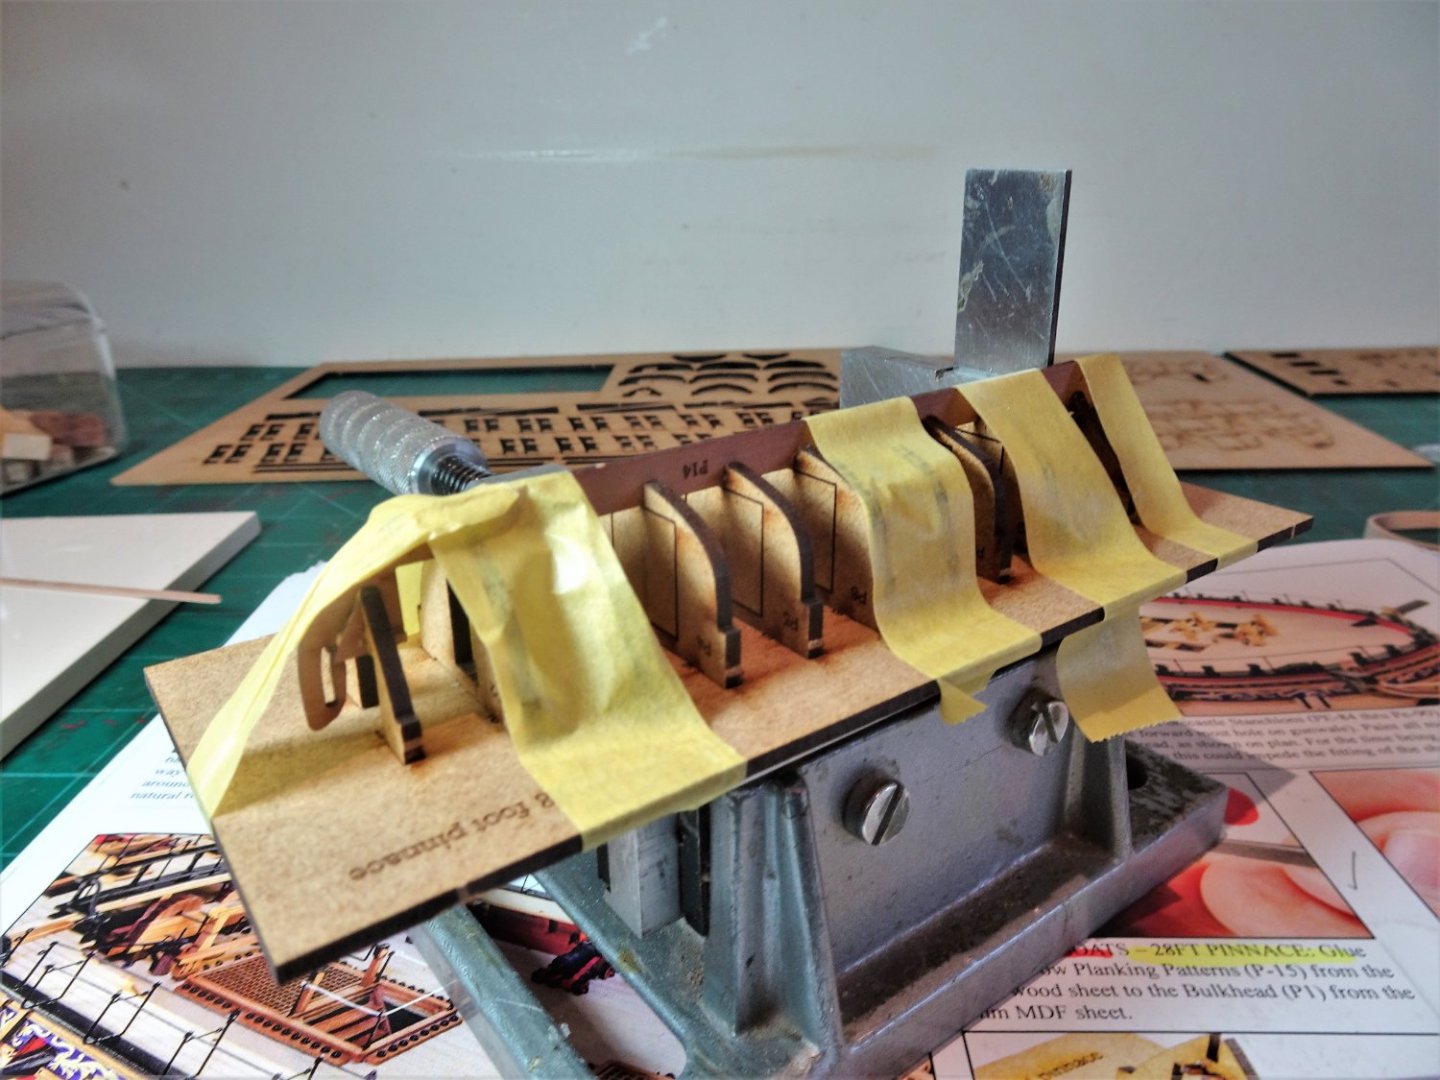
First steps
A grip block is glued beneath the building board to hold the assembly in a vice.
The twelve frames fit loosely in the board slots, but they do need a little play to allow for aligning the Pear keel piece.
I found that Frame 1 at the bow required the slot sanding to allow fitment of the forward end of the keel.
Exert pressure at your peril!
I found it quite fiddly to get the keel to seat properly down on the frames. I did quite a few dry runs before committing to glue, the bally frames kept jumping out of their slots.
7662
I found it helped to use Tamiya tape to hold the keel and frames in place as I progressed aft seating the keel.
The Launch proved much easier to attach frames and keel but in removing the keel from the fret the stern post just fell apart at the middle point, the curse of horizontal grain.
All is not lost tho’ because adding the stern board (L13) helps secure the re-glued part.
The Yawl went together well but care has to be taken with the bow fillers (Y13), careful easing before fitting is recommended.
I am also keeping a wary eye on the bow stem which as I recall from my previous build resulted in a new scratch part being made.
The Cutter (which does not form part of the kit allocation) is the Mark11 version. My previous build was the original version which lacked the finesse of the current model.
As with the original I may well clinker plank the cutter as was the style.
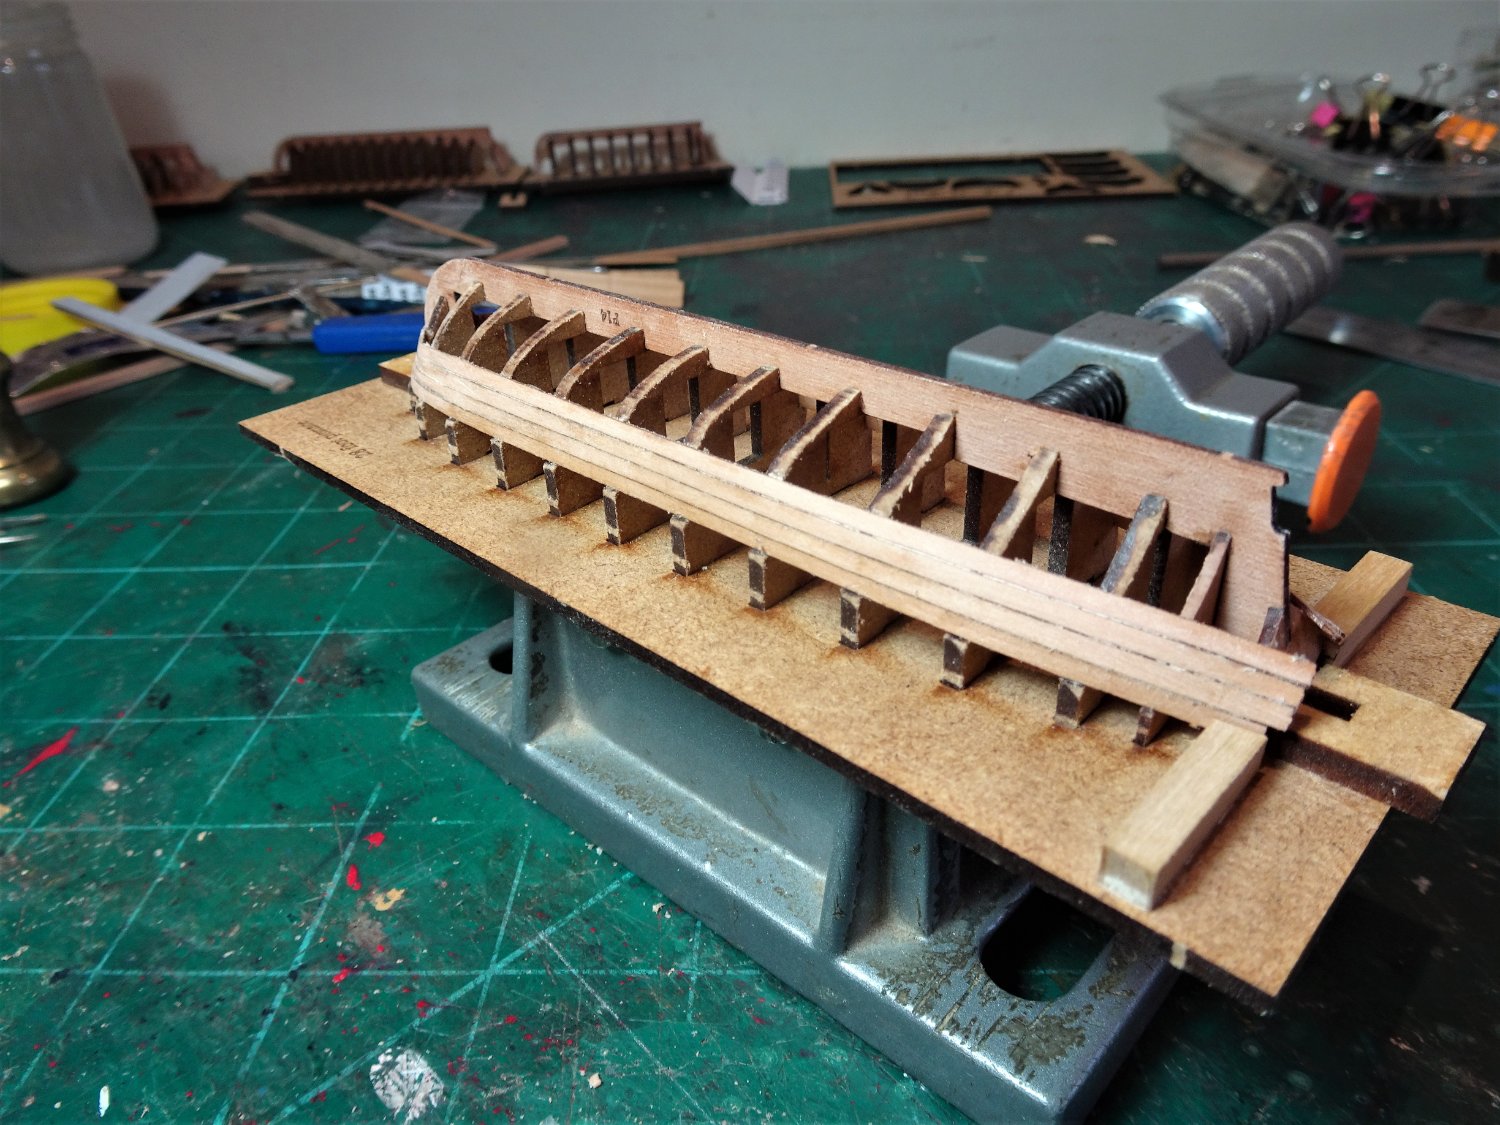
.thumb.JPG.bbfa5a63ae4557aa3ce7deb40caccf5b.JPG)
7665(2)
An afternoons work gets the basics done and I will now operate a sort of production line to completion.
The system should reduce the overall build time for the set.
B.E.
29/07/2022
-
The display base sets it off a treat Grant, well done.
B.E.
- Dave_E, mtaylor, Keith Black and 2 others
-
5
-
-
I don't know what all that means and given that I started communication using a stick with a scratchy nib and ink pot, one step removed from a quill, I constantly find myself amazed that I even find my way on here at all.
I am more than happy to rely on James, for all things MSW computer, and many things modelling.
Thanks James.
B.E.
- Edwardkenway, Ryland Craze, mtaylor and 5 others
-
8
-
Thank you, Glenn UK, Glenn USA, Kirby, Ron, Marc, Rusty, and Thuky, for your supportive comments and for all the ‘likes’
@ Glenn USA - as someone who admires the superb quality of your work, your words mean a lot to me. I put a lot of effort into the headworks, scrolls and friezes, and I’m pleased how it turned out. I also have Chuck to thank for the stern decorative panels.
@ Ron - Thanks for your input, always welcome, I was thinking of displaying the boats separately within the case, but I won’t be able to resist at least trying the Pinnace on the skids.
I too am interested in how your Camilla will look in her watery setting, on the basis of your previous examples I think she will look amazing.
@ Thuky - I think you already are, I can see you have the mindset for this malarkey, your willingness to re-work your Alert stern is the mark of the dedicated ship modeller who is bound to succeed.
B.E.
- mtaylor, Thukydides, hollowneck and 1 other
-
4
-
You really shouldn't have to work that hard to achieve a good result with those Quarter Galleries Yves, I agree they would be so much better in printed resin. Perhaps someone from CAF will see your comments and address the situation.
The QG construction is so complex and poor materials are not what you want.
Still a model is more than the sum of its parts and once you've worked your magic such deficiencies will tend to fade into the background.
B.E.
-
Well done Grant, a tense few minutes I suspect..
B.E.
- Glen McGuire, mtaylor, gjdale and 2 others
-
5
-
-
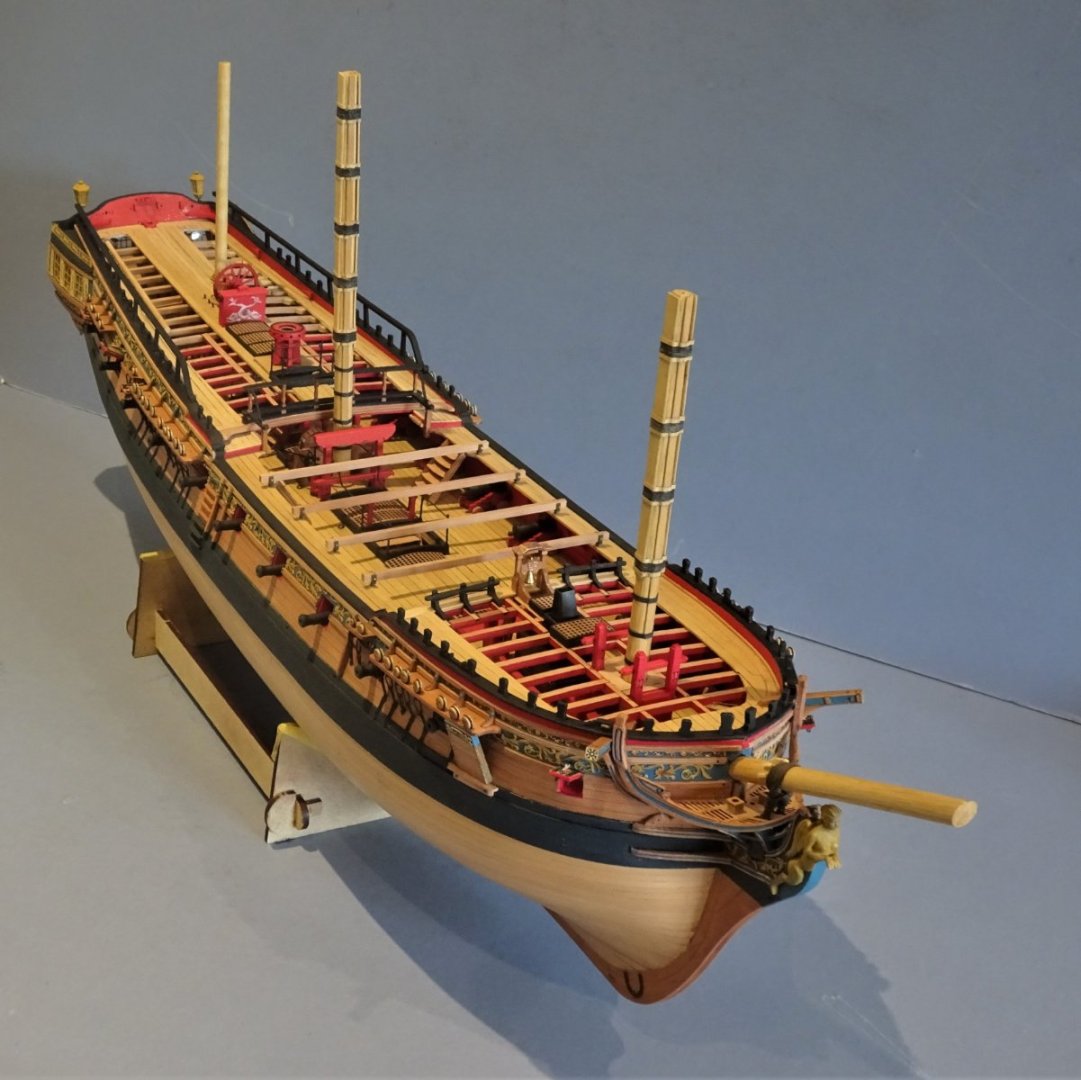
Post One Hundred and Forty-five
Twelve month review.
The final completion of Sphinx will now be put on hold whilst I attend to the ships boats.
A convenient point with the twelve month anniversary of the build start coming up.
I have worked on Sphinx pretty much daily over this time, and it is a testament to Chris’s design that a model of this detail and appearance can be produced in such a relatively short time.
I have tweaked the kit in quite a few areas to reflect my Navy Board Style version, but my Pegasus build which necessitated far more scratch adjustments, took over two years to reach this point.
.thumb.JPG.bb6845a610d29ec19cd69217908b2f37.JPG)
01819(2)
Pegasus at two year stage.
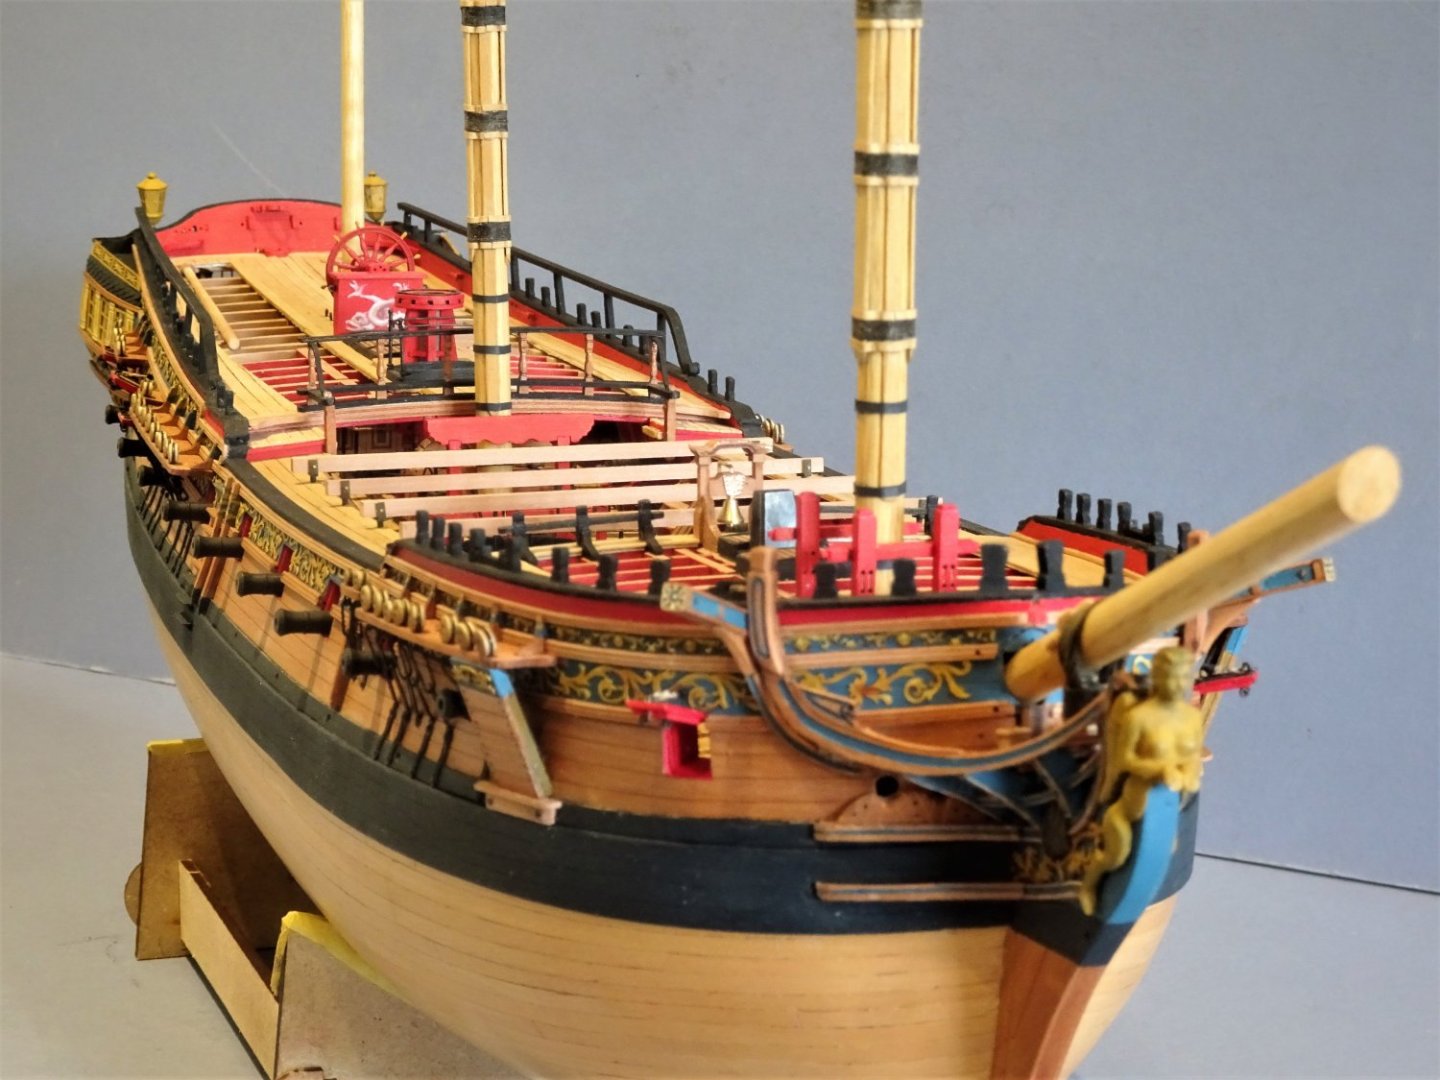
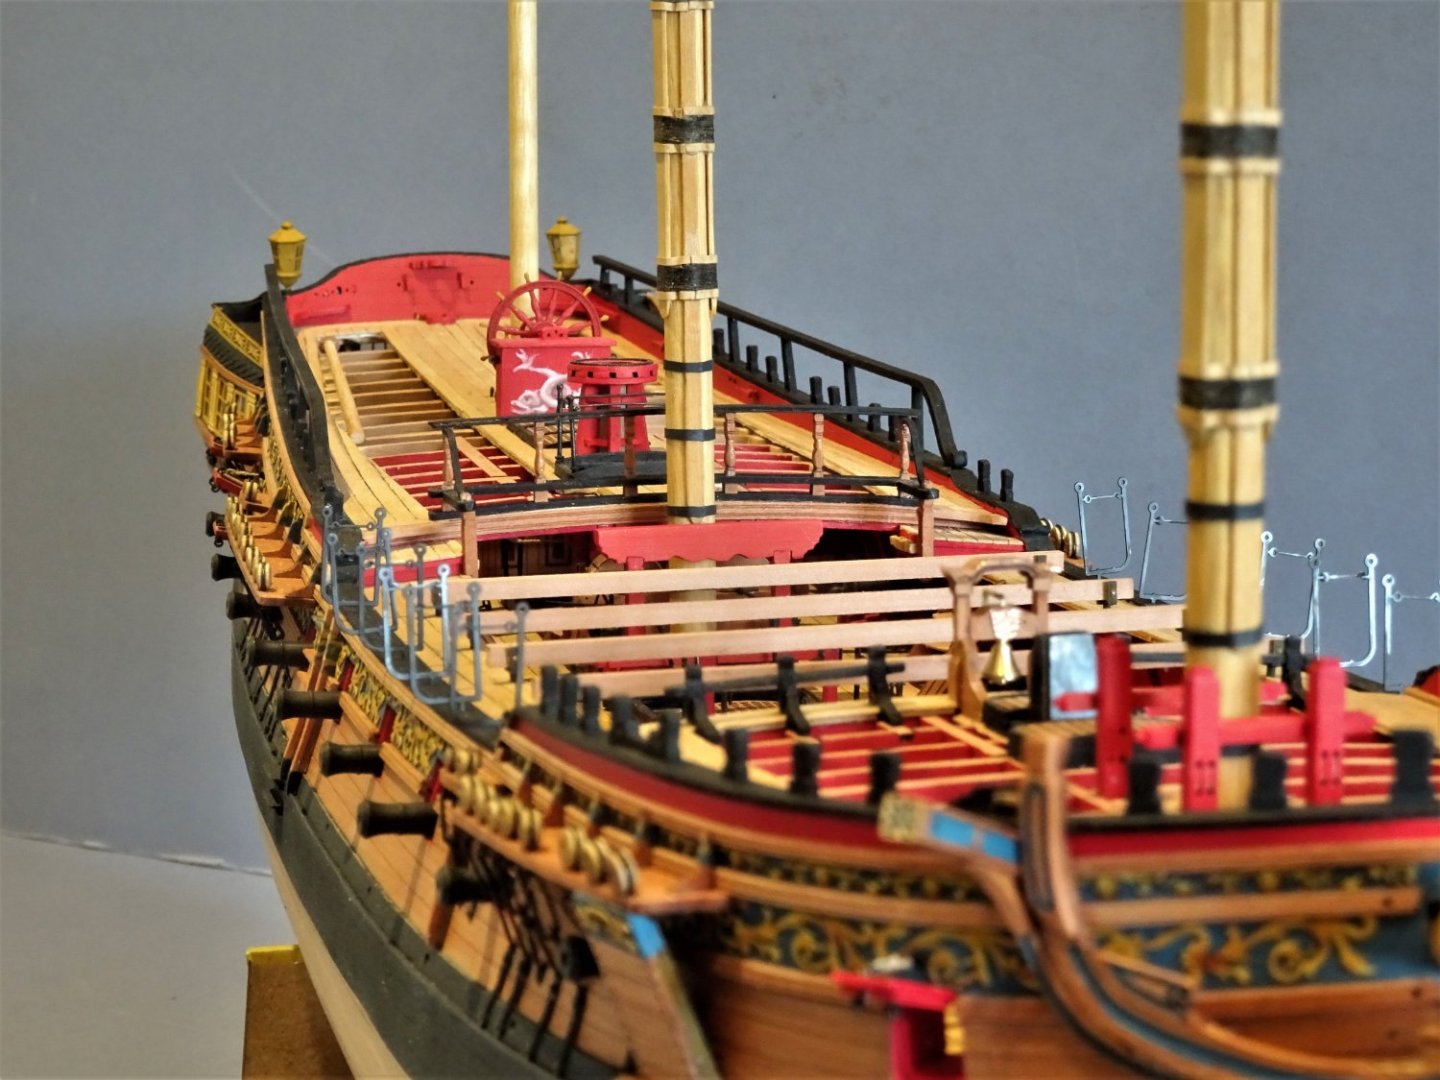
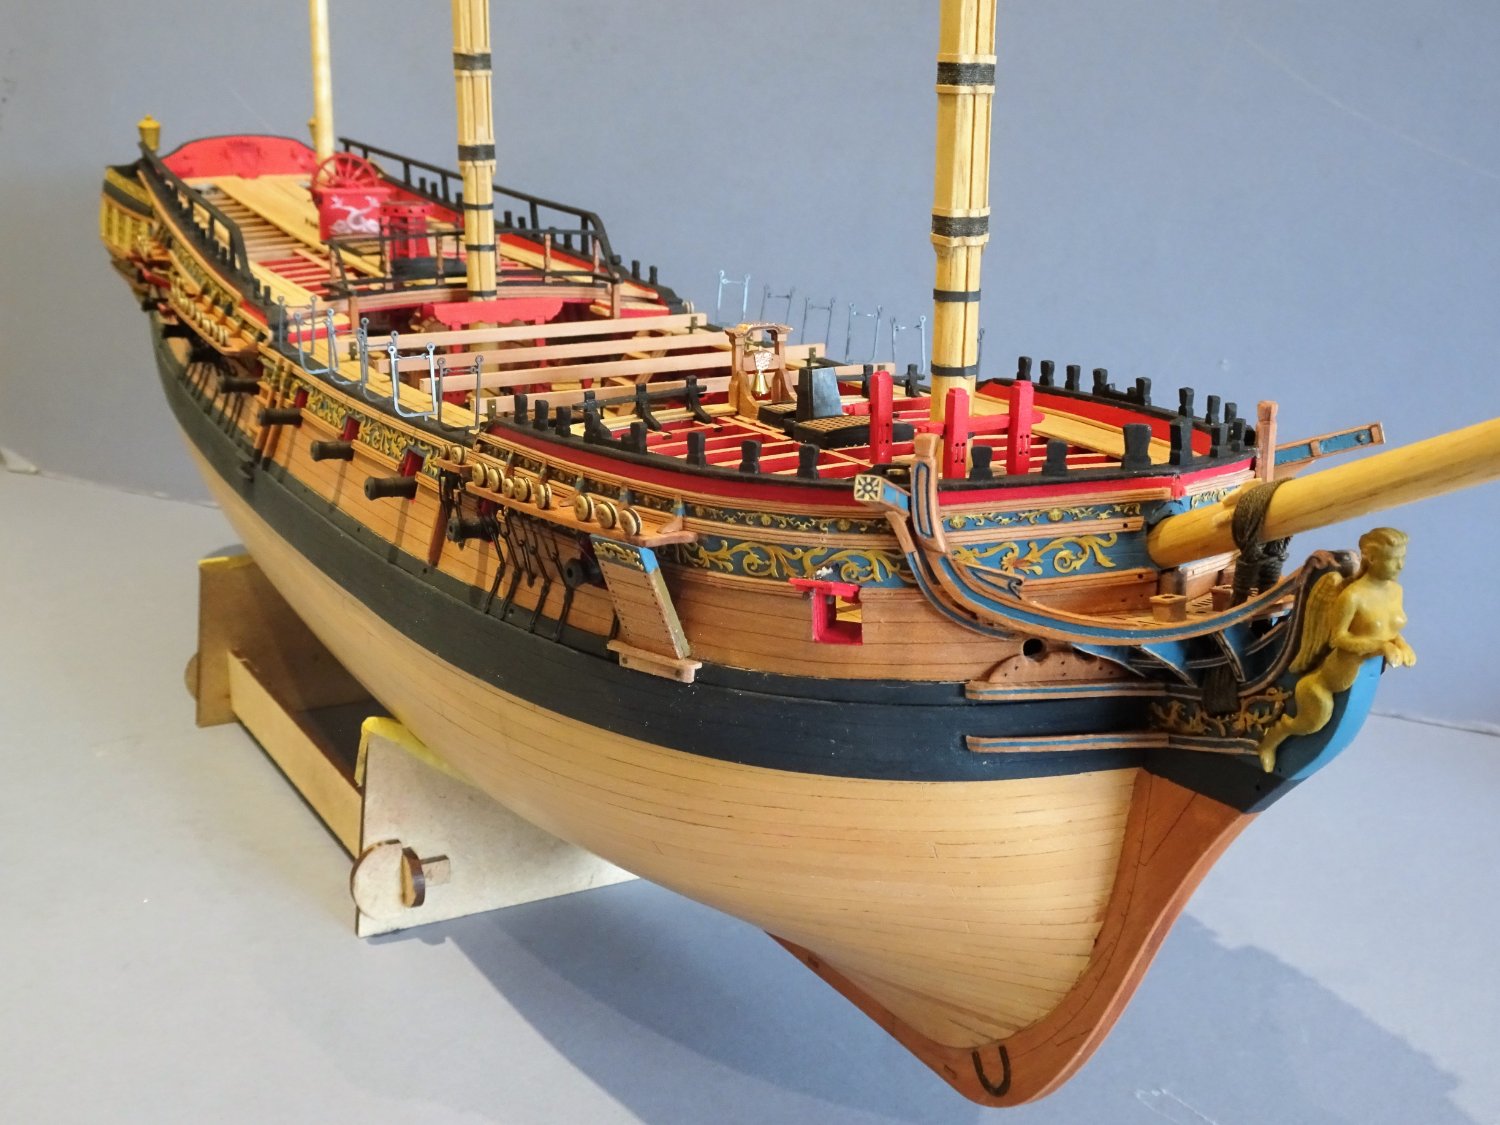
As a change from my usual hand held cluttered work bench shots, a tidy up, and tri-pod photo shoot to mark the twelve month stage.
.thumb.JPG.9dcd8d589145d0dd630e8a40abe3da49.JPG)
7646(2)
7631
.thumb.JPG.4f73f49eba83b085500f7fcf52e55ac8.JPG)
7630(3)
.thumb.JPG.c09162f797662dd3540ac9ae741e0333.JPG)
7634(3)
7633
.thumb.JPG.d6da93dffaeb54d5251e2bec0ead32d7.JPG)
7639(2)
.thumb.JPG.18ff6ad8677c36258075b80863590ad1.JPG)
7635(2)
.thumb.JPG.6c40666be5514ef63b4406cca34155e4.JPG)
7629(2)
.thumb.JPG.4e72d8e02318c0cc61af2516e9e398ce.JPG)
7644(2)
7652
.thumb.JPG.2de9fb910e23d06df6cd49cde9ec3126.JPG)
7649(2)

7648
These last three shots show the Hammock Cranes temporarily in place to help me decide if I want to fit them.
The contemporary Navy Board style model of the Amazon does show them, and the kit provided versions are very nicely detailed, but at this point I’m still undecided.
Sphinx will now be put into her case while I make the Ships boats.
Thank you to all who have shown interest in this build over the past year.
B.E.
26/07/2022
- chris watton, Nipper, hollowneck and 34 others
-
28
-
9
-
Thank you Thomas, much appreciated.
Glad to see MSW is back online, been down all day, dark memories of the great crash came into my mind.😟
On with the show,..
Post One Hundred and forty-four
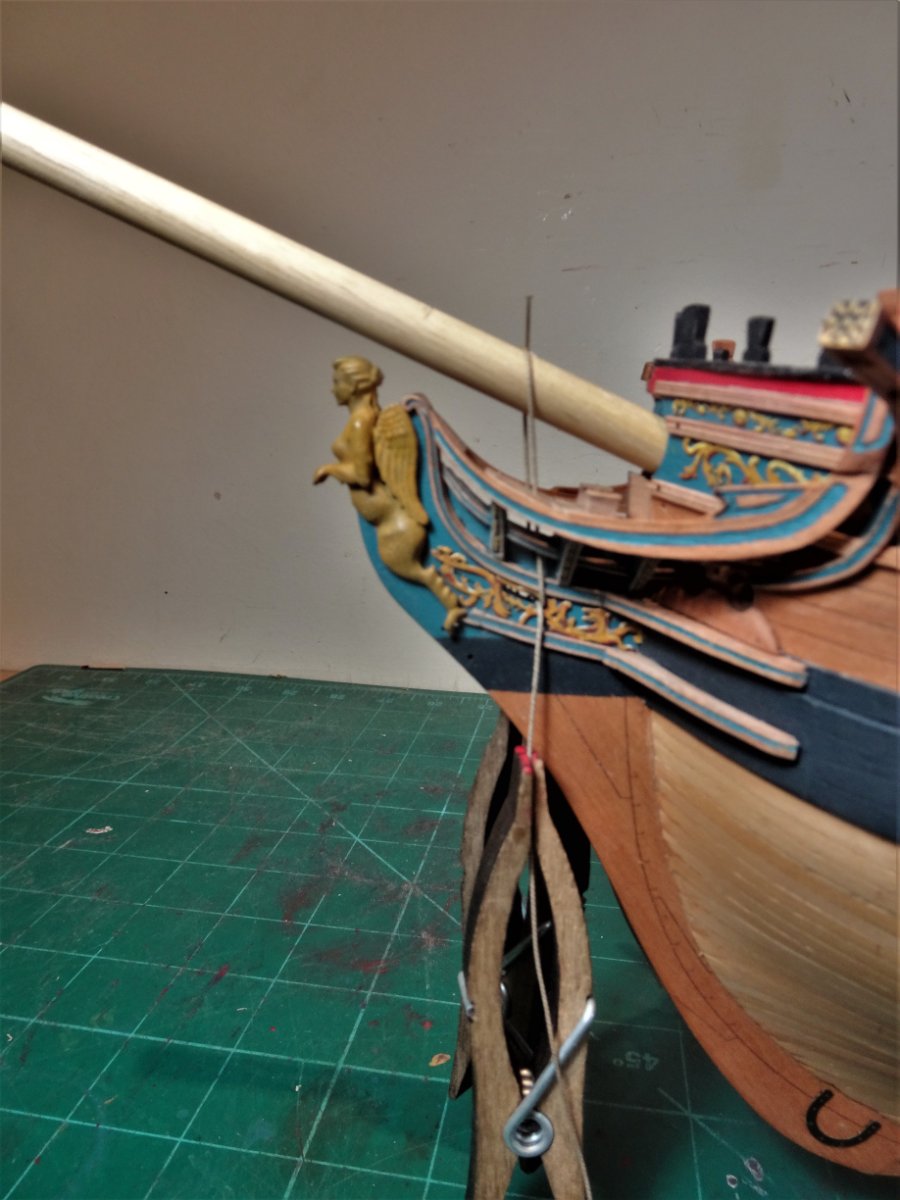
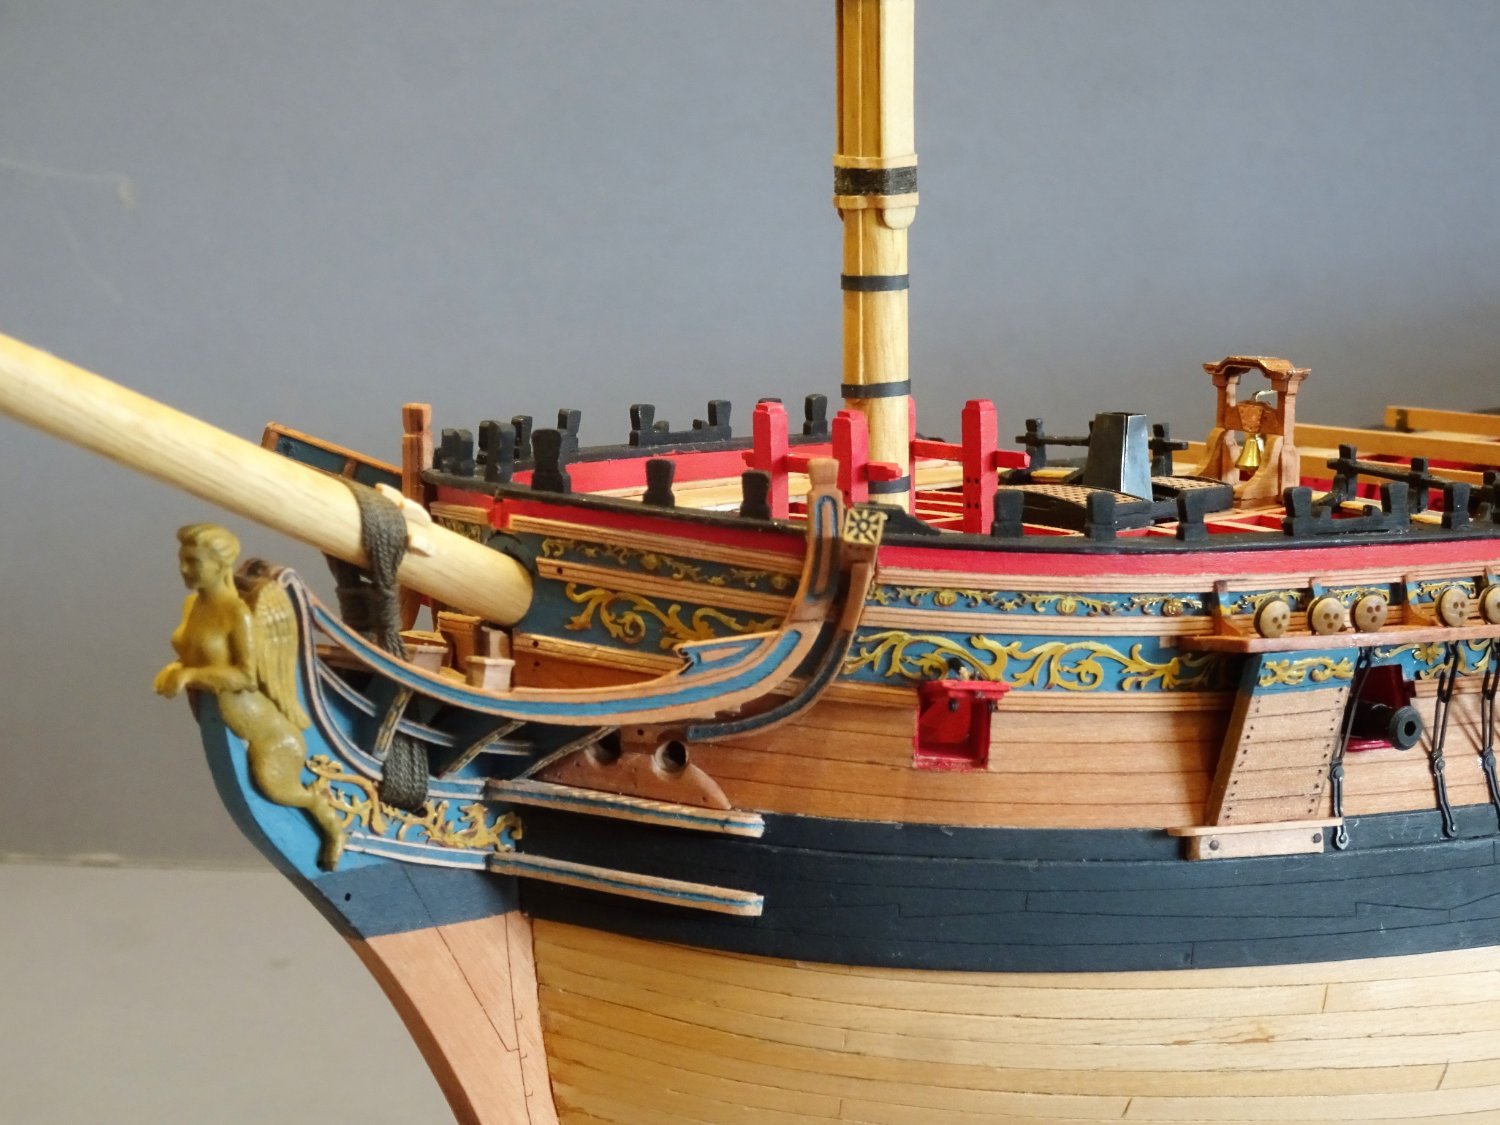
Dressing the Bowsprit.
The most prominent and only feature on my reduced length Bowsprit is the Gammoning.
Steel indicates 5” circ line for ships of 20-22 guns which equates to 0.63mm ø at scale.
I have used Syren 0.63mm rigging line.
The kit plans indicate use of 0.75mm ø line and there is a diagram on Plan sheet 20 Rigging Plan 1.
I would rig this before I add impediments such as the Boomkins to the head.
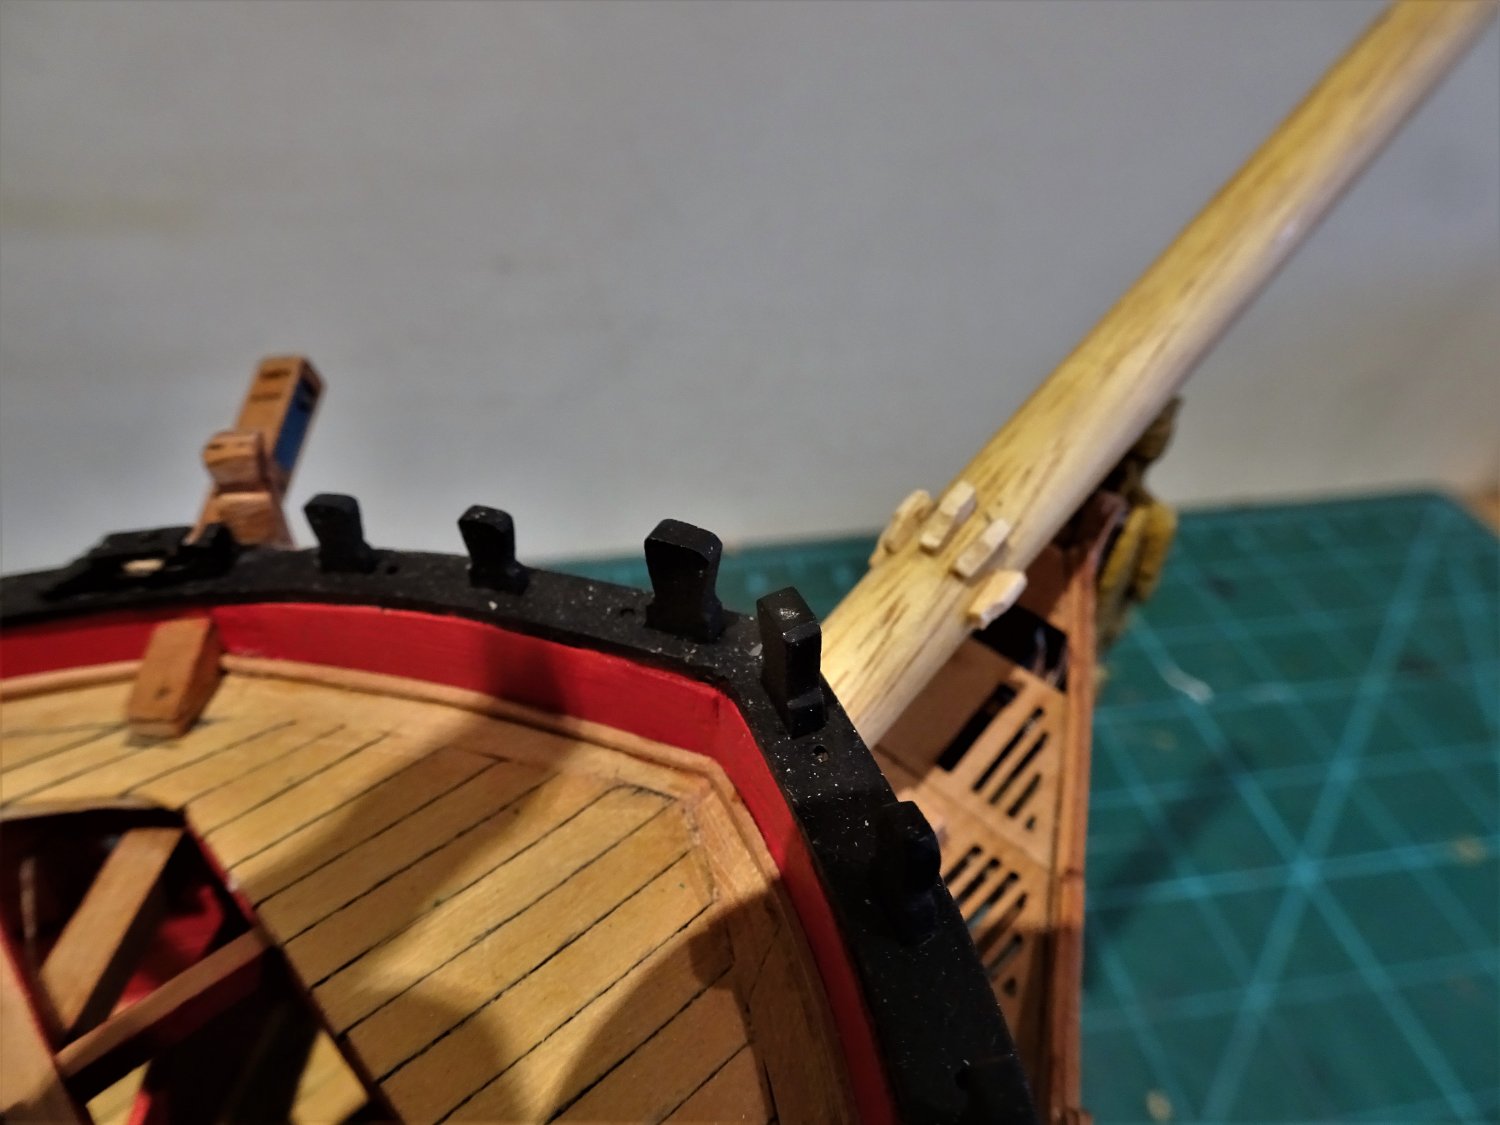
To rig the gammoning the position of the gammoning cleats needs to be established.

7600
To mark their position a temporary line is fed thro’ the slot with the line restrained at the aft end of the slot. The line must be vertical to the keel.
I found the kit provided cleats (393) impossibly small to handle for char removal and clean up. I found it easier to fashion the five required from some clean Boxwood section.
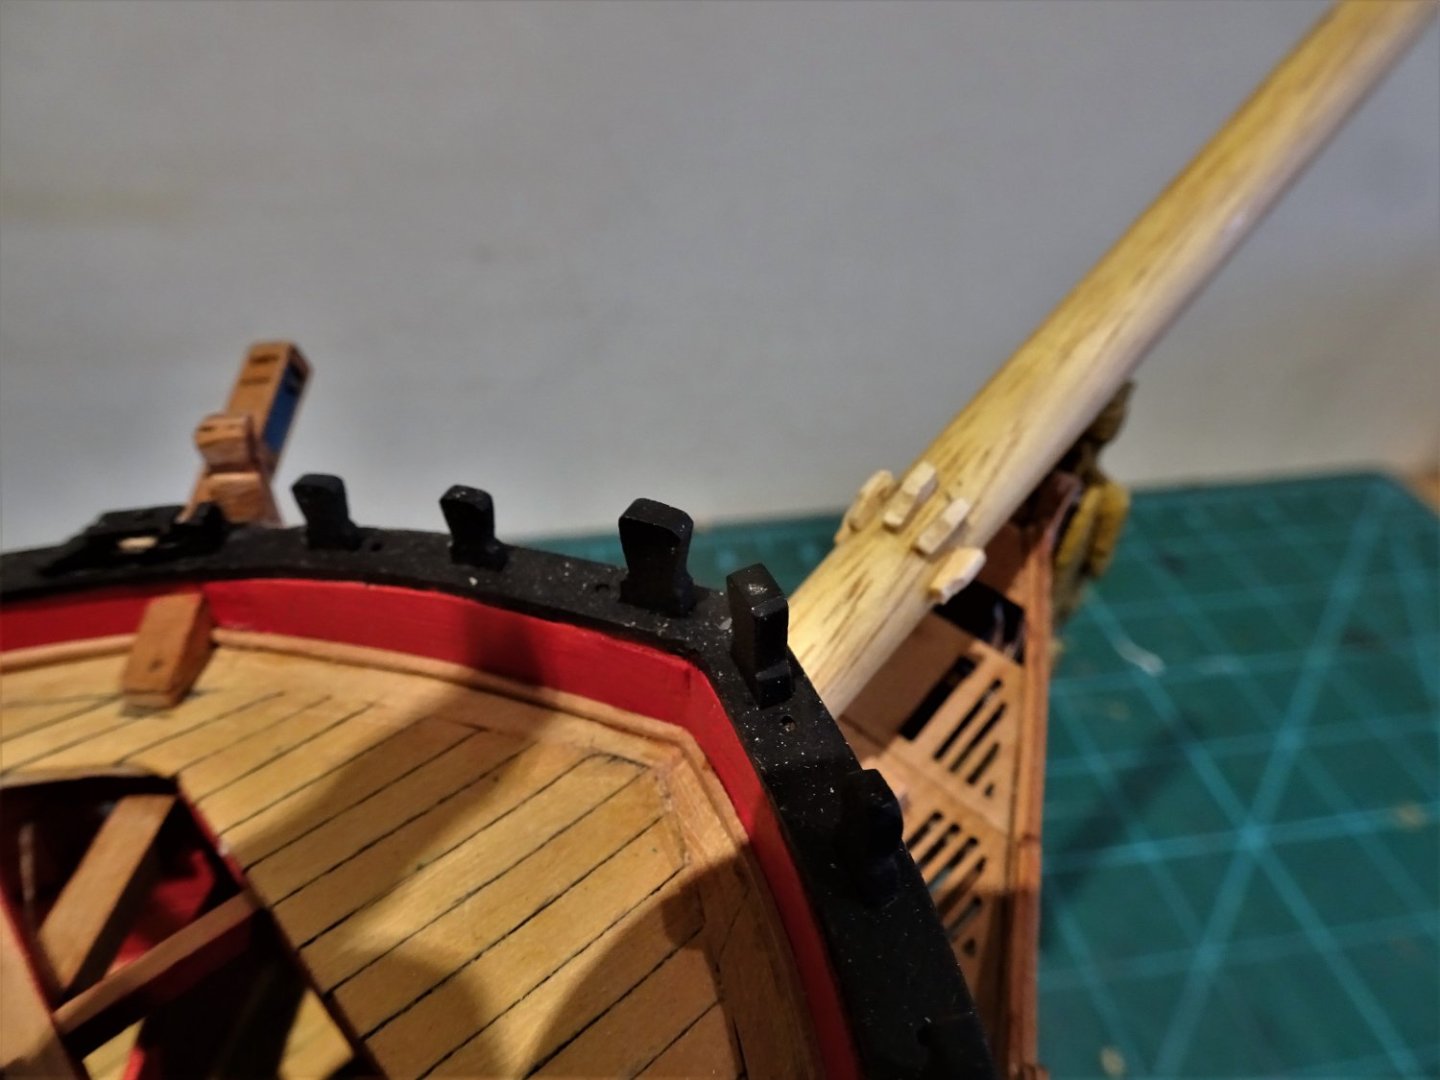
7611
The faces of the cleats are angled to meet the run of the line.
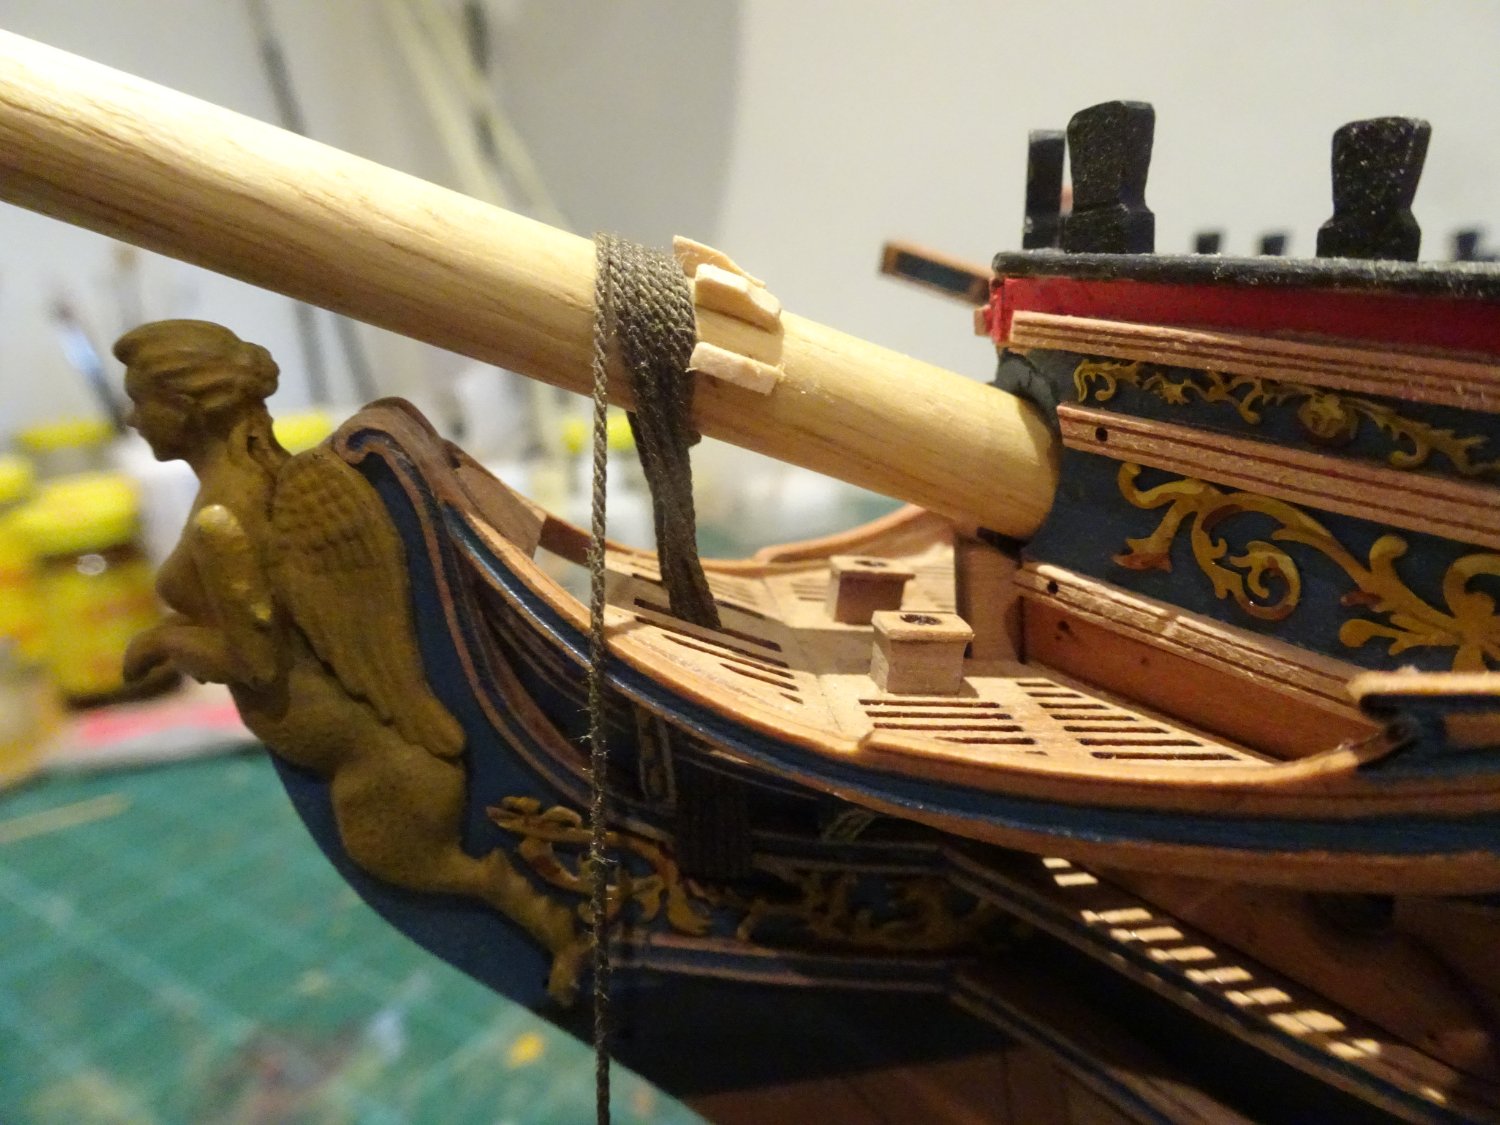
Bowsprit Gammoning
It is important to ensure that enough line is taken to complete the turns and frapping. I allowed 60” to complete the job, I had 12” left over, better too much than too little.
Steel refers to cross turns of the frapping.
When all the turns are passed, and hove tight, they are frapped together in the middle, by as many cross turns as are passed over the bowsprit, each turn hove tight: the end of the gammoning rope is then whipt, and seized to one of the turns. The frapping increases the tension; and adds to the security acquired by the purchase.
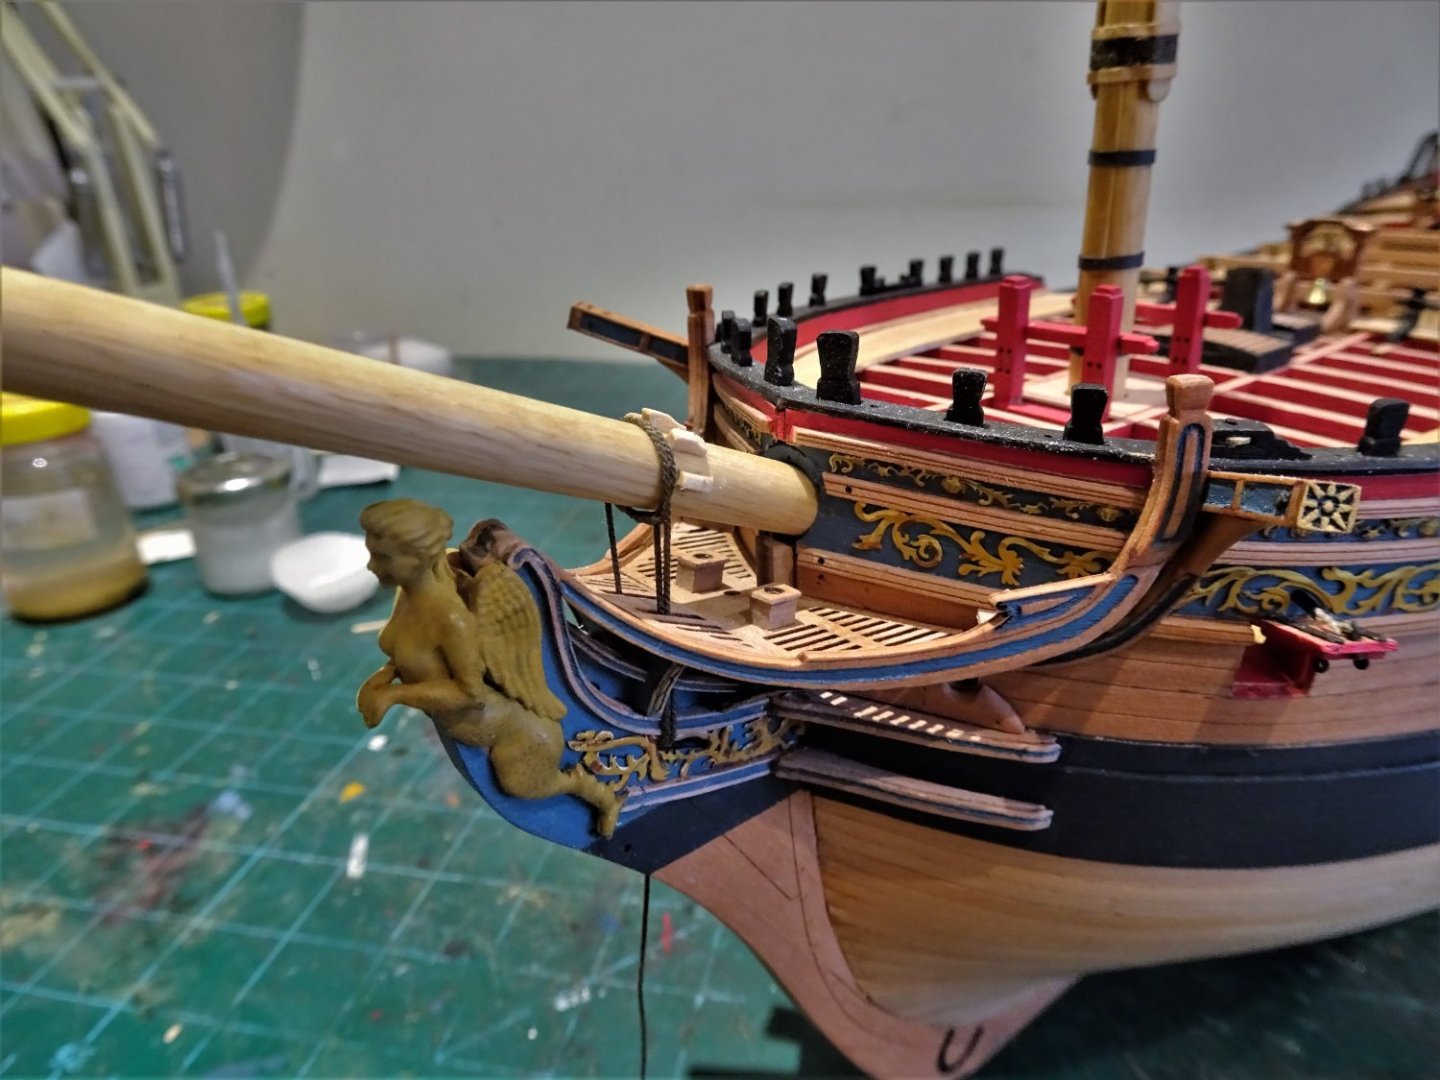
7612
Starting the gammoning thro’ an eye splice on the Port side.

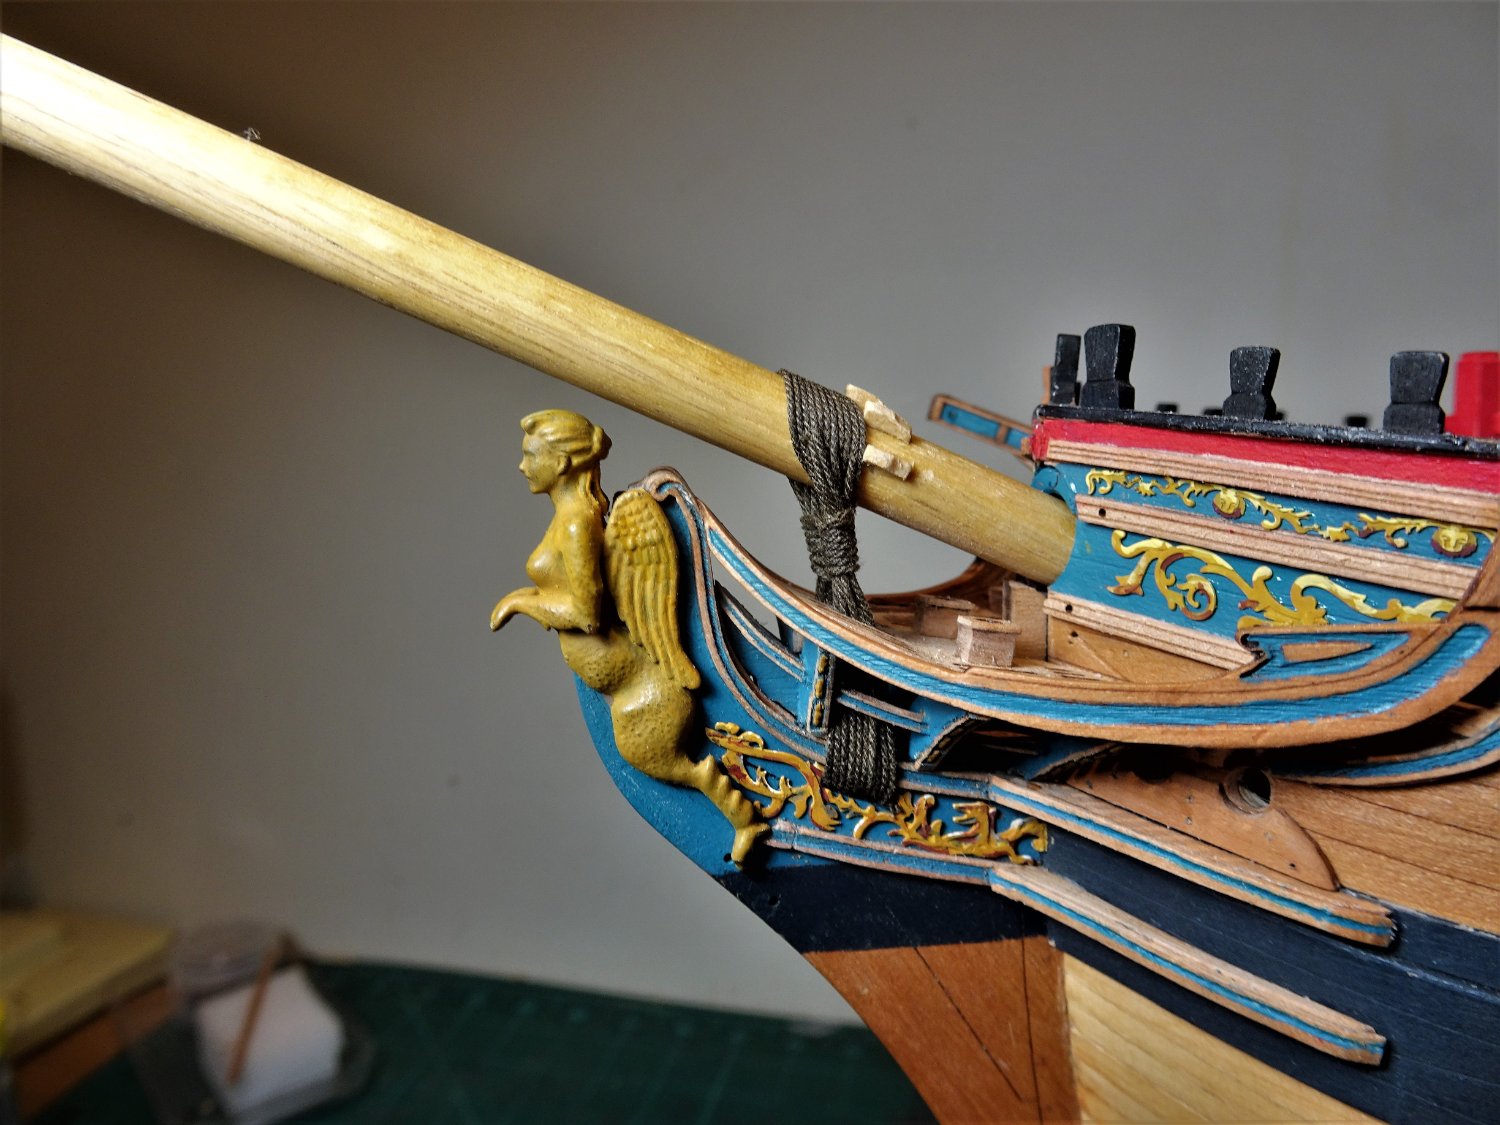
7614
The gammoning progresses, note the twist as the line passes from fore to aft with each turn.
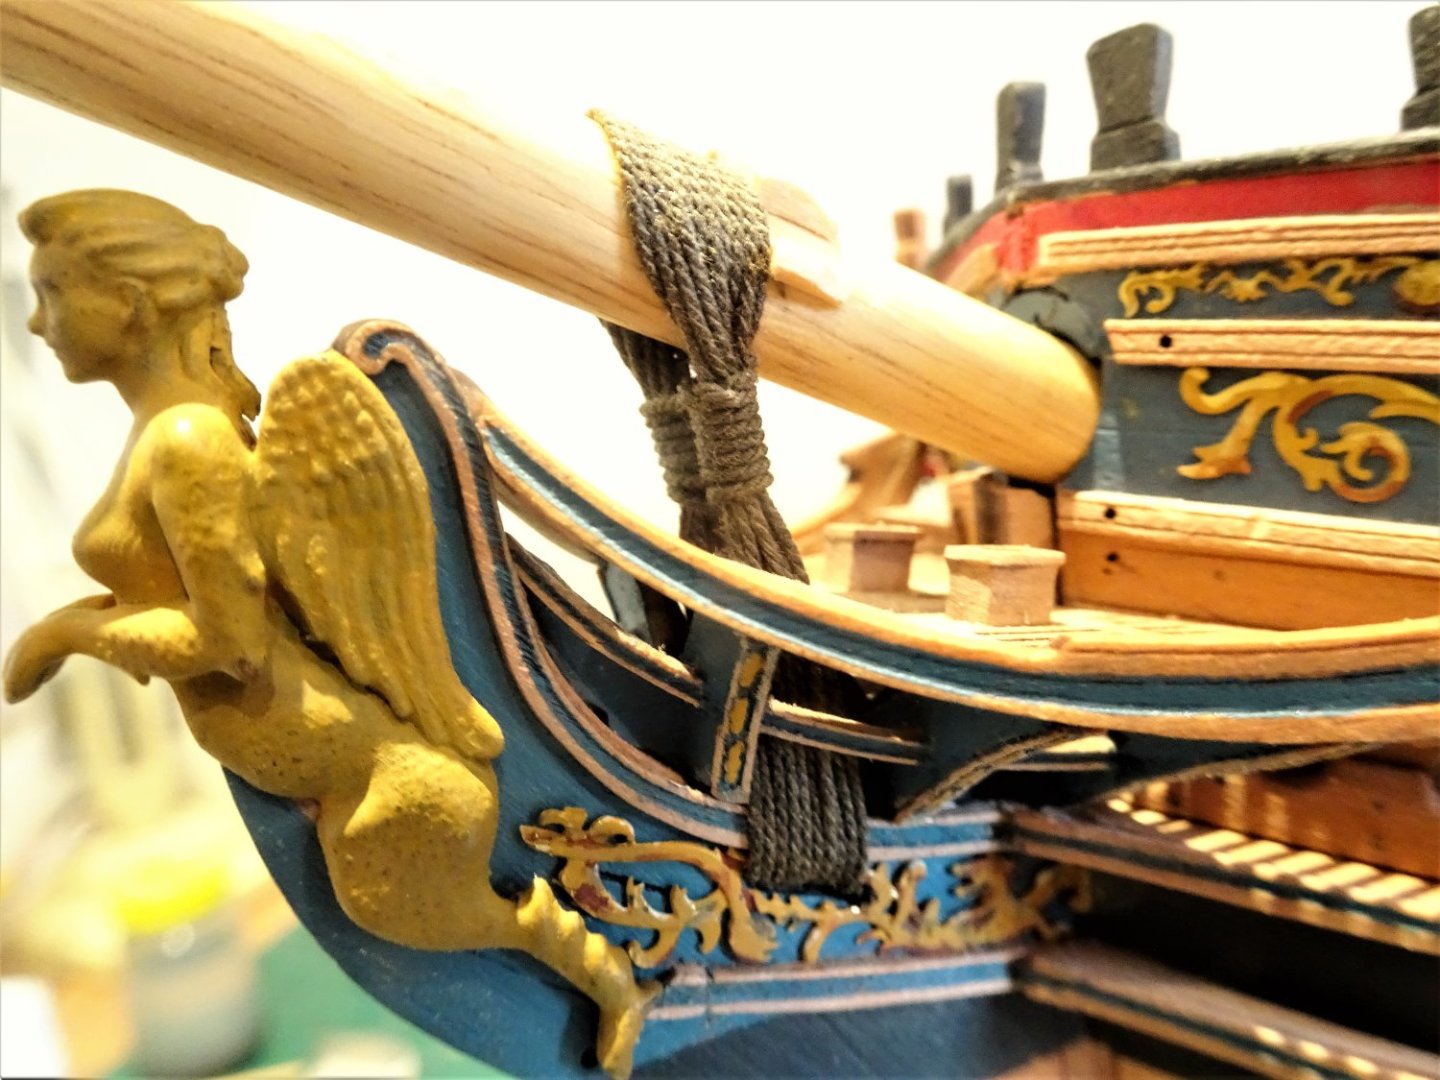
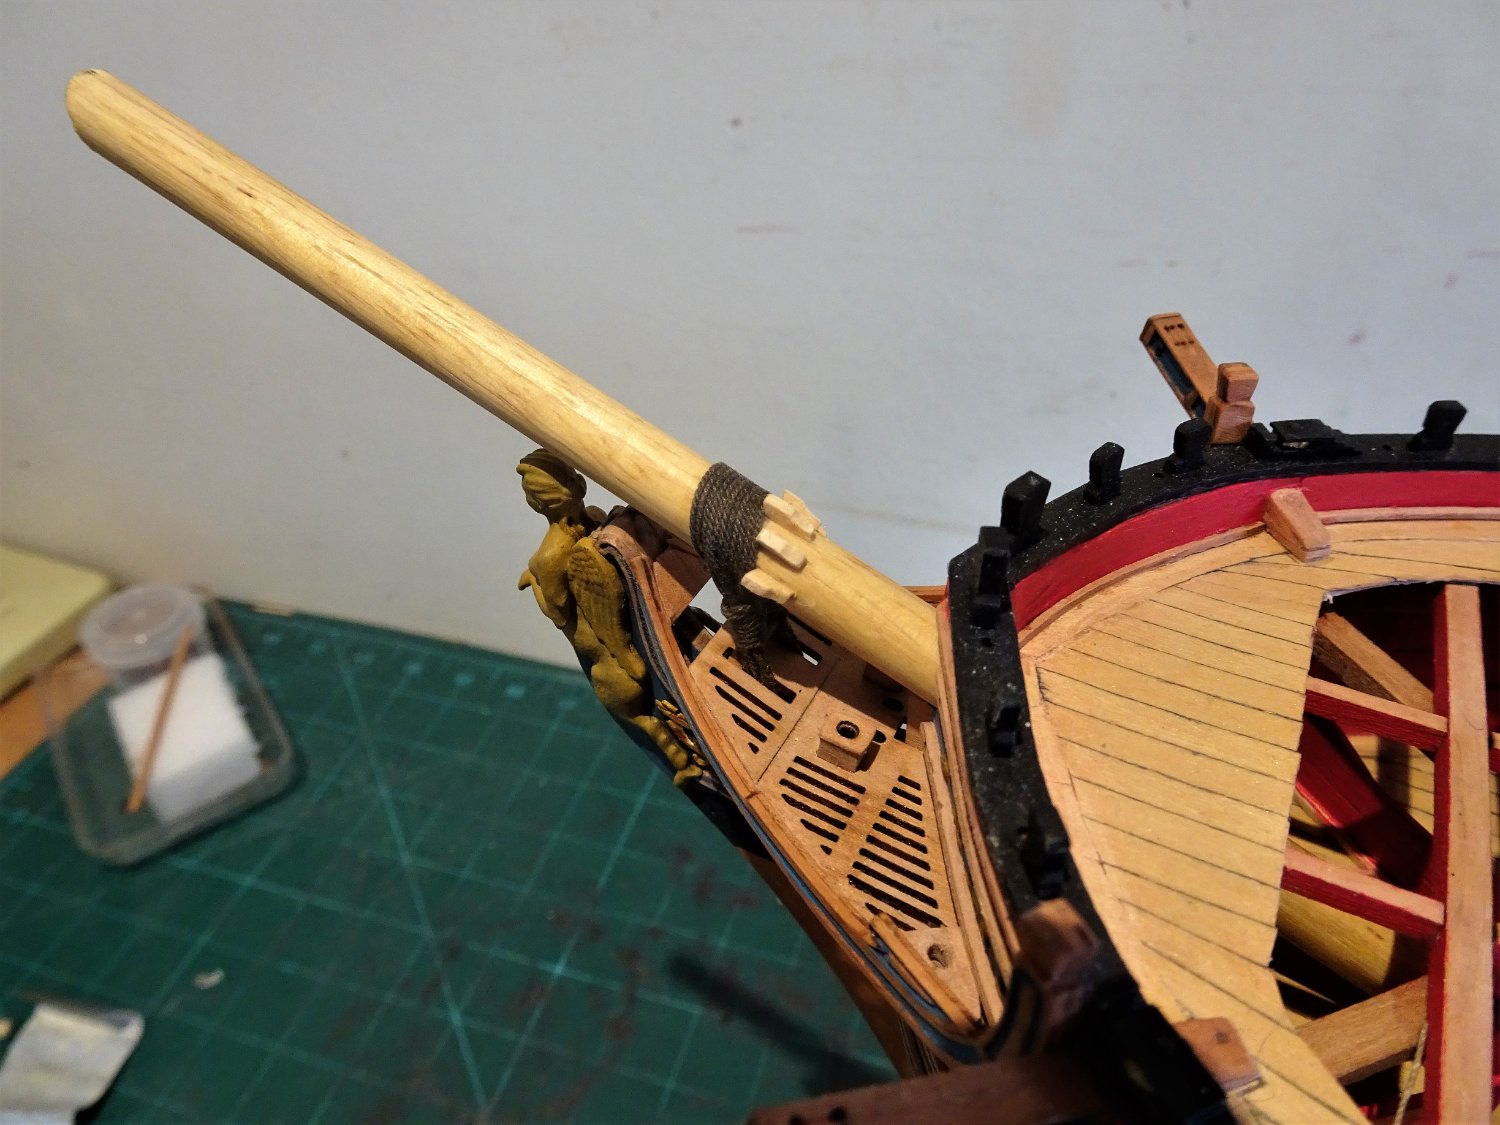
7626

7616

7627

7636
Well that’s the rigging done on my Sphinx, but the build is not over.
B.E.
25/07/2022
-
Post One Hundred and Forty-three
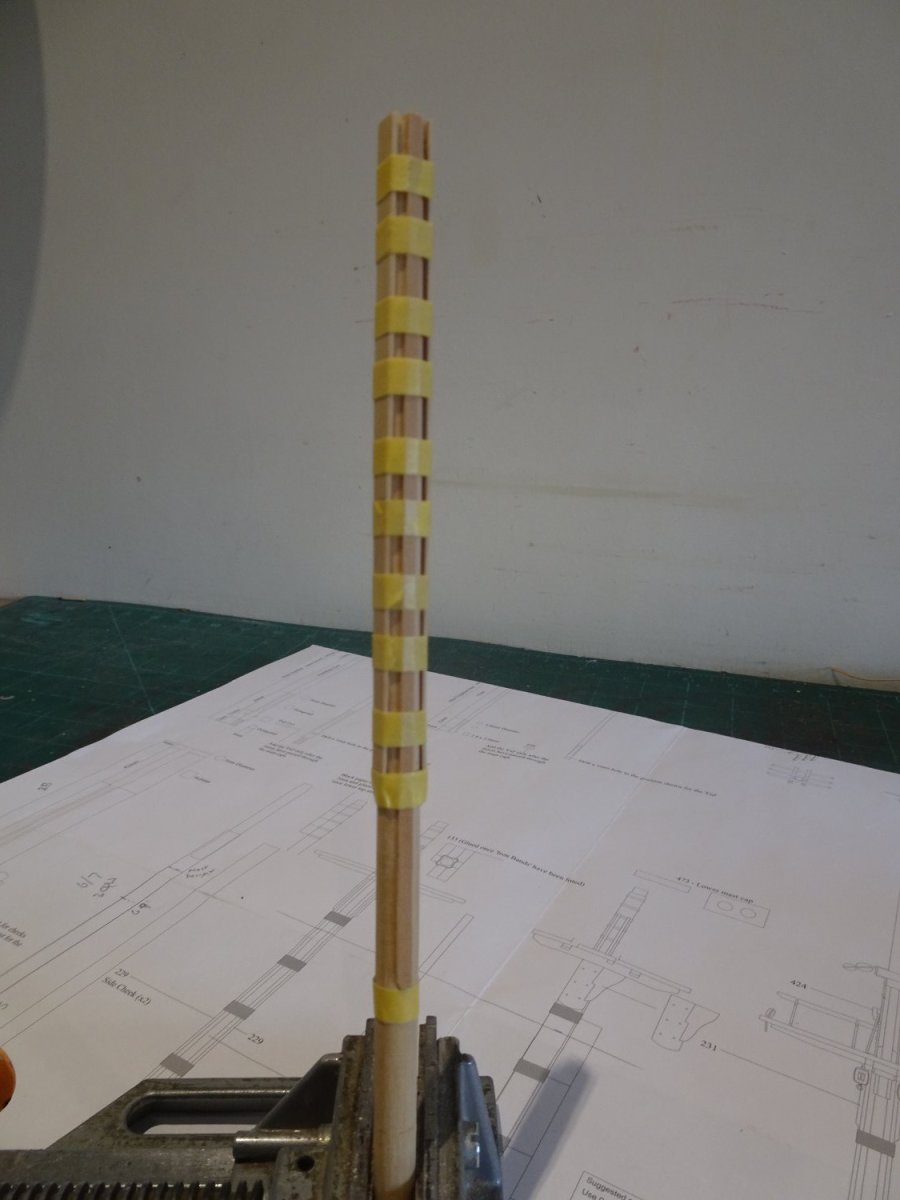
Dressing the masts – Wooldings and straps
The limited mast height still allows for five wooldings, and four iron mast straps to be applied to the Main mast, and four wooldings and three straps on the Fore mast.
For the wooldings 2½” circ line was used to a depth of 12”. This equates to 0.31mm ø line to a depth of 5mm.
I am using Syren 0.3mm ø line for the purpose.

7575
The masts are taped up to define the woolding area.
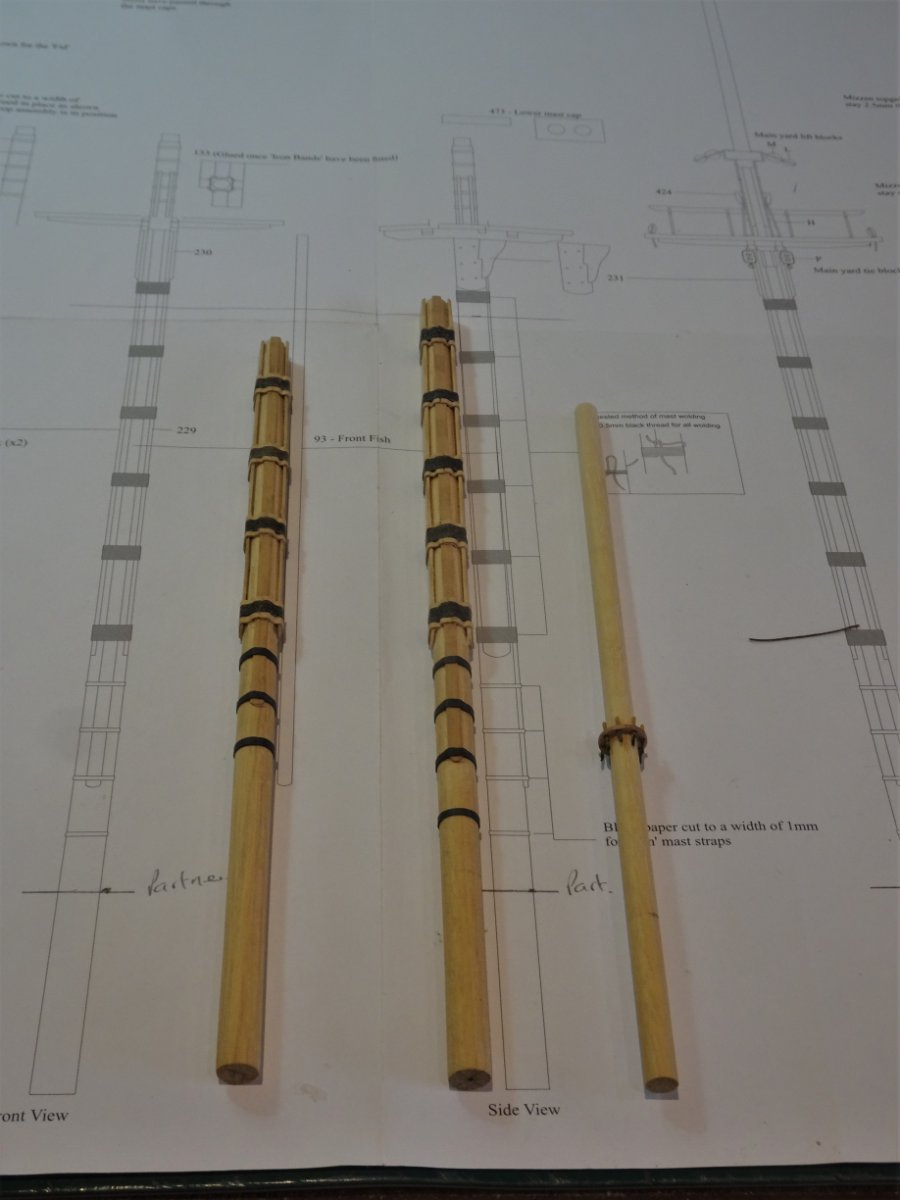
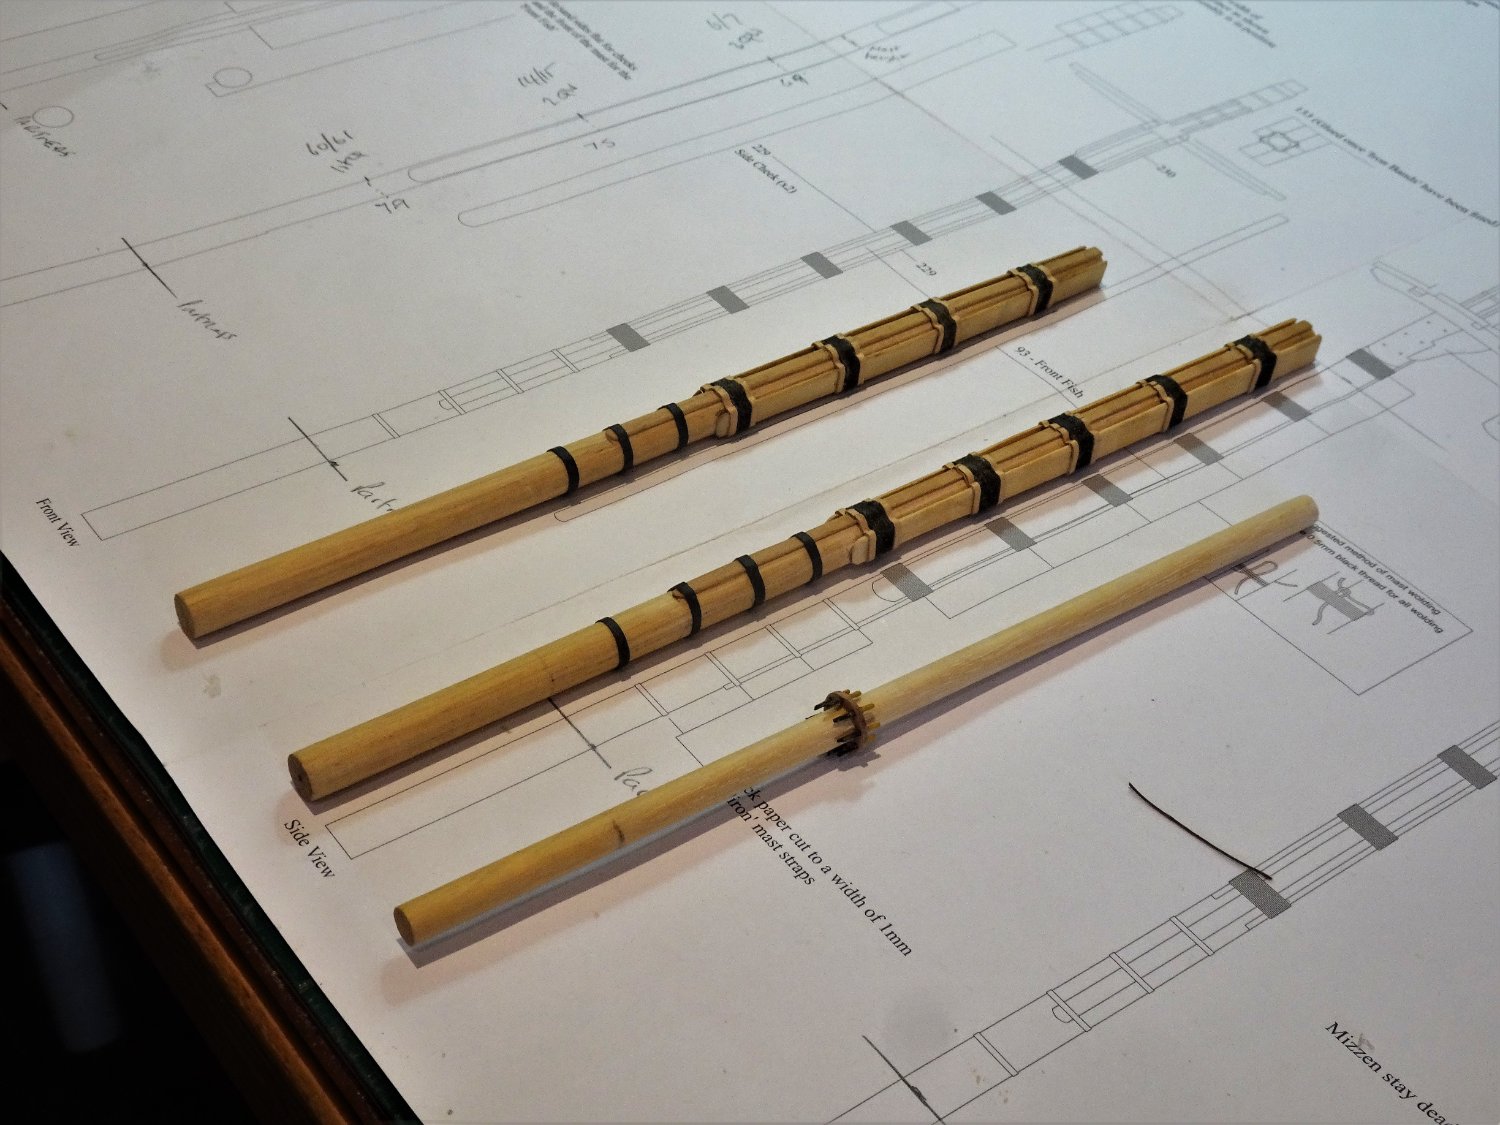
Not included on the kit plans are the wooden hoops top and bottom of the wooldings that secure them in place.
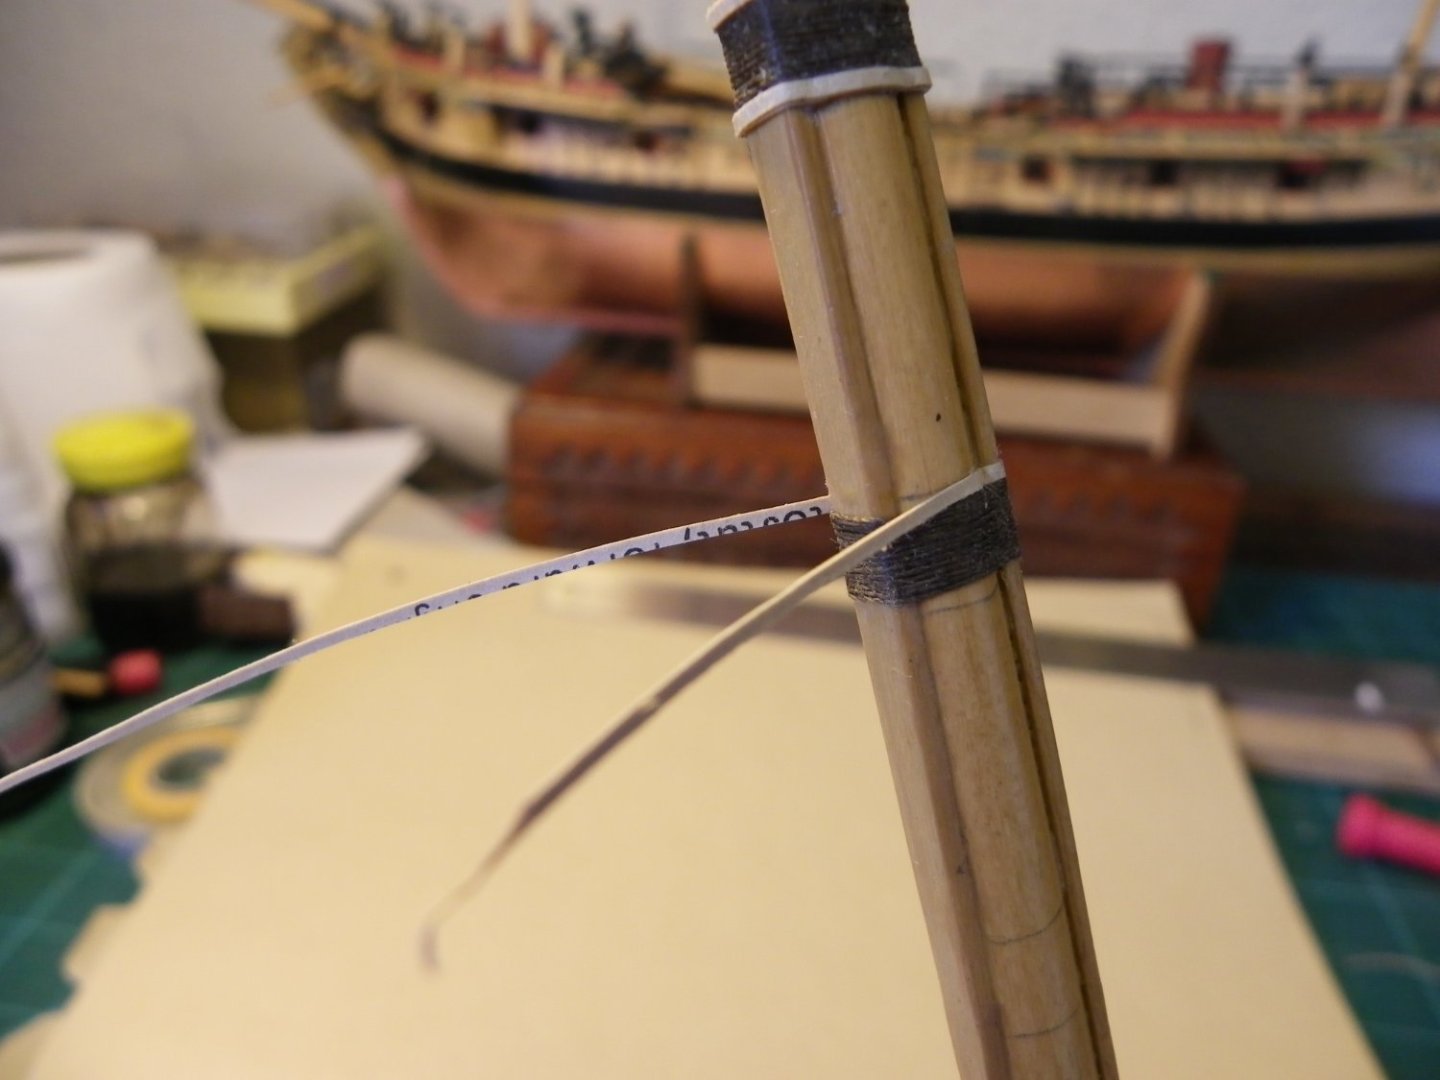
004
I used narrow strips of thin card taken from a Manilla folder to make the hoops. This was a method I successfully used on my Pegasus build way back in 2013, my previous involvement with wooldings.
7579
It is easy to apply, conforms to the required shape, and sticks easily using pva. It is also a near colour match to the masts.

7578
Slices of heat shrink tubing are used for the iron bands.
Mizen Mast
The kit includes a spider band which I added to provide a little interest to an otherwise plain stick.
7592
I’m not sure it is period appropriate, and I still may remove it. Were I rigging the ship my leaning would be towards cleats at this point in history.
.thumb.JPG.972a6e102b7c43959f2b4d537fc0bb01.JPG)
7598(2)
Trial fit of the masts. I quite like the look, I think I’ll keep them.
Moving onto the Bowsprit.
B.E.
24/07/2022
- Dave_E, jpalmer1970, Morgan and 15 others
-
18
-
The view in that first photo is absolutely stunning, looks like it belongs in the Rogers, or Kreigstein collections.
Beautiful work Chuck.
B.E.
- FrankWouts and Gahm
-
2
-
Post One Hundred and Forty-two
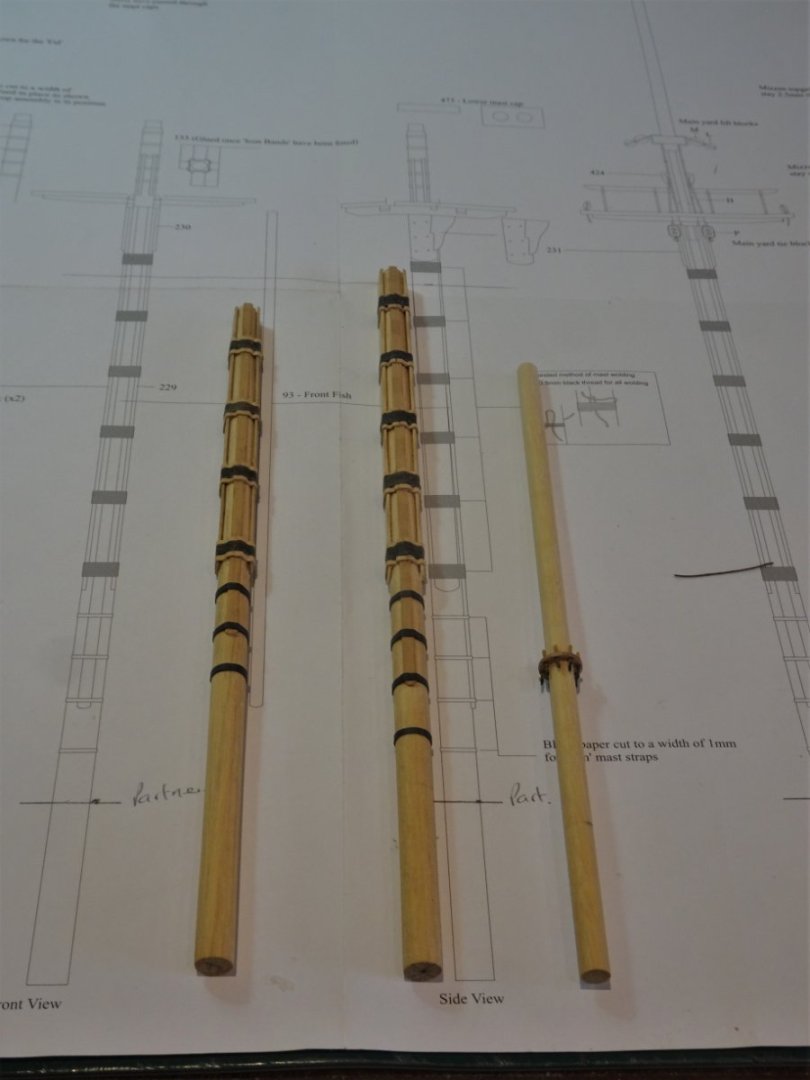
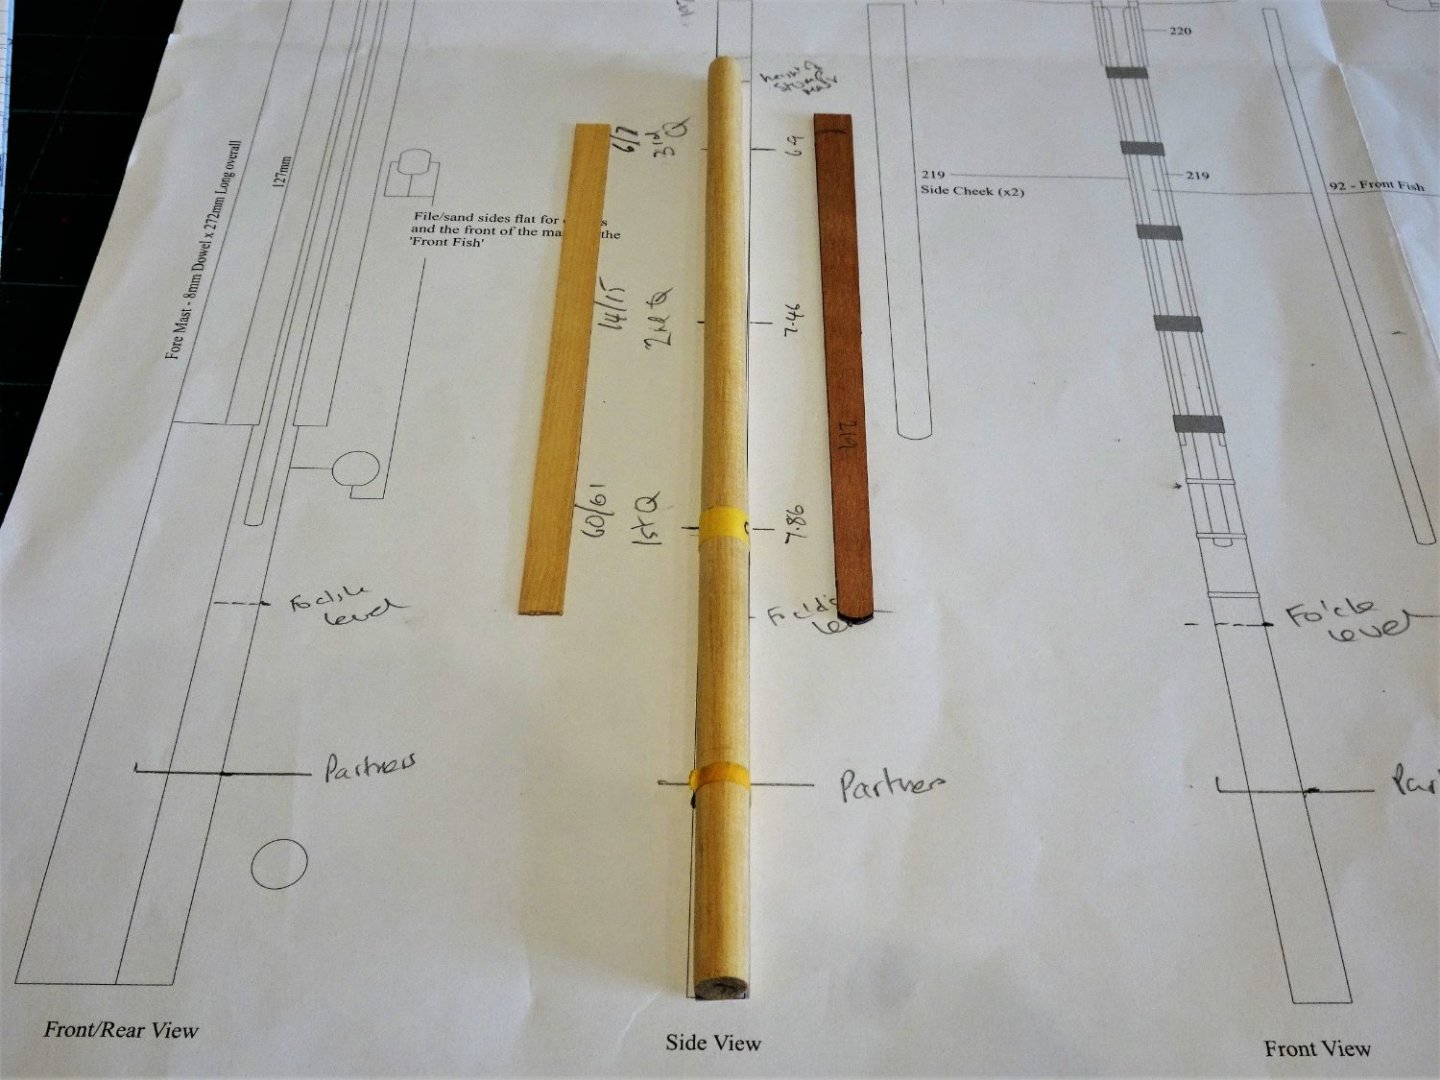
Creating the Masts.
With the masts cut to length the level at the partners is marked.
For those who may not know the partners for the Foremast and Mizen are at the level of the Upper deck, not at Foc’sle and Qtr deck levels.
This is only important if the mast is to be properly Quartered and tapered and the proportional fractions applied. Ie 1st Qtr 60/61, 2nd Qtr 14/15, 3rd Qtr 6/7.
The mast is also properly tapered below the deck but that need not concern us with this model.
Because my masts terminate just short of the hounds I have tapered close to the dimension at that point. (7mm) This also accords with the taper at the masthead base 7mm as shown on the plan.
All the relevant points were marked on the kit plans, and transferred to the masts.
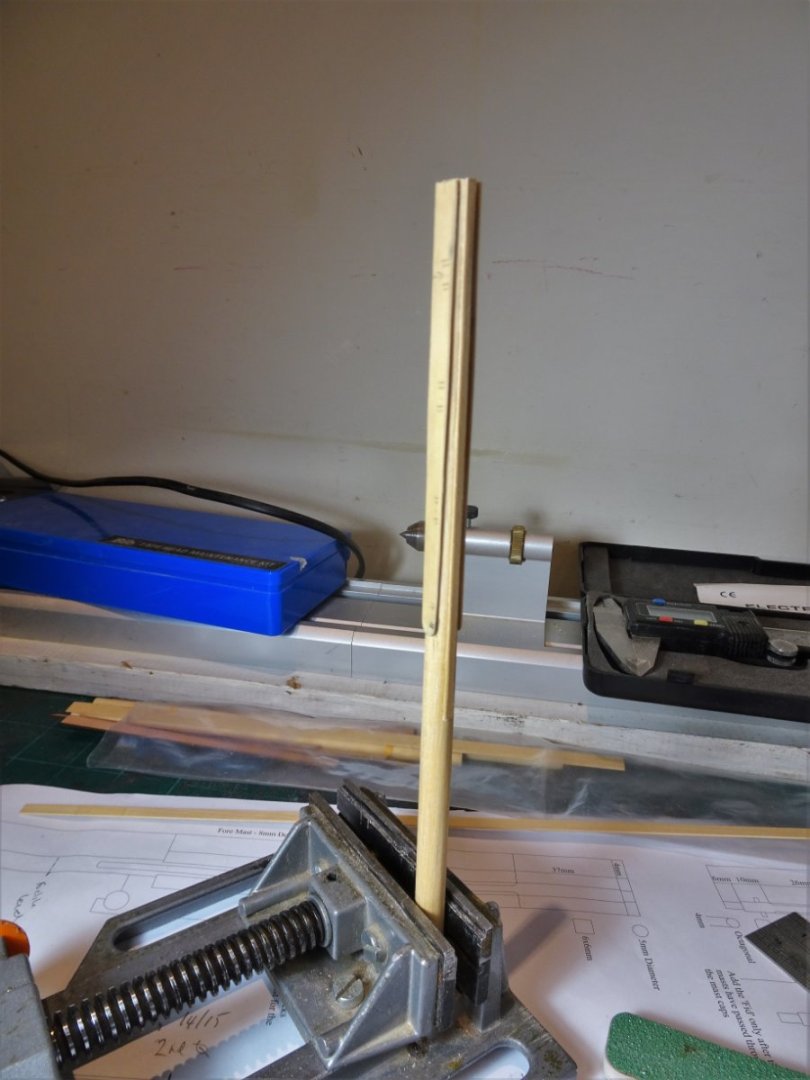
7562
The tapering was done on the lathe using only stiff sandpaper, with regular checking of the diameters at the quarters.
7565
I decided to replace the Pearwood kit cheeks with Boxwood versions that suited the Ramin mast spindles better.
The bottom end of the Cheeks is marked on the mast spindle by reference to the plans.
Creating the flats on the mast sides to take the cheeks is probably the trickiest element.
7570
I did this by marking the cheek outline on the spindle, and masking outside of this to form the area for flattening off.
I used a combination of sanding board, scraping, and eye, to form the flat.

7566
7574
The Front Fish was also replaced with a Boxwood version.
In the next post the mast will be completed with Wooldings and iron straps.
B.E.
22/07/2022
- dvm27, jpalmer1970, Glenn-UK and 11 others
-
14
-
-
Thank you Rusty, Thomas, and Chuck, the appreciation of builders whose work I admire is much appreciated.
Post One Hundred and Forty-one.
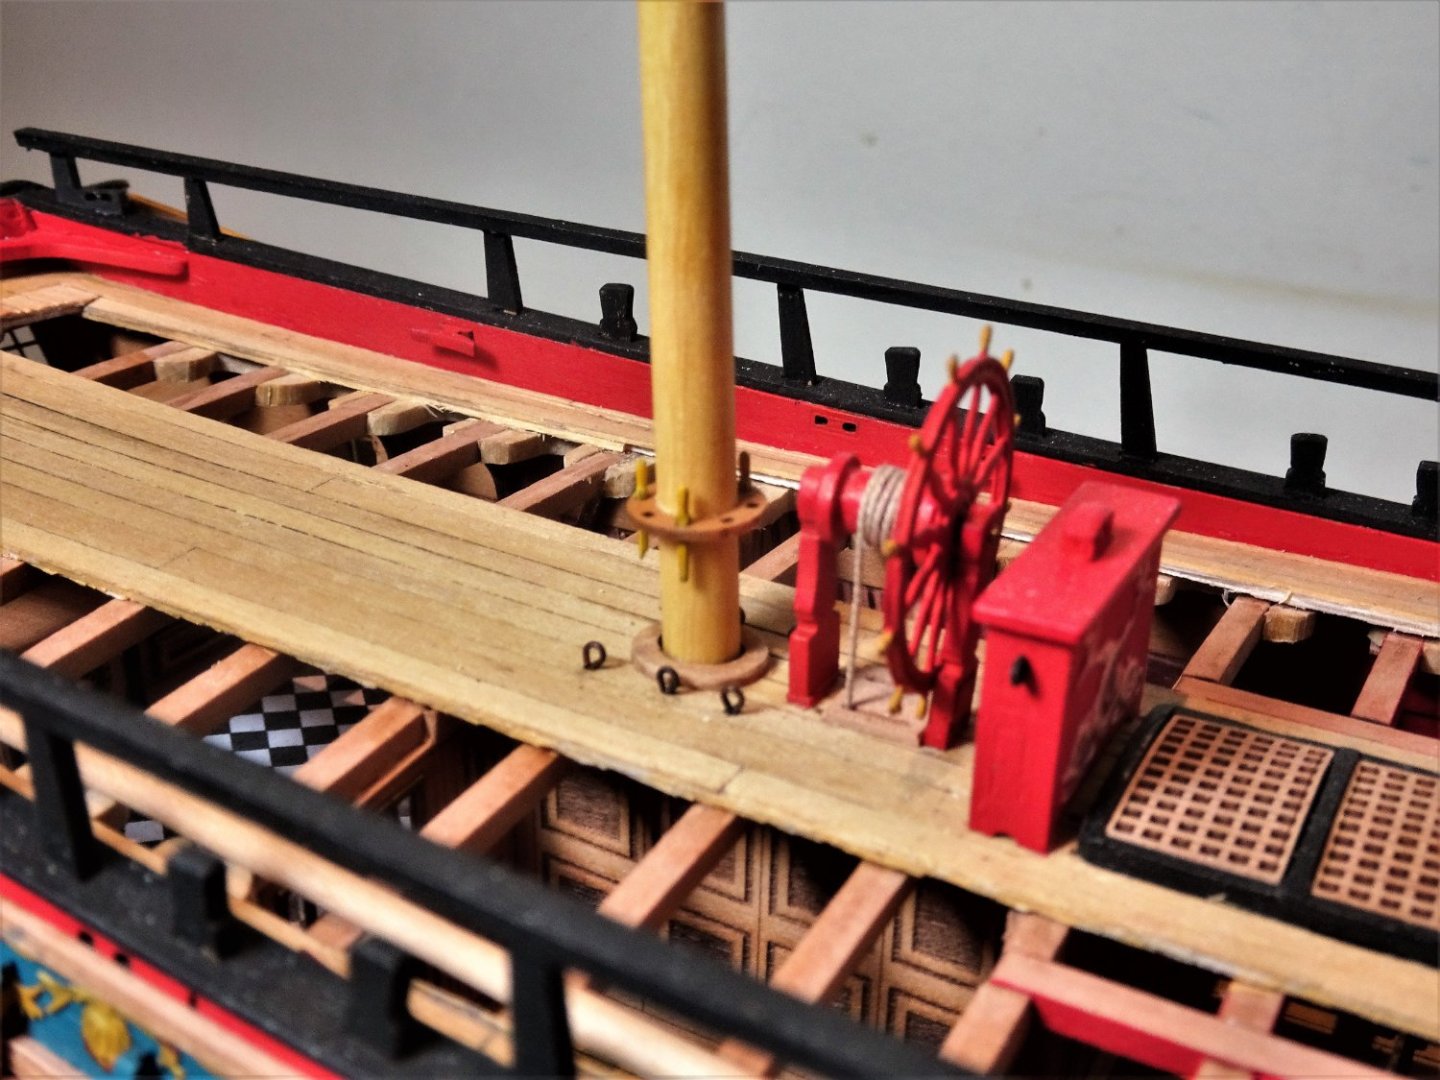
To mast or not to mast
The majority of Navy board style models don’t include masts, altho’ some do have short stump representations.
My inclination is to install the lower masts and Bowsprit of lengths that will fit within the case.
The case was pre-made for another project that my case maker had in stock but one that suited the Sphinx hull dimensions.
The Bowsprit will be left in place complete with gammoning, but the masts will not be glued so there will always be the with/without option.
These more than ‘stump’ masts will be dressed with the fittings that would appear on the given lengths.
Details such as wooldings, mast bands, cheeks and Front fish, and Gammoning on the Bowsprit will be included.
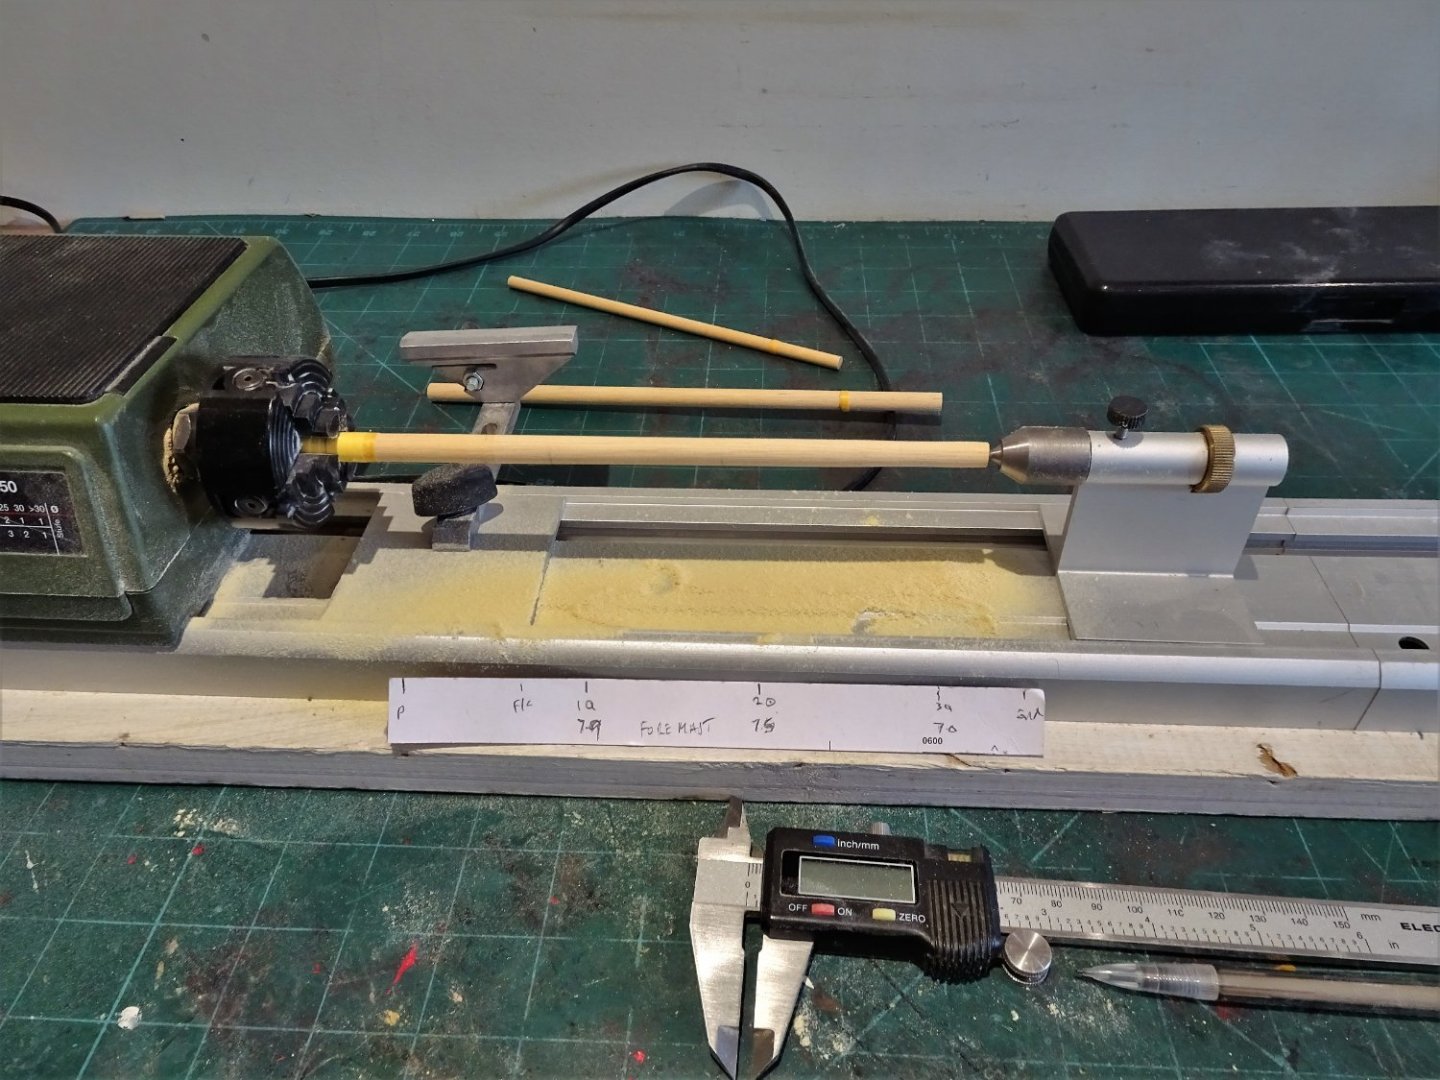
Wood Choice
I generally prefer not to use Walnut dowel for lower masts, it may be smooth and straight, but the only way to get that pale colour of the lower masts of British warships of the 18th century is to paint it, and I prefer not to paint masts.
I reserve walnut dowel for stuff like yards, altho’ even there I prefer Boxwood Square stock for the octagonally centred lower yards, and Topmasts.
I avoid Lime wood dowel like the plague, longer lengths are sure to warp, and it’s hard to get a decent finish using wood stain/and or varnish.
My wood of choice for lower masts is Ramin, a nice pale colour and straight.
.thumb.JPG.a33e8cfdff5314102425559a26d62fee.JPG)
7459(2)
8mm and 6mm diameter Ramin dowel.
.thumb.JPG.7ed51d3ee8215691c9e7dc32dc54a448.JPG)
7461(2)
Ramin can be quite difficult to source, I get mine from Mantua Models UK based in Windsor. There is a minimum order of 3x 1000mm lengths of whichever diameter is chosen.
.thumb.JPG.c898055ea93cc2b62a398e7b0bb1d676.JPG)
7558(2)
.thumb.JPG.b1db53cc4fe14ea93fa86bc0a1a18955.JPG)
7561(2)
.thumb.JPG.cbdeb0ff311bab7e438f04e9577a0ba4.JPG)
7555(2)
Having established the optimum lengths I can now work on the relevant attachments.
.thumb.JPG.afa8a0df79478d1535c34c8a2eb49571.JPG)
7551(2)
.thumb.JPG.d06e6781f6fba42b87f37666062765b0.JPG)
7552(2)
A few minor considerations still to be thought about such as whether to fit Hammock Cranes, but for all practical purposes the hull is now complete as regards Navy Board style display.
B.E.
18/07/2022
- Mirabell61, yvesvidal, Glenn-UK and 20 others
-
23

.JPG.b84e09b683fedeab041ce28163d5f1d7.JPG)


.JPG.d46ed1b7baed83677ab7556f4089ec99.JPG)
.JPG.89971776069359065c03be9d22a04bd3.JPG)
.JPGp.JPG.ca75d24a0f64903ce61d0dfbf54fd64d.JPG)

.JPG.48000e5c65d0f4abbe3387345d60784f.JPG)


.JPG.ff5bda0440c6f6e0e18c09534c84ace0.JPG)
.JPG.995e6777c585cb989521df1cf77c65cb.JPG)
.JPG.61491af489d7c4a32a4db6698de9d920.JPG)

.JPG.f43905a9f373d8daf06a6d5aa628e53b.JPG)
.JPG.82b6976b844e22fc9b0fa3210b09c5f2.JPG)

.JPG.2a82e7061e06c091978843adb275c1ed.JPG)
.JPG.ddde798902c2785092d18c3ed43b778c.JPG)
.JPG.0a9777e62ef2595709c01dde9eac849b.JPG)
.JPG.c77168dc096ad297c6256ff5bd83cacd.JPG)

.JPG.4d3e6fdf3016a692a7286ffcf58eed3c.JPG)


.JPG.5a529663d6b421472d4ae16bc0e8ebf2.JPG)


.JPG.8a8947789098c4e329e8b8bacaa088e1.JPG)
.JPG.bee0c90f317593aaa8b834fcc248fdbe.JPG)
.JPG.41edb507abd6b65fded8fd227bd8d715.JPG)
.JPG.89f51b792d3e5d8c2ca2556053c2e38f.JPG)
.JPG.4dc6bdb678e22b7750c402fd6d43659a.JPG)
.JPG.b68516a2cbf4776d62adb3016bda5922.JPG)
.JPG.0196ae2e132699052e3910e0e015bec0.JPG)
HMS Sphinx 1775 by Hollowneck - FINISHED - Vanguard Models - 1:64
in - Kit build logs for subjects built from 1751 - 1800
Posted
She’s looking excellent Ron, very nice detailing of Capt. Pennypincher, he looks a dead ringer for Russell Crowe, did he transfer from Surprise.😉
B.E.