
.JPG.ca33079f5815b861e67b9c2cccd37982.JPG)

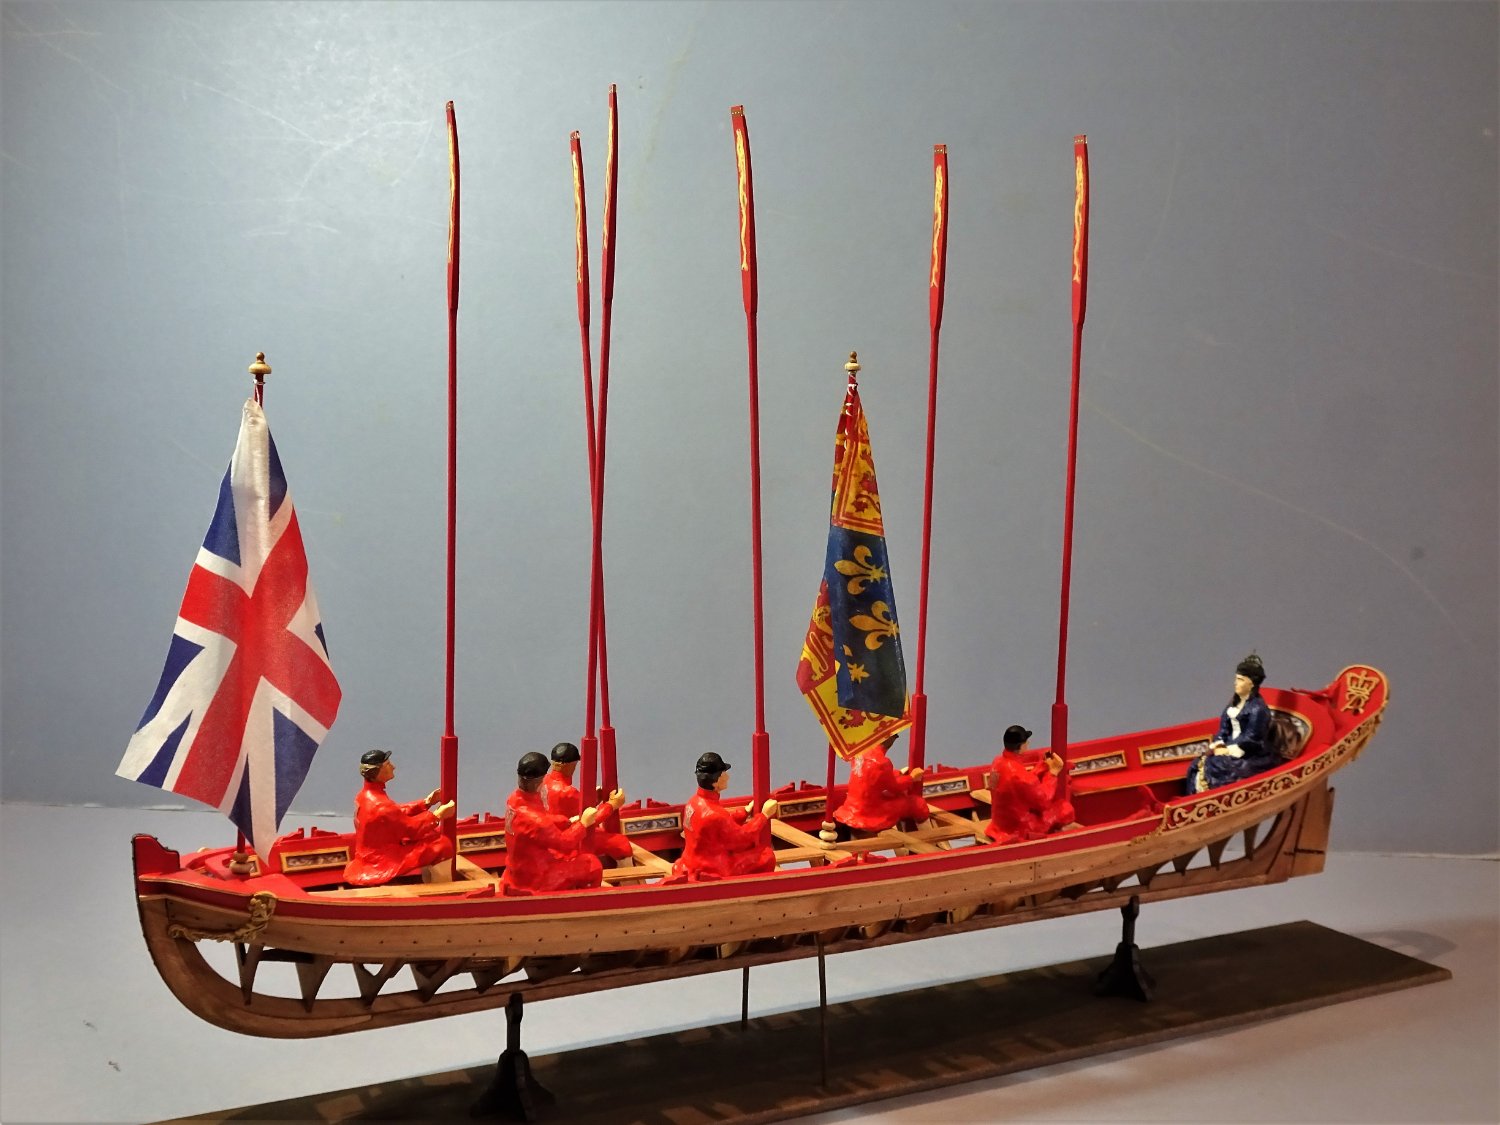
Blue Ensign
-
Posts
4,286 -
Joined
-
Last visited
Content Type
Profiles
Forums
Gallery
Events
Posts posted by Blue Ensign
-
-
-
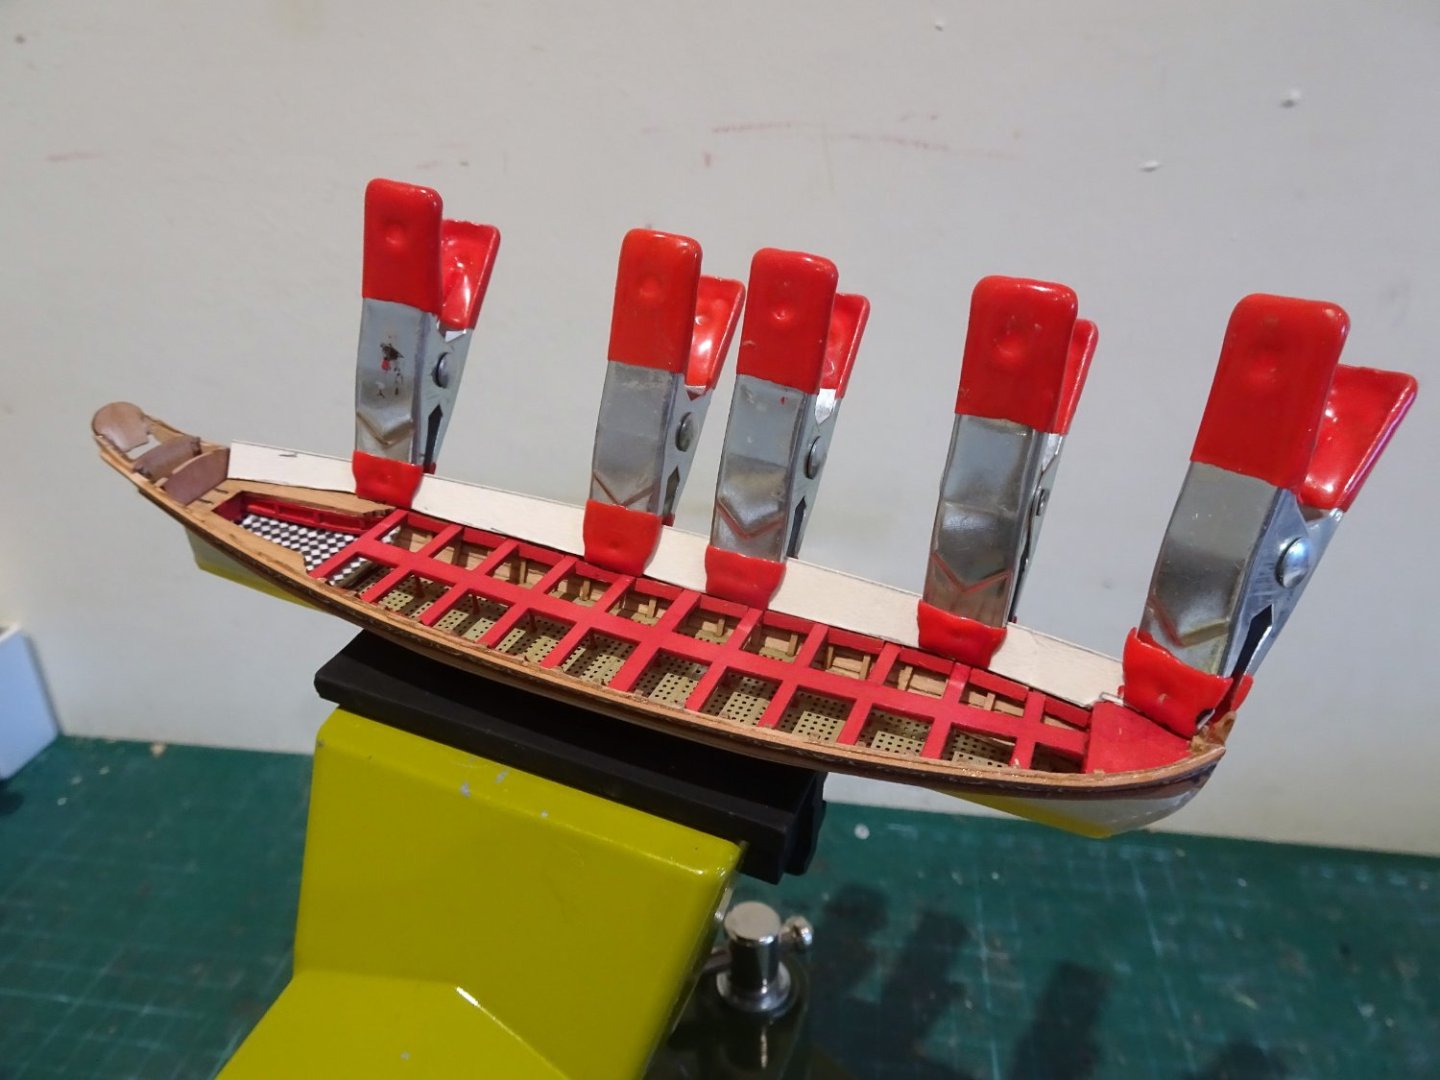
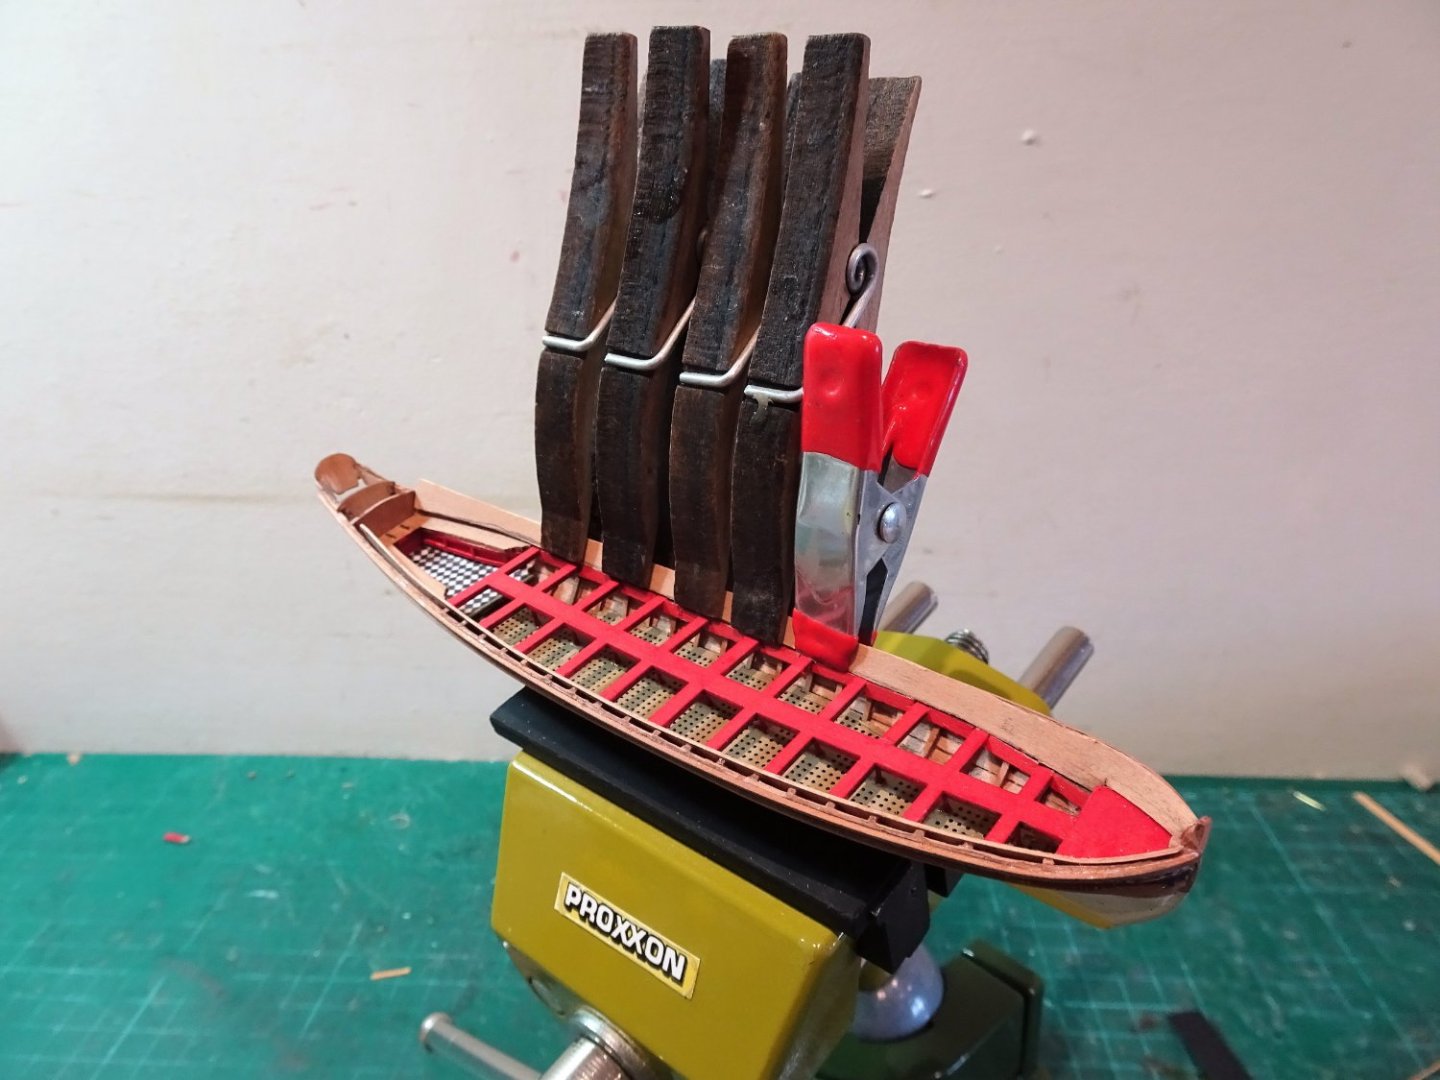
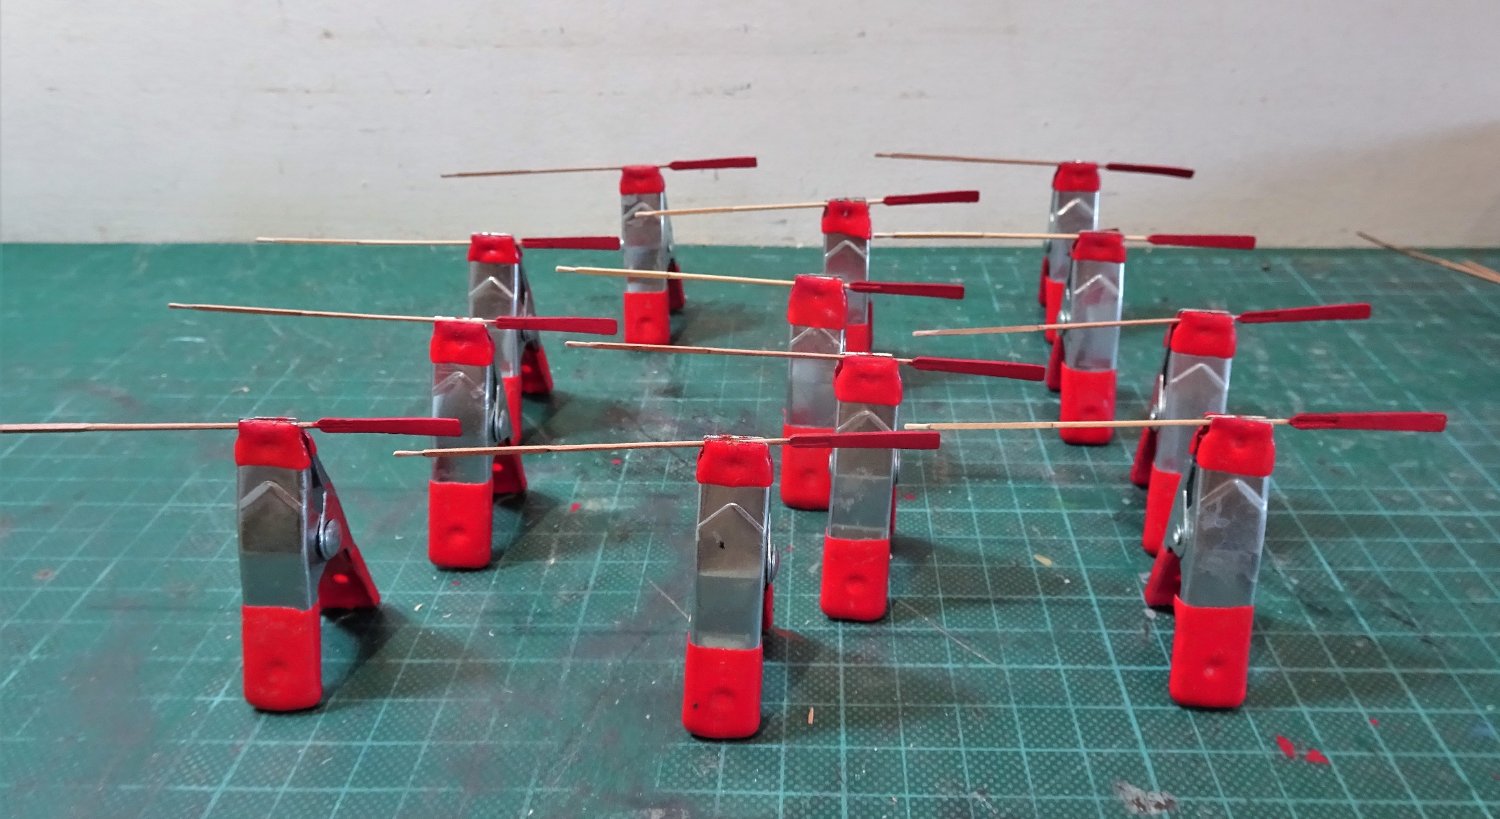
Thank you Jason, Håkan, and Mark, making oars is not too bad provided you have the makings and are prepared to accept the odd breakage close to finish of a piece.
Post twenty
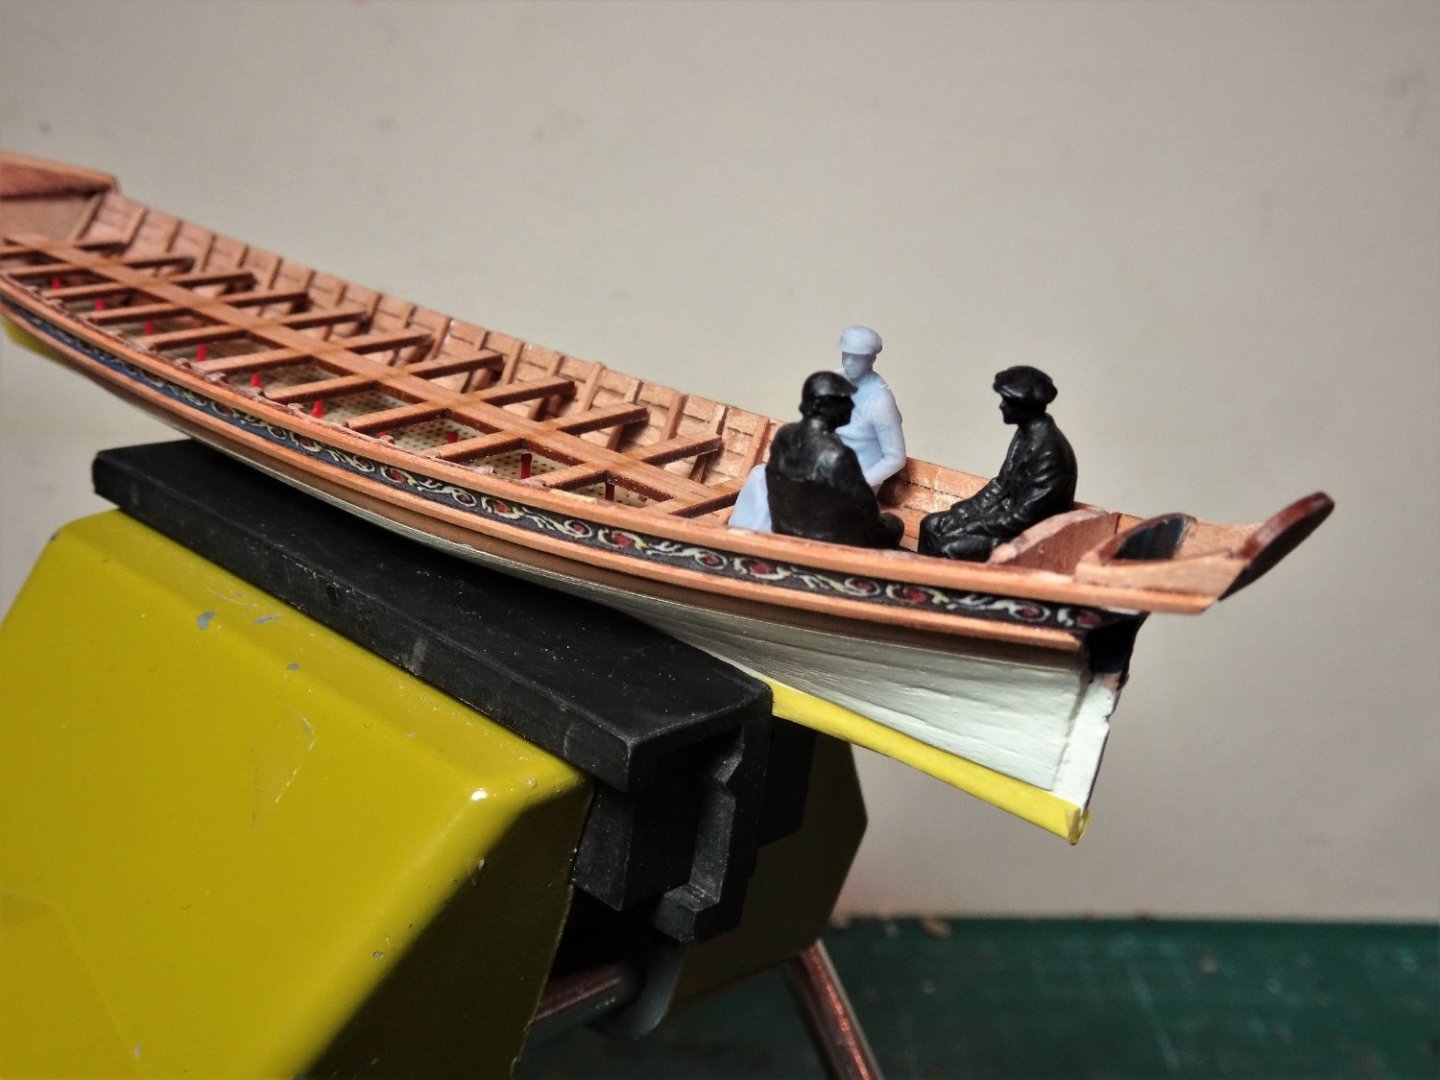
A day’s work completed the oar set bar the fettlin’ which involved inducing a slight curve to the oar blades and adjusting the handle length to a scale 11” (4.36mm)
9718
A further day involved painting the various elements of each oar.
.thumb.JPG.d466bb4df089848cfd0016d40f6def3f.JPG)
9743(2)
I decided to paint the oars the traditional red, with natural handles, and copper blade tips which represent the metal strips applied to prevent splitting of the wood.
Tin was often used but I splashed out on copper, it is an admiral’s barge after all.
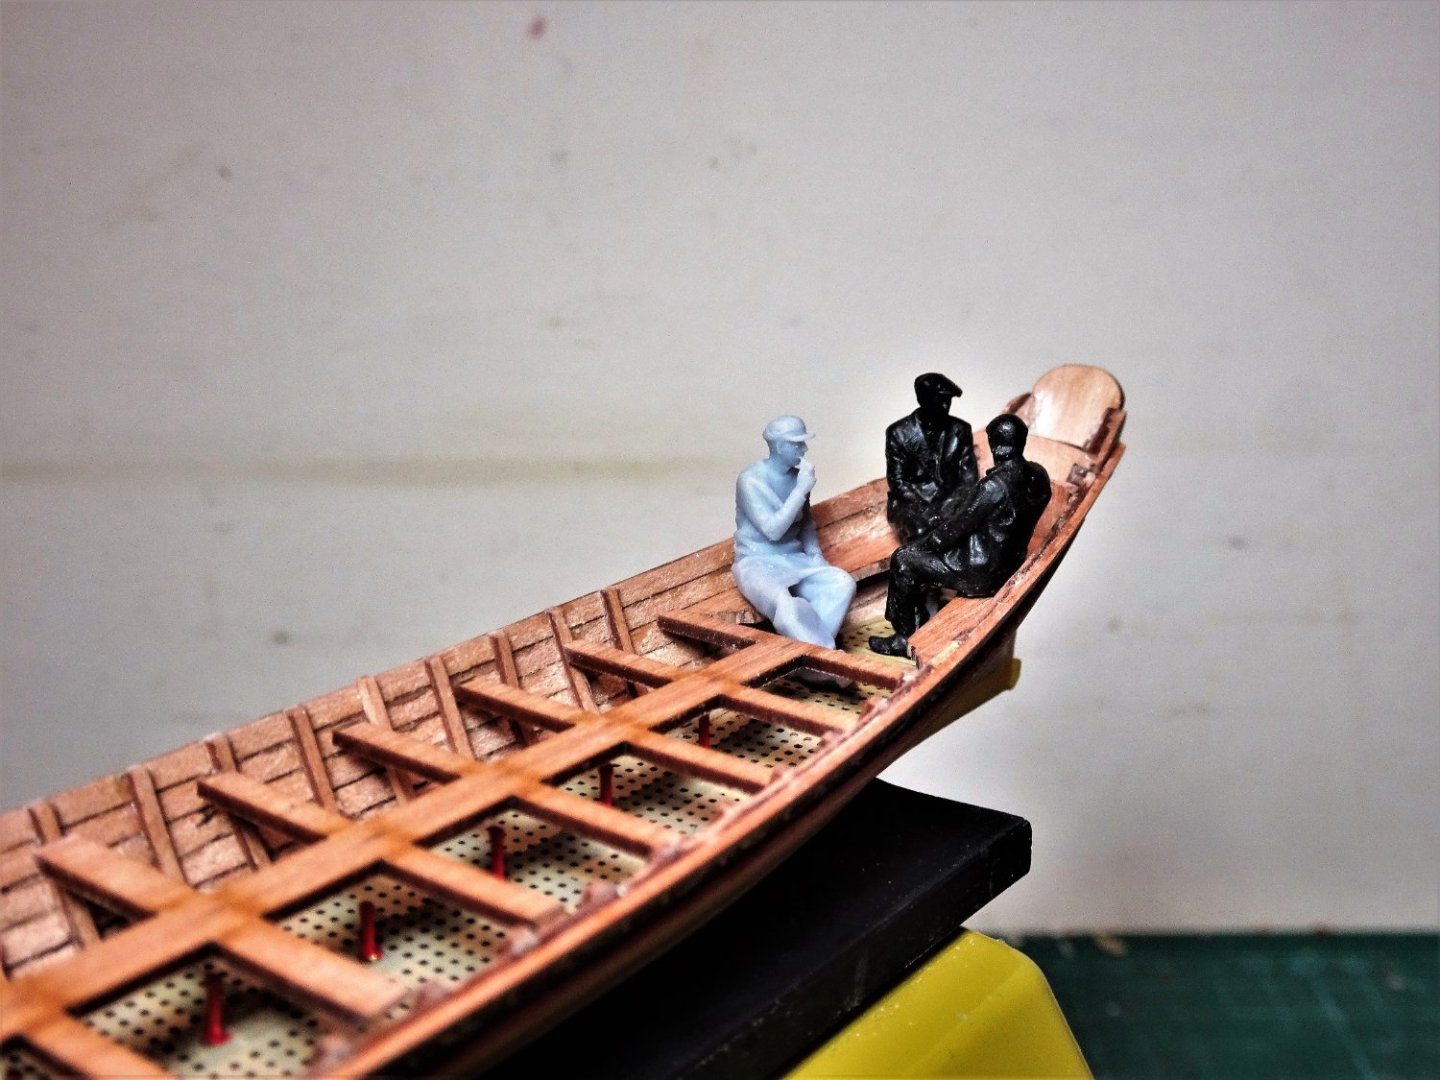
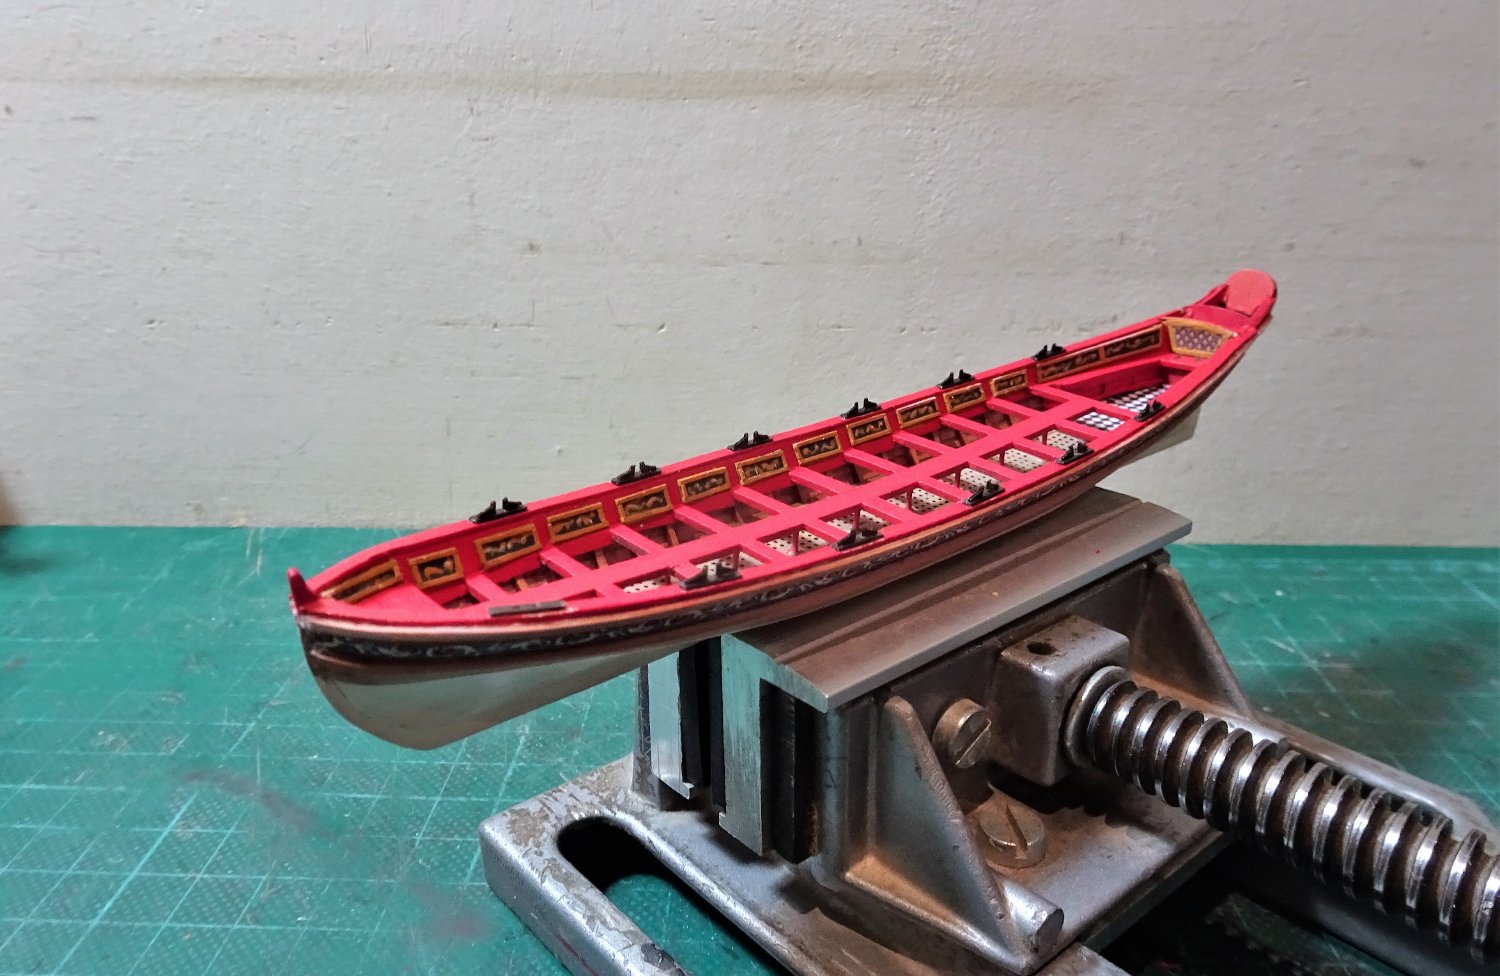
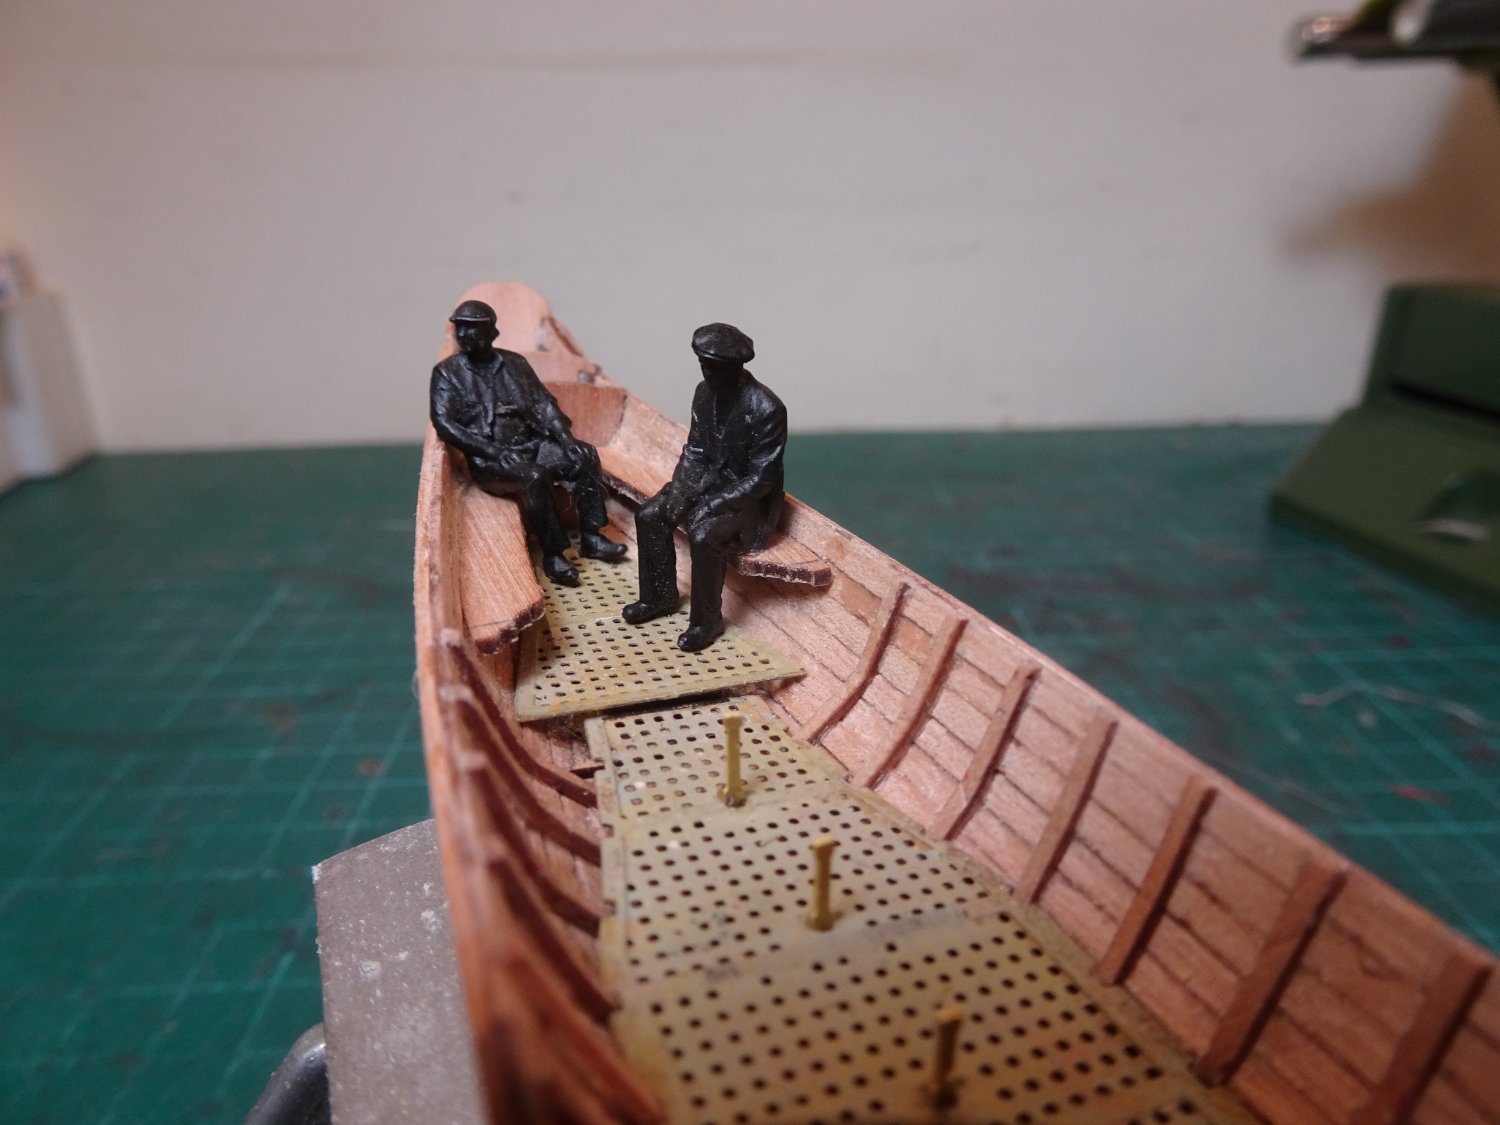
A decision is to be made of how to display the oars, I don’t really want to follow the normal arrangement of top and tailing them across the thwarts, as they would effectively cover most of the internal area.
Ideally, I would like to crew the barge with the oars out but creating acceptable 1:64 scale figures is a very difficult ask and there are no period figures commercially available in this pose that I can find.

03399
.thumb.JPG.a29a78d0e50c154fd414b2b040c7bf45.JPG)
03411
I was lucky with the Queen Anne barge kit at 1:24 as I was able to convert a couple of Deans Marine figures to represent members of the Royal company of watermen- they started life as sitting US marine figures of the Vietnam era.
I can’t envisage making or modifying 1:64 scale figures, so I will have to pass on that idea.
An alternative is to place the oars in position as they would be with the crew in place.
.thumb.JPG.b5fe36fd37091e3e3737890c62ea0664.JPG)
9730(2)
.thumb.JPG.324e4781ed401fe7613d6e616dbd9dae.JPG)
9734(2)
.thumb.JPG.243bcbd8e86cff36b994904f1174e72e.JPG)
9740(2)
This arrangement extends the width of the display area to around six inches, so I’ll ponder on it a while and play around with other options.
B.E.
11/12/22
- allanyed, Wintergreen, James G and 15 others
-
 18
18
-
Post Nineteen
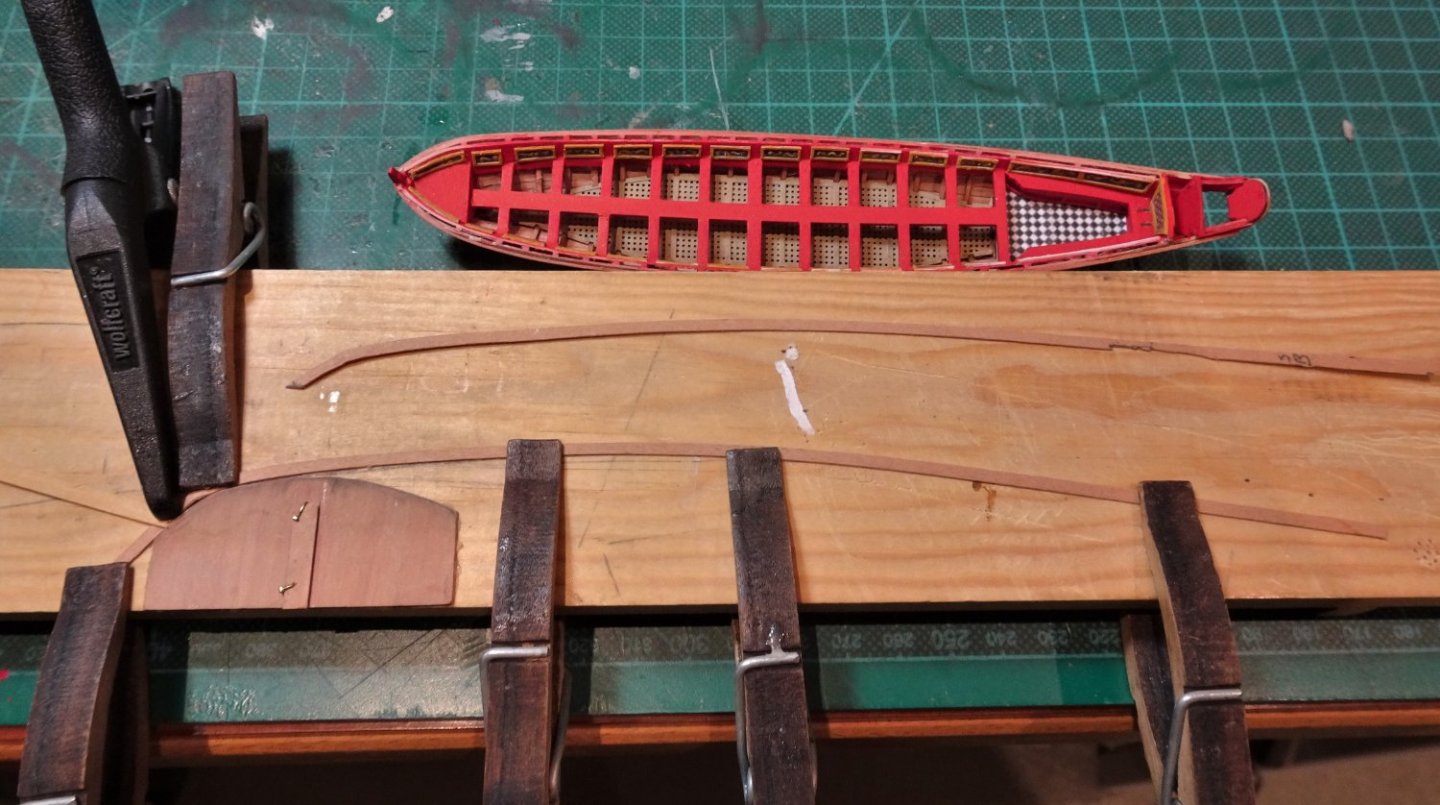
The oars.
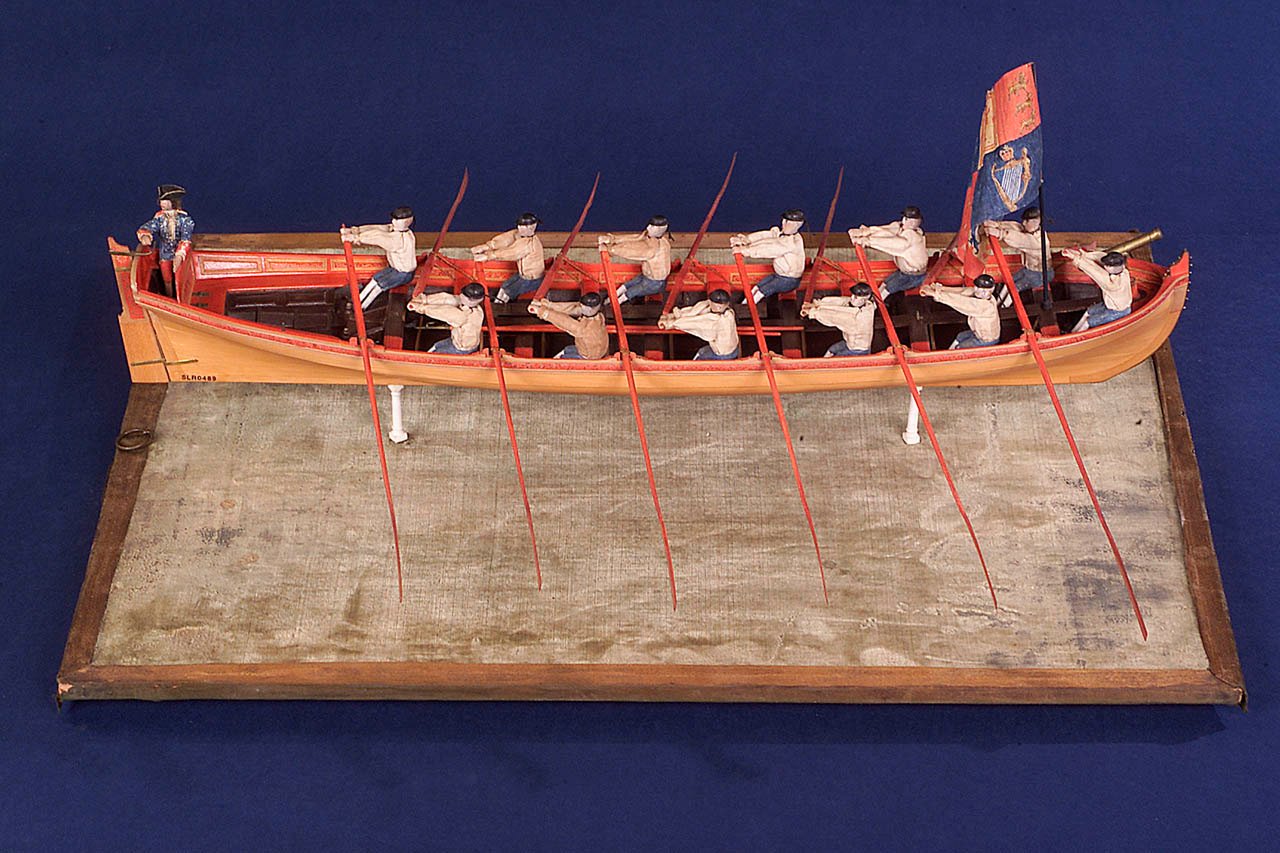
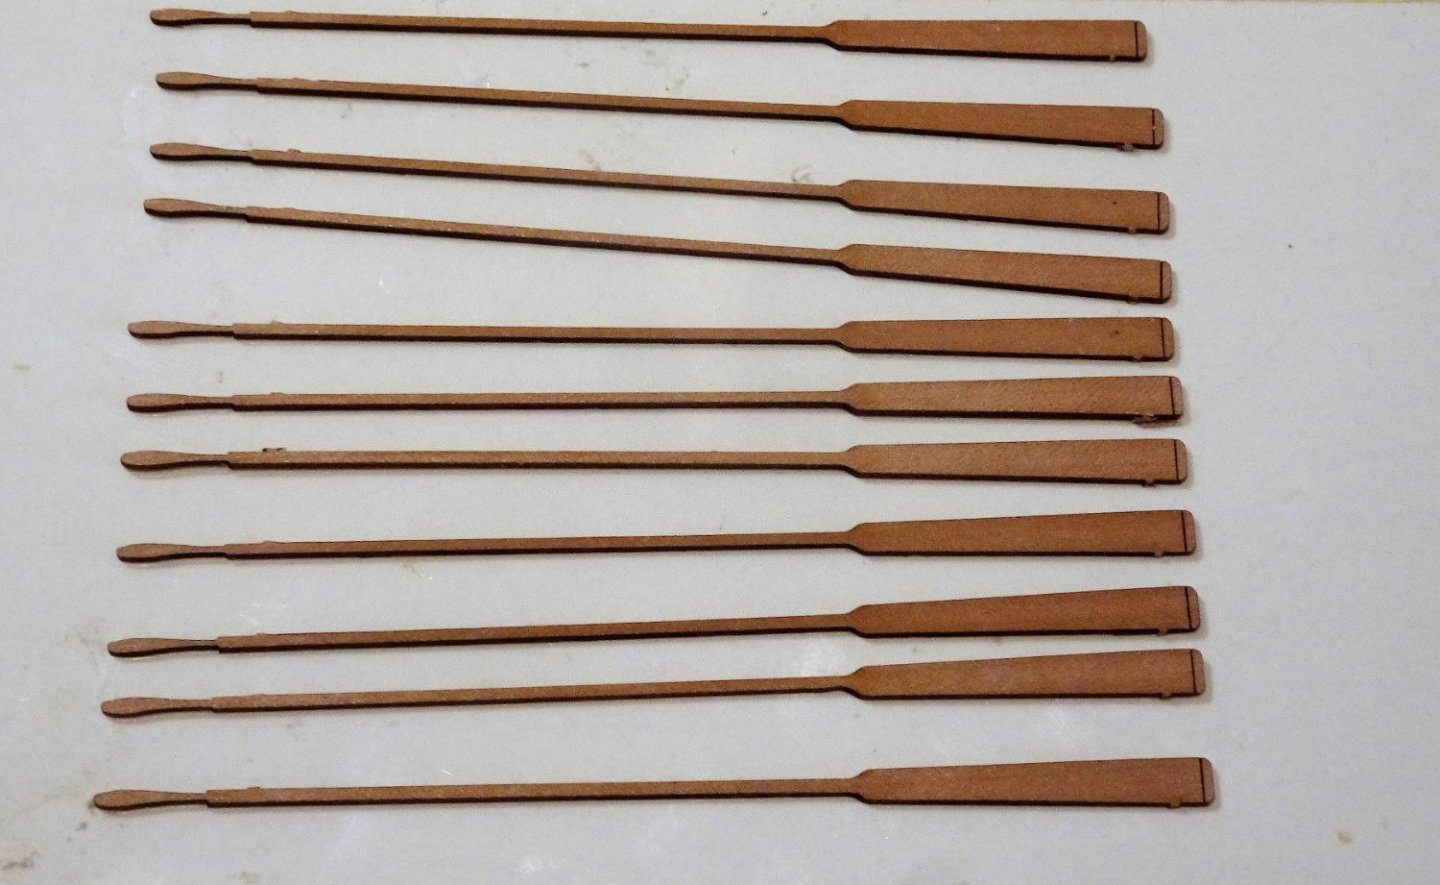
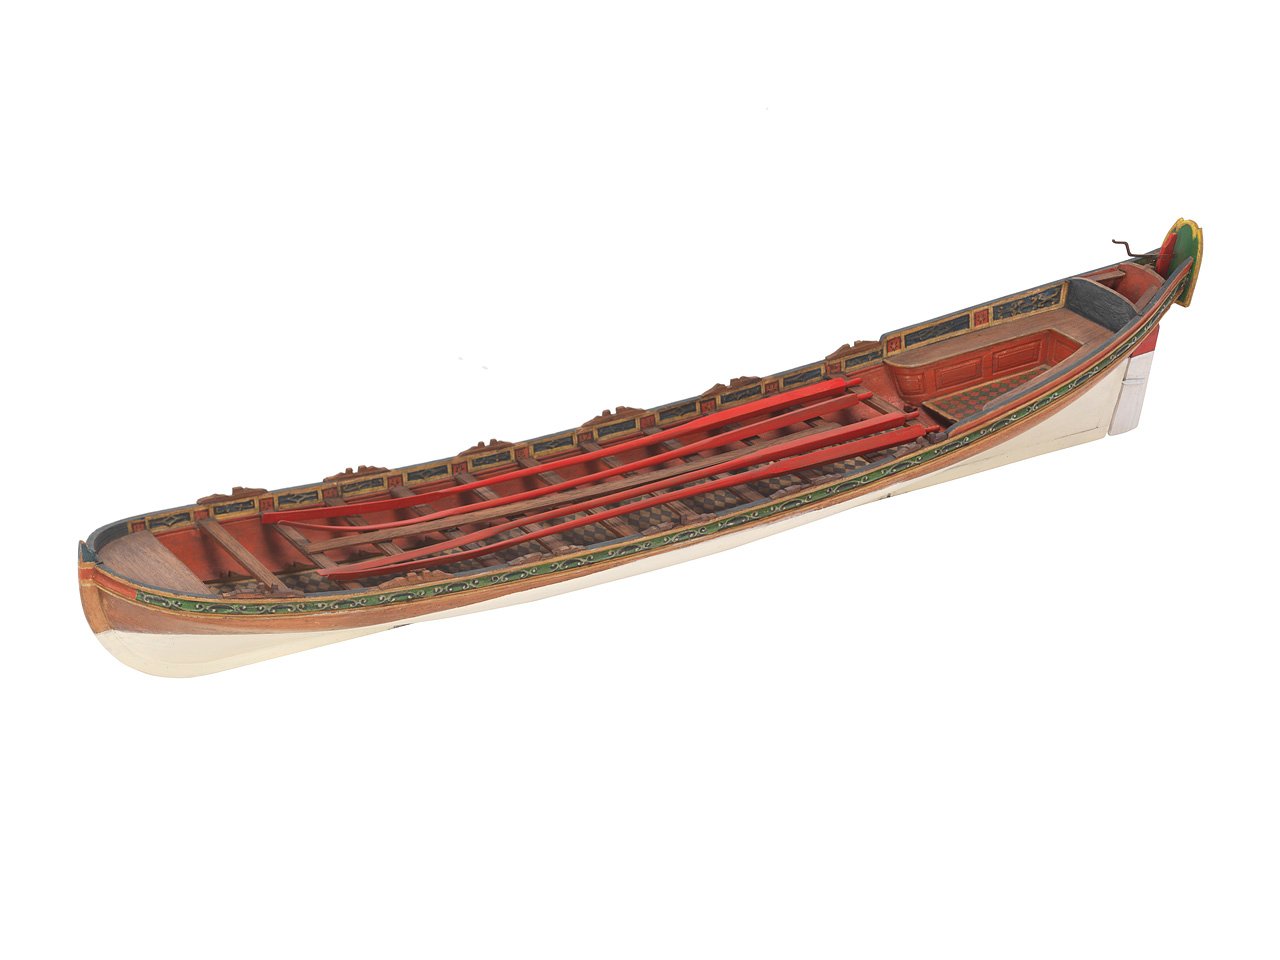
A set of twelve Pearwood oars are provided in the kit. These are a scale 74mm long equating to a length of 15’6”.
However, the kit arrangement is set up for double banking, so the oars would be shorter than those used for single banking.
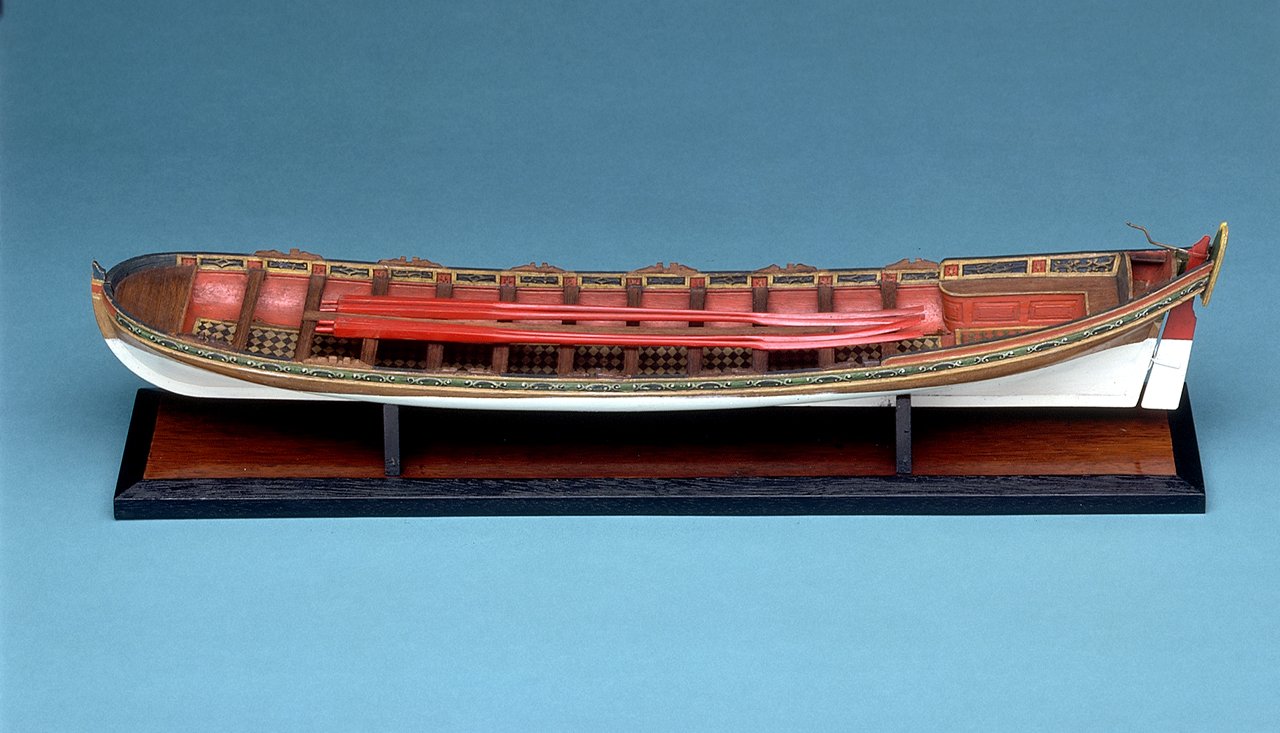
The contemporary model in the NMM gives a good visual impression of the oar/boat length relationship.
On this basis the kit oars should be in the order of 90mm length with a loom of 22mm.
9689
The provided oars are laser cut fare and suffer from the usual process simplification of being flat in profile, lacking the round of the shaft and the swell of the looms.
.jpg.afd8231fcb1a8717d195956774f75d90.jpg)
The above photo gives the correct configuration, but a lot easier to do at 1:24 scale.
.thumb.JPG.d58d4703ff79a70515c89bf041b27a38.JPG)
9701(3)
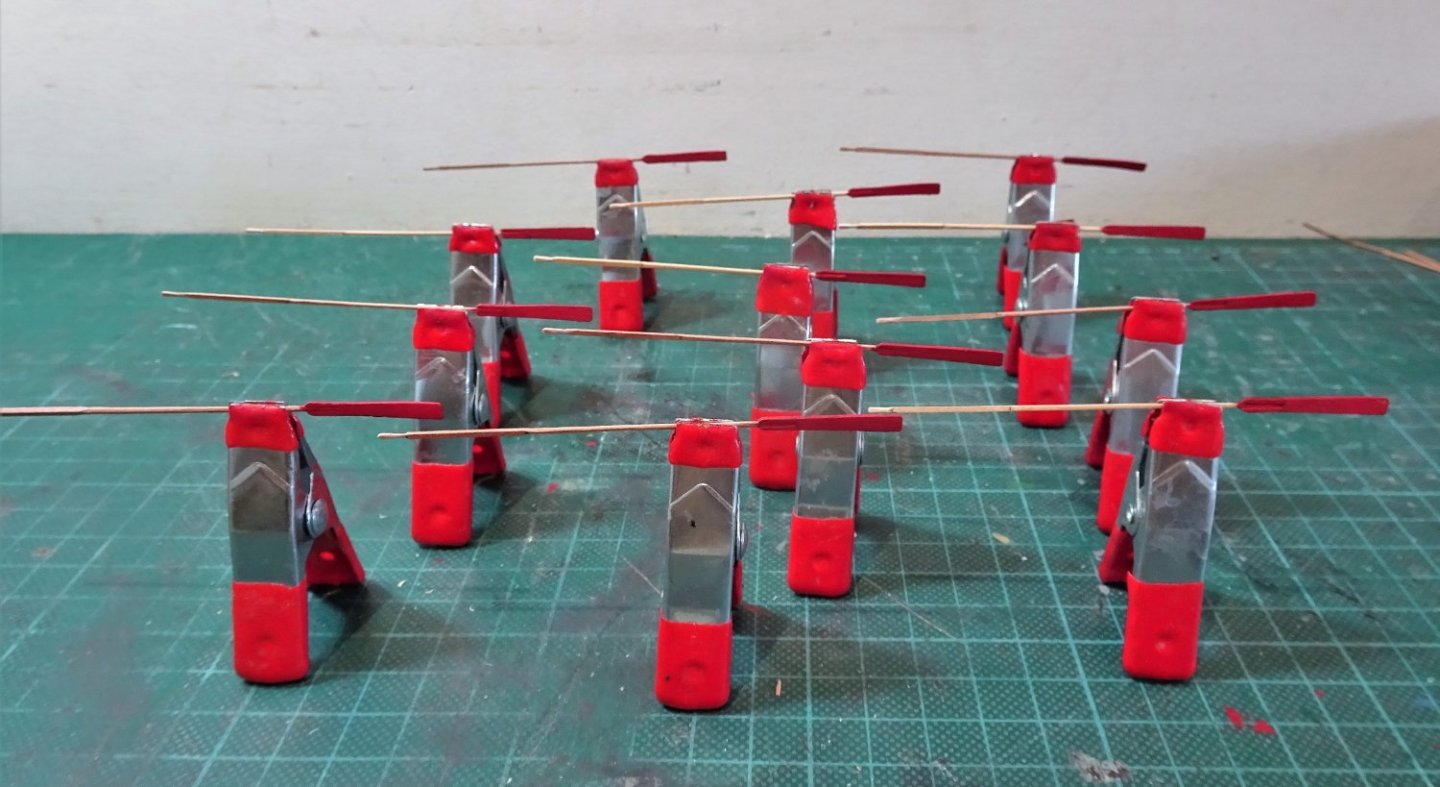
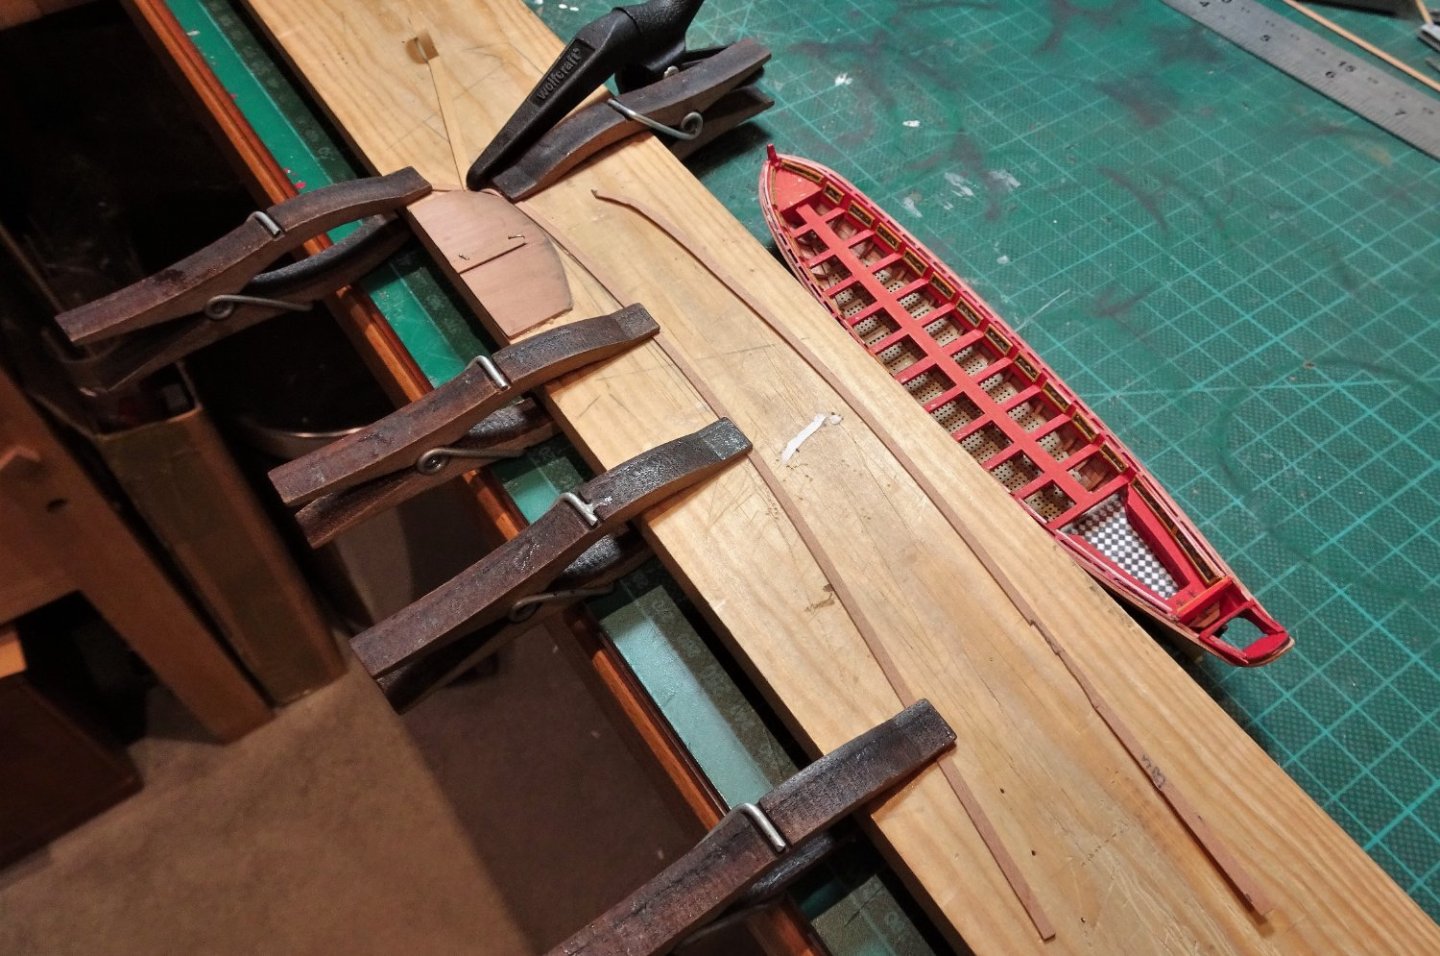
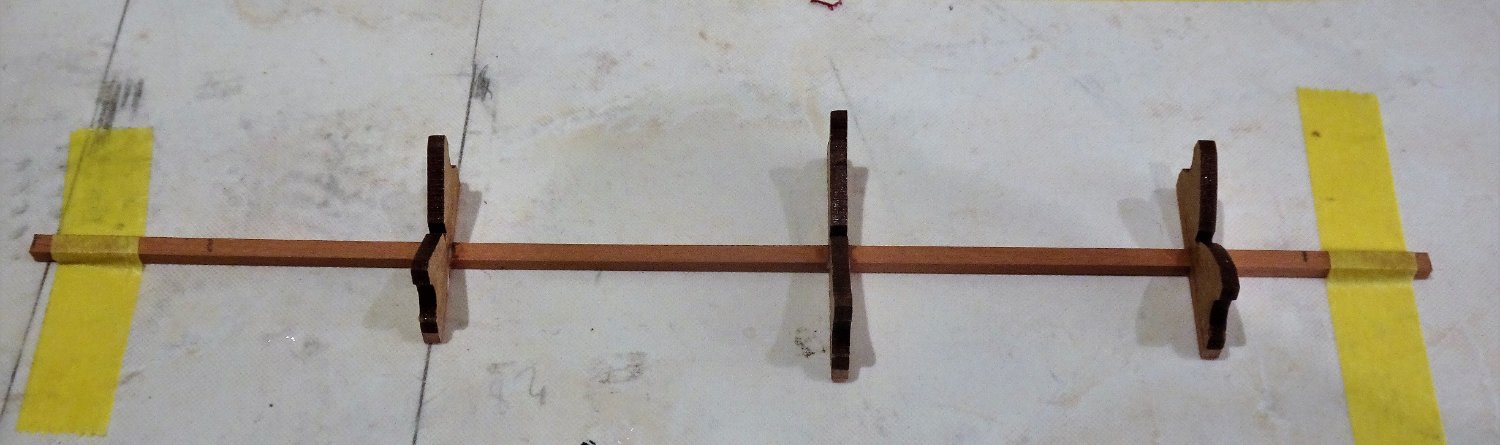
It is difficult to lengthen short oars, more trouble than its worth, so the shafts will need to be scratched, altho’ I can use the blades from the kit offering.
.thumb.JPG.aca5a34e51554dd8aa73f5503ea45578.JPG)
9697(2)
Imm square stock is used for the shafts, the sections are marked, the shaft rounded below the looms, and the blade is notched to take the shaft.
The blade requires thinning down towards the tip and a slight curve induced.
Very soft hands are required, the risk of breakage is high.
.thumb.JPG.752ef81b0c29ac23ad8eab9e56956582.JPG)
9710(2)
.thumb.JPG.3face494e1400c6034b94a47ccc2e5e5.JPG)
7912(2)
The relative length difference is apparent in these photos.
.thumb.JPG.1c2ec582778df51a923ebff52ecc2fce.JPG)
9706(2)
A further eleven oars are now required to make the set.
B.E.
09/12/22
- gjdale, dunnock, whitejamest and 13 others
-
16
-
-
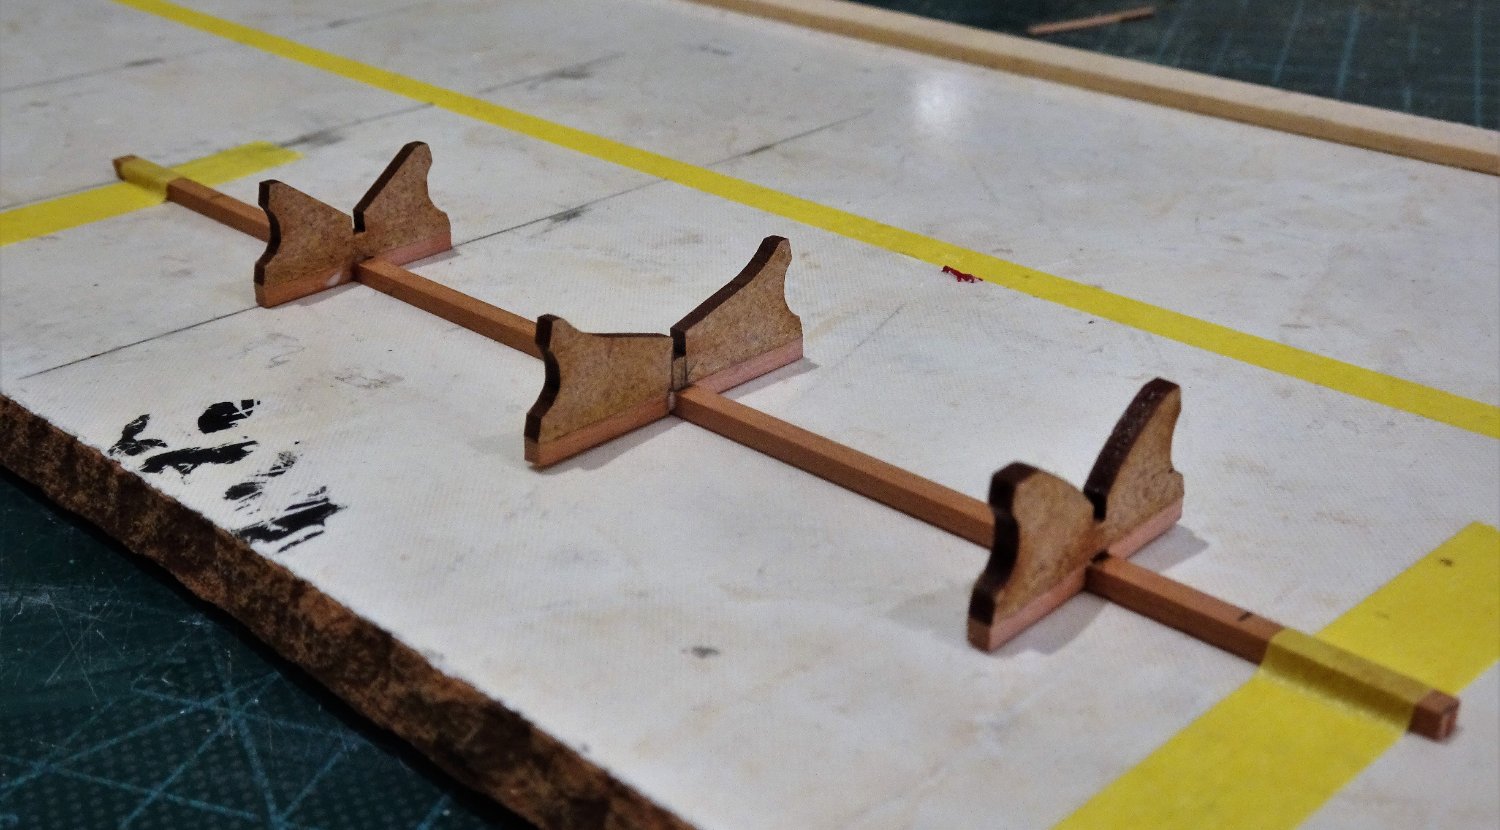
I think you're right Håkan, the mdf supports are a bit ugly, and I have plenty of thin sheet to make more delicate versions.
Looks like I will be re-visiting the display, but for the present it is oars that have my attention.
Regards,
B.E.
- Wintergreen, hollowneck and mtaylor
-
3
-
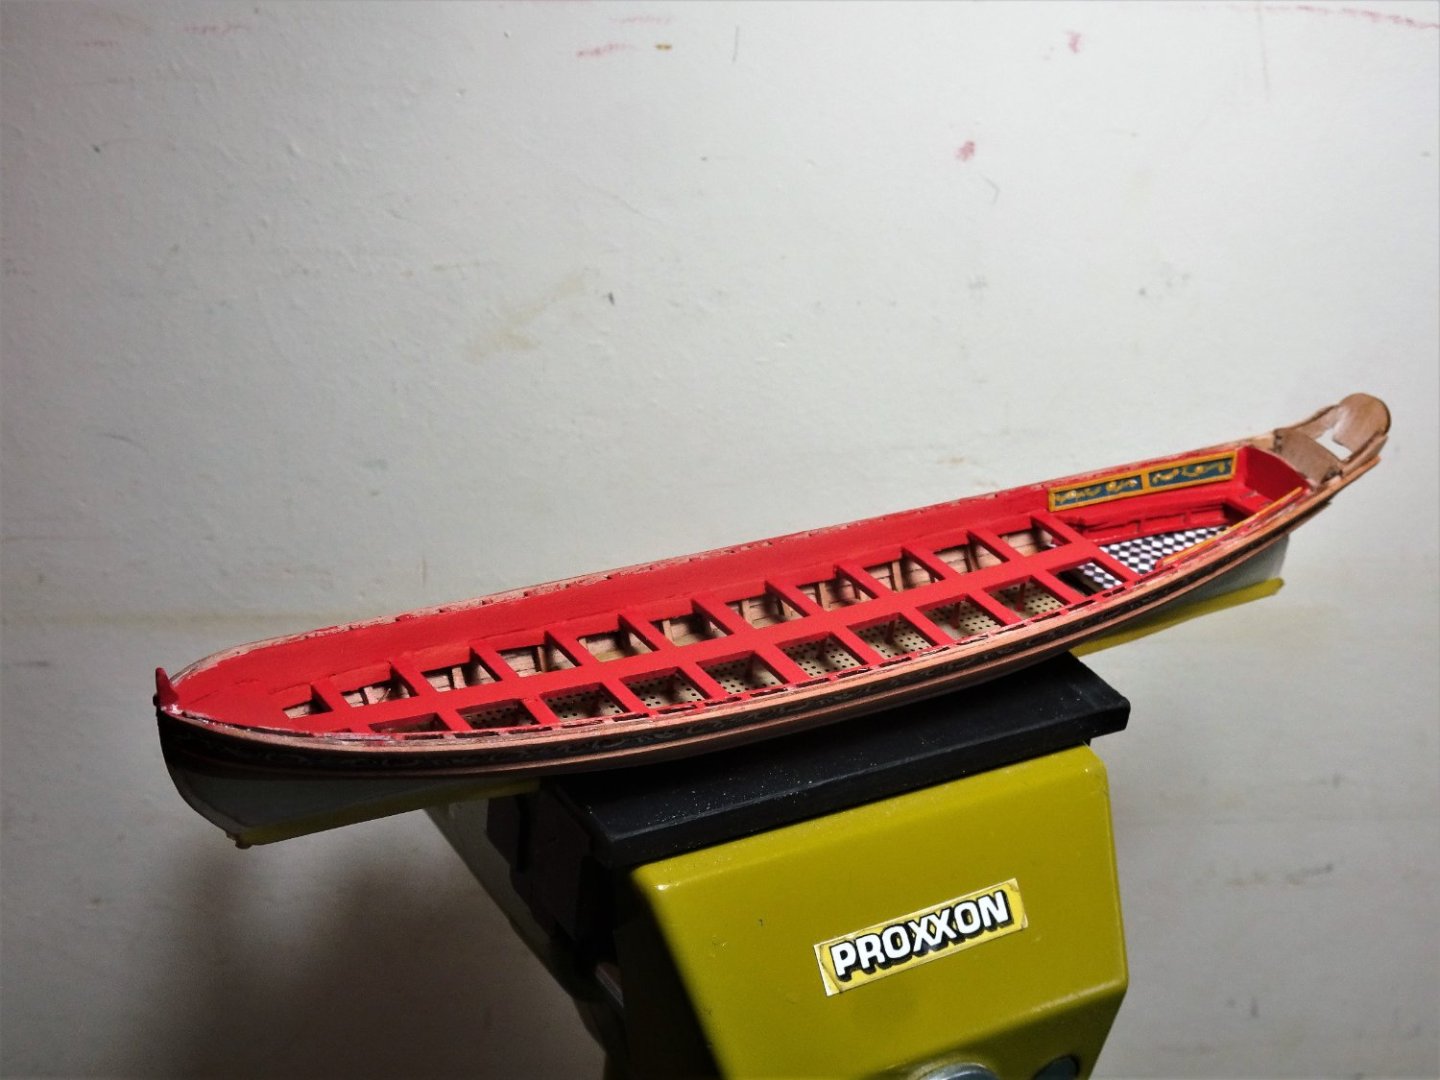
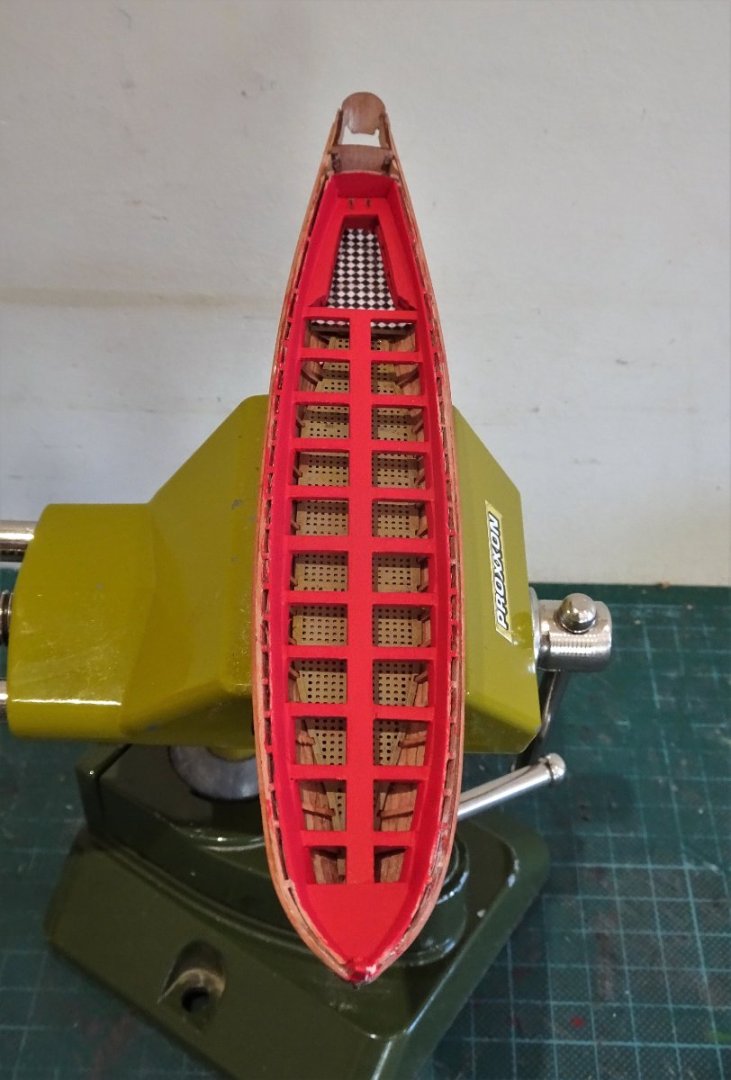
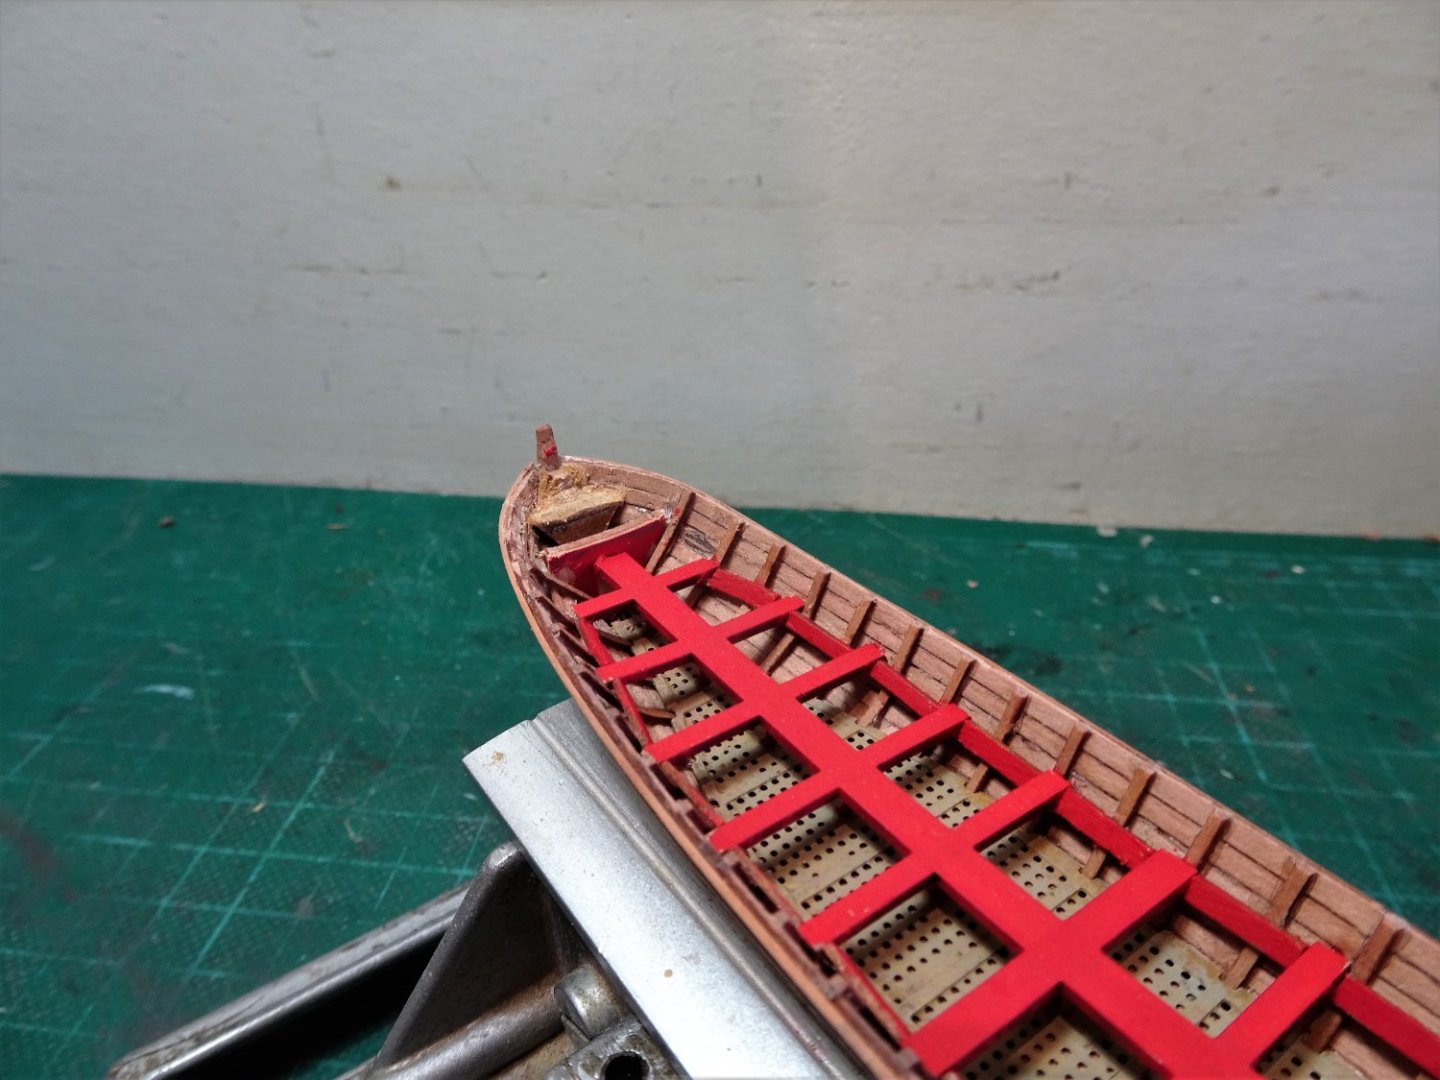
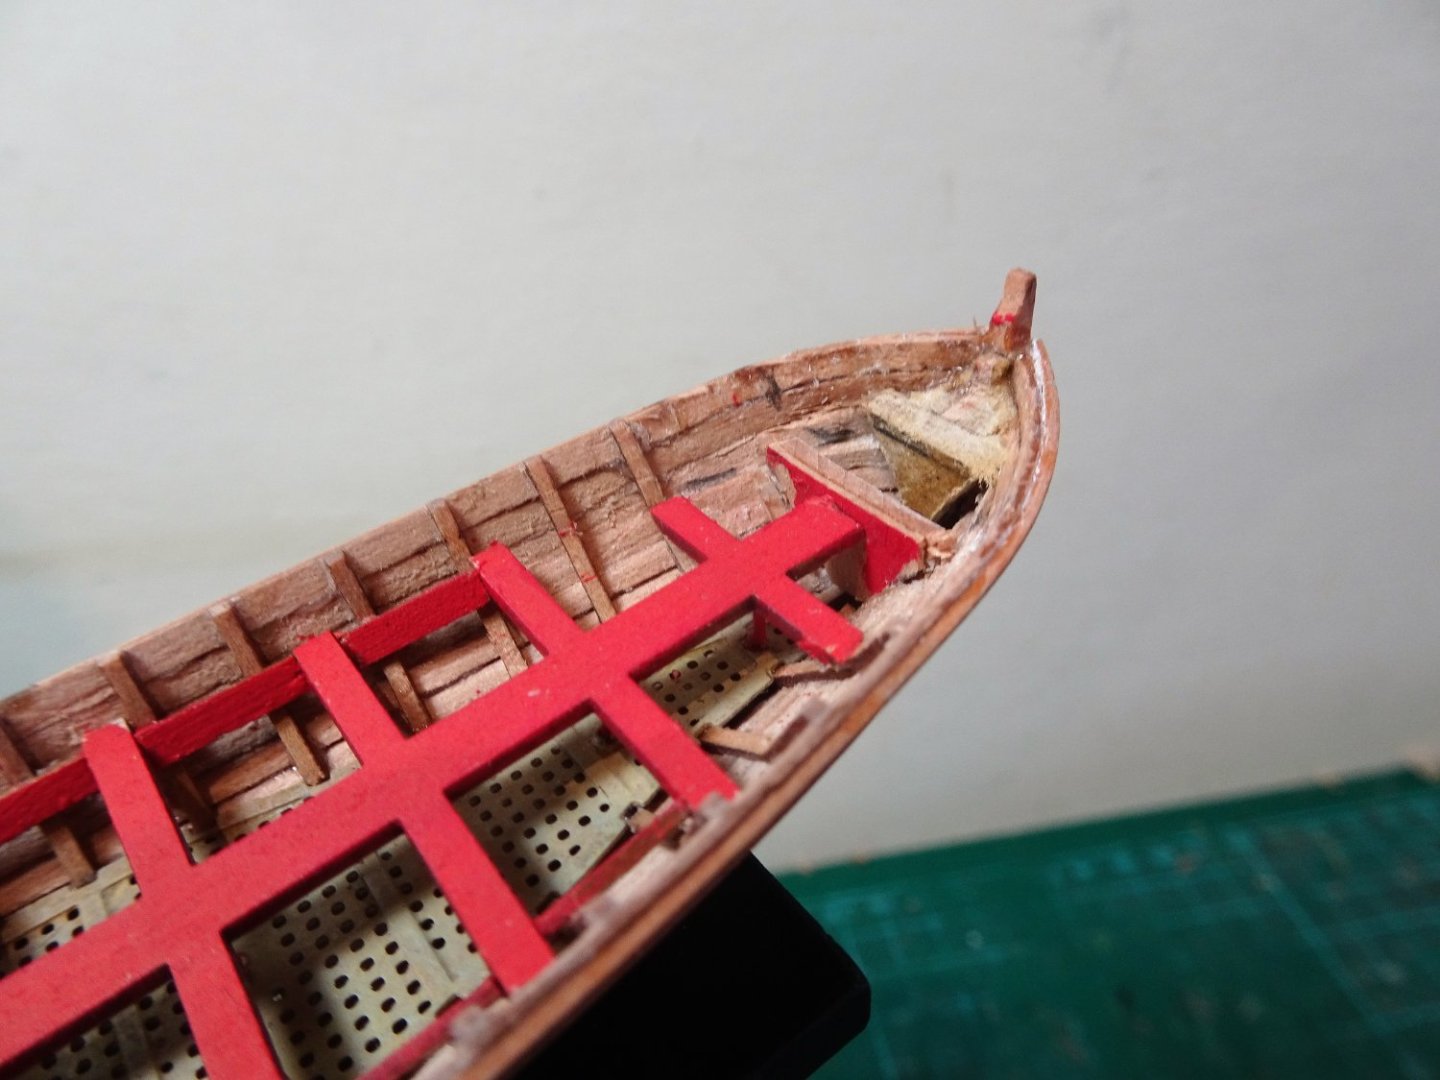
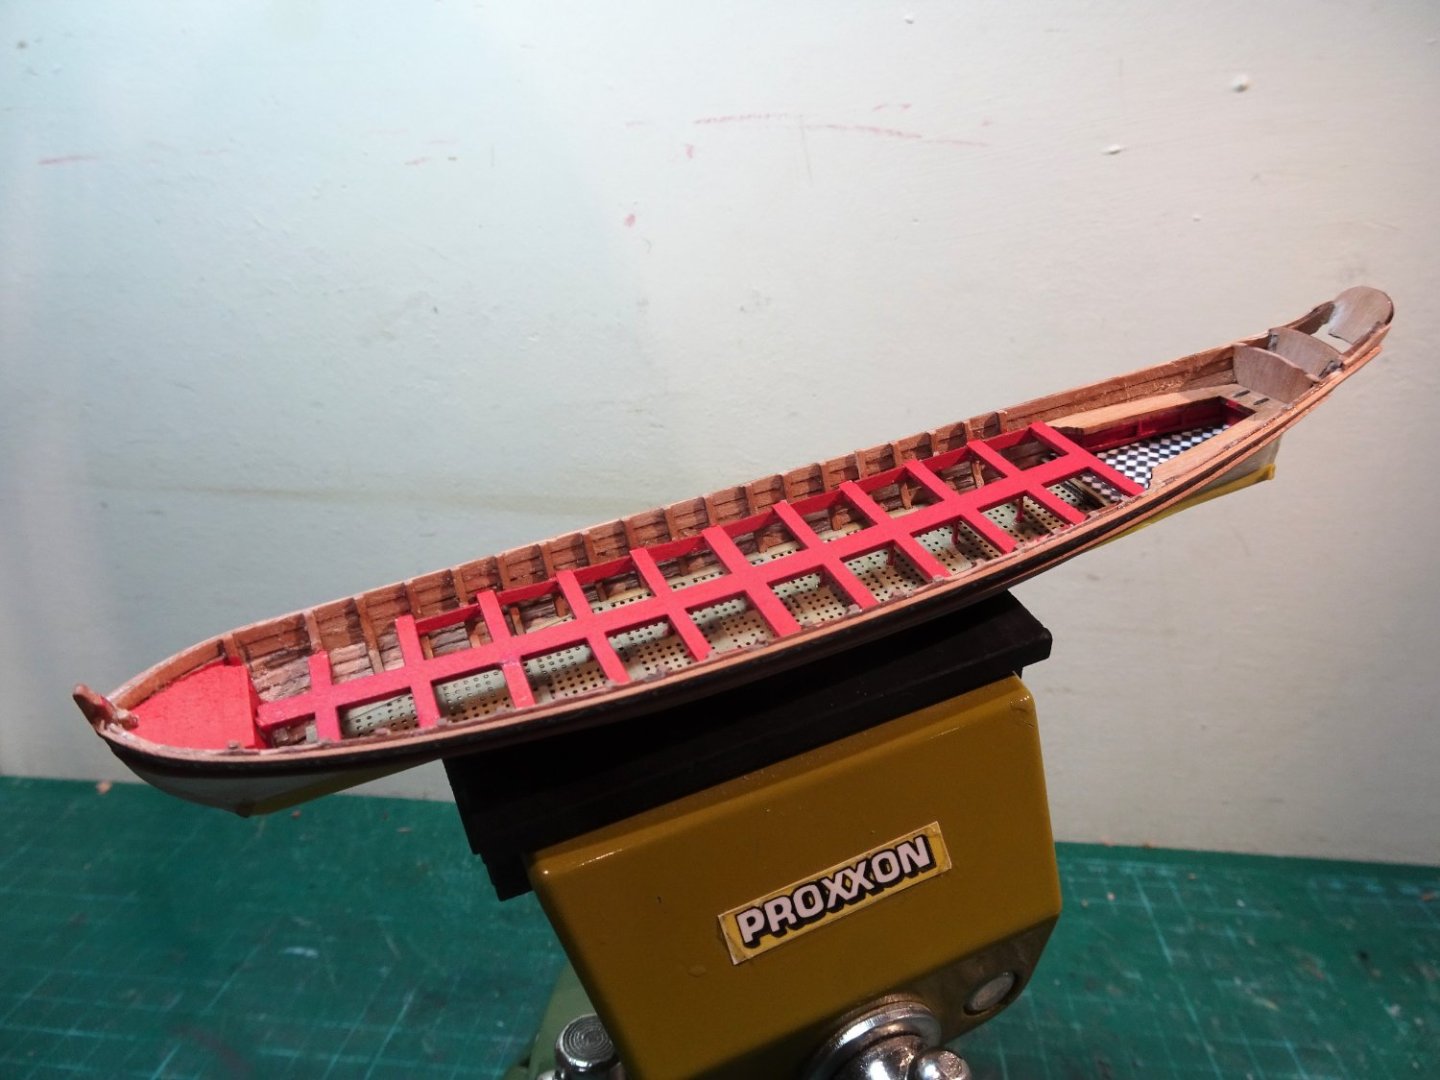
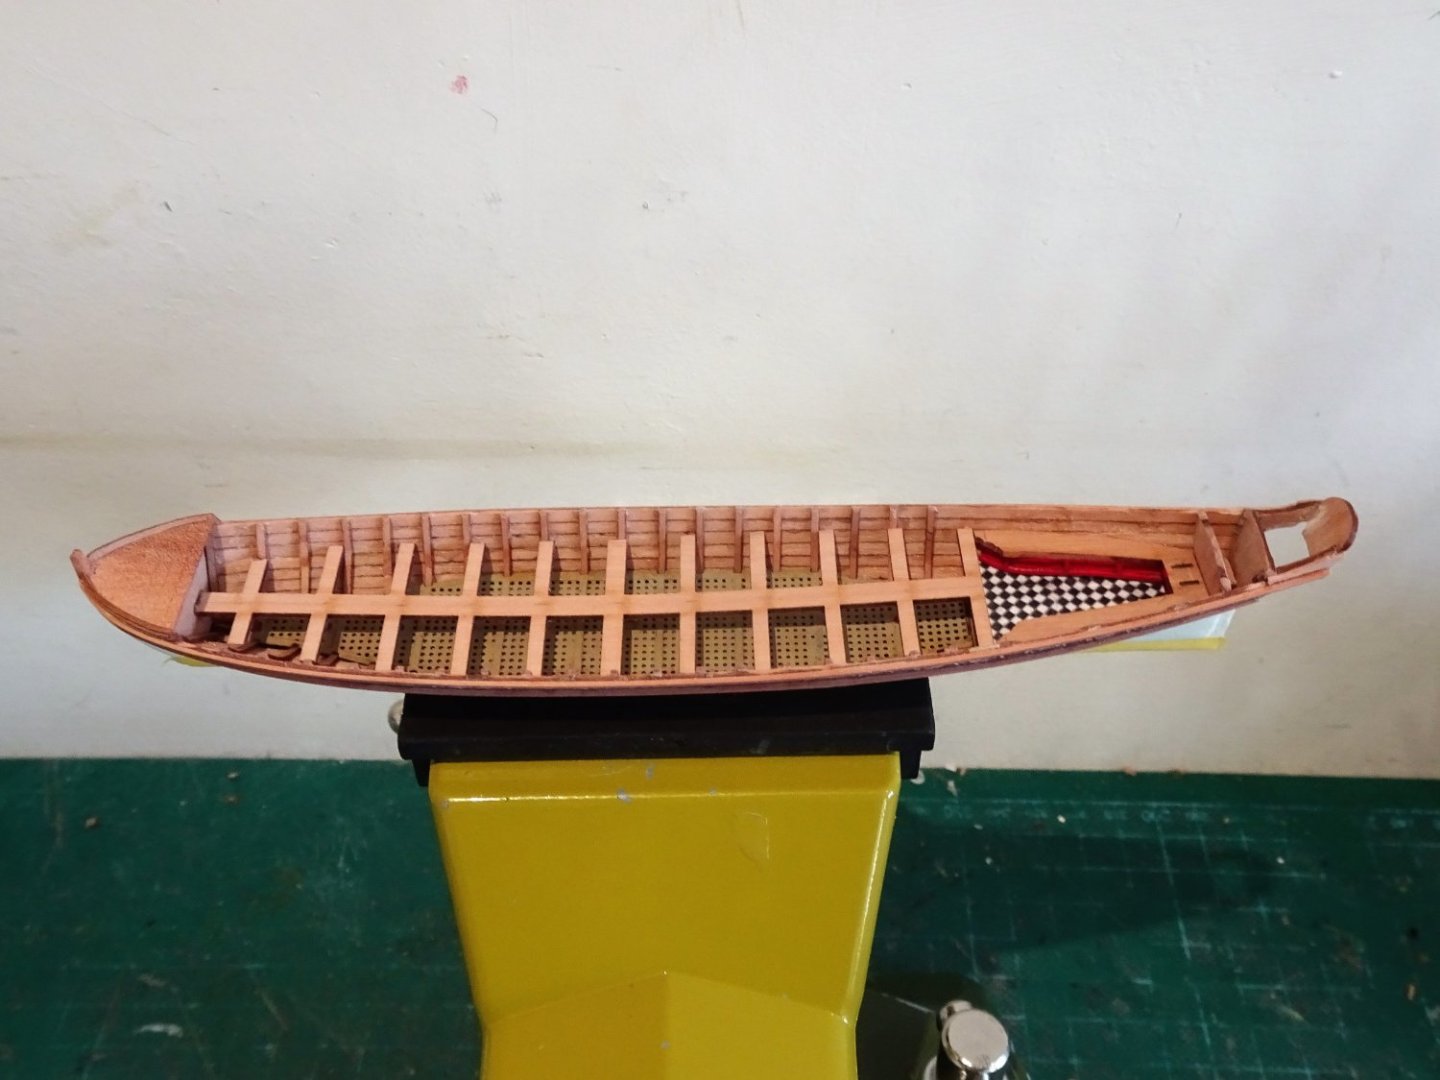
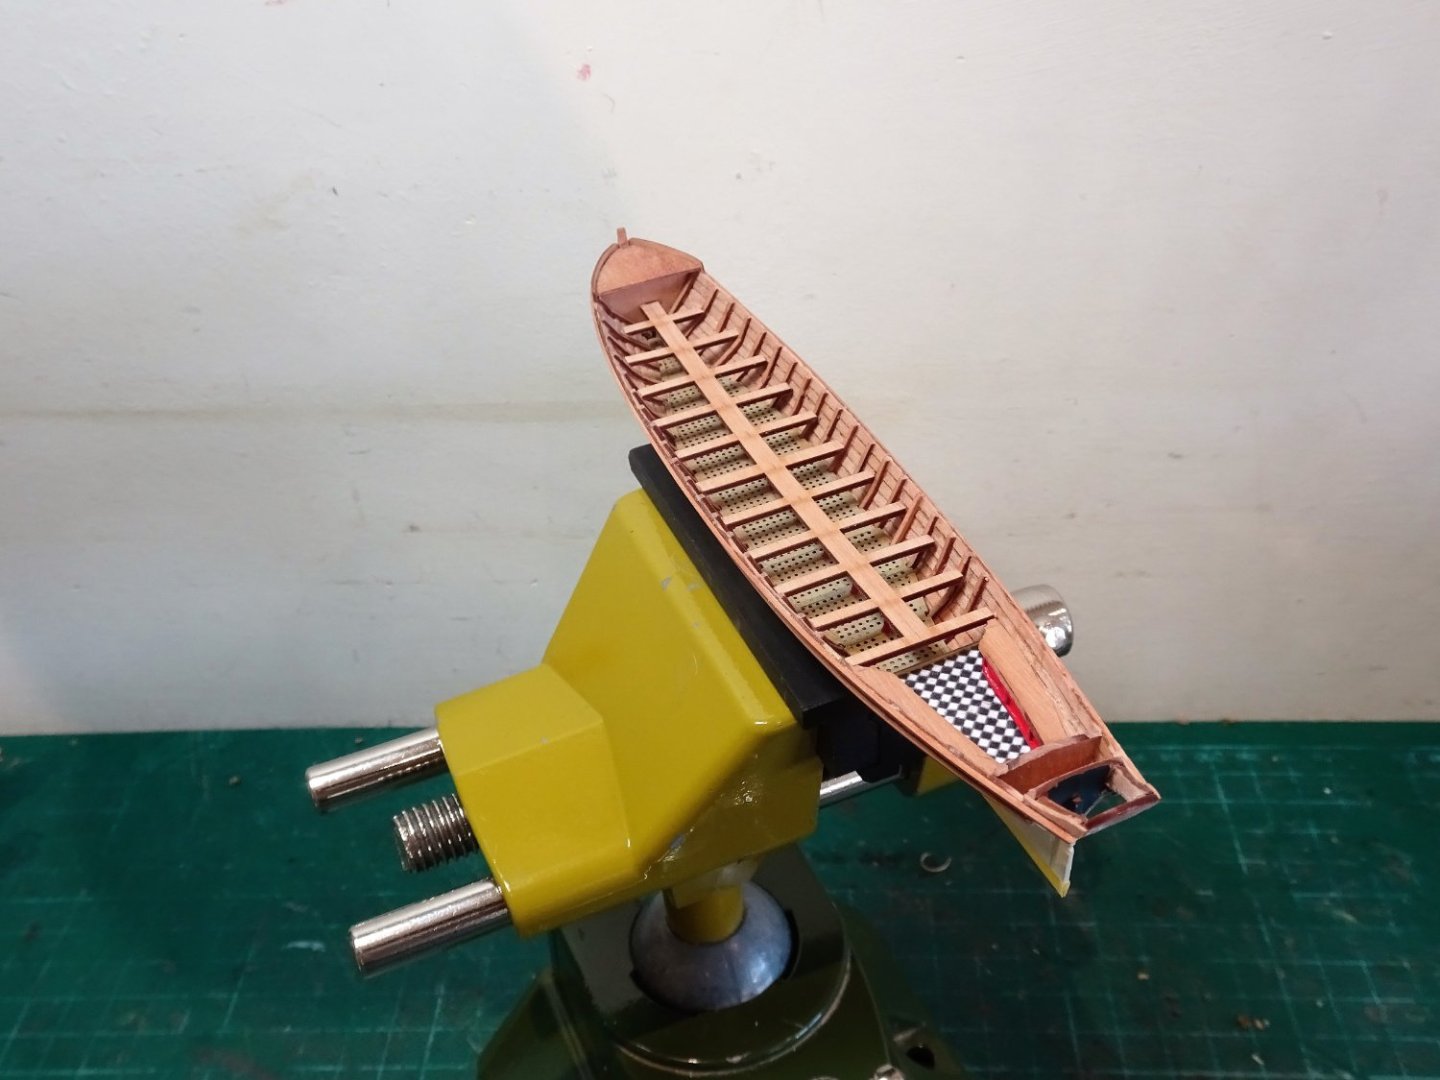
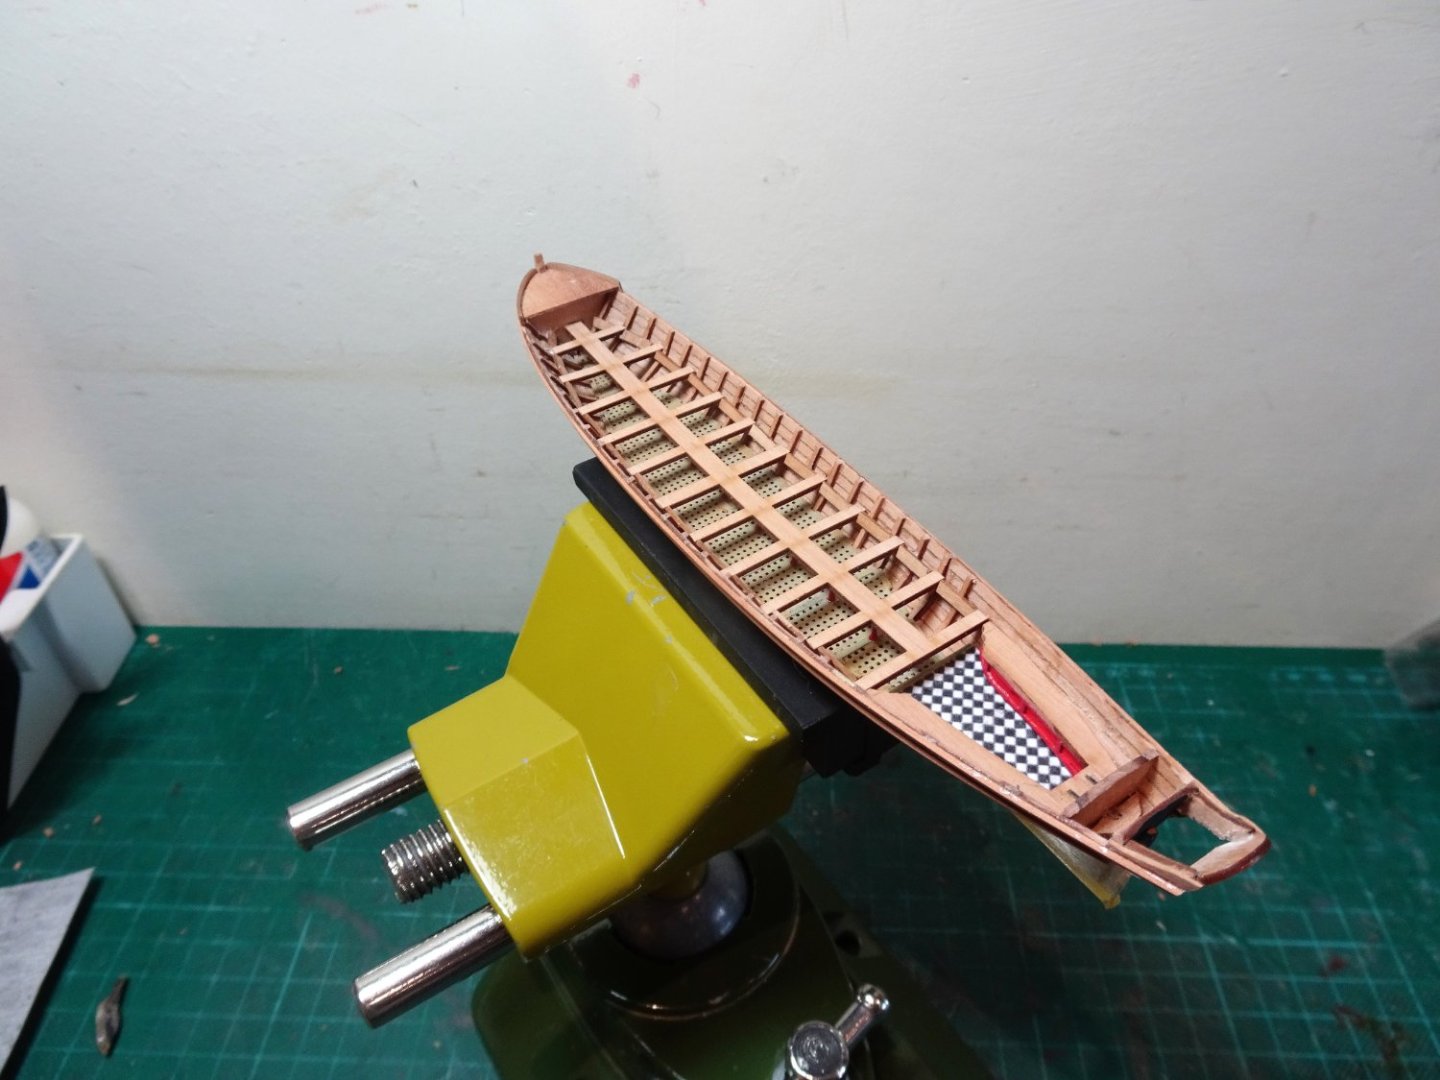
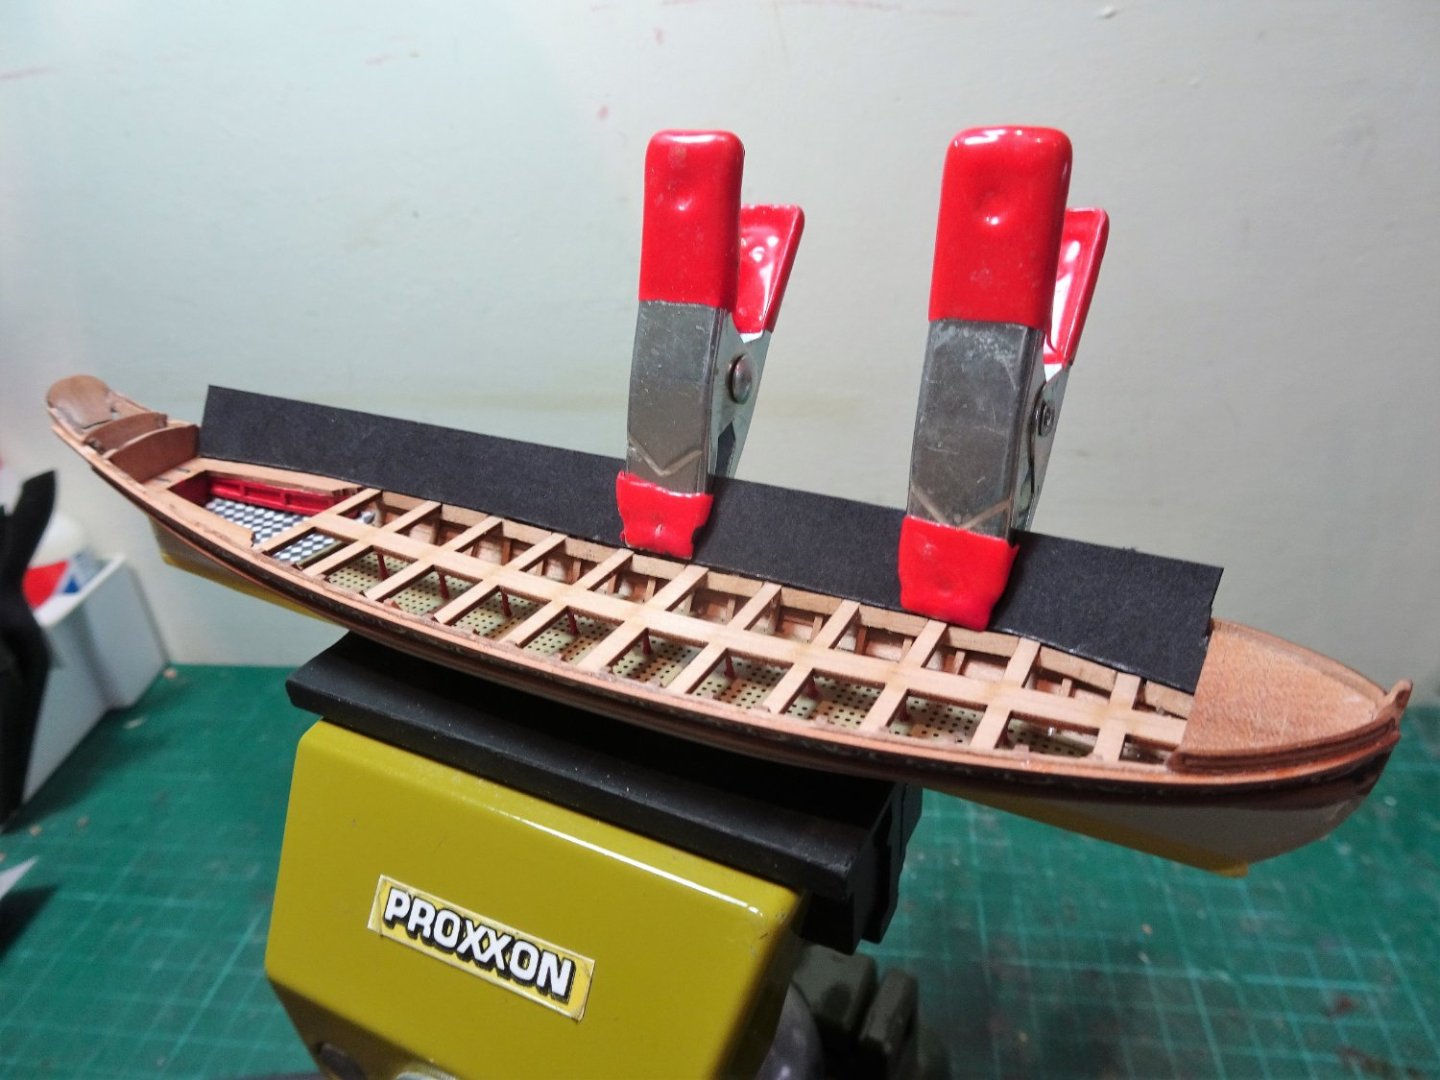
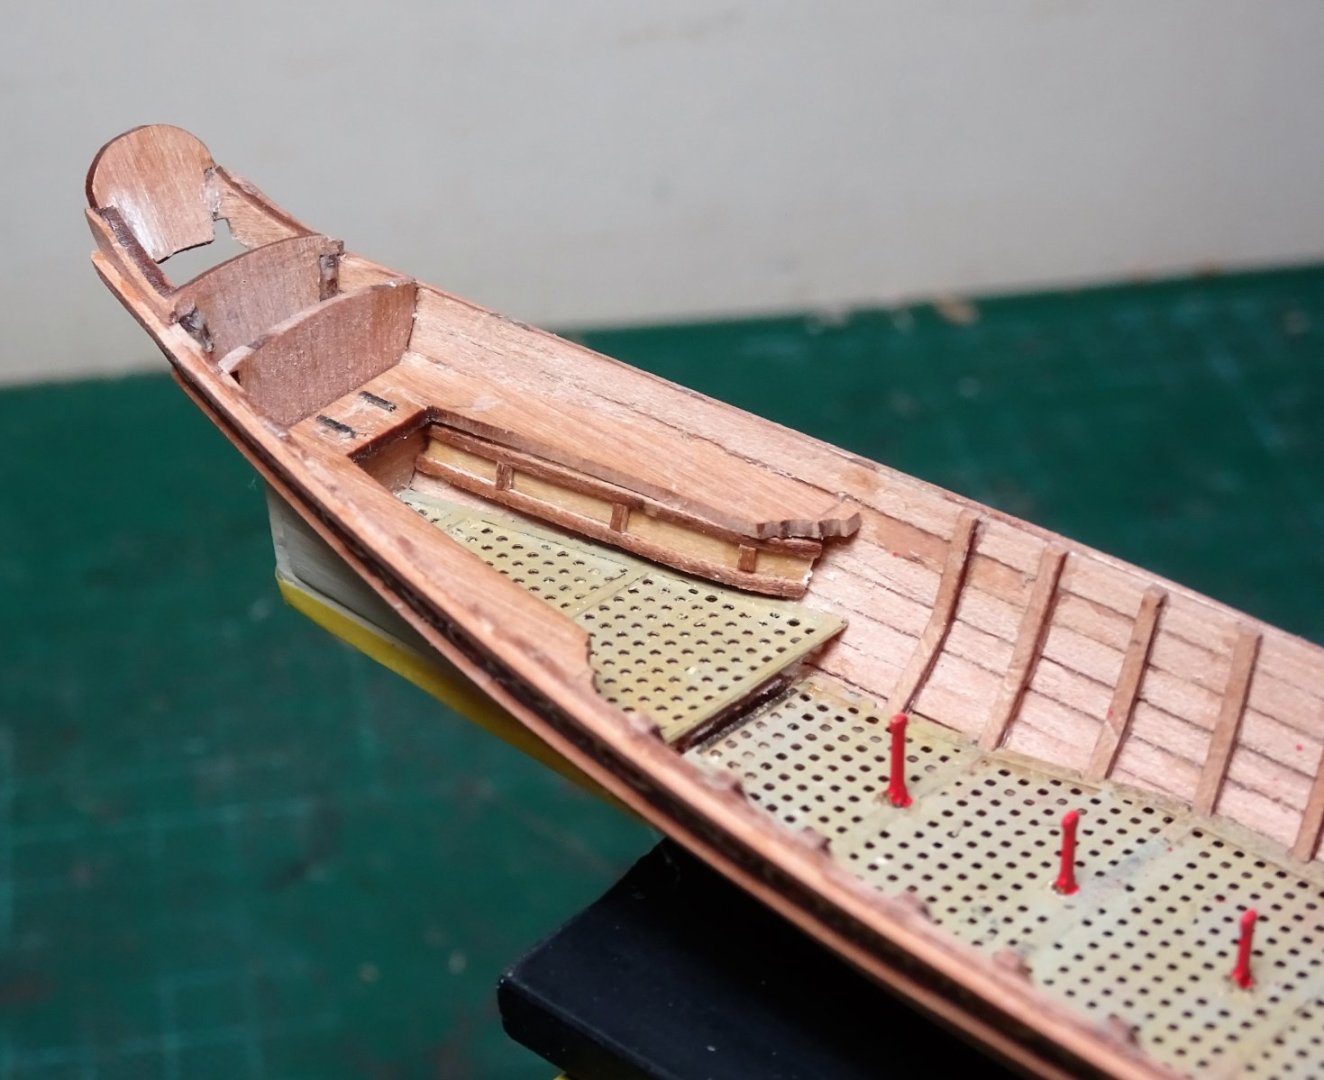
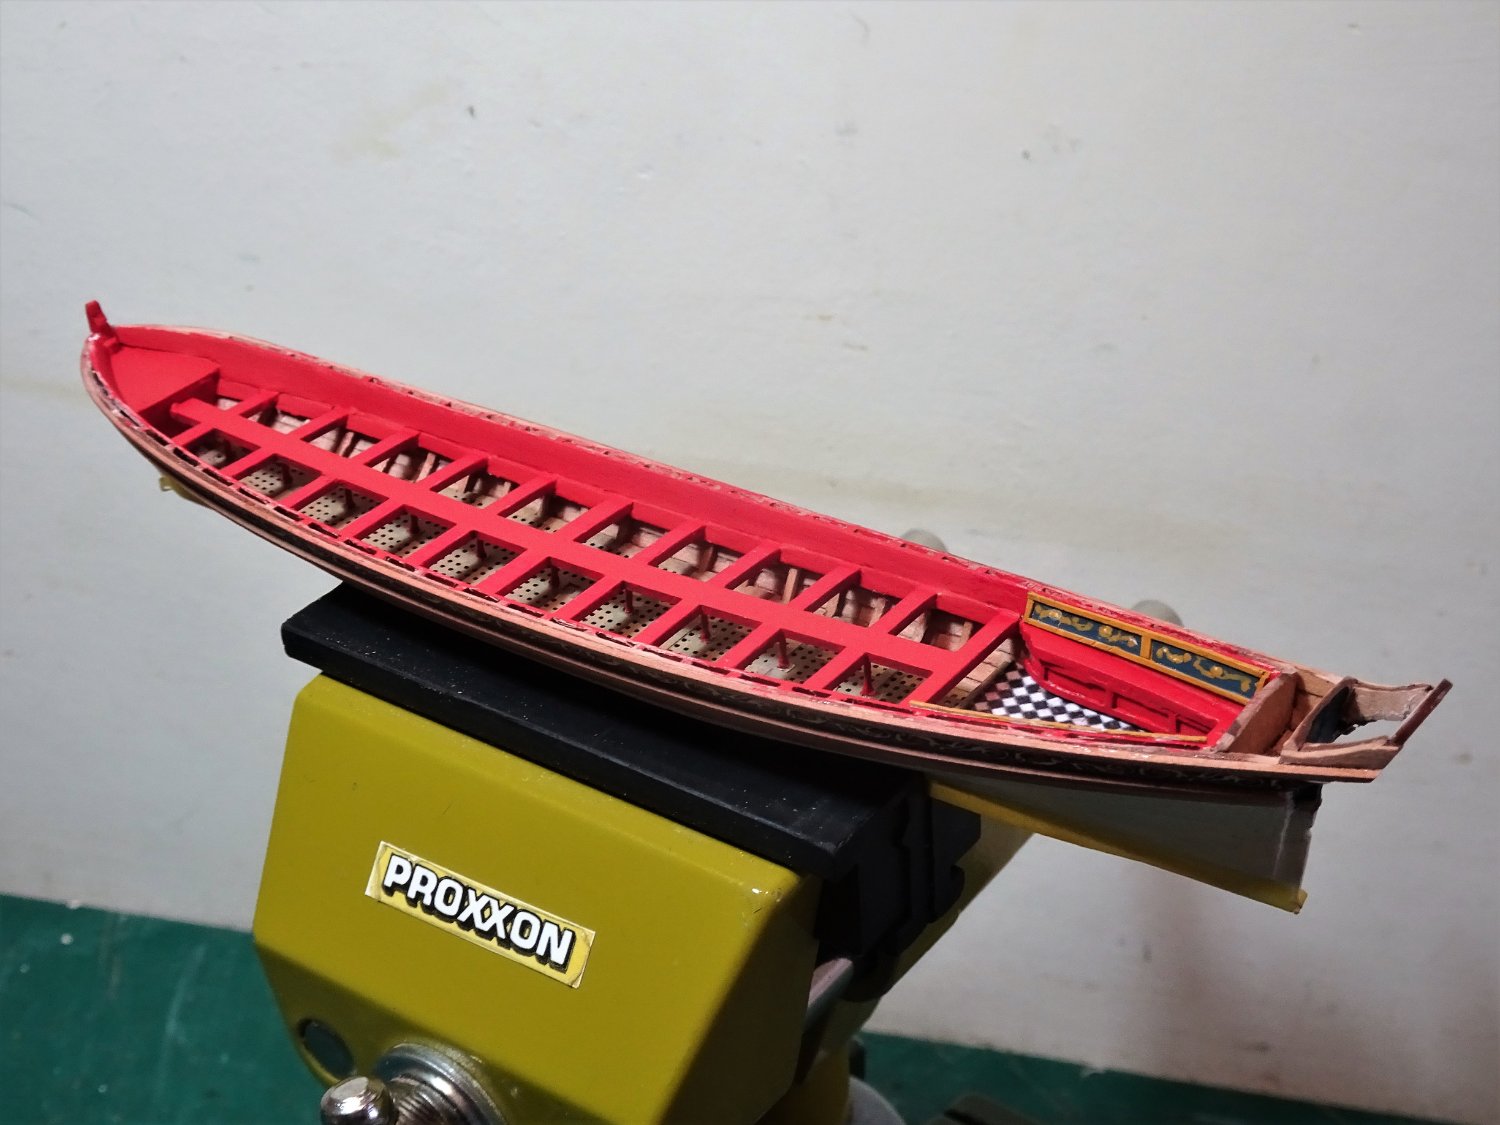
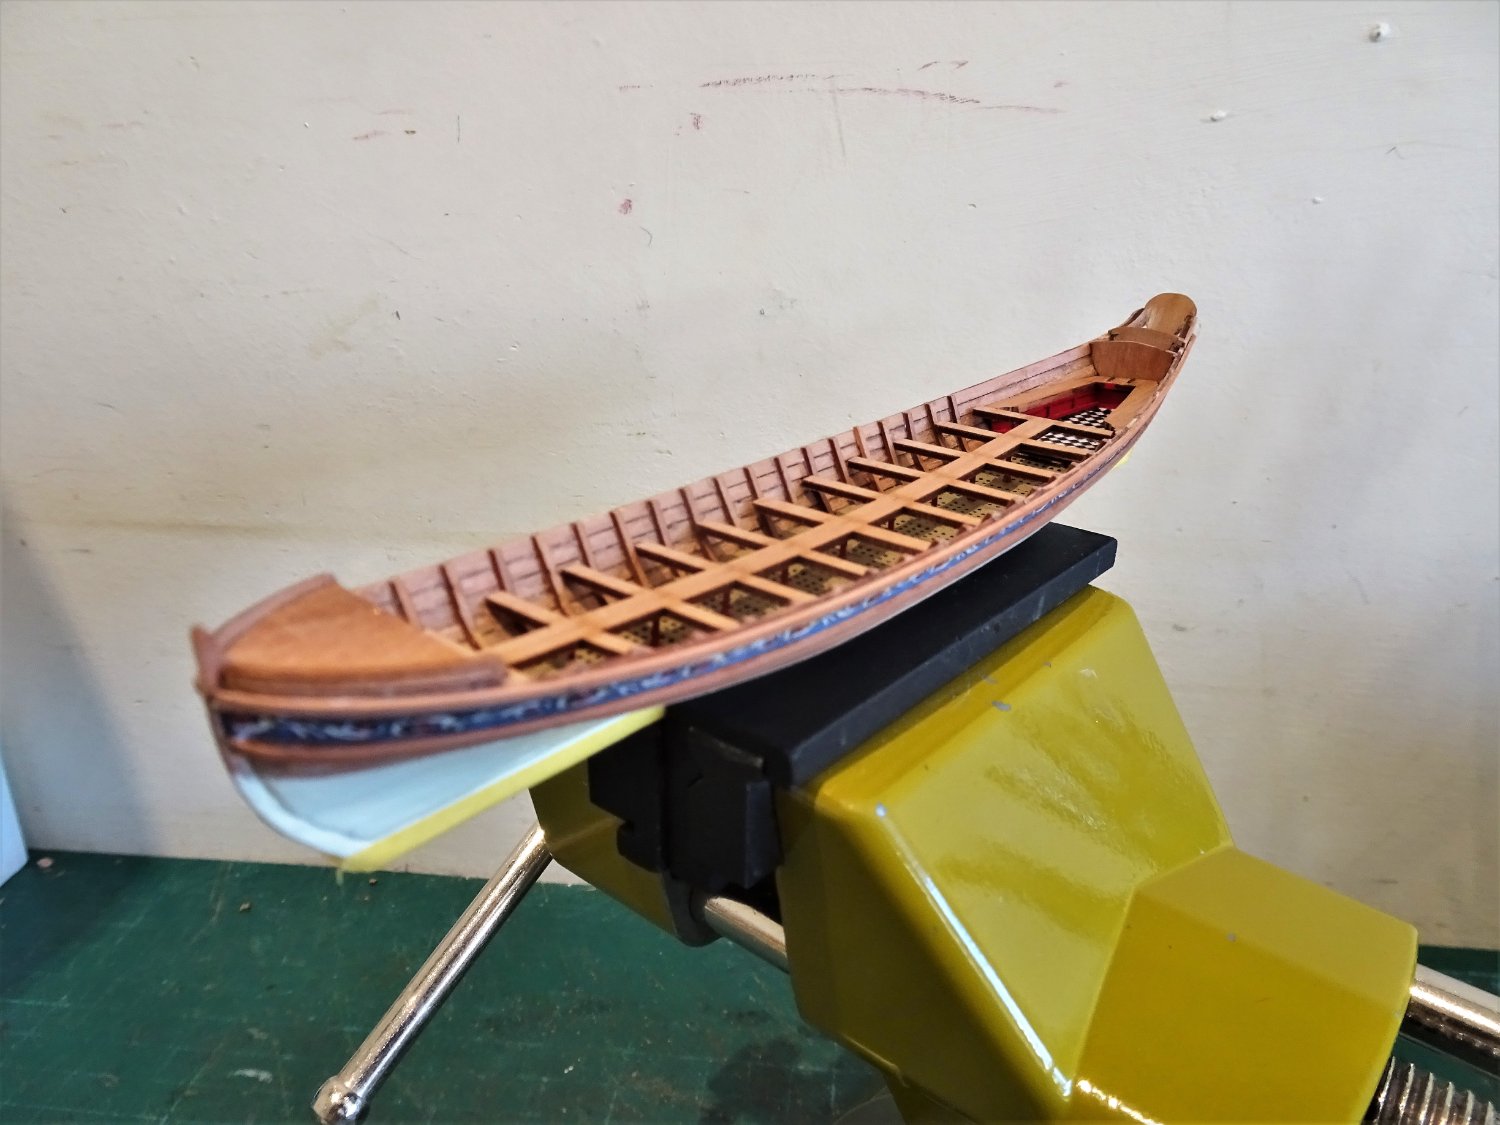
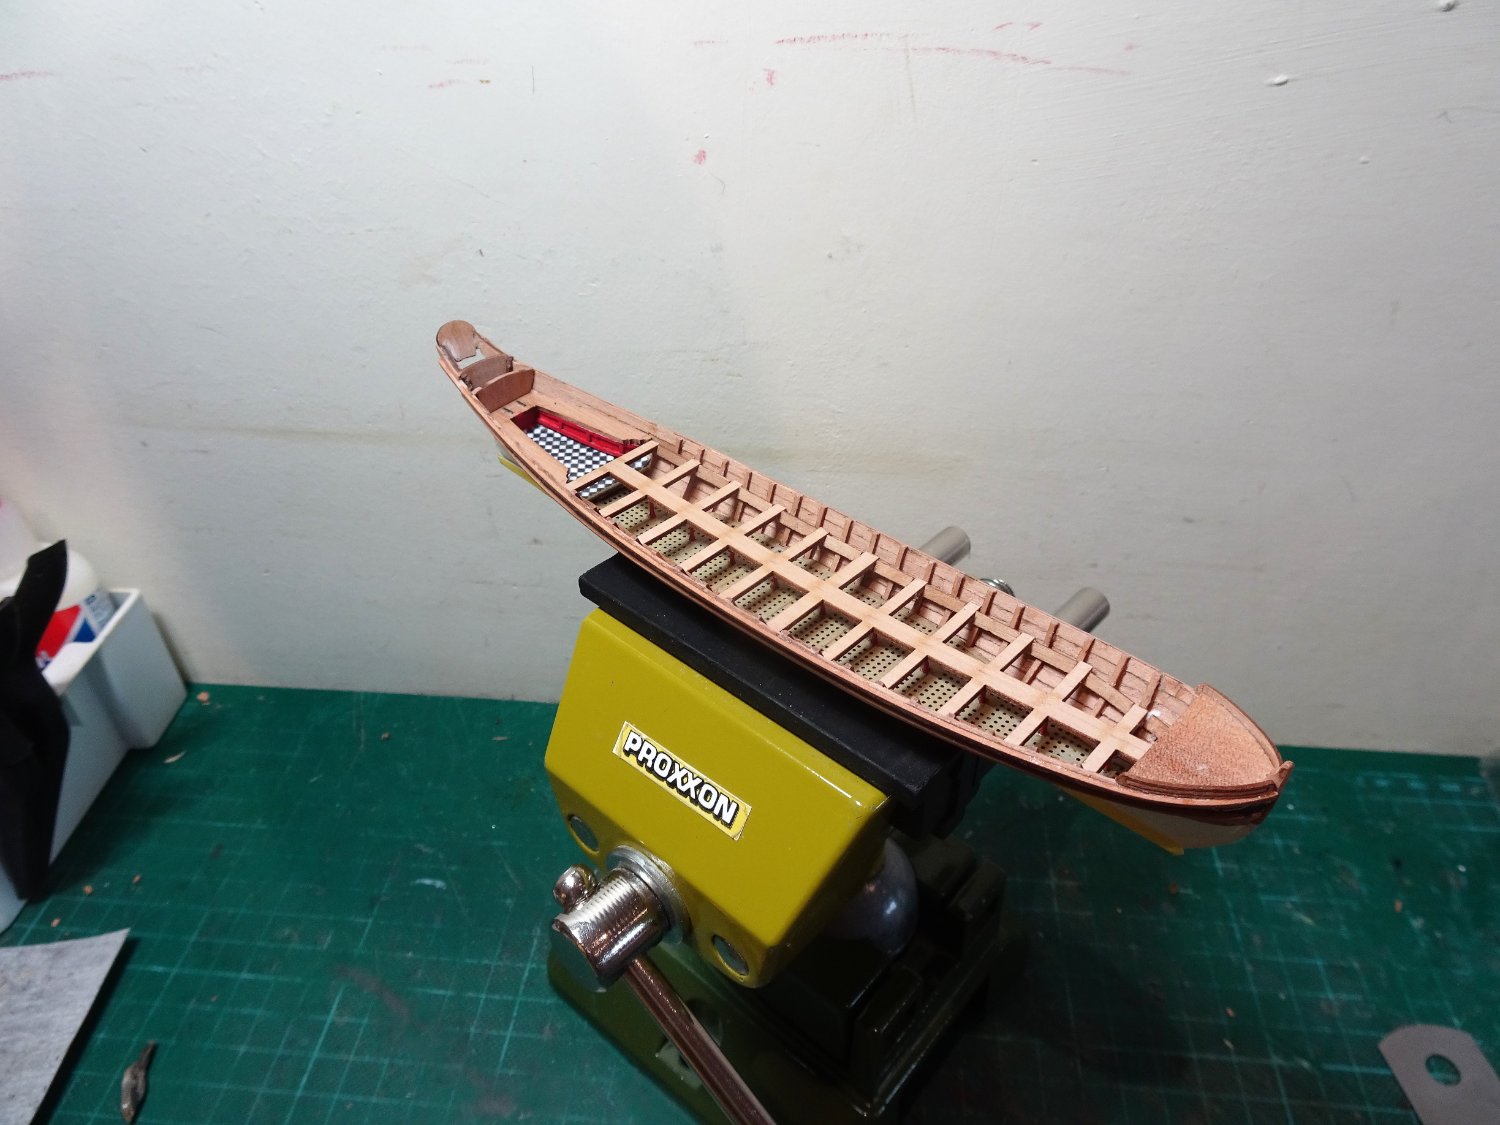
Post Eighteen
Looking at the Rudder.
.thumb.JPG.4058ddef24898f0db057101d2f76cbca.JPG)
9667(2)
The rudder is of brass etch with the straps moulded in. There is a suggestion to pad out the thickness a little using thin spare fret, which I did, the rudder is too thin otherwise.
9676
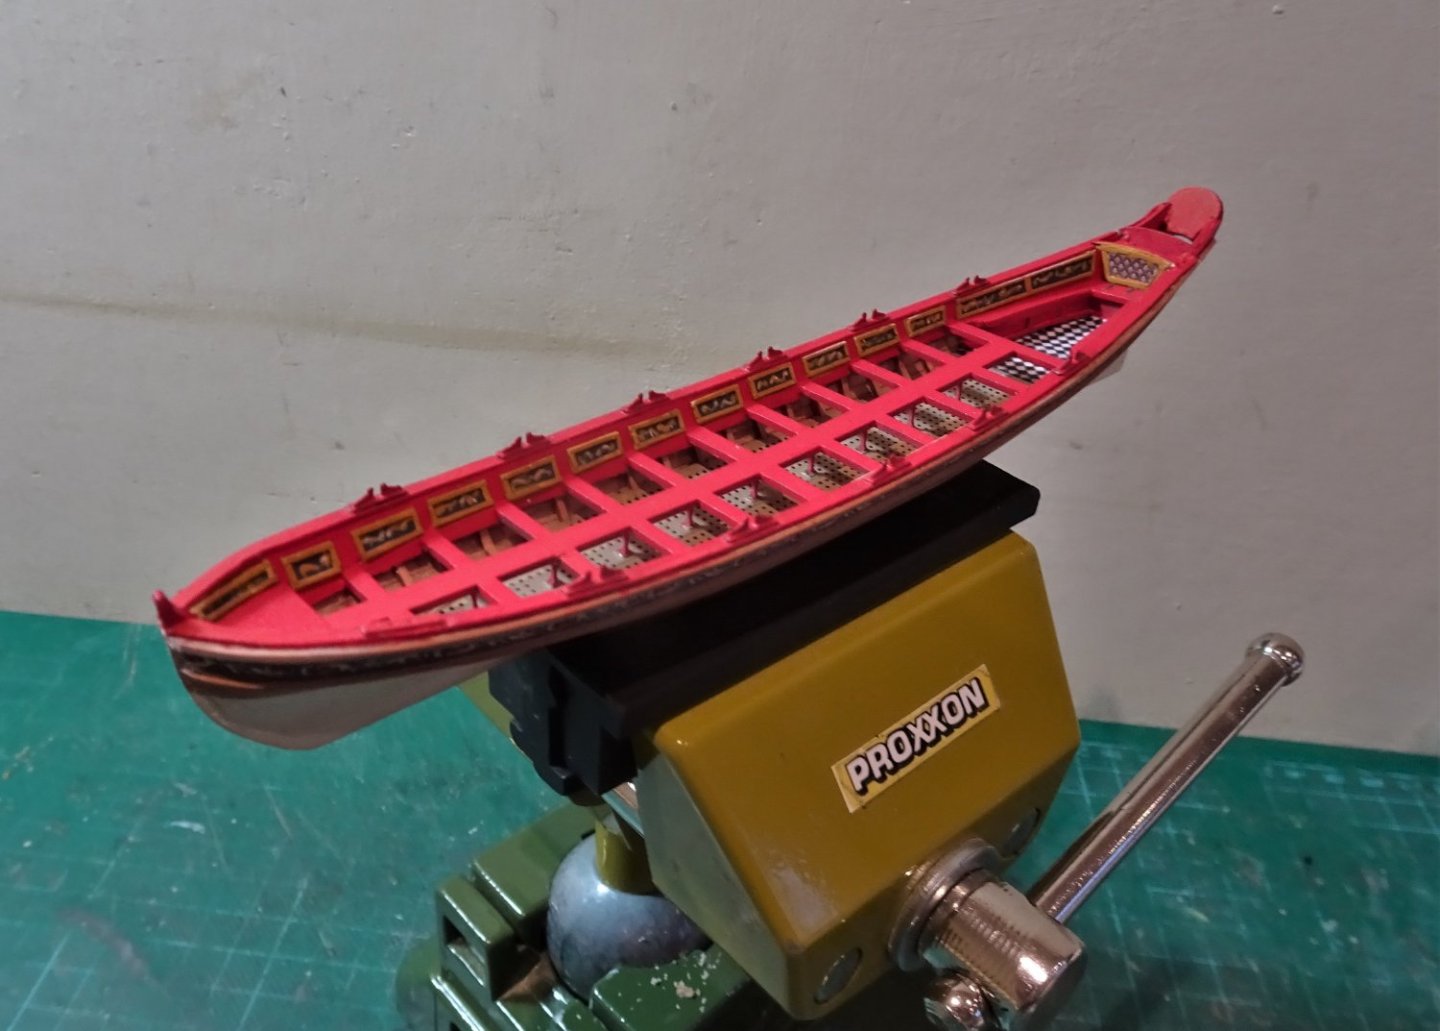
On my previous boat models, I had not used the etched rudder versions but on the barge I decide to give it a try, mainly because it was to be painted overall.
Ca was used to glue the rudder to the stern post, the straps were then pressed into place.

9664
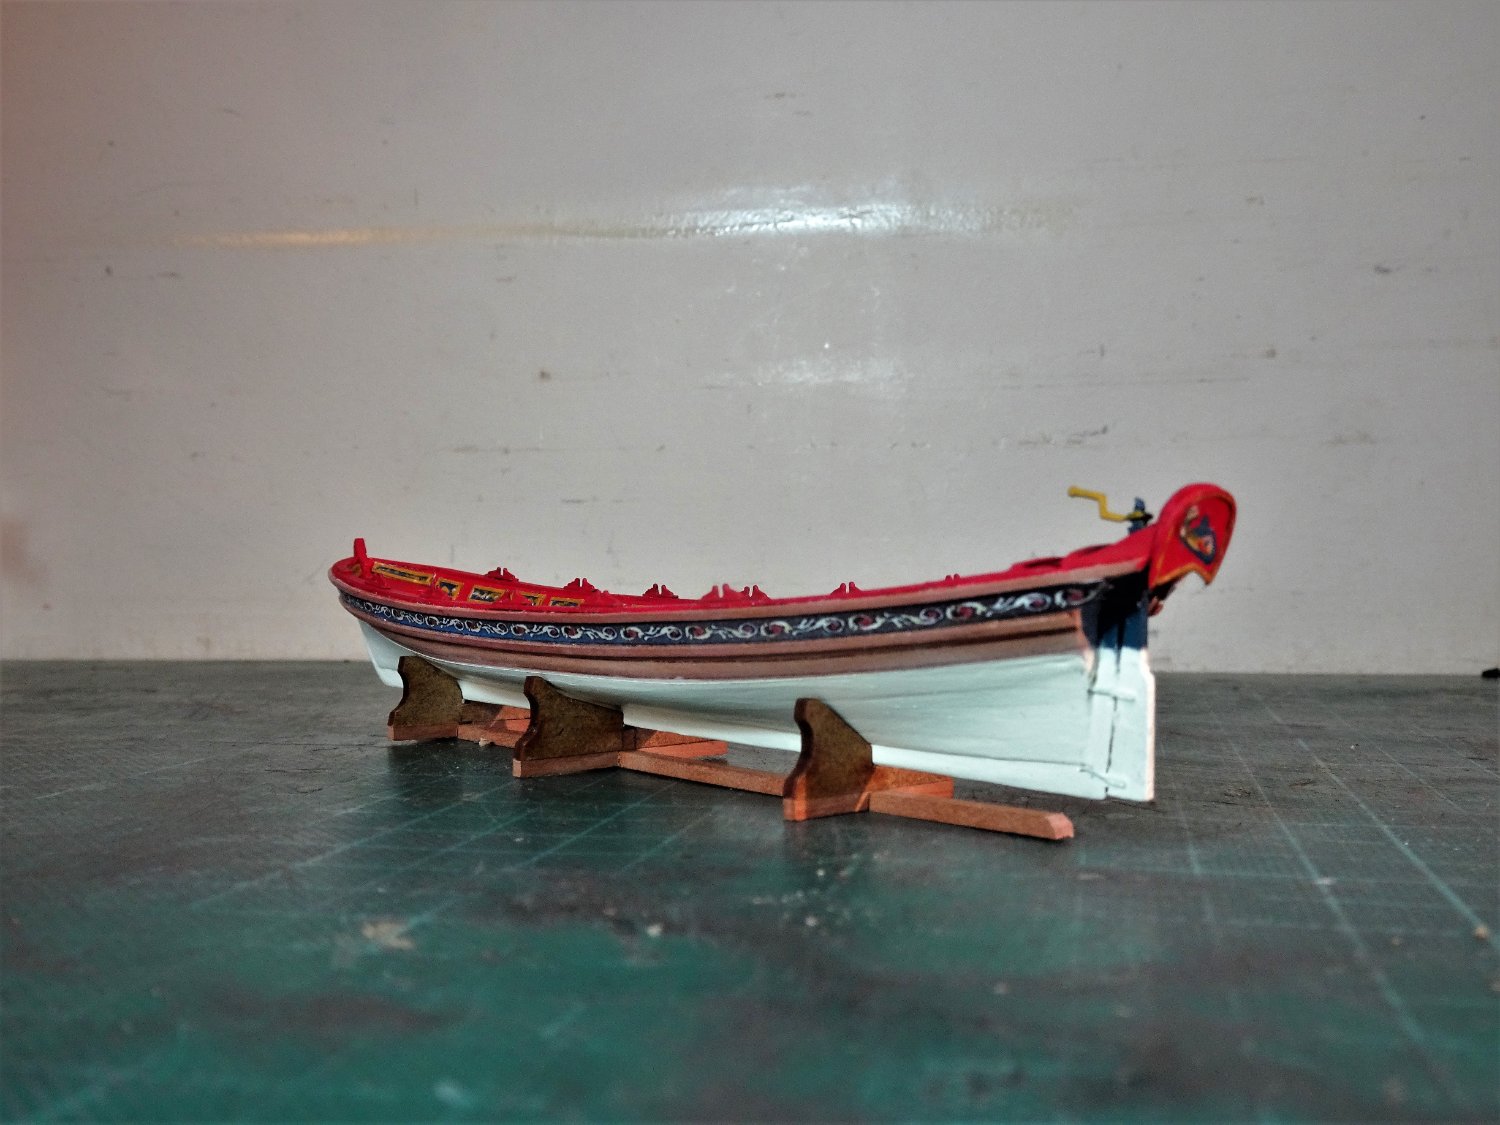
The boat cradles are of mdf.
I fixed the positions along a strip of 2x2 pearwood, this will be fixed to whatever base board I decide upon.

9662
Not quite sure how to finish the cradles, but that’s something that can wait.
9683
In the closing stages of the build there is a need to re-do the paintwork, marred by constant handling.
The lower hull has been re-painted along with the capping rail and thole pins.
B.E
08/12/22
-
Post seventeen
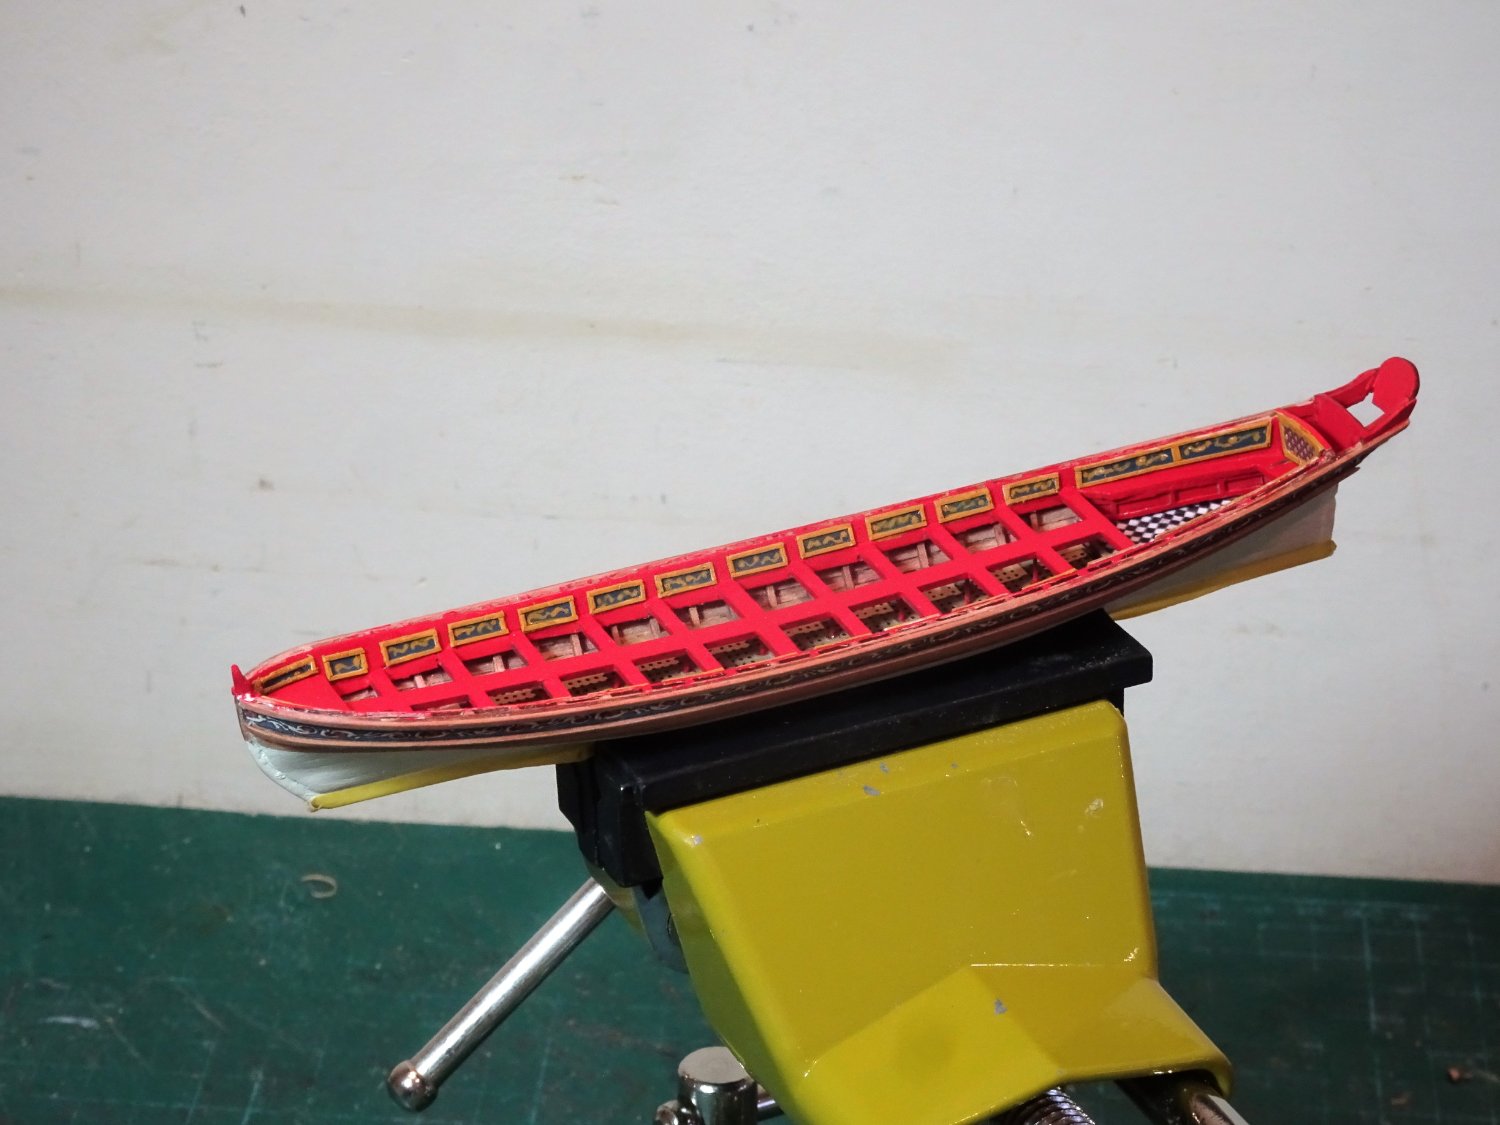
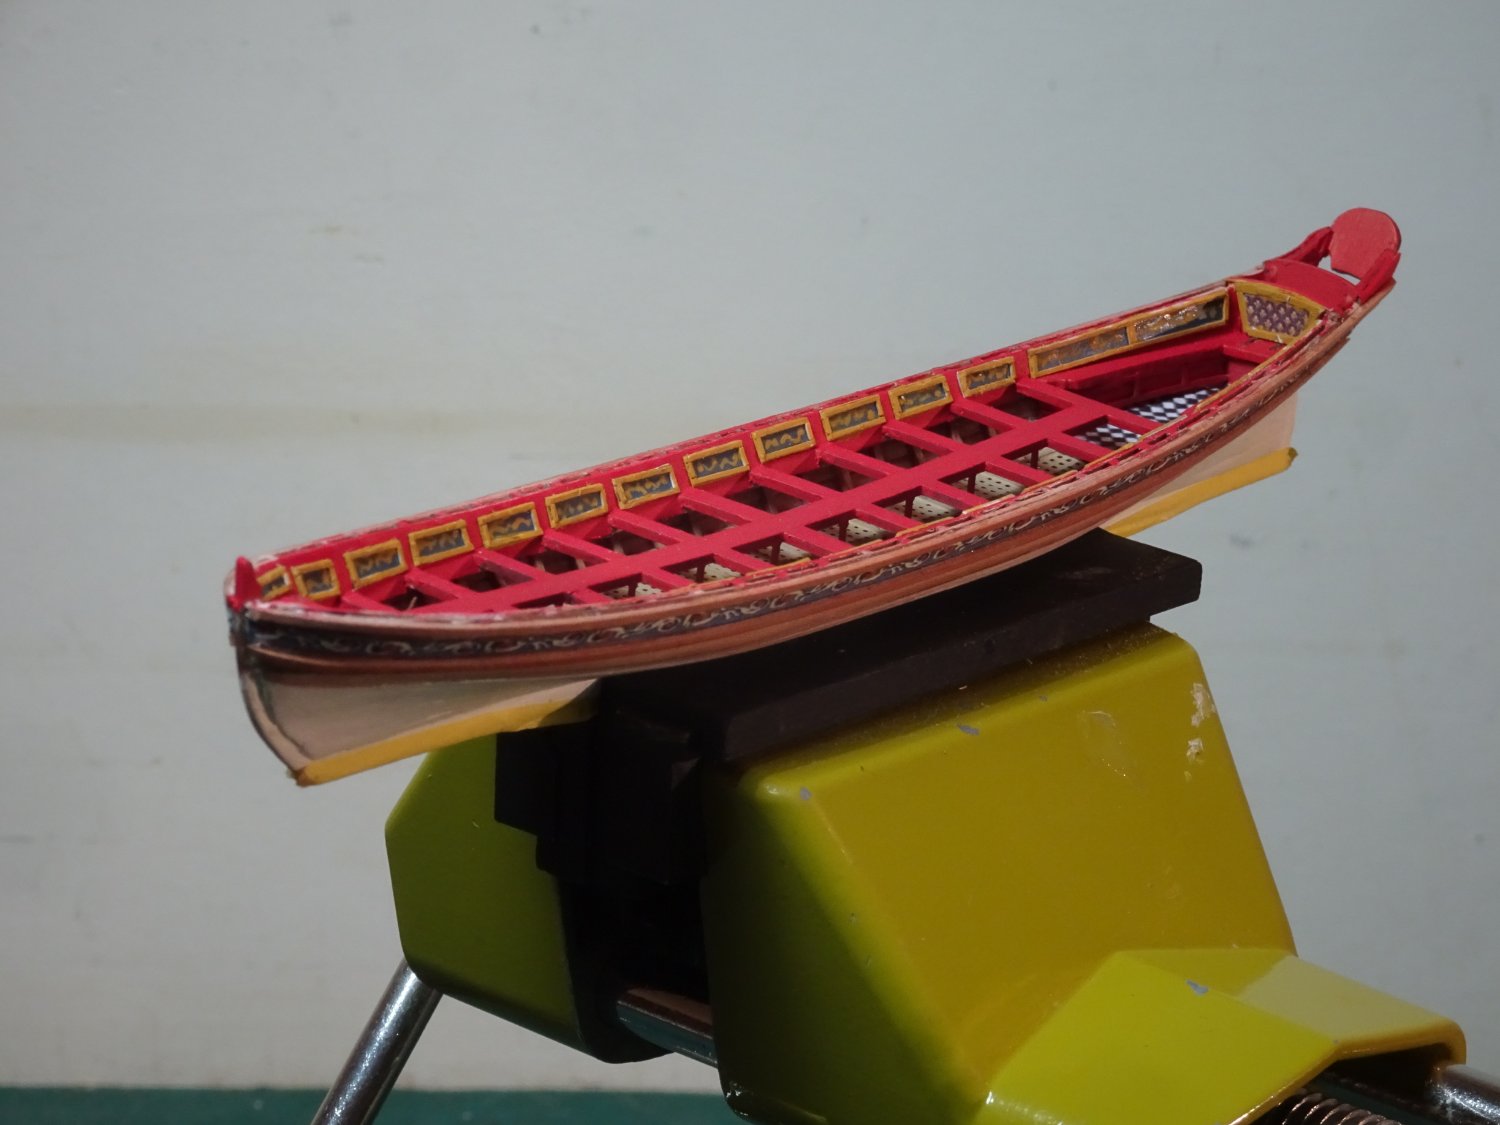
Oarlocks/Thole pins
The kit provided oarlocks are of brass etch comprising a base plate into which the tiny pin and bracket combinations fit.
At this scale replicating wooden pins is out of the question; the brackets are a possibility but would present a very fiddly exercise.
The problem with the base plate is that it would stand proud of the capping rail which I don’t really want, on the other hand, the pre-drilled holes for the pins give a uniform distance between them.
I finally decided that the kit parts were the least worst option.
9650
The base plates in position, they have been chemically blackened to provide a key for painting.
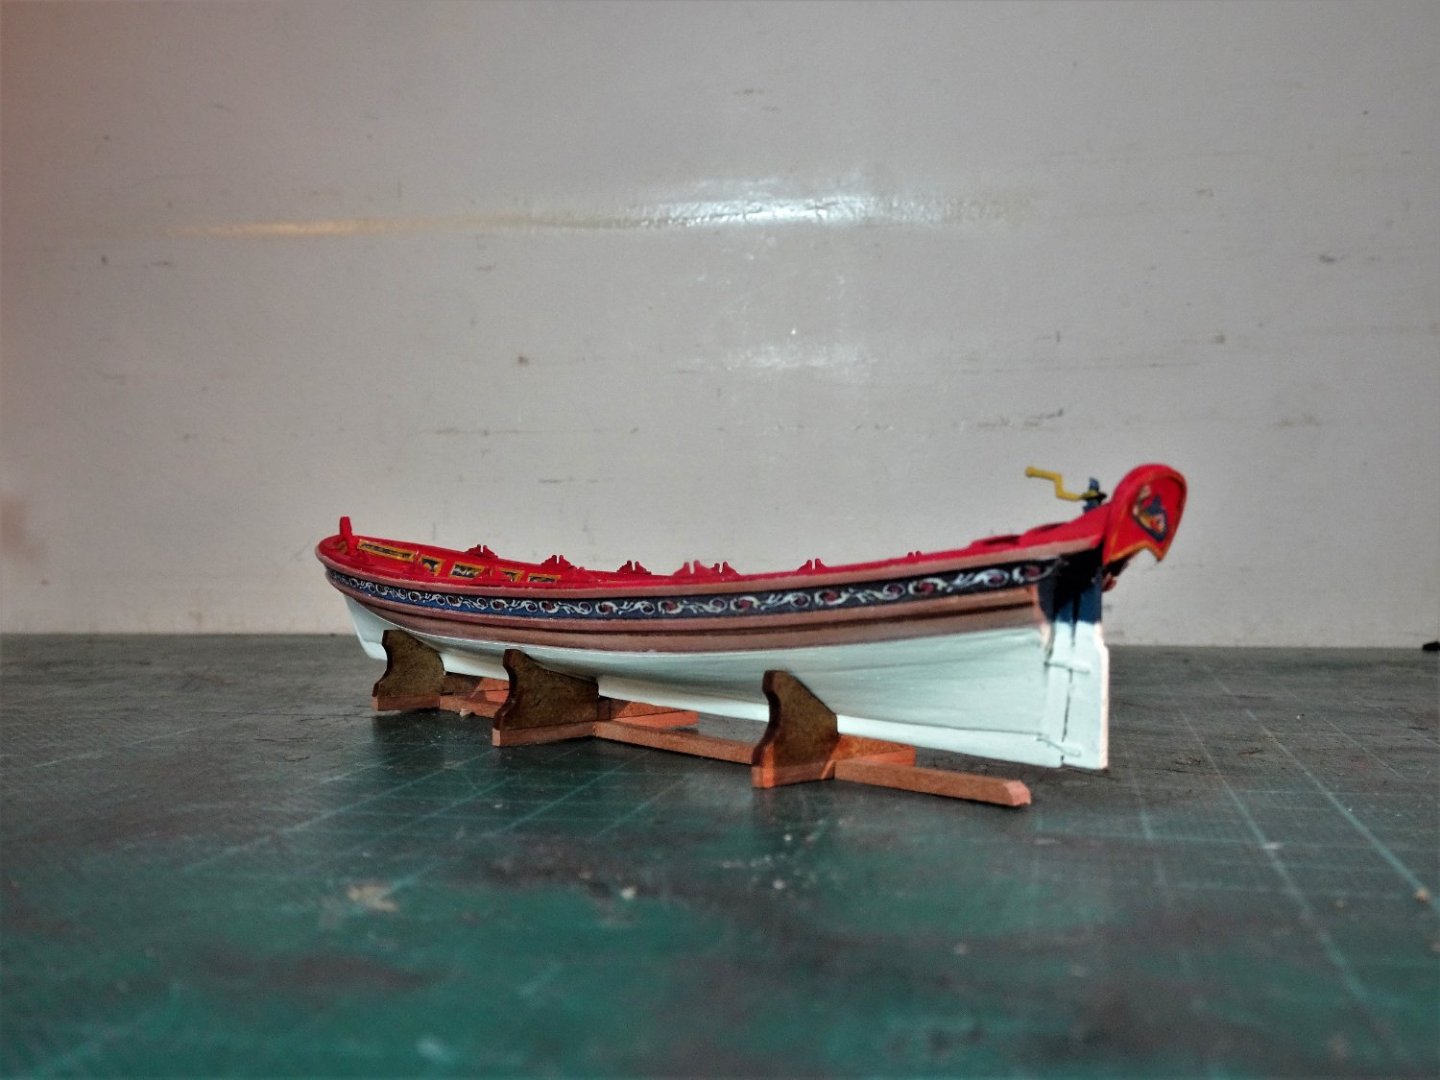
As previously mentioned in the log, the kit layout is somewhat suspect. Barges were traditionally rowed single banked and so the tholes will be arranged on each thwart alternatively port and starboard.
9648
This arrangement allows for twelve oarsmen to power the barge. One of the benefits using the longer oars is that there is a greater leverage, altho’ the relative narrowness of barges would make double banking more problematic.
Aesthetically I think boats look more elegant crewed like this.
With the second part of the assembly there is a high risk of the parts pinging off into the ether due to difficulty in holding whilst working.
I found it necessary to file the pins a little where they fitted into the base plates.
I so very nearly made it, but two pins were lost during fitting leaving me a thwart short of tholes, so bloody annoying.😒

9653
The first plate, port side, can be seen without the pins/brackets, I will try to make replacements perhaps using styrene.
9654
The plates and brackets have been painted to match the capping rails.
B.E.
05/12/22
- Morgan, yvesvidal, hollowneck and 16 others
-
19
-
Hi,
The pattern was taken from Chuck Passaro’s Winchelsea build and he gave me permission to use a modified version on my Sphinx build.
The artwork was designed by Chuck and out of courtesy I would message him and confirm that he is ok with your use.
I see this is your first post on the forum, it would be nice if you introduced yourself in the New members section.
B.E
- hollowneck, mtaylor and Dave_E
-
3
-
Thank you, Chuck, it's a testy little beggar and I'm struggling to achieve the finish on my models of the Queen Anne Barge, Pinnace, and Longboat. Scale does have advantages.
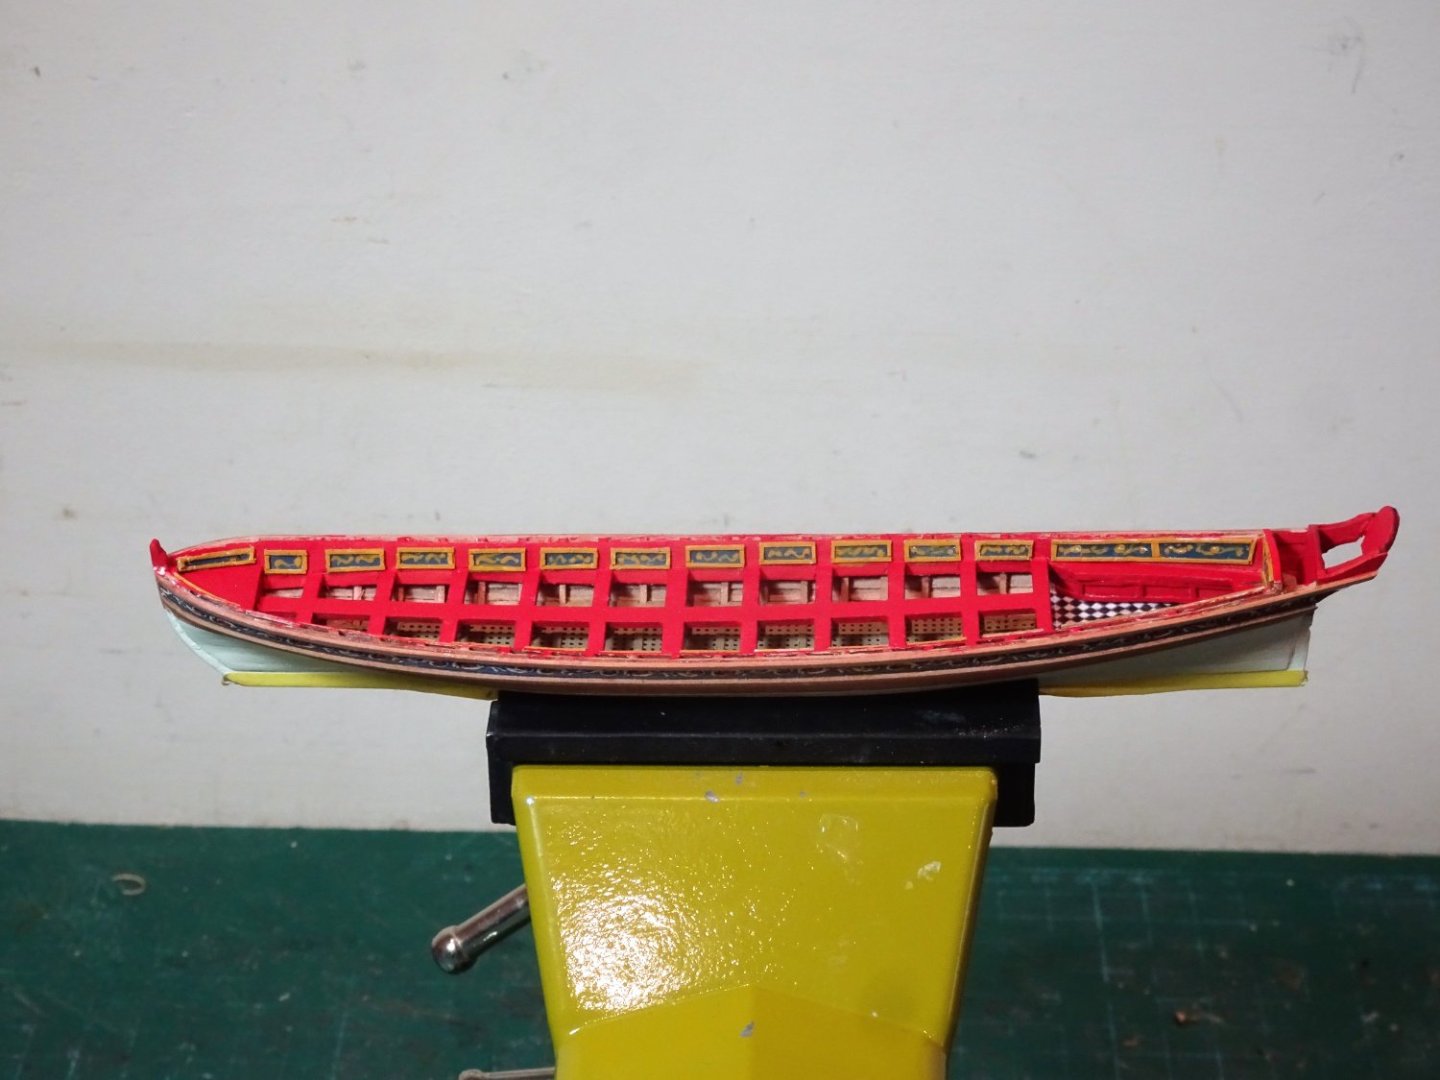
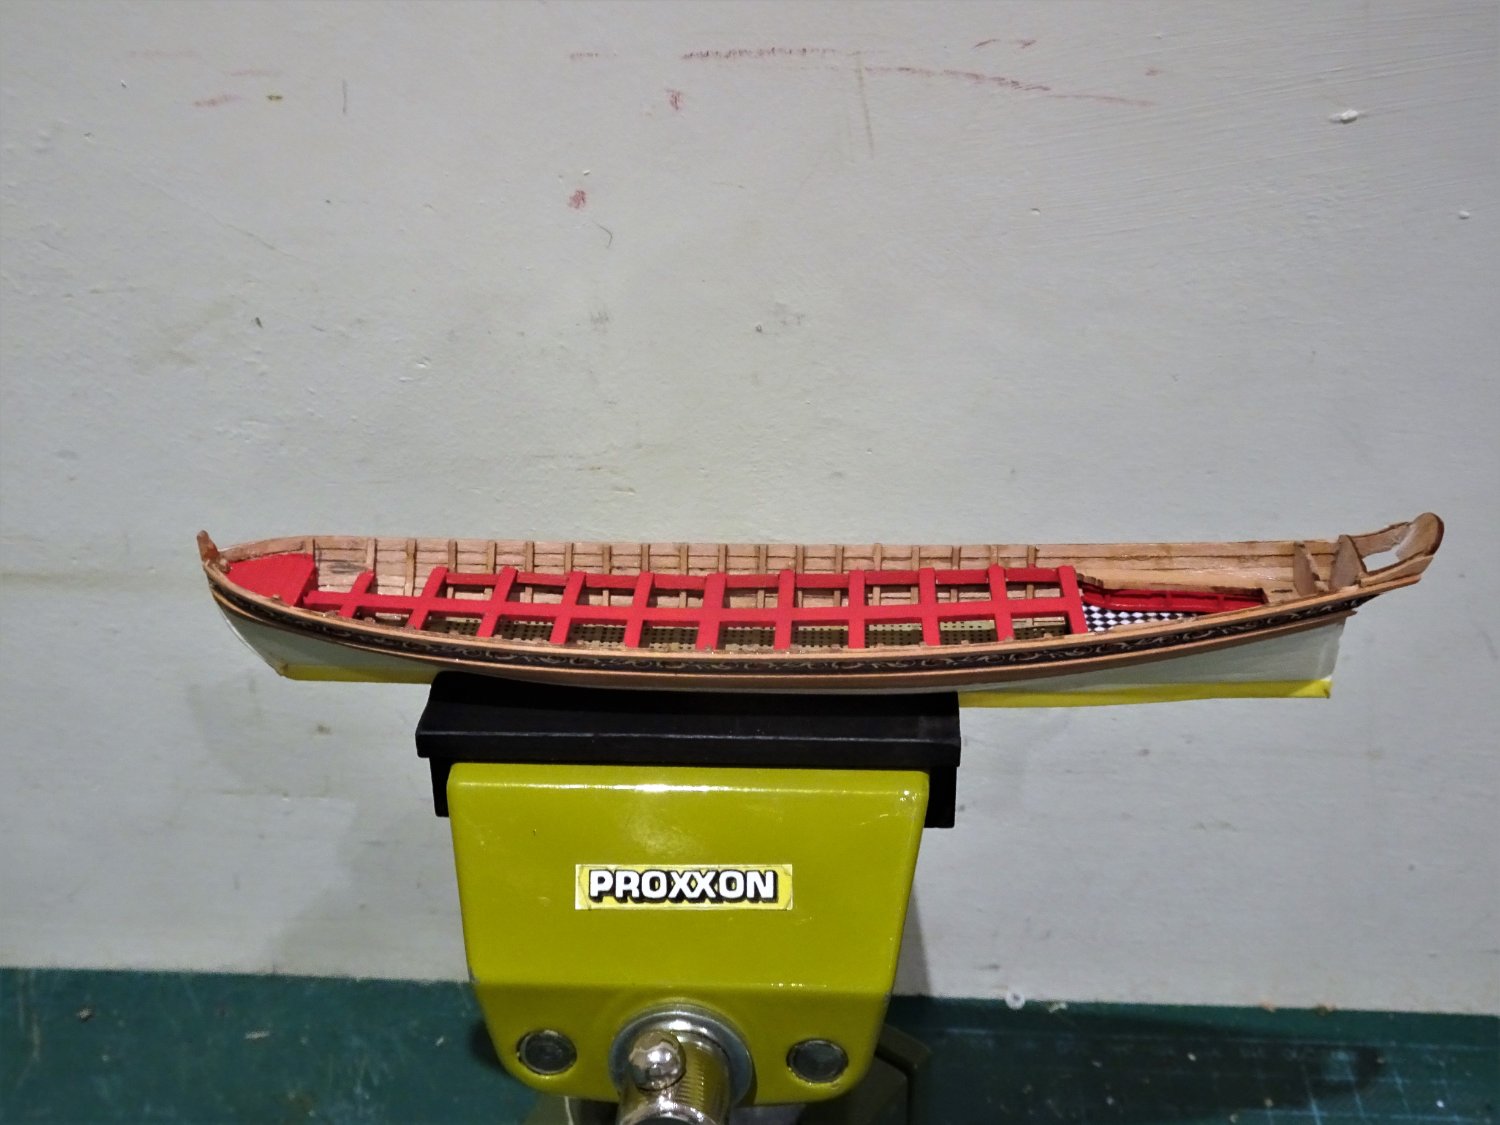
Post Sixteen
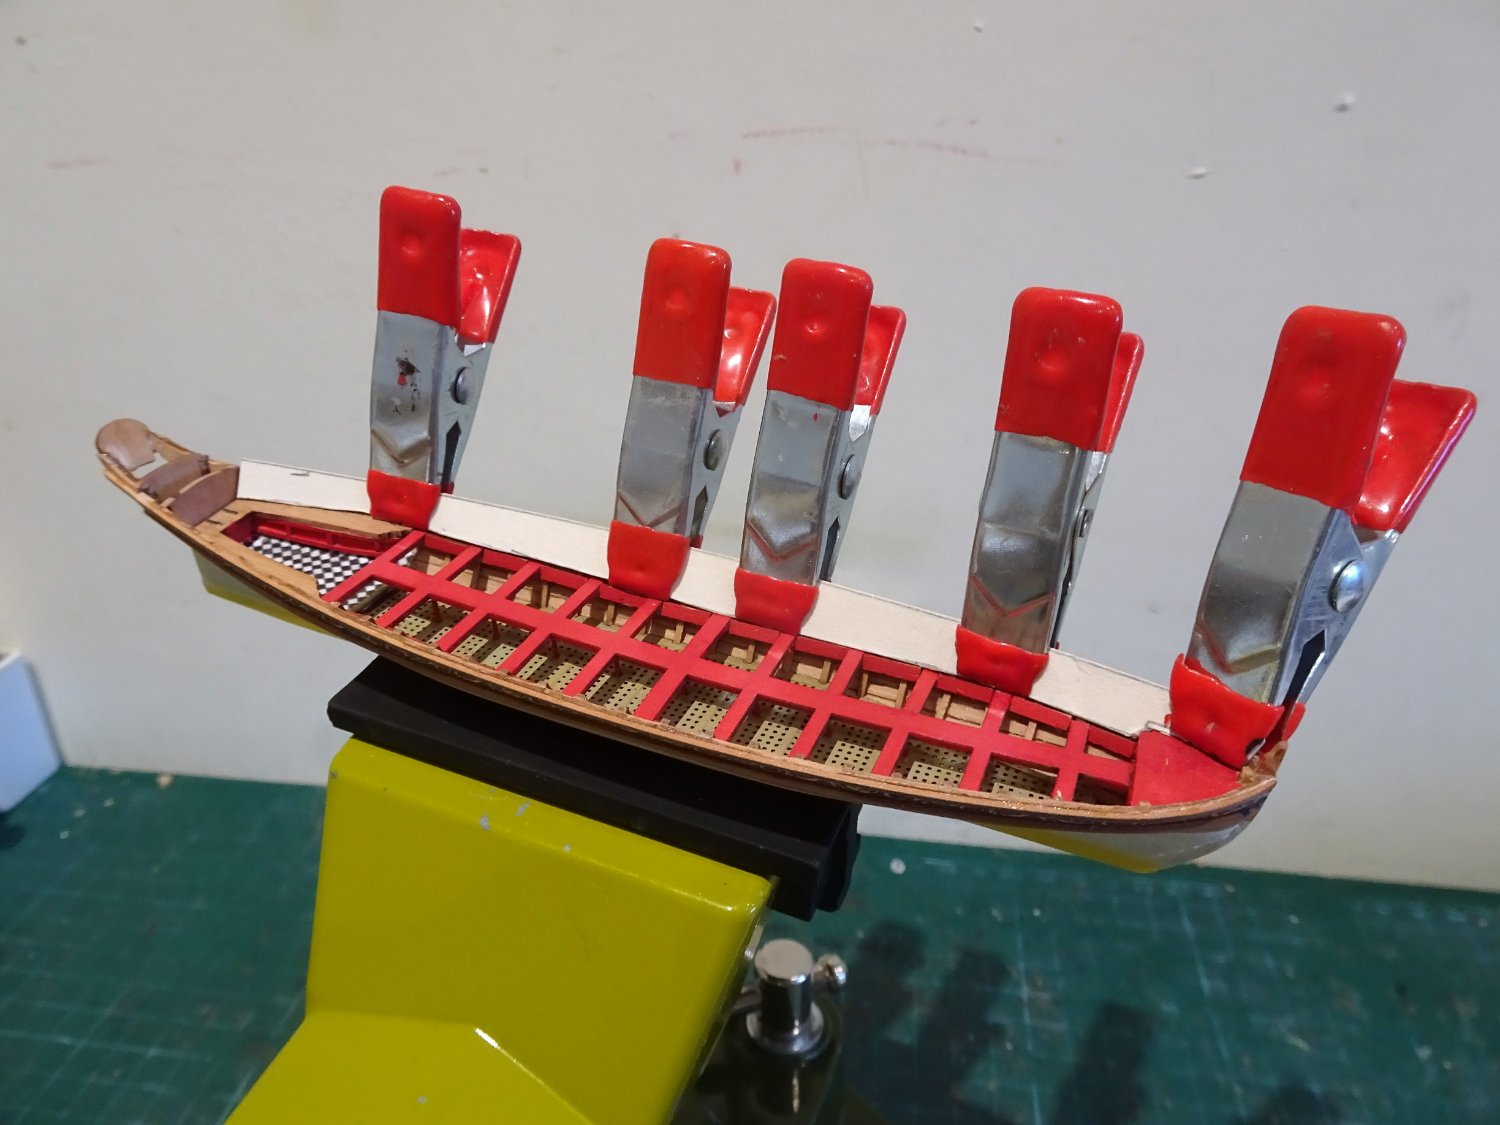
For the capping rails that don’t feature on the basic kit I use strips of fret which provide a great source of material for modifications on small scale models.
9620
9621
The degree of the bow turn and size of material just about allows for edge bending rather than cutting out.
9623
The rails are glued progressively along the gunwale using ca. I start at the bow, and it helps to dampen the underside of the rail which increases the grab of the ca.
The process proved less problematic than I had imagined.

9626

9625

9633
With the rails in place the look of the barge is much improved.
Getting there slowly, but each macro reveals further areas needing a tweak or touch-in of the paint work.
The thole pins are up next.
B.E.
03/12/22
- davyboy, jpalmer1970, dunnock and 16 others
-
19
-
Hi Håkan,
I've been led here by route of your supportive comments on my log.
What a beautiful build you are doing, and what a fine example of joinery work; I too like that boat type and will continue to follow your progress.
Sorry you're also having to fight the 'C' battle at the same time, best wishes to you.
B.E.
-
Thanks, Håkan,
Away from the macro lens it looks ok, altho' I'm still fiddling with it.
B.E.
- Wintergreen, hollowneck and mtaylor
-
3
-
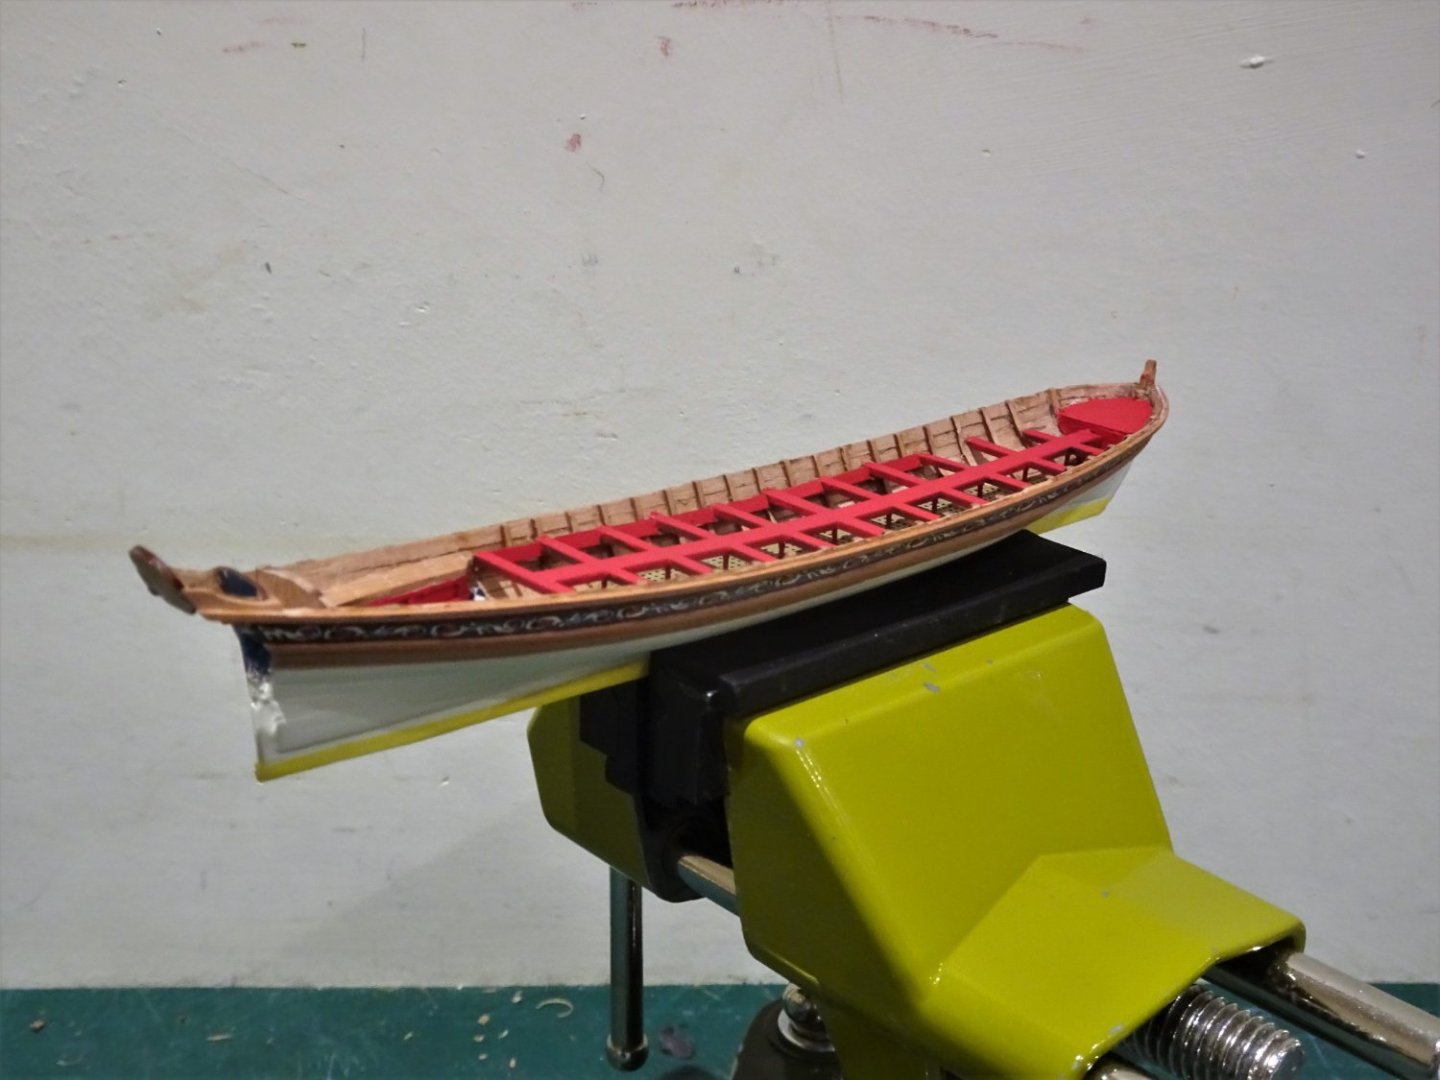
Post Fifteen
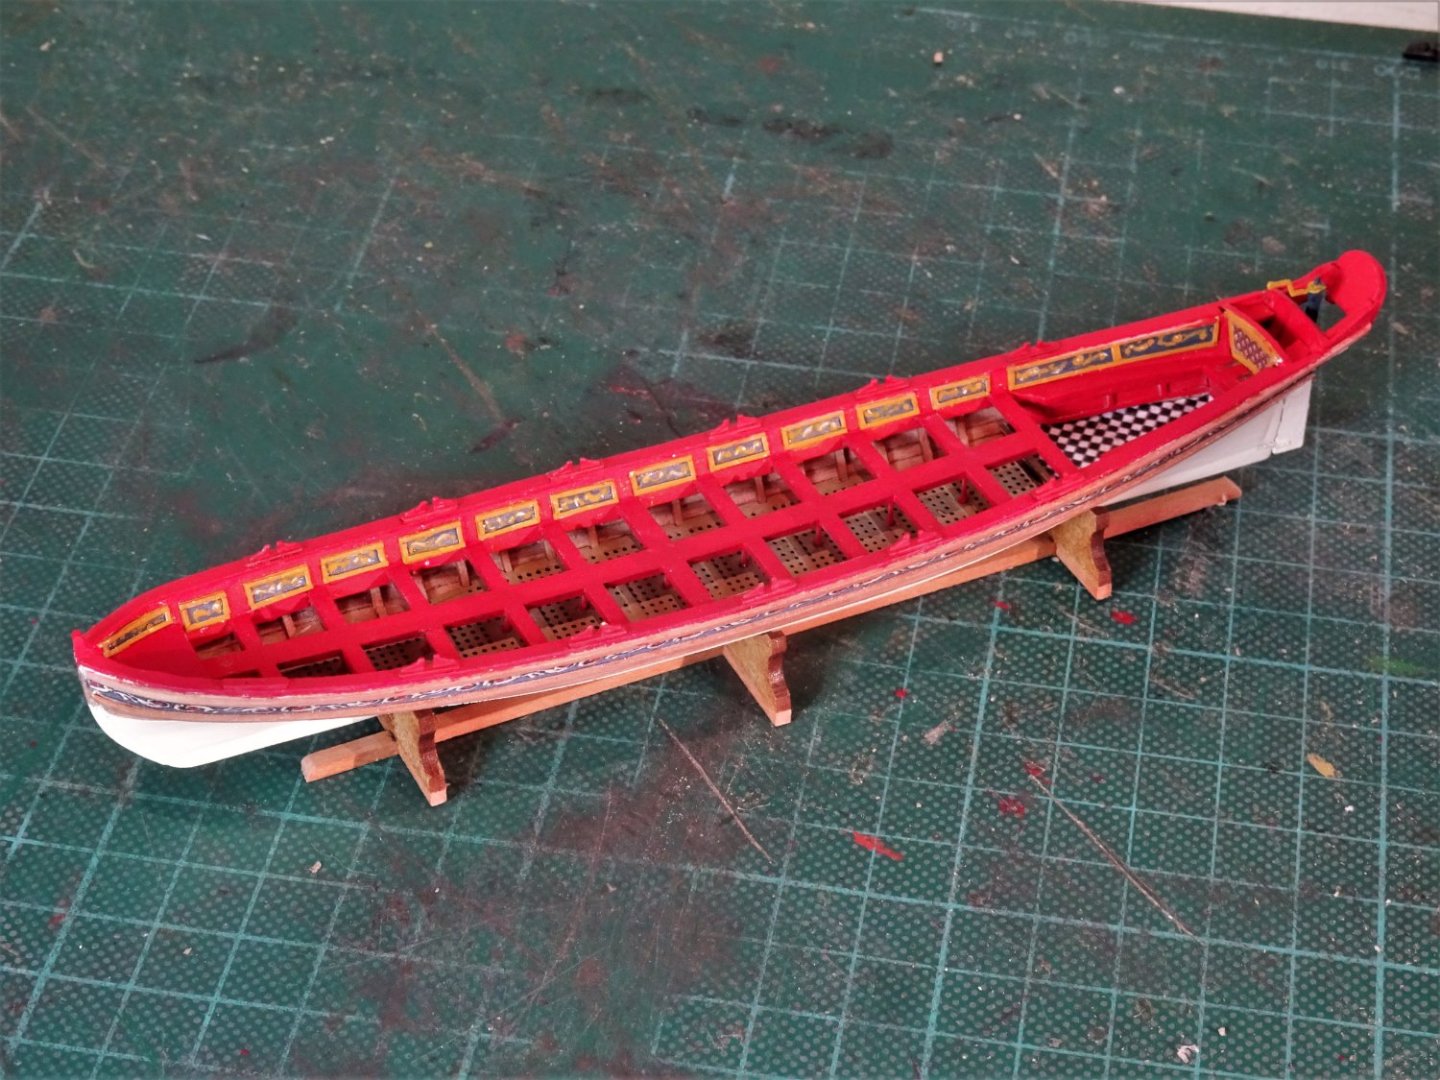
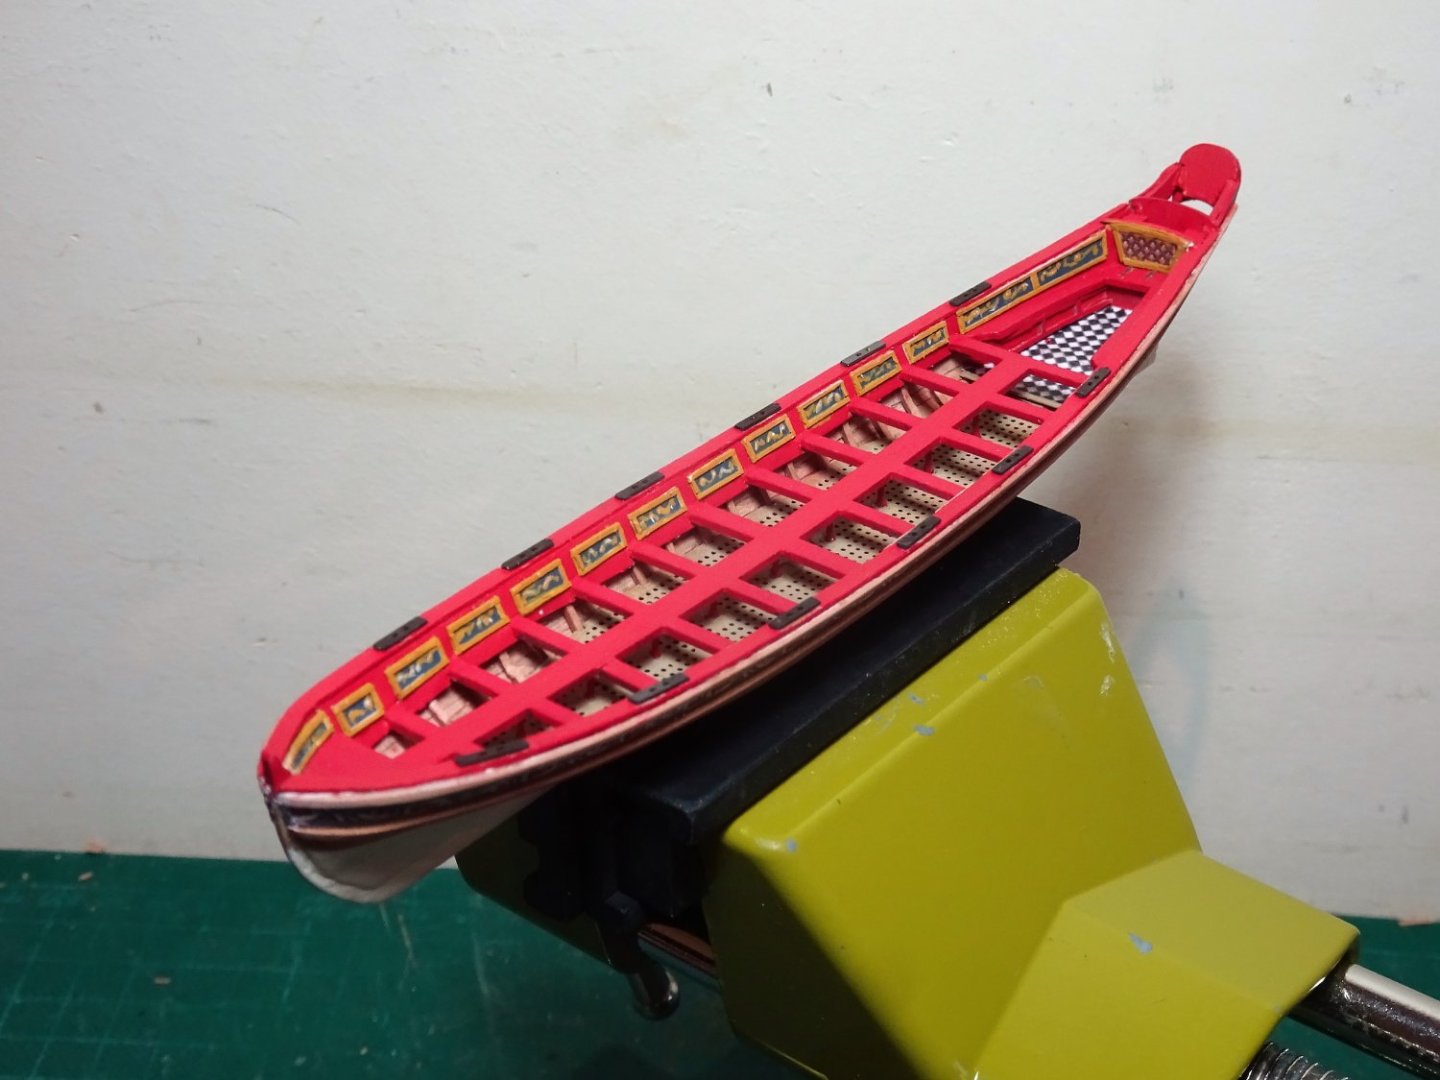
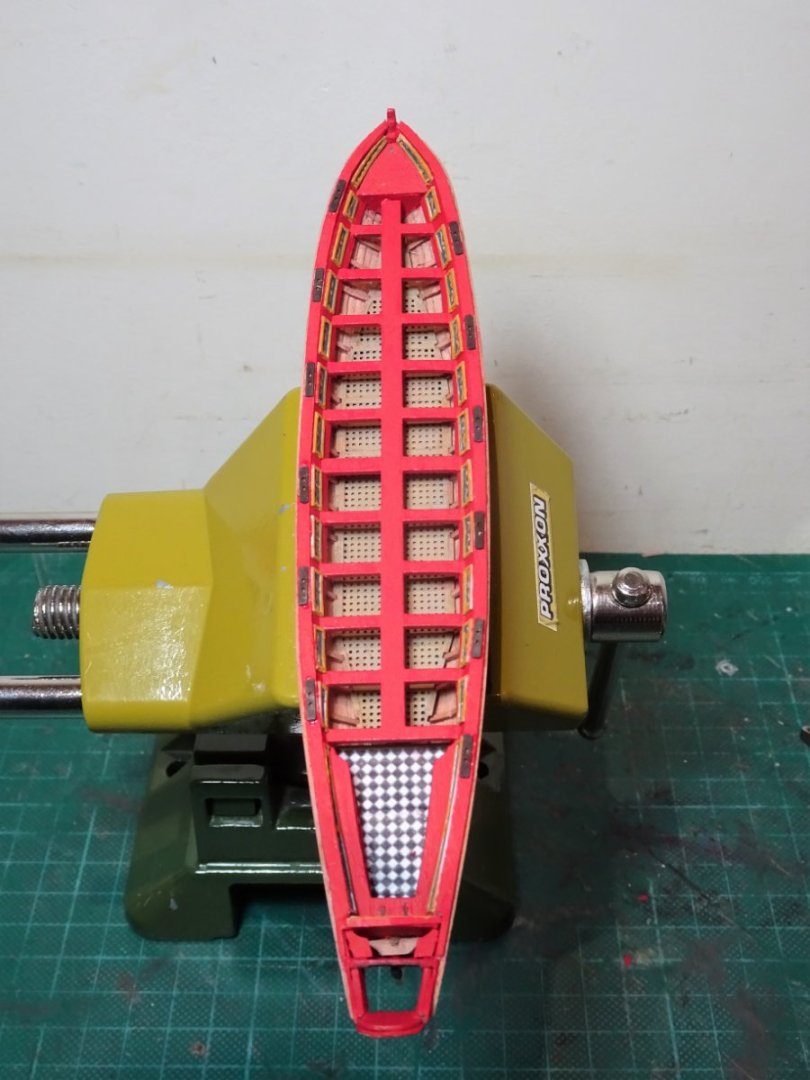
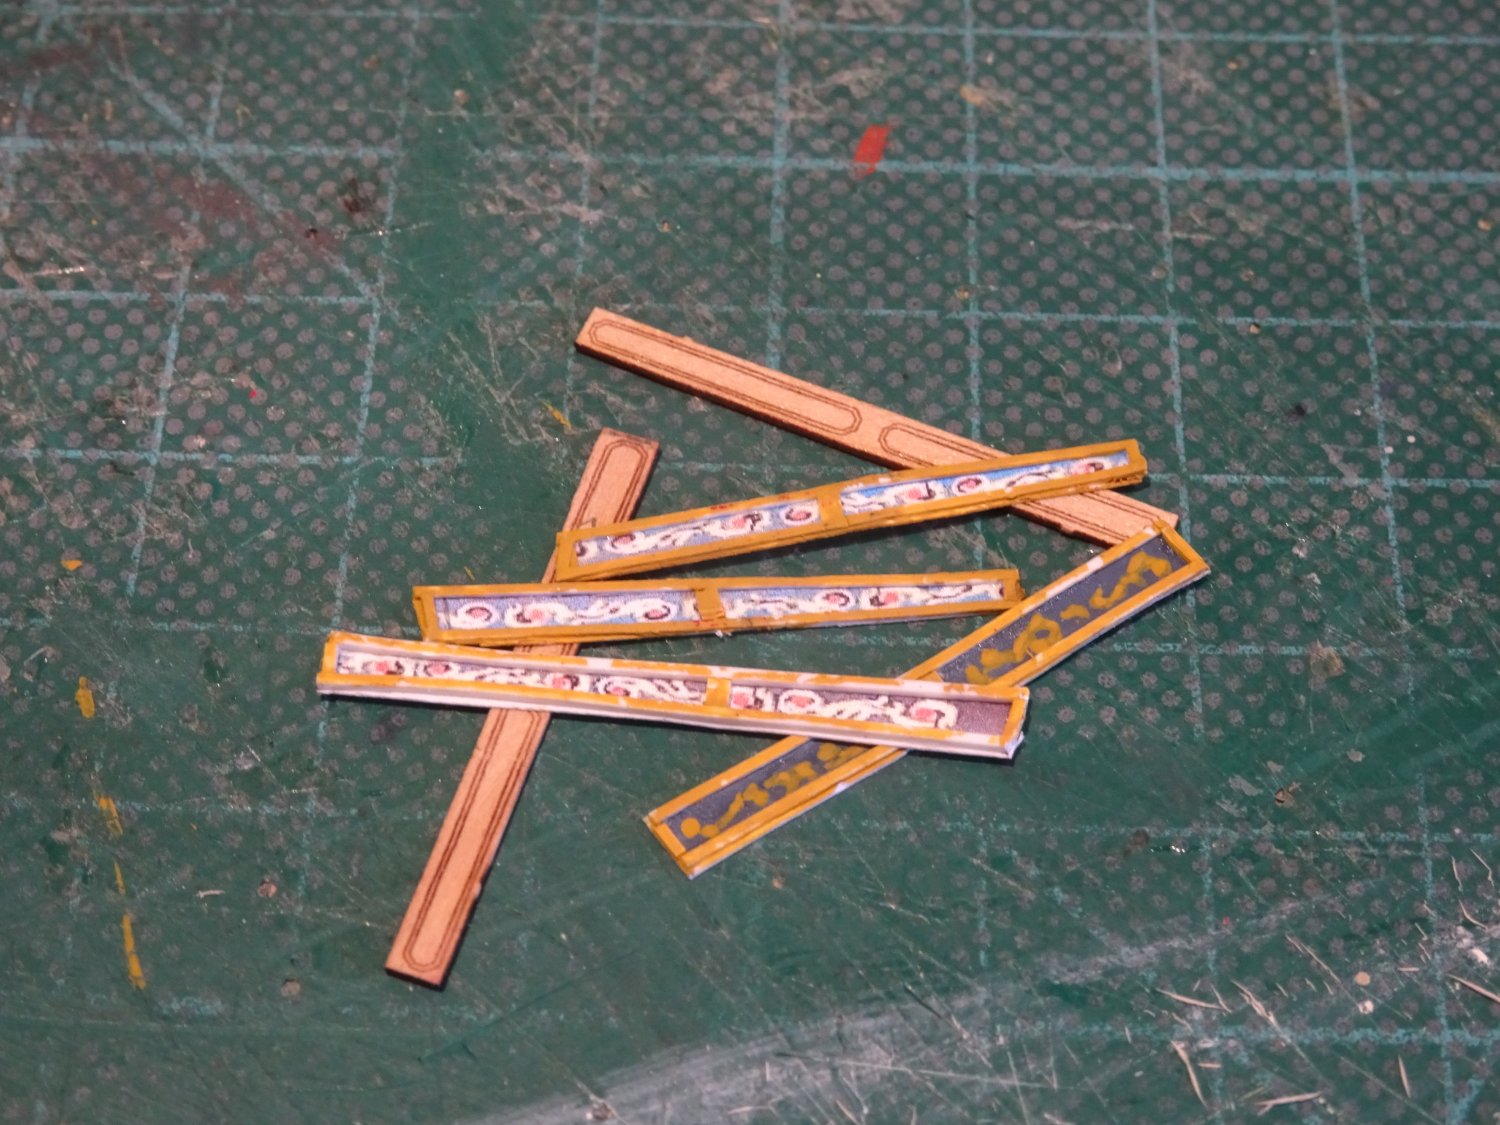
My next thought is how to represent the decorative panels.
.jpg.5aff0f15c7dba712fedab523f76093ae.jpg)
oob kit arrangement.
The kit offering, a simplification, would stand too proud, and not look good just stuck atop the linings.
I am thinking fine mouldings, possibly no more than 0.5mm x 0.5mm. in section.
I also want the panels to be inset and contain a decorative design.
A tall order at this scale perhaps, but I’ve come this far……
I discounted use of timber to make the mouldings which would have a high attrition rate of breakage.

9581
I started using a printed frieze design but didn’t like the look.
After a few false starts I settled on using 0.25mm x 0.5mm styrene strip for the moulding, glued to painted paper, with an impression of a design painted on.
This arrangement has ultimate flexibility and will not overwhelm the scale.
I started with the stern-sheet decoration.
9586

9589
The remainder of the panels fit between the thwarts.
95600

9598

9614
A time-consuming exercise making up these small panels, but they don’t look too bad from around nine inches, at least to my rheumy old eyes.
Even so I have more work to do on them.
The next task is the shaping and fitting the capping rails.
B.E.
01/12/2022
-
All coming together beautifully Ron, the crew figures look great.
B.E.
- mtaylor and hollowneck
-
2
-
An Admiralty order dated 12th July 1715 stated the outsides of ships be painted of the usual colour yellow and the ground black, but the practice seems to have been in place also in 17th century.
This does not mean that the order was universally applied and we see from contemporary models that both blue and red were used extensively as the frieze ground, but possibly involved a high degree of artistic licence.
Such licence is evident with the extensive decoration on small ships as depicted in models and paintings, which almost certainly wasn’t applied in reality.
As a modern ship modeller I am not immune to dressing models to reflect the colours used by 18th century ship modellers, I rather like the effect.
As far as Granado is concerned you could legitimately paint all the ground black with ornament picked out in yellow Ochre, the hull left bright or painted yellow, with the inboards red ochre.
All down to personal preference.
B.E.
-
Well done Mike, a very nice build, and excellent finish👍
B.E.
- AJohnson, Mike_H, hollowneck and 1 other
-
4
-
Thank you, Yves, Håkan, and Jim, I'm much happier now. 👍
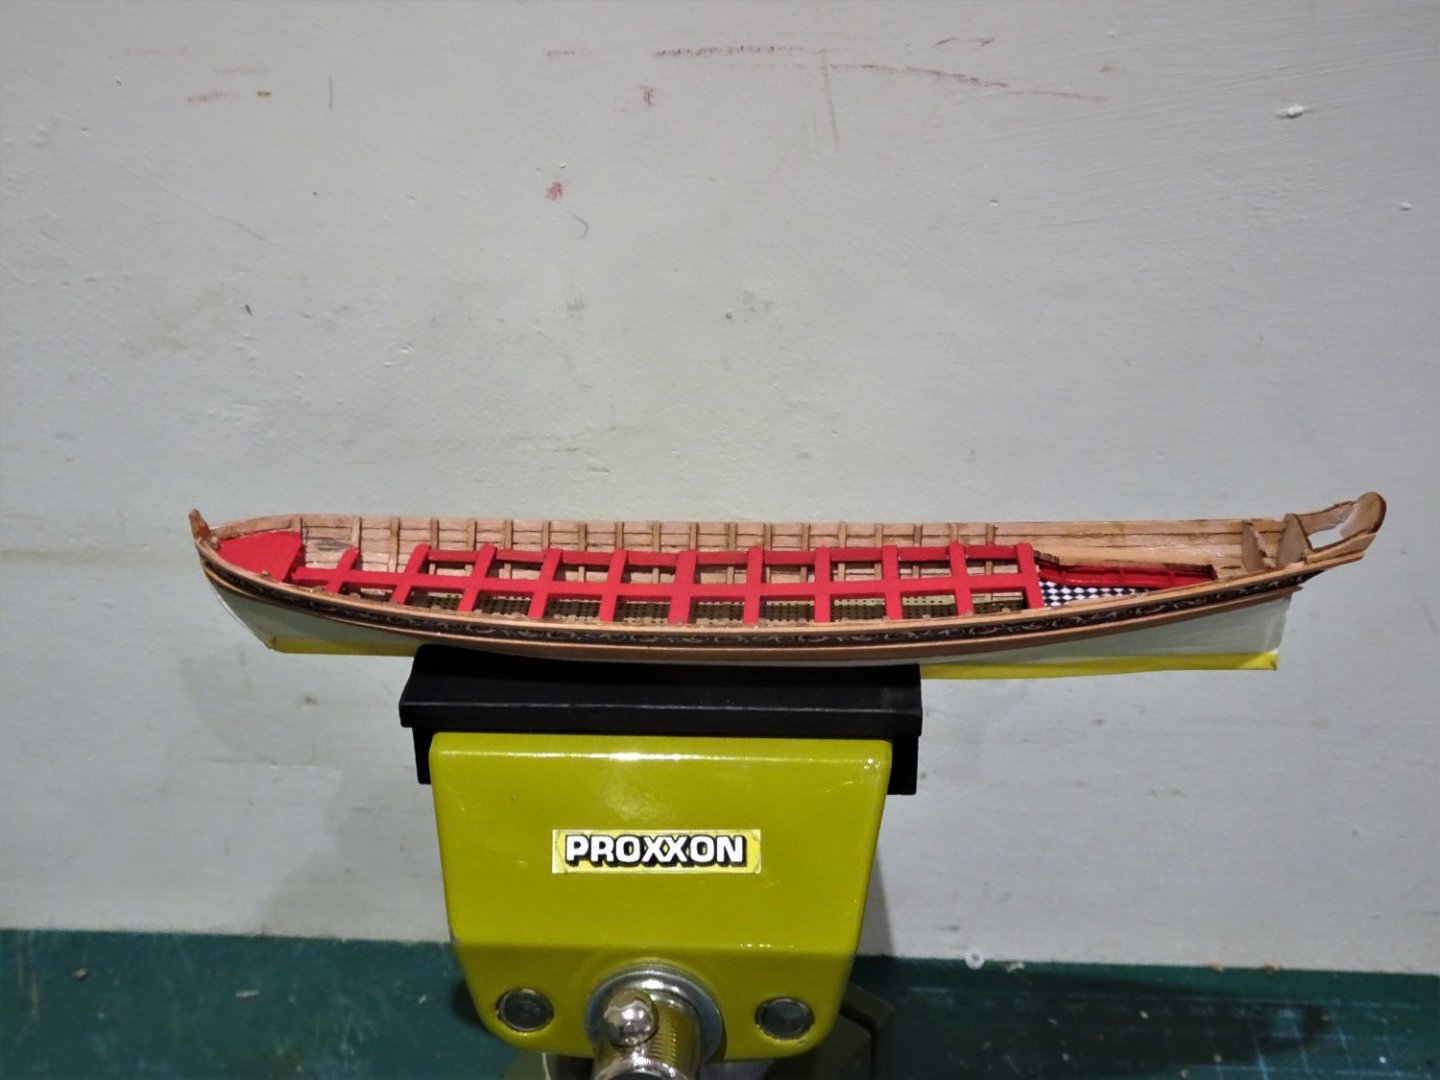
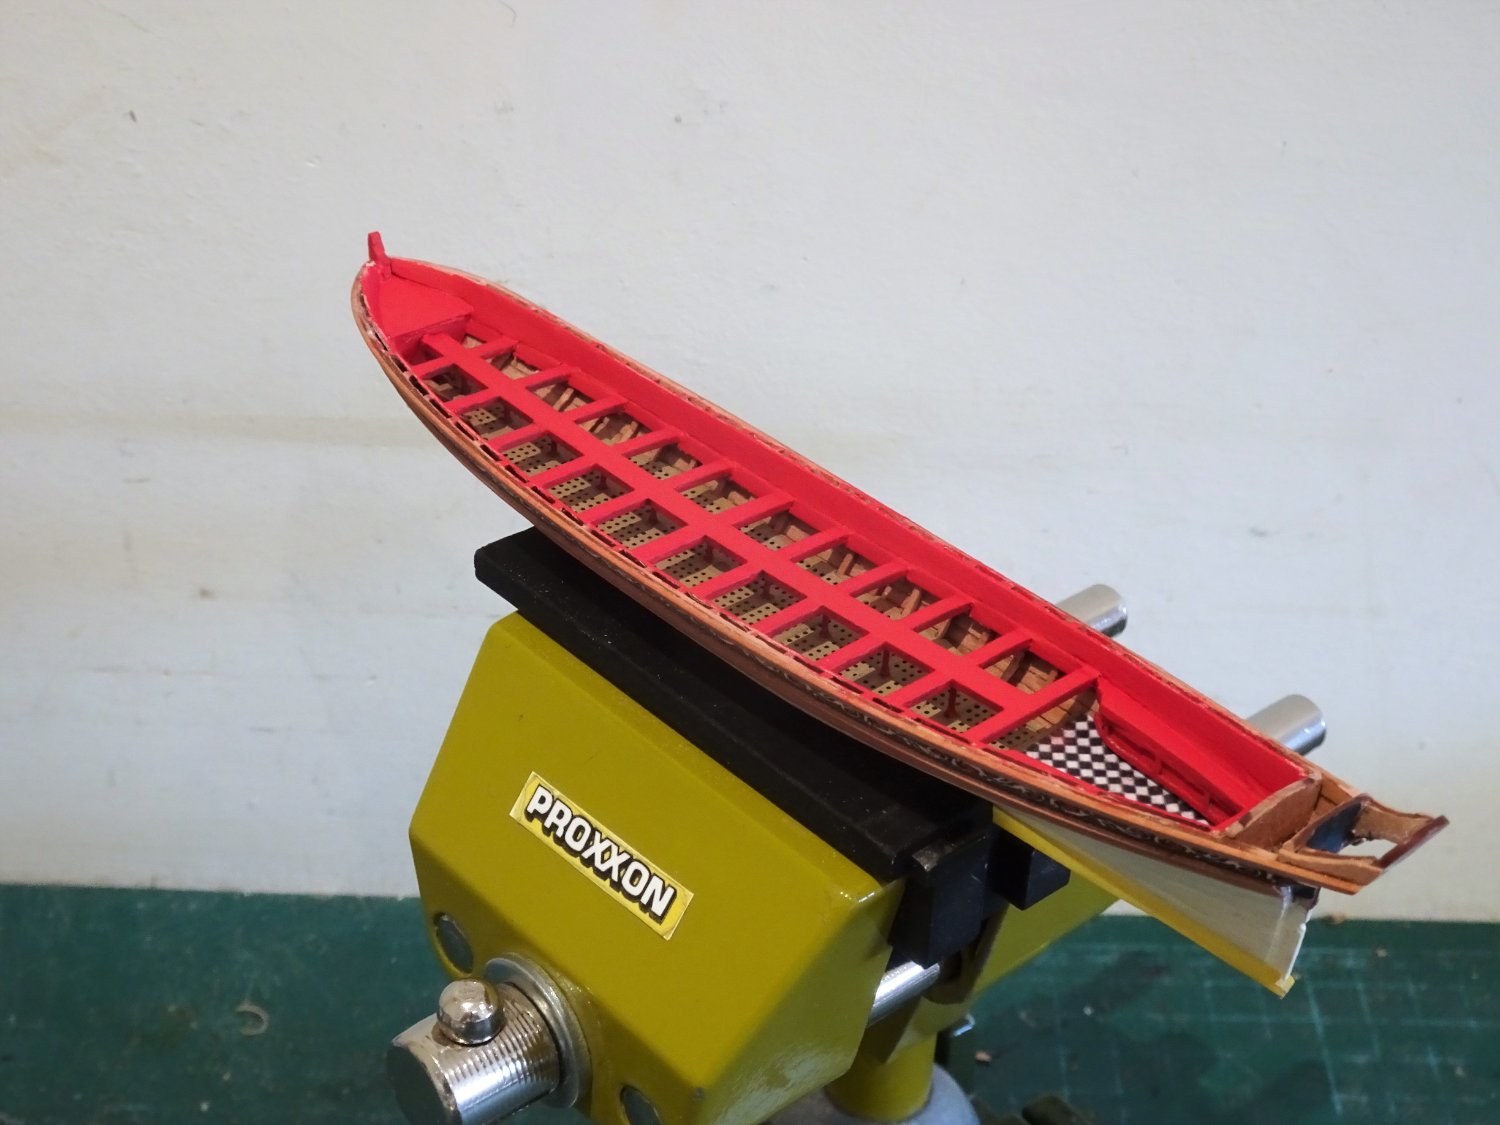
Post fourteen
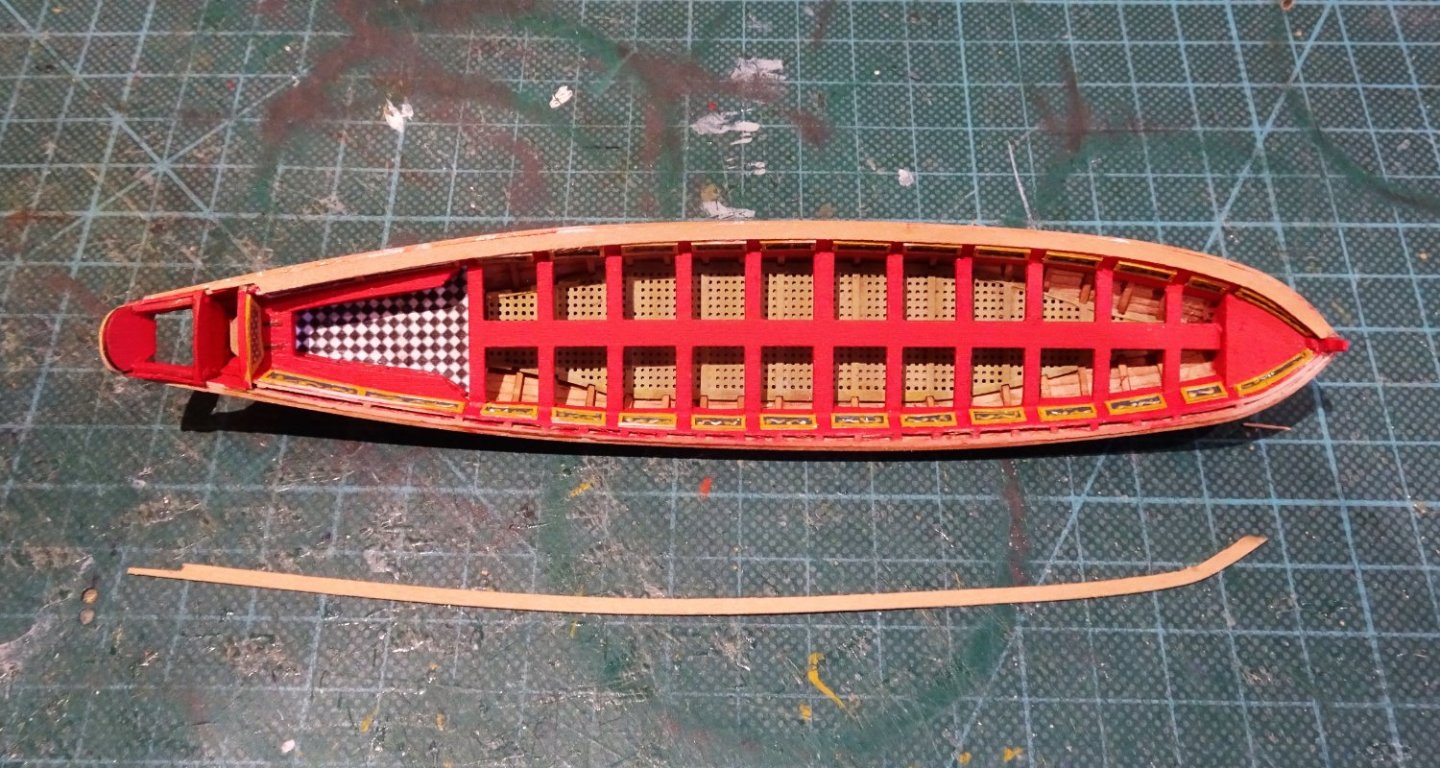
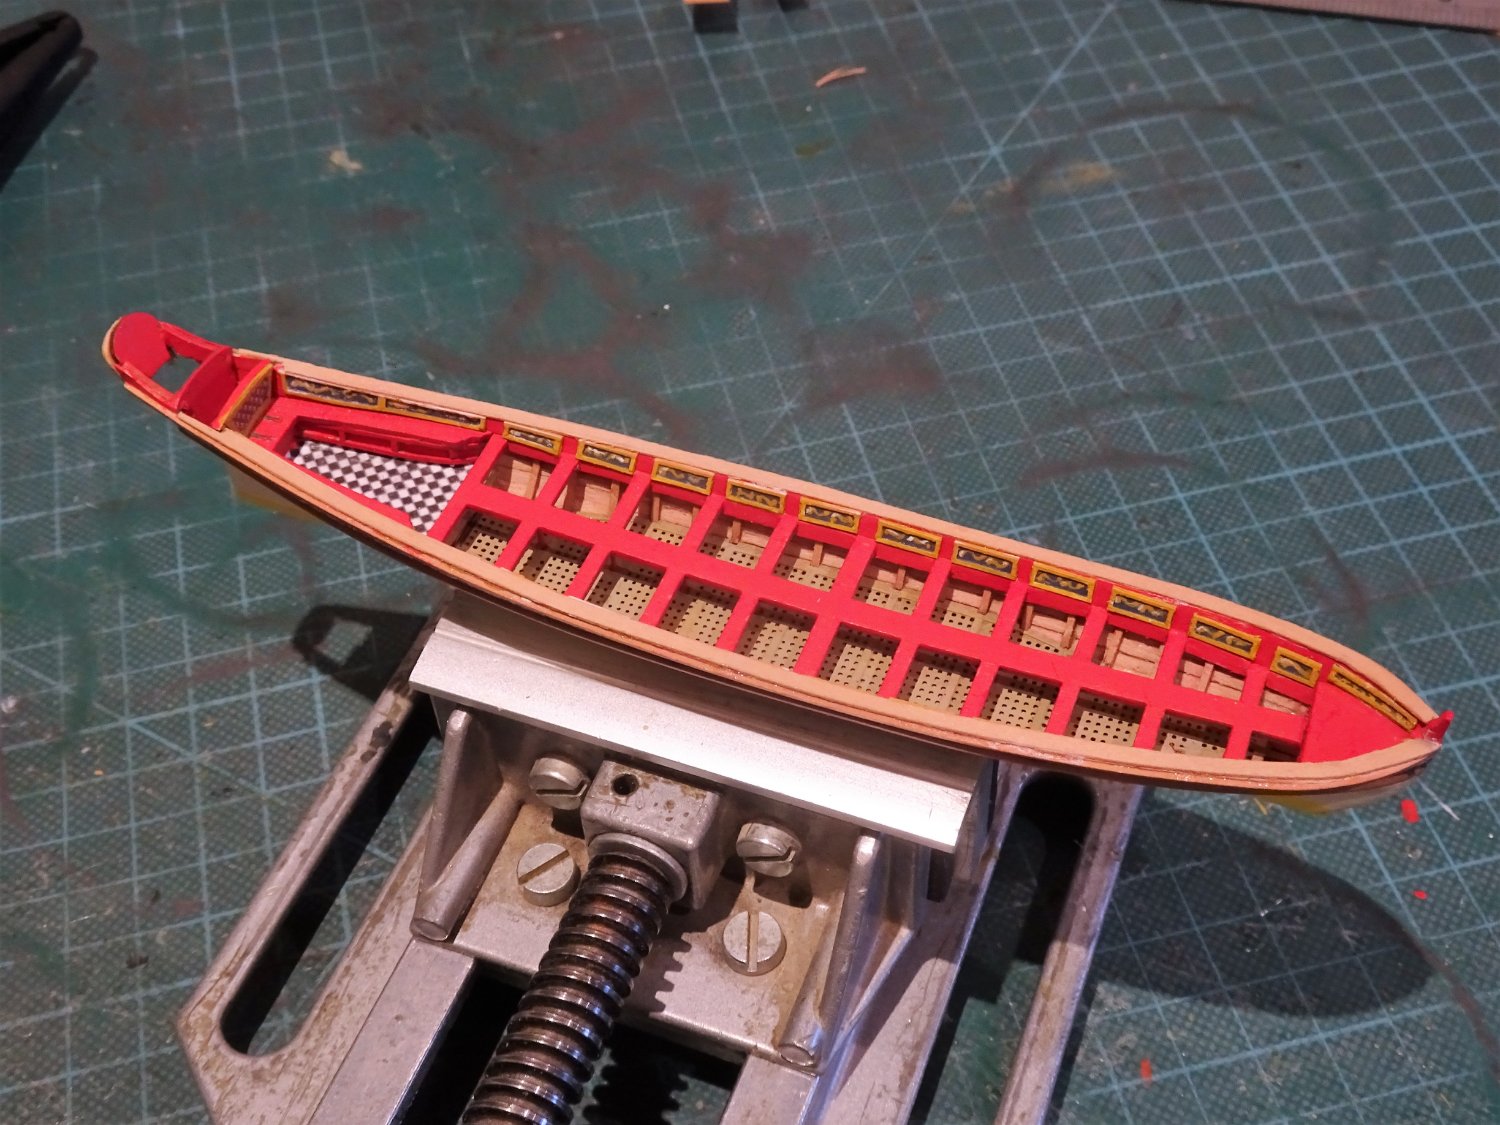
Lining the hull.
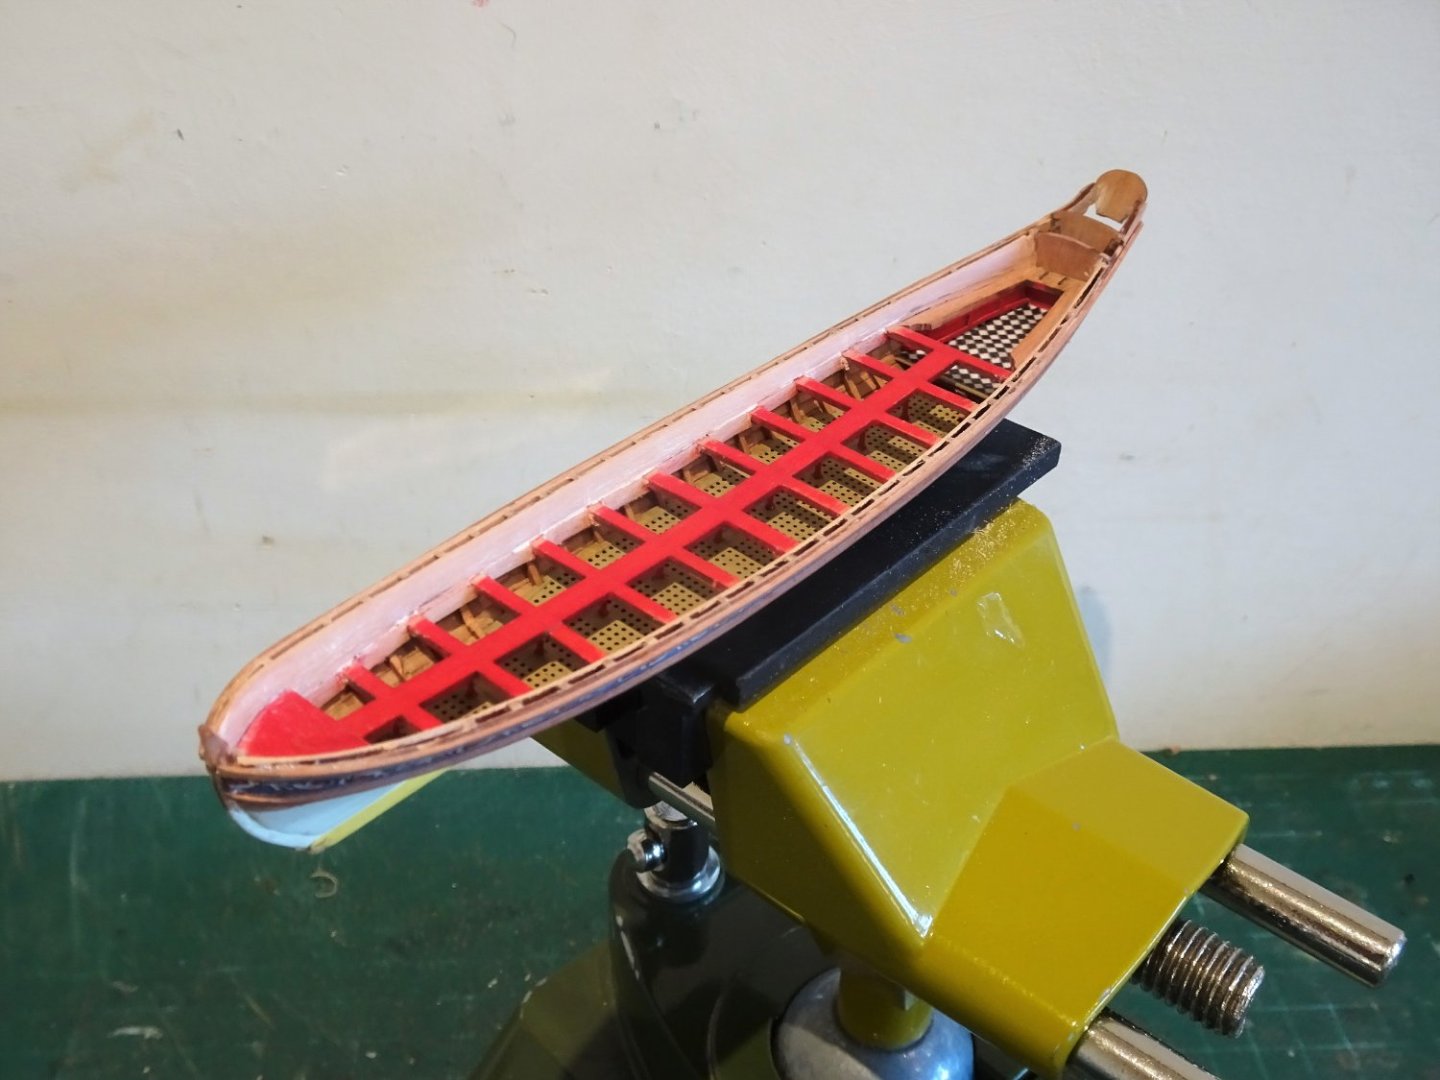
Moving on to fitting out the internal hull, the point of a build that most excites my interest.
9561
Multiple card templates were made and tweaked to match the sheer of the hull and run from the bow to stern-sheets.
9565
Once satisfied the patterns were transferred to 0.6mm Pearwood (spare fret from the Sphinx kit)
I tried to get as good fit as I could but the fallback position is that the linings will be painted so a little filler won’t go amiss should the need arise.
A full day at the work bench sees the lining in place, ready for fining down and hopefully joined seamlessly to the lower lining strips.

9568
9570
9567
At this point sanded and filled the internal hull is ready for a coat of paint.

9578
9577
9576
9575
The somewhat trickier business of the decorative panels is up next.
B.E.
25/11/2022
- DanB, bruce d, hollowneck and 17 others
-
20
-
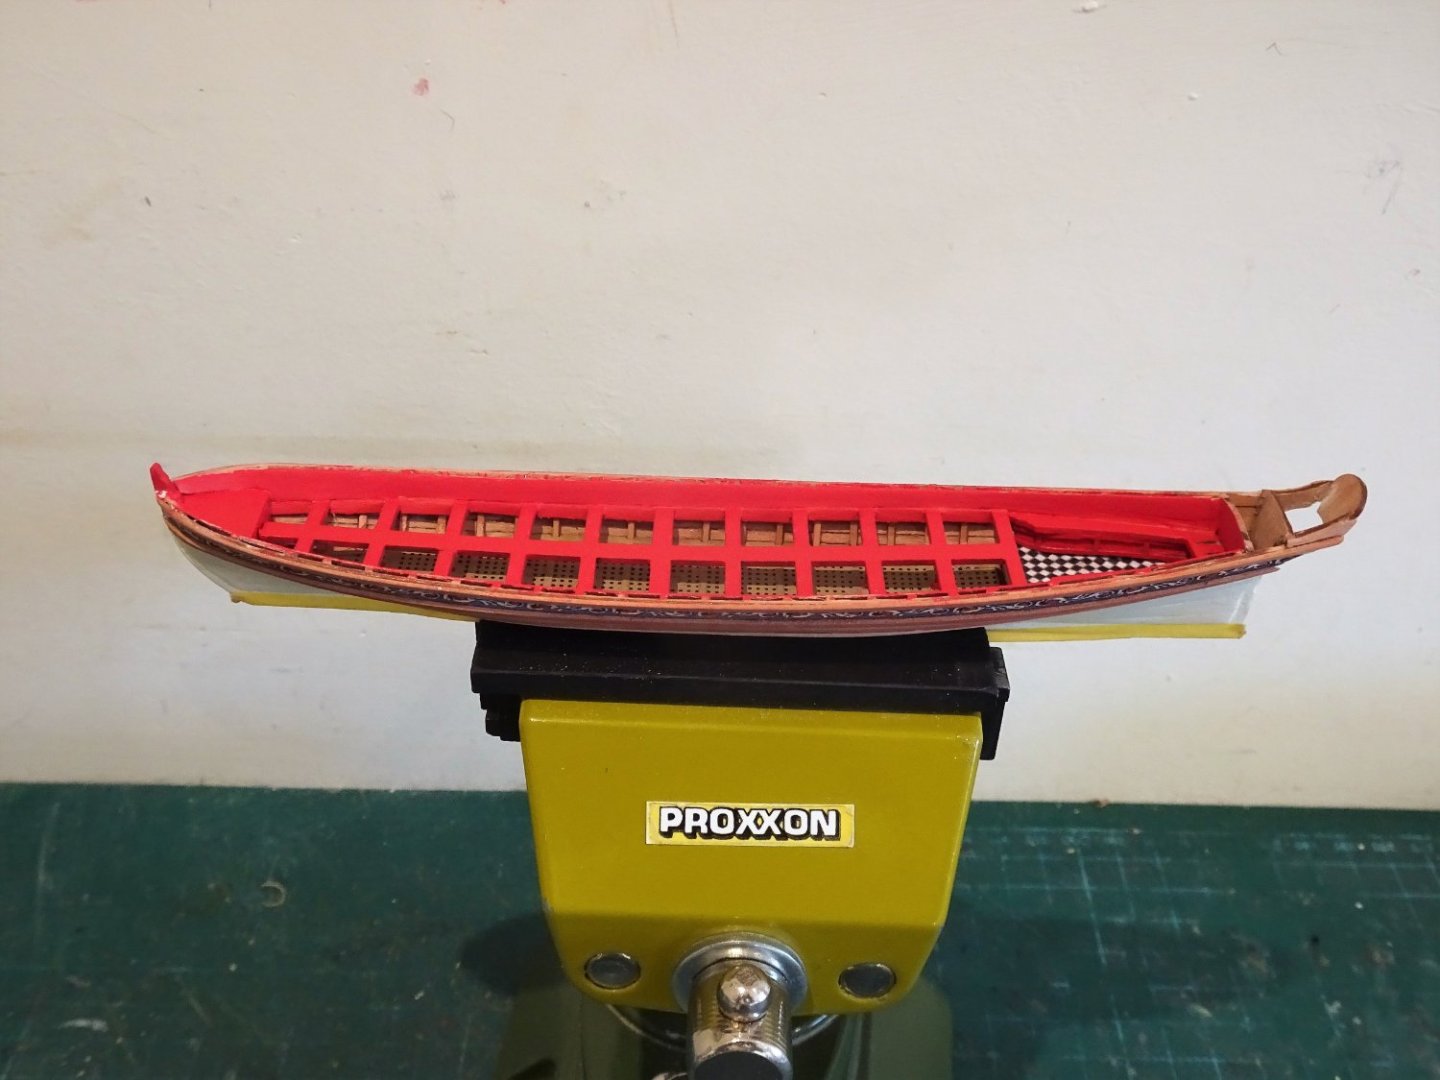
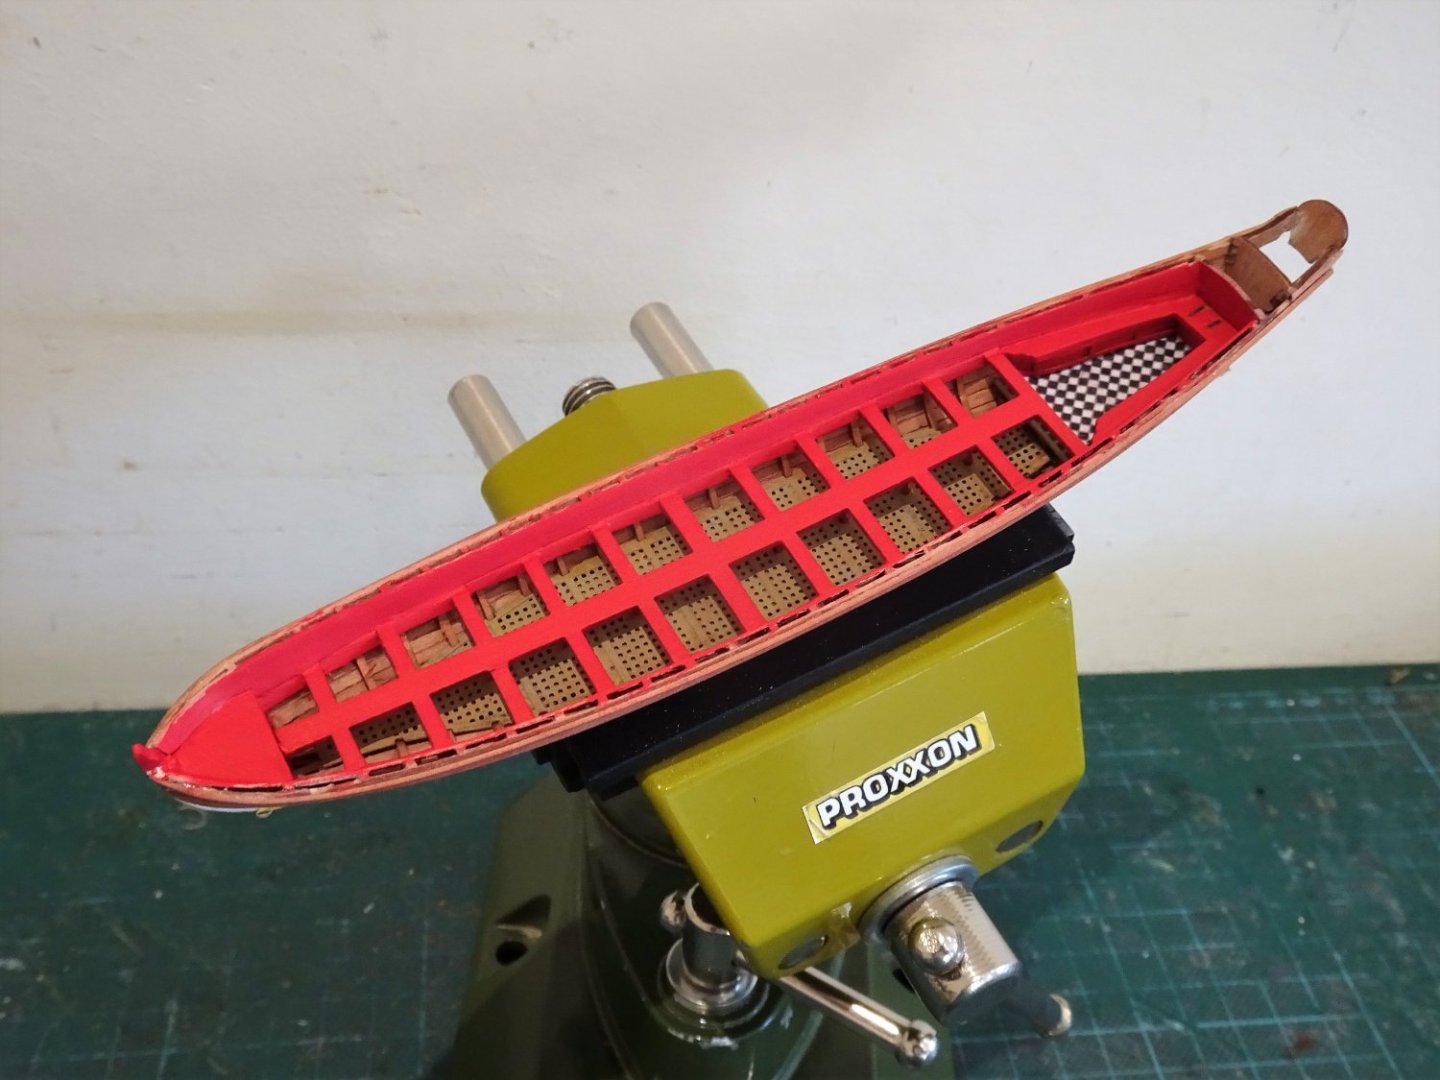
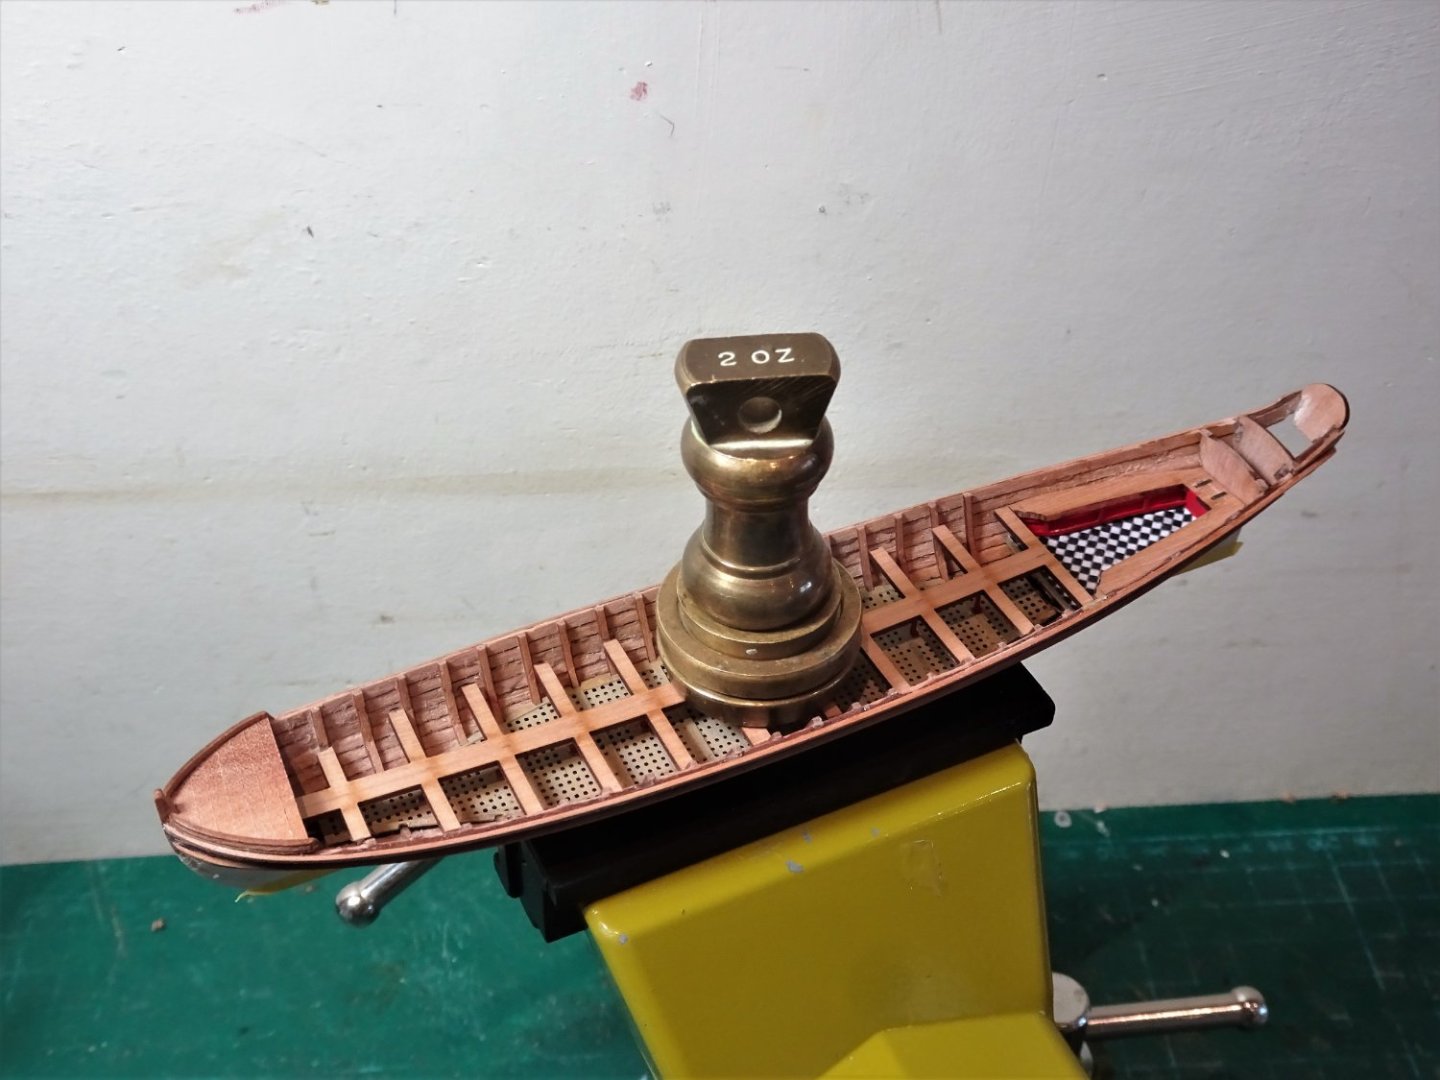
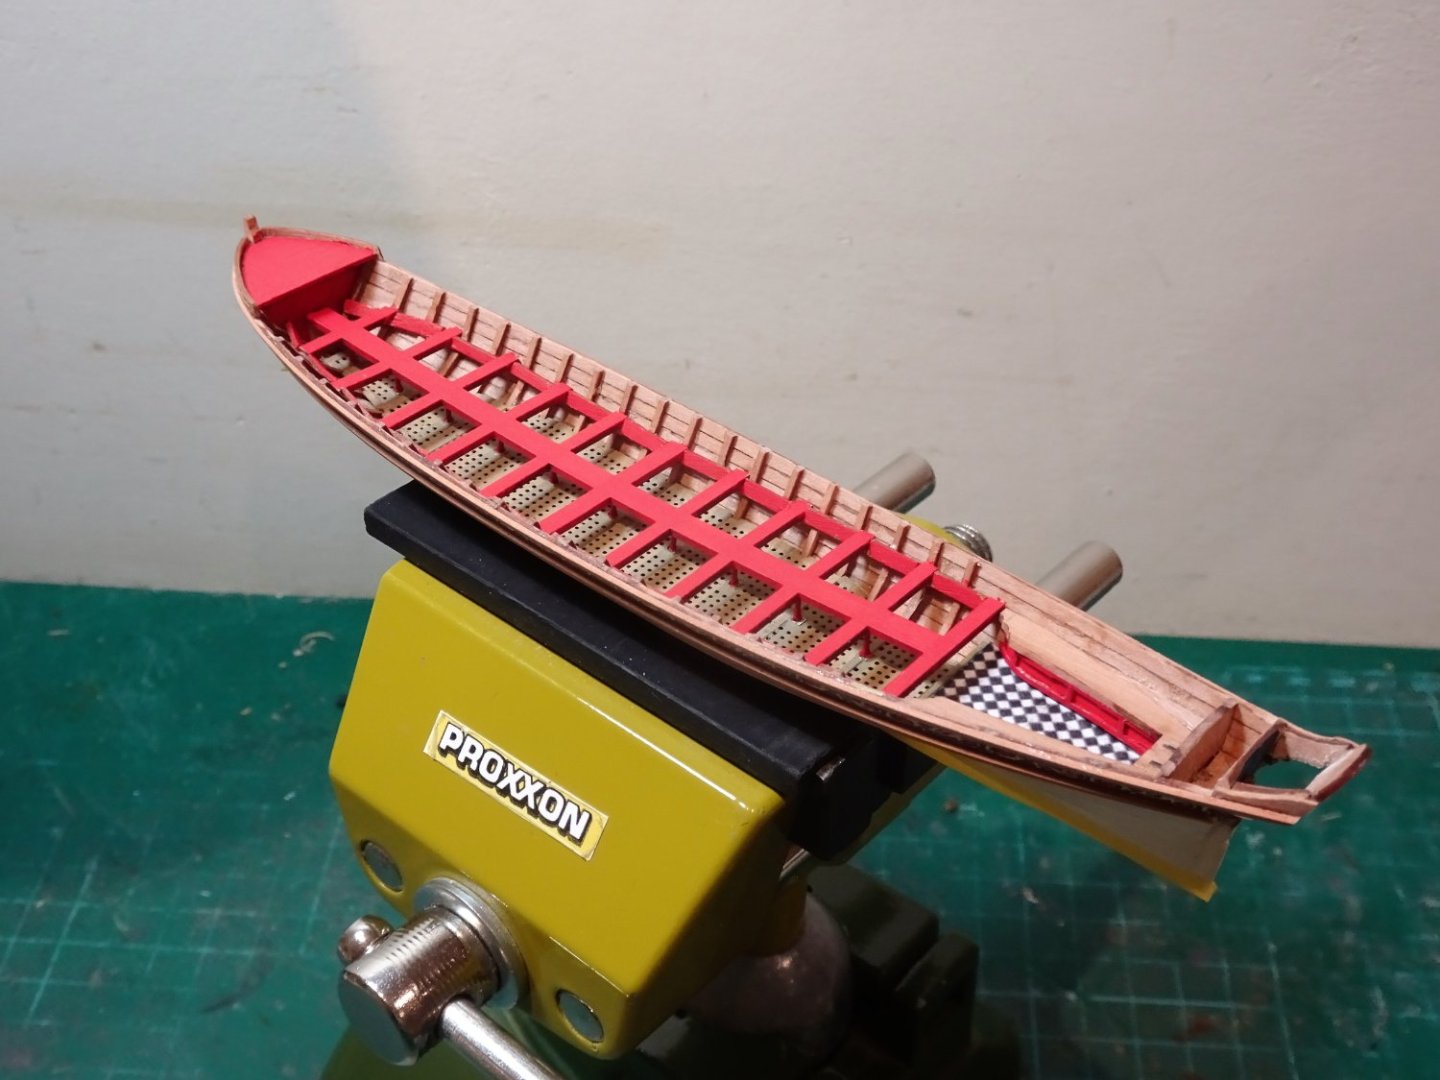
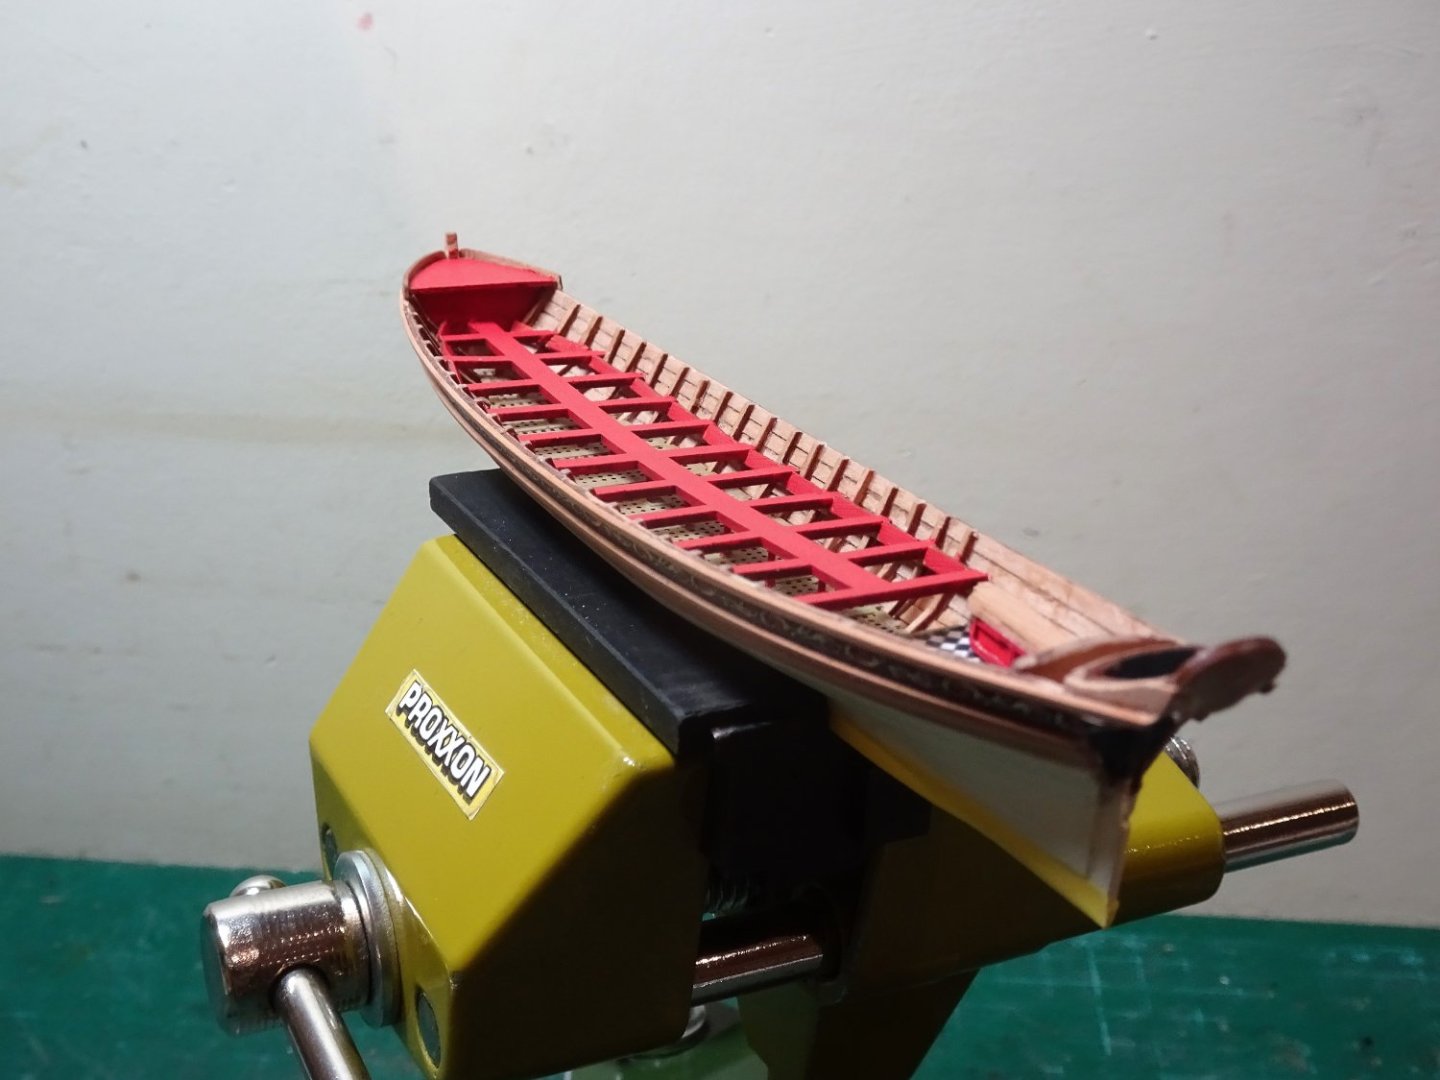
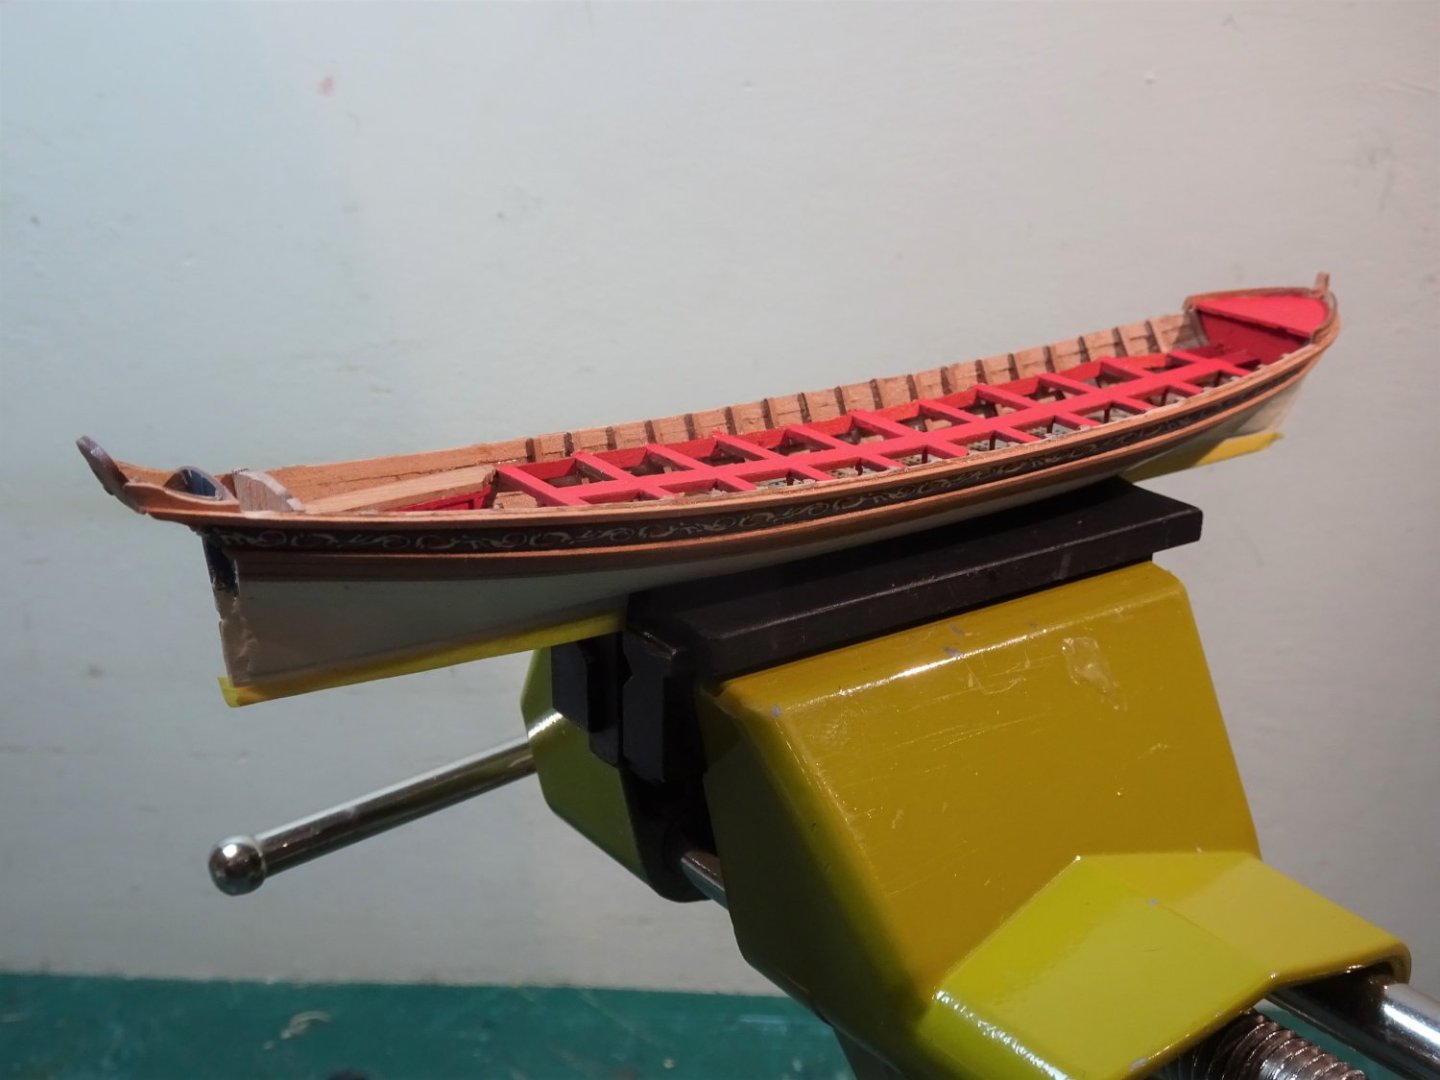
Post 13.
De-construction begins.
Removing the wash boards and platform is the easy bit.
9531
I used a combination of scalpel, micro chisels, and etched saw blades to slowly pare away the first two bulkheads.
9538
I reduced the height of the bulkheads to a fraction above the line of the central thwart dividing plank.
.thumb.JPG.5ae45e01736c008549757a847600b4f2.JPG)
9540(2)
.thumb.JPG.99c837b8411f535d992ceef806b0eb7a.JPG)
9542(2)
The job went better than I imagined, there was a slight breakaway of the planking at the bow, but the planks remained glued to each other, and a spot of ca resolved the problem.
9545
With the lowered foredeck, the barge now better reflects the elegant lines typical of the type, and I’m far happier already.
9553
9554
9557
I’m not out of the woods yet, there is the internal lining to fit, followed by the decorative panels, but at least I now feel I can continue with the build.
B.E.
24/11/2022
-
Hi Jason,
I get them from a company called Modelu.
Modelu – Finescale Figures (modelu3d.co.uk)
They do them in various scales and I bought them originally for my 1:64 Fishing boat kits.
Unfortunately, they don't do 18th c period naval figures, but they now do a range of fishing boat crew figures.
Scale figures in various poses are useful for comparison purposes, it is a pity no one does seated rowers, I could do with around a dozen if the barge ever gets completed.
Cheers,
B.E.
-
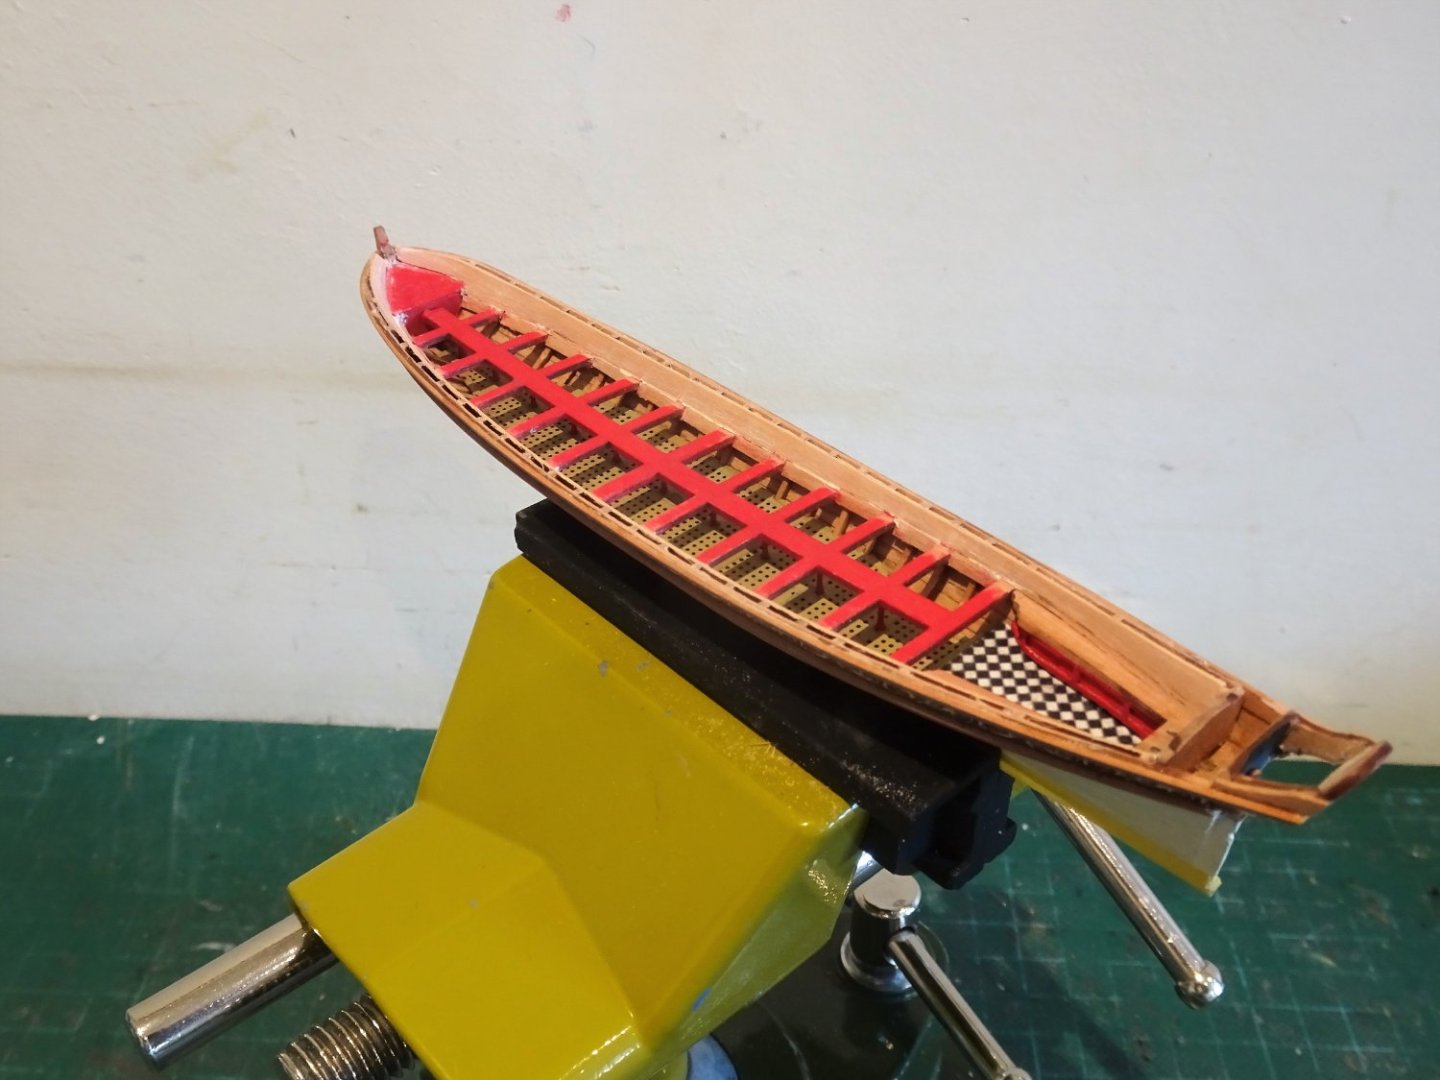
Post Twelve
Time to fit the thwarts.
9513
There is a natural spring in the unit which resists the sheer of the barge. To this end the unit is weighted into place and heat treated to follow the sheer.

9516
Ca is applied to the pillar tops and pva to the thwart ends.
The sheer is evident in this photo.
9517
9518
With the thwarts firmly in position the next stage can begin.

9519
9521
Wood strips are fitted between the thwarts this will form the lower element of the panelling.
9522
A card template is used to get the shape of the upper panelling.
9523
With a coat of paint applied I can get a good impression of how the finished boat will look.
9525
Sadly, I don’t like what I see.
9529
That Fore deck position looks so out of kilter with the elegance of a barge, I don’t think I can live with it.
The only option is to de-construct the bow area at the risk of destroying the model, but I would otherwise waste no more time on it.
If I’m going to do it, it needs to be done before I add the linings, now where did I put that Dremel.
B.E.
23/11/2022
-
Well done, Glenn, I like the cut of her jib.👍
Vanguard's range of Fishing boats are very appealing.
B.E.
-
Well Yves, a case of monkey see, monkey do.
I thought if it was good enough for a guy who was around at the time (1750) to show it, it was good enough for me.

The black and white schematic was a traditional thing to be found everywhere in the flooring from stately homes, to cathedrals, to 1950's kitchens in the form of lino.
In naval circles it probably just followed fashion of the time, except it was merely painted sailcloth, anything else would be considered extravagant.
The French on the other hand, more conscious of creature comforts preferred parquet flooring in their great cabins, perfect for unlaying by carronade.
They even had separate Bread Ovens; can you imagine!
The British were, and are, more conservative, and their lordships of the Admiralty had an aversion to anything 'frenchified' despite having pinched the designs of their Seventy-four gun ships, and finally being seduced by the epaulette, that most French of French adornments.
A brief potted history, not entirely tongue-in-cheek😉
Cheers,
B.E.
- dafi, hollowneck, jpalmer1970 and 5 others
-
7
-
 1
1
-
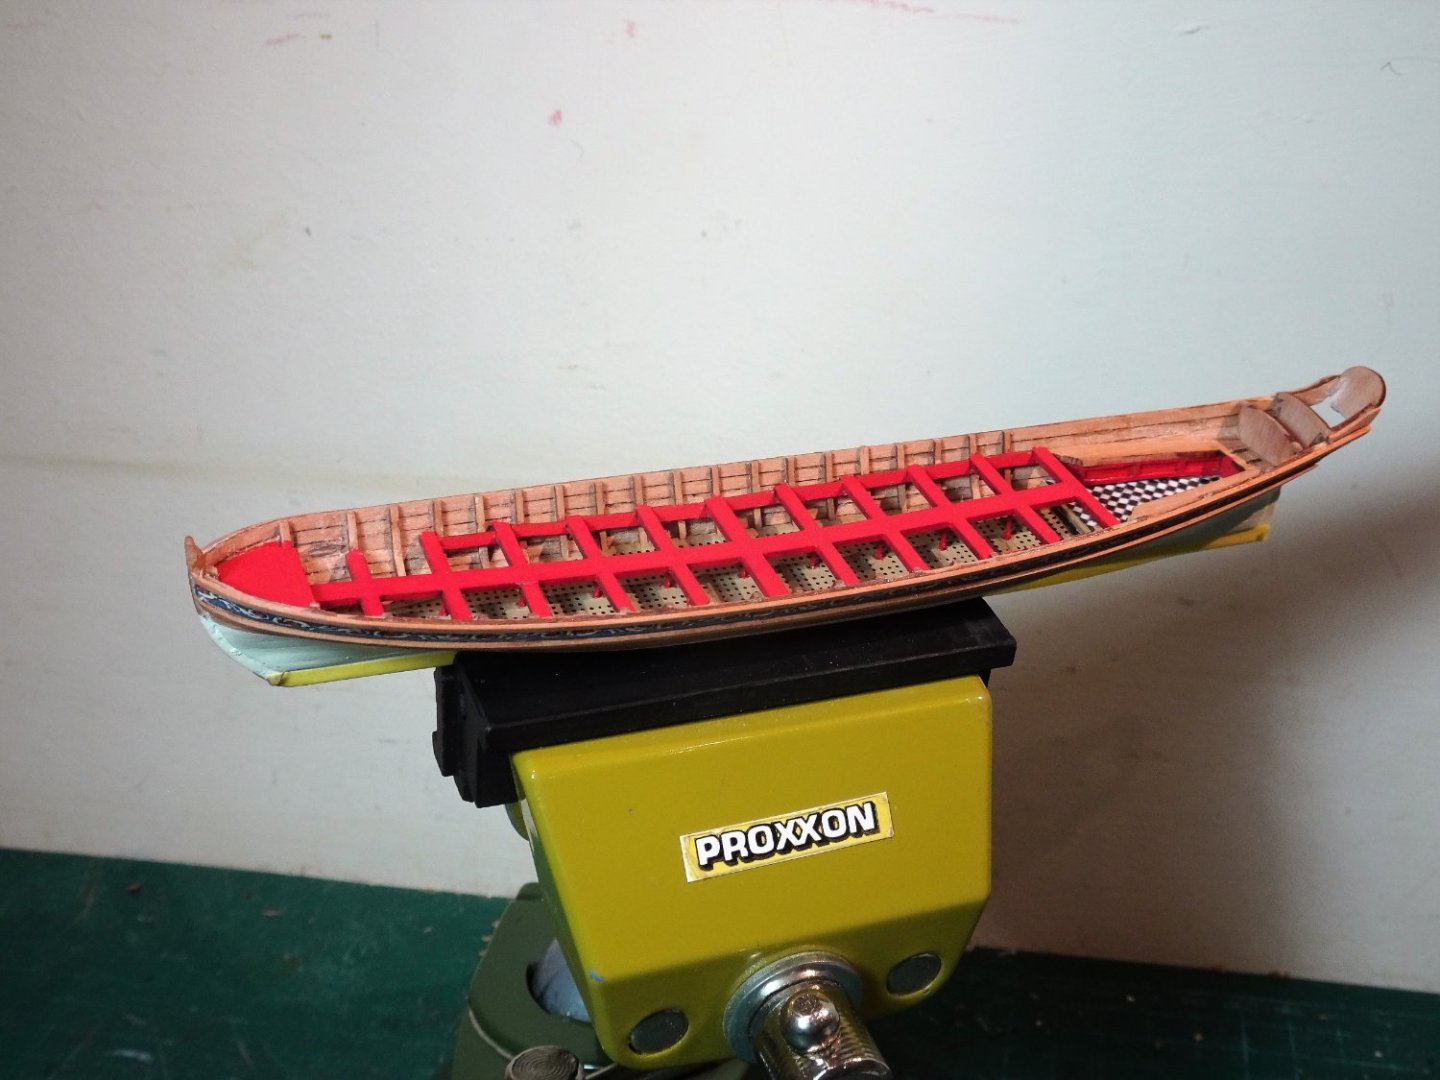
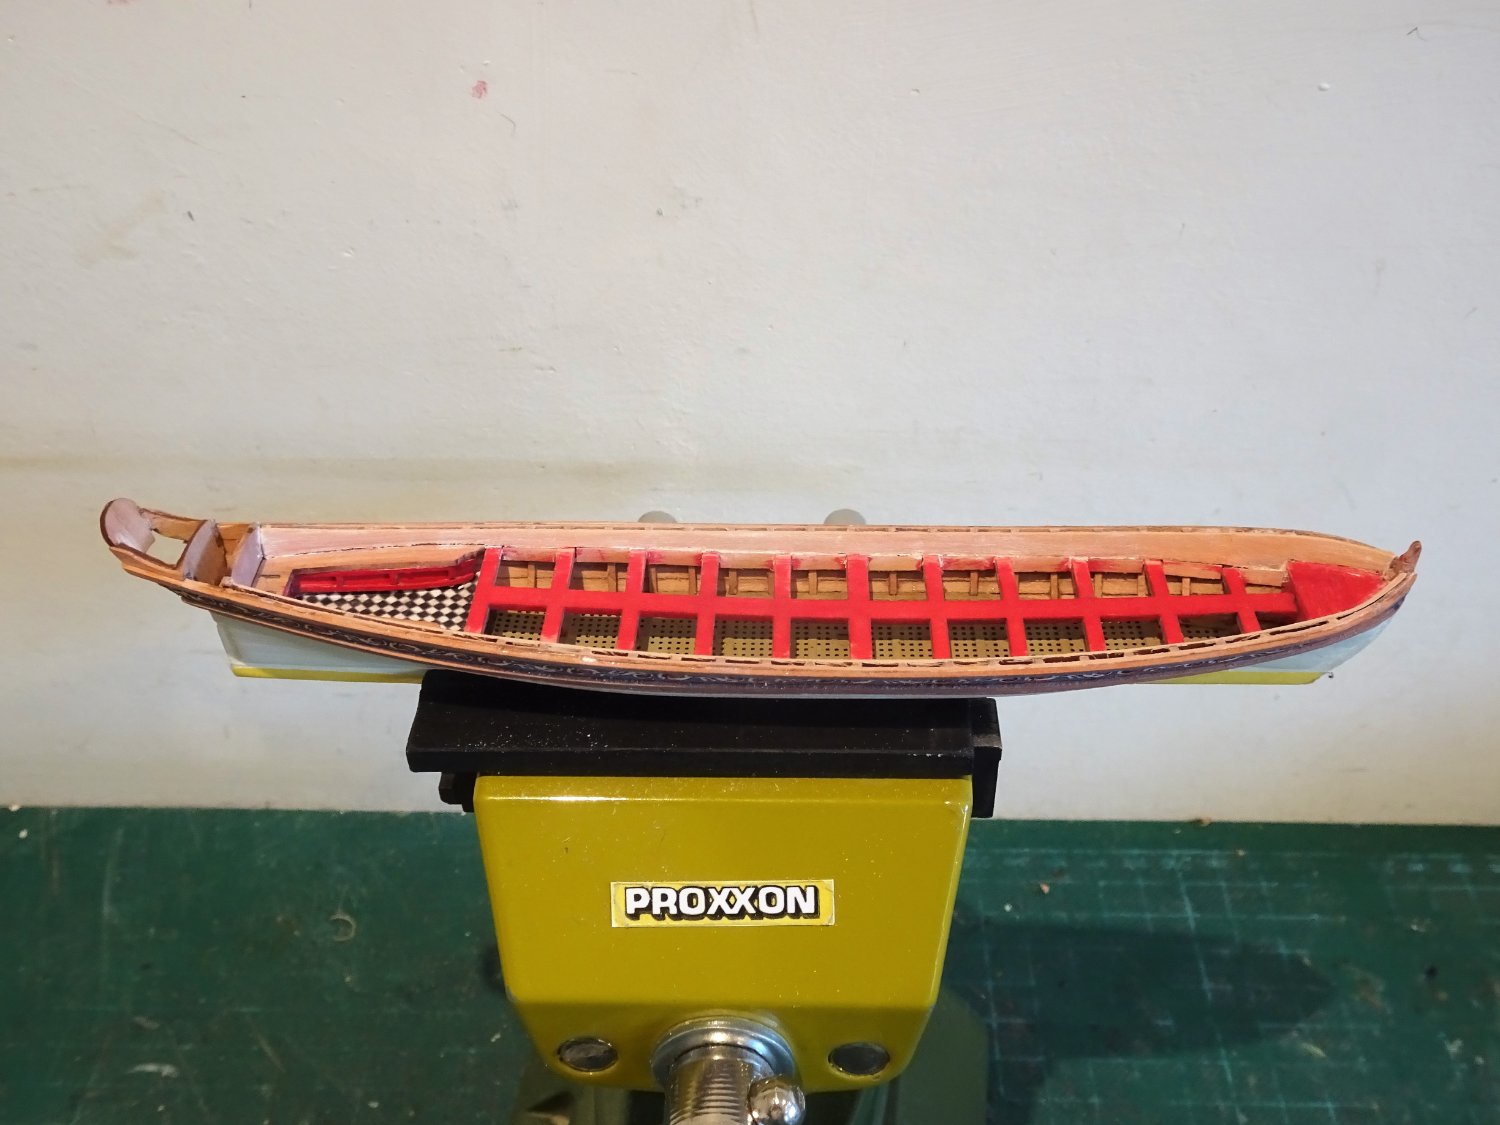
Post Eleven
Fitting the thwart set as a unit presents some difficulties.
The unit must sit down on the central supports and the thwarts be trimmed uniformly on either side to sit squarely against the hull sides at the correct level.
My approach is to use individual thwart substitutes to determine the correct lengths and apply those to the unit.
The unit is then trimmed by degrees.
The stern sheets required careful sanding and bevelling mostly towards the stern, to seat fully down at the correct level.

9494
Once again, the dockyard workers were called into use to confirm the levels.
003
Many contemporary models show panelling below the benches.
Note also that the inside hull has been lined to below the thwarts.
I fancied replicating the look below the stern benches.
Great care must be taken in sanding and bevelling the thwart ends because the grain runs fore- aft making them prone to snapping if sanding is done other than with the grain.
I suggest the thwart is held between thumb and fore-finger as close to the end as possible during sanding.
Each thwart is progressively fitted until by applying light pressure on the central plank the unit sits down on the pillars without flexing the hull sides.
It is necessary to get the thwarts and seats dry fitted to satisfaction before moving on.
I glued the stern benches first but using the thwarts to ensure the levels met up.
.thumb.JPG.dfb6ba683f9fd78b535aab5fa66244fc.JPG)
9496(2)
Getting the thwarts to look right is a major aspect of small boat builds.
9499
9498
C’mon lads, break over, back to the job.
With the stern sheets glued into place I can turn my attention to the panelling below the benches.

9495
Forming the shape of Boxwood strip to fit.
9501
A lot of faffing around to get the panelling to fit, still ongoing at this point.
.thumb.JPG.a5ae00297816f216b0875f6eaff2ae85.JPG)
9506(2)
.thumb.JPG.ee00edf785b48f7c64dfdeb716a75362.JPG)
9509(2)
.thumb.JPG.df82688f17019237760a389867ec516e.JPG)
9510(2)
Before the stern-sheets can be completed I need to work out the panelling above the benches.
Onto the thwarts.
B.E.
22/11/2022
- hollowneck, jpalmer1970, bruce d and 10 others
-
13
-
Happy Birthday Chris, have a great day.
Just enjoying the thought of what wonders you will produce in the next 20 years
Regards,
Maurice (B.E.)
- DB789, Nipper, hollowneck and 5 others
-
8
-
I think you have the shape spot on Ron, looks very convincing.
A modification you could add is to paint the English Cross of St George in the Hoist section.
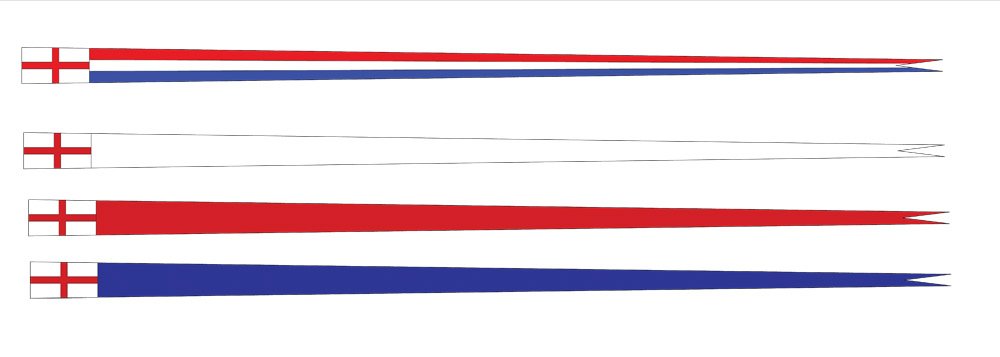
These were the four commission pennants of the period.
Colours of the Red, White, and Blue squadrons, and the Union (Common) pennant as an alternative.
Red and blue (up to 1864), Common (up to 1850). The White remained in use post 1864 as the designated naval colour.
Regards,
B.E.
.JPG.5db9f8735b892affae4f30ff15c70c62.JPG)
.JPG.8101f478822d19009991298ca4dc9a54.JPG)
.JPG.a0764a7d8b116076d3d7825af97b1634.JPG)
.JPG.0a32d89670e461e29cbae9accf452db1.JPG)
.JPG.25383f390163700f1a96fe091fa8b4ae.JPG)

.JPG.1fc3cf76bdff2ae3f55a981e9cd95cc7.JPG)
.JPG.6a001f632f9562112b6ee32430e1c1d1.JPG)
.JPG.bd596fff97345db8967f742ca57da040.JPG)
.JPG.48c8f8d9244b562919825b3c1a5eb92e.JPG)
.JPG.6288bfa51b71b52f9c44eb269c8c7bc8.JPG)
.JPG.5056486416dc5bebe571493c3b61790a.JPG)


.JPG.3d8a6817be44cb77bafb8e3d3f0f0cca.JPG)
.JPG.53b5d0ecd12ad4dd867d0f973bc334b2.JPG)


.JPG.cf58b6edcbbd80daf3f2915a1d4efd57.JPG)


.JPG.36f80105e3a103233c3a7913f79ca500.JPG)
.JPG.f0462be530ae94fe2e375ee86829e884.JPG)
.JPG.9bc55a72ffbf209ba38fb1da13724f4d.JPG)
HMS Speedy by whitejamest - Vanguard Models - 1:64
in - Kit build logs for subjects built from 1751 - 1800
Posted
That is a beautiful clean construction of the Yawl, very well done.
I like that you have replicated a matching wood finish to the gratings and footwalings, excellent effect.
Regards,
B.E.