Landlubber Mike
-
Posts
4,543 -
Joined
-
Last visited
Content Type
Profiles
Forums
Gallery
Events
Everything posted by Landlubber Mike
-
 Hi Ferit, thanks for looking in. Interesting, the picture does seem to show a gap or indent, but when I look at the model, it looks perfectly straight/in line with the general curvature of the hull. My guess is that it's an artifact from my iPhone picture. I was doing my best to take a picture over the top of the model without capturing my toes in the picture. Ian Major pointed out my feet on one of my other logs a while back, and I've been self conscious ever since!
 -
Yeah I’m in the same boat. Very hard to find!
-
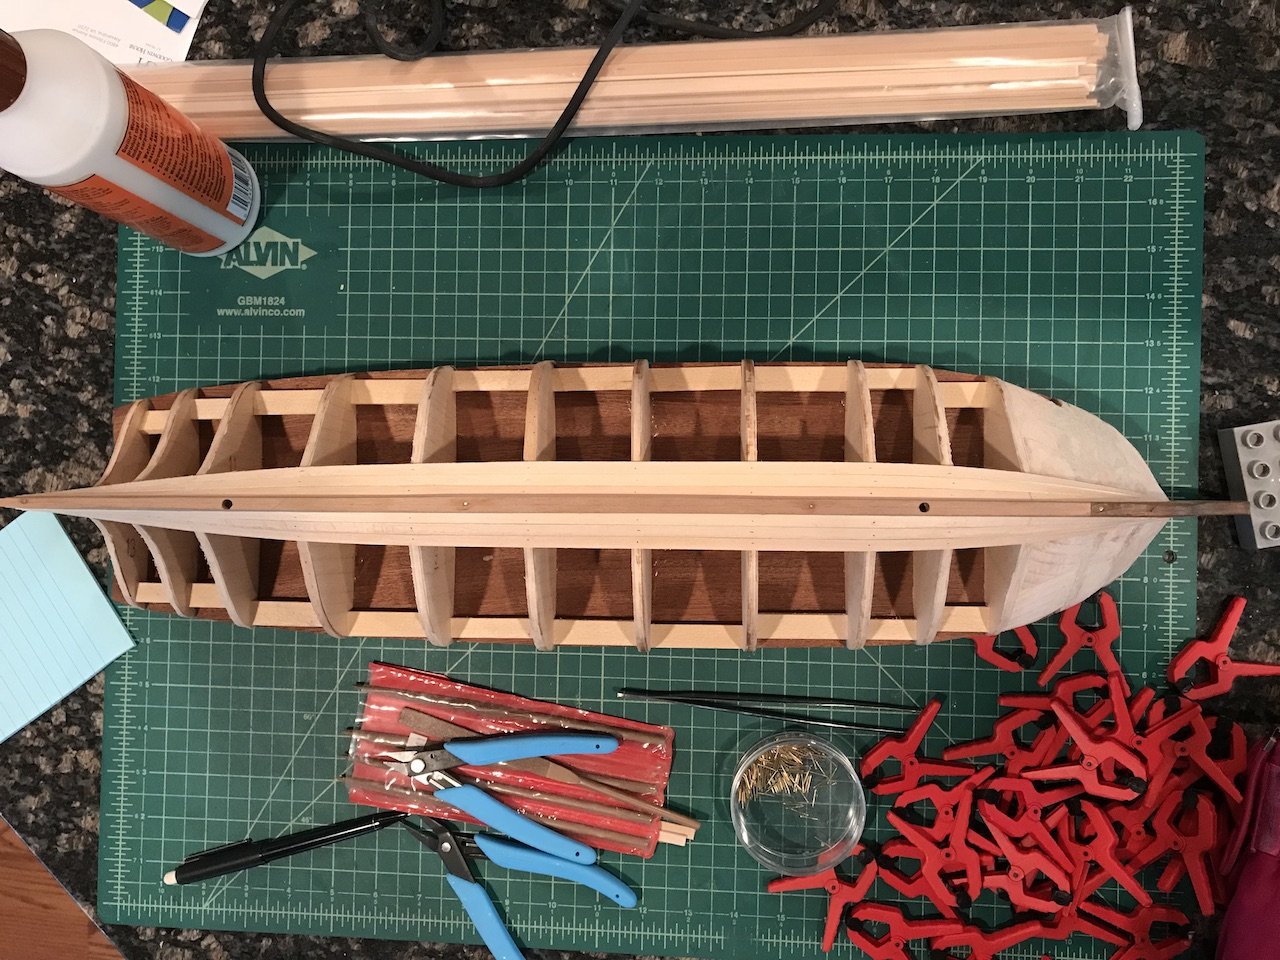
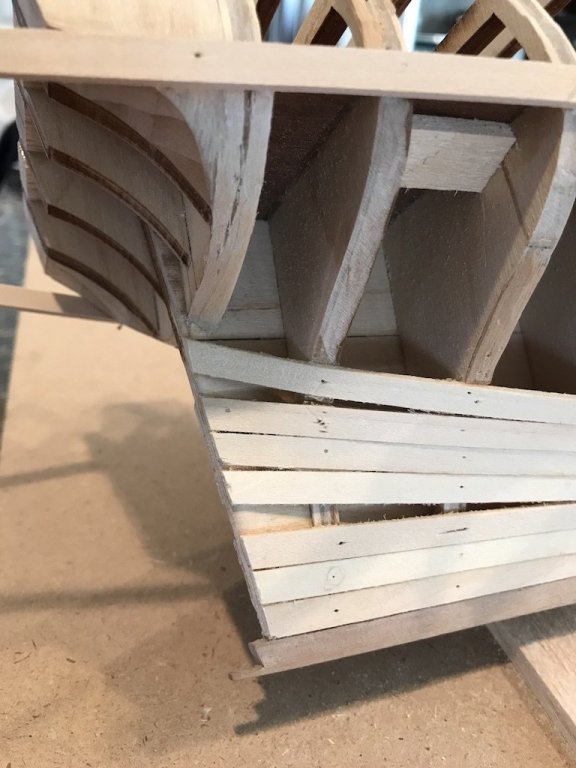
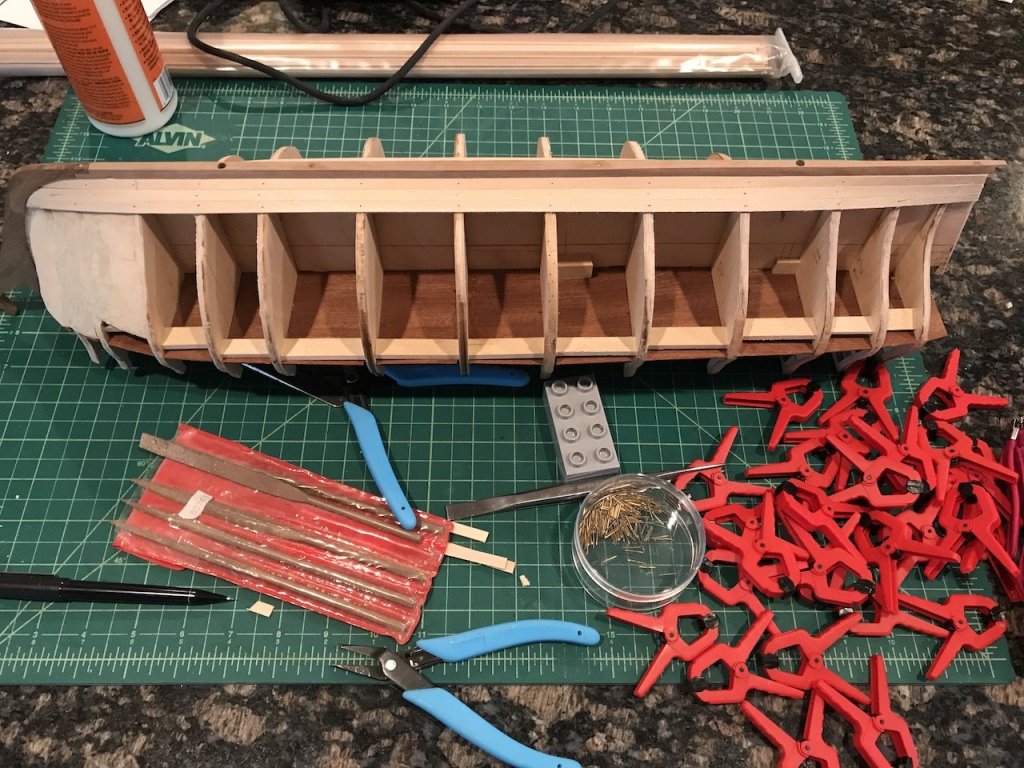
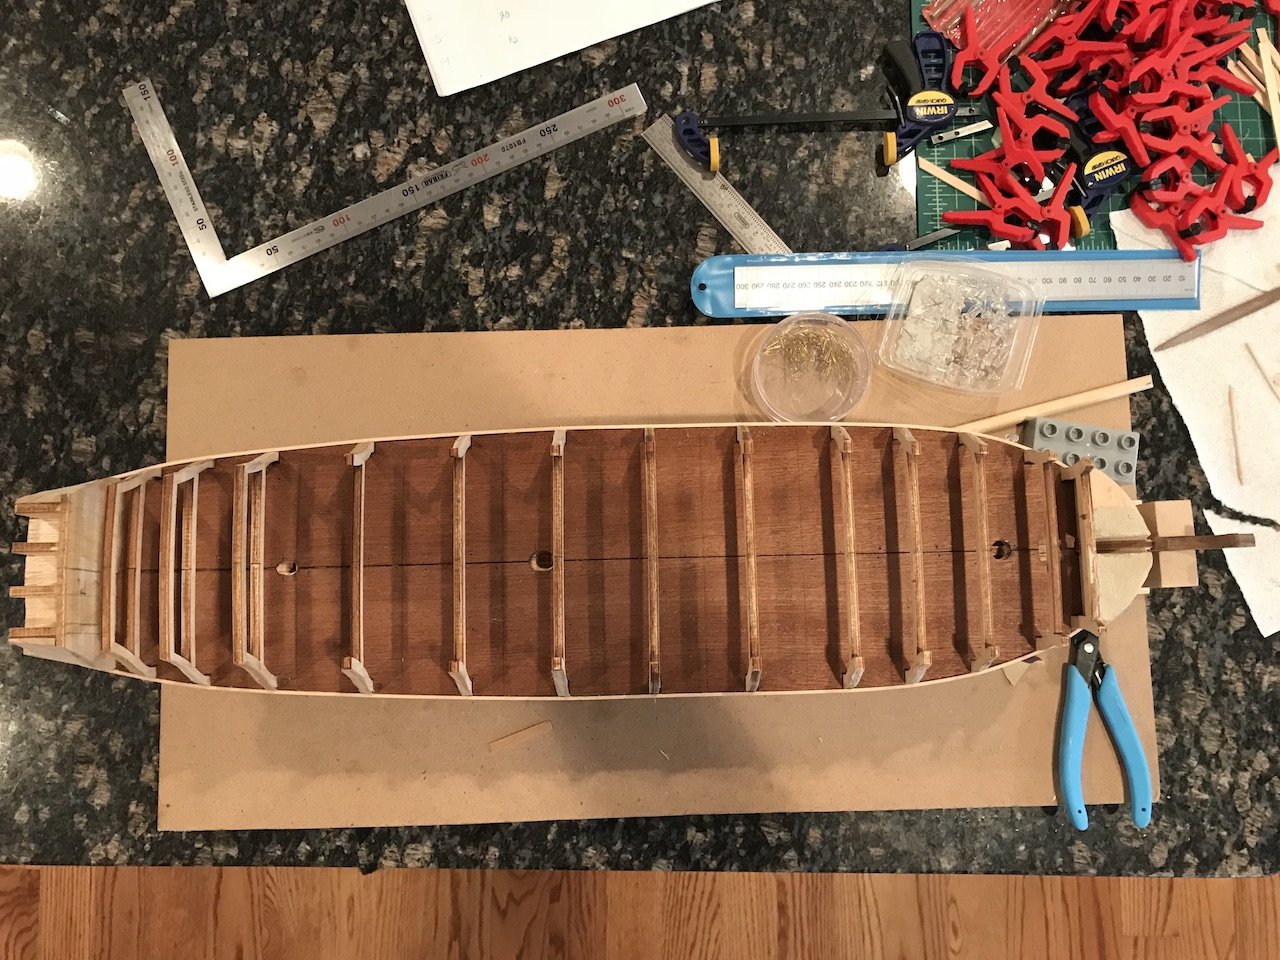
First planking is slowly coming along. I have seven or so strakes glued from the keel, and decided to switch and start from the gun deck down. This is what Pete recommended in his helpful Euromodel notes, and was the approach Keith Julier took in his Period Ship Handbook 2 (which has a chapter on the kit). This is my first time working on a multi-deck level warship. To help ensure that I had a smooth guiding line for the gun ports, I decided to run the top of a planking strake along the top line of the gun deck template. When checking for symmetry, however, I noticed that in some areas, the outer edge of the gun deck template between the bulkheads was at a different height from one side to the other. I think what happened was that with all the dry fitting, the two pieces of the template ended up having a slight bend to them, and although generally symmetrical where they were glued at the bulkheads, the outer edge of the templates between the bulkheads ended up differently. I was a bit worried about this, as not only would I have asymmetry, but the cannons would be all over the place in terms of height it I cut the gun ports out along the proper line. So, what I ended up doing was gluing spacer blocks between the templates and the bulkhead bracer blocks that I had installed before. In some cases I used the blocks to raise the edge of the templates, in some to lower, and in some to help change the the sweep. A real pain, but I'm glad I took the step. Now, the gun deck has a smooth sweep from stem to stern, and is symmetrical on both sides. I was thinking about selling this kit and moving directly to scratch building, but I'm glad I decided to stick with it. Not only is it a beautiful model, but I've been learning a lot along the way. Maybe some of these things matter less with scratch building (like the bowsprit housing and my recent gun deck alignment adventure), but I think the general lessons learned, especially how to think ahead, will come in handy. The Euromodel kit is great too in that it gives plenty of optionality to detail the kit as much as you'd like, so I'm sure that will help if I should happen to want to scratch build in the future.


-
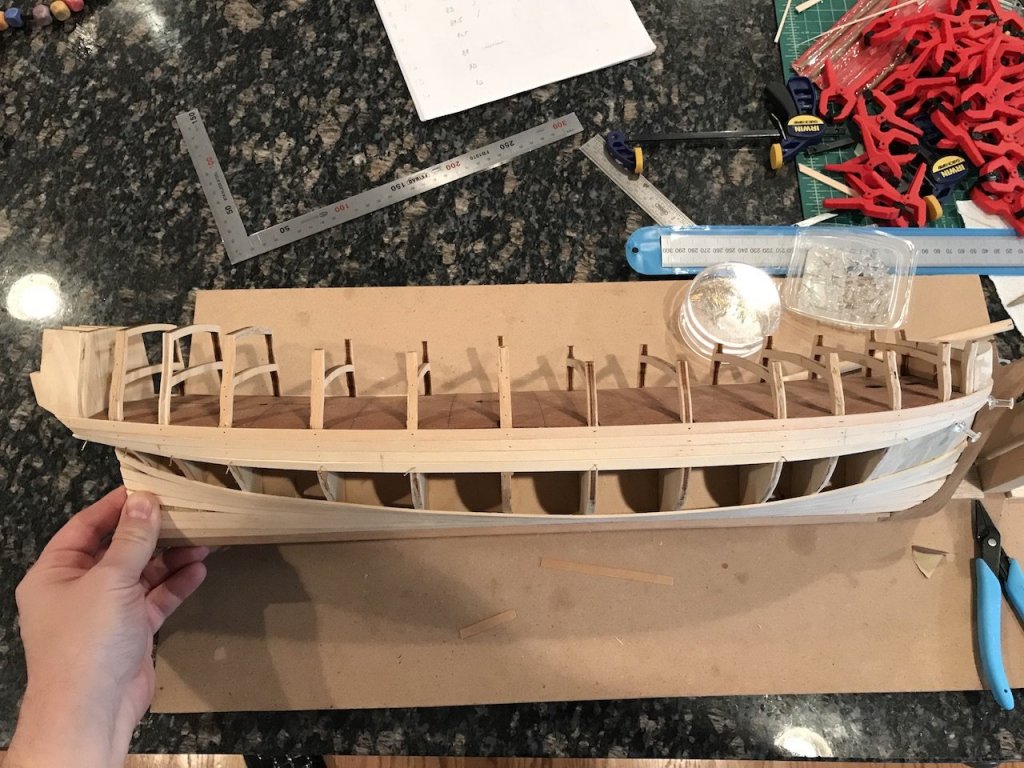
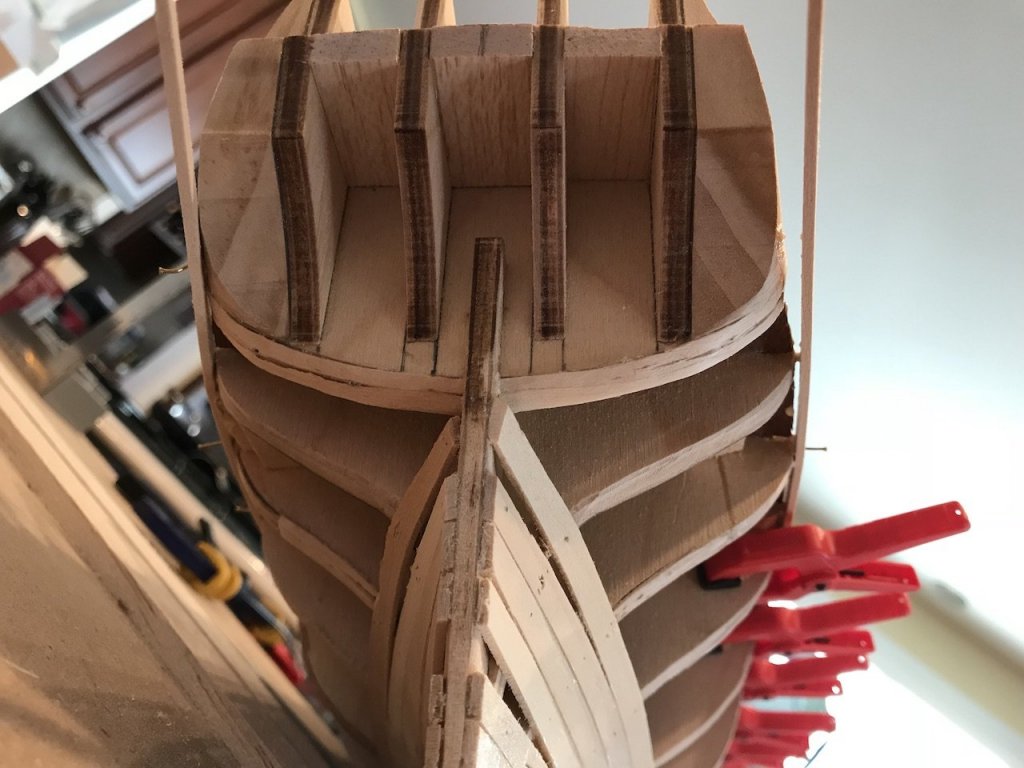
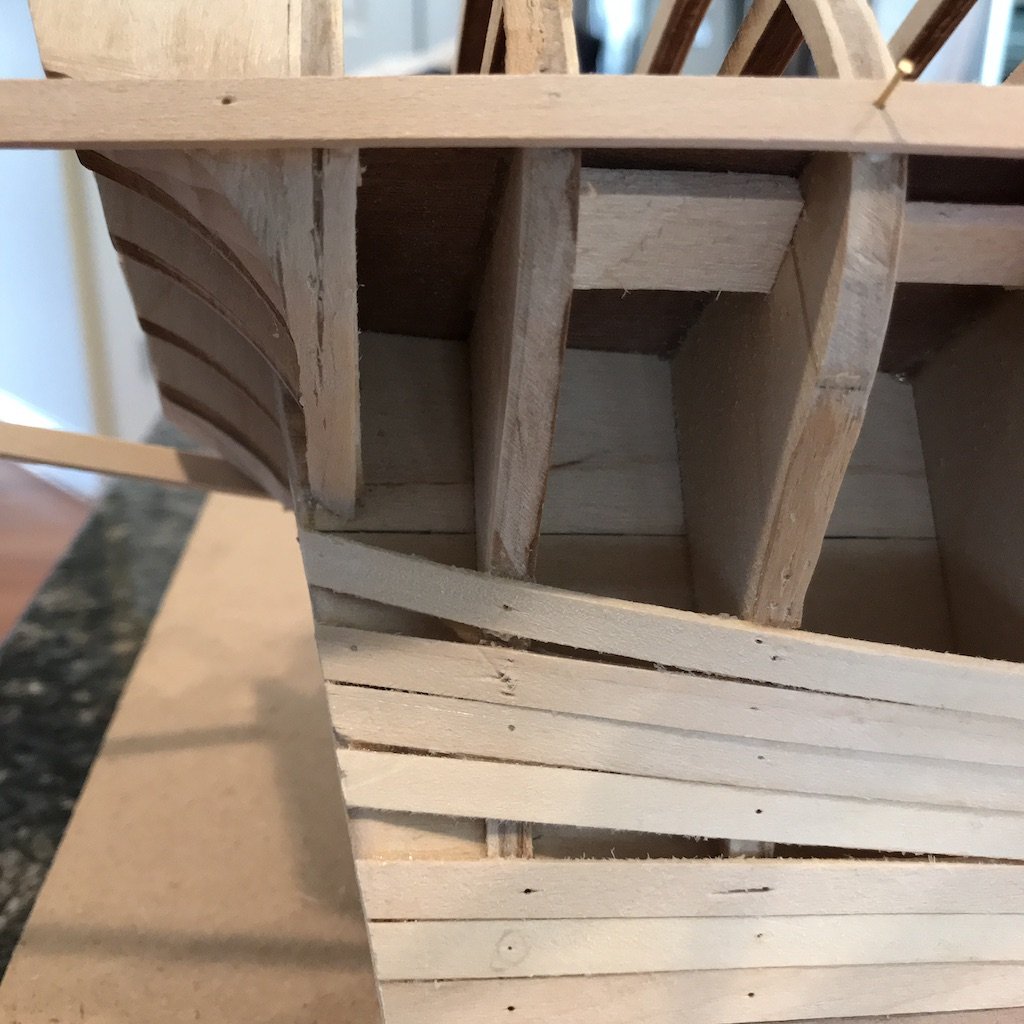
Thanks for everyone that offered thoughts on what to do with the last bulkhead. I ended up adding two planking strips to it, then fairing the bulkhead back to the original line on the aft side. Seems to have worked very well - I now have a firm, wider surface to glue the end of the planks to, while having a nice smooth transition to the stern.
-
Byrnes saw sled
Landlubber Mike replied to Trussben's topic in Modeling tools and Workshop Equipment
I was just telling someone the other day who was building miniature display tables that he needed to look at Byrnes' tools. I went to Jim's site to copy the link, and happened to see the sled on his website - I plan on placing an order this week! His tools are incredible and well worth it if you can swing the price. -
Looking great Peter. This is going to be a fantastic model!
- 366 replies
-
- 2
-

-
- bellerophon
- victory models
- (and 2 more)
-
Home Made Sanding Blocks
Landlubber Mike replied to Osmosis's topic in Modeling tools and Workshop Equipment
Those look great. I've just been taking balsa blocks, and using rubber cement to attach sandpaper to them. Yours put mine to shame -
Opinions on Sherline DRO for Lathe
Landlubber Mike replied to rtropp's topic in Modeling tools and Workshop Equipment
Danny thanks very much for that. Was good to see that is the case! https://www.sherlinedirect.com/index.cfm?fuseaction=product.display&Product_ID=1520&CFID=143721392&CFTOKEN=15985857 -
Opinions on Sherline DRO for Lathe
Landlubber Mike replied to rtropp's topic in Modeling tools and Workshop Equipment
Thanks Bill - I've been meaning to get one but have been waiting to see it go on special. Forgot to check this month, so thank you! Good to know that you can use the display for both the mill and the lathe. Saves a bunch of change. -
Simon thank you - appreciate the kind words! Thanks for that link on the Russian forum. I came across it on Pontos’ log, but probably should look at it more often. Mark, thanks for posting the plans. I think the Euromodel LAR is a different ship from the one in the Ancre plans, and my guess is that the ship is a Swedish ship, and not a French one. Apparently there’s been research out there suggesting that Admiral Paris made a mistake in copying over the Chapman plans and calling it the LAR.
-
Thanks Pete! I’ll take a look at things tonight and see what the lines end up looking like. Glad to hear you’re almost fully up and running!
-
Magnificent planking Mark! I bet the planking will take a while, but the results will be well worth it if you take your time. How thin is the veneer? Interesting looking at the stern of this ship. Her stern is kinda close to my La Renommee which you commented on earlier today, though a more pronounced square tuck stern. The tear drop at the bottom is quite nice.
- 331 replies
-
- 4
-
-
- nuestra senora del pilar
- occre
- (and 1 more)
-
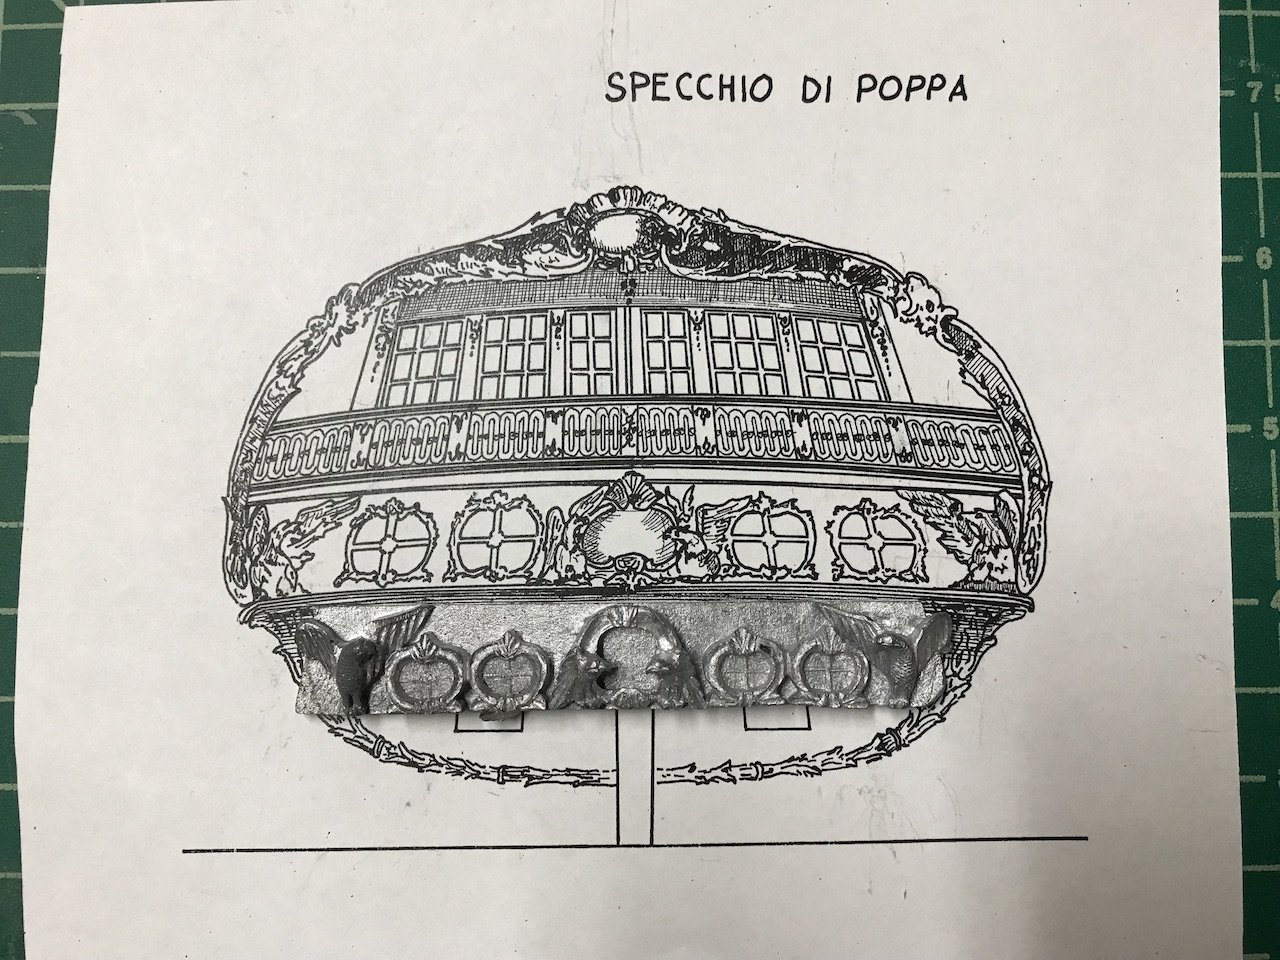
Thanks to both Marks! Marktiedens, I believe the two decorative cast metal pieces the bottom of the counter. Not sure if I will use them or try scratching my own. That's going to be a tough thing to scratch since I think the area has a slight curve, and the decorative piece is fairly thick. Will have to see about that. Mtaylor, thanks for posting your Licorne. It's good to see how the planking flows. The LAR is a bit different in that the stern is a square tuck stern, whereas the Licorne is a round tuck. The terms seem a bit reversed, but essentially the counter on the LAR is rounded at the bottom, whereas the Licorne is squared off. Still good to see how the timbers flow though (and always good to see your gorgeous model), thank you!
-
Hi Mark, your post came in as I was writing the one above. I think you're right if you take a look at my pictures. I see Hubac just wrote in too, and seems to be of a similar opinion. I did reach out to Pete, but he didn't have the benefit of my pictures. Hopefully he sees the pictures and advises on what he did on his LAR. Thanks Hubac! That was what I was thinking as well. The angle would be very steep indeed, which is why I think adding material and fairing back to the lower edge of the aft side of the bulkhead makes the most sense. Appreciate too what you said about planking the counter first, and then adding the side planking. I think what I'll do is complete the first planking, then plank the counter, and finish up with the second planking.
-
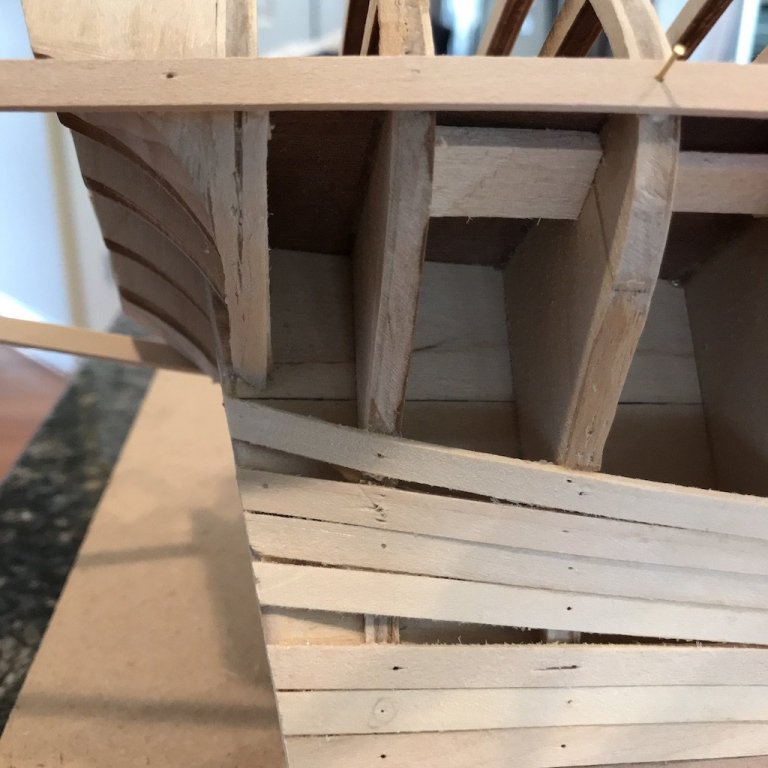
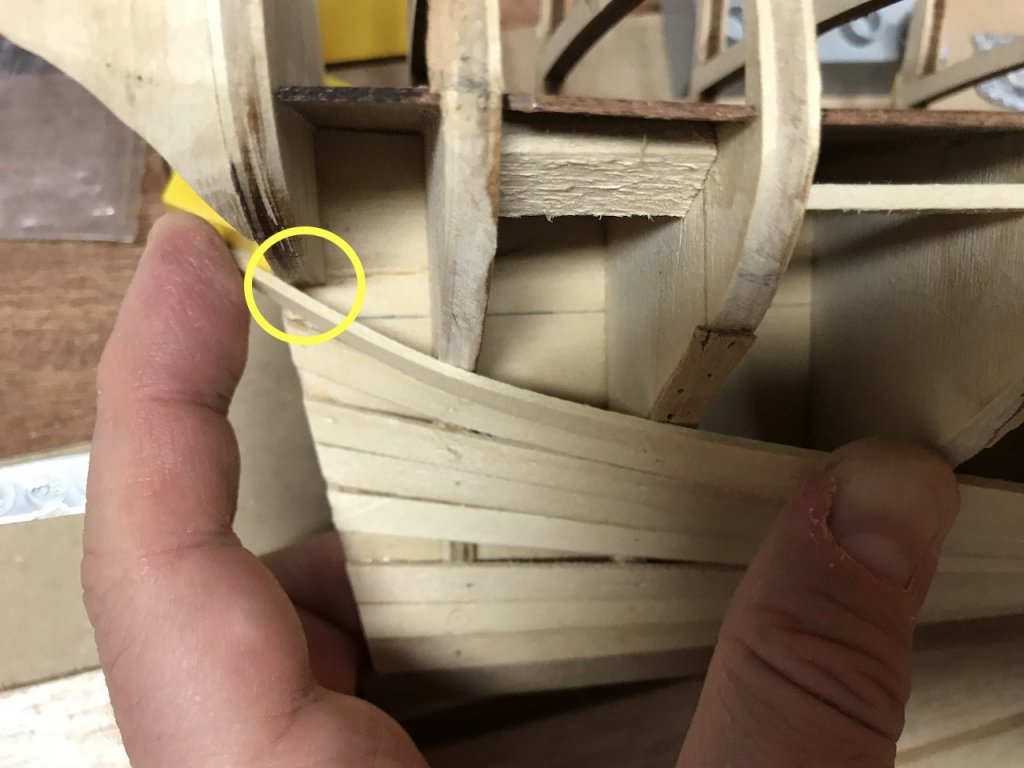
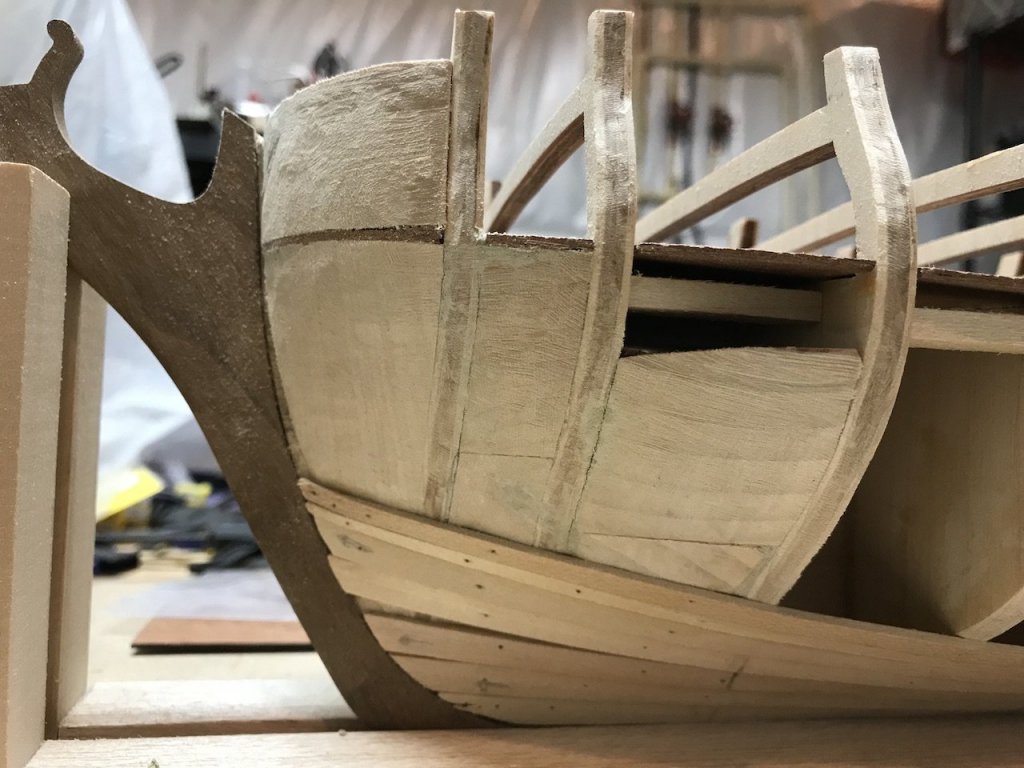
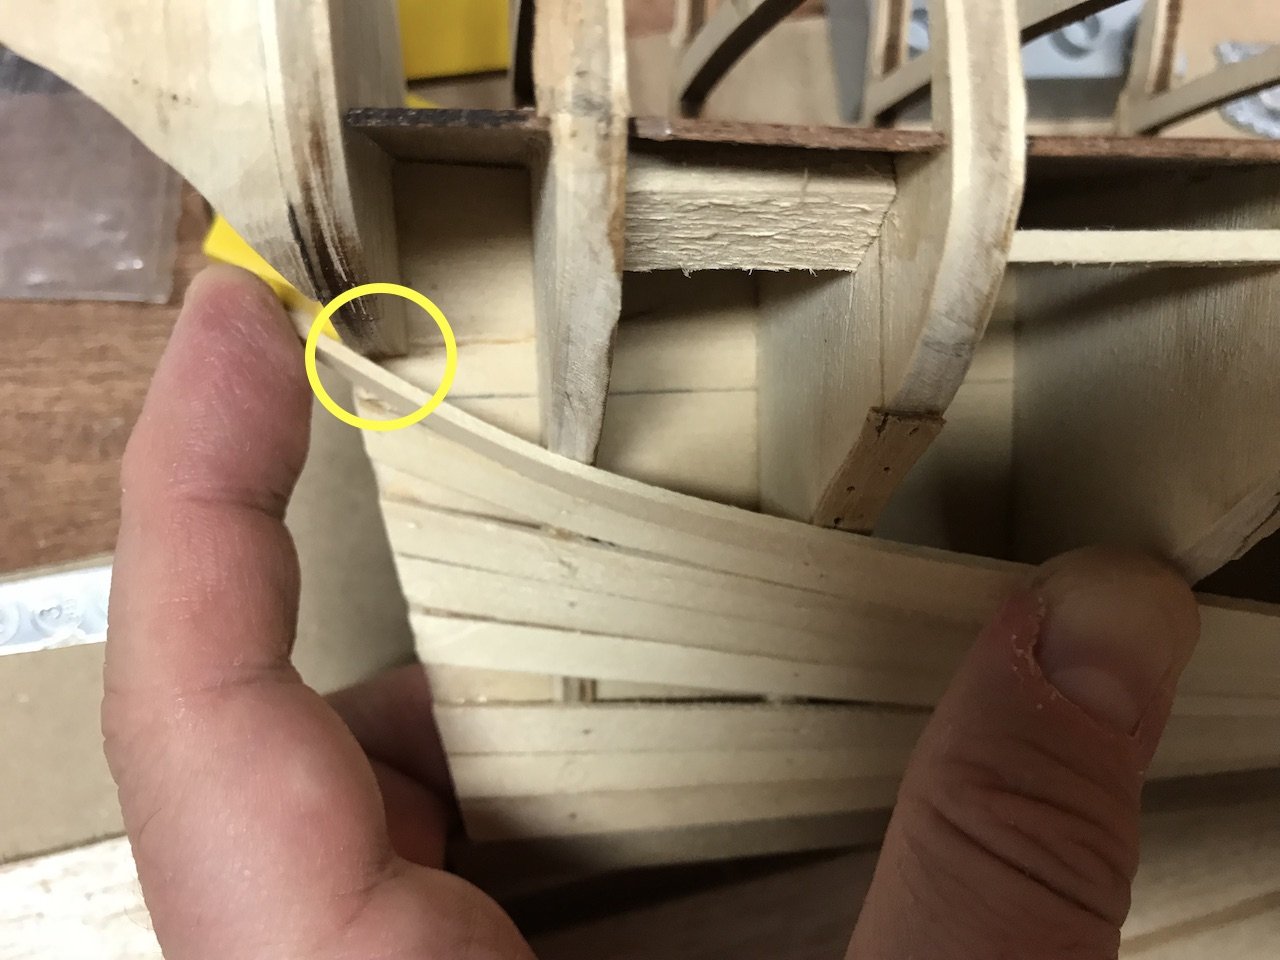
Hi Hubac, thanks for looking in. It's always harder to describe, but maybe this picture helps: If you look at the circled area, you can see that the last bulkhead is not faired, with barely any area to glue the plank to. To fair it will change the orientation of the planking considerably to a sharper upward angle. I'll also likely have to fair the bulkhead or two immediately preceding it to ensure a continuous curve. Fairing the last bulkhead will also change the shape of the lower part of the counter shown in yellow below: My guess is that highlighted area will flatten out a bit. But maybe that's ok? Looking again at the plans, seems like the same area is a bit flatter than what the lower part of the bulkhead is shaped like from the picture above: Does that all make sense? I guess I'm just trying to figure out whether to fair the bottom edge of that bulkhead - which will provide better support for the planking yet change the shape of the bottom edge of the bulkhead/counter -- or not fair it, but find some way of adding a better planking surface (for example, adding a thick strip to the bottom of the bulkhead and then fairing it to the aft line of the original bulkhead. Sorry for the confusing question. Hope this makes sense.
.thumb.JPG.eb47873e057a5f94a36da7818da10acb.JPG)
.thumb.JPG.7b95b15f66ae9a744c45186a4366d8bb.JPG)
-
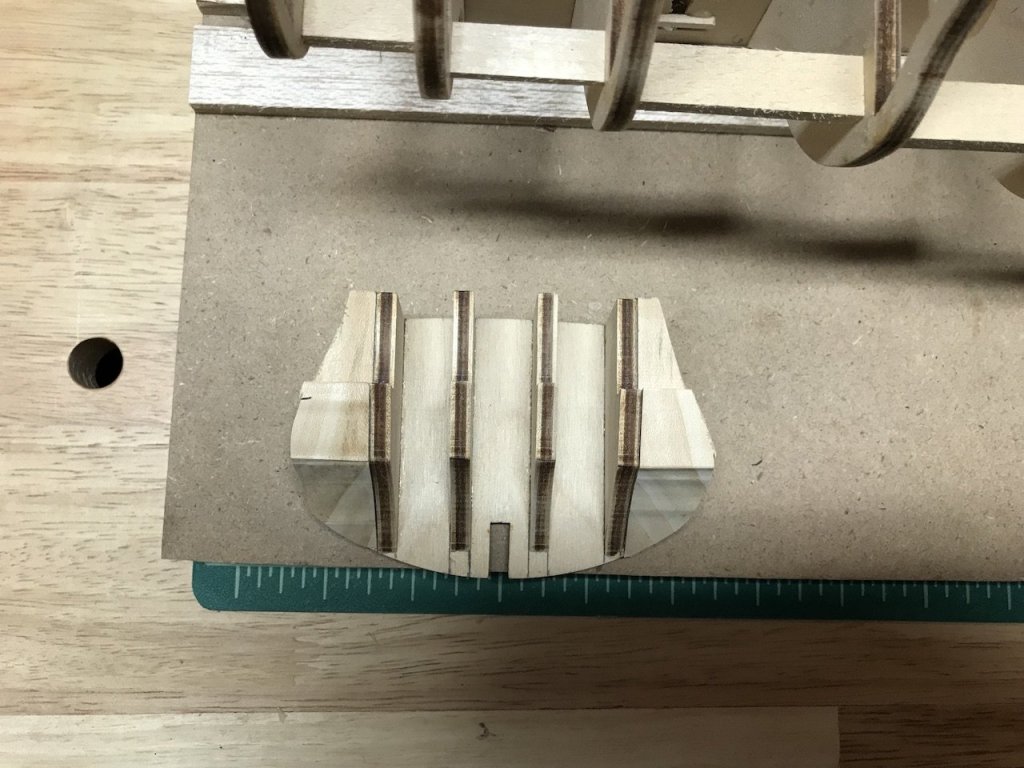
One question for everyone. The stern is sort of a square-tuck stern, and not a round tuck as with others. I think the last bulkhead provides the lower circular shape of the counter, but at the same time, I'm wondering if the bulkhead needs to be faired in order to accommodate the end of the planking runs into it. If faired though, it seems like the counter shape will change. Hopefully these pictures show what I'm trying to describe (it's the lower edge of this piece that the planking is suppose to terminate at: Anyone else encounter this issue? I'm trying to figure out whether I should fair the last bulkhead, or build it up a bit so that I can fair it to the edge the original bulkhead so that the end of the planks have something to sit on. Thanks in advance!

-
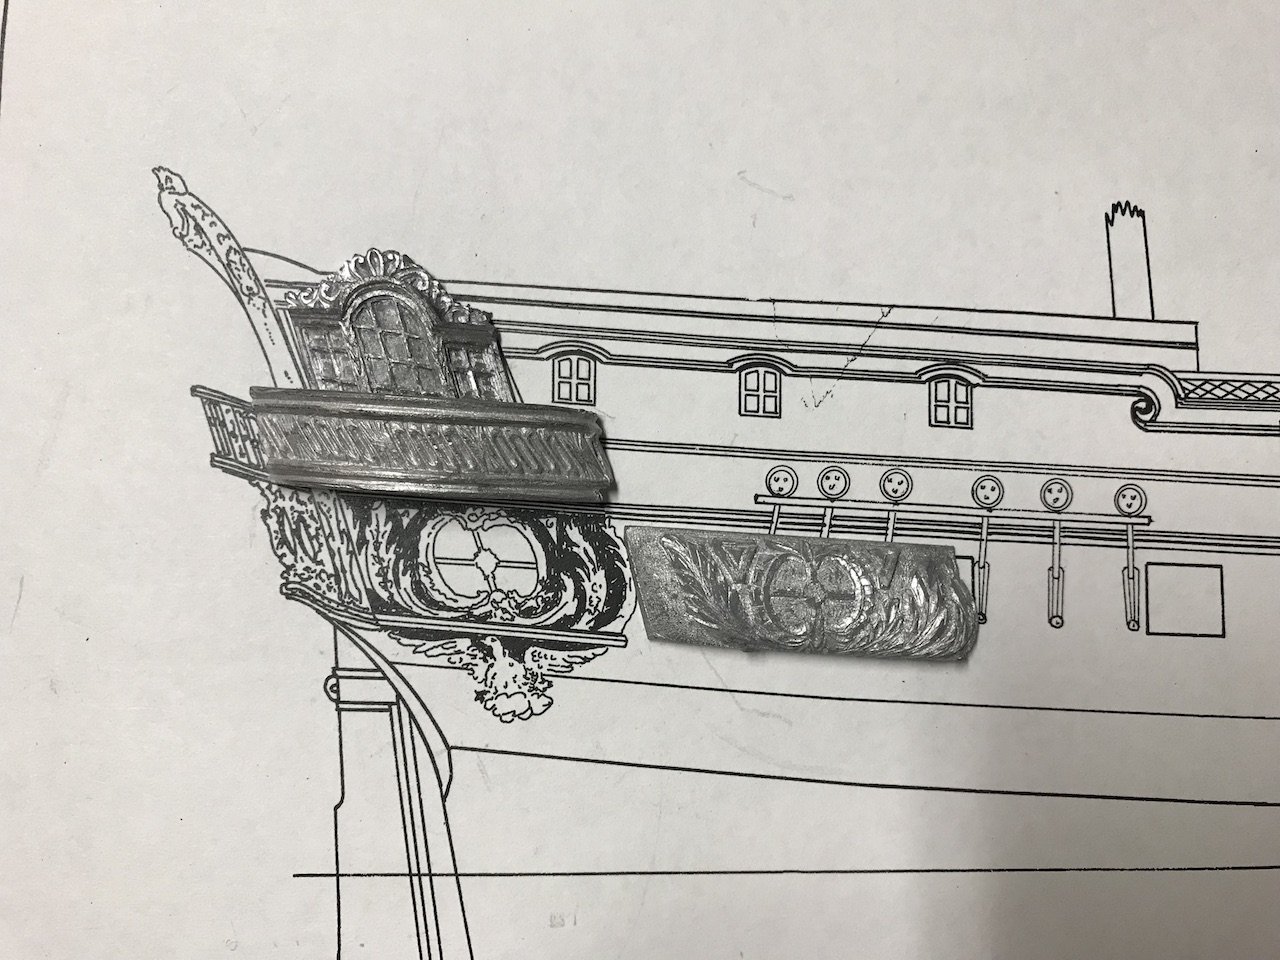
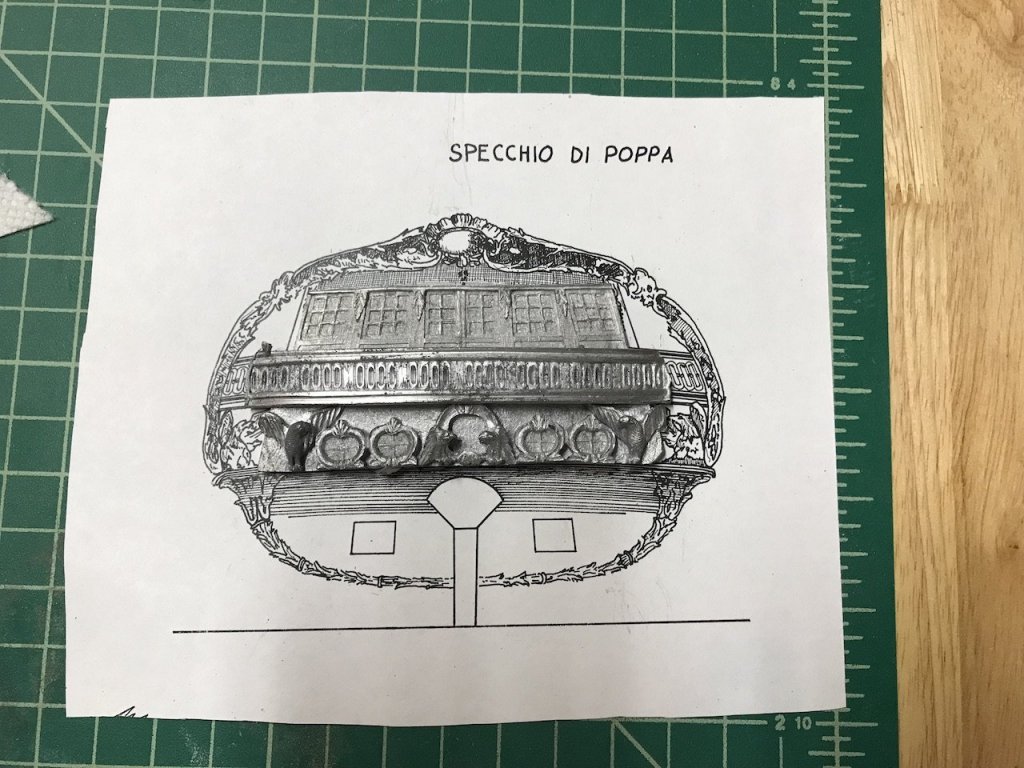
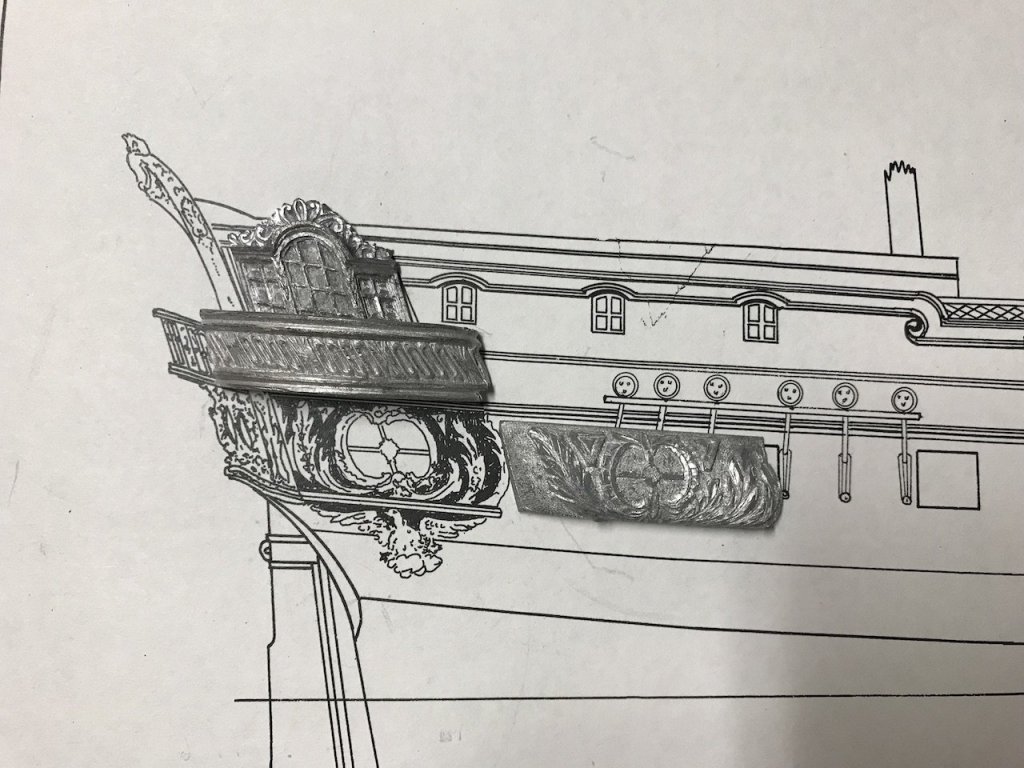
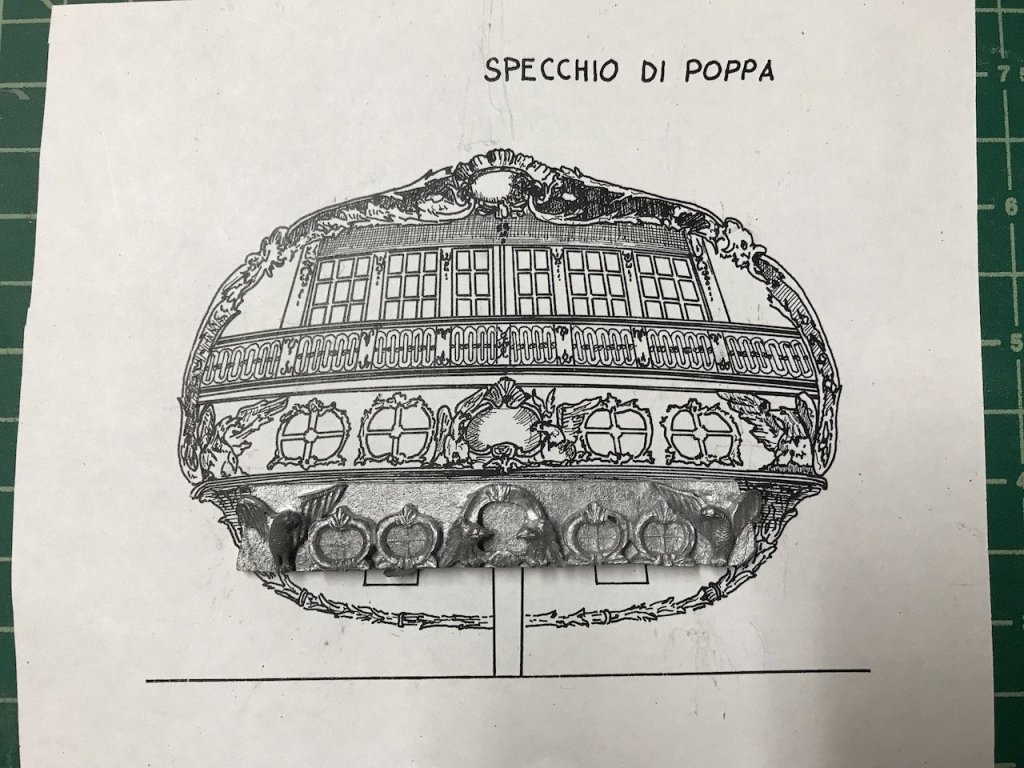
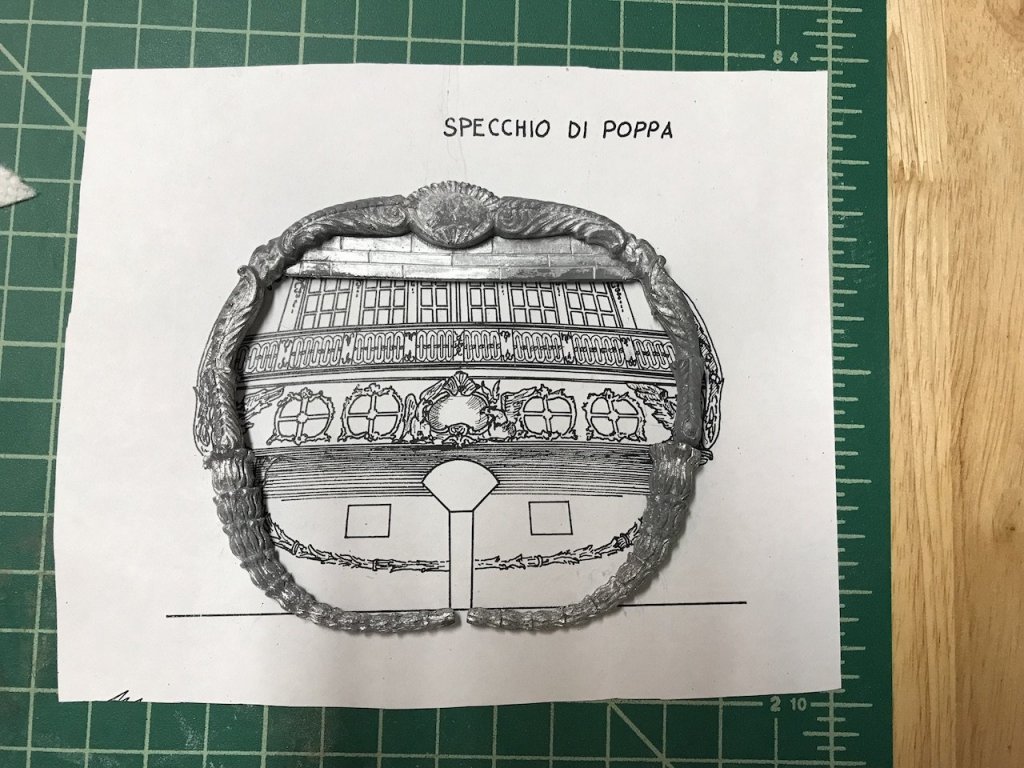
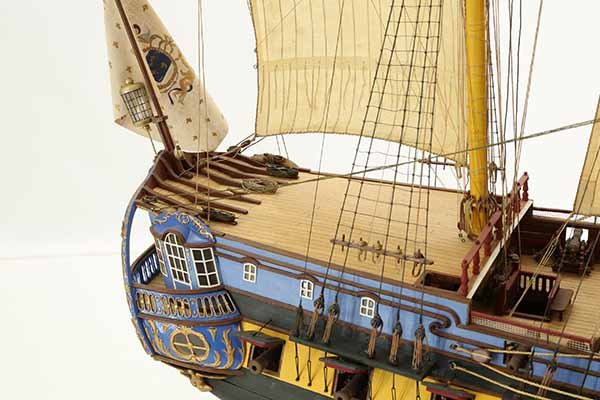
For folks building the kit, the cast metal pieces are pretty close to the Chapman plans (the kit plans shown below are exact replicas from Chapman). There are some differences though, which people should be aware of. For example, the upper tier of lights is the right dimension, but the kit is simplified in having a rectangular row, rather than slight curves as in the plans. The gallery balcony railing is pretty close. The quarter gallery lights are pretty much spot on. What is a little off is the lower tier of lights/upper counter area, the wrap around section that goes to the quarter galleries, and the tafferel - all of which are smaller than the plans suggest: They aren't off by much, but it's something to be on the lookout for. My guess is that the tafferal can be bent outwards to widen it a bit at the sides. What is tougher is the fact that the lower lights section of the stern is not as wide or tall as the plans. I'm not sure the reason, but maybe it was intended to simplify things for the builder a bit. It looks like builders have taken all types of approaches to make the cast parts work, since the plans and parts don't match up precisely. In particular, I think that the lower half of the quarter gallery should extend further out as in the picture below. I think you could use the cast part, but my guess from the Chapman plans is that one would need to add some filler under the cast metal piece to accomplish this. So, I think I'm going to try scratch building the stern as much as possible. It's complicated, and has taken me a lot of time to work through, but I think in the end I'll be a little happier. Plus, I won't have to try to fill in caps between the cast metal pieces, open up the window panes, etc.
-
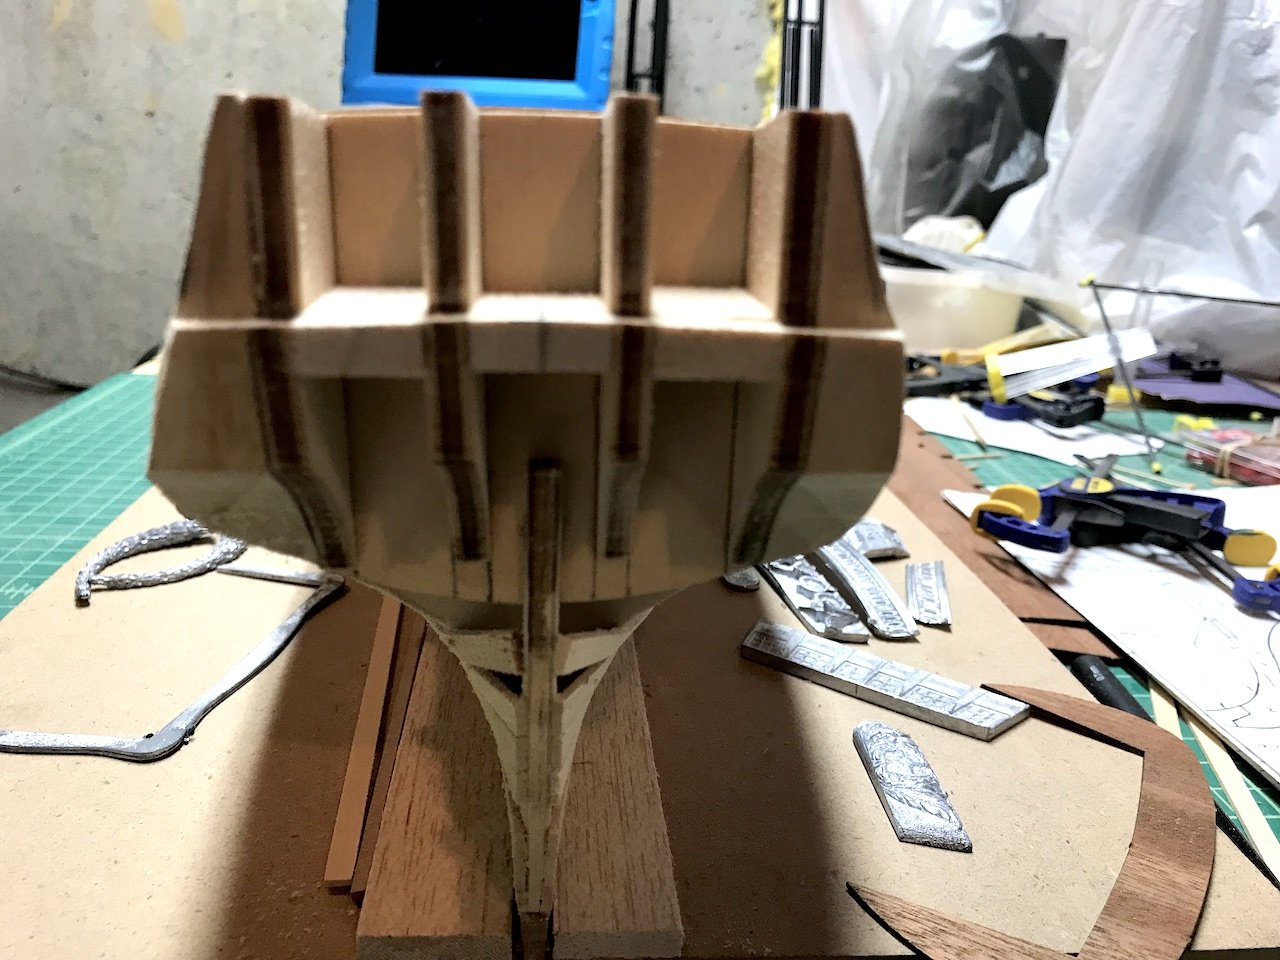
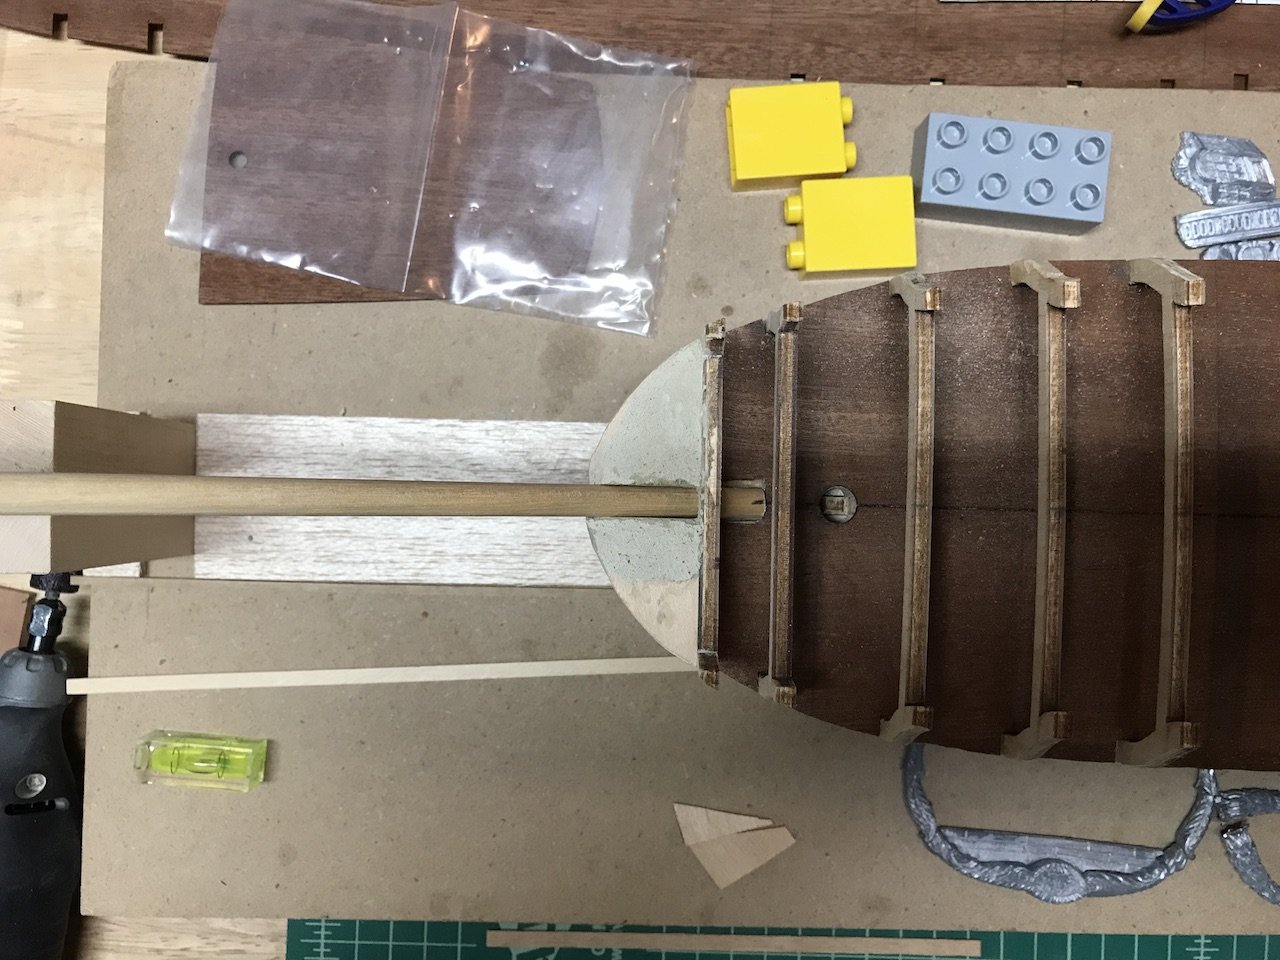
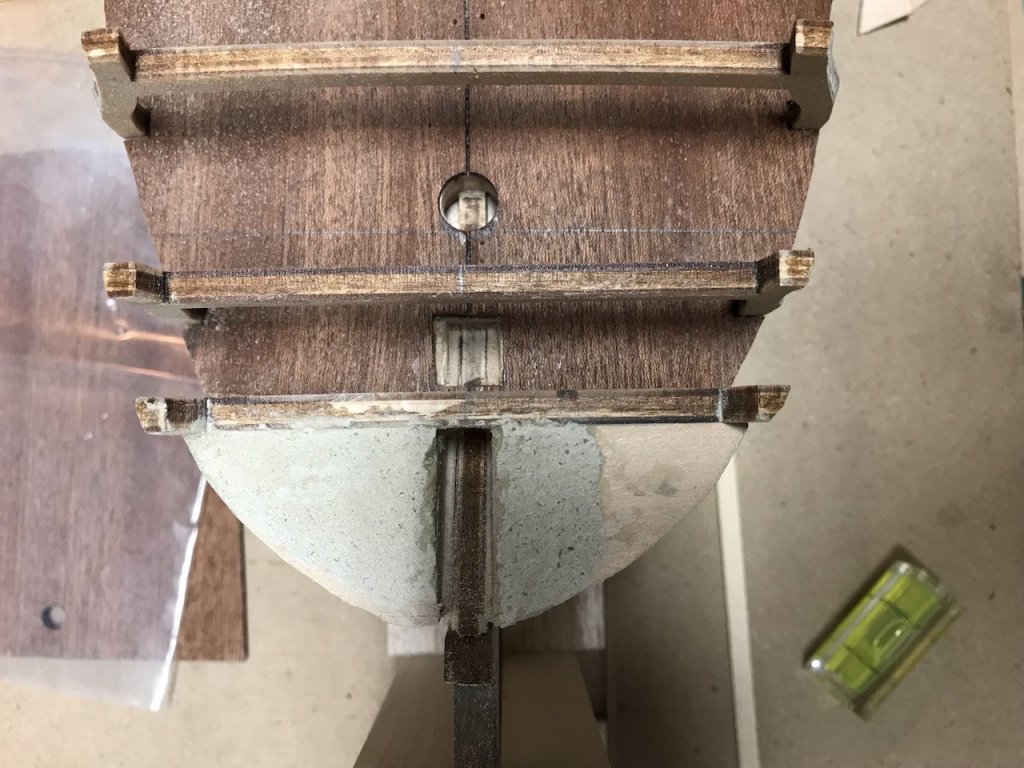
Some more progress - got the first seven strakes of first planking on, starting from the keel up. I also finished the upper stem blocks. These took a little time because I wanted to make sure that not only would they provide support for the planking, but that they would also help keep the bowsprit in alignment. Because the false keel is about 5.5mm in thickness but the bowsprit is around 8.5mm, I added some spacers to the blocks (hard to see in the pictures), with the correct bowsprit angle built in. So, everything now fits like a glove and I won't have to worry about the bowsprit alignment.


-
Looks great Chris. Didn't you use pear on your Confederacy? Where did you source this pear? Is it swiss pear?
-
Landlubber Mike's technique for furled sails
Landlubber Mike replied to Landlubber Mike's topic in Masting, rigging and sails
The anti-fraying stuff works wonders. You end up getting a super clean cut as if you were cutting paper. Hopefully that should help. For the sail cloth material, I think if you're doing furled sails the weave and thickness matters much less. The thickness really only comes into play when establishing the bulk of the furled sail, so you just have to adjust the size accordingly. If I was to do it over, I'd probably add a tad more bulk, particularly on the jibs. I've seen pictures where the sails were furled that tightly into such a compressed form, and then others where there was more bulk. I'd still just get the thinnest material you can find, wash it a few times to soften it, and then iron it out. For my current builds, I'm going to try to use full sails. That will be a little trickier as the weave, thickness, etc. becomes more important. Good luck! -
Amazing work Jason. The colors you are using complement each other perfectly. Just wow!
-
Really amazing work. Your simulated wood looks better than my real wood
- 1,035 replies
-
- 6
-
-
- royal katherine
- ship of the line
- (and 1 more)
-
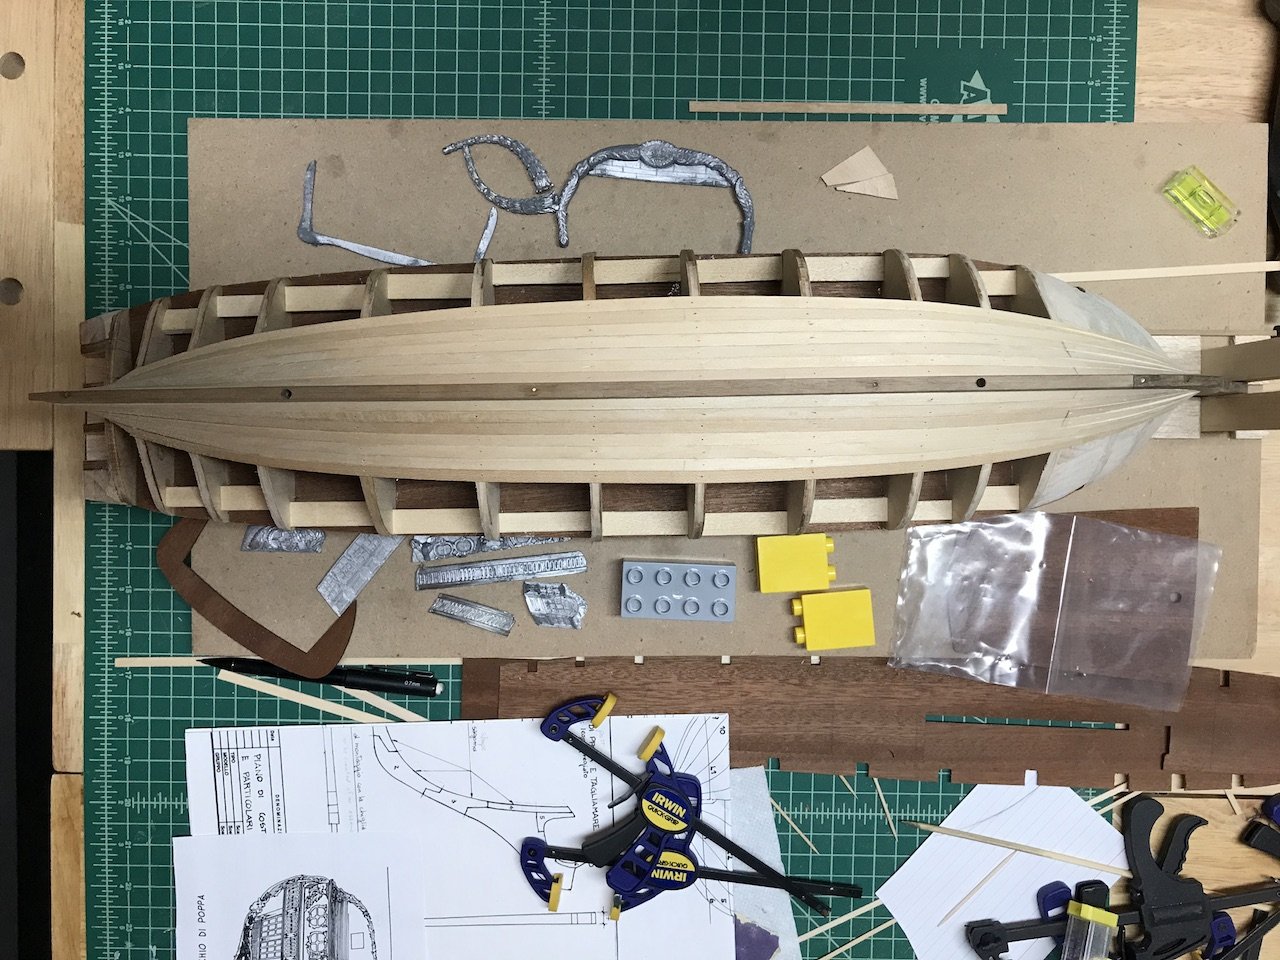
Slowly making some progress. Finally got the bulkheads and filler blocks faired and started with the first planking. First three planks starting from the keel are in: So far so good. Lots of curves on this ship. There's a lot going on with the stern, so I spent quite a bit of time going over the plans and how the cast metal parts are supposed to fit together. The interesting thing about the Euromodel plans is that they will be true to the Chapman plans in some drawings and simplified (e.g., straight, less curvatures) in others - sometimes on the same sheet. So, you have to be mindful of that when building. The cast metal pieces for the stern are pretty good, but in some cases like the row of stern windows fronting the balcony, follow the more simplified square approach, whereas the Chapman plans show more curves intended that follow the curvatures of the decks and balcony. As is often said with respect to these Euromodel kits, they are quasi scratch kits that are intended allow a builder plenty of latitude to build the model as simple or as detailed as one would like. I think I'm going to challenge myself and scratch build some or all of the cast metal pieces for the stern. I'd like to follow the Chapman plans as much as possible, and I think the cast metal parts deviate in certain respects. For example, there are windows at the lower drop area of the quarter galleries and between the balcony and counter/chase ports - but the cast metal parts have these filled in. Building them from scratch would probably take close to the same amount of time as opening these and other windows up. Along with potentially not doing a clean job opening the windows up, I worry that the seams where the cast metal and wood parts meet would need to be filled, which sometimes could be a hard thing to do. Then of course, there is the need to paint the cast metal parts, and I'm not that great when it comes to detailed painting. I just think that I can achieve a crisper finish scratching these items than I can from working with the cast metal parts. The good news is that the parts and plans give a very good model for me to base my work on. I'll try to detail some of the changes from the kit in future posts.

-
Really nice work BE. Fingers crossed here for you as well, but I'm sure you'll figure out a solution if you need one.
- 574 replies
-
- 4
-
-
- cheerful
- Syren Ship Model Company
- (and 1 more)
-
I'd say take your time Chris. I'd rather have one ship that represented my best work, than 4-5 ships that I put together in the same period of time that weren't my personal best. Plus, if your wife is like mine, she'll appreciate your house not looking like a museum. My wife's friend was over this weekend and saw my Renommee on the kitchen island. First thing she said was that she was really impressed I was tackling such a difficult project. Second thing after I left the room was to ask my wife if she was going to be ok with my putting these models all over the house. My wife assured her that I was so slow in building that she wasn't too worried.


.JPG.fe95c0793a5316a0d8f511f37580a9ce.JPG)
.JPG.a5cce6f2322b485969f7a1f1d9dca304.JPG)