Landlubber Mike
-
Posts
4,553 -
Joined
-
Last visited
Content Type
Profiles
Forums
Gallery
Events
Everything posted by Landlubber Mike
-
 I used the kit tanganyika on my Caldercraft Badger, which I thought was ok, but switched to maple for my Pegasus. Maple is a really great wood to work with, but you do have some color waves in the grain. You can take a look at my Pegasus build (linked below) to see what it looks like. If you want a wood that is uniform in color, some people use holly, which I find a bit too white. Others use boxwood, which can be nice.
 -
Great work Tom on what looks to be a complicated set of timbers. Very nice job!
- 1,354 replies
-
- 3
-

-
- constitution
- model shipways
- (and 1 more)
-
Thanks Ian. I have to confess that most of my work on the planking has been on my kitchen table and my living room ottoman My "workshop" is in the basement utility room, so no TV or adult beverages close by. I generally use my power tools down there, and then bring up whatever tools I need upstairs. With little kids running around and an Admiral to take orders from, I have to keep the main areas of the house neat. Don't worry, my workbench in the basement is a mess
-
Very cool build Ken, thanks for sharing all the steps with us. These card models look really intriguing
- 80 replies
-
- 5
-
-
- choctaw
- heinkel models
- (and 1 more)
-
Hey Ken, just came across your build log. Your planking is amazing - even more so that it is your first wooden build. Very nice job!
-
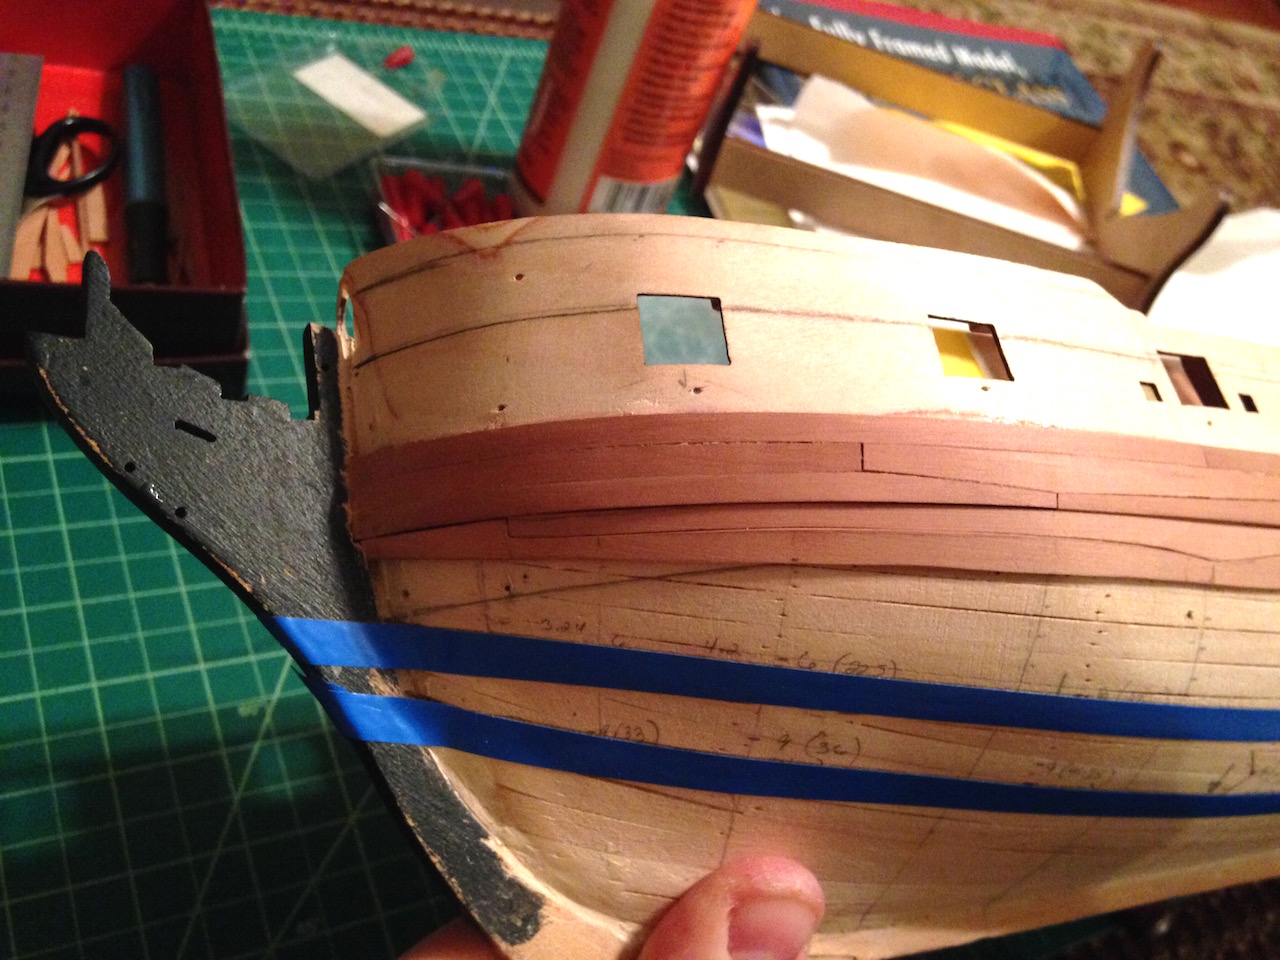
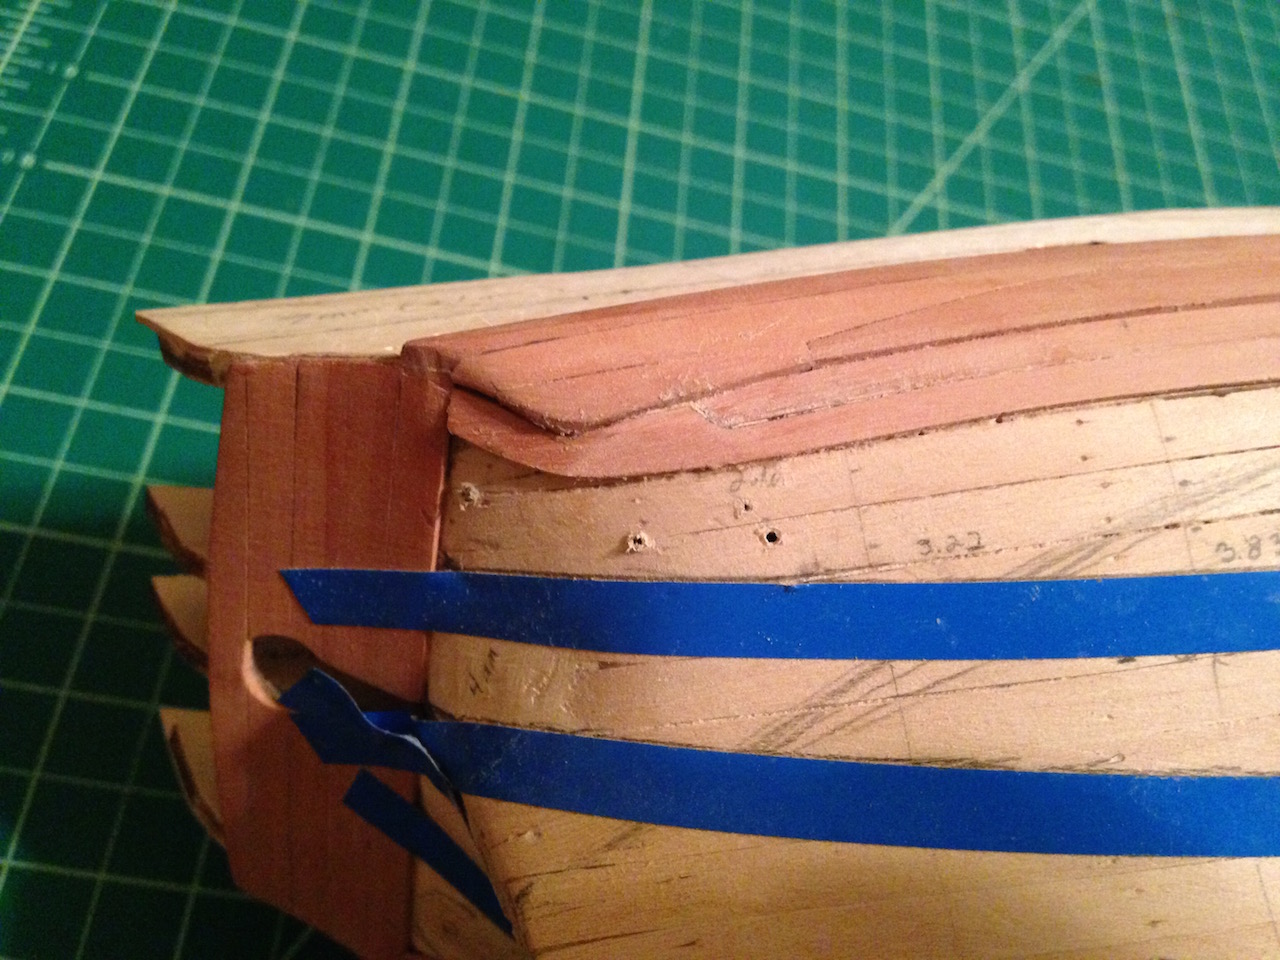
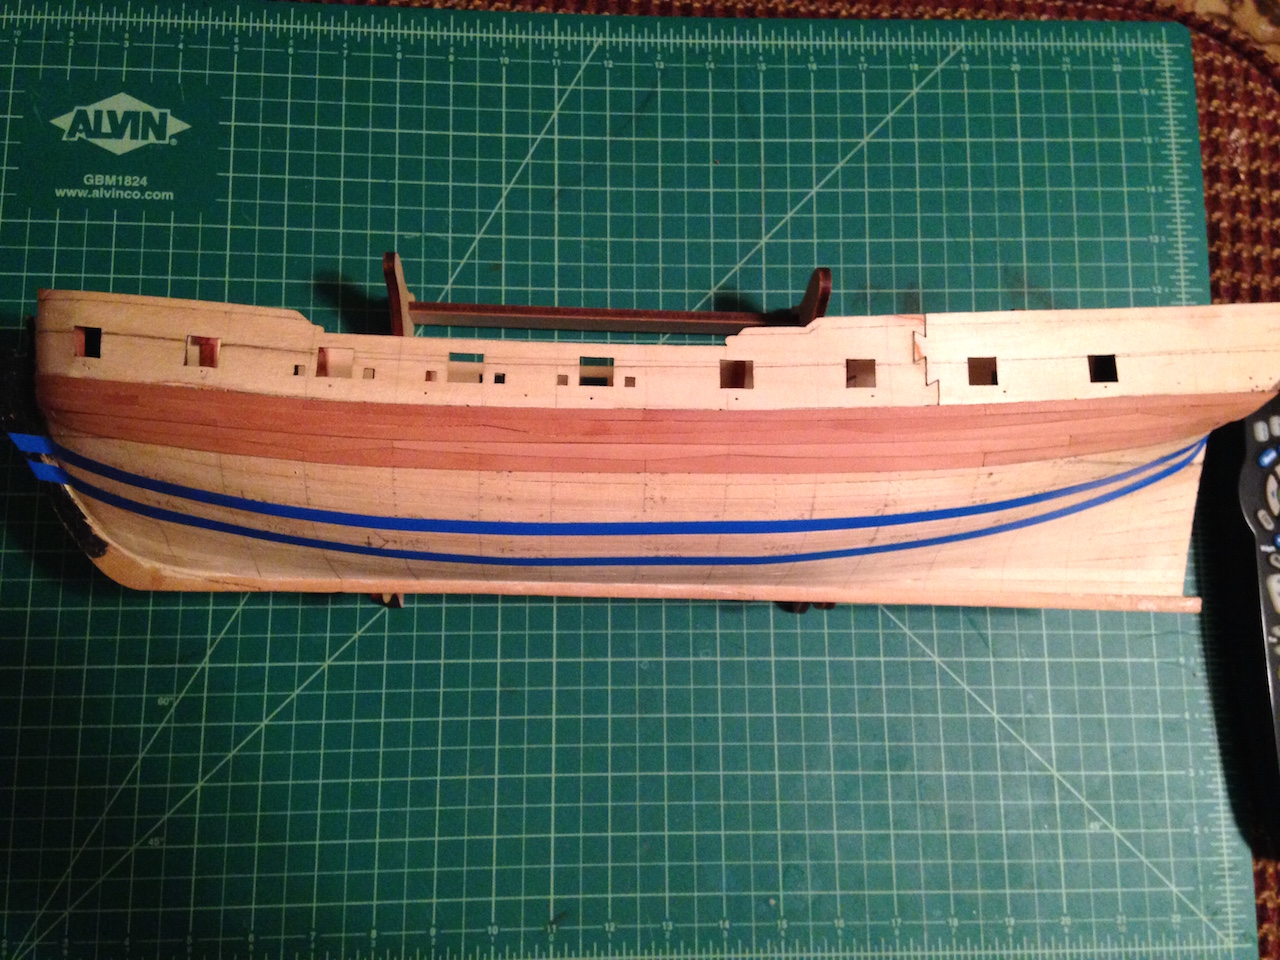
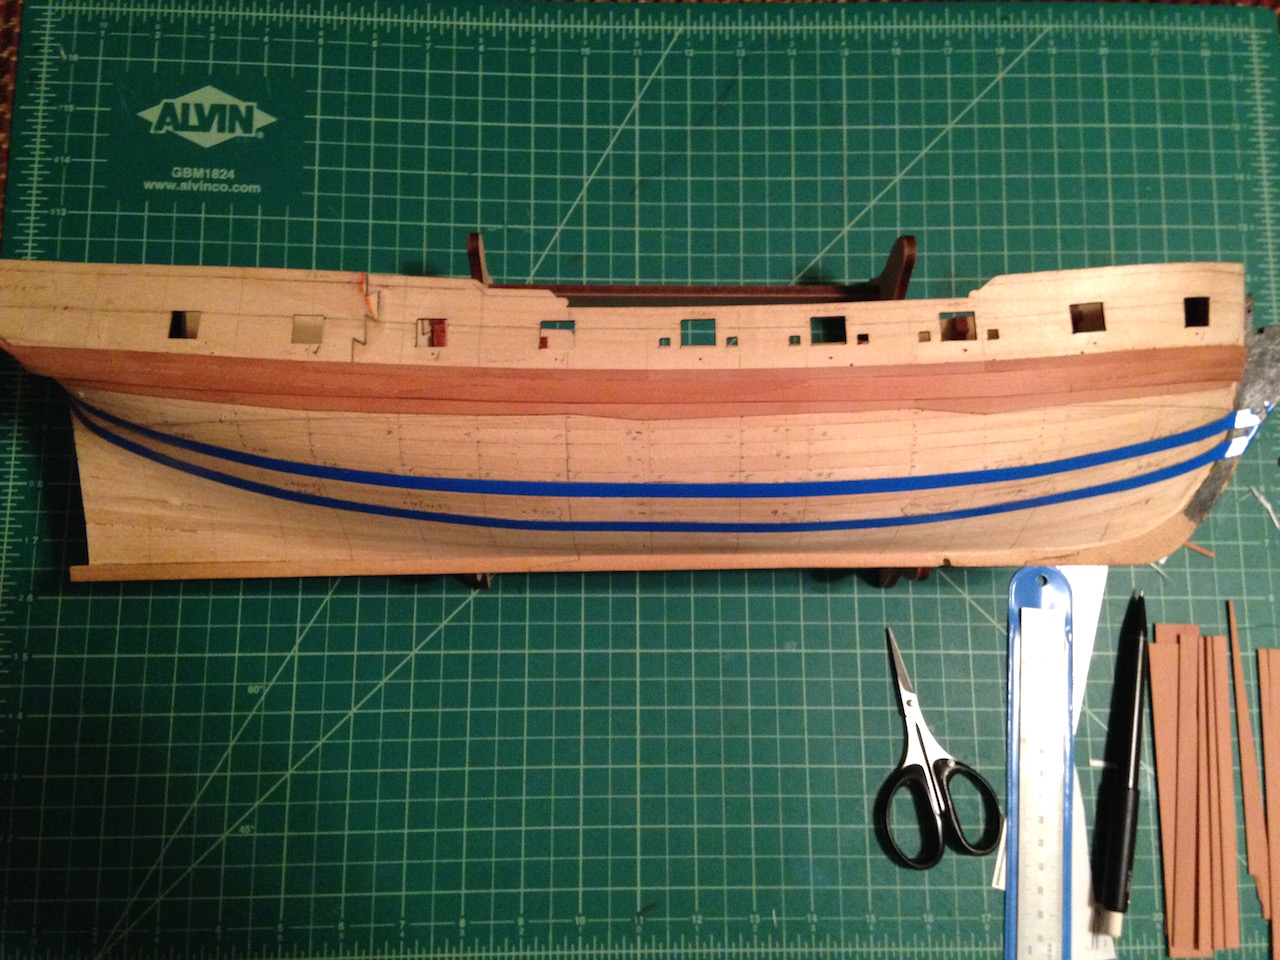
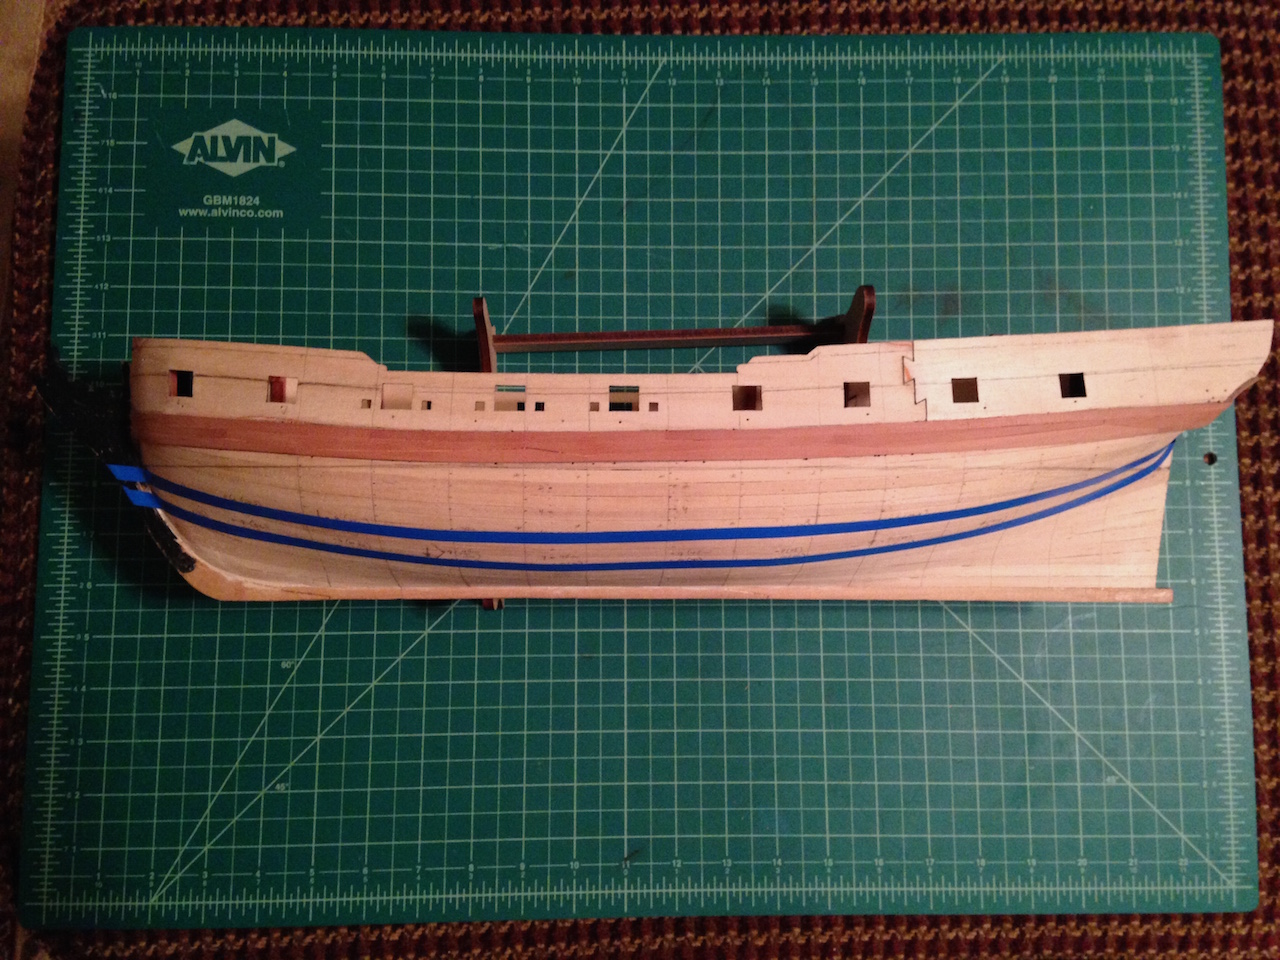
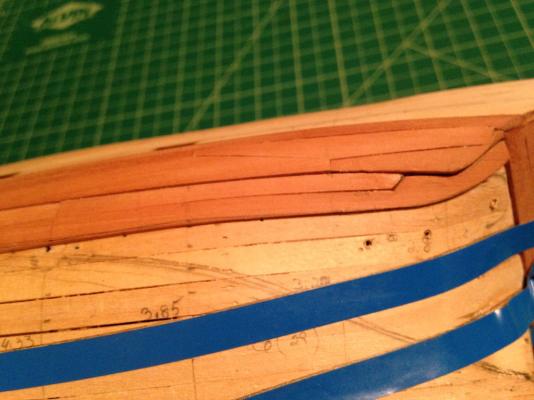
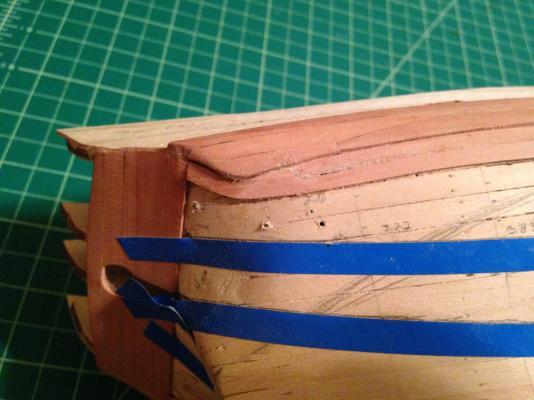
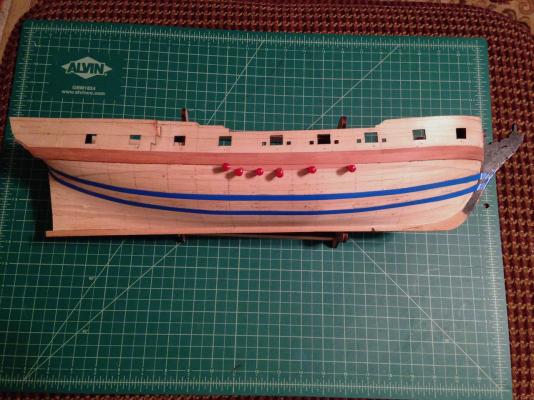
Thanks everyone for the suggestions on the aft end of the wales. The mistake was not extending the second row up higher. Not sure why I had taken that approach (maybe because there is a railing that runs across the bottom of the stern counter and into the wale?), but I ended up filling the gap with some custom fit pieces of pear, and sanded a nice curve into the aft end of the wale. I think it definitely looks better now. So this weekend, I've finished what are probably the most complicated planks on the hull - the planks in the second row leading to stem and leading to the stern. Here's a picture of the port side stem plank: Here are some pictures of the stern planks (some more sanding and finishing is needed, but it's late and I've been at it for a while tonight). Like the stem planks, this plank needed to take into account the drop plank above it. What made it more difficult is that the aft end of the plank also had to account for the hull curve up to the stern counter. Rather than use two separate planks, I decided to try and create one plank to fill that space like in the TFFM plans. Like the stem planks, I started with making a template from card, cut out the plank a bit oversize, then used an X-acto, chisel and sandpaper to slowly shape the final plank. After a few hours, I had my first plank. Like the stem side, I was surprised at how close that plank fit on the other side of the hull, so used that plank as a rough template come up with the second plank. Finally, here is a picture of the hull after the first two rows under the wale were installed: So with the first two rows done, the middle portion of the hull to the copper line is done. I have about four more rows of planks at the stem, along with another 10 or so rows at the stem. I'll probably just do partial planks on either side that will show above the copper line, and fill in the remaining hull with the kit walnut planks. Just doesn't make sense to me to spend hours and good quality pear wood planking the full hull when most of it will be covered with copper plating. Thanks for looking in!


-
Thanks for looking in Mobbsie. Hope all is well with you, my Badger Brother Too bad a lot of this planking will be covered with copper plates! It's been good practice for my Lyme build though, where I plan to leave the full hull in natural wood (no copper plates or white stuff).
-
Tricky plank Jason, looks very nice, great job!
-
Ian, great to see an update my friend. Your wheel is amazing. I was hoping to not use any paint on my current and future builds, but worried that I'd have to break that rule when it came to the ship's wheel. I bought a few from other manufacturers, and the wood ones seemed thick and out of scale, while the metal ones seem to scale, but have to be painted. Seeing your results, I might try turning a ship's wheel myself
-
Thanks for vote of support Mark I've made some good progress on the second row of top and butt planks. I've installed the first three planks of the row - no pictures yet, but I'll post some after I finish that last aft planks (which will take some time as I figure out how to address the wale issue at the stern counter). The plank at the stem on the second row is a real pain. The plank immediately above it is a drop plank, so the plank on the second row ends up filling that gap. Took me quite a bit of time to create the plank. I used card to approximate the shape, and then cut the planks slightly larger and spent a lot of time chiseling/sanding and test fitting. Thankfully the two sides were pretty comparable, so I had a good template for the port side after the starboard side was completed. Here's a picture of the starboard side plank - you can see how complicated the shape is. Glad I got them done - I now have to repeat on the stern side, but then won't have any more drop planks to deal with

-
Just wanted to wish all my friends in the US and around the world a Happy Thanksgiving (or equivalent holiday). Best wishes to you and your loved ones! I have a 19 pound turkey outside in the smoker cooking away, and wife and in-laws are working on the sides. Will open some wine and in a couple of hours, will be passed out on the couch in a turkey coma watching football.
-
Thanks guys! BE, you're right about the curve along the stern. I'm going to make a template out of paper to make sure that I have the shape right. Otherwise, I can see myself going through a lot of wood and dropping a lot of naughty words - not good with Santa watching before Christmas... Jason, I saw that Martin took that approach on using a thicker piece of wood and shaping it. He did so with good results. I ended up using my standard 2mm thick wale plank, cut a longer piece than needed, and did a couple of rounds of soaking and pinning to get the curve around the hull. The longer length helped to give me leverage to twist the plank during the soaking/pinning process. I then cut the plank a tad longer and square so that I had material at the stern to shape it into a nice curve. As people are pointing out, what messed me up was not running the plank above it (the second row) up to the counter. Took me a while to figure out what was obvious to most people I think I can shape a little pear plug into that spot, and then smoothing the curve down to that lower plank, should be the trick.
-
Funny, I was just looking the model, and realized the same thing. For whatever reason, I stopped the second/middle row of planks for the wale short of the counter. The third/bottom row I think is supposed to stop short, but it looks awkward now with the way the second row is I think the easy fix is to custom fit a little piece of pear for that area, and then work a nice curve down through the bottom plank. Thankfully it wale will be dyed black so it will be hard to see my boo-boo. Frank, after re-reading your post, I think you were saying the same thing Mark was. Sorry for the confusion, I thought you were talking about the first strake of planks under the wale.
-
Hey Frank, thanks for looking in. I'm following the planking pattern in TFFM, which has the first row of planks stop short of the counter - essentially, it's a drop plank so that 10 rows of planks end up converging into 9 rows at the counter. We'll see if I can pull it off
-
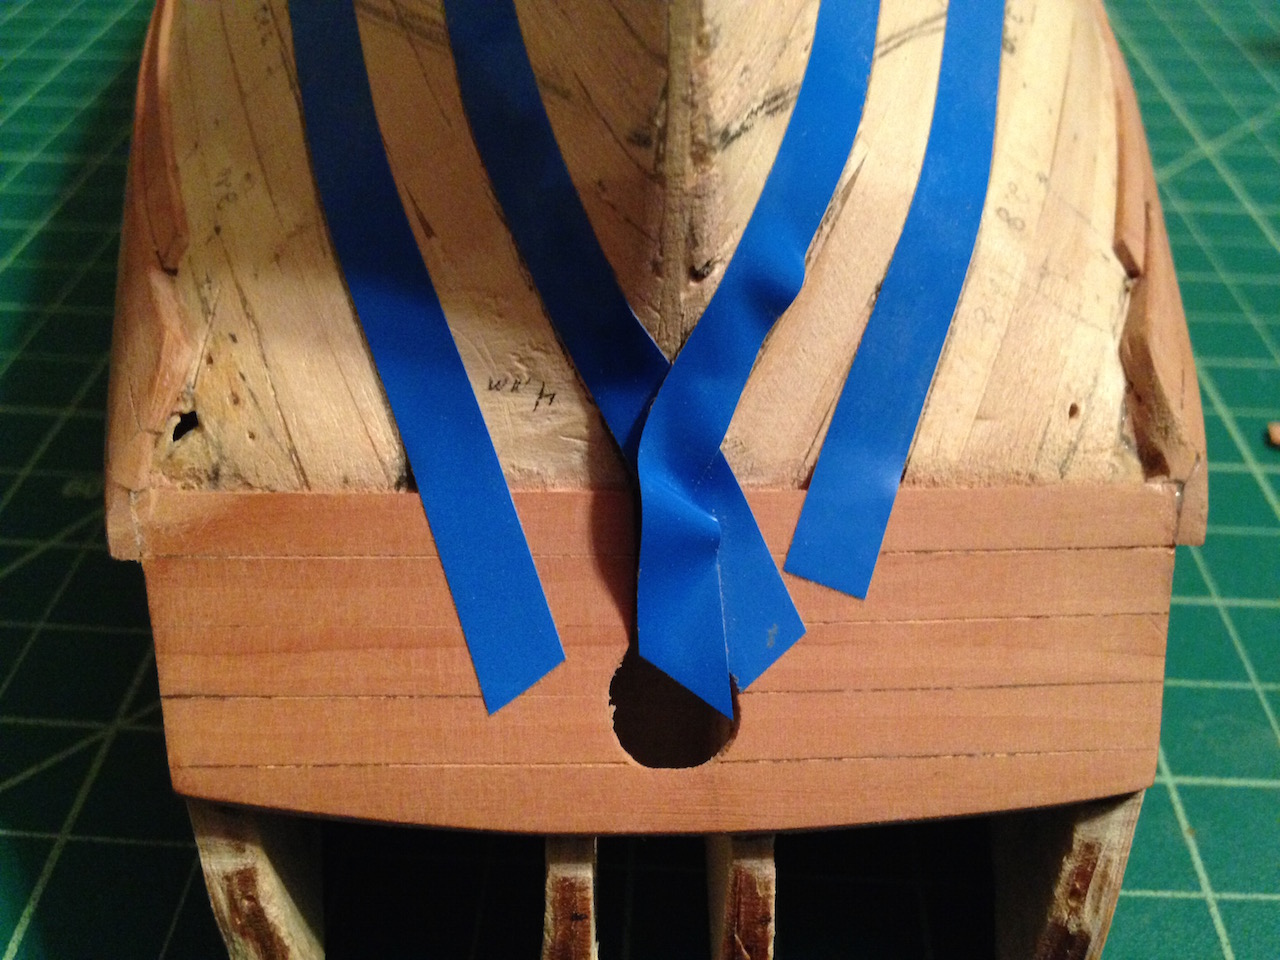
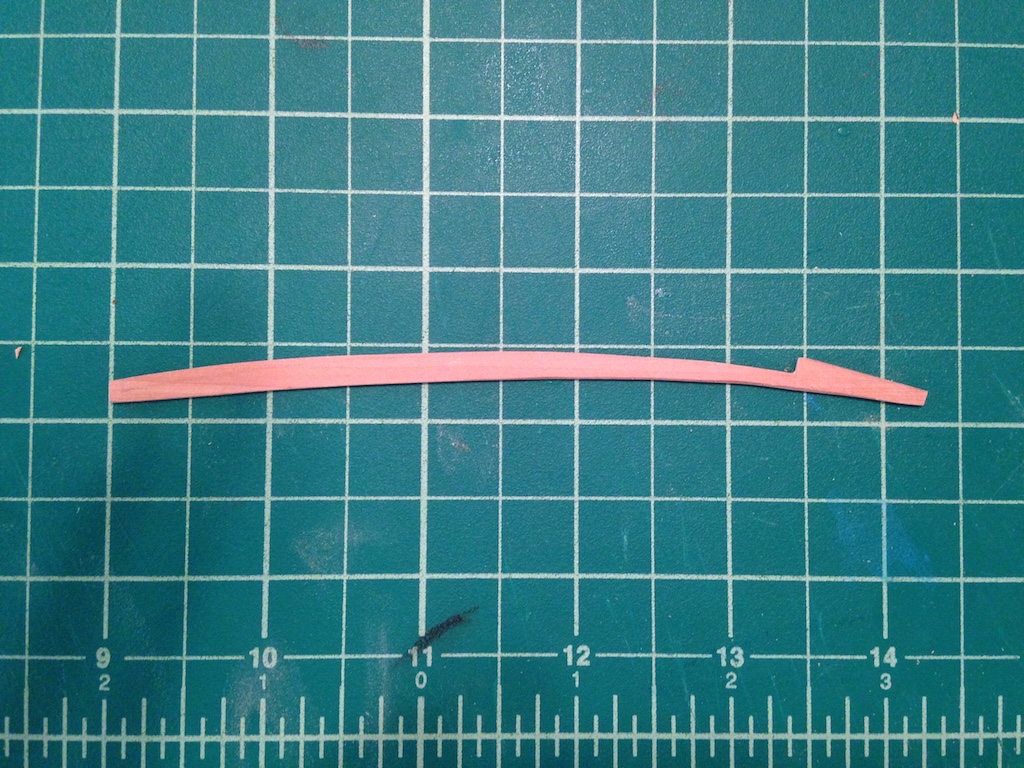
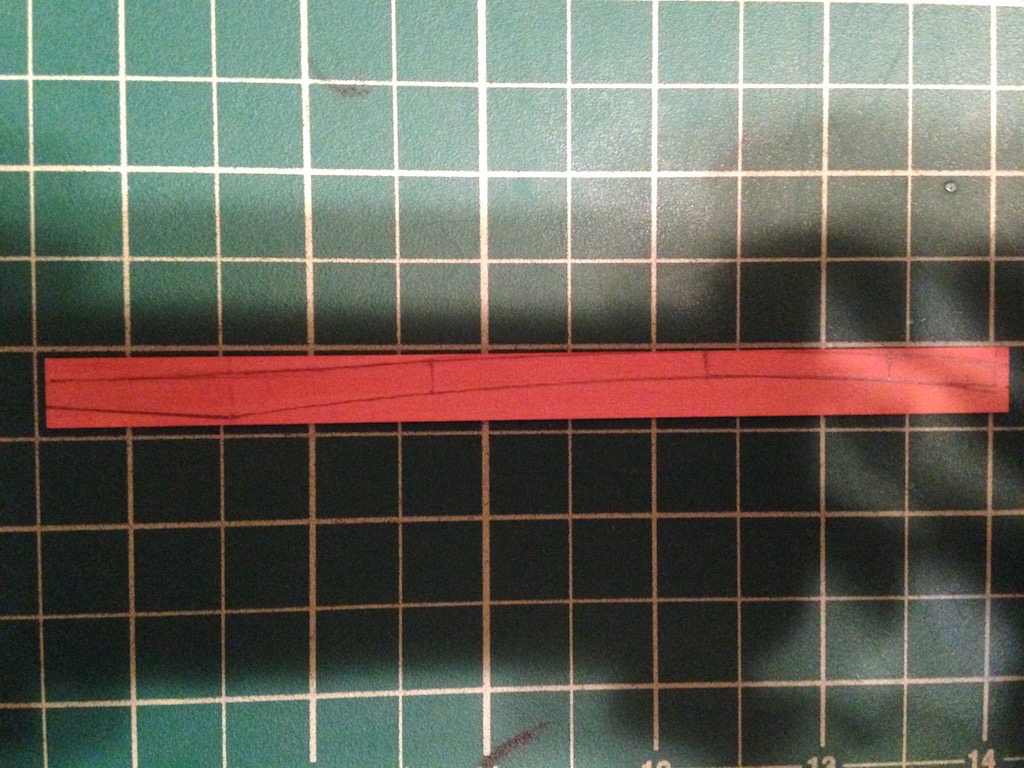
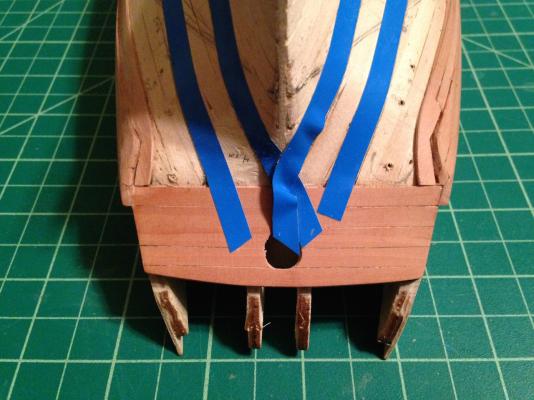
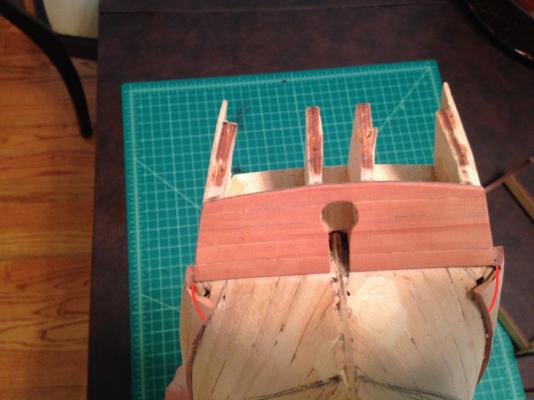
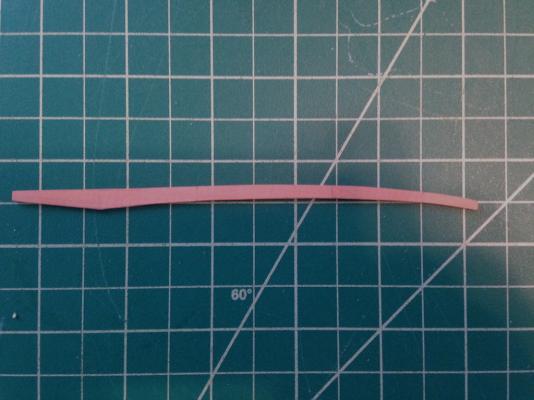
So, I managed to get the first line of planks under the wale completed. It wasn't so bad, and I think it came out pretty well. The nice thing about the spiled planks is how easily they sit on the hull. It also shows you just how complicated the curves are on a hull. I'm about to start the second line of planks. The first line ended in a drop plank at the stem and stern, so the planks on the second line ending at the stem and stern are going to be even trickier to pull off. I still have to shape the bottom corner of the wale at the stern. I feel like it curves too deeply across and under the stern counter. The shape of the plank seems correct when i look at TFFM, but it looks a little funky on my hull when looking at it from the stern side. I almost feel like I have to change the contour of the end of it as indicated by the red lines in the picture below. If anyone has any suggestions, I'd love to hear them!

-
Thanks very much guys for the kind words. Martin, I can see how adding the second planking to your Fly took a while - especially since you did the full hull! Don, glad Dave was able to pitch in and help. I have to say that it took me a while to understand the technique - it really wasn't until I took the compass and actually did the work that I could comprehend what the Jim Robert's pamphlet was getting at. Chuck does a much better job distilling the concept in his tutorial, though he takes a different approach using tape rather than a compass. Glad my five step Cliff's Notes were helpful. Give it another try. Dave, thanks for the compliment. It's nice to hear that my log is of some help. Happy to answer any questions once you start the Pegasus, though, by the looks of your Bluenose, I can probably learn a lot more from you than the other way around
-
Looks great Jason! Spiling is fun, huh? Lots of time and effort, but can't beat the results. Looks like we'll be going down this road together. I'll be sure to pass along any tips and caution flags as I get more planks under my belt. Maybe I should have tried masking tape instead of wide scotch tape (which, I think was actually "book tape", whatever that is, and which didn't take pencil very well). I found using the compass to be pretty easy and accurate, but maybe it was beginner's luck. The tape method to me seems to require getting the tape marked correctly, then transferred and cut out correctly. The compass technique just requires one to get the plank marked correctly, so maybe less room for error which for me, is always a good thing.
-
I've been a little busy lately, but one week later, I spiled my first plank I tried the tape method in Chuck's tutorial, but I found it a little difficult - it might have been the tape I used, but it ended up striking me as easier to use a compass like in the Jim Roberts pamphlet from Model Expo. It's a bit tricky because not only did I need to spile the plank, but I needed to spile a top and butt plank. Since the top and butt planks are mostly in the center of the hull needing little spiling, my approach will be to keep the top and butt angles straight and sharp, and spile the long side of the plank. We'll see how that goes. If you don't have the Robert's pamphlet, the cliff notes on the approach are: 1. Cut a wider plank than your full width plank. My full width planks, accounting for the top and butt planks, are 6mm, so I cut 10mm planks. 2. Position the plank along the wale as tightly as possible, but don't overlap the plank above it. So, that means that there will be a gap between your plank and the wale in some spots. Mark on the plank the position of each bulkhead. 3. Adjust the compass to slightly wider than the widest gap between the plank and the wale. Then, using the wale as a guide for the point end of the compass, trace onto the plank the outline that will define the edge with the wale. 4. Transfer the plank widths at each bulkhead to the plank, and connect the points using a french curve. 5. Cut the plank and sand to fit. It sounds a bit more complicated than it really is, but the technique works very nicely. Anyway, here is the first plank. This is the plank that will go on the starboard side right under the wales forward of the plank I already have in place. It stops just short of the stem as a drop plank, and the second row will pick up the gap. You can see how much of a curve the plank has on either end. For my first build, the Badger, I just tapered the end of the plank as it approached the stem, but you can see how that way still doesn't give you the curve you need without forcing the plank laterally against its width. As Chuck says in his tutorial, it takes longer, but is well worth it. The plank fits so neatly against the hull and against the wale without any twisting or other forcing actions. I can see how using this technique will lead to much better planking and avoid the need for a first underlayer planking. I don't think it's worth (in time and in pear wood) planking the full hull this way, as I'll be coppering the hull. My plan is to do two complete first rows which will get me over the copper line for most of the hull, and then add the remaining 4 or so rows at the stem and probably close to 10 at the stem. Then, I'll just use the kit walnut to fill in the remaining areas.


-
Thanks Jason! I'm still trying to figure out how I will do that The first plank didn't really need any spilling, so I thought that was a good one to start with. My thought is to treat each row pair of top and butt planks as its own mini planking band. For the Pegasus, there are three such row pairs. It gets a little tricky because in the top-most pair, the two rows converge to one at the bow and stern. The top plank is a bit shorter, and then the bottom plank needs some customization to continue the line and fill in for the top plank (I forget the proper name - hook plank perhaps?). When I used top and butt planks for my deck, it was easier than I thought it would be. It's all about triangles, so as long as you have two of the sides, it's pretty easy. I'm not sure if the two sides are curved in any way for the hull planking, but at 1:64, I hope that I can get away with relatively straight sides and just spile the longer side.
-
Thanks guys, it's great to be back. I've been spending a lot of time thinking about how I wanted to approach the planking, probably too much thinking and not enough doing. I feel like I always get stuck, if not almost a type of paralysis, when I need to start a new tool, technique, section, etc. As in those other times, I figured I needed to just jump in and start working. With one plank on, the others don't seem so intimidating Ian, hope all is well with you and that you and your wife are spending lots of time with the grandkids. I've been doing some more thinking about the Lyme, and will turn back to her once the Pegasus is planked. The Pegasus kit is so well done that it's giving me a good template to learn the construction techniques, since as we know with the Corel kit, a lot of scratch building is needed. I've been taking measurements along the way and comparing them with the NMM plans and the plans in TFFM, and the kit is spot on. Thanks Martin, so that's how you use the chisels! I'm very embarrassed to say that I was trying to use them like an X-acto blade and wasn't very successful. Your technique with the vice makes much more sense! Your Fly is looking really great. Have you decided on whether you are going to paint the areas above the wales for the friezes? Your planking is so nice I'd have a hard time deciding whether to paint the upper hull or not.
-
Well, other summer hobbies, kids, work, and life in general got in the way, but I'm back on my Pegasus. Even though I'm going to copper the hull and stain black the lower hull between the wales and the copper line, I figured I would try to plank at least the visible part of the planking using the planking pattern in TFFM. Not only does that involve spiling, but also the top six rows use top and butt planking (at least in the middle of the hull). Quite challenging, but it will give me practice for future builds. The rest I'll just go with the full walnut planks since they will be covered with the copper plates. The blue tape below marks the top six rows and the top 9 rows. I figured I would go with these for my planking bands because the top and butt planks are used in the top six rows, and the top nice rows fill out the line of planks to the stern counter. Haven't gotten too far yet, but did get one of the top and butt planks laid. Martin, if you're reading this, I haven't figured out how to use the chisels yet but hope to do so. This plank was pretty much straight, so an x-acto and a straight edge was all that i needed.

-
A few models come to mind: - Model Expo's Constitution is 48" - AL's Surprise is 52" - Euromodel's Royal William is 46" - Billing Boats has a few I think that push 40+"
-
Hey Martin, your Fly is coming along really nicely! I'm about to start the lower hull planking on my Pegasus. Did you end up working from the wales down to the keel? Did you spile your planks? It seems a little tricky to spile if you are going with a double planking approach. I'm thinking that I'll have to draw out the bulkhead ribs on the first planking to get some reference points. The good thing is that by coppering my hull, I really only have to be concerned with spiling the upper third portion of the lower hull. Hope all is well!
- 467 replies
-
- 1
-
-
- fly
- victory models
- (and 1 more)
-
Sorry, forgot to add the link to my post. I added it above, and here it is as well: https://panavise.com/index.html?pageID=1&page=full&--eqskudatarq=5