GuntherMT
-
Posts
2,213 -
Joined
-
Last visited
Content Type
Profiles
Forums
Gallery
Events
Everything posted by GuntherMT
-
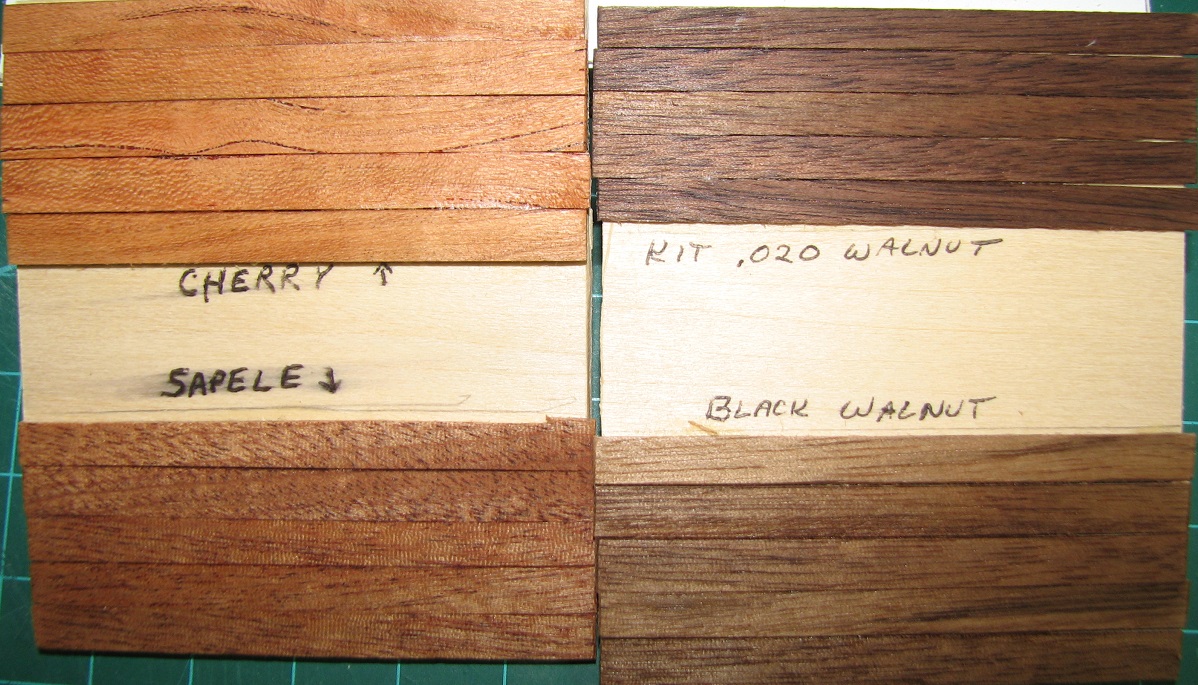
Thanks Randy and Steve. As I mentioned, I don't really have a specific use for these planks in mind, I just had a few minutes while taking a break from work (working from home today), so chopped up a plank of each to make those little sample pieces so I could see what they each looked like. The Sapele is certainly harder to cut than the others (I was just straight-chopping the planks with a razor blade), but I think it's got an interesting look and might be useful for making deck houses, hatch covers, or flat transom planking, etc. on some project in the future. Of those four, I do agree that the kit walnut is very nice, and since it's much thinner than the others would certainly be easier to use for hull planking! I also did a small deck-planking sample earlier in the log where I used maple, and it was pretty nice for that, but I've also got 30 each Boxwood and Holly planks coming in mid November from Jeff at HobbyMill.
-
Personal Messages
GuntherMT replied to aliluke's topic in Using the MSW forum - **NO MODELING CONTENT IN THIS SUB-FORUM**
I can still get to the first PM conversation I had with you Alistair, so I think that means it can't be that one of us has banned the other. -
Good to know Rich, although I have no real plan for any of this wood right now, I just got a bunch of different kinds to see how they looked, figuring I can use them for deck furniture and other bits and pieces for future projects.
- 831 replies
-
- 1
-

-
- Armed Virginia Sloop
- Model Shipways
- (and 1 more)
-
Other than having more plan sheets, it looks like their instructions/plans for the Constitution are pretty much the same as the ones I got for the Carmen, and when I hit the rigging there were two pages with a couple of pictures that pretty much said - complete the standing rigging with black rope, and the running rigging with tan rope according to the photos and plans. So yea, it appears that Constructo doesn't go much for giving you any actual rigging instructions.
- 1,756 replies
-
- 2
-
-
- constitution
- constructo
- (and 1 more)
-
Personal Messages
GuntherMT replied to aliluke's topic in Using the MSW forum - **NO MODELING CONTENT IN THIS SUB-FORUM**
So I was exchanging personal messages with another user today, and I tried to go back and look at a prior message, and I now get this: Sorry, you don't have permission for that! [#10275] You have been banned from this personal conversation. I responded to the other user, and he responded that he is getting the same thing, and has no idea why. When I click on the link in the notification email for that message, I get the same thing. All three of my conversations with him are now gone in my conversations list, but I have a different conversation with him from a few days ago, and it's still allowing me to see it without any issue. Color me puzzled. -
Looks like you've got quite the array of resources already gathered. You should do great! I started my first build by grabbing the kit from the store along with a few random tools and glue, and went to town, so you should be much better prepared than I was. I did find the build log here was a great help to me. Not only did I get some great feedback during the build, but the very existence of the build motivated me to perhaps put just a little more effort and care into her than I would have if nobody else was ever going to see it if I failed miserably and deposited the entire mess into the garbage. I also read as many other build logs as I can, since many of the things you'll be doing are not dependent on the type of ship at all (planking for example, or general woodworking or rigging techniques and tips), and you'll find many great ideas in other peoples build logs. Look forward to seeing this get going, best of luck!
-
It does look fine the way you built it Barehook, thanks for the photos. Random mid-day non-update update. Sample planks comparing wood from the kit vs. some I got from Ebay. As is labeled in the photo, Cherry, Sapele, Black Walnut, and the kit supplied .020 thickness Walnut. Taken with a flash. Planks were cut to length, not beveled, then rough sanded, lightly sanded with 240 grit, wiped with a damp cloth, and then when dry given a single rubbed in coat of wipe-on satin poly.

- 831 replies
-
- 5
-
-
- Armed Virginia Sloop
- Model Shipways
- (and 1 more)
-
Very nice. Did you manually serve the shrouds, or did you get a machine to assist with that?
-
Hi Mike, This section looks really great. I've never had much interest in the section models, but after seeing this, and a couple other really spectacular builds on here, I've changed my mind and think one of these would be a great project, and they look really good when well done like yours is. Thanks for sharing, I'll be following along as you finish the rest for sure.
-
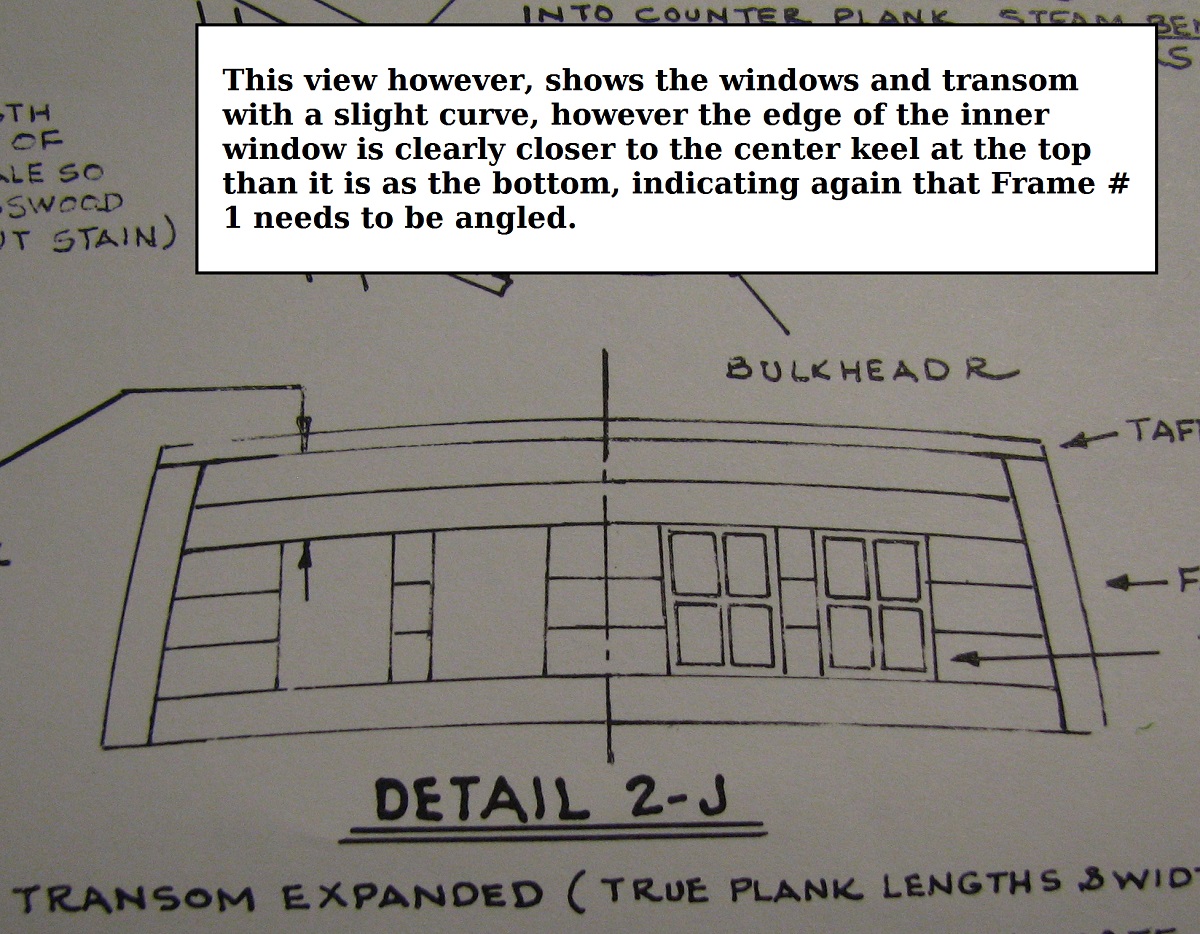
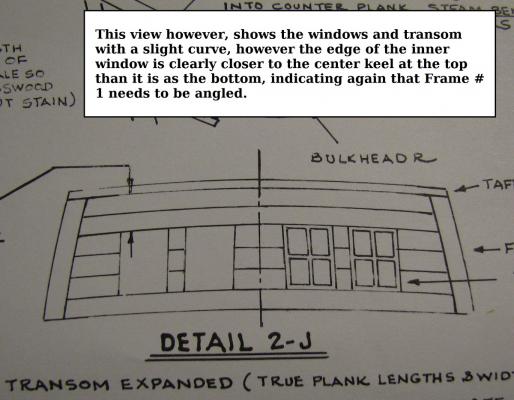
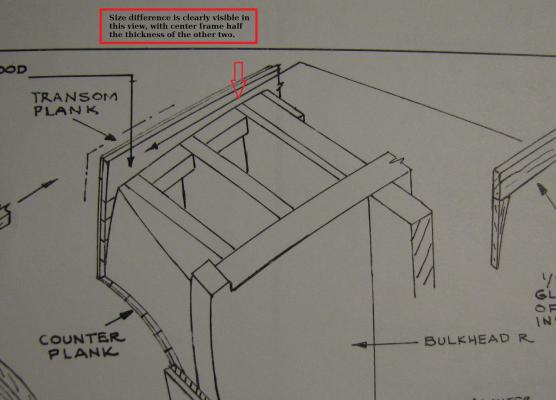
Thank you for the feedback gentlemen. Russ - I've got the sub-deck almost completely flattened out now, and the patch, as you say, shouldn't be a big deal to get in decently. On the window angle - as can be seen in the detail 2J, and in the photo from Barehook, the frames have an angle built into them. They could be placed as shown by Barehook, or angled as shown by the plans (or something in between). Since the angle to the center frames is established by beveling the edge that contacts the window frame, I'm fairly certain I could do this by simply trimming with an X-acto blade, or just sanding, as the angle doesn't matter beyond the depth of the window frame since there is nothing else that connects to this frame behind the window. Barehook - thank you for the picture. I went through every build log, and every completed AVS on the site, and good clean shots of the stern when completed, and details of how each person built them out, are surprisingly rare. Yours looks good, but I'm still leaning towards trying to get mine closer to detail 2J in the plans if I can swing it. Jim L, and Cap'n Magee, thanks for stopping by and commenting!
- 831 replies
-
- 1
-
-
- Armed Virginia Sloop
- Model Shipways
- (and 1 more)
-
Also - opinions from other AVS builders on this are more than welcome, but my current plan it to try to get it as close to the plan sheet details as possible here.
- 831 replies
-
- 2
-
-
- Armed Virginia Sloop
- Model Shipways
- (and 1 more)
-
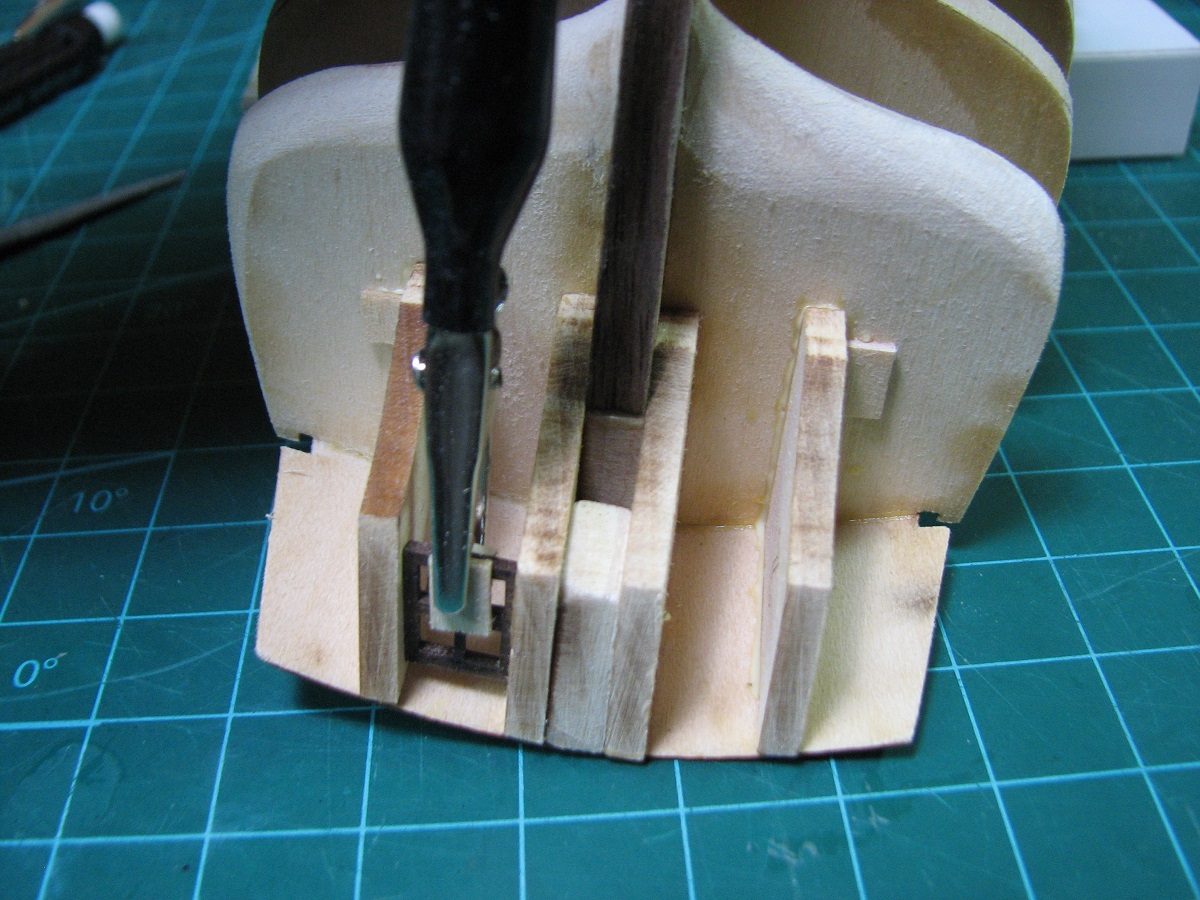
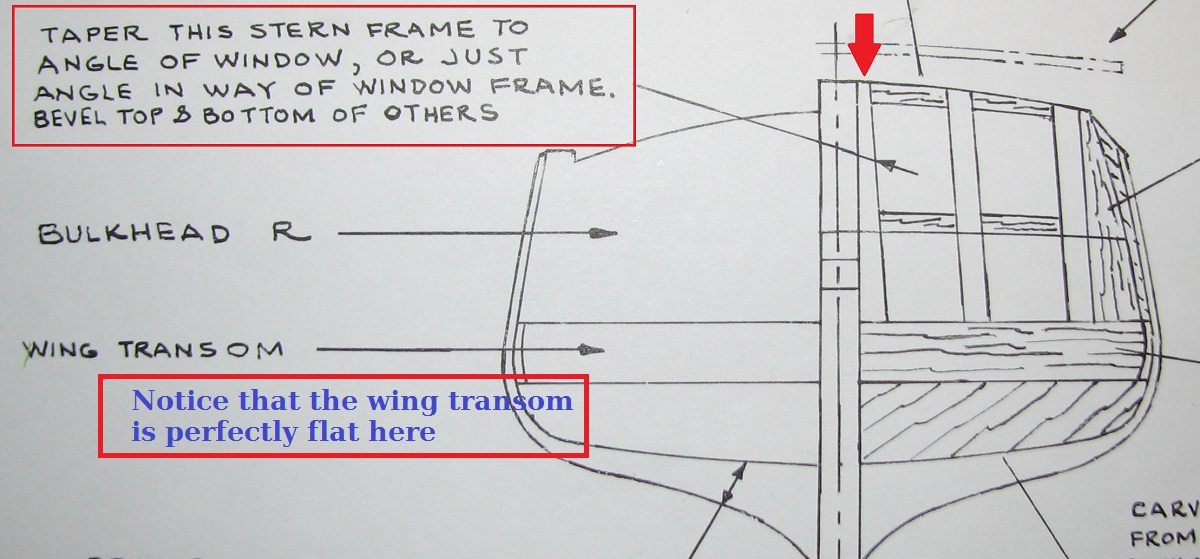
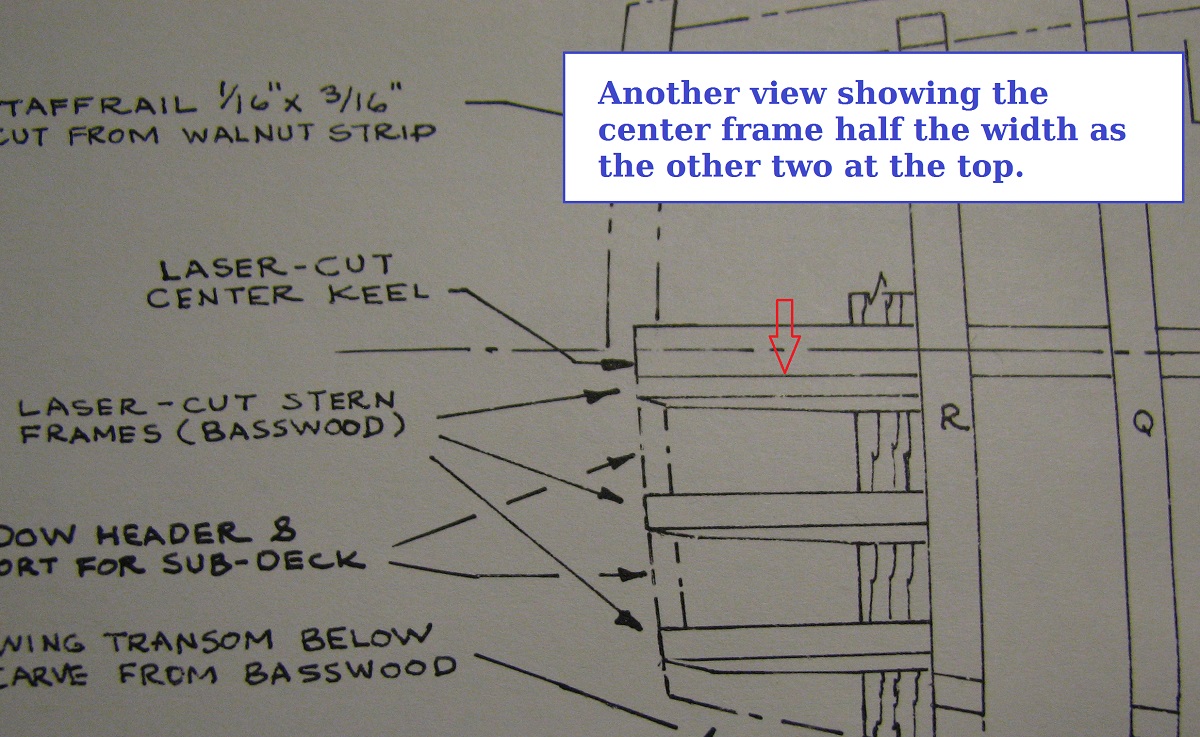
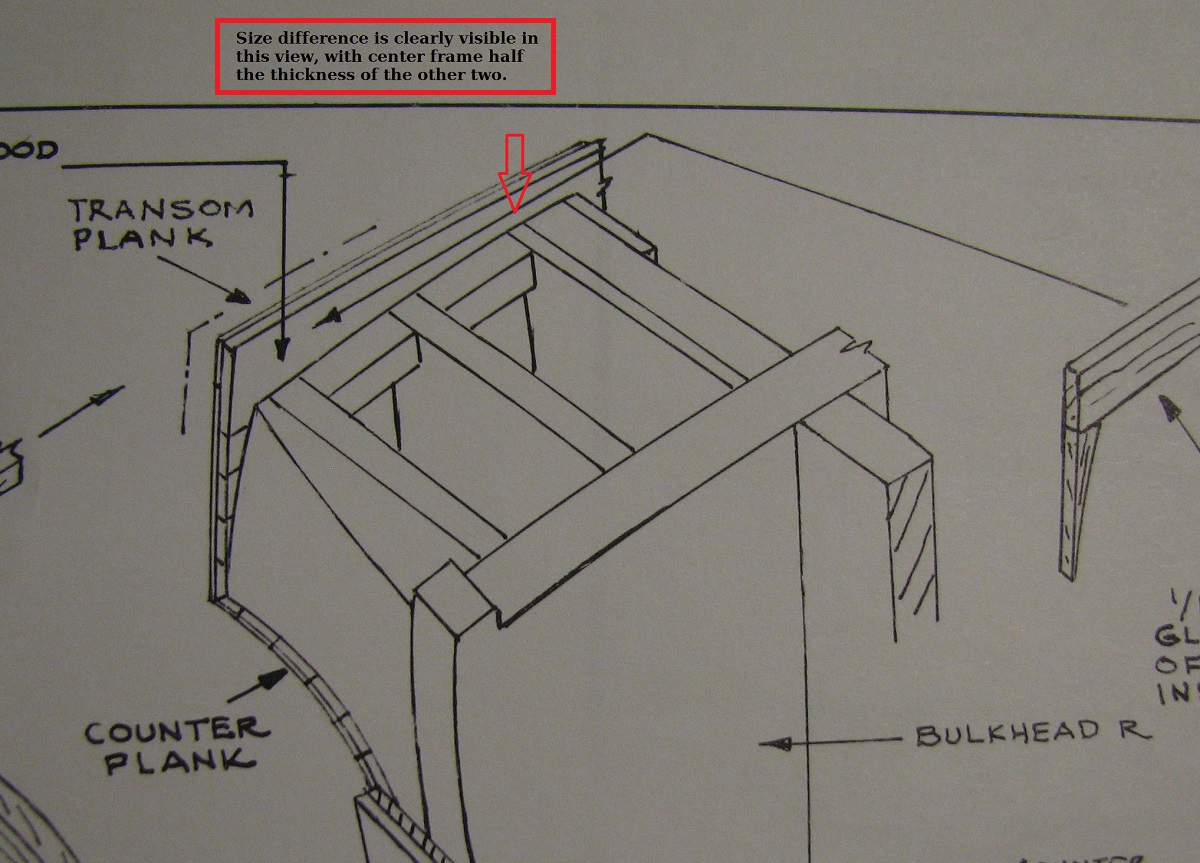
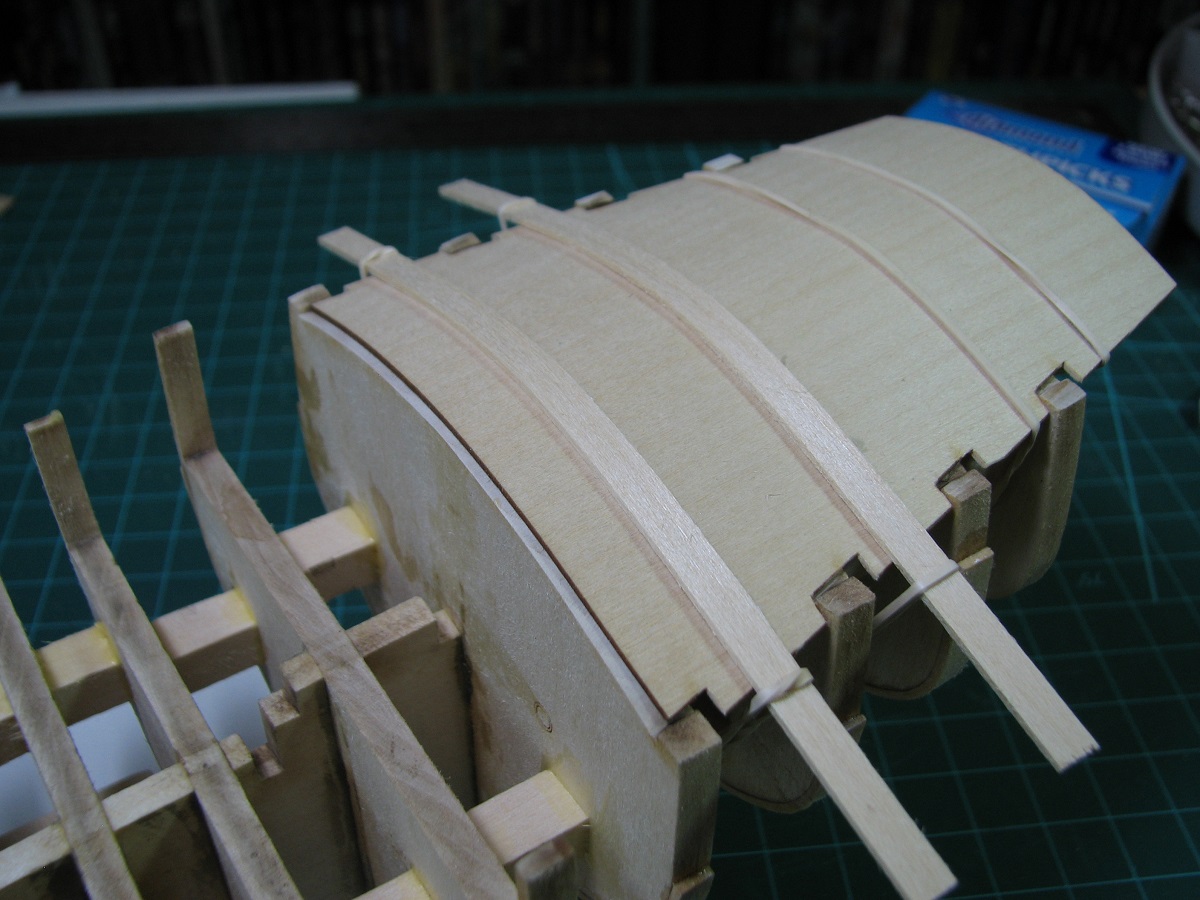
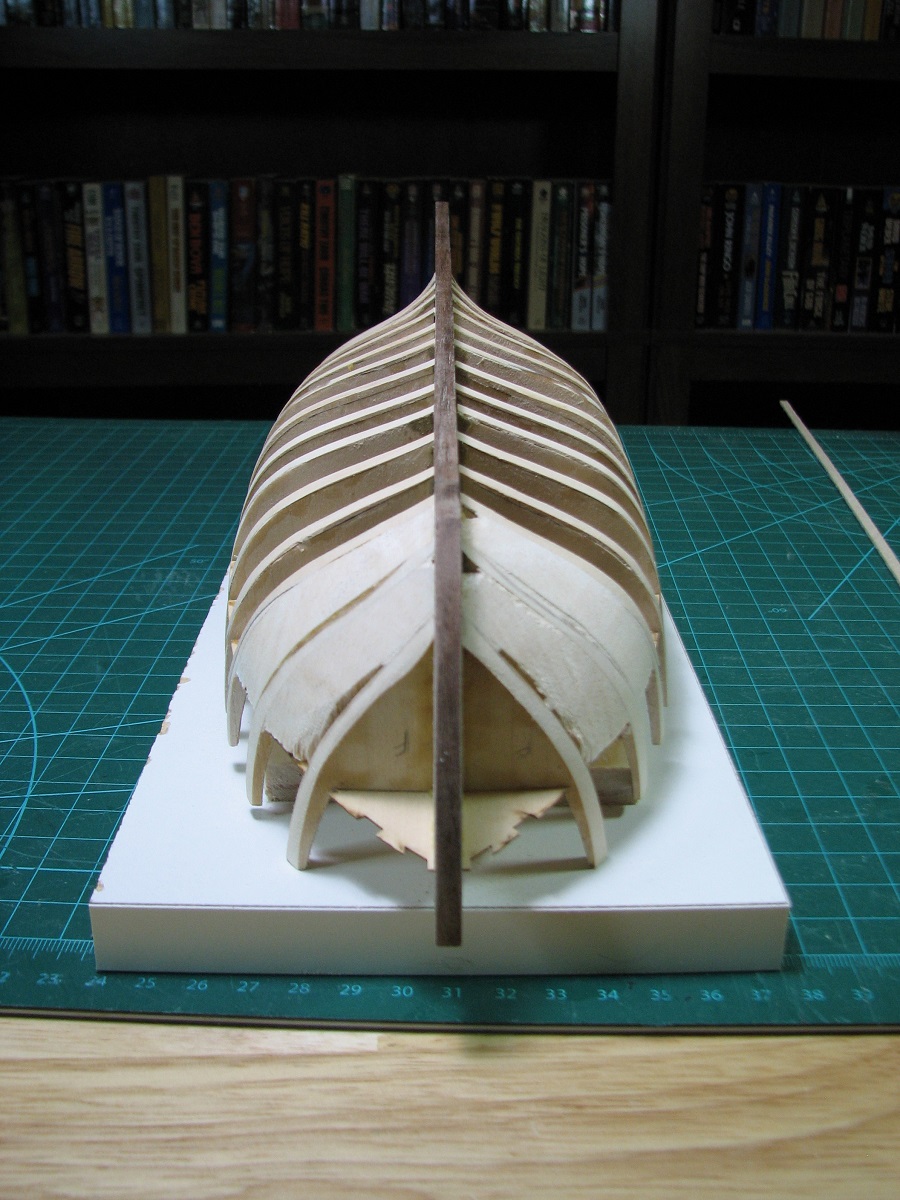
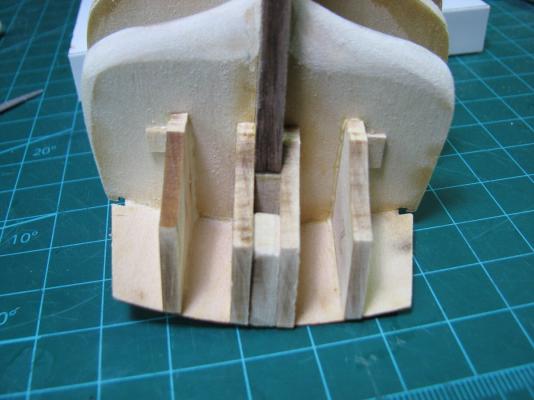
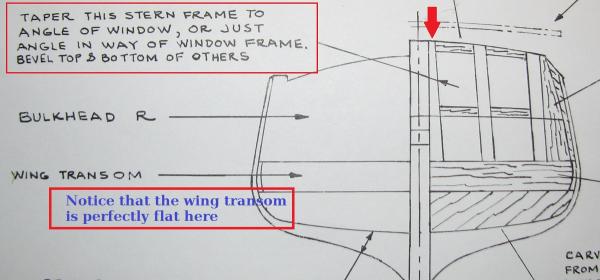
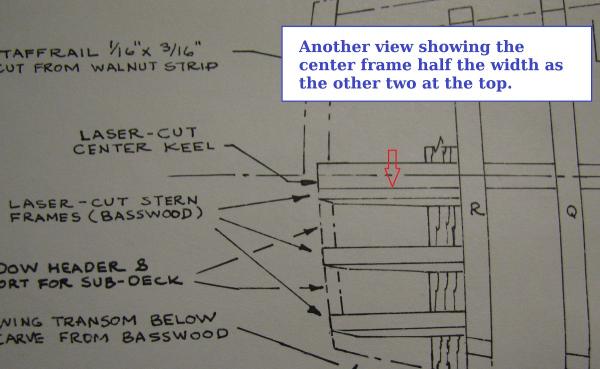
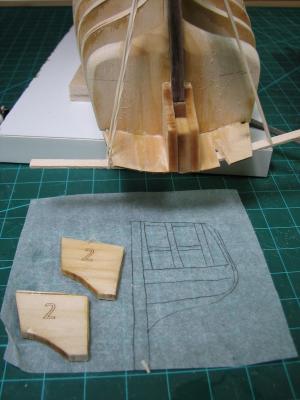
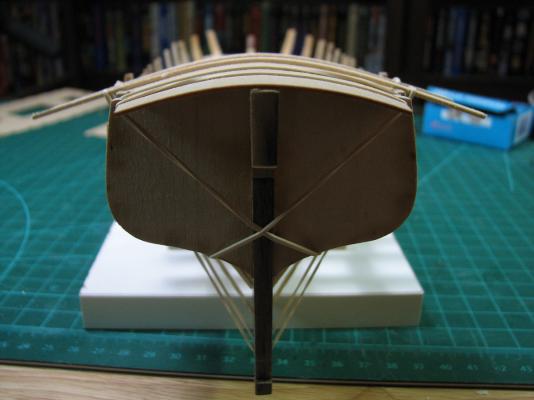
So yesterday I placed the inner two stern frames based on how the Bob Hunt practicum indicates it should be done, but got nothing else done as I had a long work day and an HOA meeting at night. This evening I sat down and started trying to get the outer frames to line up in a way that they looked right, and no matter what I did, if I had one edge aligned properly and the window tight, the other edge was all kinds of out of whack. So I went back and stared at the plans for a while, and it dawned on me while I was looking at them that the Hunt practicum is wrong in this area. He has the #1 frames only beveled to match the sub-deck, and then glued to the keel, but the plans show something completely different. The plans show that frame #1 needs to be angled in such a way that the top and bottom of the window frames are level, meaning that the top of frame #1 needs to be narrower than the bottom, and the wing transom ends up completely flat, not angled as shown in the practicum. But then the 'expanded transom' detail does show a slight curve, so in reality, perhaps it's a little bit of both. So tonight ended up being a 'go backwards' night, as I soaked the #2 frames to remove them so that I could get to the #1 frames and then re-align the #2's. Unfortunately I managed to rip off part of the sub-deck with one of the #2 frames, and all the water has made it all wavy because it's so thin. Hopefully I'll be able to fix that after it's dried by gluing it down to blocks or the top window frame supports. I left the #1 frames in place, as in looking at things, I only need to angle the outer edge where the window frame will sit, and I think I can do that with it in place, rather than trying to remove it from it's very well glued spot against the keel. From last night, placing the frames: The various plan views showing what I mean above. And the destruction showing the damage to the sub-deck. Going to let this mess all dry overnight before I touch it and try to make it right.

- 831 replies
-
- 8
-
-
- Armed Virginia Sloop
- Model Shipways
- (and 1 more)
-
Looks great, congratulations! What's up next?
-
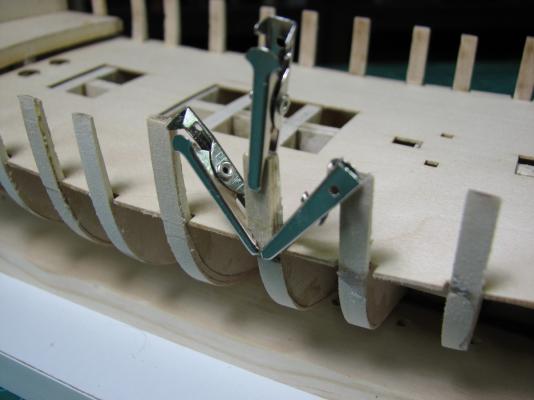
Wayne, could you use something like what I did for my top decks? Run a section of planking or if you don't want any curve, use a larger stiff piece, and maybe build up the inside to match the curve, and use rubber bands to hold it down. Something like this, but with the plank/board run through the frames, under the deck to stick out to either side, and then run the rubber band from one side to the other as needed to keep pressure on. I'll remove the pictures after you've seen them if you'll remind me!

-
Your 'keeper' would force me out of the shipyard (and the house). Deathly allergic to those kitty-cat things. The Syren is looking good.
-
Have to agree with Rick, that antennae array/forward mast assembly is awesome.
-
Fantastic job on the painting. Looks great!
-
You picked quite a whopper for your first rigging job. Sure looks great to me though!
- 517 replies
-
- 1
-
-
- Endeavour
- Artesania Latina
- (and 1 more)
-
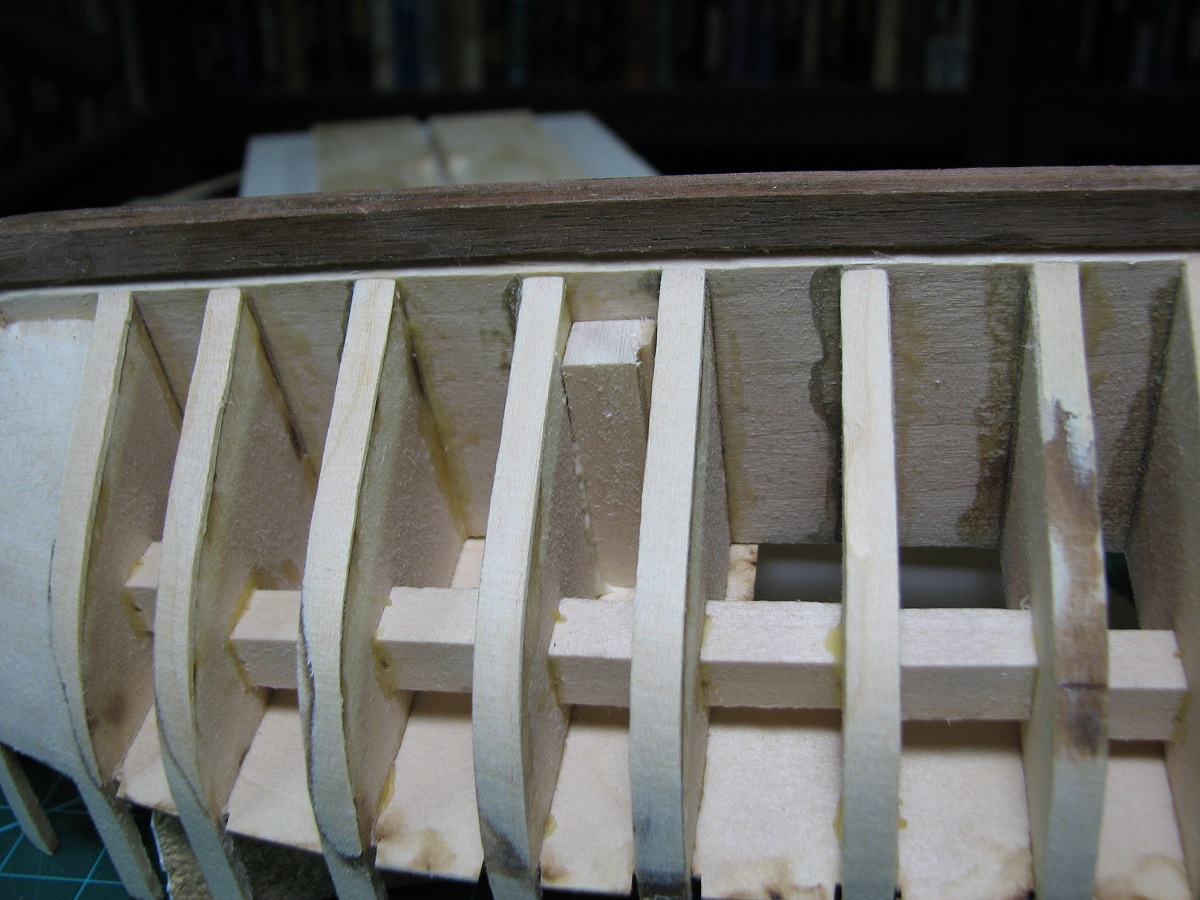
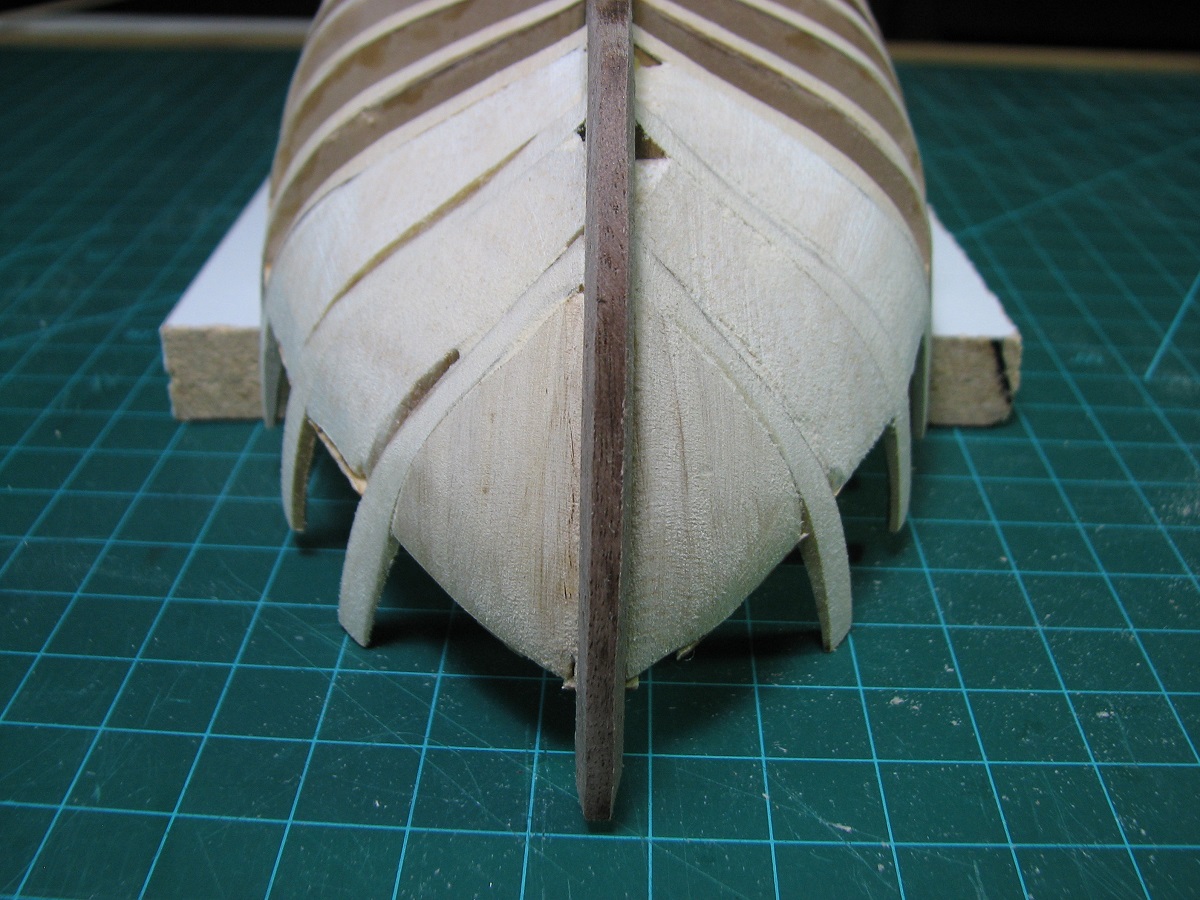
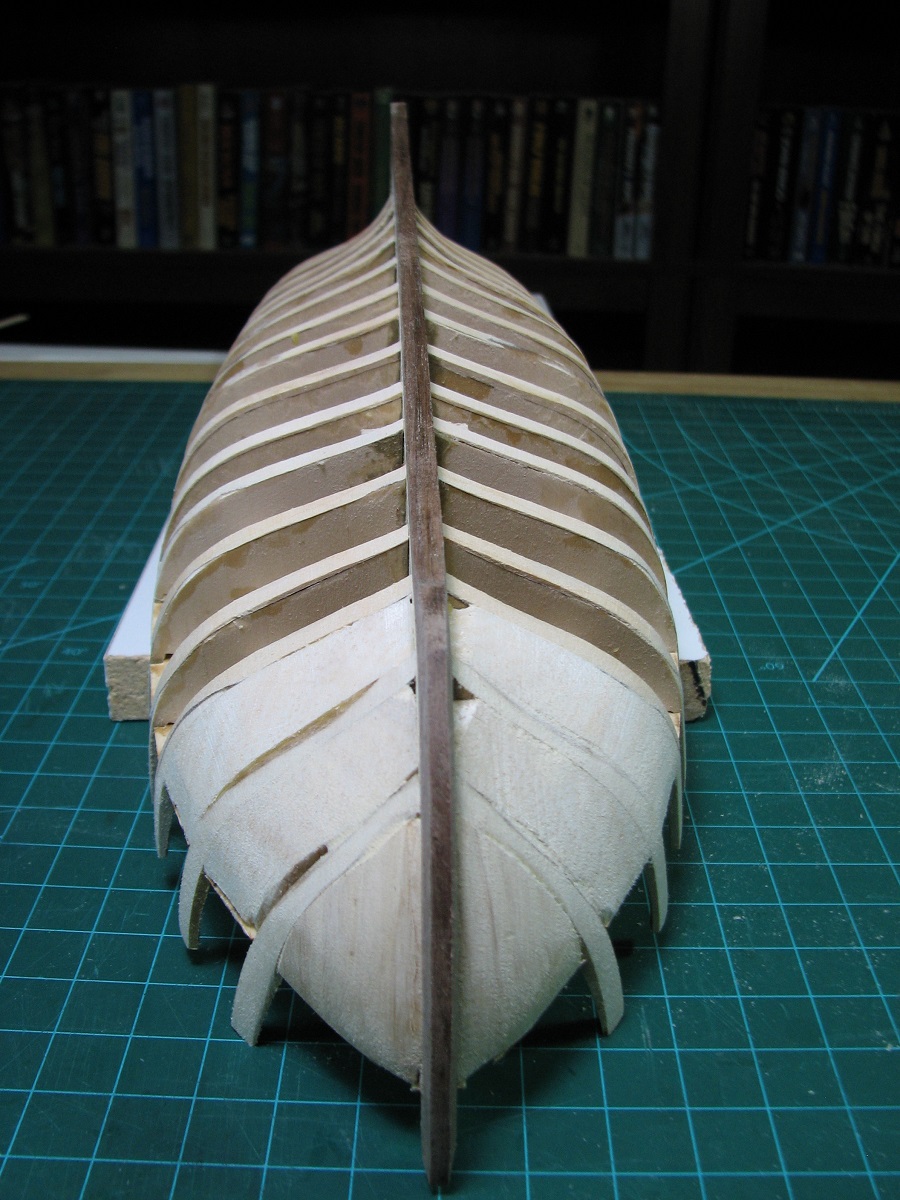
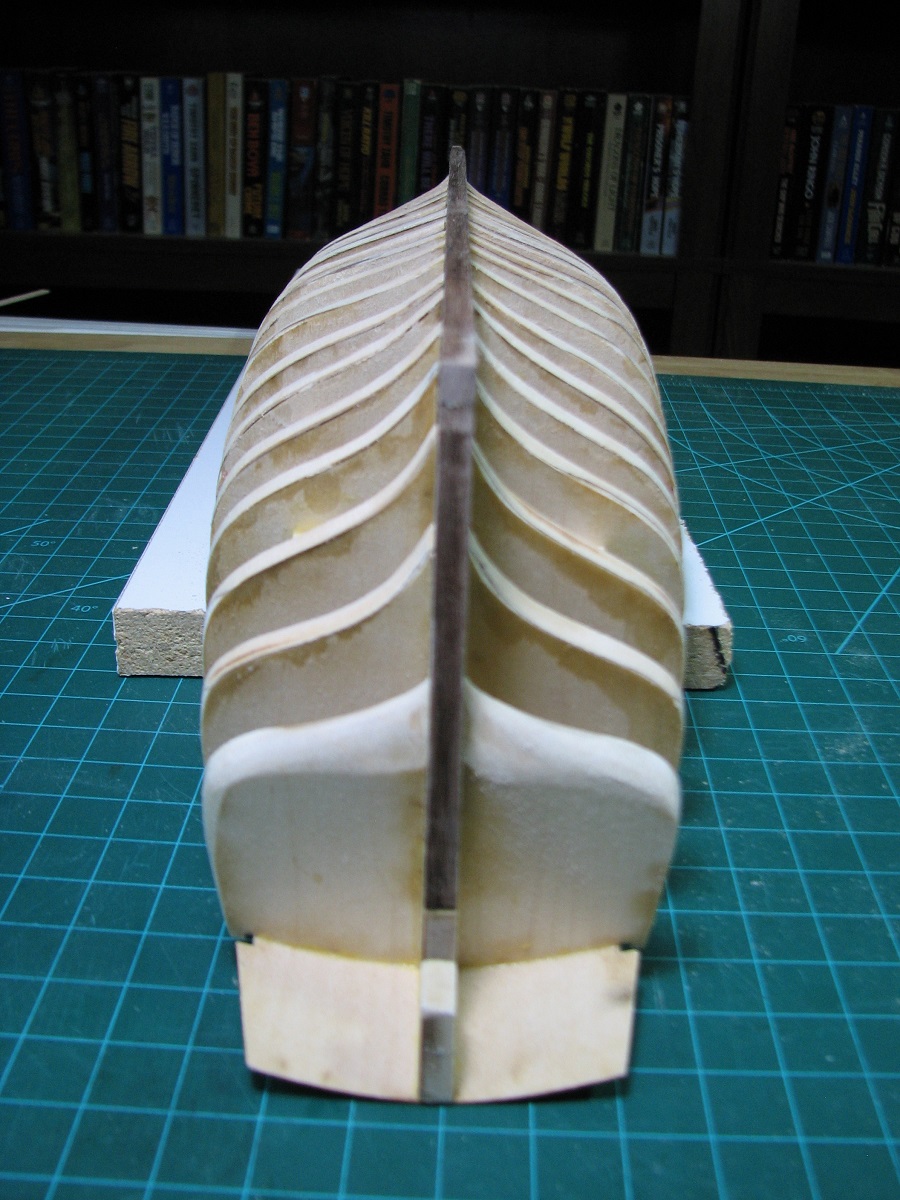
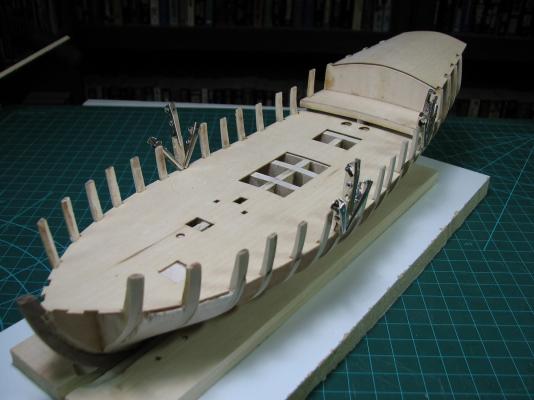
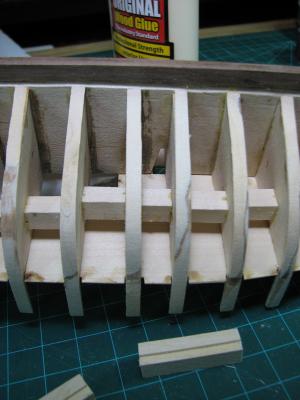
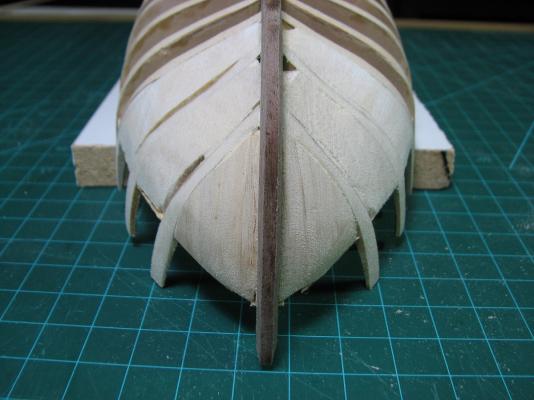
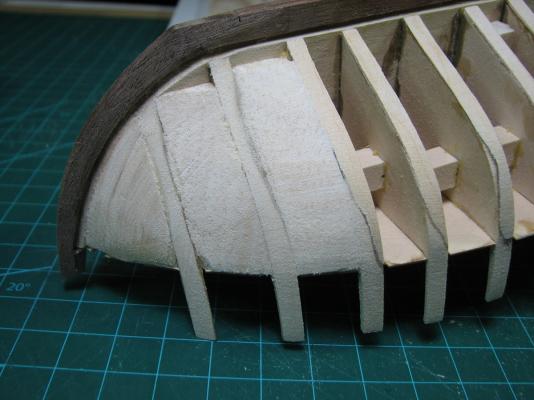
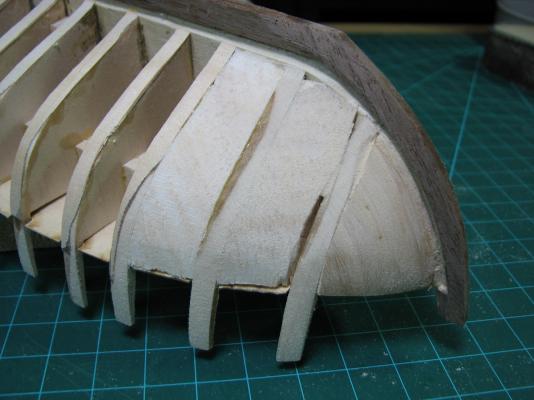
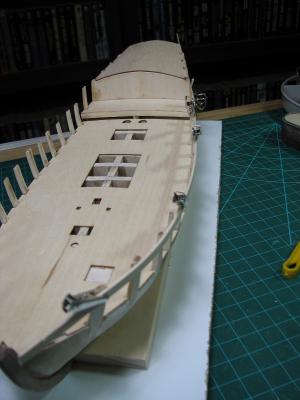
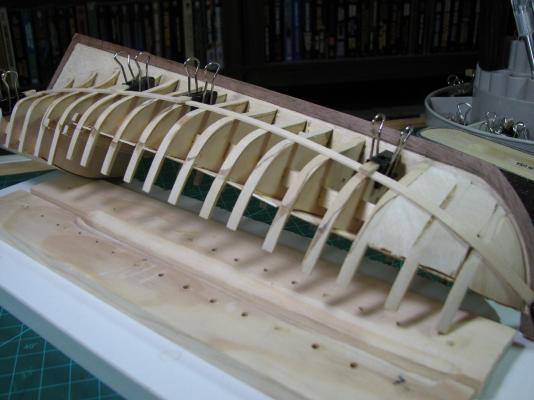
When last we saw our intrepid little boat, the subdecks had been glued, but no fairing had been done. Since then some progress has been made in that department. I began by doing a 'rough' fairing to see where I needed to add any shims. Because of adding all of the shims to the bottom of the bulkheads prior to mounting them, I found that no shimming was needed except for about half a dozen extensions that were not going to touch the planking without causing a 'dip', or needing to remove far too much material from their neighbors. Once again I dipped into the 3/64ths basswood deck planking, and cut pieces for the extensions. I used a second piece of basswood in the clamping so that the alligator clamps I used wouldn't leave divots in the shims where I didn't think I needed to sand very much material away. Here you can see my clamping system so that I could use regular wood glue to hold the extension shims in place. I made some blocks to reinforce the mast mortise, and placed them. I made them overly long as I didn't want to apply a lot of glue right around the mortise. This is also why I added a 'shim' to the edge of them, to get more glue surface away from the mortise opening. I cut out bow fillers to a rough size with a hand scroll saw (I see a nice power band saw in my future I think, every time I use the scroll saw I see how useful of a tool it would be where I could guide a piece with both hands or a fence) and then did all the shaping with my Dremel and a drum-sanding attachment. Once I had them nearly right I glued them in place before the final fairing, as I wanted them fixed in place to do the final shaping against the bulkhead, keel, and deck. I did another run with a rough (120 grit) sanding block and reduced all of the bulkheads until I was seeing 'kit bulkhead' material on all the higher bulkheads, so that my mass shimming didn't cause the hull to be too 'fat'. I also realized that I had never beveled the stem, so I finished that, and trimmed the excess wood from the keel that extended aft beyond the sternpost. At some point I need to make a tiny filler for the hole where the sternpost and keel connect that was left because of the keel being the wrong length. And a couple test plank runs. Very happy with how nicely they lay all the way from the keel up to the top of the bulkheads. Still need to do a final pass with a 250 grit sanding block, but I am going to build out the stern and get it faired up with the hull before I do that. Looks like the stern should occupy quite a few hours to get it right. Fairly amazing to think that on the Carmen I was at this point in the build within a few hours of starting, since I didn't know any better, and did pretty much none of this early preparation work! Then again, the planks didn't lay anything like this when I started working on them.


- 831 replies
-
- 17
-
-
- Armed Virginia Sloop
- Model Shipways
- (and 1 more)
-
You should be able to soften wood glue with just water. It may require letting it soak through the wood, but with some patience water should do the trick. I've had to do this several times on my build already.
-
I had a box on the door this evening. The replacement bulkhead arrived from Model Shipways exactly 1 week after they responded saying they would replace it, so pretty happy with their service. They sent the entire sheet, and the bulkhead "F" is perfectly cut, so my kit part was an anomaly, not an issue with their pattern. Obviously I won't be using it at this point, but it's nice to know they support their product and if I ever do get stuck with a bad part, I won't have to wait too long for a replacement. I got the hull faired with 120 grit, but it was a long day at work and I'm not going to finish it tonight, so no real update or pictures.
- 831 replies
-
- 2
-
-
- Armed Virginia Sloop
- Model Shipways
- (and 1 more)
-
You can actually use the machine for seizing as well. Here is a video by Alexey, who is the maker of the serving machine. I think my link takes you to where he is finished assembling the machine and begins the demonstration on how to use it to serve rope, make beckets, strop blocks, and do seizing. http://youtu.be/o5gZQRN6yoU?t=7m8s
-
Thanks Ken, I assumed this was the case, but it's good to get confirmation.