BobG
-
Posts
3,091 -
Joined
-
Last visited
Content Type
Profiles
Forums
Gallery
Events
Everything posted by BobG
-
You take on the most interesting orphan models to build, Mike. I'll be following along on this interesting project.
-
I'm really happy that you decided to add the two wonderful fishing vessels to your line of kits and it seems that will be very busy with 6 more kits already in line next. I would love to see you consider making a kit for Shakleton's Endurance someday. Surprisingly, I don't think there has ever been a wood kit made of her. I believe a high quality kit of the Endurance would be extremely popular since It is such a legendary ship and the true story of her tragic voyage is so compelling. Not only that but she is a beautiful ship as well. She would certainly diversify your line up of kits too!
-
I hear you, Justin. It's such an important step in laying the foundation for the planks and to get a correct hull shape. I think this is one of those modeling skills that simply comes with more and more practice.
-
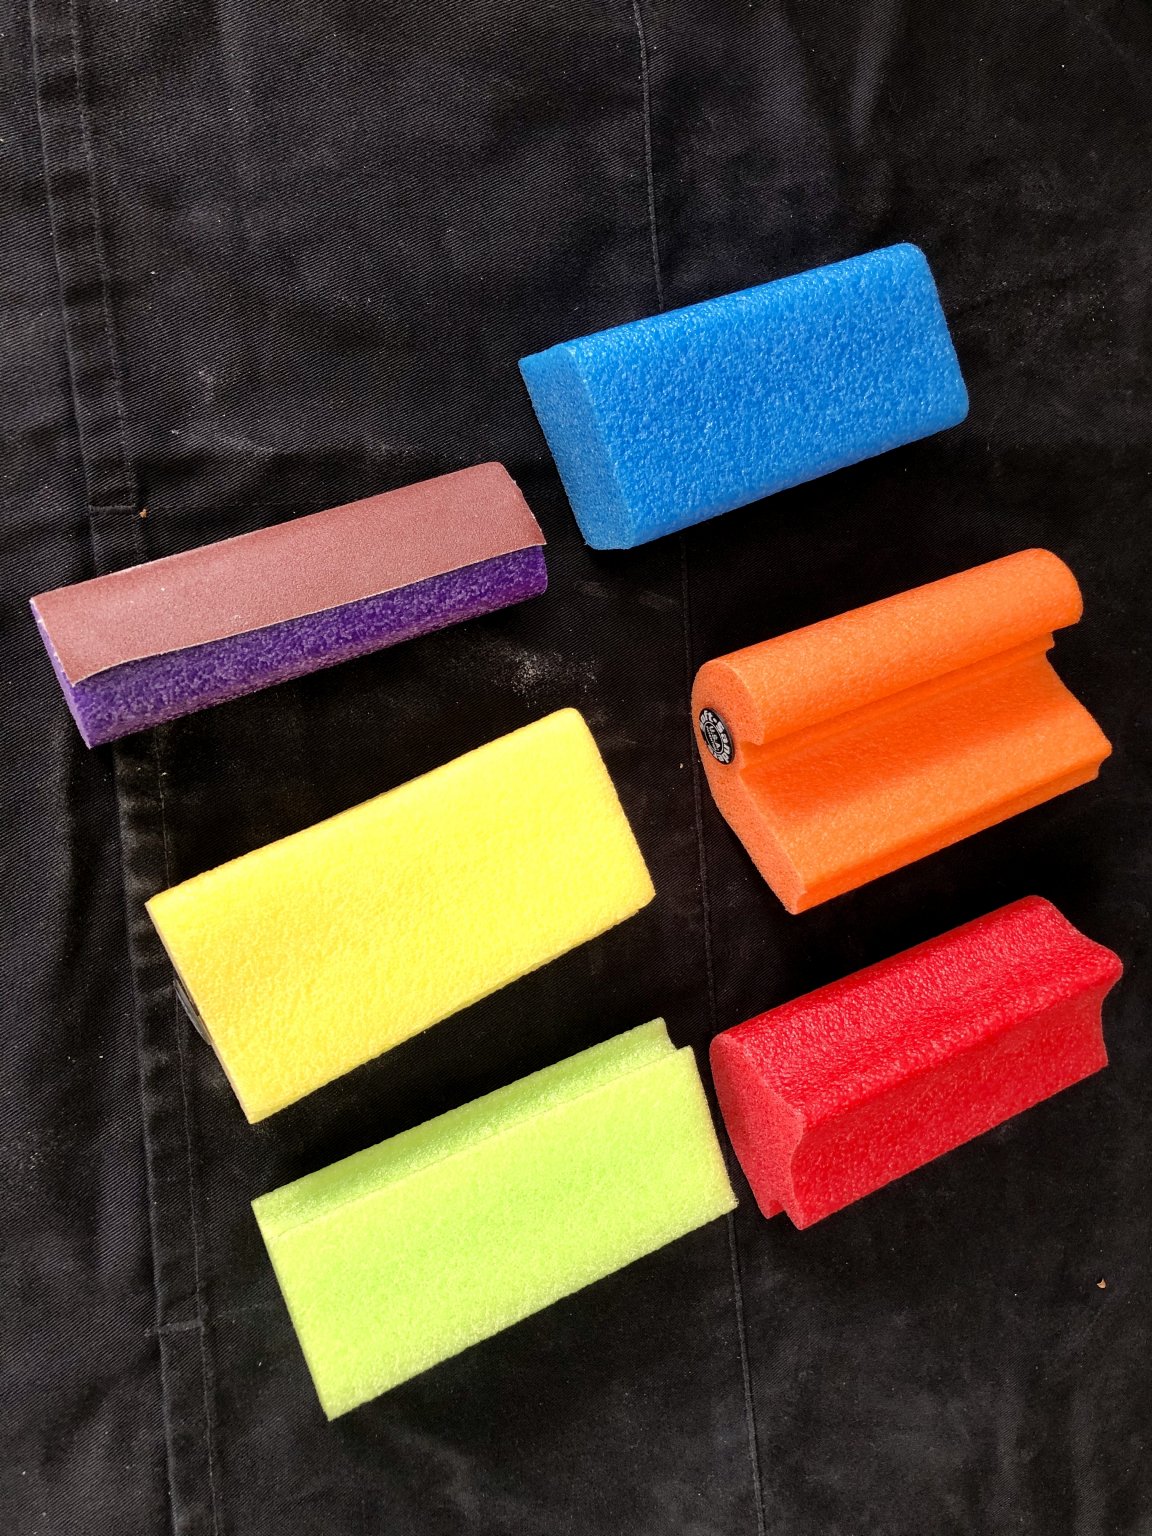
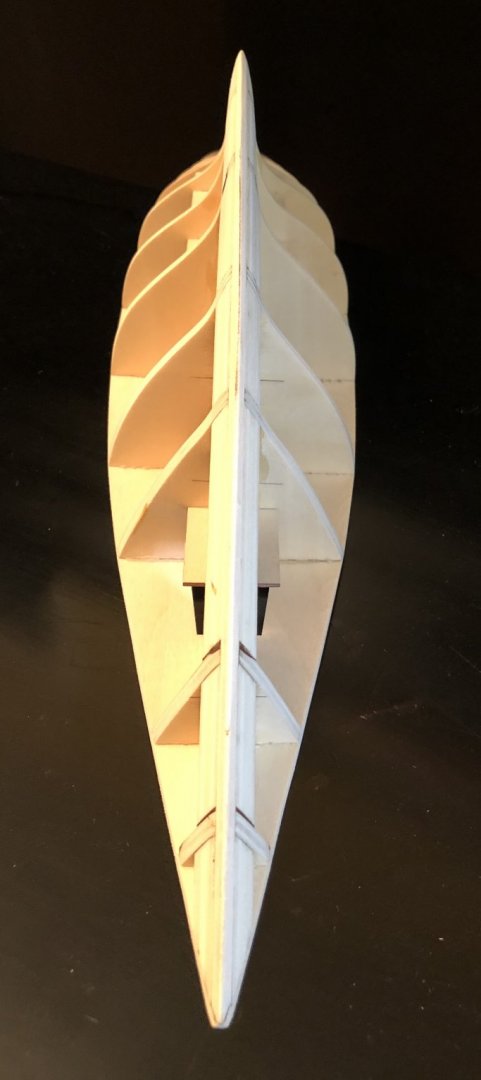
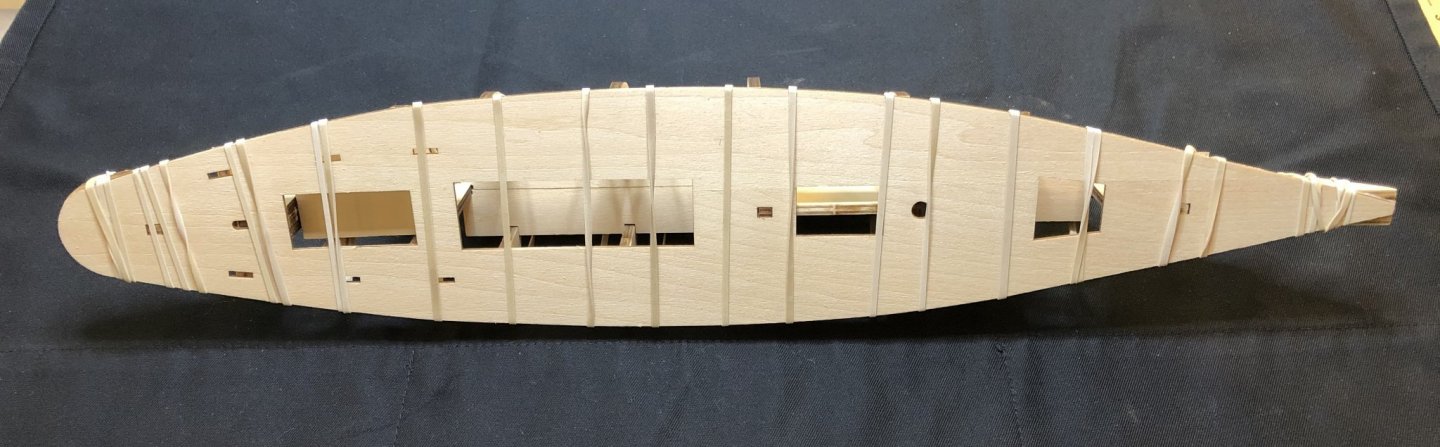
I finished fairing the hull today. I'm always unsure of this process though and I hope I did a good enough job on it. I probably spent a 7-8 hours in the past two days sanding and checking and sanding and checking. I went slowly using 120 grit sandpaper on the Soft-Sander blocks that I recently purchased. I used a plank to lay across the bulkheads regularly to check for high and low points as I was sanding and I sighted down the hull from different angles to try and see if the hull shape looked symmetrical. It looks fair to me when I sight down the keel and it feels fair and symmetrical to my hand but I'm still not sure if I may have overdone it or it may still need a little more sanding. We'll see how it goes once I start planking. I really like the Soft-Sander blocks. They are very light and comfortable to hold for long periods of sanding and they conform nicely to curves and various shapes. They are stiff enough to sand precisely but have some give to them so the edge will not gouge. They use adhesive-backed sandpaper and it was easy to put it on the blocks and peel it off. I bought the 5" length block set that has 6 different shapes and comes with 6 pieces of adhesive-backed sandpaper in grits from 80 to 2000. They also come in 8 and 11 inch block sets. I only used 120 grit for the fairing with the yellow and purple blocks. I got this set on Amazon: https://www.amazon.com/Style-Line-STY0701-Piece-Sanders/dp/B002XMOX3I/ref=sr_1_6?crid=1M0E8L0AXZT8T&dchild=1&keywords=soft-sanders+flexible+sanding+blocks&qid=1589766325&sprefix=soft-sander%2Caps%2C210&sr=8-6 I like them so much that I ordered some more adhesive-backed sandpaper in various grits from the manufacturer's website. They also sell the sandpaper in rolls. https://www.shop.softsanders.com/main.sc I used the yellow block the most and the purple blocks worked well for the more pronounced curved areas. You can see the sandpaper attached to the purple sander below:


-
Hello Rici, I have begun building this model and have started a build log. It would be great if you would like to follow my build. I'm sure I will have a lot of questions and you might be able to give me some good advice and steer me in the right directions if you see me going off course. Any and all advice would be very much appreciated and welcome.
-
This ship just keeps getting better and better! 👍👍👍 from me for a Winnie cross-section. I would love for it to have the main mast and rigging with it too or at least as an option.
- 1,784 replies
-
- 2
-

-
- winchelsea
- Syren Ship Model Company
- (and 1 more)
-
I think William would look quite regal wearing a tricorne!
- 195 replies
-
- 2
-
-
- lady eleanor
- vanguard models
- (and 1 more)
-
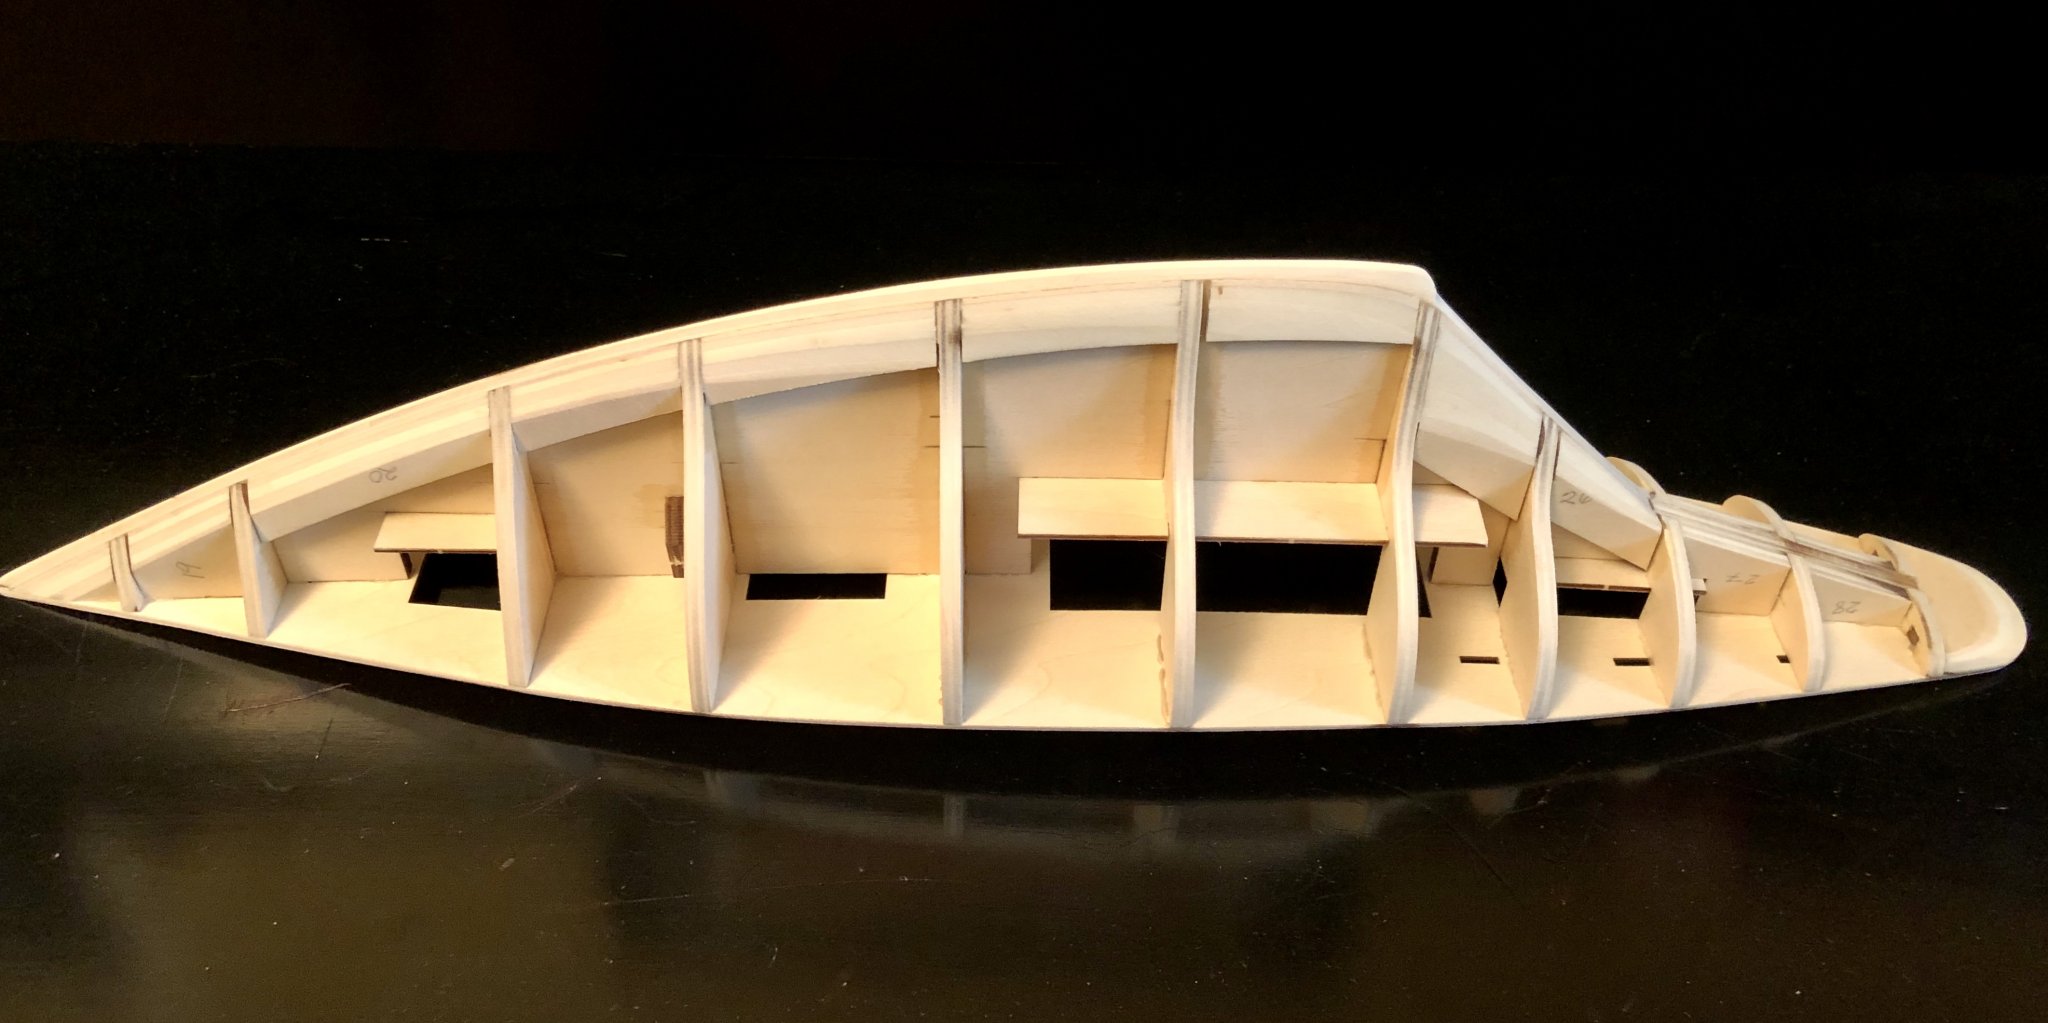
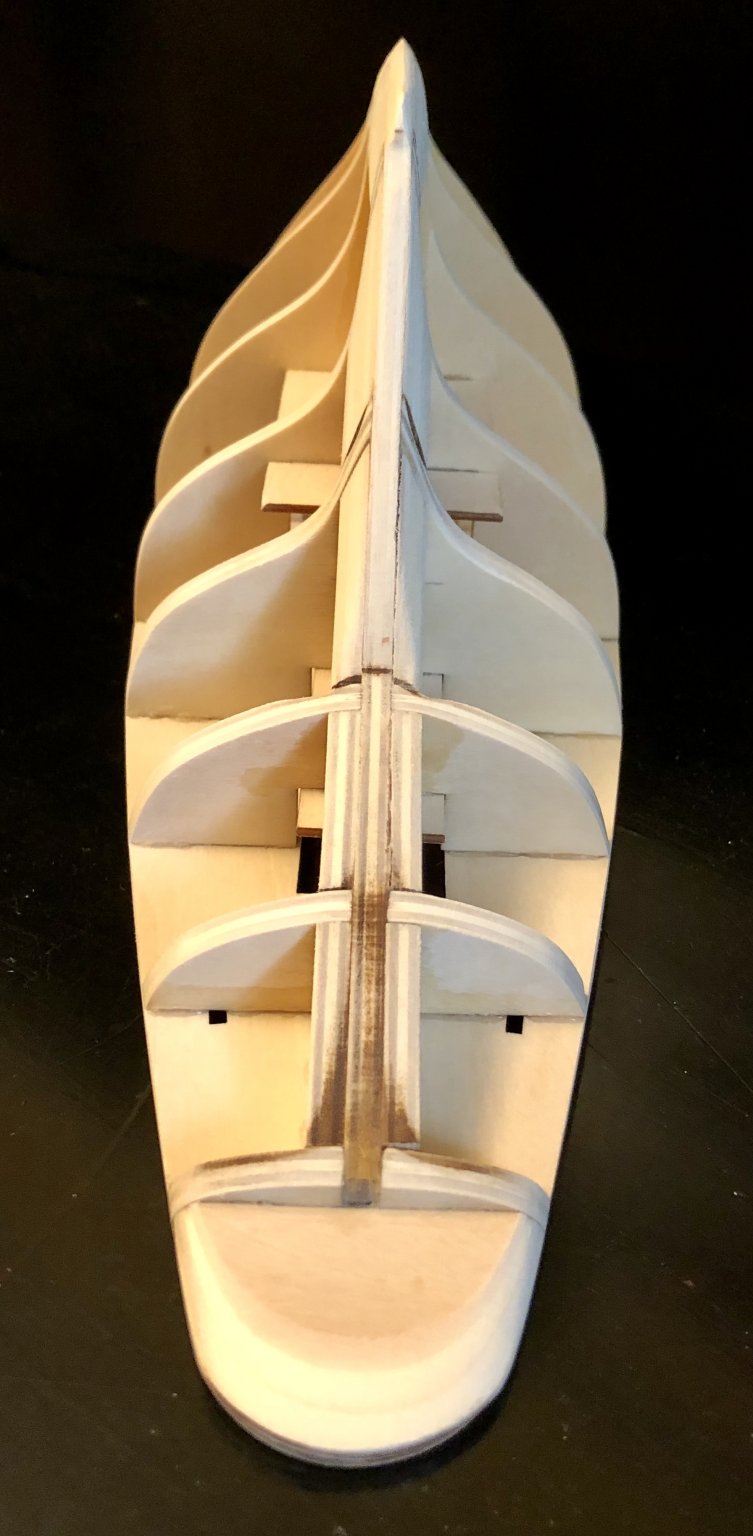
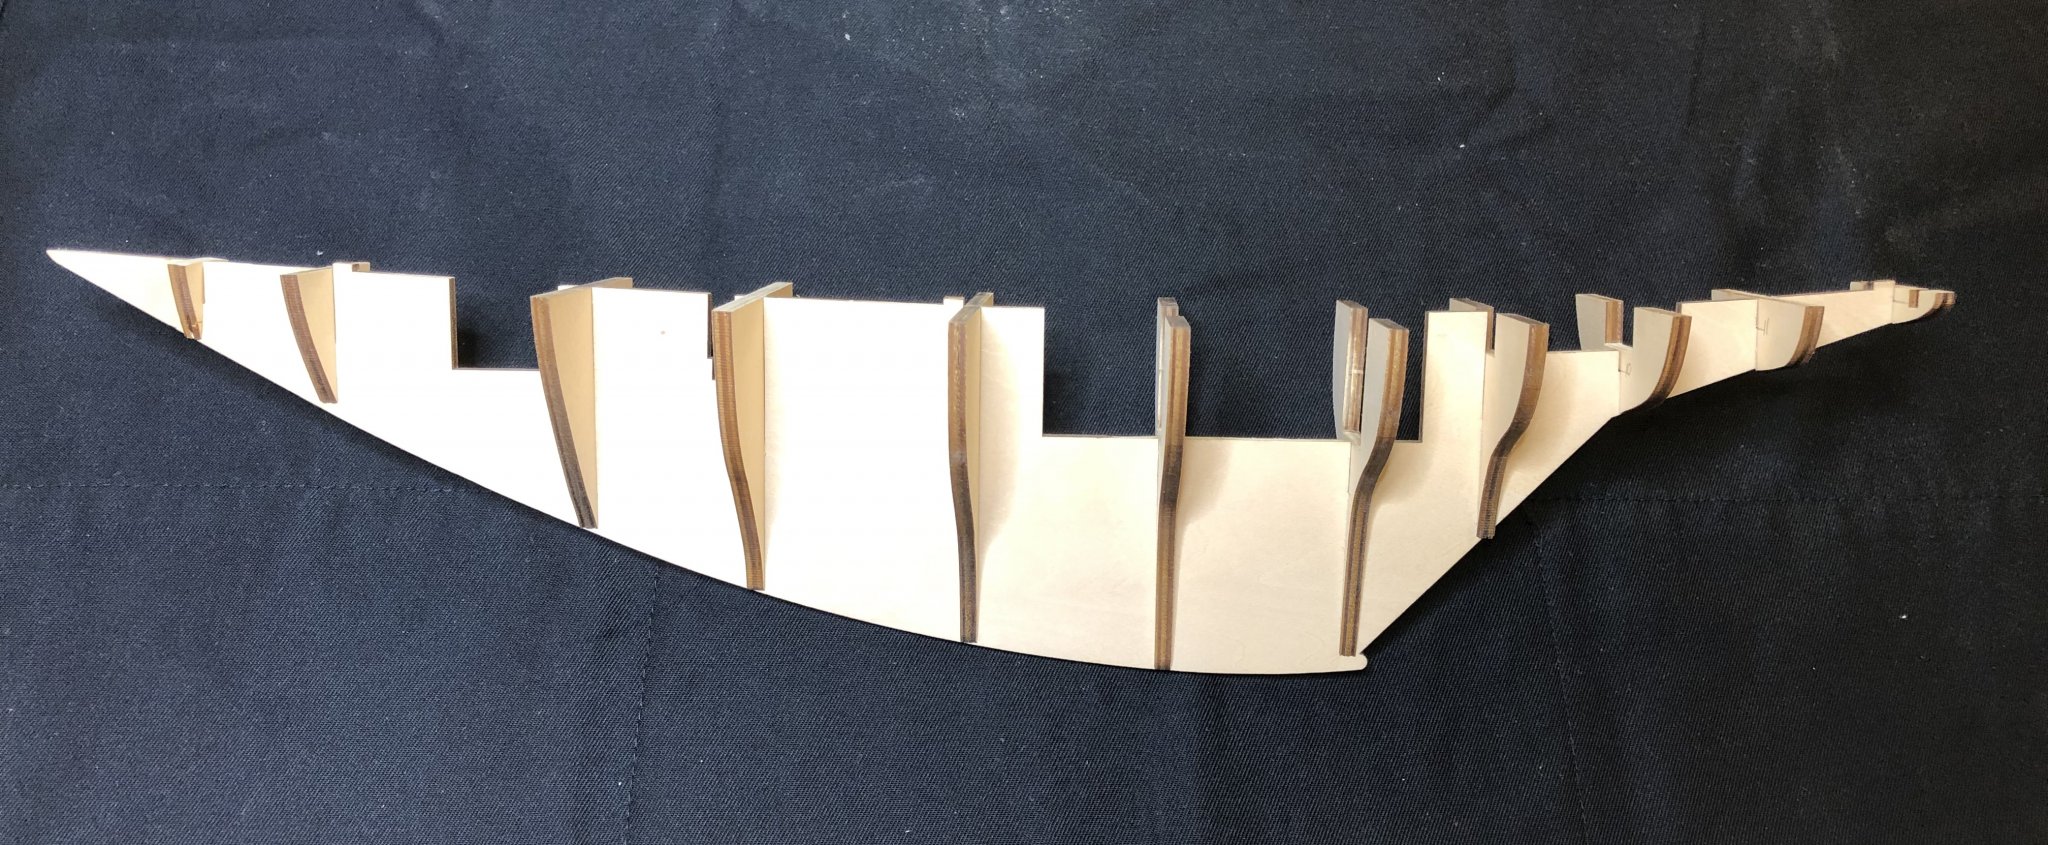
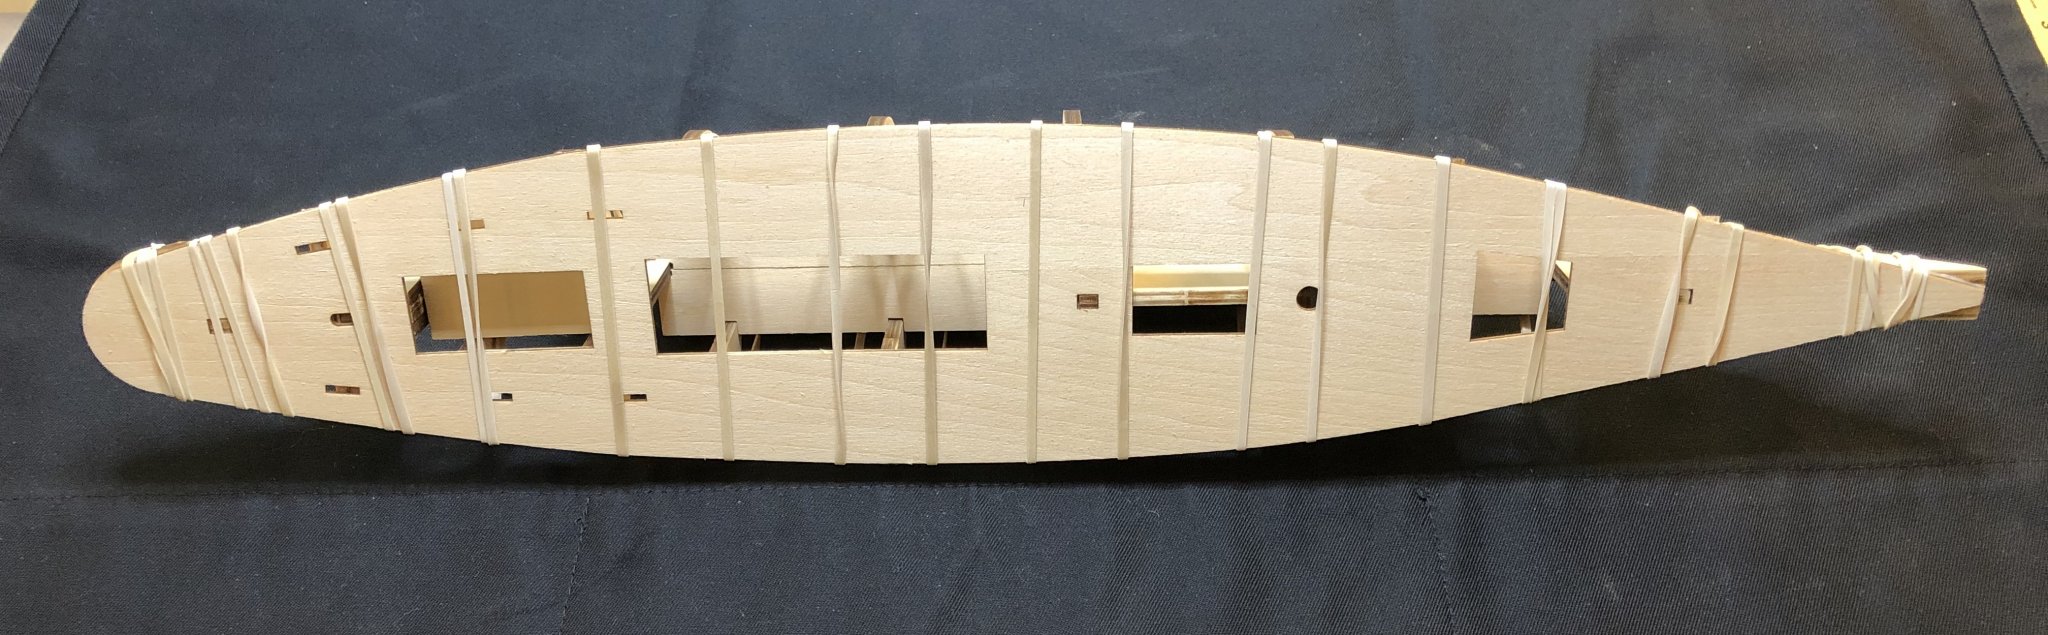
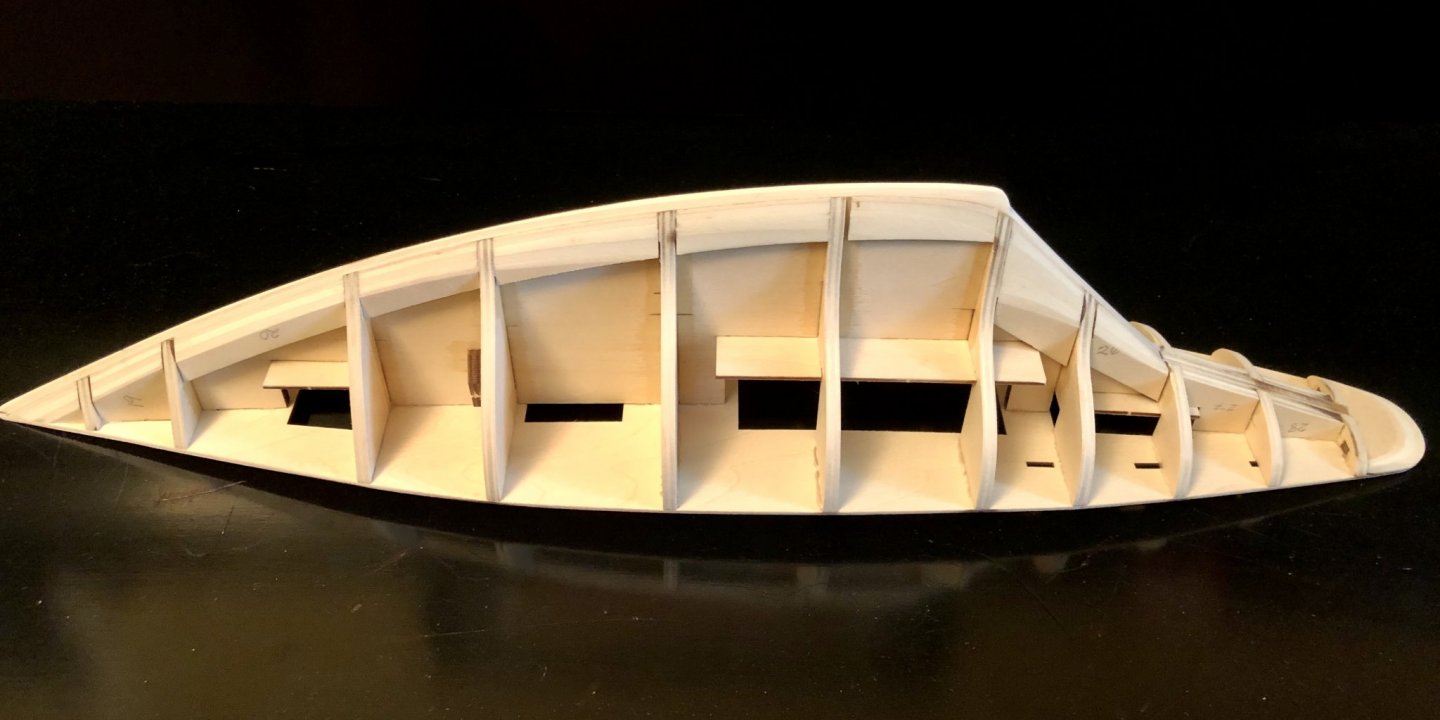
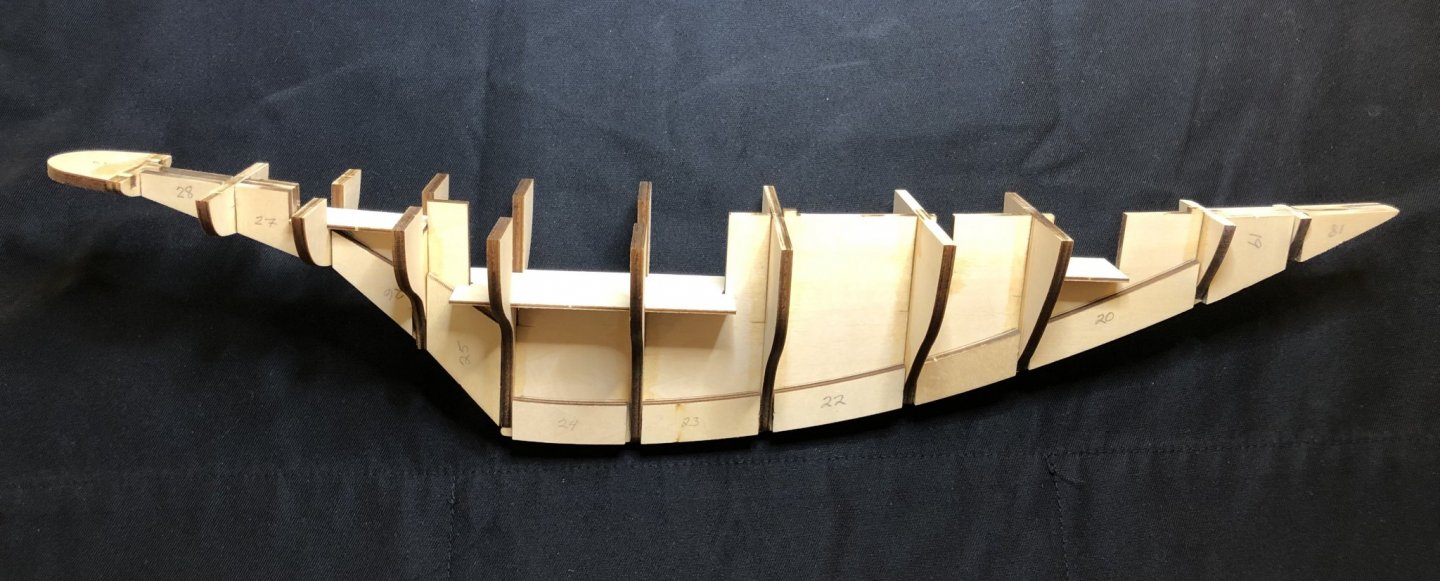
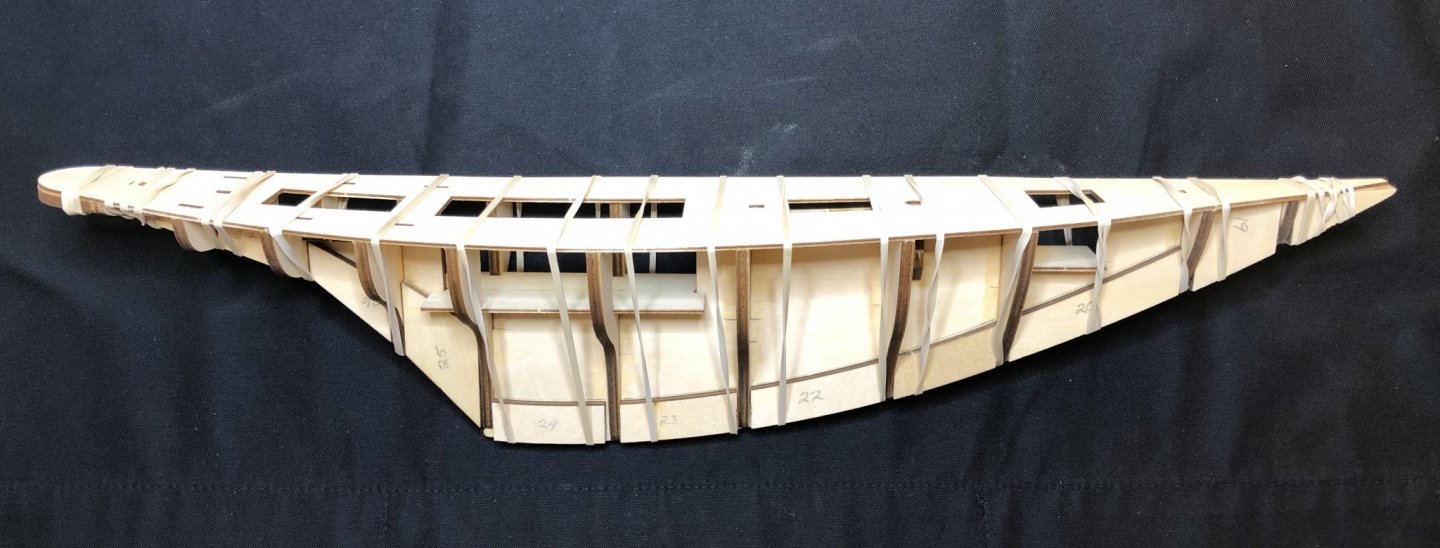
I carefully filed the slots on the bulkheads and the keel former until I was able to get the bulkheads to seat completely down in the slots while dry fitting them. Only bulkheads #9 and #10 needed to be squared up and clamped for gluing. All the others were a very tight, square fit. I used thin viscosity CA so it would seep into the seams of the bulkheads since they were such a tight fit. I then dry fit the deck onto the top of the bulkheads and keel former so I could insert the horizontal fantail piece #13 into the two slots on bulkhead #12 at the correct angle. Then I tacked it in place against bulkhead #12 with a spot of medium CA. That held it at the correct angle and then, after removing the deck, I used thin CA so it would run down into the seams as I held it firmly in place. That worked really well and made a strong bond on this rather fragile area. Next up was to glue in all the keel stiffeners between the bulkheads. Take care to study the plans and notice that the not all of the stiffeners are flush with the bottom of the keel. Only the first two stiffeners at the bow and the stern are flush with the bottom. All of the other stiffeners have a 1 mm space between them and the bottom of the keel or sit at odd angles. Guess why I know that...?!! Luckily, I only had to remove 3 of them with isopropyl alcohol and then glue them back in place correctly with CA. Note to self: Make sure to study the plans more thoroughly before proceeding! I also glued the subdeck floors in place I dry fit the deck and it was a good fit so I used white glue attach it and held it in place with rubber bands. The deck plate is very flexible so it was easy to form it to the shear of the boat and, after letting it set for a few hours, I removed the rubber bands and it formed a very solid structure for the fairing and planking to come. The keel area is quite thick with the stiffeners in place so it looks like there will be quite a bit of sanding to get a fair run for planking yet to come. Since this is a sailboat that was made for open ocean racing it will have a rather V shaped hull that narrows sharply at the bottom. I've just started that process and will make another post when I've completed a bit more. Thanks for taking the time to take a look at my build log.


-
It's time to update my build log. I have been able to get the build started and, after spending quite a bit of time studying the plans and trying to get as much as I could from the very brief instructions, it has been going fairly well. Harry, who goes by hof00 on this forum, has been extremely helpful in answering my questions and sending me photos of his beautiful build of the Pen Duick. You can read his log and our current conversation here:
-
Good looking assistant you have there BE! Watching you start this build has gotten me thinking more about the Zulu Lady Isabella model Chris now has also. So watching you have so much fun with this model has convinced me to go and place my order and the Flirt will be another I'll order up when she's available. One can't have too many projects to look forward to...at least that's the way my thinking seems to be!
- 195 replies
-
- 2
-
-
- lady eleanor
- vanguard models
- (and 1 more)
-
How did you clamp the deck down since the hull is already planked? I'm really excited about this model and can't wait for it to become available to the public.
- 109 replies
-
- 2
-
-
- Vanguard Models
- Flirt
- (and 1 more)
-
Wonderful work, Jean-Paul. This is going to be one of the finest Medway Longboat builds ever completed here on MSW and your build log will be of great assistance to many other modelers in the future.
-
Hi Harry, I spent part of this morning fairing the forward half of the frames. This process always makes me nervous. I hope I'm doing it correctly. I'll try and post some photos tomorrow and update my build log. I think it will be an adventure for sure! I hope I will be able to make a template from a few of the photos you emailed to me. I'm getting better at slowing down and double checking the plans since the written instructions are practically useless and the photos in the instructions are small and rather blurry so they are much help either. I'm flying by the seat of my pants at the moment but I seem to be on the right track...we'll see! Did you make a build log of your Cutty Sark? I'll have to take a look at your build log. You might want to add a signature with links for your completed builds and current log. You do such nice work that a lot more forum members would be able to easily find your models and logs that way. Just a suggestion... Thanks so much again for your continued assistance and interest in my build.
- 70 replies
-
- 1
-
-
- pen duick
- artesania latina
- (and 1 more)
-
This build just keeps getting better and better, Hellmuht. I'm enjoying following your build very much. Your build inspired me to buy a copy of the Ancre monograph for the St Caterina. I think it will be very interesting to see all the steps you have taken to build your model even though I'm not skilled enough to undertake such a project yet. I'm also interested in dioramas and I recently ordered a book on making them: Waterline Dioramas by Justin Camarata. I ordered the book from Sea Watch Books: https://www.seawatchbooks.com/ItemDisplay.php?sku=107002 Continued good luck with your build.
-
I think you have hit on a lot of ideas. I guess I'll have to make a choice once I get to that point. It must have taken you forever to drill that hole just turning the drill with your fingers and pliers. Good on ya, man! I've finished gluing in all of the frames, keel stiffeners and the deck. I will start fairing the frames tomorrow. I always a bit unsure about this step since it's so easy to take off too much or too little which then creates problems in the planking. Are you currently building anything? Best regards,
- 70 replies
-
- 1
-
-
- pen duick
- artesania latina
- (and 1 more)
-
Thanks very much for your informative reply, Mehmet. I would like to learn to do these kind of weathering techniques eventually. I look forward to following your build log on this wonderful model you are making. Best regards, Bob
-
That makes good sense. Did you have an extra long 4 mm drill bit so that the shank of the bit extended below the bottom of the keel in order for you to have something to hold on to as you turned the drill bit? If not, how were you able to turn the drill bit if the shank of the bit was flush against the sternpost? Many thanks Harry,
- 70 replies
-
- 1
-
-
- pen duick
- artesania latina
- (and 1 more)
-
Wonderful work! She's going to be very special by the time you are finished.
-
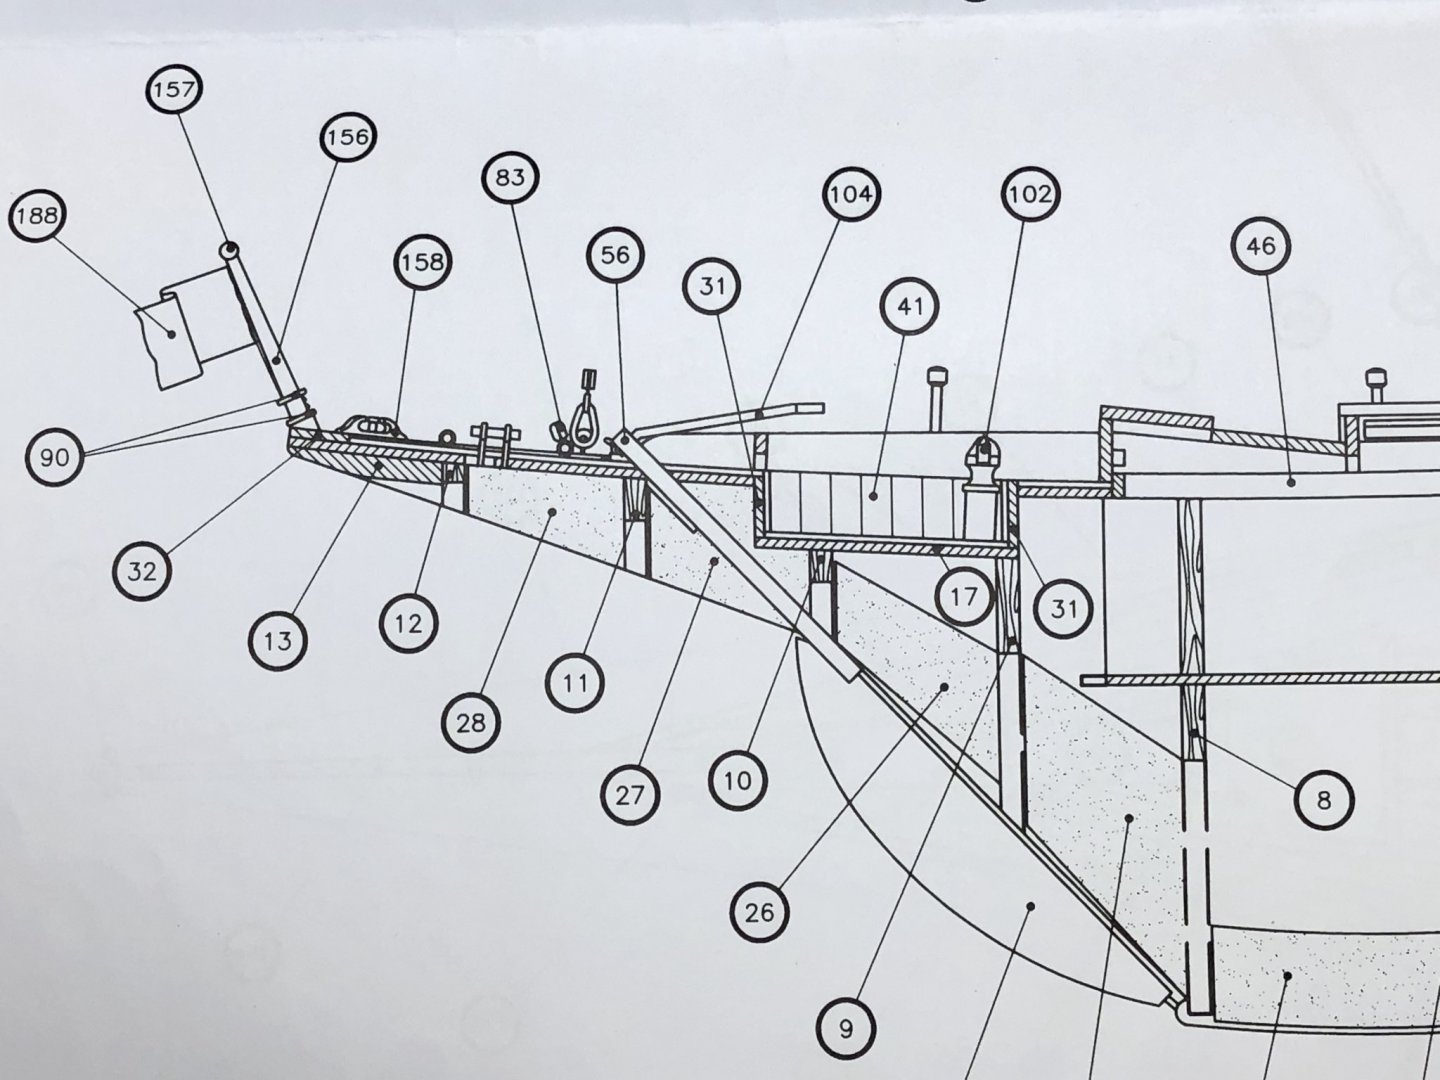
Thanks so much for your informative reply, Harry. The instructions are so brief and lacking in details and the pictures are so small and blurry that I feel like I'm finding my way in the dark! Drilling the rudder tube still seems like it will be a very tricky operation even following your explanation . It seems like you are required to essentially blindly drill the hole once the deck and planking are done. Did you start the drilling from the deck and go down or from the keel and go up? Drilling from the deck down seems to be the obvious thing to do. I'm having trouble wrapping my head around this process. I guess the biggest question I have is how did you accurately set the angle of the drill at first? Then, once you had the angle of the drill set, how did you manage to keep it at the correct angle and also perfectly centered down the middle of the false keel so that the exit hole would be exactly in line with the center of the rudder? This seems like it must have been practically a shot in the dark trying to keep the angle and the centering of the drill accurate while drilling by hand without anything to guide the drill. I think your idea of adding a "doubler" to the false keel along the sides where the drilling will take place could be a good idea, but I wonder if the exit hole at the bottom would be in the correct place exactly once the planking is on the hull? I may end up just gluing it in a fixed position but it would be nice to have an actual rudder that articulates though. I also spent some time trying to blow up the deck photos from the French link you posted and try to get them to match up closely to the actual size of the Pen Duick deck piece. I tried quite a few different setting and couldn't get the enlarged prints to match the actual deck though. It may have something to do with the differences din the imperial measurement that we use here in the USA compared to the metric measurement used in the rest of the world. Our standard paper printing size is 8 1/2 x 11 inches which different than the A4 metric paper size used in the rest of the world. The conversion of our standard size paper to the metric A4 is 8.27 x 11.69 inches. So something is getting lost in the translation. I may just have to try and draw a layout of the decking joggles but I'm not sure how well I'm going to be able to do that. Thanks for you help. I'll go and continue fumbling along and see what happens!
- 70 replies
-
- 1
-
-
- pen duick
- artesania latina
- (and 1 more)
-
The Flirt is looking great, Chris. I'm looking forward to watching James build her.
-
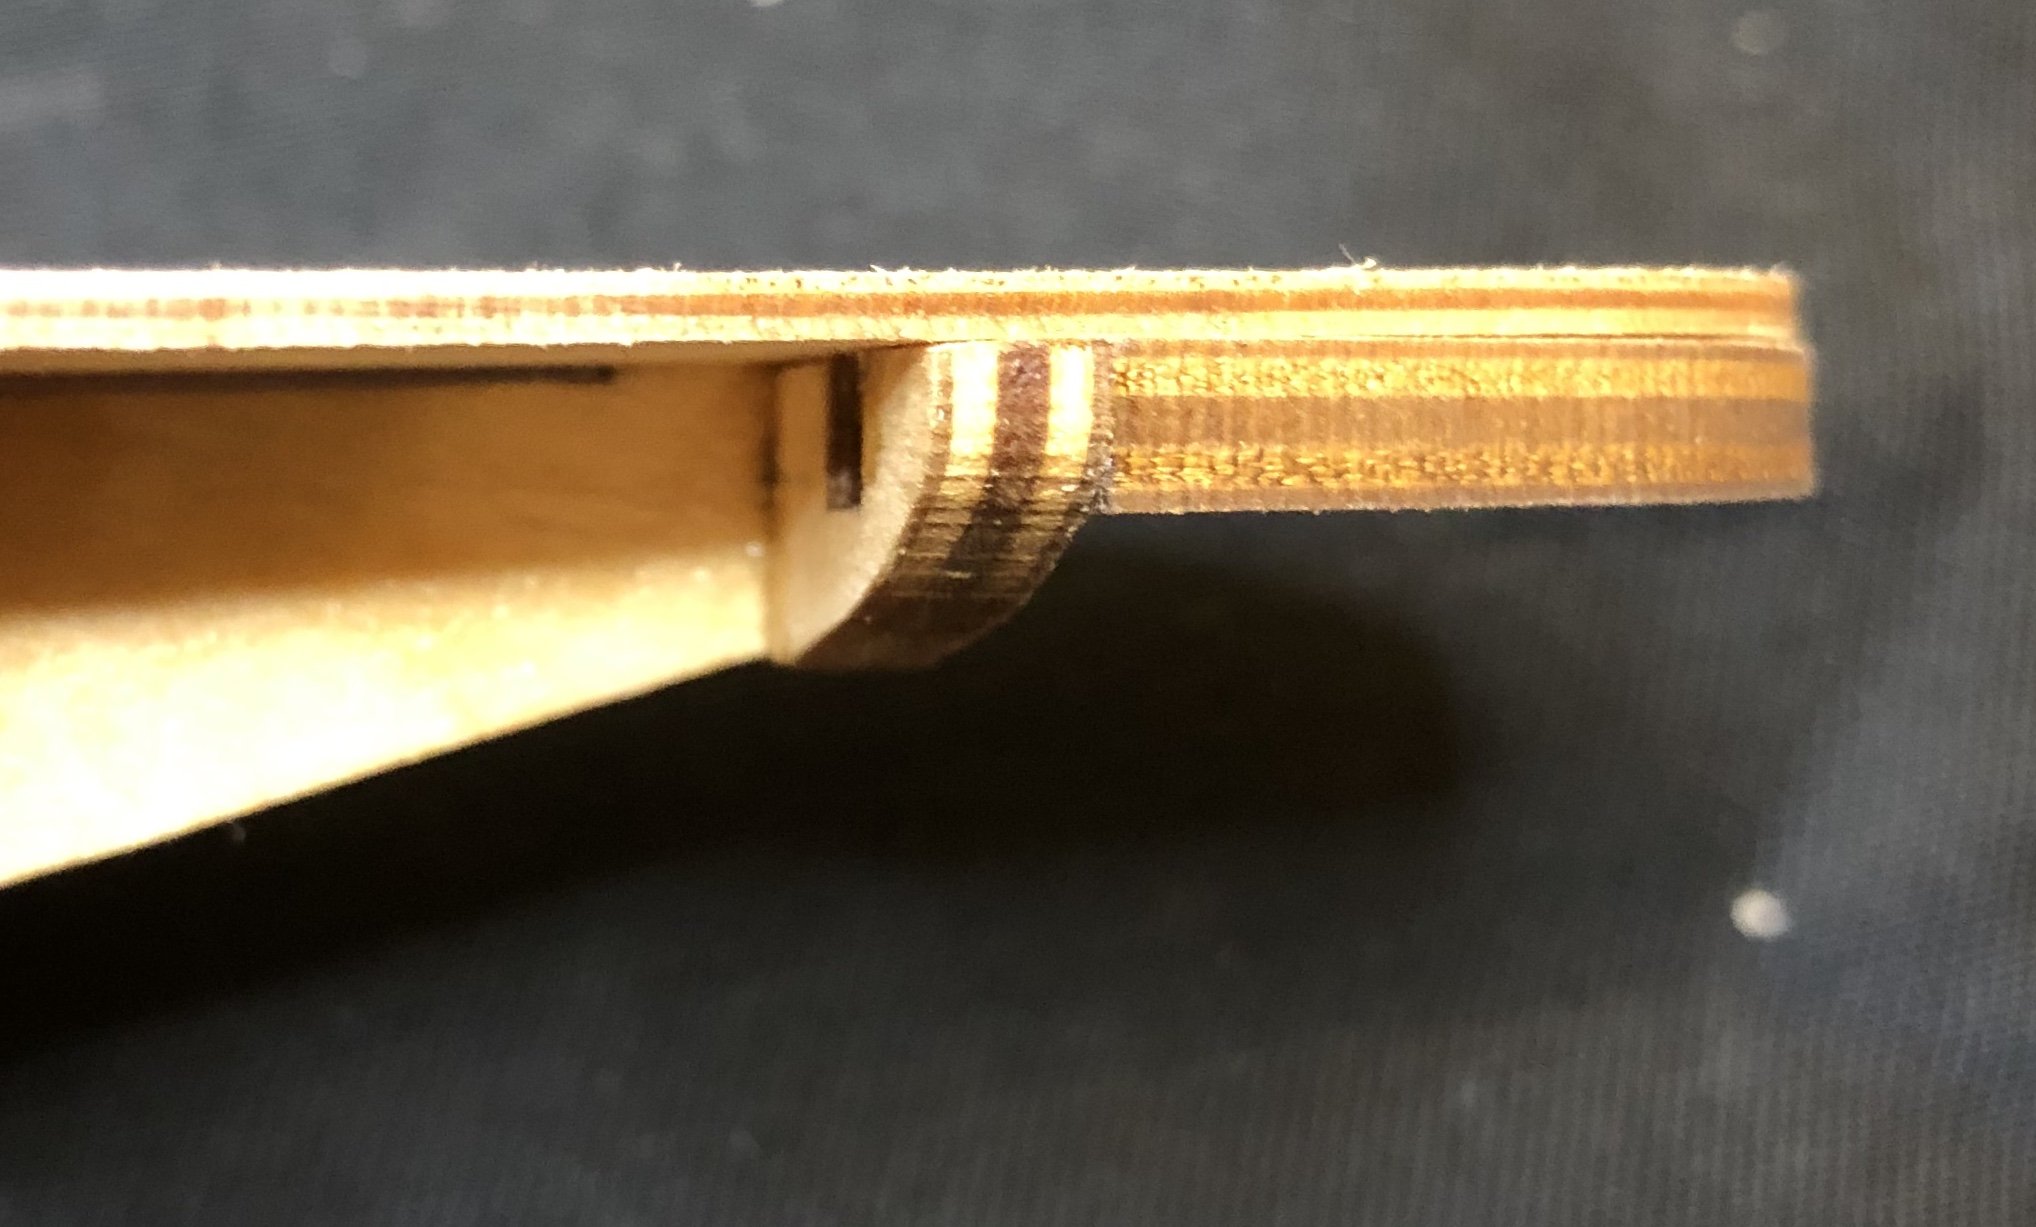
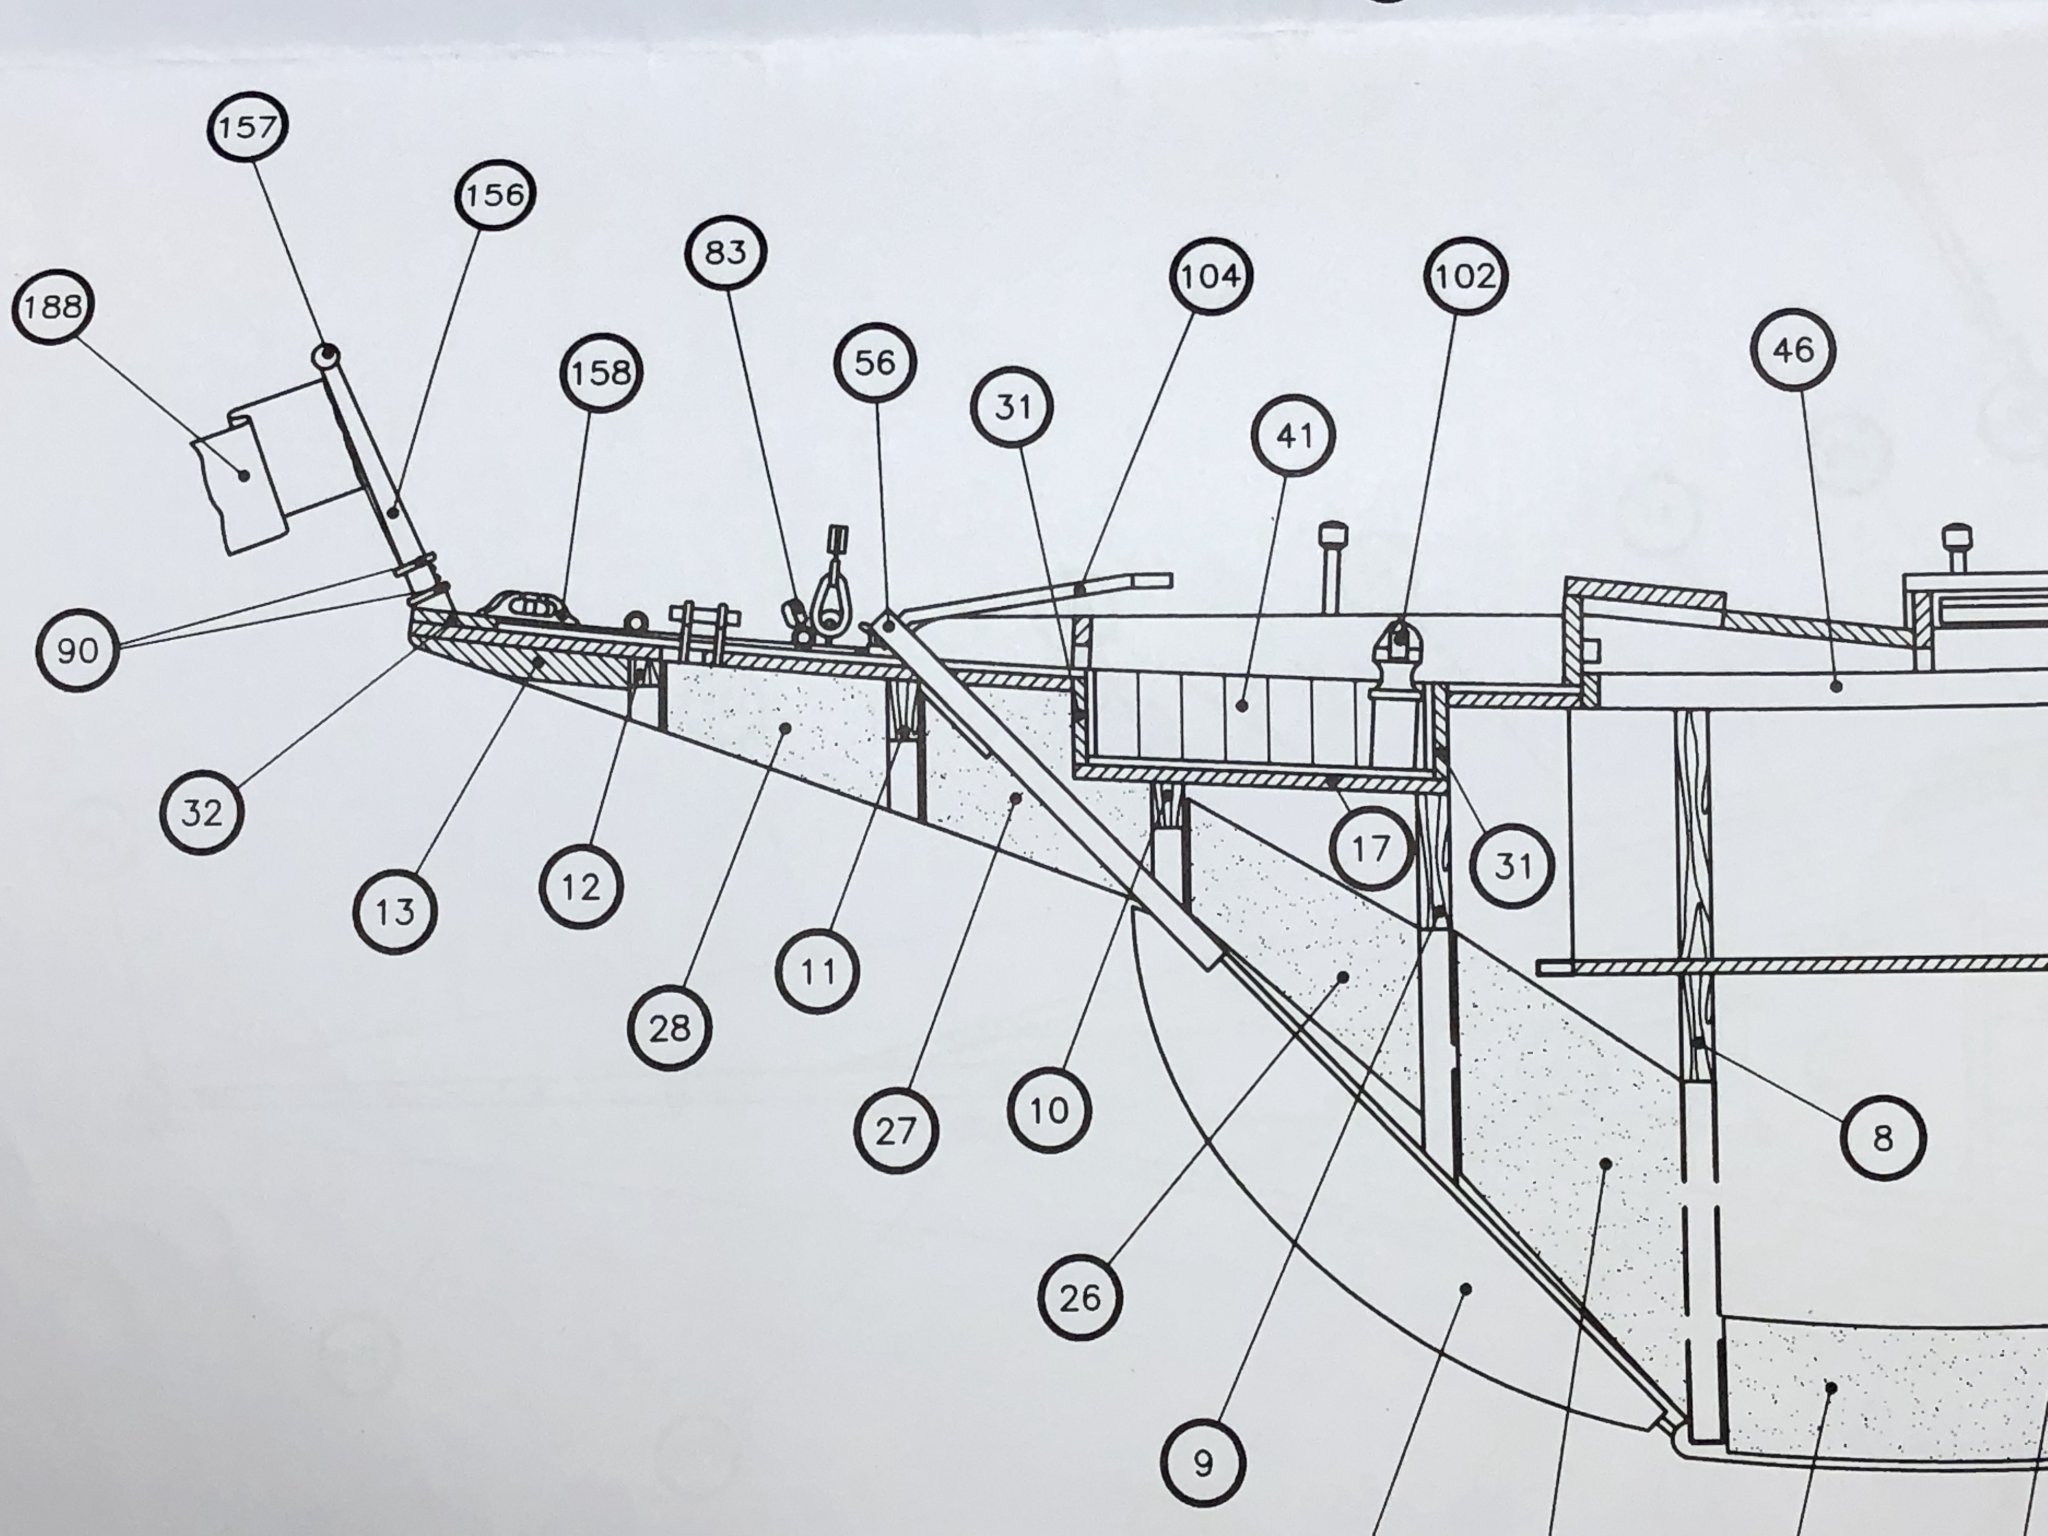
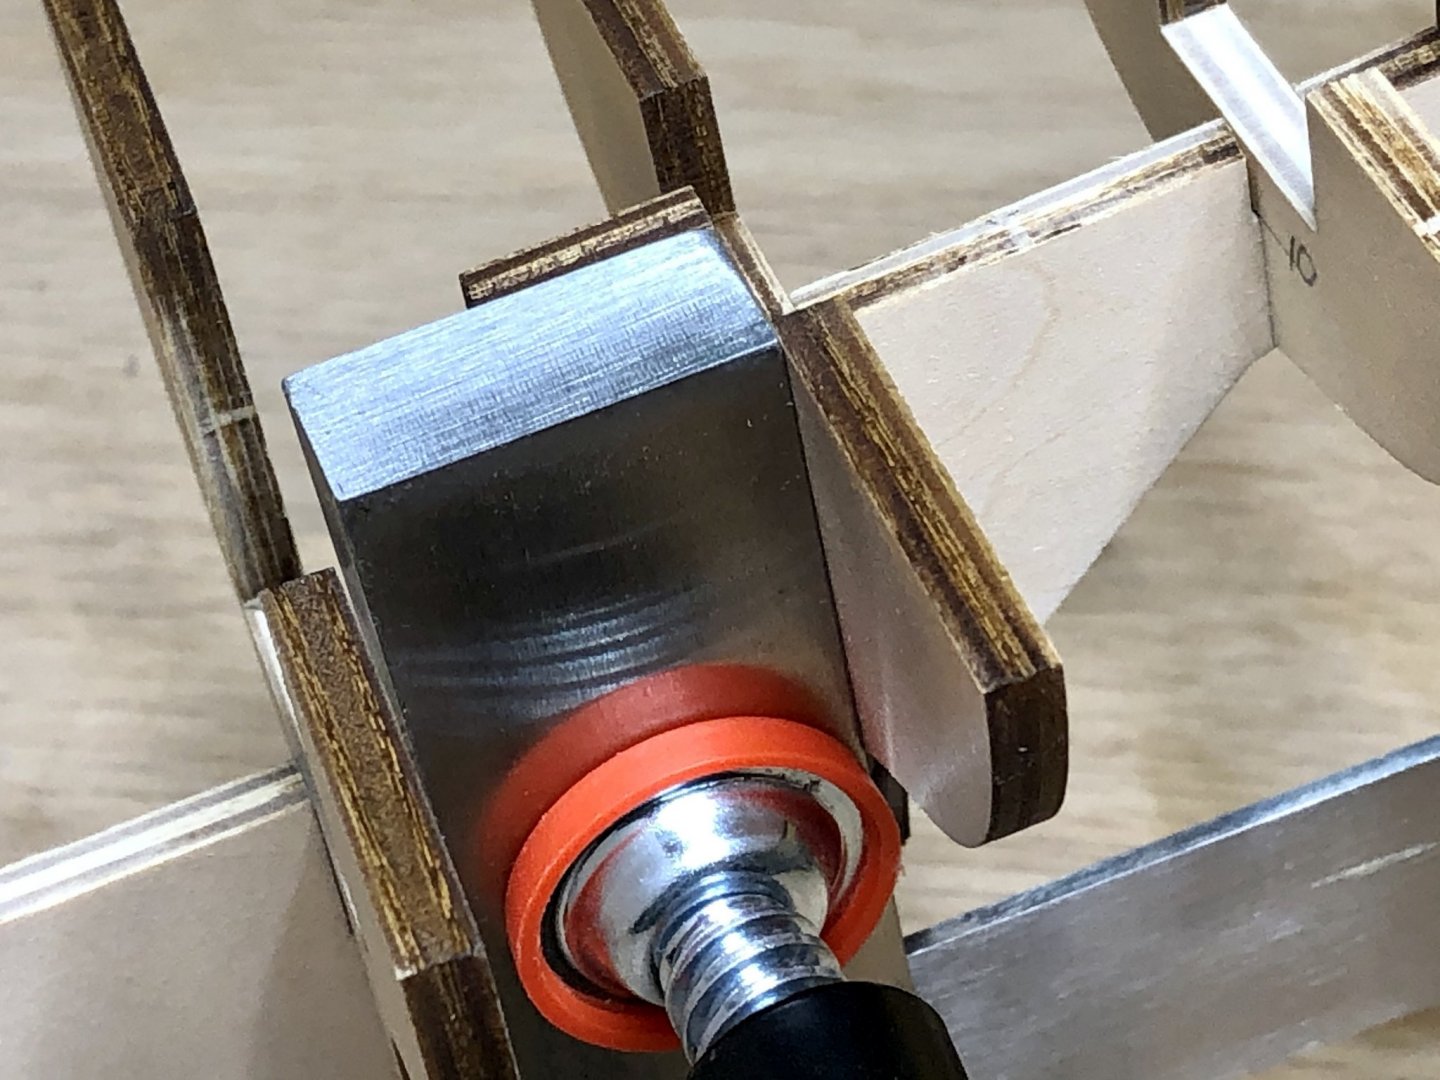
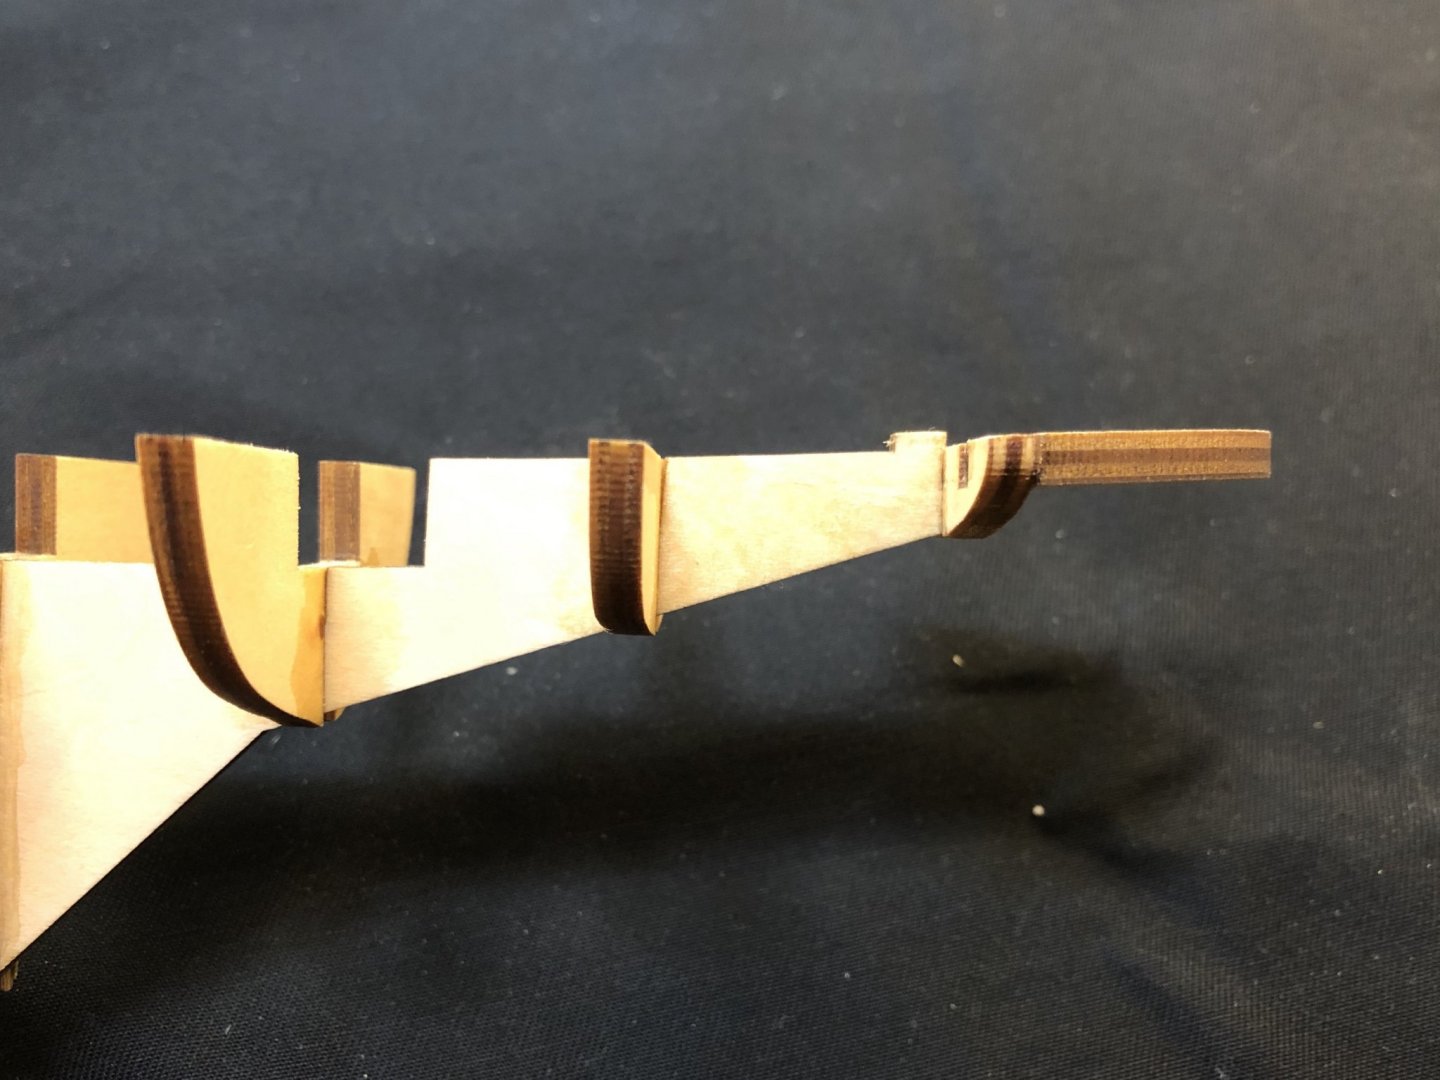
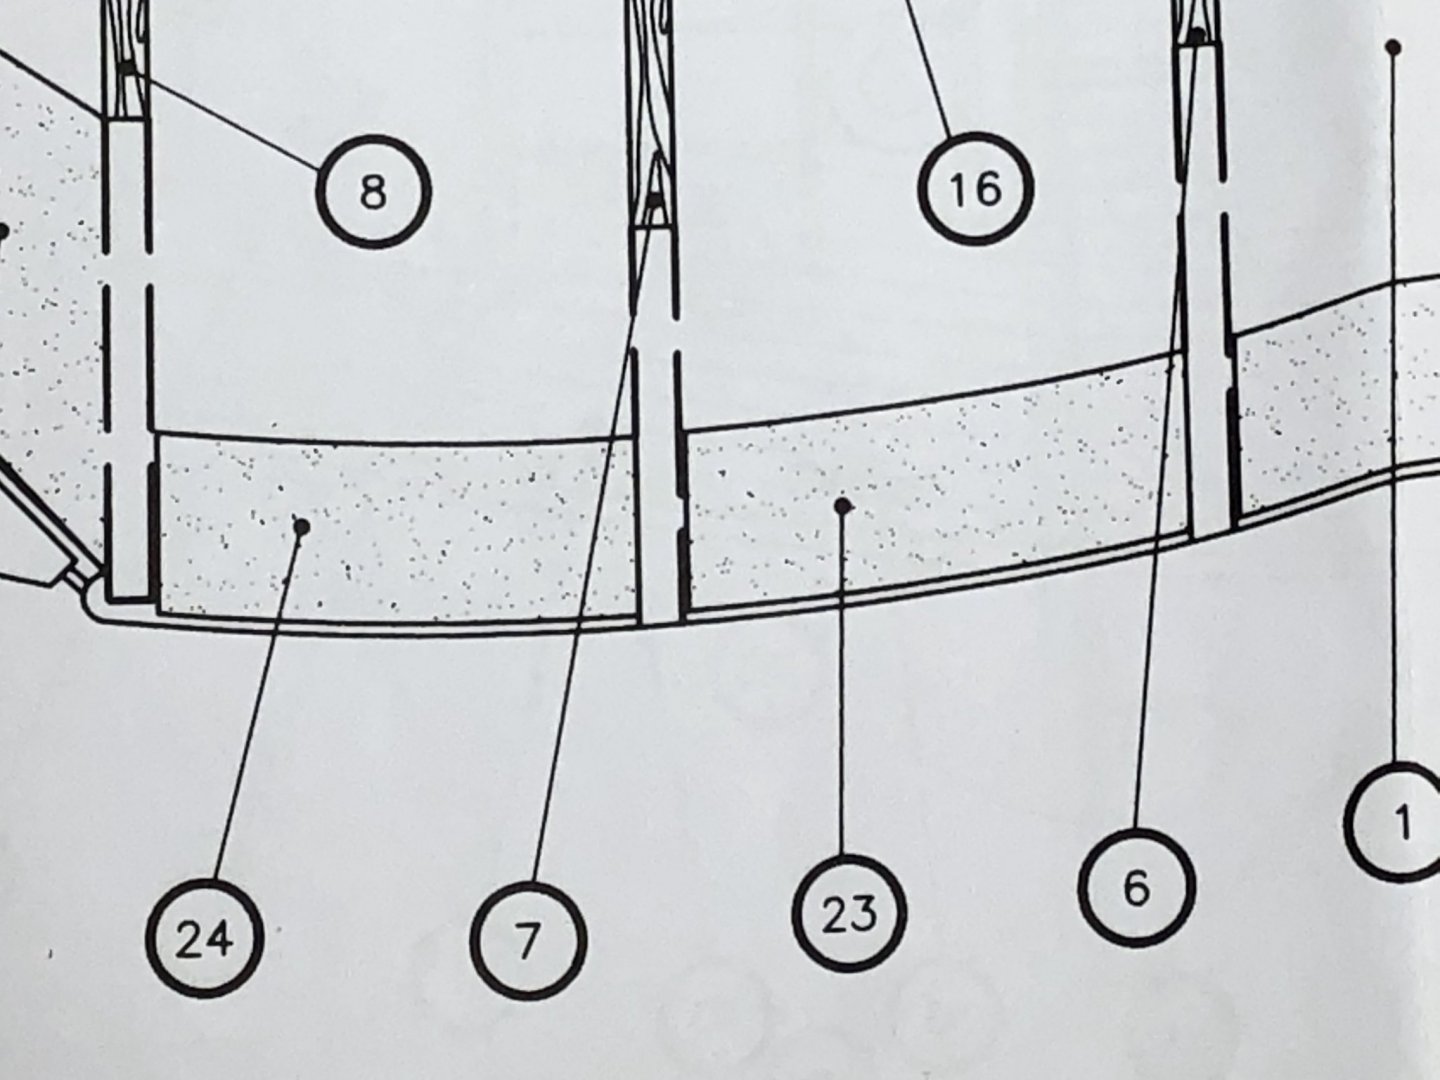
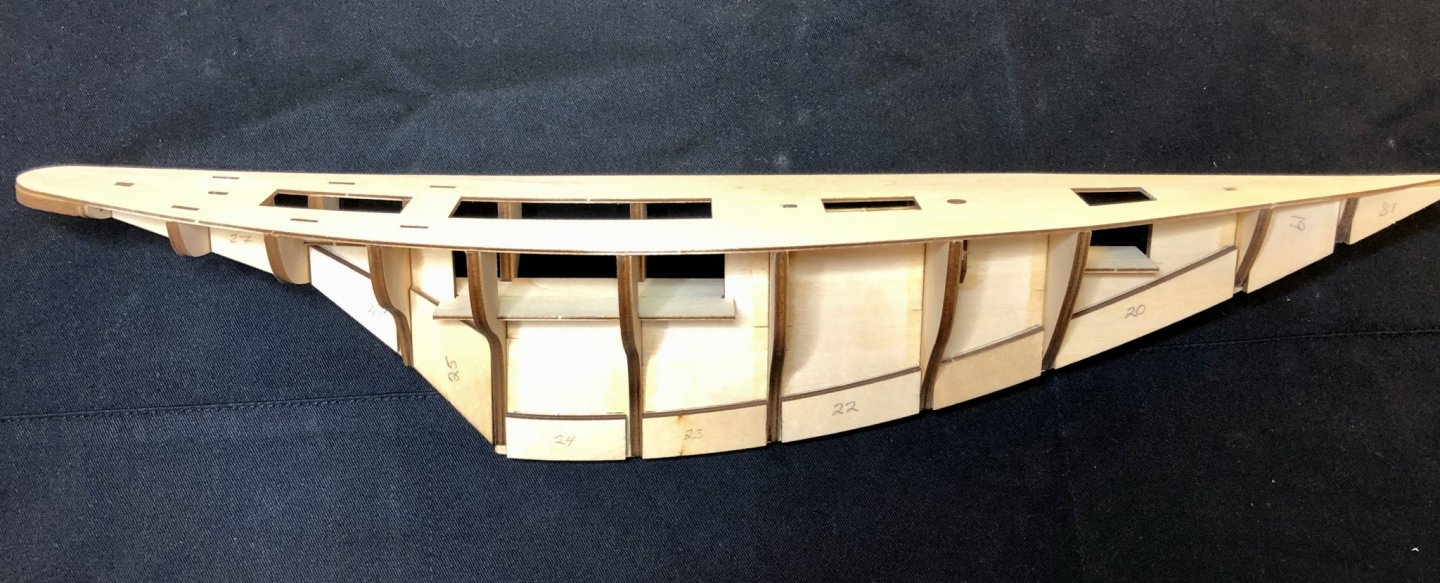
Hello Harry, I've been reading over the brief instructions and studying the plans and I have a couple of questions that you may be able to help me with. As you know, the instructions are pretty brief and the photos are not a whole lot of help either. One of the last things the written instructions tell you to do is to drill the rudder blade shaft which is a long, diagonal hole through the deck and false keel for the rudder masthead (the rod that attaches to the top of the rudder). I can't imagine how I could accurately drill that hole especially after the planking and deck have been completed. I wonder if you did this and, if so, how you managed to do it? Here is a photo of the the hole that would need to be drilled to make the rudder blade shaft for the rudder masthead #56: Also, the plans show that the stiffeners along the middle the false keel are not glued flush with the bottom of the keel. There is a small space between the bottom of the stiffeners and the bottom of the false keel as seen in the photo below (parts 23 and 24 for example). I'm not sure what the purpose of that is? Should those stiffeners in that part of the keel be flush with the bottom of the keel? Thanks very much and I hope your move is going well.

- 70 replies
-
- 1
-
-
- pen duick
- artesania latina
- (and 1 more)
-
Happy birthday, Dave, you're still a spring chicken compared to me! Ain't that the truth! I spent most of the day correcting mistakes and trying to make sense of the instructions and plans on the Pen Duick I building. Two steps forward and one step back all day long... 🥺
- 77 replies
-
- 1
-
-
- point berlin
- diorama
- (and 1 more)
-
The debonder will work. It's a bit messy. Give it a little bit of time to soak in where you want it to go and then use something like an a sharp Xacto knife blade to gently help pry the plank away from the spots where it is glued to the bulkheads. After the plank is off you can clean up the bulkheads with some very fine sanding if necessary being careful not to change the fairing. Wait until all the bulkheads are completely dry before applying another plank. It's good to always have the debonder available for ungluing your fingers too. Believe me, it will happen!
-
Hello Hellmuht, Thanks for your reply. I just looked at my Messages Inbox and I didn't receive a message from you. I'm not sure why it isn't there. I just read your entire build log again and you are a very skilled craftsman! The details you are adding to this boat are wonderful. I love the grapnel, buckets, and nets. The glass ball float is fantastic! I spent a 1 1/2 years aboard the US Coast Guard Cutter Storis in 1966-67. We patrolled the Being Sea and the Gulf of Alaska and we would often find these glass balls washed ashore on remote beaches. The replica you made is wonderful. I have a very long way to go before I have the skills to undertake a scratch build like this. The beautiful job you are doing on this boat is inspirational for me though.