HOLIDAY DONATION DRIVE - SUPPORT MSW - DO YOUR PART TO KEEP THIS GREAT FORUM GOING! (Only 24 donations so far out of 49,000 members - C'mon guys!)
×


gjdale
-
Posts
4,891 -
Joined
-
Last visited
Content Type
Profiles
Forums
Gallery
Events
Everything posted by gjdale
-
 The stand looks great Sjors, and a nice touch with the name plate. Coppering looks to be coming along nicely too.
- 1,616 replies
-
- 1
-

-
- caldercraft
- agamemnon
- (and 1 more)
-
Beautiful work on those detail pieces Danny.
-
Thanks very much Alan, Augie, Sjors, Mobbsie, Ian and Mark, and also all of the "likes".
-
Slog - sorry for the bum steer on the Coptic markers, but good to know they have at least been tested now. On paints, you should be able to use acrylic paints, like Winsor and Newton. Buy them in tubes and thin with water (ie squeeze some out and drag some water into it on the palette). Using paints in this way, you can mix your colours to get an exact match, and thinned to your desired consistency. If you're not sure how to use something, it's always worth checking out You tube - I invariably find a few videos of people demonstrating exactly what I'm after. It might not be in our field of modelling, but the techniques are generally the same. Painting is one are where there are plenty of video tutorials. Don't ask me how I know!
-
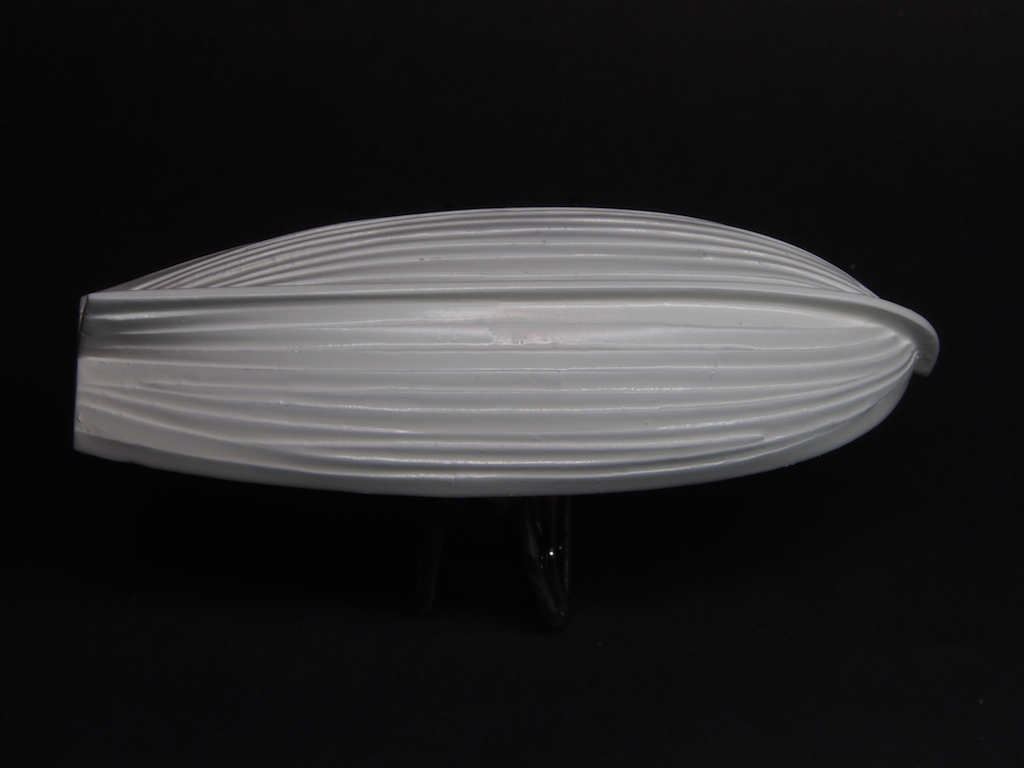
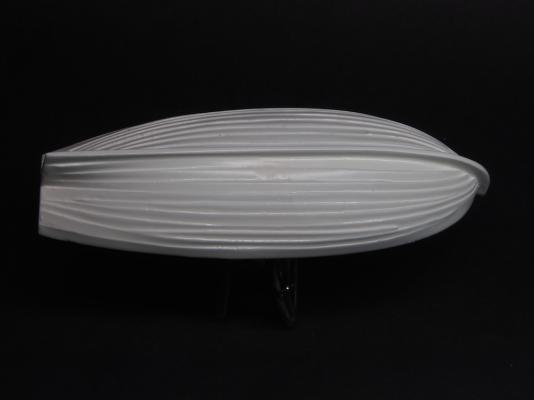
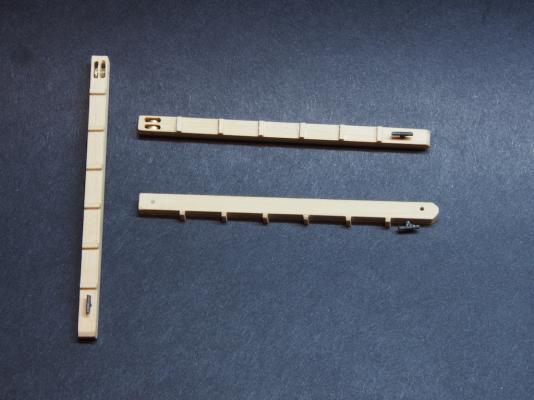
Cutters Ver 2.5 continued.... Only a minor update today. I've been painting the hulls for the last week or so. Decided to break out the airbrush for this job and after six coats of white paint on top of the gesso undercoat, plus one coat of clear Satincote (one more to come), here's a quick sneak peak at the outside of one of the hulls - just to prove that progress is being made As soon as I get another coat of Satincote on the external hulls, I'll move onto the interior, painting that in yellow ochre before proceeding with the fit out. This painting lark is a slow process! In between watching paint dry, I've been working on the quarter davits to carry these Cutters. I've mainly been working from the diagrams and description in Longridge for these. The basic structure is boxwood, with working brass sheaves held in place with a copper wire pin. I also manufactured the cleat for the base of each davit by silver soldering brass wire into a T-section and then cutting/filing to shape. These have been blackened and placed temporarily in place for the photo. The davits will be painted black prior to final fitting. At the base of the davit, I have manufactured separately some brass swivel/hinge plates to attach the davits to the hull - these aren't shown in the photo below, but will be fitted in due course. So here's what they look like (only 3 of the 4 davits shown in the pic):
-
Ah, so you finally got off the Chatham Dockyard bus Sjors - exactly a year since we took that photo.
- 1,616 replies
-
- 2
-
-
- caldercraft
- agamemnon
- (and 1 more)
-
Nice work Ian. On the question of hook length, I reckon you could afford to halve the length of the shank.
-
Lovely Bob, just lovely.
-
Great to see son progress Slog. Looking good. Those Pitt Pens look like the answer to your prayers alright. Along similar lines, you might want to try out some Coptic markers, which you'll find in any art supply store. I've no idea if they will be suitable, but the Pitt pens prompted my memory. They come in a really large colour range too.
-
Congrats Mark. Take a bow and have an adult beverage or three. She's looking mighty fine Sir!
-
More excellent work Mobbsie - and nothing boring about it my friend! Fabulous looking yards, and I love those blocks I just worked out that it was exactly one year ago last weekend that we had a wonderful weekend together visiting Chatham and Portsmouth, and of course Chateau Mobbsie. Still the highlight of the whole holiday for me.
- 1,279 replies
-
- 1
-
-
- agamemnon
- caldercraft
- (and 1 more)
-
Yup, wot he said! Looking good Wayne. This is a really sweet looking vessel.
-
Thanks Ian for your pictures and descriptions - most informative.
-
Brilliant approach to the brickwork Alexandru - I love it!
-
Beautiful symmetry there Bob. I haven't tried it myself, but Sculpey might be a good option to try - at least you can put some more on if you take off too much! I know that Brian C used it for his decorations on his Fubbs, and they seem to have turned out very well indeed.
-
Good idea to break it up like that Ray - they can become a little tedious! The ratlines look great so far - nice and evenly spaced.
-
Great set of photos there Vivian. You're doing a terrific job on her.
-
Nice set-up Mike. At least with the Admiral having her own part of the room, you can't be accused of 'abandoning' her for your hobby!
- 968 replies
-
- 2
-
-
- hahn
- oliver cromwell
- (and 1 more)
-
WOW! That looks superb Augie. Hope you and the Admiral have a great holiday - I can't believe its now exactly a year since we did the same. Where are you headed?
- 2,191 replies
-
- 1
-
-
- confederacy
- Model Shipways
- (and 1 more)
-
Sweet! That looks superb Sjors. Now just lift your game and do better on the starboard side will you? :P
- 1,616 replies
-
- 2
-
-
- caldercraft
- agamemnon
- (and 1 more)
-
Hi Ian, It may have seemed simple to you, but your descriptive post on the manufacture of your die to make the cap squares was particularly educational for those of us who remain metal-work neophytes (or in my case, luddites). I am DEFINITELY copying this to my "great ideas" folder! (I might have to call this folder SIFI - Stealing Ideas From Ian ) Would you mind posting a picture of your railroad riveting tool in action? I'm intrigued by this.
-
Ian, Well done all round. I have to say that the thinner thread in your latest post looks to me to be the winner. Great work, well executed.
-
Dave has it right Ed! What a wonderful description of a relatively simple solution to a complex problem. And while I say "simple", I for one would never have worked out that remedy by myself. Thanks for your continued sharing and instruction of techniques Ed - your contribution to this forum and Shipmodelling in general is beyond description.
- 3,618 replies
-
- 1
-
-
- young america
- clipper
- (and 1 more)