HOLIDAY DONATION DRIVE - SUPPORT MSW - DO YOUR PART TO KEEP THIS GREAT FORUM GOING! (Only 24 donations so far out of 49,000 members - C'mon guys!)
×


gjdale
-
Posts
4,891 -
Joined
-
Last visited
Content Type
Profiles
Forums
Gallery
Events
Everything posted by gjdale
-
 Looks like that's come up well Kevin.
 -
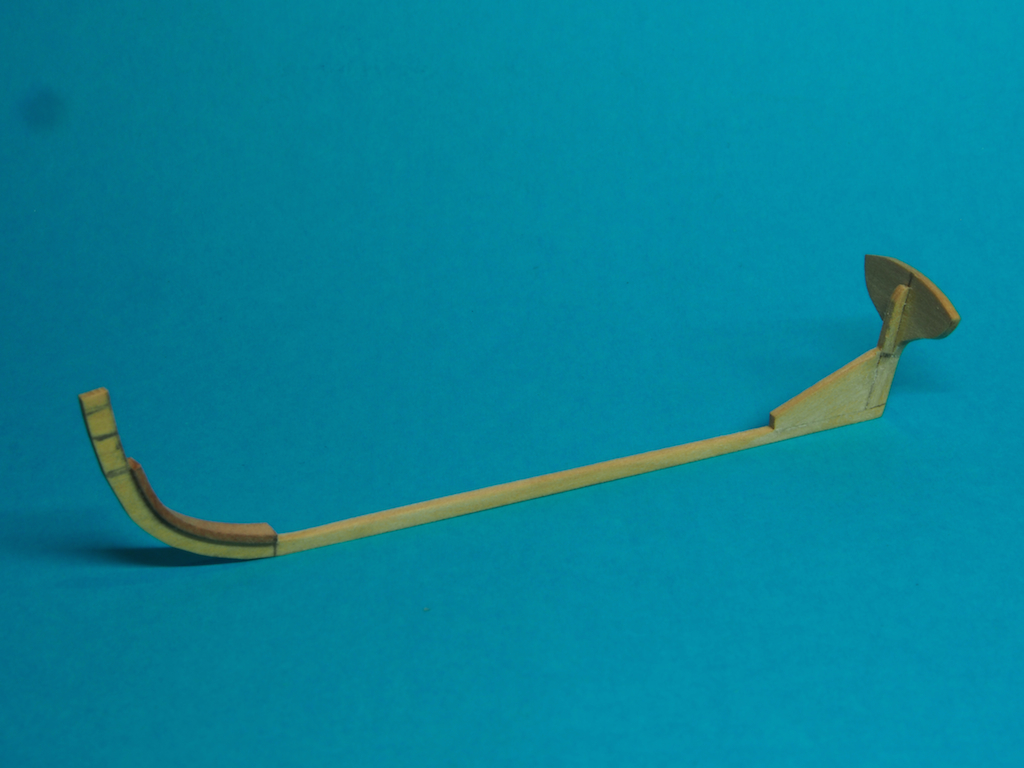
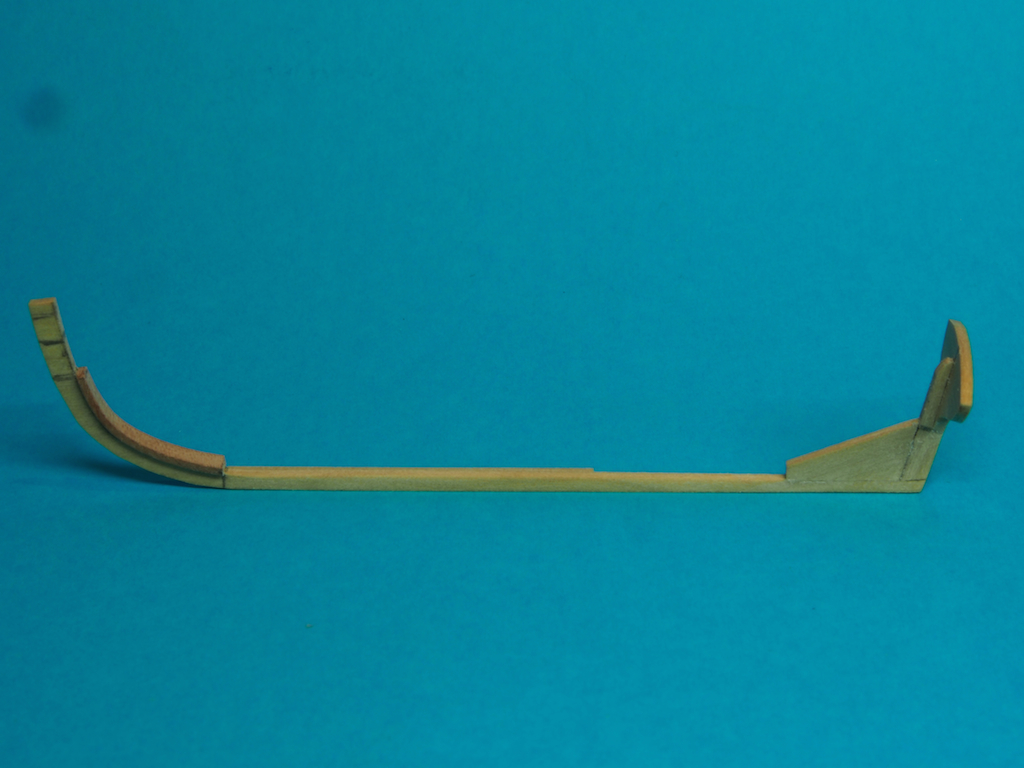
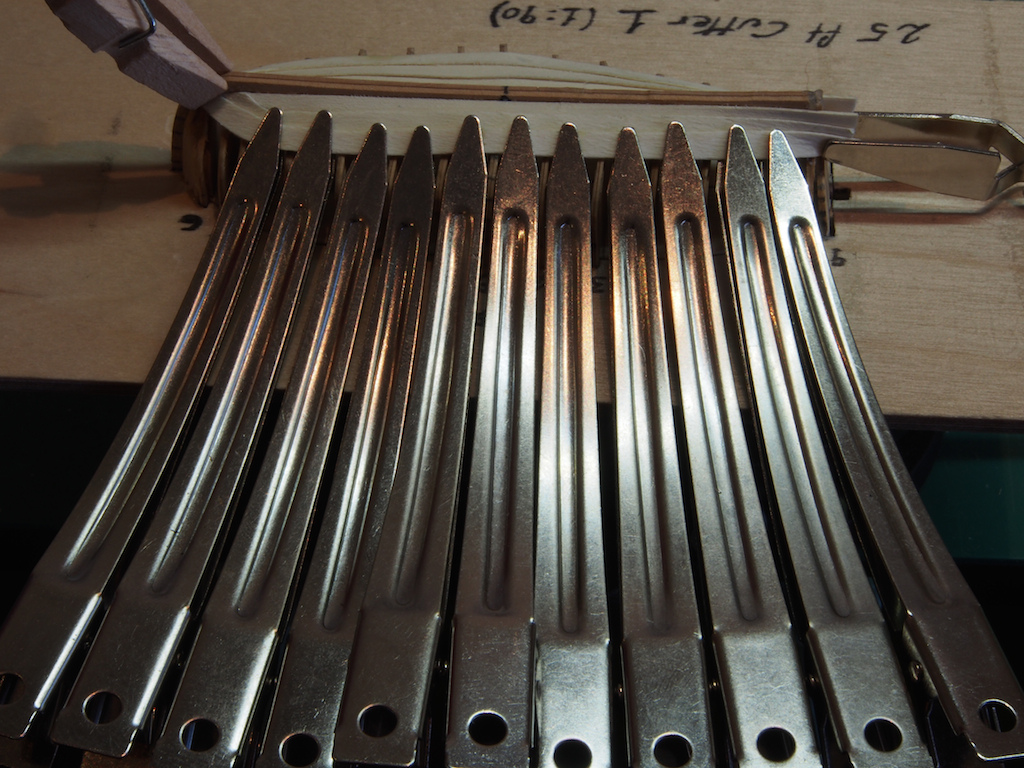
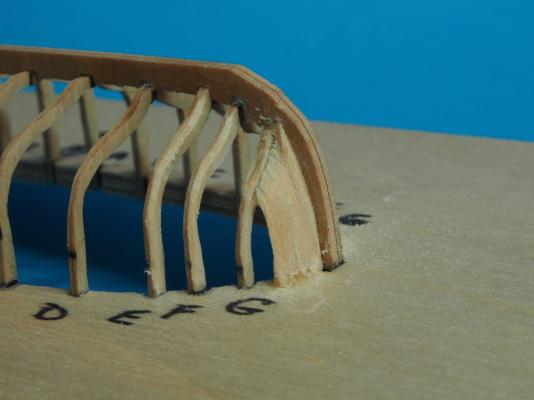
25' Cutters Ver 2.0 (continued) A minor update. I have completed the keel/backbone assemblies. This was a fiddly job to say the least! Here is a couple of pics of one of the completed keel sections. The temporary hogging strip has now been removed. I had to cut a slot into the stern of the plugs in order to fit the stern post in, which was essential to getting the transom in place: Finally, here is pic showing a completed keel assembly on top of the plug. The space between the keel and the plug will be filled by frames and sections of hogging strip in due course. So far, so good. Next up......the frames............
-
Shihawk, The one from the US is called Micro Glaze and is sold by MicroMark (product id #80894). It claims to be good for window openings up to 1/4" square. I've no idea how it compares to the stuff Kevin is using, but I suspect they are pretty much identical. They work well and produce a nice "antique" glass look. Hope this helps.
- 1,319 replies
-
- 2
-

-
- caldercraft
- Victory
- (and 1 more)
-
Just remember, it's not a race Michael. The finish line will present itself in due course. If you focus too much on the finish line, you'll forget to enjoy the journey along the way. You're doing a great job. Take it at your own pace and keep enjoying it.
-
Hopefully you won't have a problem Kevin - i was just concerned that you would end up with the "excess" in a visible way. When I used Microglaze (a similar product) on my stern and quarter windows, I applied it before attaching the window strips to the model, and hence was able to apply it from the back/inside. Perhaps a quick test run on some scrap would answer the question for you. With luck, it won't leave a visible residue. I look forward to seeing the outcome.
- 1,319 replies
-
- 2
-
-
- caldercraft
- Victory
- (and 1 more)
-
Help with a Byrne's Saw - end of cut problem
gjdale replied to rtropp's topic in Modeling tools and Workshop Equipment
Mark - I drilled and tapped the fence. Of course, this was the first time I had ever tried tapping and didn't watch the YouTube "how to" until after I had broken several taps - hence the few 'extra' holes you can see (evidence of broken off taps stuck in the fence!). A key point to keep in mind is that the screws need to be countersunk into the attachment so that a flush face still remains on the business side of the fence. This means that the material used for the attachment needs to be of sufficient thickness to allow the screw head to be countersunk. -
Help with a Byrne's Saw - end of cut problem
gjdale replied to rtropp's topic in Modeling tools and Workshop Equipment
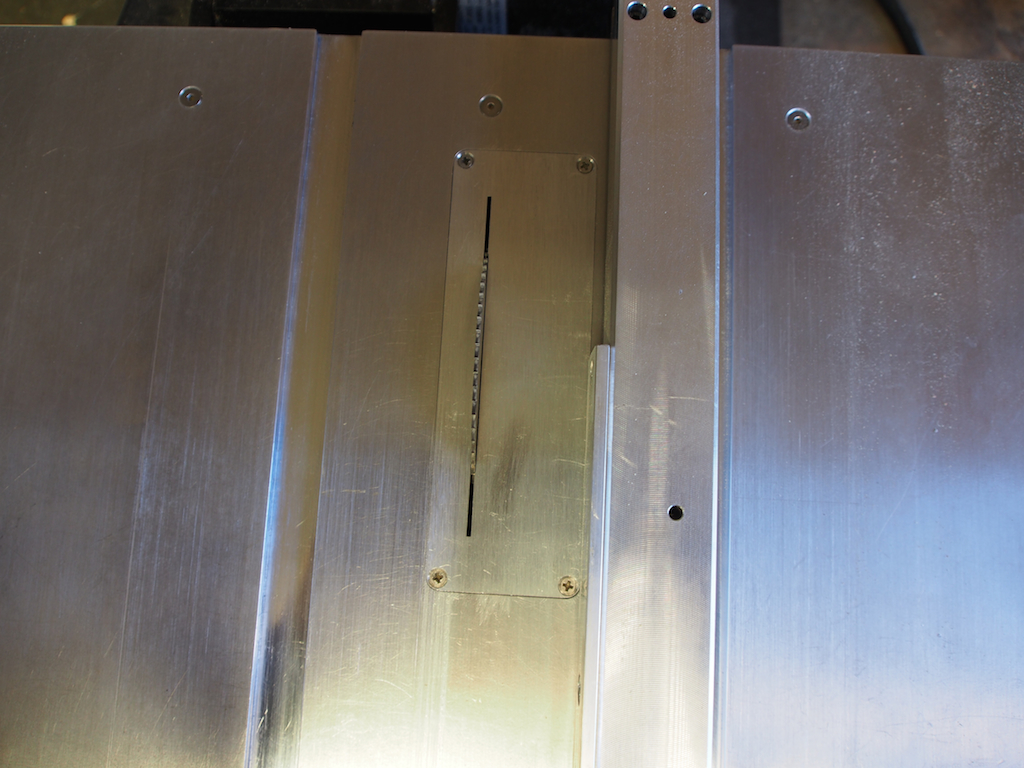
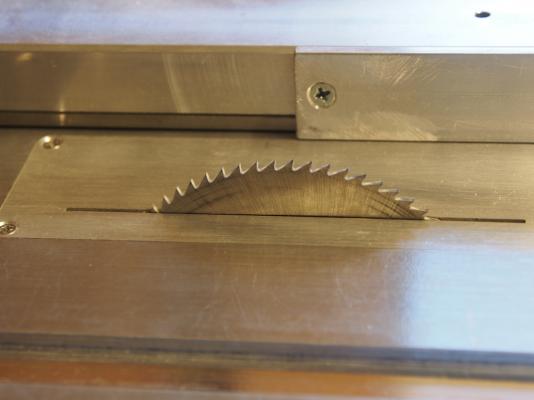
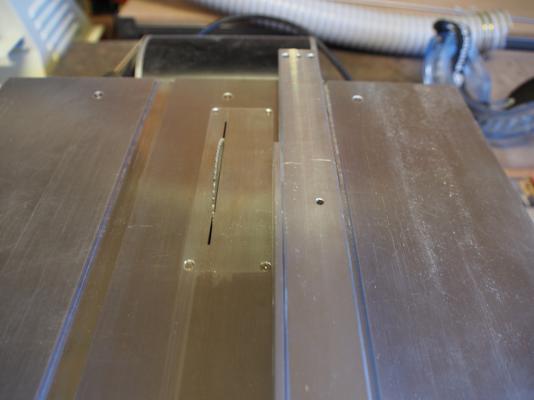
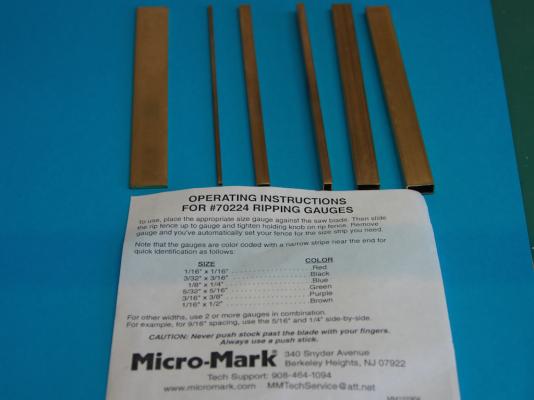
Just following up on my post of 08 Jun and my solution to the problem of blade binding while ripping strips. I said that I had added an extra piece of fence to the front half of the high fence, extending from the front of the table to approximately the centre of the saw blade, with the theory being that this would allow extra clearance at the back of the blade to prevent the binding issue without having to try and offset the rear of the fence. Well, I've since tested this and it works like a charm. Here's a few pics of my setup - very simple, and quite crude, but effective. I've set the blade (a 0.04" kerf) at max height for the photos, but of course that is adjusted to a suitable height for the thickness of the material being cut. Being attached with only two screws, it is quite simple to remove when it's not needed, and very quick to install when it is. I've also invested in a set of Ripping Gauges from Micromark. These are inexpensive, work very well and make setting up for a "standard" size cut very simple and, more importantly, repeatable. Hope this is of some help to those who may have experienced similar problems with ripping stock.

-
That stuff works well Kevin - I used a similar product. You say you'll use it on the stern galleries as well, but as these are already in place you may have some difficulty. I would expect that you would normally paint the glaze on the back/inside of the windows - not sure how it will look when applied from the front/outside?
- 1,319 replies
-
- 1
-
-
- caldercraft
- Victory
- (and 1 more)
-
Ah, now that makes me feel better! But despite having transported my work space to your home for the photo Bob ( ), your "finished" work always looks spotless - not even a speck of dust in the photos. How do you achieve this?
-
Lovely, as always, Bob. I'm always amazed at how clean and crisp your work looks. Any housekeeping secrets you'd care to share?
-
Thank you all for your wonderful words of support and encouragement - they confirm that I made the right decision. In reality, once I could picture in my mind the whole building process with the new method, it was not a difficult choice. I'm already much happier and I haven't even got to the frames yet, let alone the planking.
-
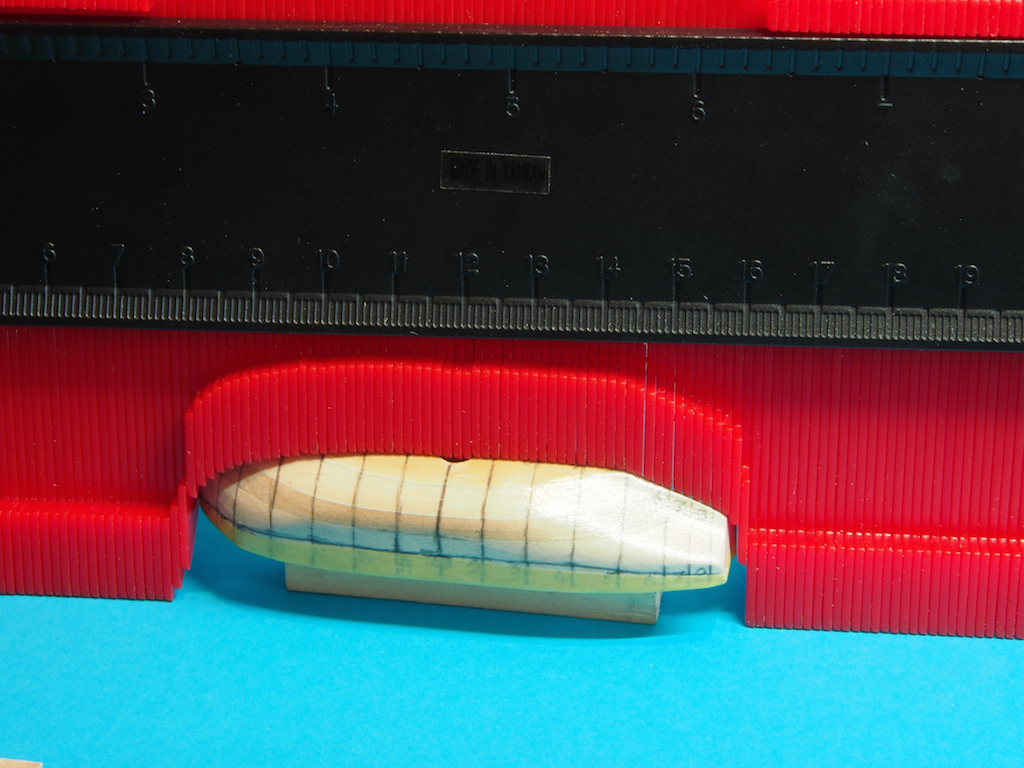
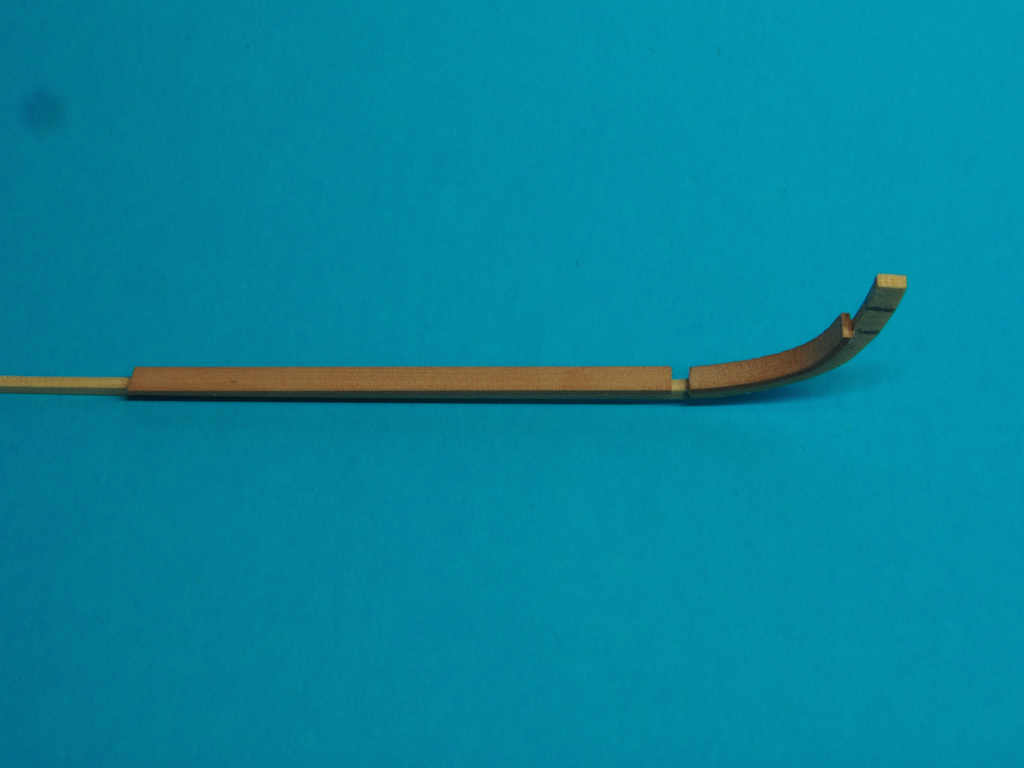
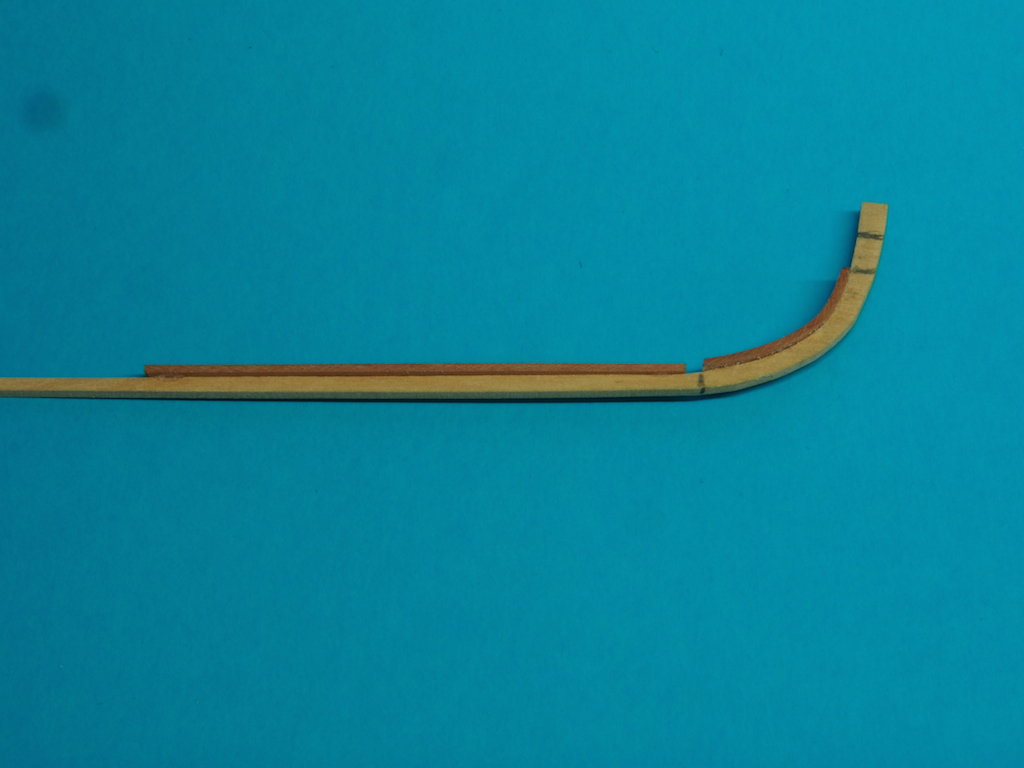
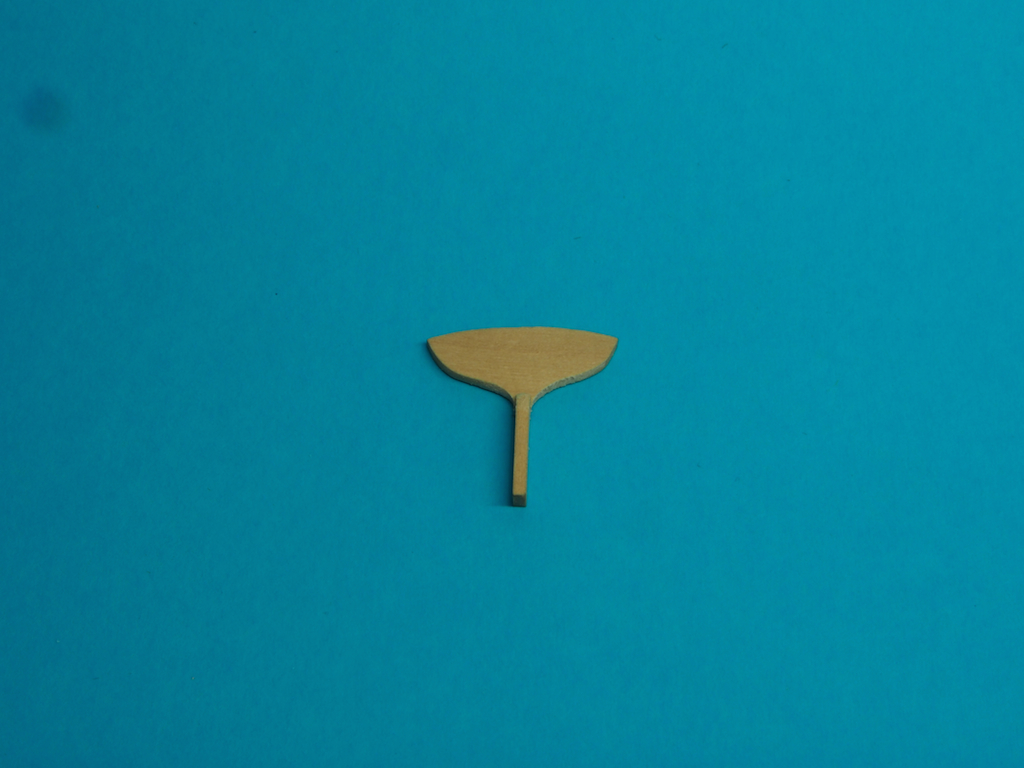
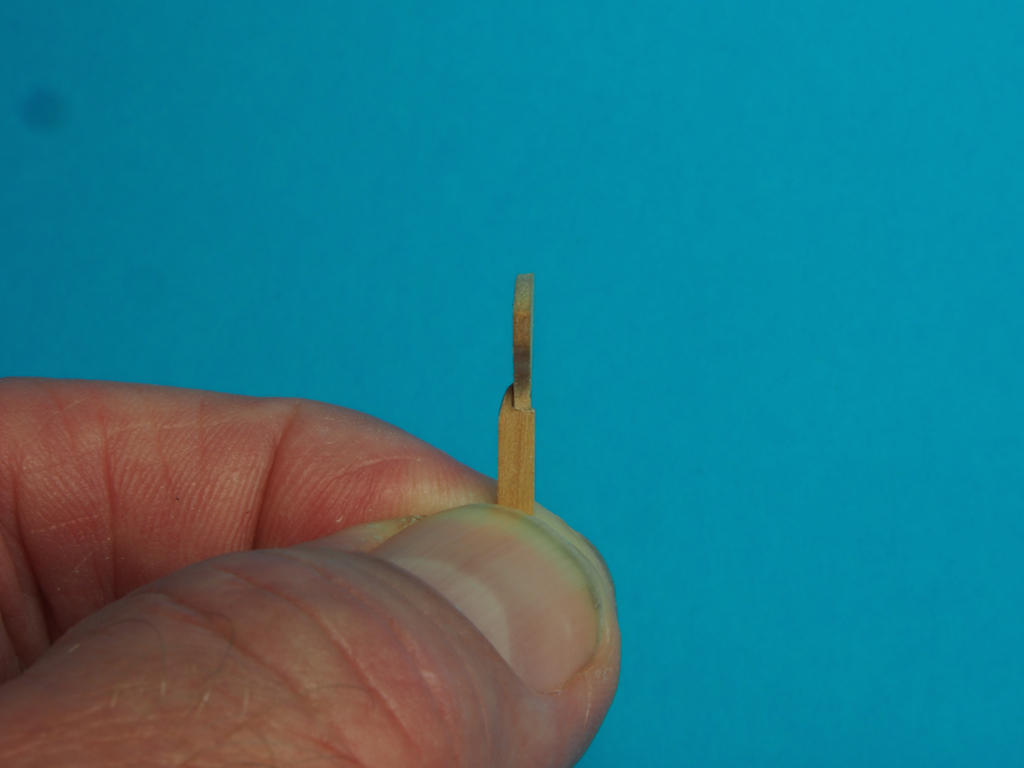
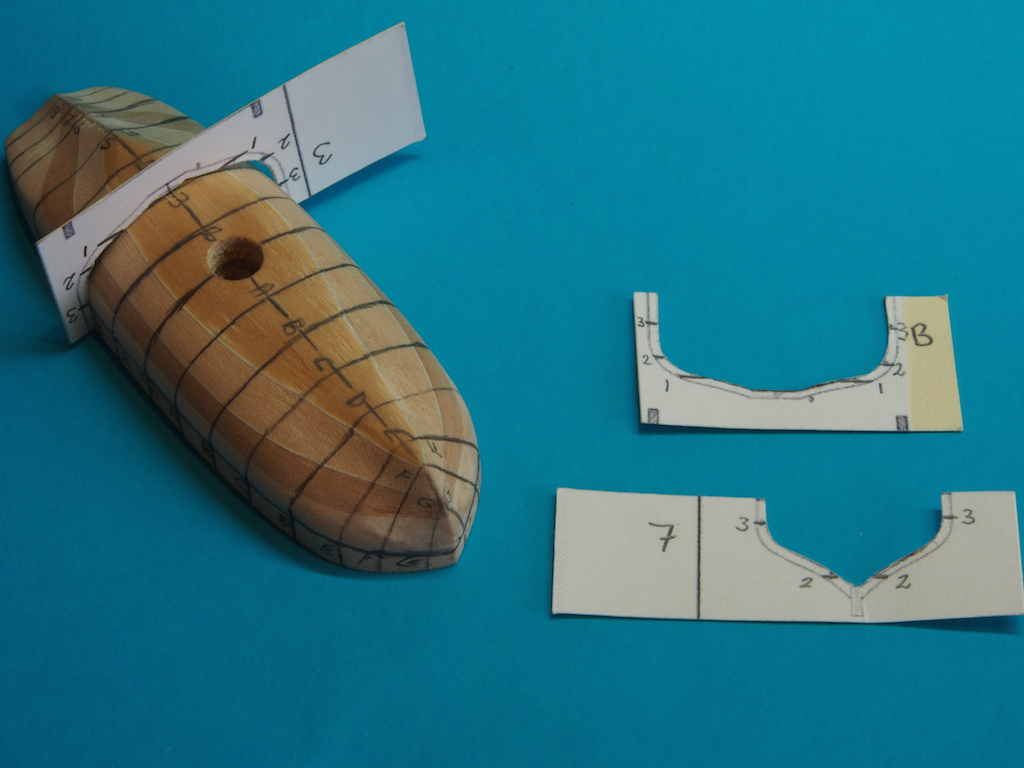
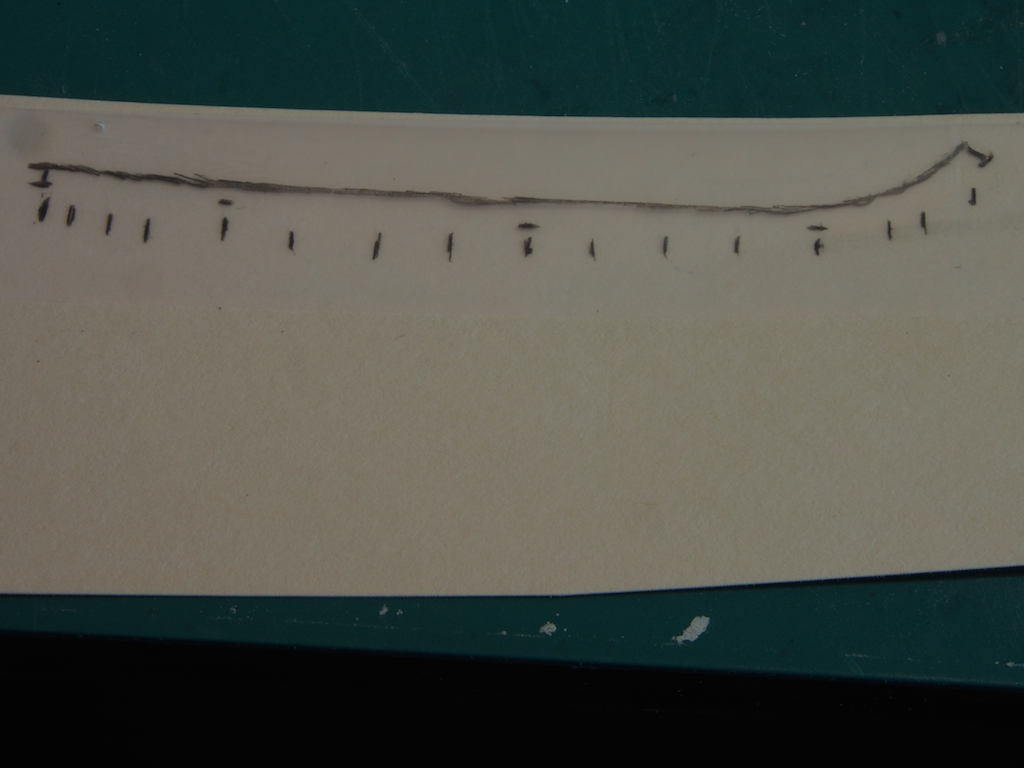
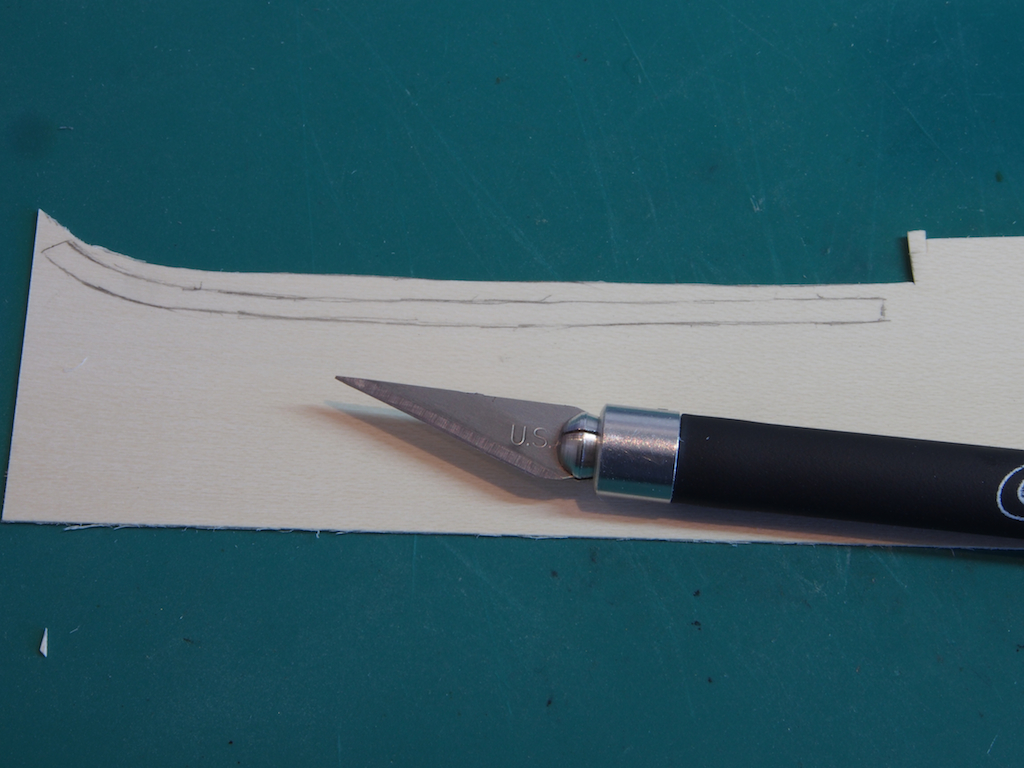
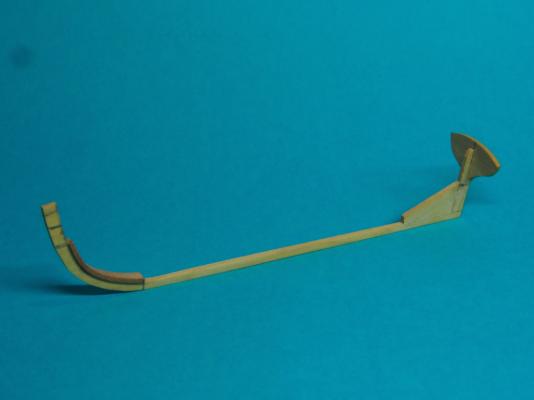
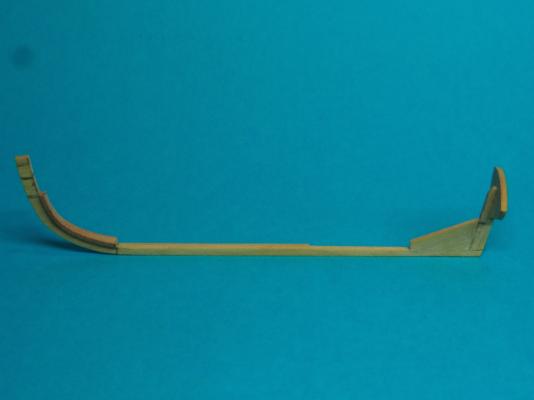
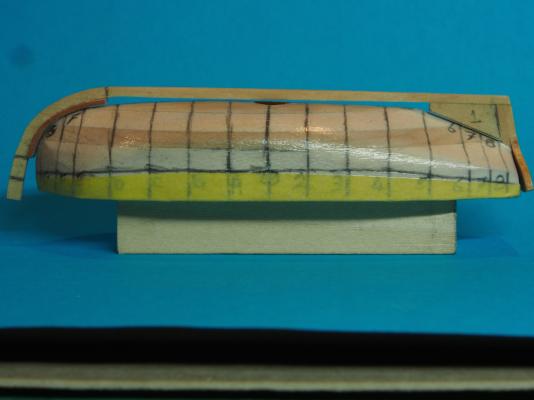
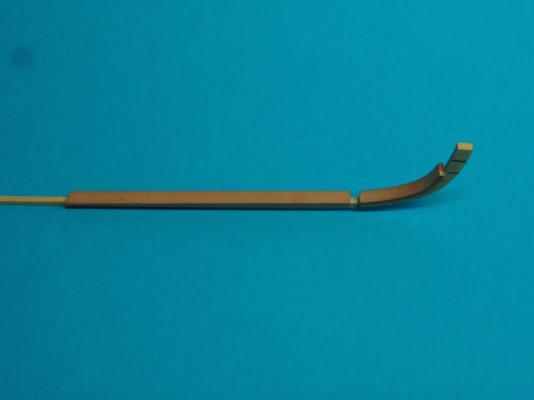
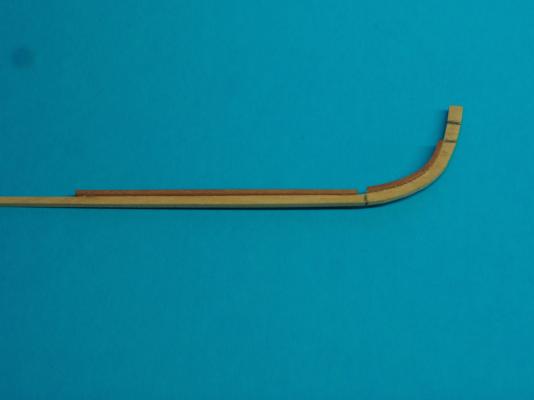
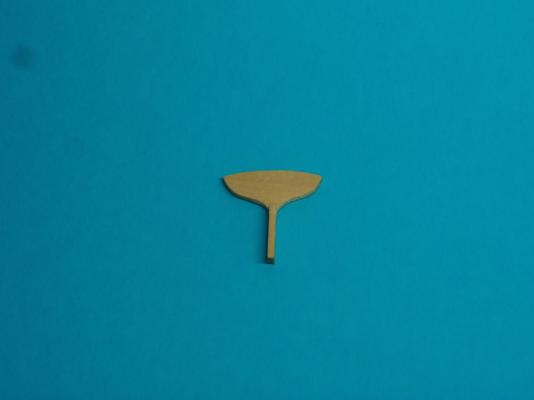
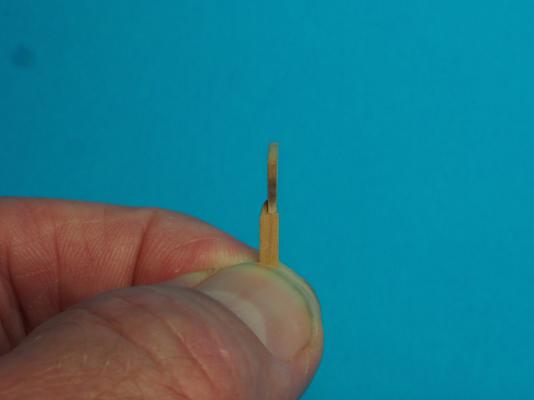
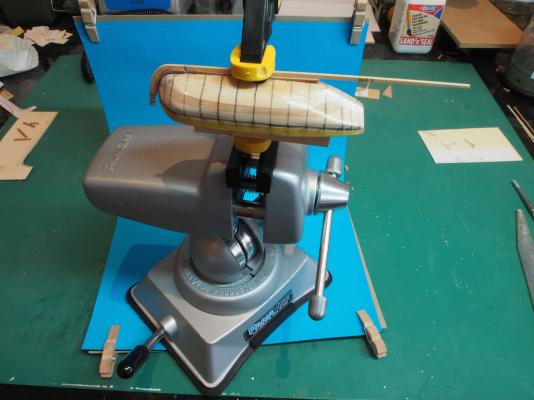
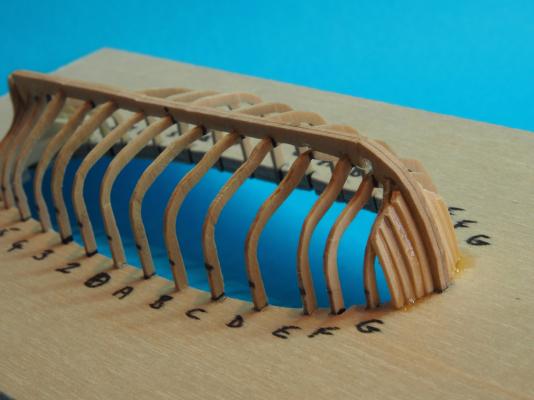
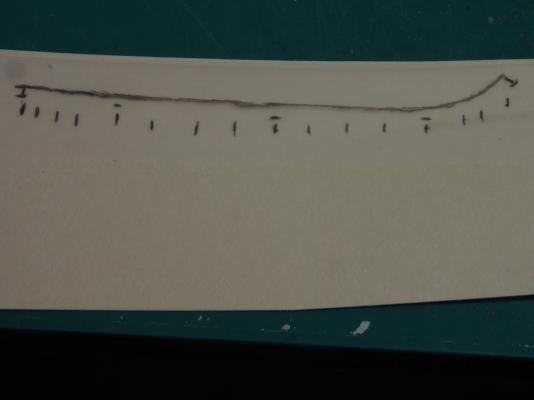
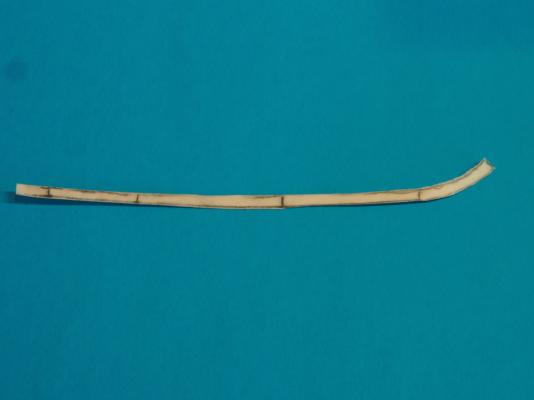
25' Cutters Ver 2.0 (continued): Having completed the plugs, it was time to commence work on the keel. First up, a Profile Guide was used to extract the final shape of the plug along the keel line, and then transfer this to a card stock template: This was done separately for each plug to account for slight variations in the final plug forms. After several attempts, I had a cardboard template with which I was happy, and I then transferred this pattern to a sheet of 3/64" Boxwood. I decided to cut the stem and main keel in one piece, accepting that the stem will be cut across the grain. I figured this would be preferable than trying to make a decent scarf joint in something this small. I then used the waste piece of Boxwood sheet as a former to bend a piece of 1/32" x 3/32" Pear strip to form the Apron. This was then attached to the inner side of the Stem/Keel and hopefully will give it some extra strength. In the photo below, an extra piece of Pear strip has been temporarily spot glued along the main keel to serve as spacer for aligning things along the plug. The spacer is the same thickness as the frames will eventually be. This is a major point of deviation/difference from the Antscherl method in that his resin plug had slots cut for the frames to be inserted into. I couldn't see a way to do that easily, so opted for attaching the frames on the outside of the plug, and the keel over the top of that. The spacer will eventually be replaced with short sections of "hogging" strip (not sure if that's the right term) that will be placed on top of the keel and between the frames, providing a level surface on the inside of the frames along the keel. The keel is left over length at the stern, to be adjusted at a later point. Next up, the Transom and stern post were made. Both are cut from 3/64" Boxwood sheet. They were cut separately so that the wood grain is in the correct direction for each piece. The disadvantage is that there is a very small gluing area joining the two, so at the moment they are very fragile. I have also cut the basic shape for the Stern Deadwood (or Stern Knee), but this will need to be finessed to fit with the Sternpost/Transom piece. Finally, my latest toy (er, I mean tool) arrived today. I decided to lash out and buy the Panavice swivelling vice, mounted on a vacuum base. I thought it would be just the thing for working on these little boats - at least, that's what I told the Admiral In this picture, you can also see the setup I've been using for photographing progress. It's simply a piece of blue paper, clipped to two pieces of cardboard - the backing of a pad of writing paper, cut in half). One half of the cardboard is inserted into a slot cut into a piece of MDF, which holds it vertical and hence provides a seamless transition to the horizontal piece. A little tip I picked up from watching photography tutorials on YouTube. Right, that's me up to date. A little fiddling to get the Stern Deadwood in place and the whole backbone will be complete. I'll then be ready to start on the frames. Stay tuned................

-
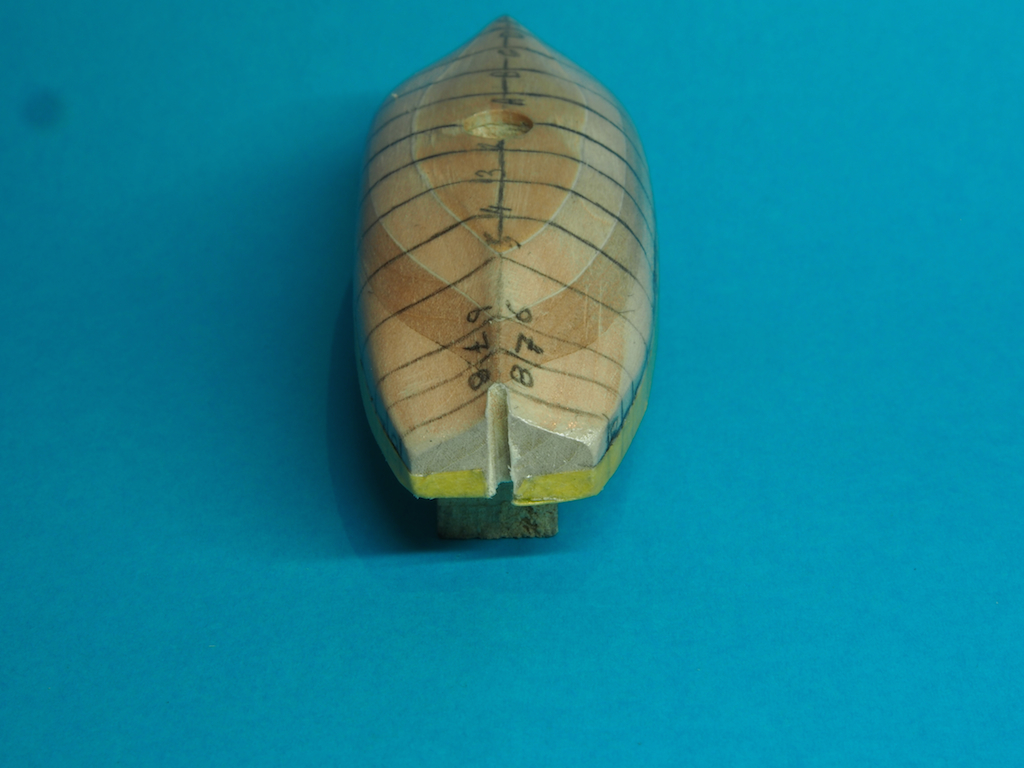
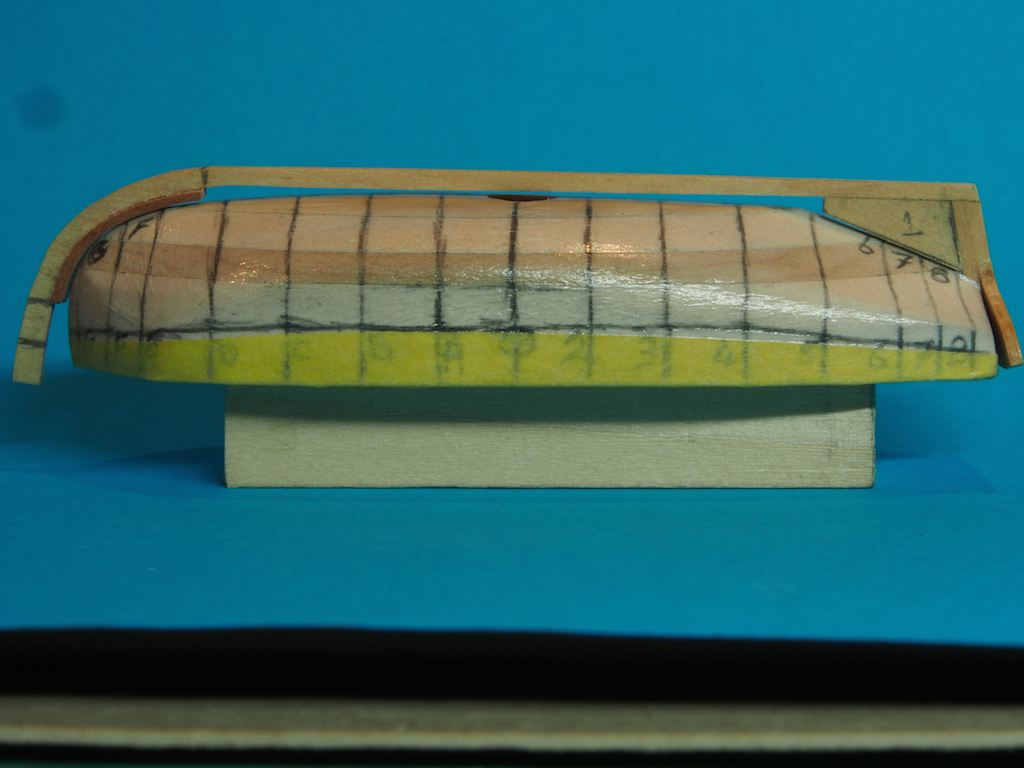
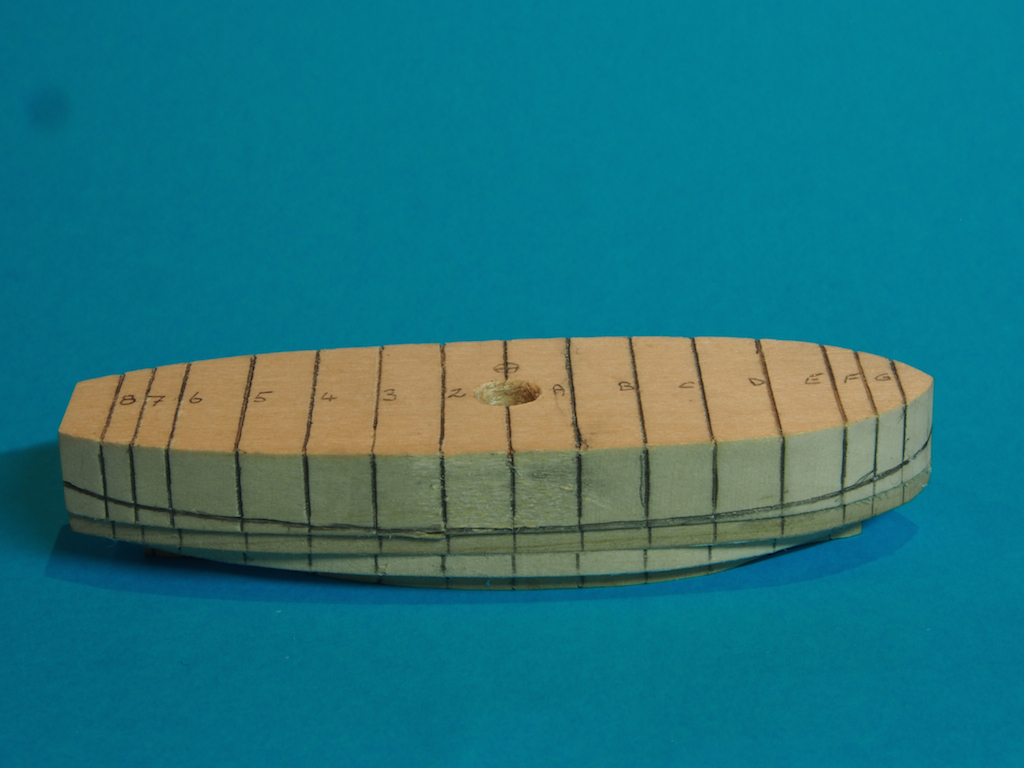
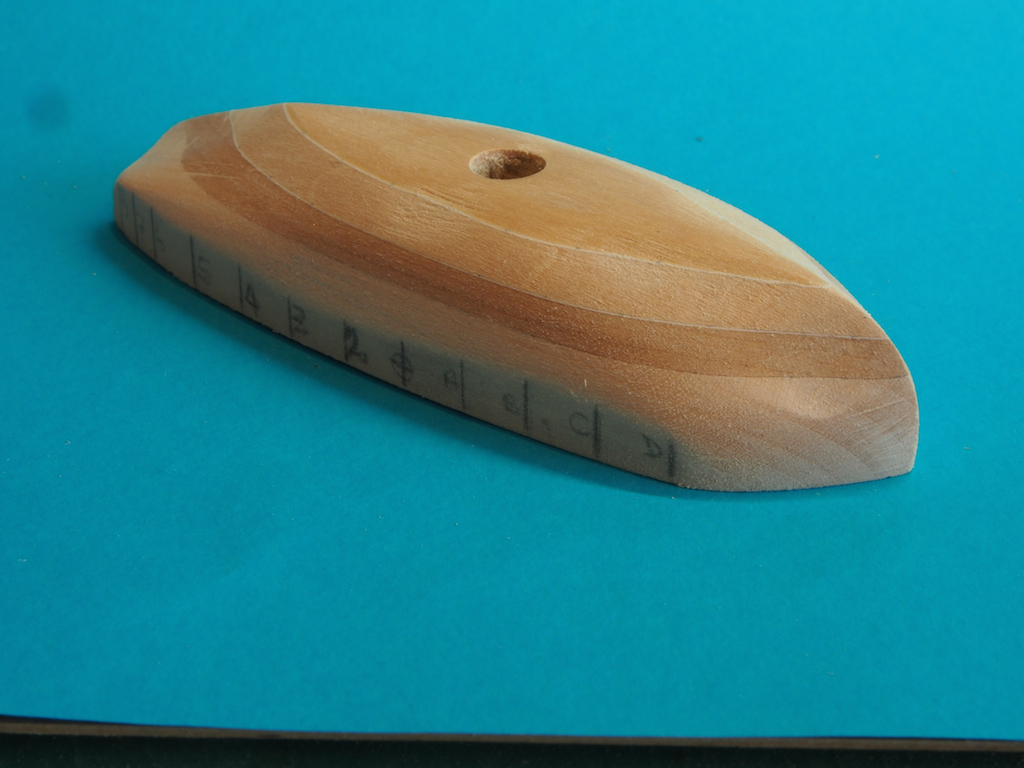
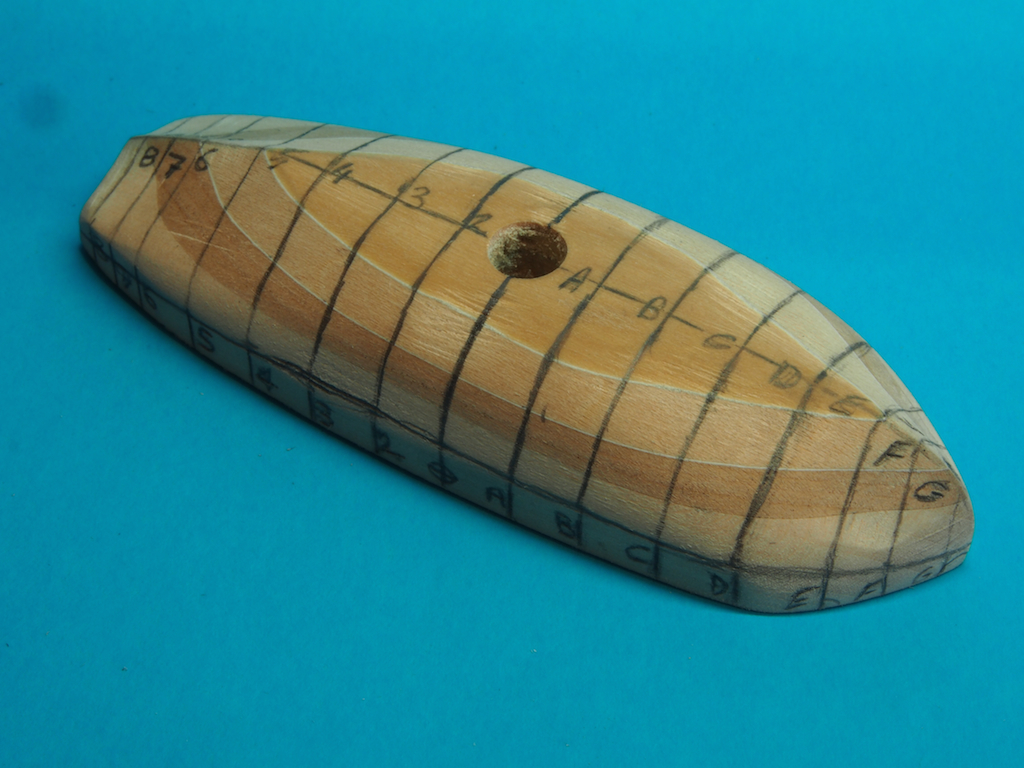
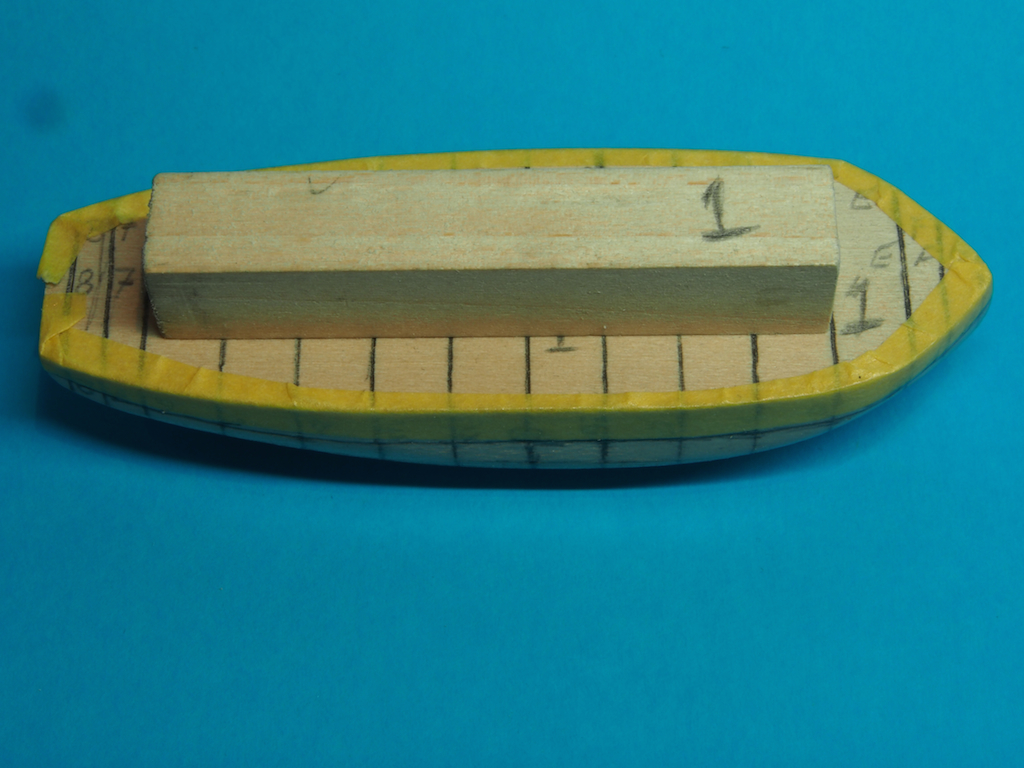
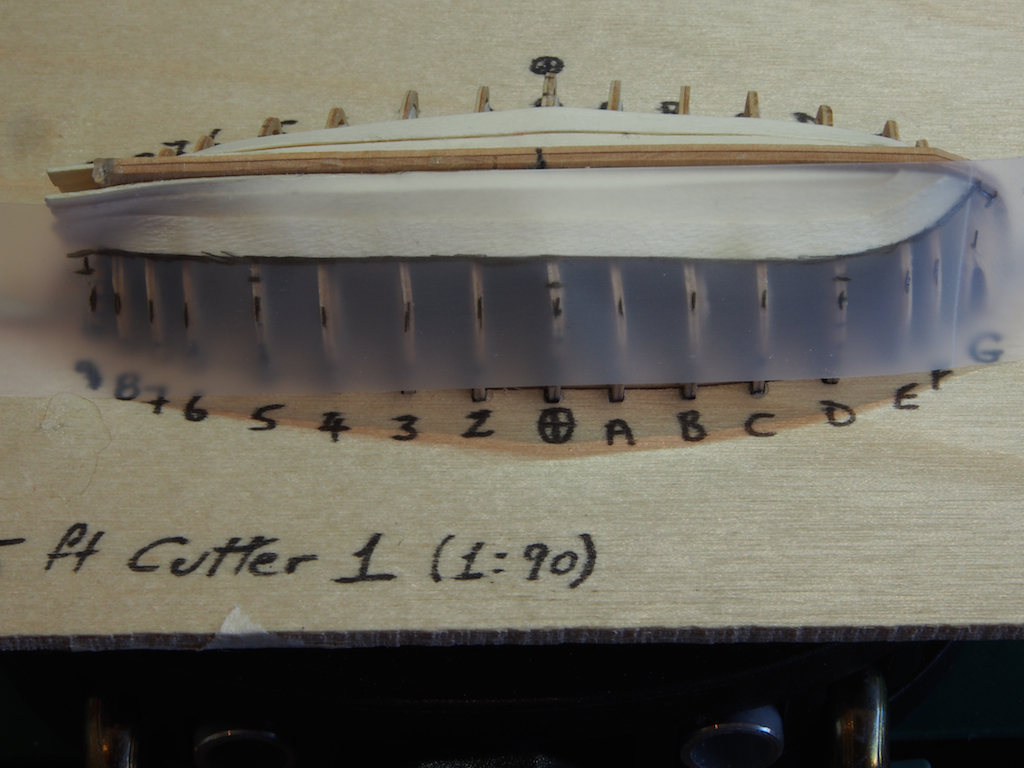
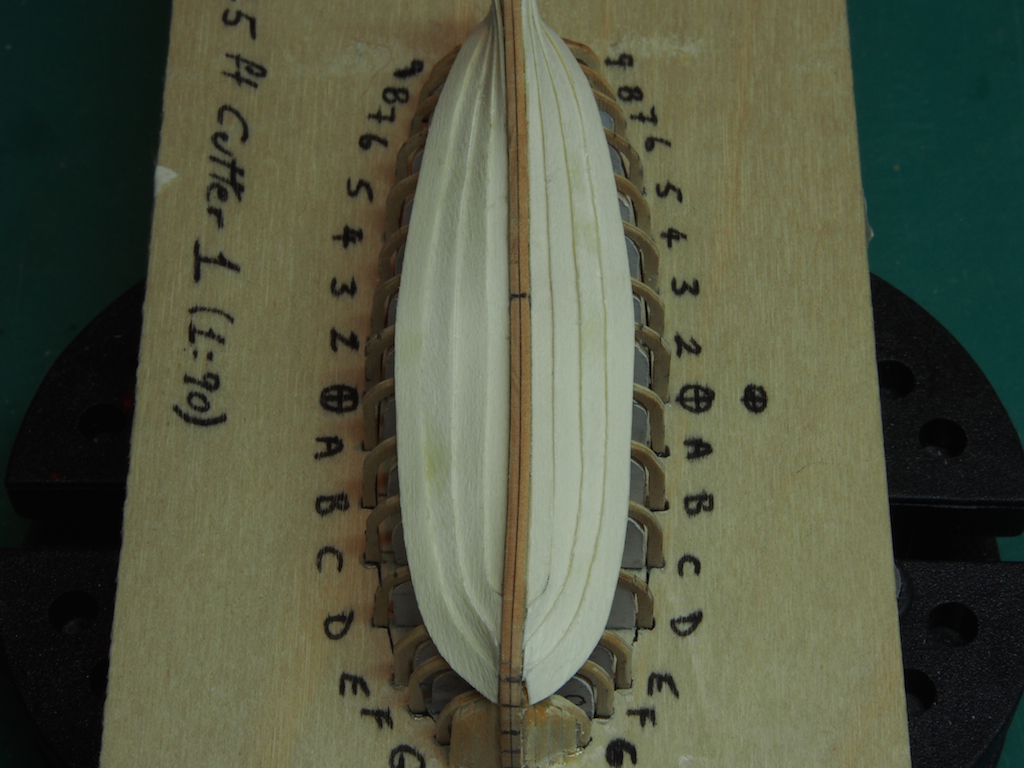
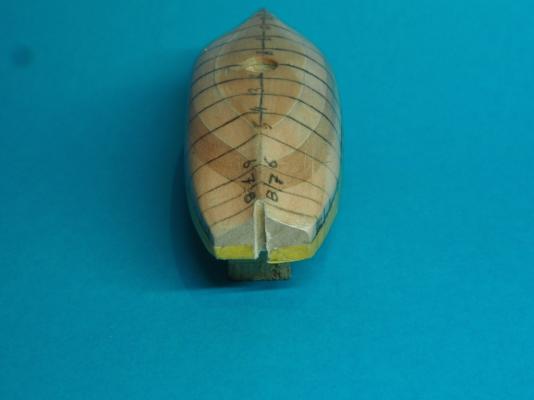
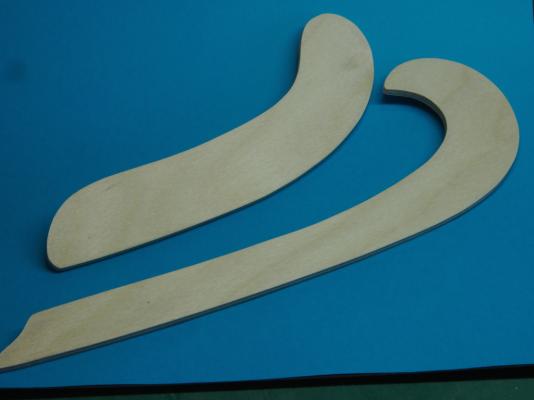
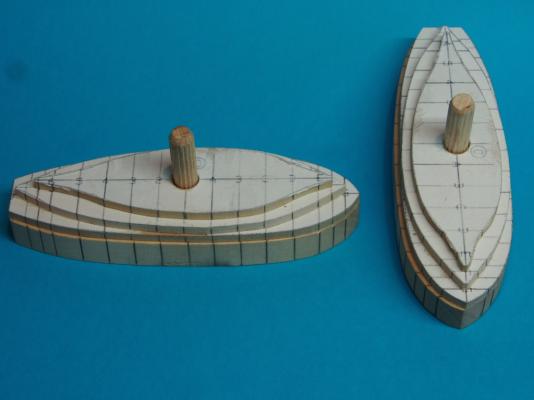
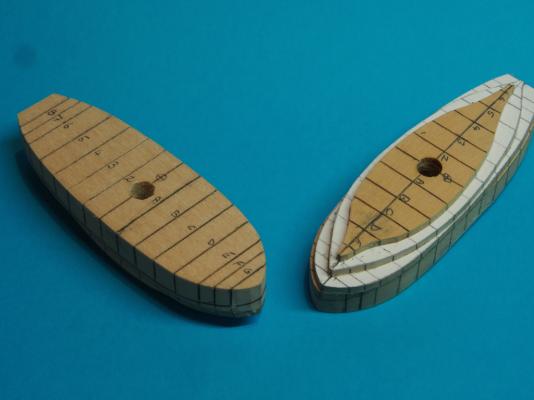
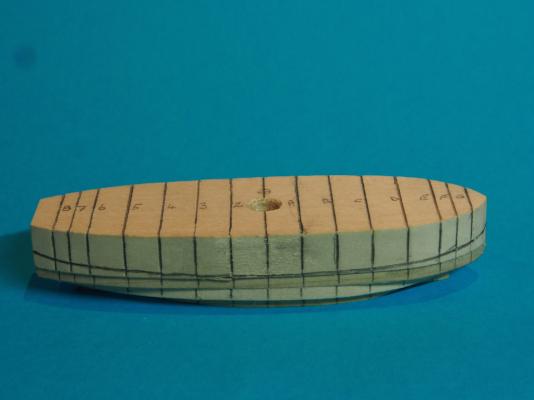
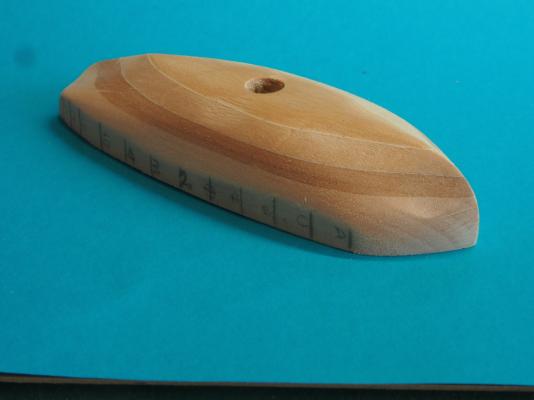
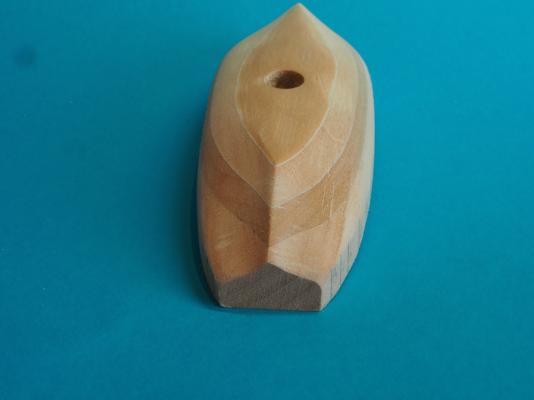
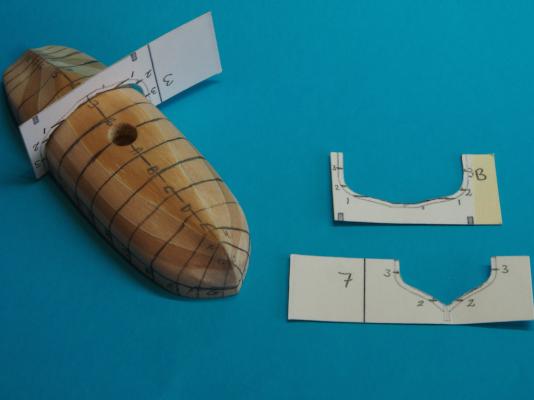
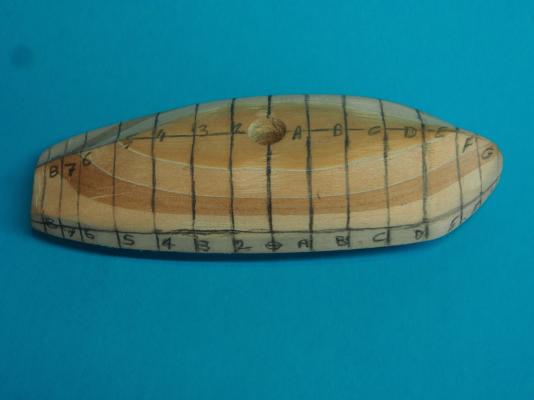
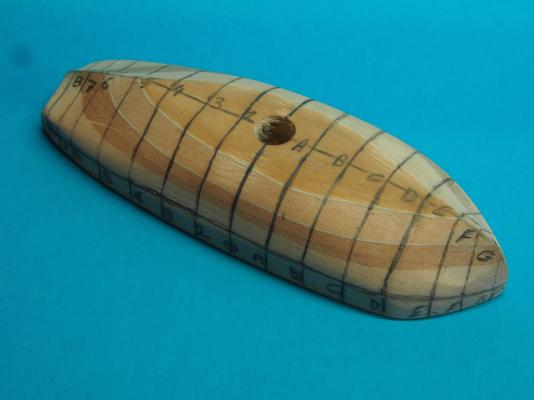
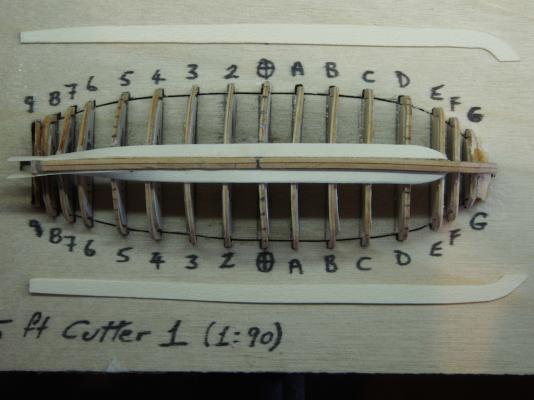
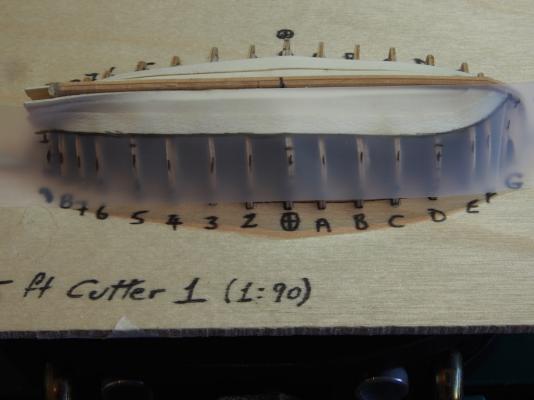
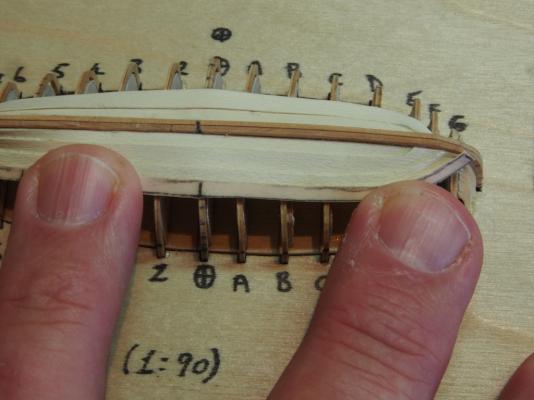
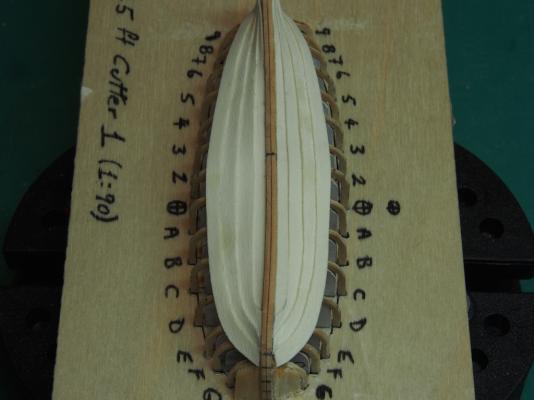
25' Cutters Ver 2.0 After terminating Cutters Ver 1.0, I thought long and hard about the various options for method. I also recalled Remco drawing my attention to the tutorial written by David Antscherl when he and Greg Herbert offered a 1:48 scale 18' Cutter kit. At one point, it was possible to download the instructions for this, although I don't know if it is still available. Fortunately, I had previously downloaded it and, after some study, decided that I would follow this method with a few necessary modifications along the way - some because of the scale differences, and some because their kit offered a pre-made resin plug with features that I am unable to duplicate. First up, Antscherl recommended that if one didn't own a set of Ship's Curves (sometimes known as French Curves), then one should make some from thin plywood using the templates provided. Aye, aye Sir! Next, I needed to make a plug (well, two actually - one for each boat). I went back to my drawings/plans in my Warrior Practicum, scanned these into TurboCad and re-scaled them to produce the appropriate size. By the way, at 1:90 scale, a 25' Cutter is just 3.3" long (or about 85mm). I then printed the water line templates onto sticky label paper, cut out the waterlines from stock of appropriate thickness (I had previously prepared for this as an option when I ordered timber from Jeff Hayes at Hobbymill some time ago), and assembled the basic plug. The dowel is to assist in aligning the plug components. Each water line component uses a different timber. The purpose of this is that the different colours of the timber show clearly where each waterline is (clever eh?!) I then scored the station lines into the top and bottom paper patterns (using an Exacto knife) before removing the paper patterns. The scored lines are then easily traced over with pencil to show the station lines again: I also used a template to mark in the Sheer Line, and scored this as well: The plug was then shaped roughly using a sanding drum in the Dremel, and finished by hand to 600 grit. In this picture, you can see the effect of the different timbers in showing the waterlines. Templates for the frames were printed onto sticky paper and attached to card stock to check the shaping of the hull at each station line, and along the keel. The numbered lines on the frames represent the water lines, with the number 3 representing the Sheer line. The station lines and Sheer line were then re-marked: A piece of Tamiya masking tape was then applied to the excess plug above the Sheer Line before the hull was given several coats of sanding sealer. The purpose of this is that the sanding sealer will help prevent the frames from sticking to the plug (I'll probably also wax this), while the masked off part will provide a good surface for the frame ends to adhere to the plug (they will be cut off later on). I also attached a piece of scrap stock to the top of the plug to be used as a "handle". This will come in handy for holding the pug in the vice during framing and planking. Continued next post ......... I also

-
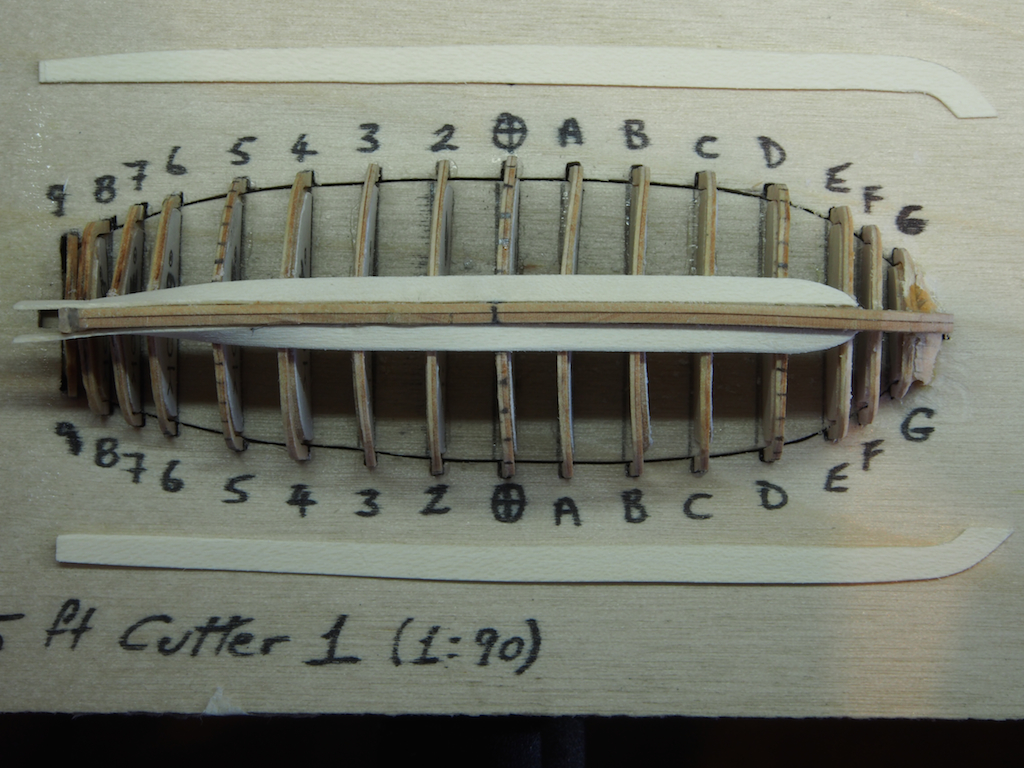
Thank you Mike, Shihawk, Bob, Augie and Michael, and also to all of the "likes". It's been a while since I posted an update - not because I haven't done anything, but because I struck a problem and had to make some tough decisions. I've said many times that the support and encouragement of everyone here has inspired me to continue to strive to always do better, and not to accept poor work just for the sake of moving on. And so it was with this in mind that I got to a point with building the two 25' Cutters, that I came to the conclusion that they just weren't up to an acceptable standard, and there was no fix that was going to make them that way. So after mulling it over for a while, I have binned them and re-started the Cutters as Ver 2.0. I wasn't going to post any further progress pics of Cutters Ver 1.0, but decided that sometimes we learn more from our mistakes than from our successes. So, in the hope that others may gain something from my errors, I will post progress up to the point of termination. I'll then follow up with a further two posts to show what I've been up to with Ver 2.0. So here we go..... Cutters Ver 1.0 I have previously posted pics of the frames and keel assembly into the building board. This was the same technique as used successfully in building the 28' Pinnace. The next step was addition of the Hawse Timbers: And then fairing these: Now it came to the planking. I used 1/64" Holly for the planking, cut individually from some sheet stock. Here is the Garboard plank going in, and probably the major source of all further errors. I had decided to try applying the spiling technique to see how it would work in this miniature scale. You can see in the photo where some of the frames have been marked out using the tick strip method. Next up, Scotch "Magic" Tape was applied and the line of the previous planked marked, along with the tick marks for the next plank: The tape was then transferred to a piece of card stock and the shape faired in: The cardboard template was cut out: And checked against the hull: The shape was then traced around onto a piece of Holly sheet, and cut out with the trusty Exacto: This photo show the plank being glued and clamped. Because of the very fine and fragile materials, I needed a clamp with a very light pressure. I found these hairdresser's clamps quite useful for this purpose (not an original idea, but a good one ). I got to about here: ....and realised two things. Firstly, the placement of the Garboard strake was such that it was causing too much of a downward curve in subsequent planks. Secondly, the planks were not sticking to the frames around the bow, which were too delicate to force into place. At this point I released the boats from the build jigs and confirmed that that the only course of action was termination. Many rude words and a good stiff drink later, Ver 2.0 was commenced. Some observations: 1. This framing technique is not suitable for a clinker planked hull. 2. Spiling actually works, even at this scale, and is well worth the effort. 3. Placement of the Garboard strake is absolutely critical to a successful planking job. See next post for commencement of Cutters Ver 2.0............


-
HMS Druid by Krug - FINISHED - 1:48 - Hahn
gjdale replied to kruginmi's topic in - Build logs for subjects built 1751 - 1800
A very promising start to the figurehead Mark - looking forward to seeing the wood version. -
Great job Danny. I'm sure the owner will be delighted - you are a very kind soul. Now, get back to work on Vulture!
- 62 replies
-
- 1
-
-
- king of the mississippi
- artesania latina
- (and 1 more)
-
Nice work as always Danny. I love it when you show your tooling set-up as part of your "how I did this" - I find it really useful for understanding more about how to get the most out of the tools at our disposal.
-
Stunning Bob! She just keeps getting better and better - just beautiful.
-
The deck looks gorgeous Michael, and that trailer really is neat.
-
Hi Pops, Just a thought for you in placing the riser. Rather than relying on repeated measurements, having determined the distance it sits below the gunwale, cut a strip to that width and use this as a spacer for locating the riser. This way you'll be guaranteed to have the riser at the same height on both sides, and consistent along the length of each side. I used this technique in constructing my scratch-built boats at 1: 90 scale and it worked a treat. Hope this helps.
- 132 replies
-
- 2
-
-
- 18th century longboat
- model shipways
- (and 1 more)
-
HMS Druid by Krug - FINISHED - 1:48 - Hahn
gjdale replied to kruginmi's topic in - Build logs for subjects built 1751 - 1800
Well done Mark! Can't wait to see the figurehead and final completion. A truly outstanding piece of work of which you should be justifiably proud. -
Tool for bending metal strips or wire
gjdale replied to Don Quixote's topic in Modeling tools and Workshop Equipment
Brian, As far as saws and sanders go, you can't get better than the Jim Byrnes machinery. His table saw (4") is an absolute joy to work with, and his disc sander is too. Both are extremely accurate, well made, and quiet running. Many of the folks here at MSW swear by his products - myself included. Oh, and he also makes a Thickness sander, a Ropewalk machine, and a Draw plate......... If your wife asks, we never had this conversation.................. -
Tool for bending metal strips or wire
gjdale replied to Don Quixote's topic in Modeling tools and Workshop Equipment
You might like to have a look at this log by Archjofo - some really outstanding work, and a great photoessay on doing exactly what you asked about. http://modelshipworld.com/index.php?/topic/1029-la-créole-by-archjofo-scale-148-french-corvette-of-1827-scratch-build/page-16 -
Looking very nice Mark. Can't wait to see the cant frames in place.