HOLIDAY DONATION DRIVE - SUPPORT MSW - DO YOUR PART TO KEEP THIS GREAT FORUM GOING! (Only 24 donations so far out of 49,000 members - C'mon guys!)
×


gjdale
-
Posts
4,891 -
Joined
-
Last visited
Content Type
Profiles
Forums
Gallery
Events
Everything posted by gjdale
-
 A months work very well spent Dan! Your perseverance has been well rewarded - the results speak for themselves. Well done!
 -
There are a number of build logs here where people have used lights, and I'm sure there's also been separate discussions on the subject. Have you tried doing a search for "lighting" or "LED"?
-
Immaculate as always Johann. Just lovely! While I appreciated Druxey's translation, I didn't need it to appreciate the meticulous quality and attention to detail of your work.
-
Beautiful is the only word I can think of Bob. I just love seeing your update shots.
-
Dewalt 788 Scroll Saw Steal
gjdale replied to FlounderFillet5's topic in Modeling tools and Workshop Equipment
Hey Max, good for you! What a find! I'll bet you're still grinning like a Cheshire Cat, and probably will be for some time yet. I'm no expert, but I know a lot of folks recommend the Flying Dutchman brand of saw blades. I've just got some myself and so far I'm liking them a lot - enough to order more anyway. The type I'm using are called Flying Dutchman Ultra Reverse and they come in a range of sizes. I suggest that you buy a dozen or so in a variety of sizes and test them out to see what you like. Over here they're costing me AUD $4.50 per dozen (about US $4.00). With all that money you just saved, you could buy a life-time's supply! Have fun with the new toy. -
Both of those are on my "one-day" list! I have both the Fubbs Practicum (Romero) and the McArdle Sussex book on my bookshelf just waiting patiently. One day........ Lovely work with the parquet flooring by the way Mike.
-
Hmmmmmmmmm........passable work I guess............maybe use 395 micron treenails next time........ :P Okay, I'll get my coat and leave now <slinks out - exit stage left>
- 1,215 replies
-
- 7
-

-
- sloop
- kingfisher
- (and 1 more)
-
Thanks Remco and B.E. Yep, persistence (or better still, sheer bloody mindedness) comes in real handy in this hobby! Have to admit though, that the support and encouragement of all the fine folk here at MSW goes a long way too!
-
Great work Jack! Re the photography tips, I think if you just creat a new topic under "tips and tricks", the Mods will move it if they think appropriate. Perhaps if you put a note in the first sentence inviting the Mods to do so, it will grab their attention. It would be shame not to share your wealth of knowledge on this subject more widely.
-
Thanks Augie, Foxy, Mark and Lawrence. Foxy - welcome aboard. Thanks for your suggestion re using a coin for scale. That is done by a few folks here, but the trouble is the multiple currencies in use. I'm not sure how many of our international viewers would be familiar with Australian coin size. The hand however (my last pic), while variable in size, is pretty universally understood.
-
Thanks Slog, Alan, Wayne, Bob and Mobbsie. My wife tells me I'm stubborn. I prefer to think of it as persistence! Wayne - not cross-eyed just yet, though did manage to finish each day with a thumping headache and the beginnings of a CA-induced allergic reaction. Mobbsie - the surgery went very well, thanks for asking. It was another visit to the nasal surgery I had last year, though relatively minor by comparison. In fact, I needed no pain meds post-op, although it did take several days to fully get over the anaesthetic. Thanks for your comments on my narrative - I figured that if I learned a few things along the way, it might save someone else a bit of grief along the way, so why not share all the mistakes as well as the successes? I'm looking forward to the fitting out now. Having done this twice already for the Launch and Pinnace, it should be a walk in the park. (Famous last words).
-
Sweet! I'll bet your happy with THAT little re-do!
- 1,616 replies
-
- 1
-
-
- caldercraft
- agamemnon
- (and 1 more)
-
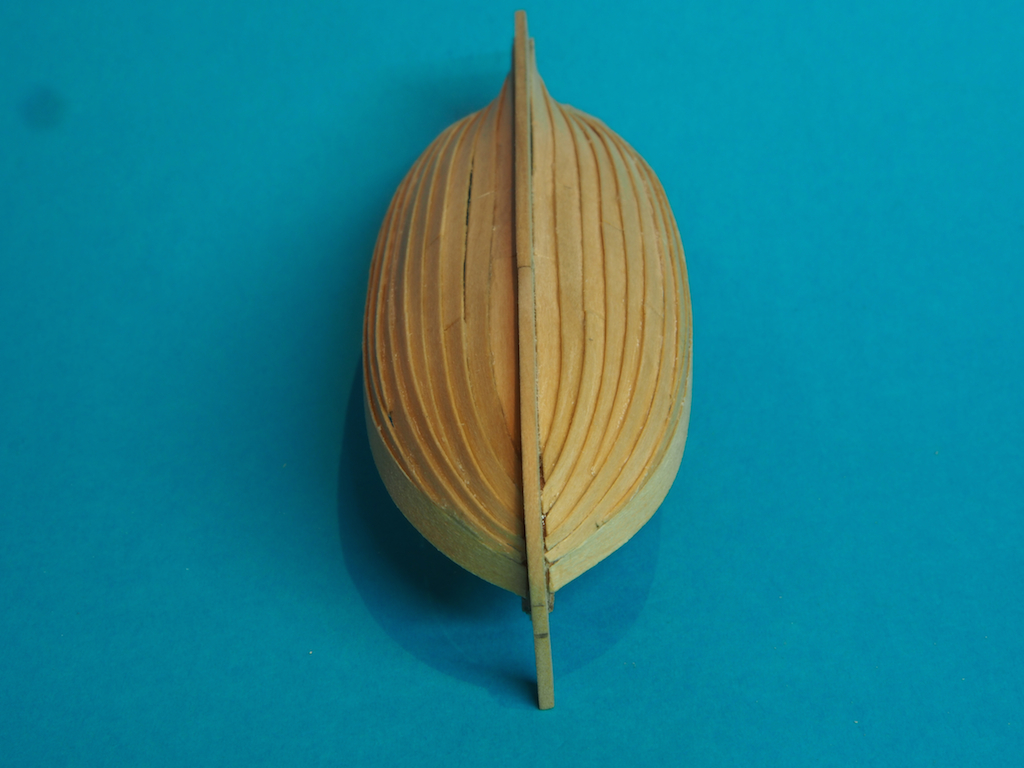
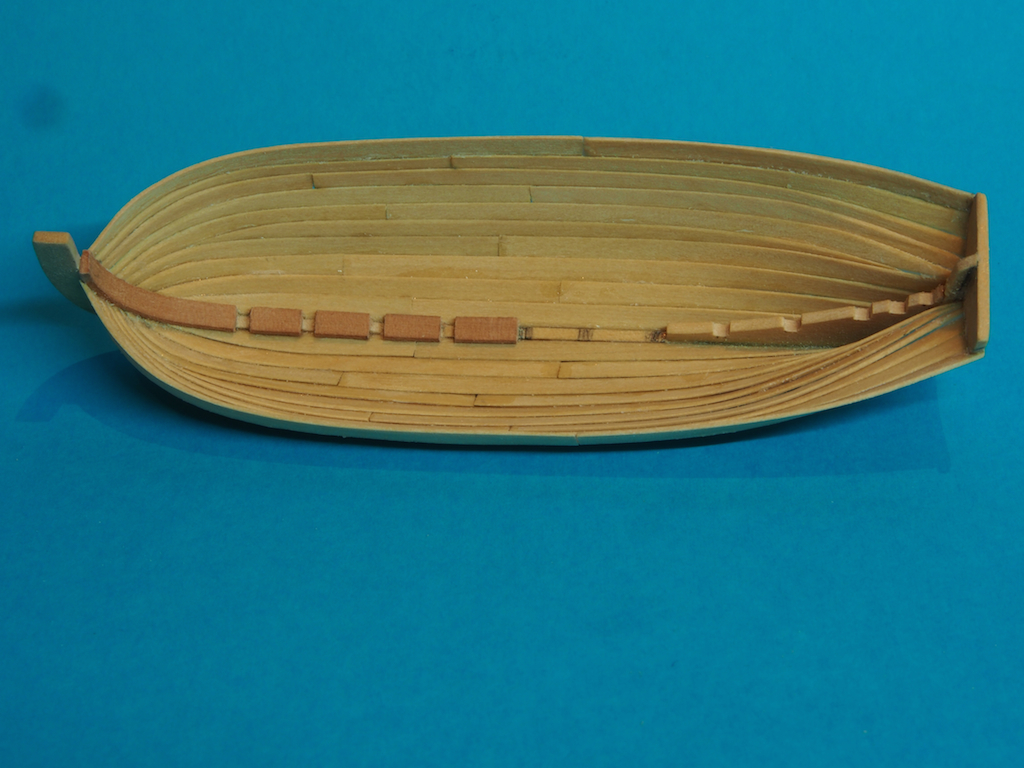
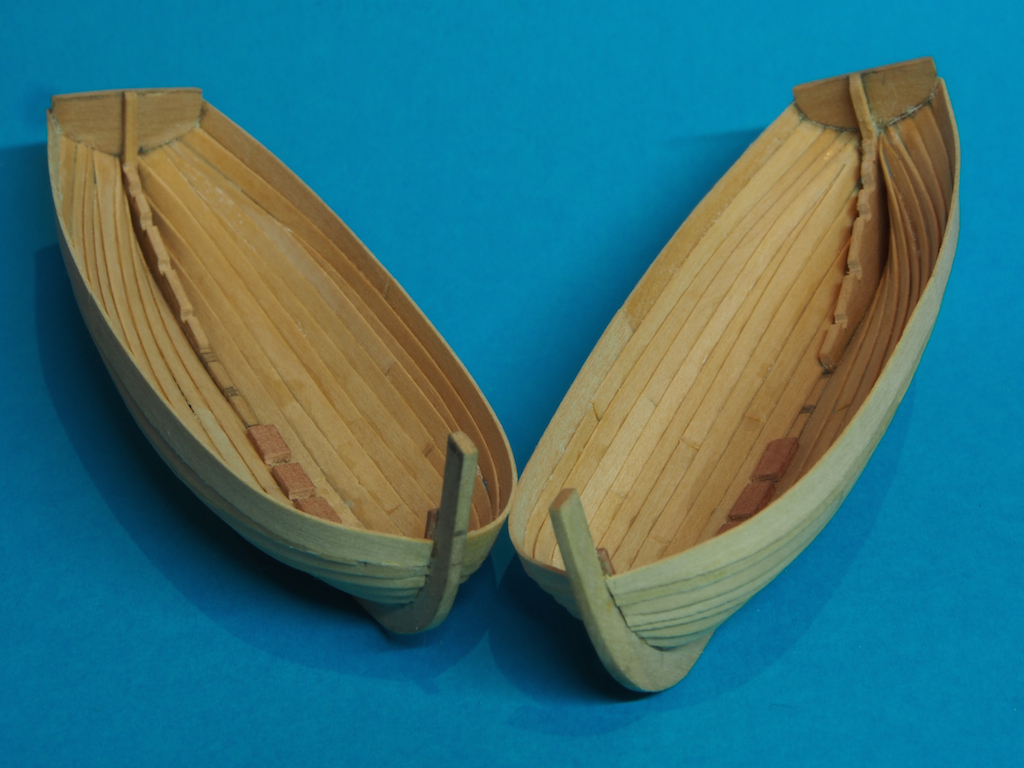
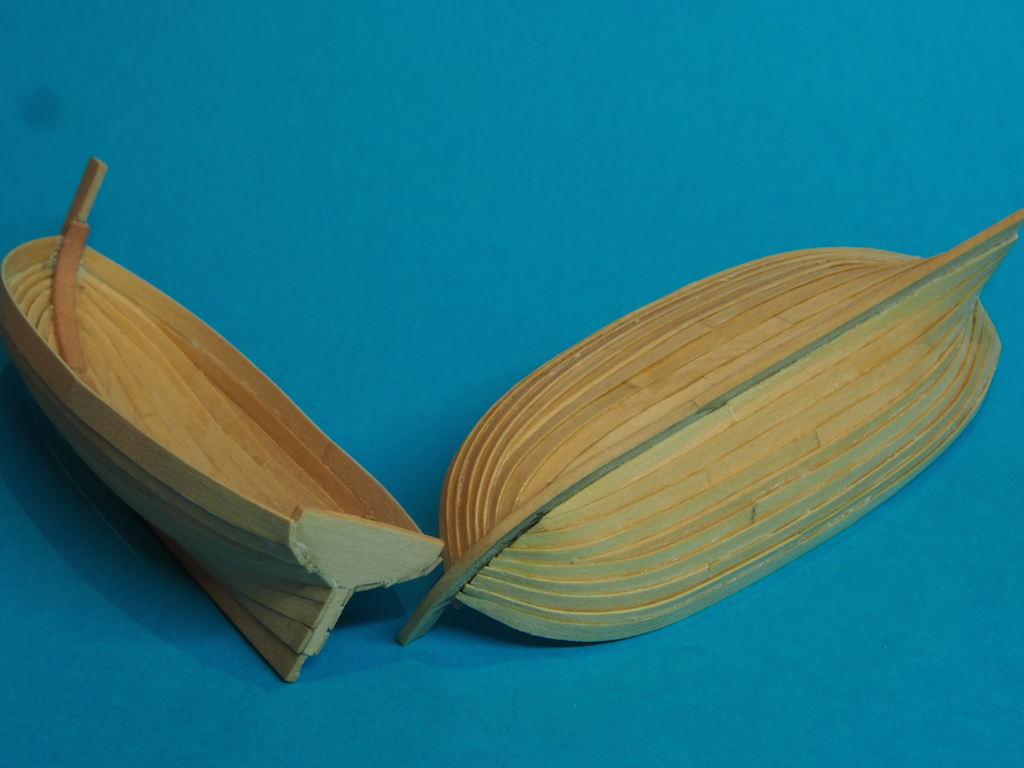
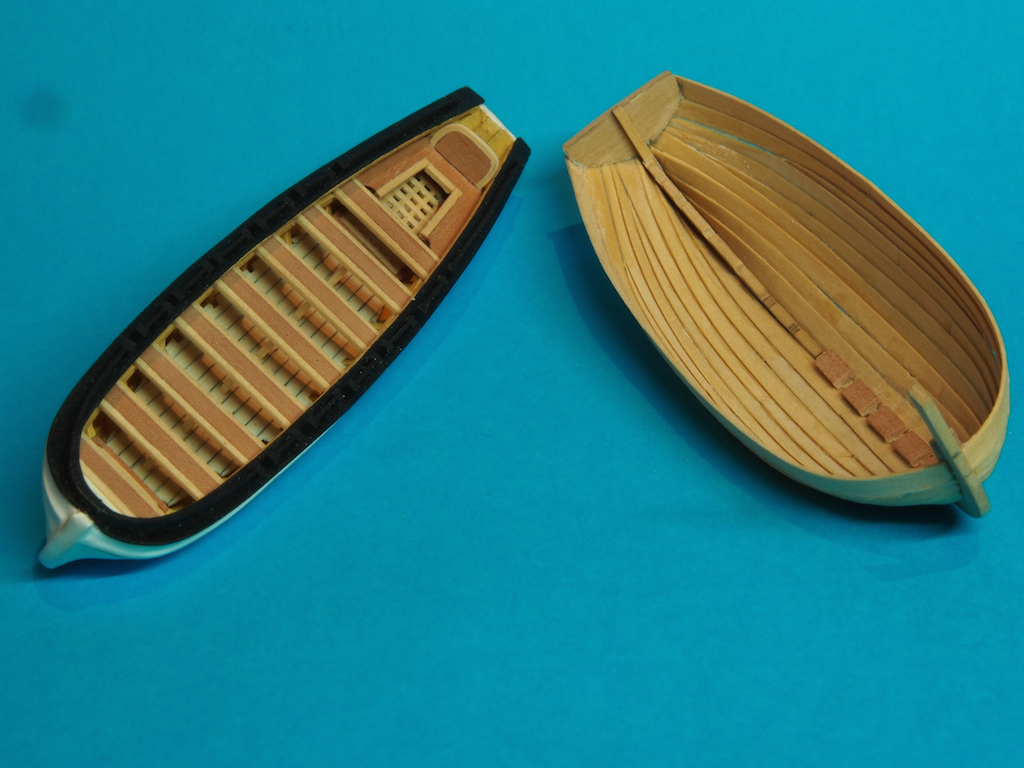
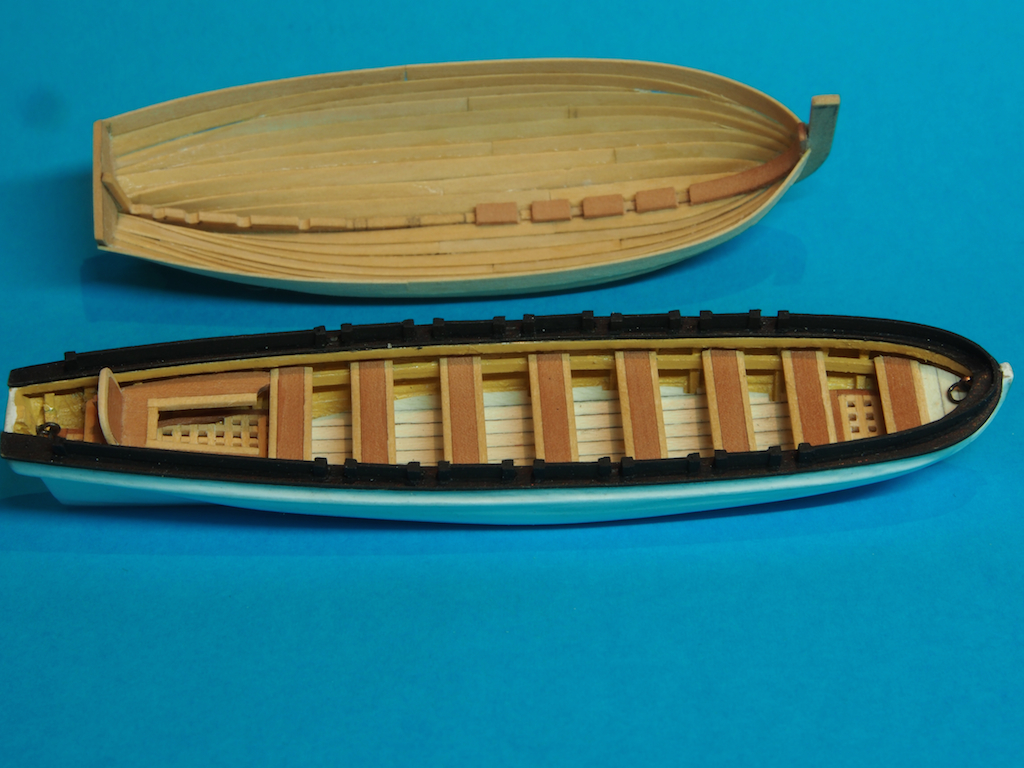
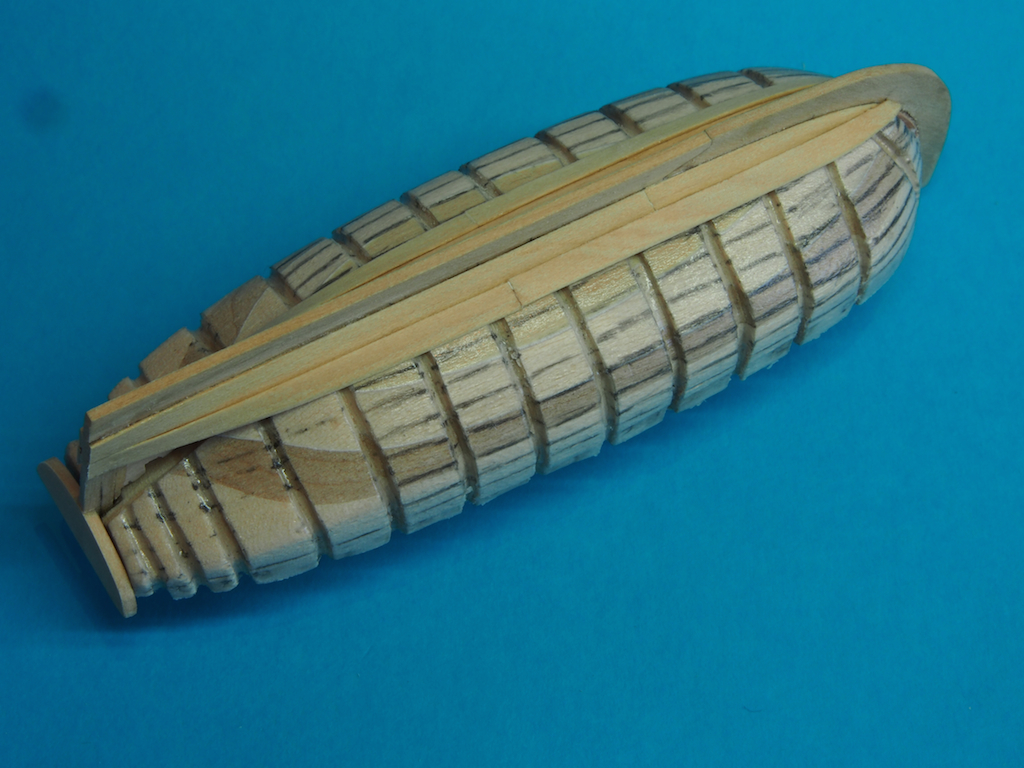
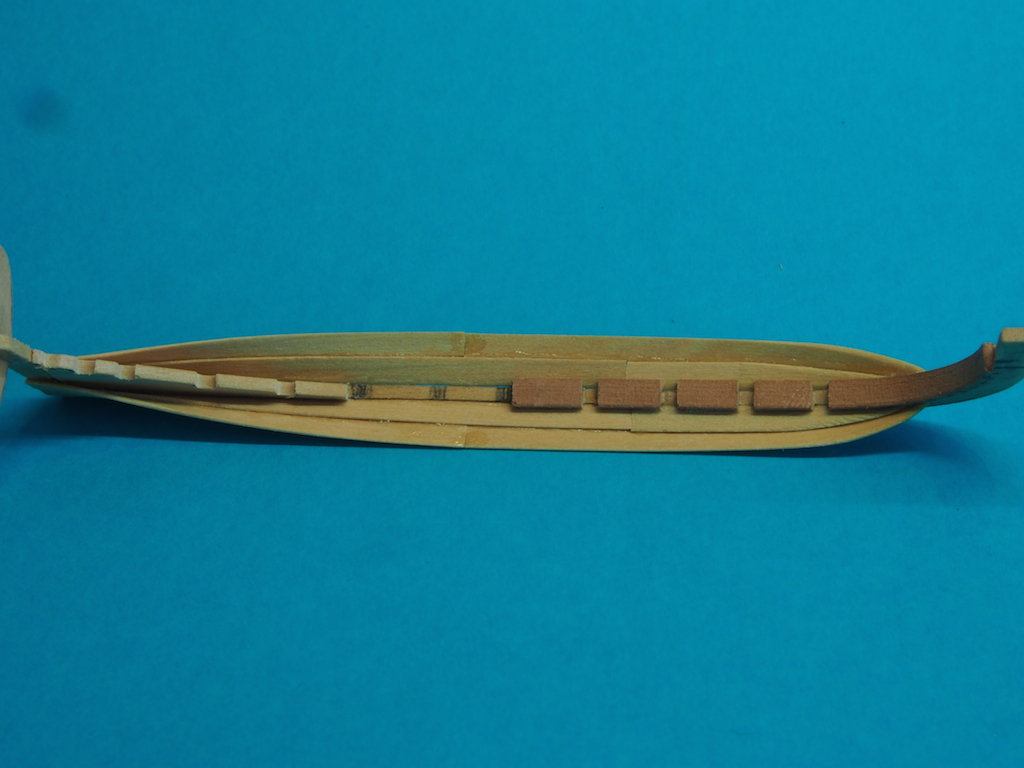
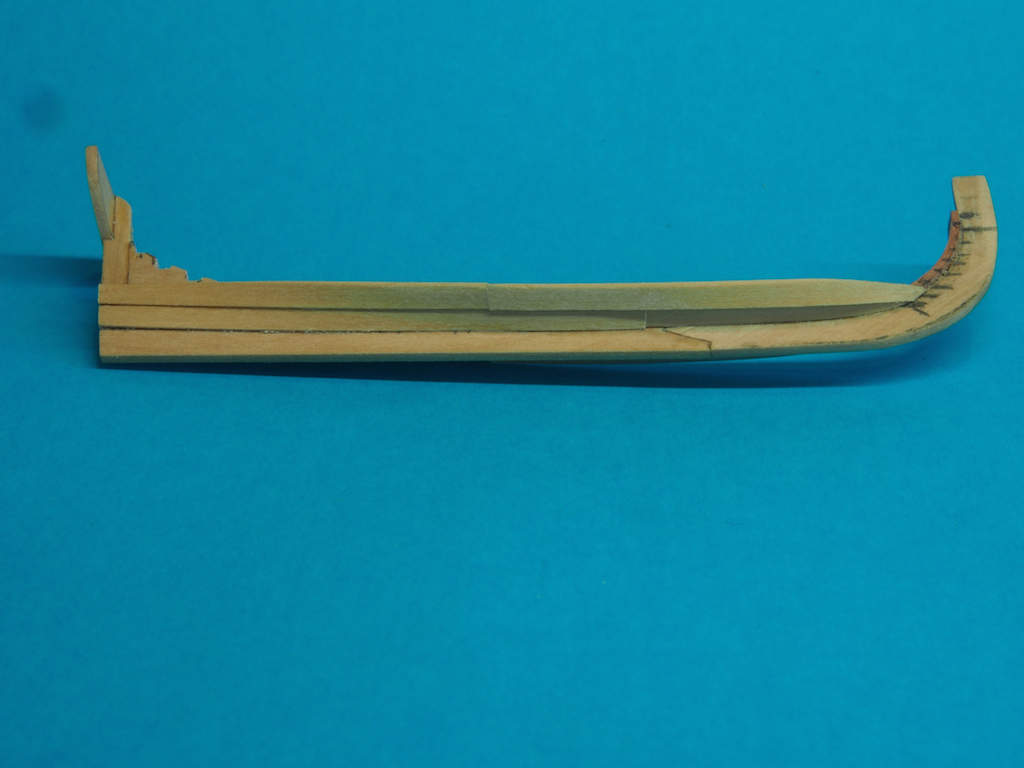
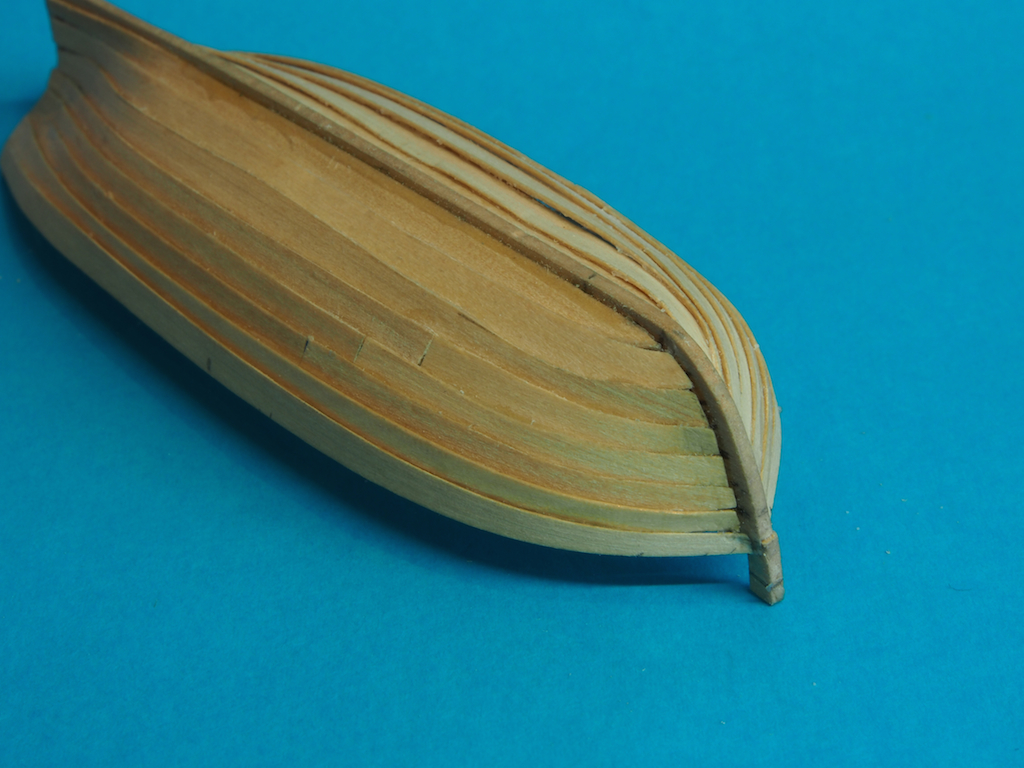
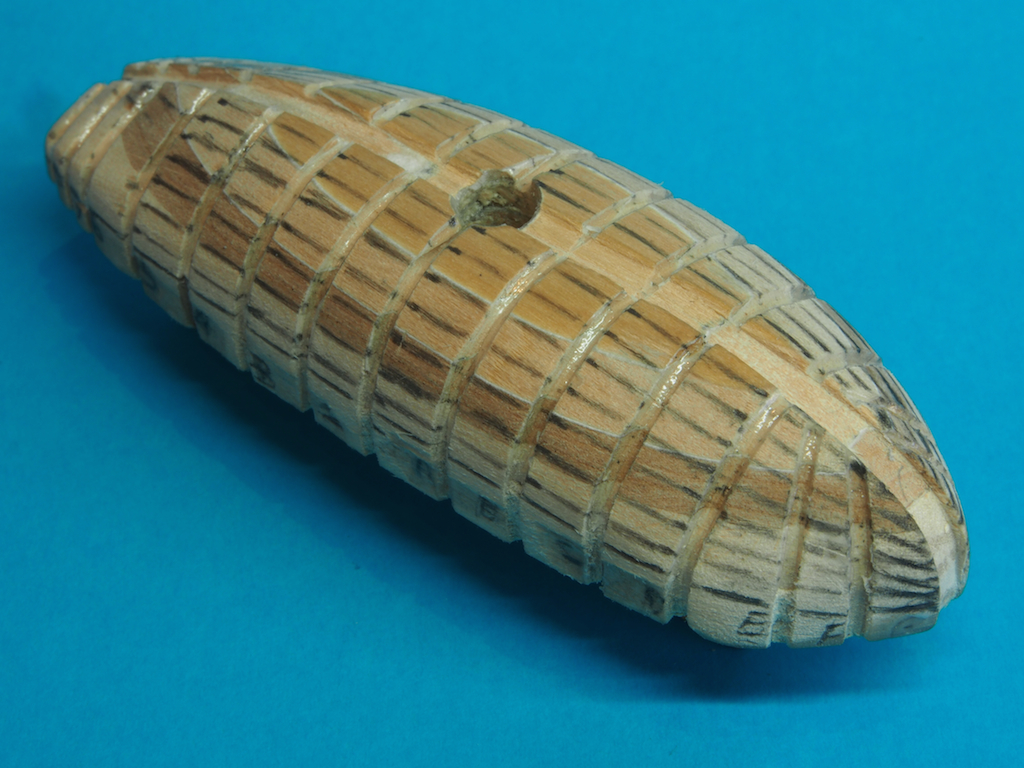
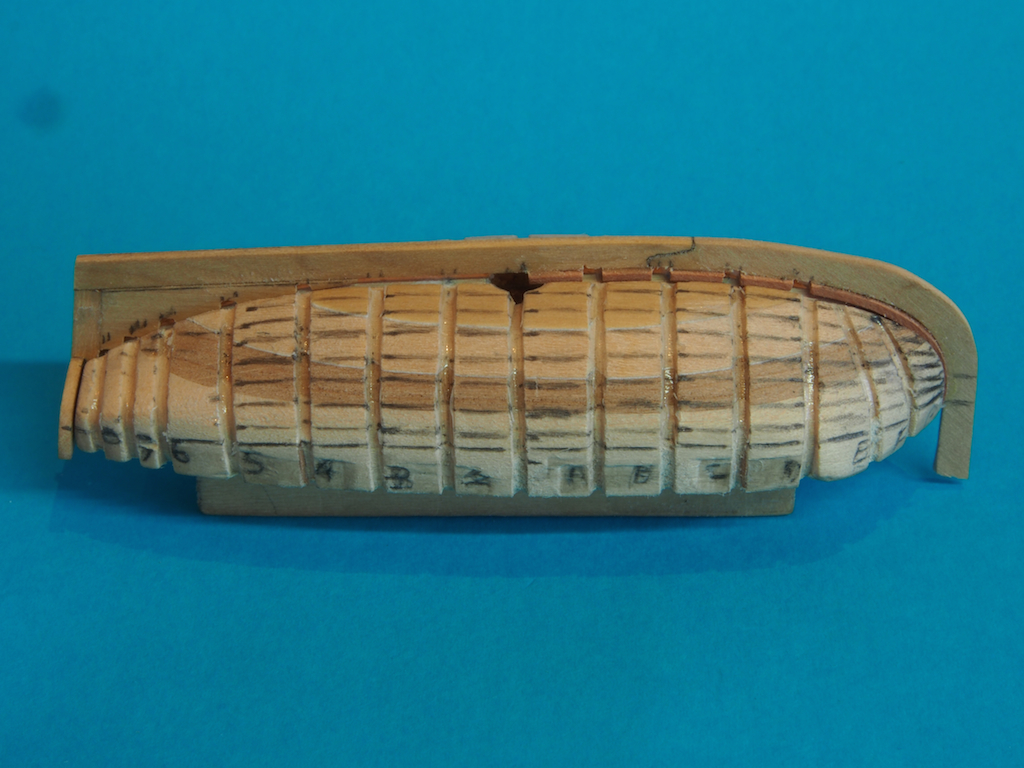
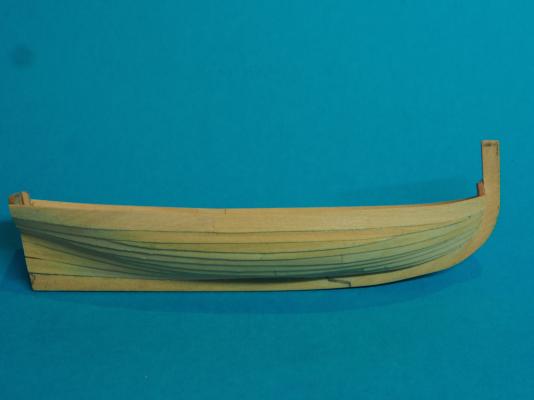
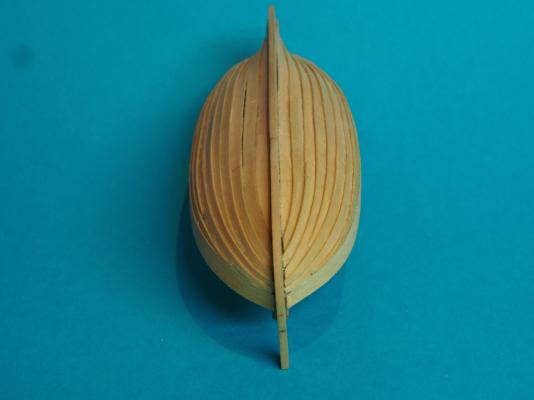
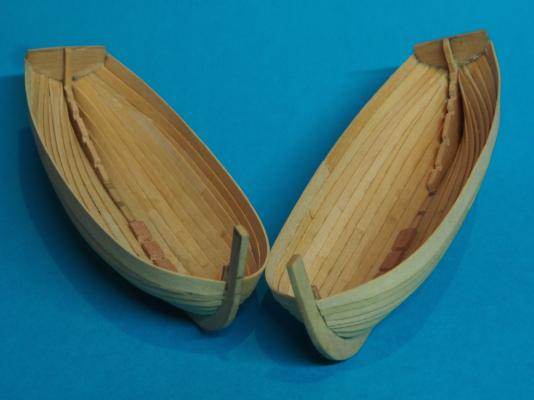
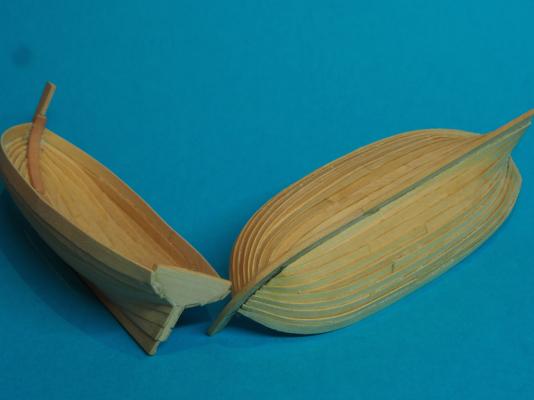
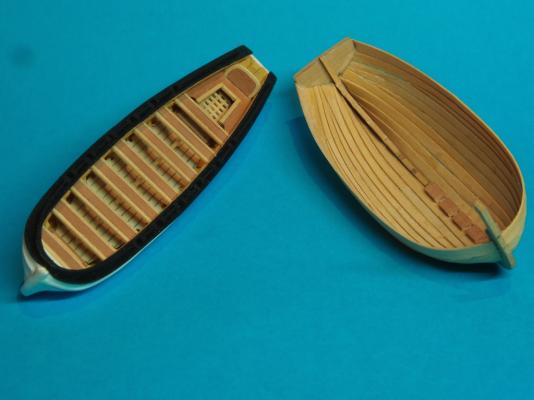
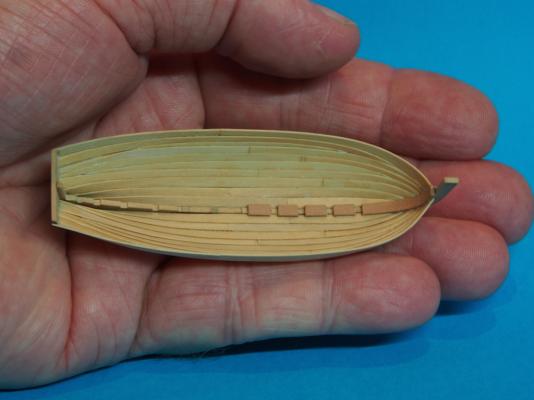
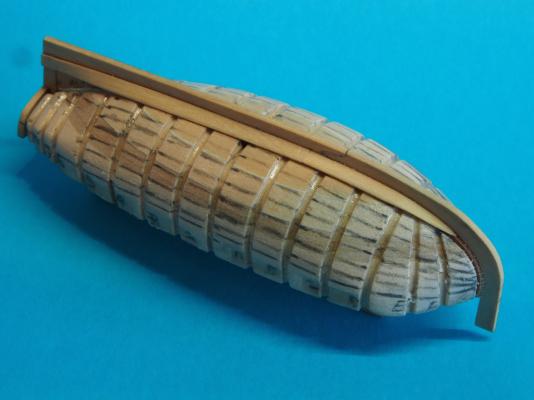
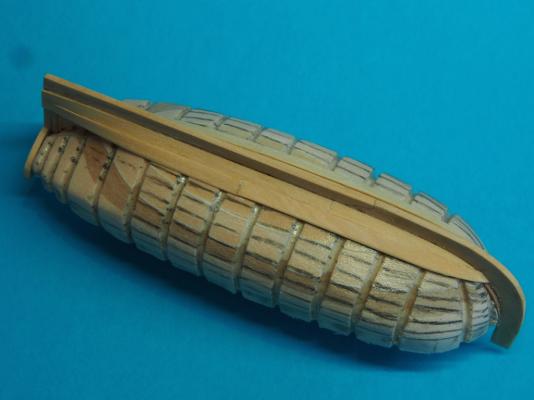
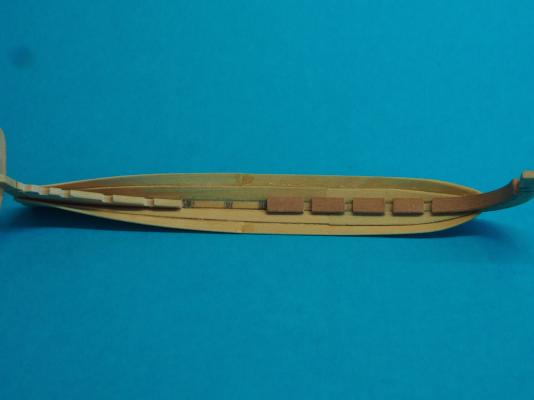
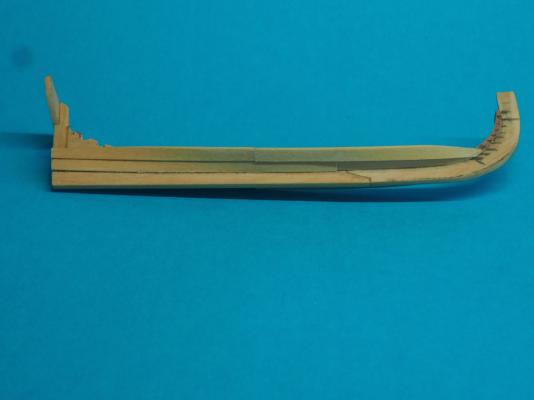
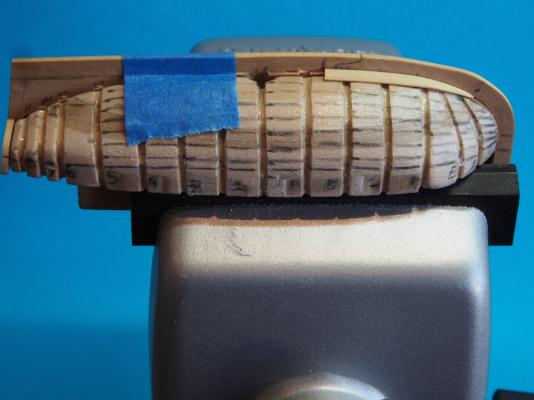
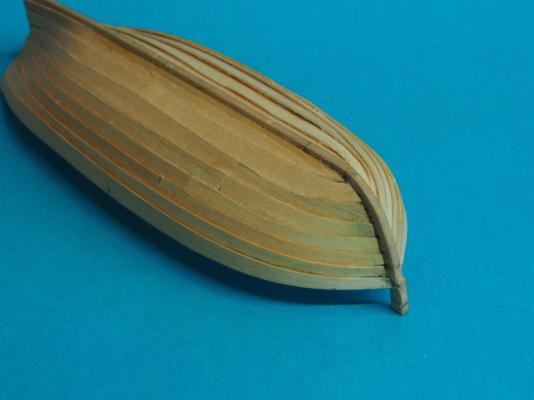
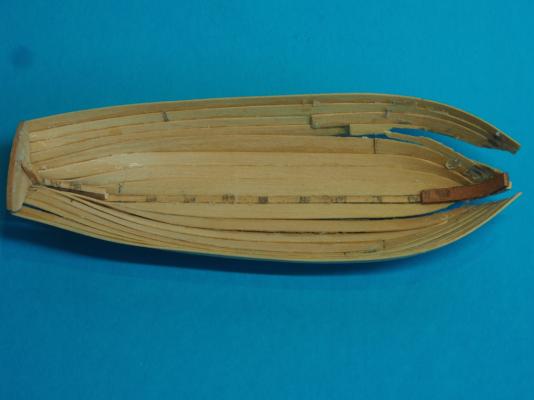
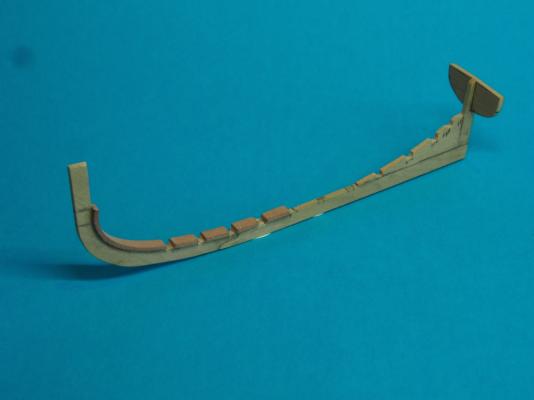
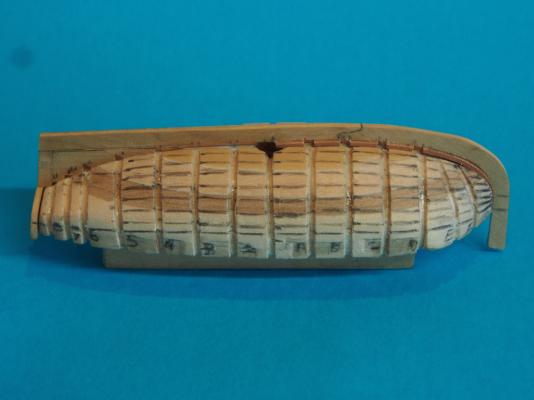
25’ Cutters Ver 2.5 (continued) All progressed reasonably well with the planking from here on, although I did need to make a couple of stealer planks that I would not have needed to do if I were cutting the planks individually from sheet stock. Never mind – I think I managed to sneak them in in a not too obvious way. The secret here was to really feather the ends of the stealers so that they blended with the adjacent plank. Here’s a few photos of the completed planking. The stem needs trimming and shaping, as does the transom, but the hard work is done. While it could be better, I'm satisfied with the results here - they say the third time is the charm! And just to prove that I was working on two at once: I thought I’d throw these two photos in to show the real difference in hull shape between the Cutters and the Pinnace (the Pinnace is 3’ (actual) longer than the Cutters). And finally, just for scale, here’s the obligatory picture of a Cutter in that giant fake hand….. Next up, fitting out and painting. Stay tuned……


-
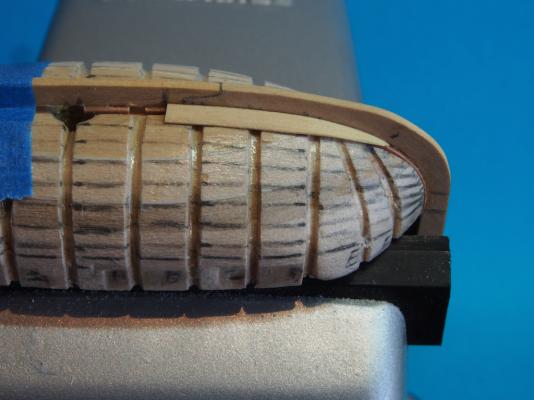
25’ Cutters Ver 2.5 (continued) An idea that I picked up from looking at the 18’ Cutter build log by MauryS, was to simply use some blue painters tape to help hold the keel in place on the plug. This must have been serendipity, as I'd only just acquired some of this tape after watching some YouTube tutorials on using a scroll saw, where it was used underneath patterns due to it's low tack and lack of residue being left behind. Because we’re using more than one plank per strake, it is easy enough to re-locate the tape for the next plank. This is particularly important because of Lesson No.3 in the previous post! As soon as a plank was glued in place, I would remove the tape, pop the keel out of the plug and check for any glue seepage before it became a problem. This routine saved my bacon on more than one occasion later on. Here you can see the blue painters tape with the fore part of the Garboard being fitted. Another thing I noticed by studying Maury’s log was just how far forward the Garboard strake went. Here you can see a close up showing that I have taken it almost to where the keel rises vertically. And here is a shot showing the entire Garboard strake in place. One problem I had with this version was that I no longer had enough sheet stock left to cut planks individually, so was limited to using some strip stock. All of this planking was done with 3/32” wide Boxwood strip (1/64” thick), with the exception of the Sheer strake, for which I used 1/8" wide strip stock. I found that once the planks were shaped, a quick dip in a glass of water (remember not to drink from THAT glass ) and the plank could be bent in the fingers roughly to final shape before fitting. The heat from the fingers and the thinness of the planks meant that they dried out during this process. Here’s a couple of pics of the second strake in place: And here is one showing the hull starting to take shape off the plug (remember to remove from the plug after EVERY plank to check for glue seepage). One important aspect with this style of planking is the bevel on the edge of the planks. Both mating faces need to be beveled and this is best achieved with a small sanding stick (I use a flexible one similar to a nail file) prior to final fitting. The other, somewhat more tricky part is to add the “rolling bevel”. This occurs at both ends of the strake, where the bevel is reversed to allow for the “gain”, which is where at both bow and stern, the planks cease to overlap and lie adjacent to each other. In this picture you can just make out the bevel on the upper edge of the second strake, with the rolling bevel occurring just as it rounds at the bow. Continued next post…..

-
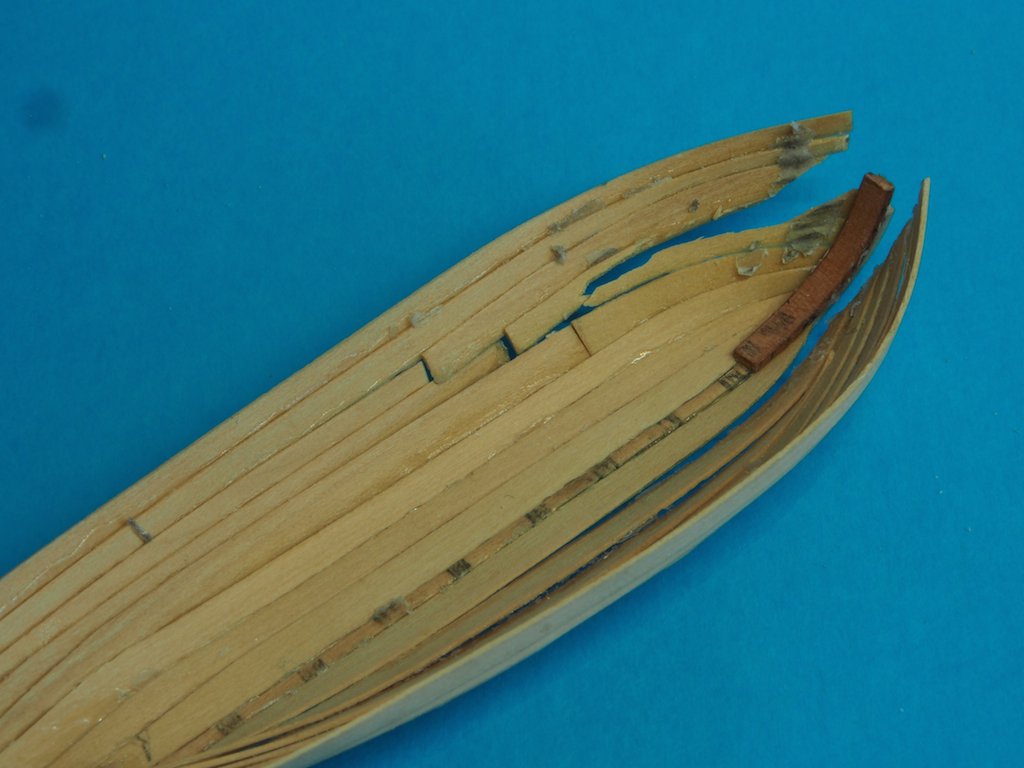
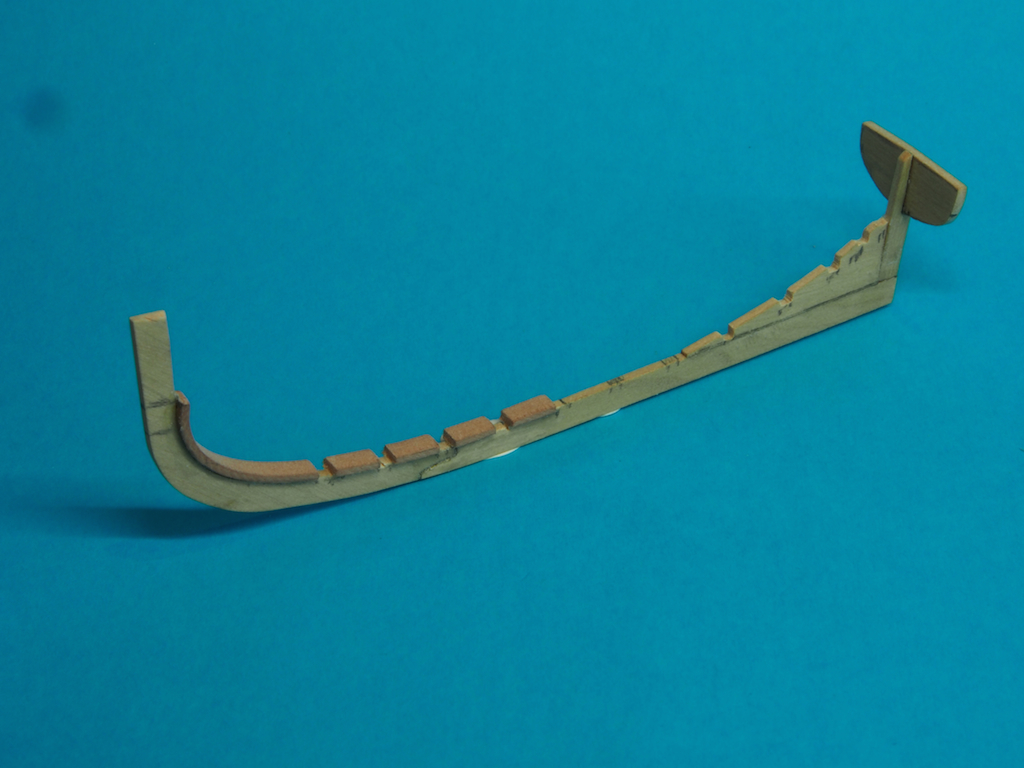
Thanks Augie, Remco, Mobbsie, Mark, Sjors, John, Leanne and Rich for your kind words of encouragement, and also to all of the “likes”. I’ve been quiet on this log for a couple of weeks, partly because I’ve been both back at work and back into hospital for some minor surgery (nothing serious), and partly because some more “learning” has taken place. It has taken me a while to figure things out and have some real progress to report, but here I am at last with some learnings to share and some progress to show. I will post this across three separate posts due to the number of photos (should keep “See Yours” happy ) 25' Cutters Ver 2.0 (continued) To start, picking up where we left off with Cutters Ver 2.0. Things got off to a promising start, however the further I went, the less satisified I was with the result – mainly with the way the run of the planks was working out. I think I just plain got the garboard wrong, and it just sort of gradually snowballed from there. A couple of things I learned along the way…… Lesson No.1 - because of the issues I was having with clamping, I decided to try using thick CA glue instead – never my preference as I tend to suffer an allergic reaction to it if I’m exposed to it for too long. Anyway, it seemed to work pretty well, and of course enabled work to progress a little more quickly than waiting for PVA to dry. Lesson No.2 - using at least two planks per strake makes it MUCH easier. Here is the result of one of the Ver 2.0 Cutters. In this photo, it doesn’t look too bad, but viewed from the side, the planks at the bow look pretty ordinary. I would probably have used this, had it not been for Lesson No.3….. Lesson No.3 – No matter how good your preparation, never trust that glue will not stick to your plug. Here is how the second Ver 2.0 Cutter came off the plug……… Lots of rude words out loud later……….. Thought about this for a couple of days and decided that a third attempt was called for. Much of my method for Ver 2.0 was okay, but needed refinement, so I decided to call the next version, Ver 2.5. 25’ Cutters Ver 2.5 The first thing I did was to modify the keel assembly. I decided to cut the keel in two pieces so that the stem was cut with the grain running diagonally for greater strength. I even managed to cut a scarph joint! I also decided to go back to my original idea of an extended apron that would become a hogging piece, with notches cut out for the frames. I also notched the stern deadwood for the frames. Here’s one of the new keel skeletons: I then decided to modify the plug by carving a groove for the keel/apron assembly: This made the keel assembly almost a “press” fit and certainly provided much greater lateral stability. Here is a picture of the new keel in the modified plug. In this picture the plug has been marked out for the run of the planks. This worked out to be reasonable guide. Continued next post…….


-
Fabulous picture Jack - you certainly are a very talented photographer. I showed my wife and she had only two words: "Oh wow!"
-
All progress is good John, no matter how small! Looking very nice too.
-
18' Cutter by Maury S - Scale 1:48 - SMALL
gjdale replied to Maury S's topic in - Build logs for subjects built 1751 - 1800
That's a great idea about wedging the keel in place from the opposite side Maury. I've been doing my own scratch version of this at a 1:90 scale with my own plug and have been having issues with keeping the keel in place. Your solution is so simply elegant and obvious, that I completely overlooked it. Thanks! -
Yep, great decision Sjors! It shows how far we've come as modellers when we can make these re-do decisions that easily. If you know in your heart that you won't be happy with it, then re-do now rather than regret later. Good for you. Now, my advice is SDH (Start Drinking Heavily)!!!! :P
- 1,616 replies
-
- 3
-
-
- caldercraft
- agamemnon
- (and 1 more)
-
That second set of bow blocks looks much better Mike.
-
Ray, I don't know how I missed this log, but have just spent a very enjoyable few hours reading it through from the beginning. What a marvellous job you are doing of her - you should be very proud! I noticed that there are still a few pictures missing from pages 7 and 10 (no doubt from the server glitch a while back). I look forward to following your progress from here.
- 536 replies
-
- 1
-
-
- diana
- caldercraft
- (and 1 more)
-
18' Cutter by Maury S - Scale 1:48 - SMALL
gjdale replied to Maury S's topic in - Build logs for subjects built 1751 - 1800
Nice start Maury. Think I'll pull up a chair for this one. -
That's a mighty impressive piece of edge bending Bob! Did you use a former of some sort for this as well, or just water and the electric bender?