HOLIDAY DONATION DRIVE - SUPPORT MSW - DO YOUR PART TO KEEP THIS GREAT FORUM GOING! (Only 24 donations so far out of 49,000 members - C'mon guys!)
×


gjdale
-
Posts
4,891 -
Joined
-
Last visited
Content Type
Profiles
Forums
Gallery
Events
Everything posted by gjdale
-
 Great to see you got your new thread from Chuck, Jesse. I can assure you that it's a delight to work with. I might suggest you remove that first picture (package with your address) though as it contains more of your personal details than you should be comfortable with......
- 607 replies
-
- 1
-

-
- scottish maid
- artesania latina
- (and 1 more)
-
Nice to see the rigging gnomes back at work Sjors. Now that you're all refreshed after your holiday, I expect we'll see this one finished in no time!
- 1,873 replies
-
- 2
-
-
- occre
- san ildefonso
- (and 1 more)
-
straight mill vs. mill/drill combo.
gjdale replied to rtropp's topic in Modeling tools and Workshop Equipment
Richard, If you go with the Sherline mill, one of the accessories you can buy is called a "sensitive drilling attachment". This would overcome your issue as you simply pull down on the attachment to drill. It's designed to take very small drill bits. Here's a link: http://www.sherline.com/1012pg.htm The Sherline is a top notch machine and highly regarded by many modellers. I have one and love it. Hope this helps.- 1 reply
-
- 2
-
-
Very nice Mark. Sometimes the simple solutions really are the best!
-
Welcome home Sjors. Looking forward to seeing pictures of both your trip AND progress on your ships.
- 1,616 replies
-
- 1
-
-
- caldercraft
- agamemnon
- (and 1 more)
-
Fantastic Michael! You must have been tickled pink to see her floating. Can't wait to see her under full sail!
-
That looks fabulous Michael!
-
Good to see work on you Vic underway again Kevin. A tedious re-do job, but you'll be very pleased you did once it's complete. Hang in there!
- 1,319 replies
-
- 2
-
-
- caldercraft
- Victory
- (and 1 more)
-
Mick, Happy Birthday! Be prepared to fall in love with this machine! His disc sander is also a wonderful piece of machinery and well worth the investment.
-
Ah, I see you're a quick study Maturin - you'll do well in this Hobby. Don't forget, when discussing the cost of kits, tools etc with your wife, to amortise the cost over the time taken to build, and then compare that to other past times, like golf for instance. Your wife will be very appreciative of the economical hobby you have chosen and funds will be released immediately!
-
I'm with Michael on this one - bribery goes a long way!
-
ancre LE BONHOMME RICHARD by Jeronimo - FINISHED
gjdale replied to Jeronimo's topic in - Build logs for subjects built 1751 - 1800
That is just stunning Karl - I can't find the words to express my amazement and appreciation for your skills.- 662 replies
-
- 2
-
-
- bonhomme richard
- frigate
- (and 1 more)
-
HMS Druid by Krug - FINISHED - 1:48 - Hahn
gjdale replied to kruginmi's topic in - Build logs for subjects built 1751 - 1800
Well done Mark - she looks terrific. Looking forward to the figurehead after you've had your break. -
Nice catch and recover Toni
-
Lovely work on the rudder Jack.
-
Great news Kevin (or should that be Buzz? ) I look forward to the next update.
- 1,319 replies
-
- 1
-
-
- caldercraft
- Victory
- (and 1 more)
-
Thank you Mark for taking the time and trouble to share these details with us. I'm shamelessly copying your drawings and filing them for later use!
-
Beautifully done Mark. Love that scarph jig - do you have any more details (pictures or drawings) of how it is constructed?
-
Joe, If you search for "HMV card models" you should get plenty of hits. Here's one: http://www.kartonmodellbau.de/en_GB
-
Hi Boyd, Just paying you a return visit, and glad I did. Looks like you've made a really nice job on the hull planking there. It's always more challenging when you choose a natural timber finish - no chance to hide mistakes under a coat of paint! Keep up the great work.
-
Some good progress there Leanne - almost there! How do the chooks like their new palace?
-
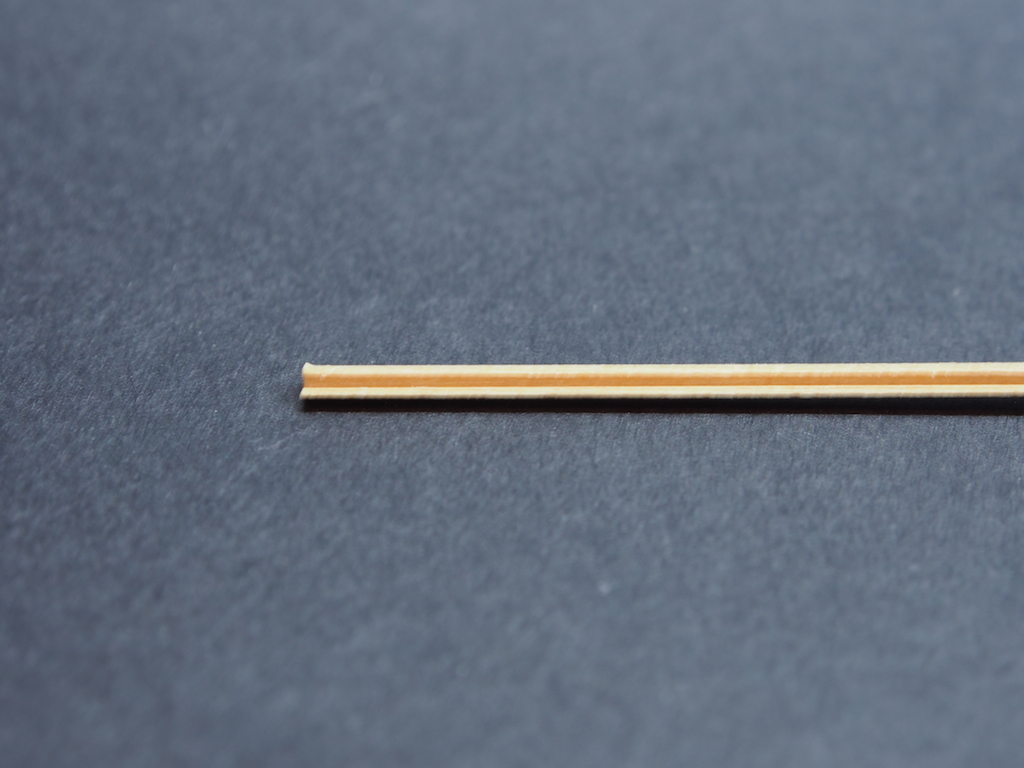
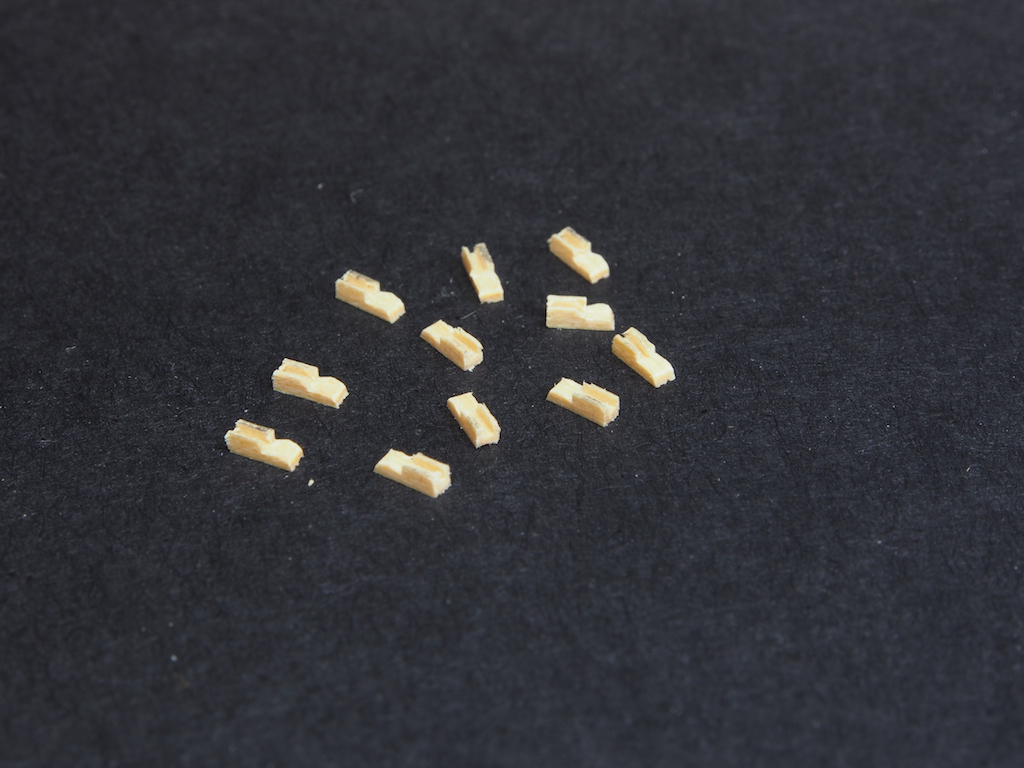
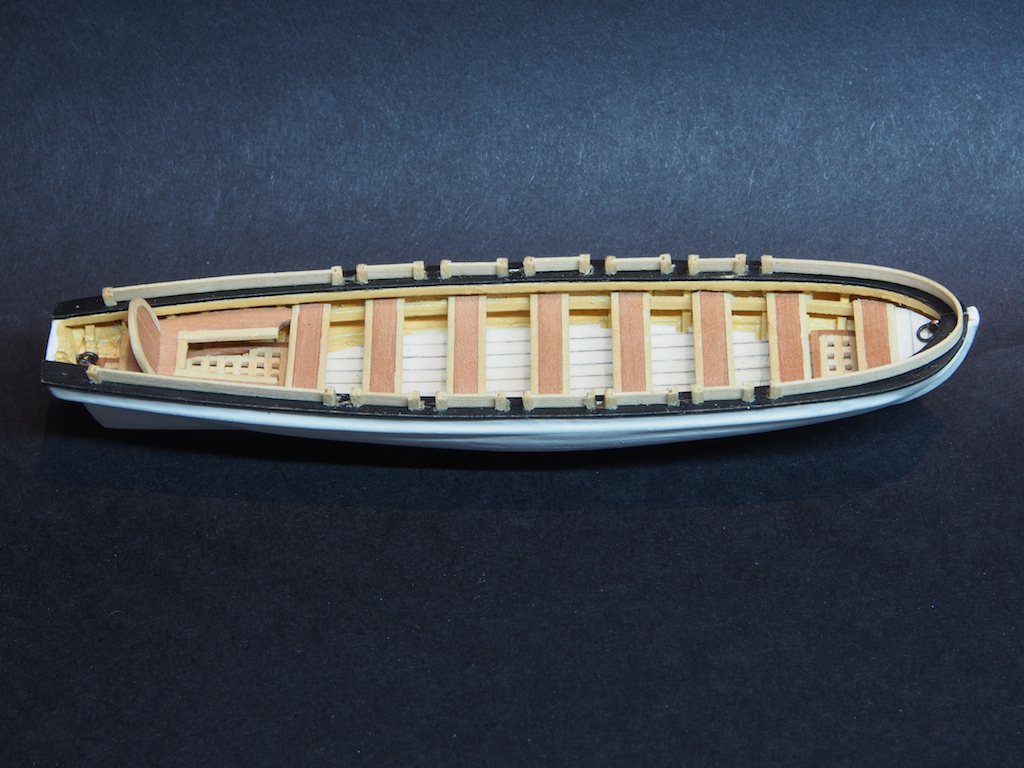
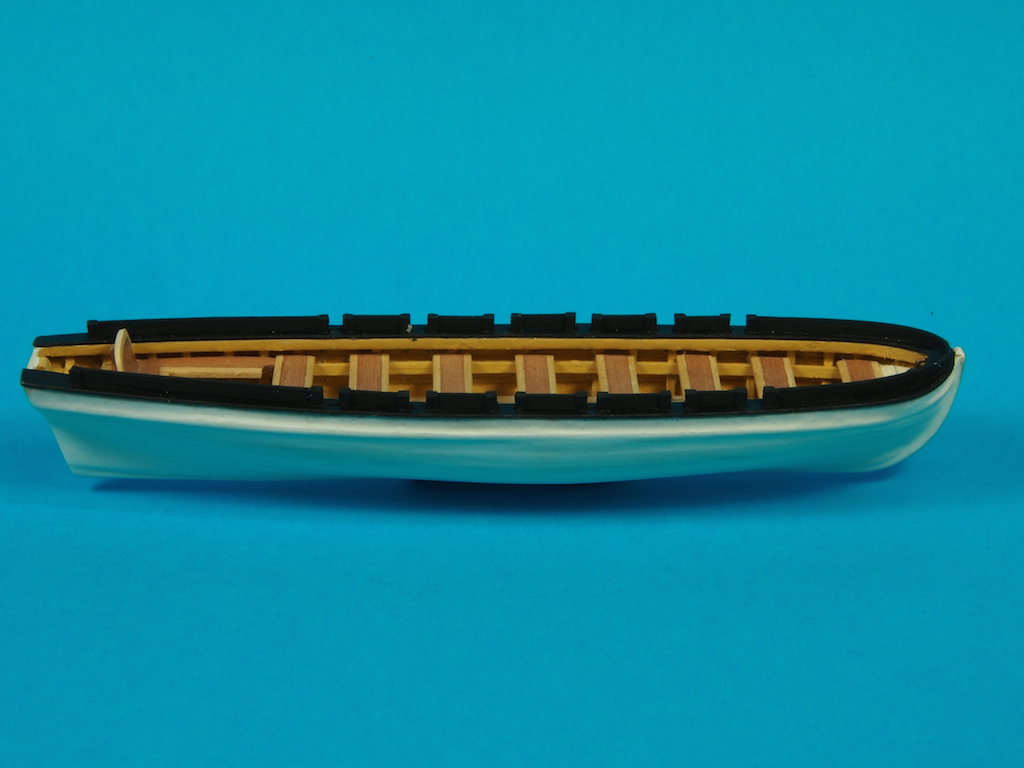
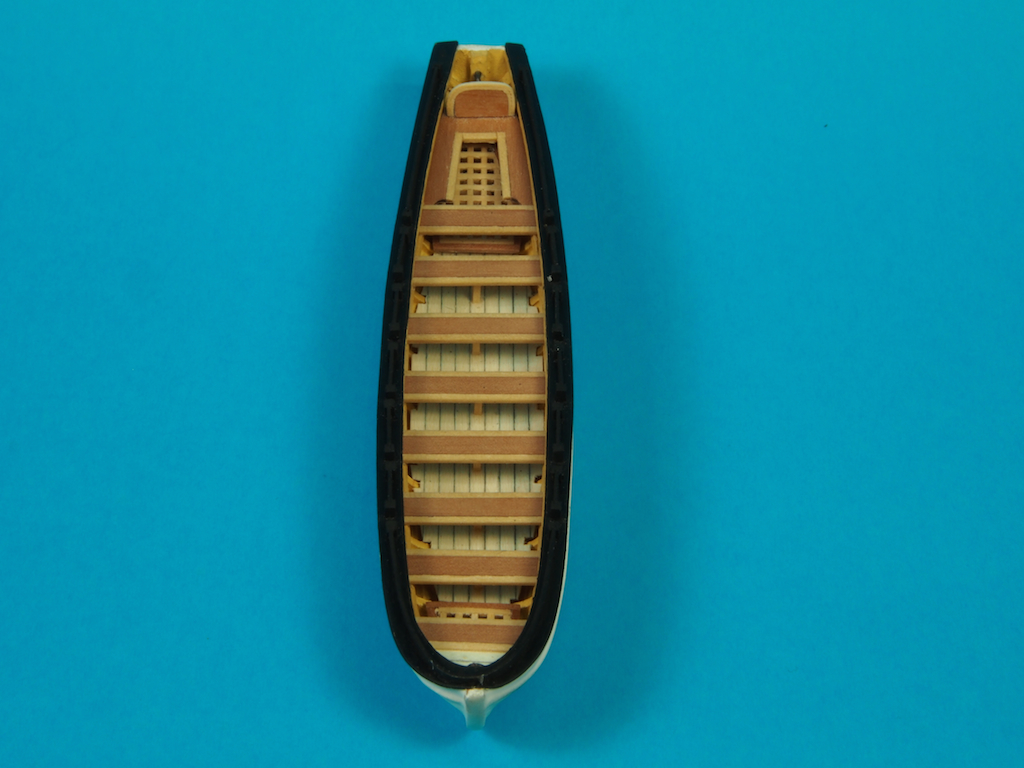
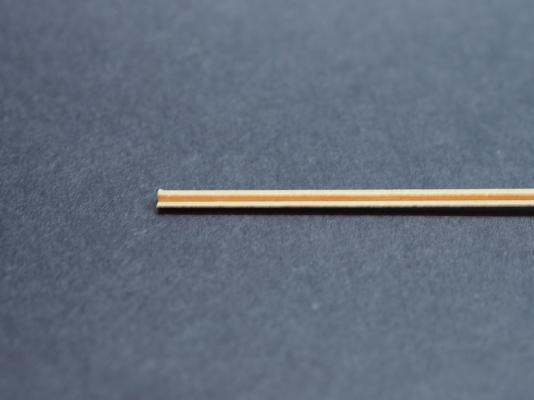
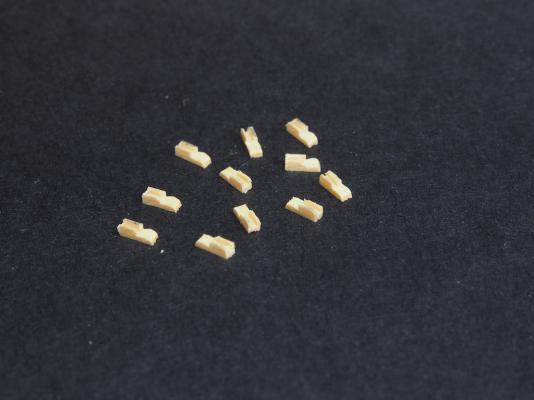
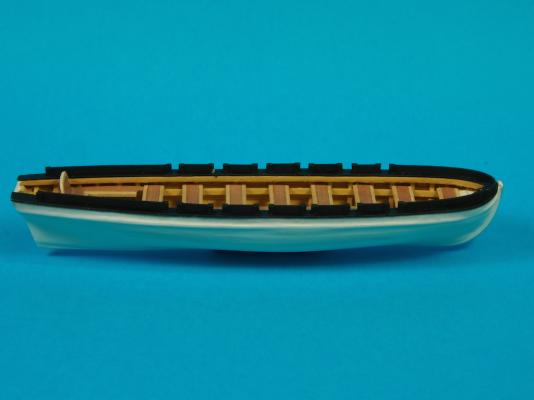
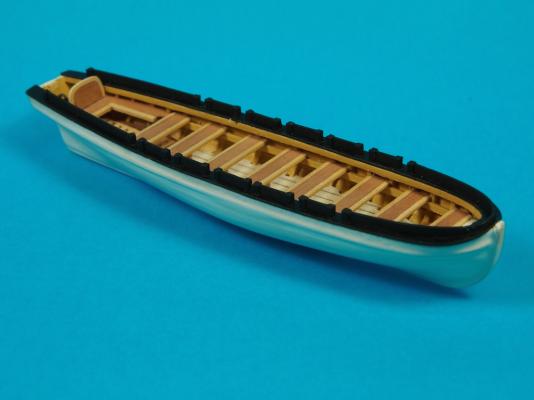
Thanks very much for the kind comments Sherry, JesseLee, Ben, Bindy, Mark, John, Keith and Mike. And thanks again to all of the "likes". Ship's Boats continued.... This weekend I tackled the task of making Oarlocks and Splashboards for the Pinnace. The oarlocks were quite tricky. I started with a strip of 3/64" sq Boxwood stock, into which I cut a 1/64" rebate, about 1/64" deep using the Brynes saw : Then I made up a simple jig to use on the Byrnes saw that would enable me to cut a tenon-like leg for each of the oarlocks before separating it by hand from the main stock. Here's what they look like before cleaning up: These were then installed into the Caprail and 1/64" x 1/16" Boxwood strips added for the washboards. I decided to make the bow washboards one continuous strip that was bent around the bow after soaking, and once dry the underside was sanded and shaped to fit the shape of the sheer line. On the real thing, all of the washboards apart from the bow and aft-most ones were removable. I decided to glue mine all in so that they didn't accidentally remove themselves later on. Here they are in place: I should perhaps have painted all of these parts before installing them, but I was worried that the paint would clog up the channels in the oarlocks and make the washboards too hard to fit. So, I had to paint them in situ. I also decided that I wasn't completely happy with the seat back I had made for the Sternsheets (the proportions looked wrong to me), so I decided to make another one. Here are a few pictures of the completed Pinnace (I don't intend to make oars or rudder). To continue my experimentation with photography, this time I've use a mid-blue background so that the black-painted parts don't get lost. Next up, back to the Cutters........


-
Can't help with a manual, but I thoroughly recommend checking out this video on YouTube. If you search for Alex Snodgrass Bandsaw Clinic, you will find that this video provides all the information you need to set up your bandsaw correctly, regardless of brand. I've pasted a link below, but if it doesn't work, just search in Google and it will come up.
- 1 reply
-
- 1
-