


gjdale
-
Posts
4,894 -
Joined
-
Last visited
Content Type
Profiles
Forums
Gallery
Events
Everything posted by gjdale
-
 Hi Mike, Thanks for dropping by. I haven't done the quarter davits yet. Still considering how I will tackle this one as I agree the kit instructions are somewhat lacking here. I will probably be guided by Longridge for this aspect.
 -
Looking good Sean, Your decision on treenails was a good one in my opinion. The Danish oil seems to come up very nicely too, Re your canon question, it is the canons that sit on carriages you need to be careful with. Those with only dummy barrels will be able to be fitted into the gun port frames easily from the outside (though I would check the fit of the dummy barrel flange into the metal hole for each frame before fitting to the hull). Those that are on carriages and will later be covered by another deck are the ones to fit early. The instructions suggest that these can be fitted through the gunports from outside. They can't. Now is also a good time to make sure your gunports are set at the right height. I understand that you are going to go ahead with the supplied metal gunport frames, but don't trust the notches on the frames as a height guide. I suggest you make up a gun/carriage assembly and use this to ensure each port is at the right height. Keep up the great work - it's looking really good.
-
Great work Sjors, You'll be finished this one in no time. Oh wait........I seem to recall that the Sjors shipyard will be commencing work on the Aggy from 01 Jan 14......maybe this one will take a little longer then
- 1,873 replies
-
- 2
-

-
- occre
- san ildefonso
- (and 1 more)
-
Barry, Your are in luck. I've sent them to you in a PM.
-
Thanks Jeff, John, and B.E. B.E. - Thanks so much for your excellent response with so much information. I was hoping I could rely on you to provide an authoritative response and you didn't let me down I posted the question separately for the benefit of others who may not be following this log, so the answer you provided there will hopefully help many others as well. The link to the online version of Steel is particularly helpful. I'm going to give this a little more thought now before finally deciding which way to go regarding Brace Pendants. I'll also consider how I will display the Yard Tackle Pendants - tricing them up might be the way to go. Thanks again for the input B.E. - that really has helped remove the confusion - possibly more than you could know!
-
Thank you so much B.E.! Once again you are a font of information - that all actually makes sense! Thanks also for the online link to Steel. I'll give this some more thought now as I'm still at a point where I can change my mind........hmmmmmmmmmm............
-
Barry, I think I may have a copy of these on my other computer. I'll check tomorrow and send you a PM if I have any luck.
-
This post is intended for anyone who has built, is building, or is contemplating building HMS Victory, whether in kit form or scratch built. Others with an interest in Rigging generally may also like to chime in. I've come across an interesting conundrum regarding the rigging of Victory that other Victory builders may be interested in. I spent several hours poring over documentation to try and work out the use of Yard Tackle Pendants and Brace Block Pendants. I consulted several sources, but my primary reference for any assertions here is Longridge. I also sent a PM to Gil Middleton to seek advice on his approach to this aspect - his reply is posted within Gil's own log (as we had a problem with the PM system), so I won't repeat it verbatim here. First up, as far as I can tell, Yard Tackle Pendants are only used on the lower yards of the Main and Fore Masts. Longridge talks of these in the text descriptions for each of the yards, and this is matched by the drawing of the Running Rigging by Campbell (Plan No. 7 in Longridge). Secondly, I don't believe Pendants were used for Braces except for the Cross Jack Yard. Longridge specifically states (pg 258), in his description of the Cross Jack Yard, that "Here is the only place in the ship where Brace pendants are employed." I also checked over McKay's AOTS book, and as vague as it is, it does seem to match Longridge as well, with the exception that it does not show brace pendants for the Cross Jack Yard. I got terribly confused by all of this as Antscherl (in TFFM) employs brace pendants on all yards, and although he shows the Yard Tackle Pendants, he doesn't say much about them. The Mamoli kit plans, as bad as they are, actually do match Longridge (now there's a turn up for the books!), with the exception of the Cross Jack Yard Brace Pendants, and belaying of the yard tackle pendants. I got further confused when I looked back over Gil's excellent log, where he has employed brace pendants on all of the upper yards. So I asked Gil about his sources and choices. Gil's response was (in essence) that the Jotika plans showed them this way, and that this matches his photographs of the actual ship (see Gil's log for these photos). He opined that Longridge was basing his version on the 1922 restoration and that this may have been different to the more recent restoration to (supposedly) the "Trafalgar" state of the ship. Gil also quite correctly points out that different Captains changed rigs to suit there personal preferences, so unless we can go back and interview Captain Hardy, we might never know for certain. In the meantime, Gil has chosen to stick with the Jotika/Trafalgar restoration version, and I have decided to stick with the Longridge version on the basis that if Longridge is wrong, then I'm happy to be wrong with him. I've also been confused by the belaying of the Fore Lower Yard Tackle Pendants. Longridge, in the text (pg 242), is quite vague saying, "The pendant...is a 7-in rope with its lower end spliced round a 13-in double block which is connected by its 3 1/2-in fall to a 13-in single block which hooks on to an eyebolt in the side of the deck." In the diagram (Plan No.7) "the side of the deck" seems to translate to the Fore Channel, and this matches the drawing in McKay (pg 109), though neither actually show the final belaying point clearly. In checking the text again, Longridge's Belaying Plan (Plan 10, pg 266) and his Table of Belaying Points (pg. 270) both show that it belays to the "7th timber head, side of forecastle". But this raises another question for me - how does the line get to this belaying point without going through the shrouds/ratlines and/or the hammock netting and consequently becoming fouled? It would make more sense to me to belay it on the Fore Channel, outside the shrouds, as seems to be indicated by all of the diagrams. Does anybody have an opinion on this? For interest, general discussion and further opinions as appropriate.
-
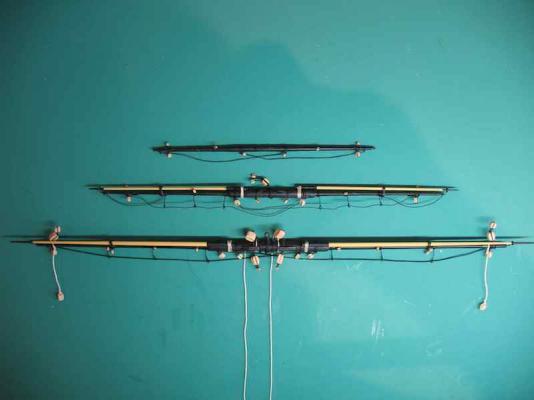
I've been battling with a persistent virus for the past two weeks, so progress hasn't been as fast as I had hoped for this holiday period. That seems to be a regular pattern for me of late - too busy while working to get sick, so get sick as soon as I stop and relax! I have however, finished fitting out all of the yards for the Main mast, so they are ready for installation to the ship. Just the one pic to keep you-know-who happy I've also come across an interesting conundrum regarding the rigging of Victory that other Victory builders may be interested in. I spent several hours poring over documentation to try and work out the use of Yard Tackle Pendants and Brace Block Pendants. I consulted several sources, but my primary reference for any assertions here is Longridge. I also sent a PM to Gil Middleton to seek advice on his approach to this aspect - his reply is posted within Gil's own log (as we had a problem with the PM system), so I won't repeat it verbatim here. First up, as far as I can tell, Yard Tackle Pendants are only used on the lower yards of the Main and Fore Masts. Longridge talks of these in the text descriptions for each of the yards, and this is matched by the drawing of the Running Rigging by Campbell (Plan No. 7 in Longridge). Secondly, I don't believe Pendants were used for Braces except for the Cross Jack Yard. Longridge specifically states (pg 258), in his description of the Cross Jack Yard, that "Here is the only place in the ship where Brace pendants are employed." I also checked over McKay's AOTS book, and as vague as it is, it does seem to match Longridge as well, with the exception that it does not show brace pendants for the Cross Jack Yard. I got terribly confused by all of this as Antscherl (in TFFM) employs brace pendants on all yards, and although he shows the Yard Tackle Pendants, he doesn't say much about them. The Mamoli kit plans, as bad as they are, actually do match Longridge (now there's a turn up for the books!), with the exception of the Cross Jack Yard Brace Pendants, and belaying of the yard tackle pendants. I got further confused when I looked back over Gil's excellent log, where he has employed brace pendants on all of the upper yards. So I asked Gil about his sources and choices. Gil's response was (in essence) that the Jotika plans showed them this way, and that this matches his photographs of the actual ship (see Gil's log for these photos). He opined that Longridge was basing his version on the 1922 restoration and that this may have been different to the more recent restoration to (supposedly) the "Trafalgar" state of the ship. Gil also quite correctly points out that different Captains changed rigs to suit there personal preferences, so unless we can go back and interview Captain Hardy, we might never know for certain. In the meantime, Gil has chosen to stick with the Jotika/Trafalgar restoration version, and I have decided to stick with the Longridge version on the basis that if Longridge is wrong, then I'm happy to be wrong with him. I've also been confused by the belaying of the Fore Lower Yard Tackle Pendants. Longridge, in the text (pg 242), is quite vague saying, "The pendant...is a 7-in rope with its lower end spliced round a 13-in double block which is connected by its 3 1/2-in fall to a 13-in single block which hooks on to an eyebolt in the side of the deck." In the diagram (Plan No.7) "the side of the deck" seems to translate to the Fore Channel, and this matches the drawing in McKay (pg 109), though neither actually show the final belaying point clearly. In checking the text again, Longridge's Belaying Plan (Plan 10, pg 266) and his Table of Belaying Points (pg. 270) both show that it belays to the "7th timber head, side of forecastle". But this raises another question for me - how does the line get to this belaying point without going through the shrouds/ratlines and/or the hammock netting and consequently becoming fouled? It would make more sense to me to belay it on the Fore Channel, outside the shrouds, as seems to be indicated by all of the diagrams. Does anybody have an opinion on this? I hope to install the Main mast yards tomorrow.
-
Rusty, I'm no expert by any stretch of the imagination, but I would offer this additional thought for you. Turning very small wooden parts in a wood lathe, using hand held tools, is a very delicate (and difficult) operation as just a tad too much pressure will destroy the part in the blink of an eye. If you use a metal lathe, the tools are held in the machine and applied with great control, making the manufacture of small parts so much easier. So it's not a question of, "how much metal would I turn", but more one of, "how much control of the tool do I need?". I know the outlay cost is more, but you will remember the quality of the Sherline long after you have forgotten the price. Hope this helps.
- 421 replies
-
- 3
-
-
- granado
- bomb ketch
- (and 2 more)
-
ROYAL CAROLINE 1749 by Doris - 1:40 - CARD
gjdale replied to DORIS's topic in - Build logs for subjects built 1501 - 1750
Wonderful to see you back at MSW Doris; we have all missed you and your exquisite work. Thank you so much for these recent photos - what a delight! I do hope you are now over your health problems, and as others have said, ignore the small-minded jealous bigots - you have many friends and admirers of your work from all over the world, right here at MSW.- 883 replies
-
- 3
-
-
- royal caroline
- ship of the line
- (and 1 more)
-
Well done Jeff. I'd read that post on making eyes and wondered how it would work - very well it would seem!!!
-
Hi Sean, Good to see your build log started. You'll find no shortage of advice here from the many Victory builders. Take your time, read the instructions well ahead of where you are at and plan your next moves carefully. That way you will avoid most of the obvious traps with this kits instructions. If you don't already own a copy, I strongly recommend obtaining "The Anatomy of Nelson's Ships" by C. Nepean Longridge - it is the "bible" for modelling this ship, and you will find it indispensable once you get to the rigging. Re coppering, I chose to use the kit provided "green bits" and found it provided an acceptable result. If I were starting over, I'd probably go the copper tape route as suggested above. Re your question, it's that long ago that I did this step that I can't actually remember how I approached it, but I think your idea of planking the deck before installing the grating and ladders makes sense and would avoid potentially very thin strips around the coamings. Again memory is failing me, but I think you will need to install the false decks before planking them. Hopefully someone with more recent experience of this stage will chime in here.
-
More stunning work Gaetan!
-
Have to agree with the others Kevin, I think you are being overly harsh on yourself. The work you have done on your Victory to date has been top notch, and when you have done a "re-do", the results have been well worthwhile. And we all have re-dos!!! Similarly, your work so far on Bismarck has been very good. Striving for perfection is one thing, but don't let aspirations for perfection get in the way of enjoyment and satisfaction from things that maybe just short of perfection - that way lies disappointment and frustration. You are a very capable modeller who turns out very good work and who is learning and improving all the time. Just like the rest of us. That's why we are here on this forum - to learn, grow and develop our skills.........and to support each other through the tough times. Now, get back to work!!!
- 384 replies
-
- 10
-
-
Hi Gil, Thank you so very much for your detailed reply to my query, though I have no idea what might have happened within the PM system. Your reply certainly answers the question as to why the differences among sources, even if we can't be definitive about which is "correct". I also think you are right in saying that so much depended on the whim of the Captain at the time. Having mulled this over for a few days now, I have come to the decision that I will stick with Longridge. If he is wrong, then I'll be happy to be wrong with him. Thank you again for sharing your thoughts and sources. This is one of the great strengths of this forum, that we can share our collective knowledge and research. Cheers, Grant
- 755 replies
-
- 5
-
-
- finished
- caldercraft
- (and 1 more)
-
Thanks Keith and Gary. Keith - I think that Janos has done/is doing a carving of the old Victory figurehead. I have some photos if you're interested - just PM me and I'll send them to you. Gary - TFFM refers to the four part book series, The Fully Framed Model, by David Antscherl. While specifically about building a model of a Swan Class Sloop, it is a very good general reference set. Volume four deals with rigging. The while set is very well written and relatively easy to understand. He is quite meticulous about reference to primary sources. As I mentioned, while there are some differences between the rigging of a sixth rate sloop and a first rate, those differences are relatively few and the principles and techniques discussed by Antscherl are equally applicable to both (in general). Longridge remains my primary source of guidance, but Antscherl often helps me to understand Longridge. Hope this helps you.
-
Hi Gil, Just wondering if you'd seen the PM I sent you the other day? Please forgive me for pestering you - I know it can get pretty hectic this time of year. Cheers, Grant
-
Glad to hear you're okay and ready to resume in the shipyard Andy.
- 382 replies
-
- 1
-
-
- stadacona
- sylvan scale models
- (and 1 more)
-
Thanks Jeff, Lawrence, B.E. and Sjors, and all those who "liked". Your support and encouragement really helps keep me going through this tedious stage. Sjors, as I said in my earlier post, there is no tension on the lifts or tyes of the topmast and topgallant yet as there is no counter tension to stop the yards sliding up the mast. That will come when further rigging, such as braces, has been added. I have almost finished fitting out the Main lower yard. Expect to complete that and possibly the Main topmast yard and Main topgallant yard today. Will post an update when those are completed. The end is creeping inexorably closer!
-
Personally, I blame the salami sandwich!!! Great that you caught the error in time though Augie - much easier to do the re-do BEFORE it is attached to the ship
- 2,191 replies
-
- 5
-
-
- confederacy
- Model Shipways
- (and 1 more)
-
Glad to hear that you solved you copper plate cutting quandary Jeff. Nice progress.
-
Hi Wayne, After seeing this model in the background on Skype earlier today, I just had to drop in and read the log. Looks like a really interesting little build - and nicely done so far. I'll certainly follow from here.
-
Hi Wayne, Great to meet you on Skype today. Your Harriet Lane is looking superb - obviously worth the effort of the research and re-dos. Looking forward to seeing you bring her to completion.
-
Nate, I'm not familiar with Gorilla wood glue, but if it is a PVA glue, then apply some isopropyl alcohol to the glue for a while first and it should come apart quite easily. You might try soaking some paper towel in the alcohol and clamping that around the joint to help it soak in too. If you're not familiar with isopropyl alcohol I suggest you get acquainted with it real quick - it will become your best friend. Over here you can buy it in the hardware store by that name, otherwise look in the chemist for Rubbing Alcohol. 100% is best, but diluted forms (like Rubbing Alcohol usually is) works okay too. Once you've got the pieces apart, you'll need to straighten the warpage. You might try wetting the timber and clamping it between two boards, or placing it under a heavy weight, and let it dry overnight. Good luck.
