gjdale
-
Posts
4,894 -
Joined
-
Last visited
Content Type
Profiles
Forums
Gallery
Events
Everything posted by gjdale
-

Echo by Maury S - FINISHED - Cross-Section
gjdale replied to Maury S's topic in - Build logs for subjects built 1751 - 1800
Very nicely done Maury. -
And then you can add the currency exchange rate as well. When I bought my Byrnes tools a couple of years ago, the Australian dollar was at parity or slightly better against the Greenback - in fact it was about US $1.05. I knew that situation wouldn't last so I went ahead and bought a LOT of stuff from O/S at the time (including my Sherline stuff as well). I'm so glad I did as the Australian dollar is now trading at around US $0.70 - that actually represents a further 50% to the price for us, including on the already exorbitant postage rates!!! The worst part is, I can't see any change in the exchange rate coming in the near future - at least not in a favourable direction for us. Okay, rant over. I'll get my coat and leave now.....
-
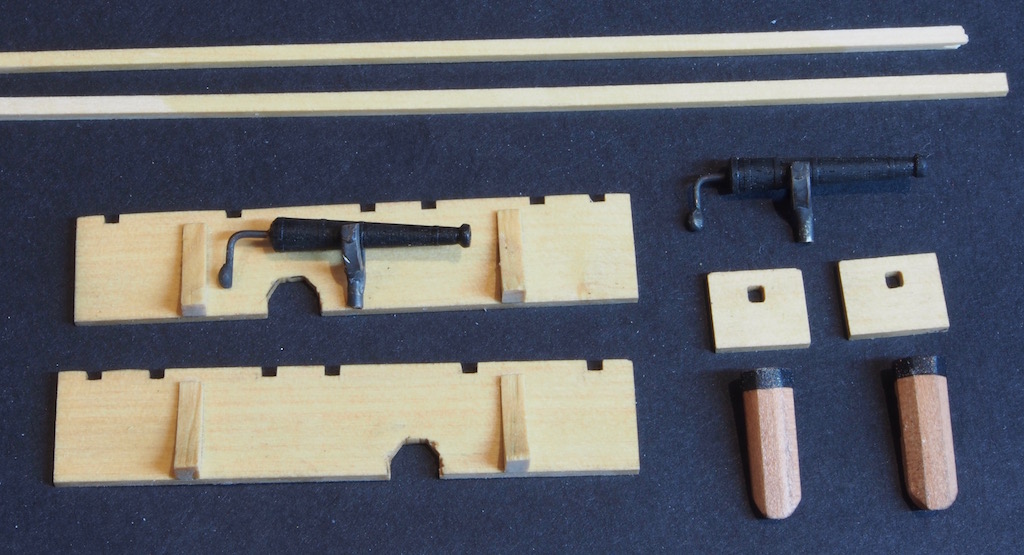
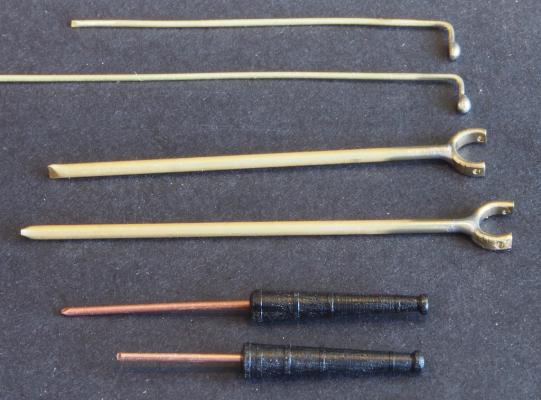
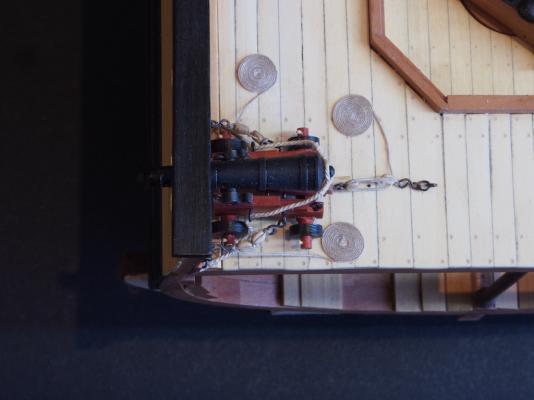
Thanks again for all the kind words and "likes". Some more progress to report.... Swivel Guns and Channels The Swivel Guns were made from 1/4” square Ebony stock, turned on the lathe and once again using the compound slide to achieve the taper. The only difficulty encountered was due to the very small size (19mm long and 3.8mm in diameter at the widest point, narrowing to 2mm at the narrowest). I copied the plan into my CAD program and painstakingly took off measurements for all the re-inforce rings............and then cut them by eye! The mounting yoke is a “U-shape” atop a central pedestal. To manufacture these, I hammered flat some 1.5mm diameter brass wire and then formed it around a 5/32” (4mm) brass rod. It was then transferred to a wooden dowel of the same diameter, squeezed tight, and then a 0.8mm hole was drilled right through the brass and dowel to take the subsequent “axle” pin for the guns. The piece was then removed from the dowel, the ends trimmed as close as possible to the cross-holes, and a 1.5mm diameter brass rod “handle” was then silver soldered to the base of the “U-shape”. The “handle” was left extra long for ease of handling. The swivel gun handle was formed by bending a piece of 0.8mm diameter copper wire to 90-degrees and then placing a “blob” of silver solder on the end. Again, the part was left extra long for ease of handling. Here is a photo of all the manufactured parts of the swivel gun prior to blackening of the metal components. The pedestals for the Swivel guns were made from3/16” square Pear stock. First the corners were chamfered with a miniature plane to create an octagonal section, and then the end was drilled to receive the mounting yoke stem. The pedestals were then notched to fit over the cap rails, and finally a strip of black paper was added to simulate an iron band around the top. The channels were cut from 1/16” thick Castello Boxwood, with 1/16” wide notches cut on the mill. A cut-out was also shaped to fit around the Swivel gun pedestals. The Swivel guns were then assembled by epoxying the handle into a pre-drilled hole in the base of the gun, and inserting a 0.8mm copper wire through the yoke and the gun. This was epoxied in place, and once dry, the ends of the copper wire were snipped close and filed back to the just proud of the yoke surface. Some of the blackening had by this stage rubbed off, so I tried an experiment of blackening "in-situ" with Jax Pewter Black. I have become a big fan of this product, ever since I discovered (read somewhere, can't remember where) that it is best used undiluted and applied with a paint brush (after the usual cleaning routine). It is then rinsed with distilled water. On this occasion, I washed (ie with a paintbrush) all of the metal parts again with vinegar, washed again with water, then painted on the Pewter Black again, and washed with water. It seems to have worked well and had no adverse effect on the Ebony timber. Here is a shot of all of these components, including the now assembled swivel guns. These will not be mounted in their pedestals until the build is finished, in order to protect them from clumsy hands! Finally, here is a close-up “zoom and crop” of a completed Swivel gun – complete with scarred iron-work! Next up, Deadeyes and Chain Plates…..


- 456 replies
-
- 15
-

-
- finished
- bomb ketch
- (and 2 more)
-
Fabulous work Dan. She looks terrific. I'm sure your customer will be delighted.
- 108 replies
-
- 4
-
-
- andrea doria
- ocean liner
- (and 1 more)
-
Great results Mobbsie. Looks like a very practical and easy to use method.
- 129 replies
-
- 3
-
-
- armed launch
- panart
- (and 1 more)
-
John, Ultimately it's your decision to make. But I would ask myself, just how much is this going to bother me down the track? If the answer is, "not at all", then leave it as is. However, I suspect that this is not the case, else you wouldn't have asked the question...... In my experience, taking a few extra days now to fix something to your own satisfaction, and while it is still accessible, is well worth the extra time and effort. Your call my friend.......
-
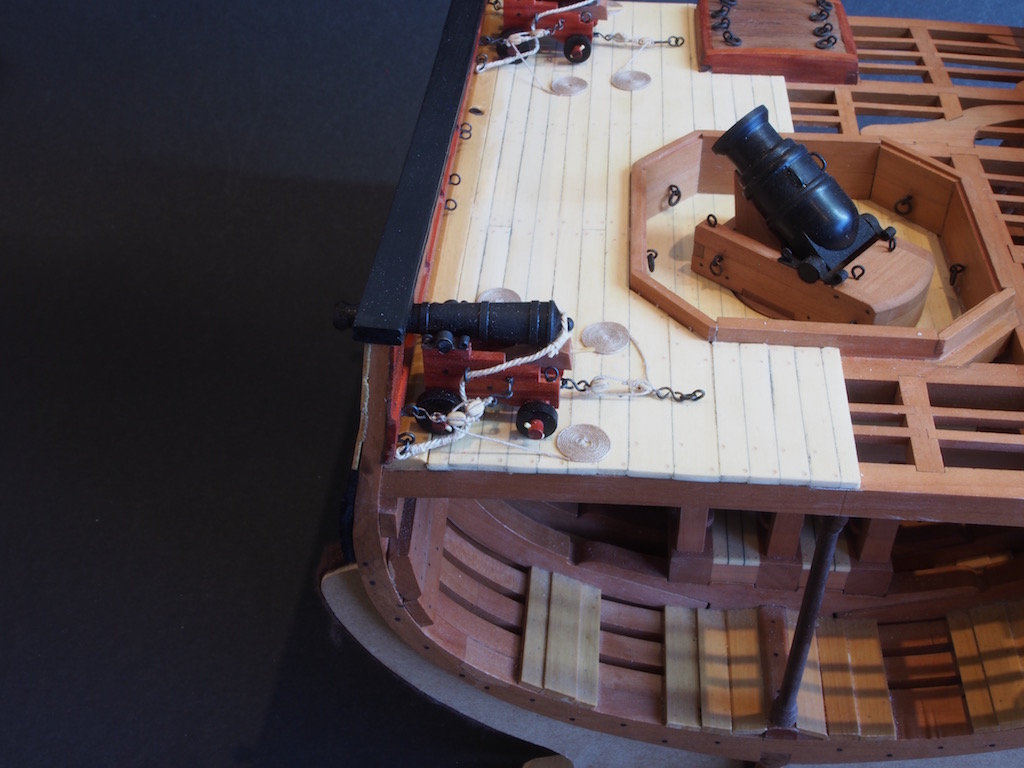
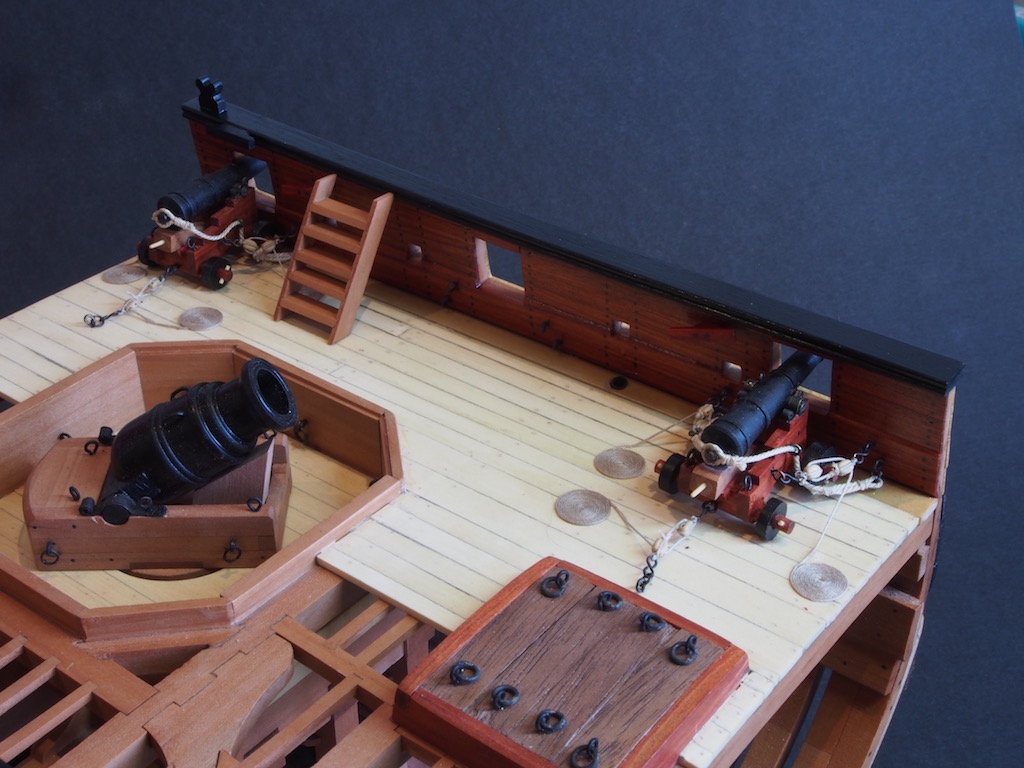
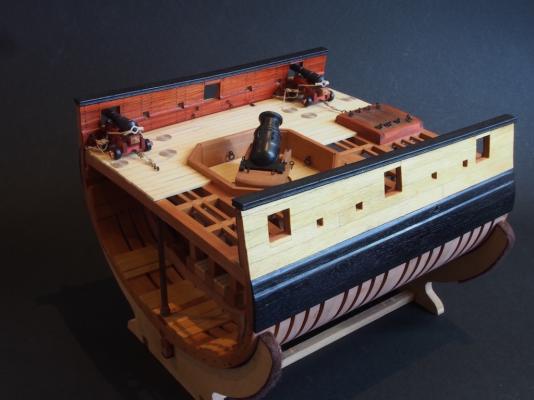
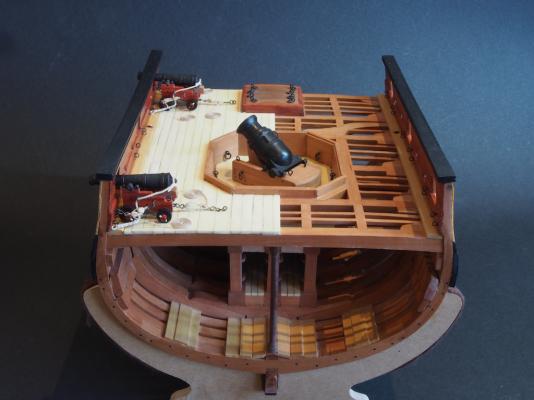
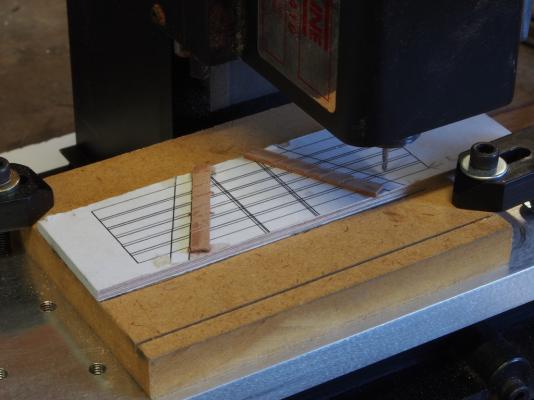
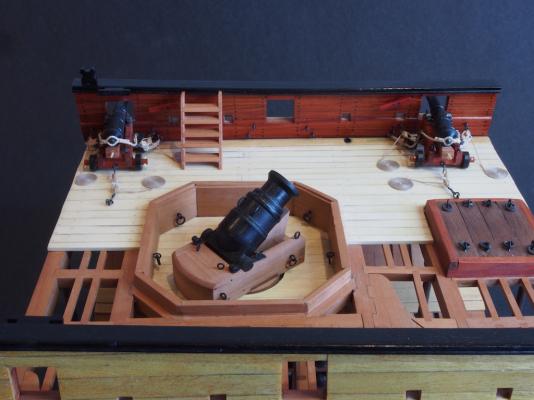
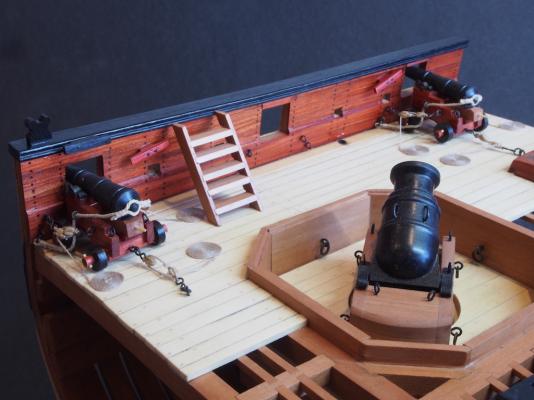
Thanks for all the kind comments and encouraging words folks, and for all the "likes". First up, a confession.... I've been holding off on updating for a little while, as I've been in a bit of a quandary about what to do about the guns. On the one hand, Danny was kind enough to give me two of his Russian-made guns, which are quite exquisite and match the scale pretty nicely. On the other hand, I was very pleased with my own attempts at turning the guns. So which to use..... The Admiral was consulted and she was quite firm that my own guns would be more in keeping with the rest of the project. So, I dropped Danny a quick note and of course he was cool with that decision. Happy days! On with the show.... 4lb Guns (continued) The cap squares were made from slices of 0.05mm Brass strip, bent around a brass rod former, then drilled to accept the pin on the forward edge. An elongated hole was drilled for this purpose. The pins were made from some left over “dog bone” shroud fasteners from a previous kit. These had the advantage of being flat rather than round, and I simply cut them in half and inserted them in the elongated holes. Hinges at the aft end were simulated by gluing in place a tiny section of brass tube. The cap square pieces were all chemically blackened prior to final assembly. To rig the guns, eye bolts and hooks were made from brass wire, and then chemically blackened. Although 2.5mm blocks would have been more correct for scale, I opted to use 3mm blocks to save my sanity. I used Chuck’s rigging line for all ropes. 0.3mm diameter was used for side tackles and the train tackle, and 0.88mm for the breaching rope, these being the closest I had to hand for the correct scale. I opted to simulate a cut (or “cont”) splice in the breaching rope to go over the button on the cascable. I also decided to show the extra line from side and train tackles in a Flemish coil, which I realise is not authentic, but I decided that as the Admiral would be visiting, then we’d make an effort to look pretty! I failed to take any “in-progress” shots for this sequence, so here are a few showing the guns rigged and in place. Upper Deck Finals Once the guns were in place, all that was left to complete the upper decks (internally) were a few cleats and a ladder. The cleats presented no problem and were simply shaped from appropriate sized stock. Two of the cleats on each side were made from Red Heart, while one on each side, and the funny-shaped cleat atop the cap rail were made from Ebony. All cleats were fixed with copper pins, chemically blackened in place. For the ladder, I decided to use my mill to create some accurate dados in the ladder sides, which are 3/16” wide and made from 1/16” thick Pear stock. The hardest part about this was setting up an appropriate holding method in the mill. Once firmly held in place, the dados were cut with a 1/16” end mill, to a depth of 0.8mm. Here is a shot of the mill set-up: The steps of the ladder were also cut from the same Pear stock. When assembling the ladder, the fronts of the steps were allowed to protrude somewhat, so that once the glue was dry, they could be sanded back flush with the ladder sides, creating a bevelled front edge of the step. Finally, here a few shots of the Upper Decks now complete as far as internal fittings go. Next up, Channels, Dead-eyes and Swivel guns…….


- 456 replies
-
- 20
-
-
- finished
- bomb ketch
- (and 2 more)
-
Cutter Cheerful 1806 by rafine - FINISHED
gjdale replied to rafine's topic in - Build logs for subjects built 1801 - 1850
Very nice set of teeth there Bob. I empathise regards working with tiny blocks. I just made the same decision, opting to use 3mm blocks rather than 2.5mm on my cross section.- 525 replies
-
- 2
-
-
- cheerful
- Syren Ship Model Company
- (and 1 more)
-
Wow Ian! That's just brilliant. I love the "optical illusion" approach.
-
I have a 21" Excalibur and love it too!
-
Sorry to hear you've been under the knife Robbyn, but glad that you're on the mend now. I look forward to further updates on your Syren in the near future. Hope you have a great year.
-
Ronald, Try Crown Timberyard for replacement wood - they are a sponsor of this site and appear to have taken over the mantle from HobbyMill. All reports I've read here have been very positive. Jason (the owner) also appears to be developing an excellent reputation for customer service, just at Jeff at HobbyMill had. Sorry for butting in Robbyn - back to your build.
-
Have you had a look at the Sergal kit? Here's a link to Cornwall Model Boats (just one supplier). I haven't built it, but it looks to be a very nice model. http://www.cornwallmodelboats.co.uk/acatalog/mantua_mississippi.html
-
Harbor Freight Mini Wood Planes
gjdale replied to grsjax's topic in Modeling tools and Workshop Equipment
A plane is a fast and efficient way of tapering, converting square stock to octagonal prior to final shaping (eg masts), or creating a bevel on one edge. As Mike notes above, one of the additional advantages is that a plane creates shavings rather than saw dust, which is both easier to clean up and less of a health hazard. Miniature planes simply allow you to use these advantages on smaller pieces of stock. And as Bob Blarney notes above, I too have become a devotee of Paul Sellers' YouTube videos. If you haven't already checked them out, do yourself a favour..... -
This looks to be a very interesting project Peter, so I think I'll pull up a seat in the front row to follow your progress. Looking forward to see how she develops.
-
Cutter Cheerful 1806 by rafine - FINISHED
gjdale replied to rafine's topic in - Build logs for subjects built 1801 - 1850
Wonderful work on the rudder Bob.- 525 replies
-
- 3
-
-
- cheerful
- Syren Ship Model Company
- (and 1 more)
-
Just outstanding Alexandru - what a treat to view your updates! :)
-
Yep, gotta agree Mobbsie, the planking looks great where it counts. Looking forward to seeing your next layer go on, and am very interested to read about your ebonising trials.
- 129 replies
-
- 3
-
-
- armed launch
- panart
- (and 1 more)
-
She looks lovely Mark - well done! I don't envy you the sanding job ahead, but it will be worth the effort.
-
Thanks Mobbsie. I used the Sherline lathe for this job, not the wood lathe.
- 456 replies
-
- 4
-
-
- finished
- bomb ketch
- (and 2 more)
-
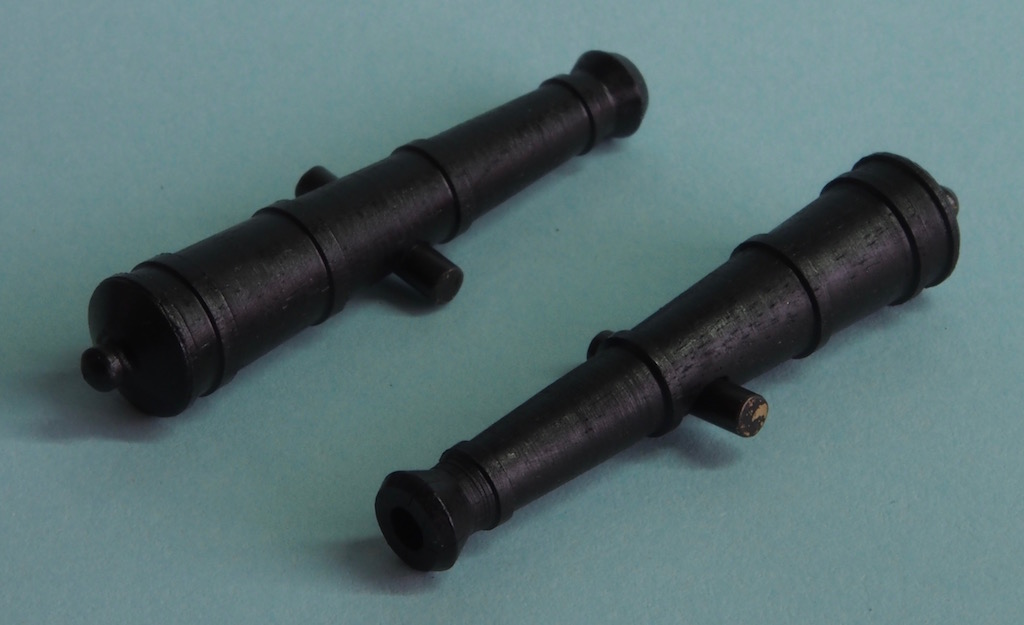
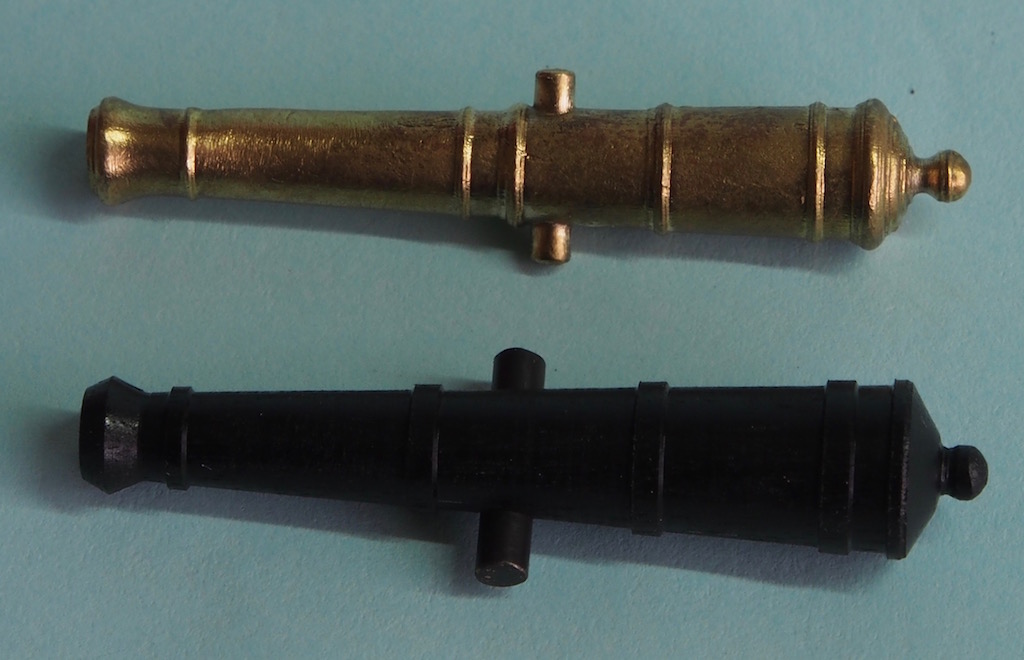
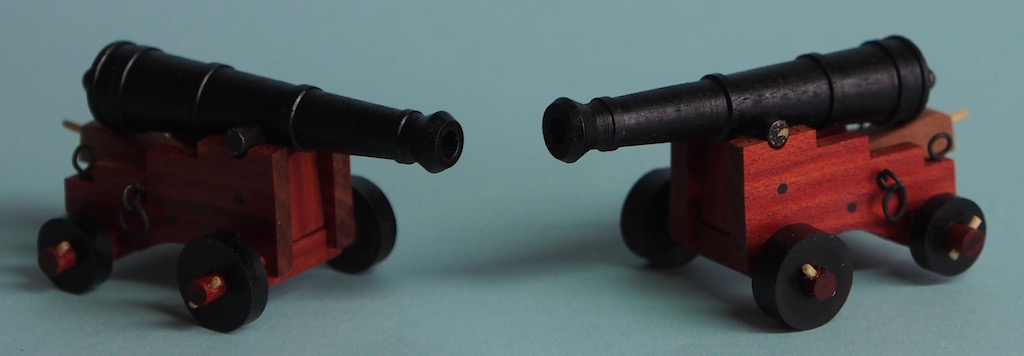
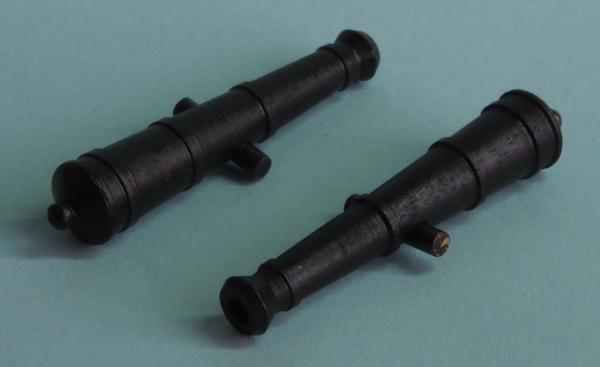
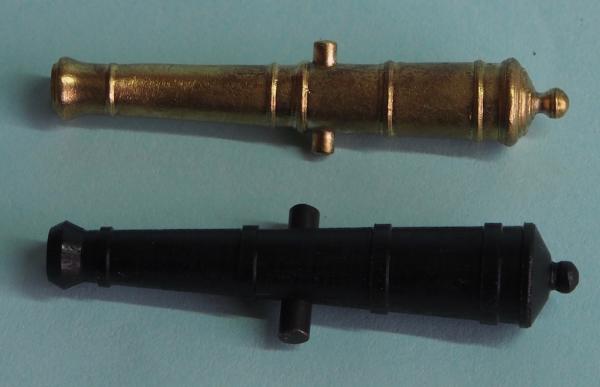
Well, another month has passed since my last update - where does the time go? It seems that work, life, family, and Christmas have all taken priority for the last several weeks, but I have at last managed to find some time to make a little more progress. 4-lb Guns After fitting out the gun carriages with the requisite ring-bolts and eye-bolts, I decided it was time to have a go at turning the gun barrels. I had been putting this off as I had never attempted to turn a tapered gun barrel before and I only had sufficient ebony of the correct size to have one go – it was get it right first time, or think about other alternatives. I spent some time studying the drawings, taking measurements, and reviewing any instructions I could find for turning gun barrels on the lathe, as well as reviewing the instructions for using the compound slide on the lathe to cut tapers. I was so focused on each step in the process, that I forgot to take any “in progress” shots. You’ll just have to take my word for it that all went according to plan, and in the end turned out to be somewhat easier than I’d feared. The only “oops” I had was when I tried to get a bit too clever with forming the button on the end of the cascobel, and it parted off by itself. To fix this, I drilled a hole in the base of the gun, along the axis of the gun, to receive some 3/32” brass rod. I rounded the end of the rod by filing and sanding, and then blackened it and epoxied it in place. I’m pretty happy with the way this “fix” turned out too, as it is quite difficult to tell the difference between the “good” one and the “fixed” one now. Here’s a picture of the two turned guns. To ensure that the trunnion was correctly placed below the centreline of the gun, I drilled the hole for this in the square stock before I started turning. The trunnions themselves are 3/32” brass rod, chemically blackened with Jax Pewter Black. Here is a comparison shot with one of the brass guns that Danny gave me (these are the ones he imported from Russia). While I took all my measurements from Jeff’s drawings, you can see that the overall size and shape is pretty close. Finally, here is a couple of shots of the guns placed on their carriages. I still need to make the cap squares to go over the trunnions, and that will complete this section. Hopefully, it won't be another month before the next update!


- 456 replies
-
- 23
-
-
- finished
- bomb ketch
- (and 2 more)
-
That's a nice looking rear end you've got there Steve! ... On the ship, that is!
-
Congratulations Erik, a truly lovely build. Like many others, I look forward to seeing your next build.
- 222 replies
-
- 4
-
-
- 18th century longboat
- model shipways
- (and 2 more)