

tlevine
-
Posts
1,960 -
Joined
-
Last visited
Content Type
Profiles
Forums
Gallery
Events
Posts posted by tlevine
-
-
-
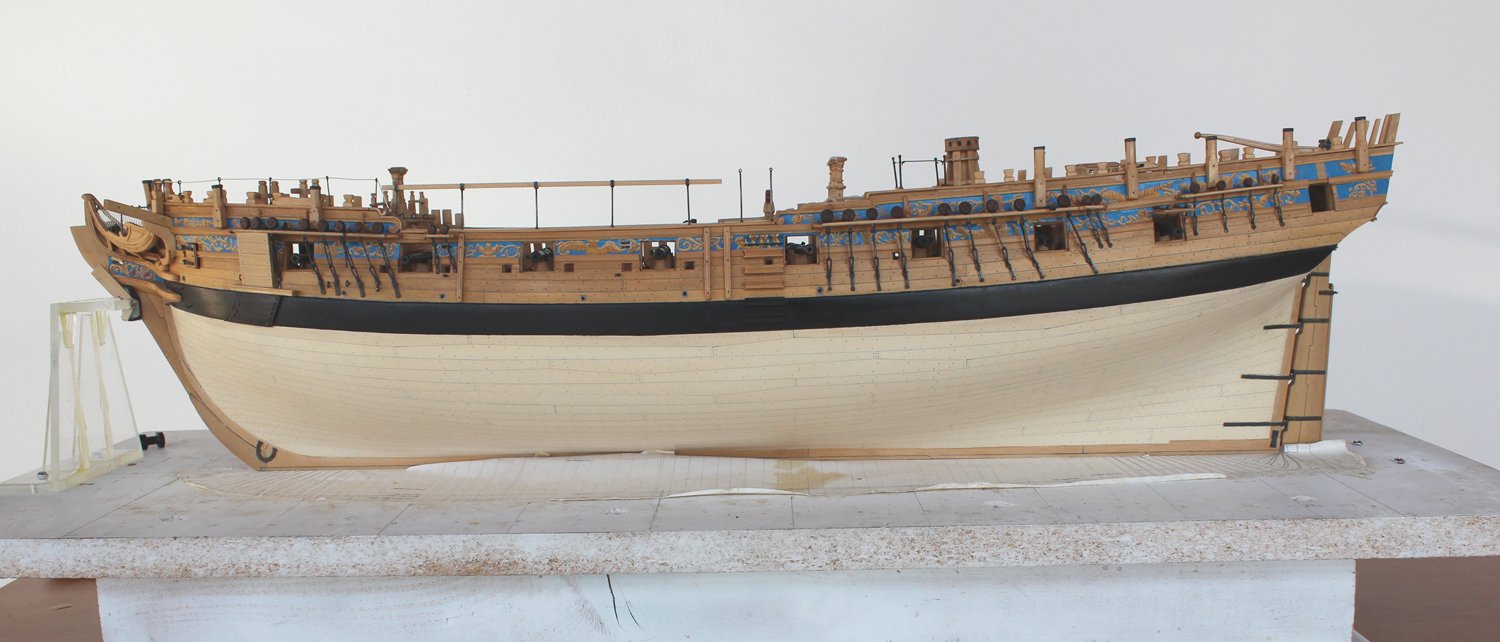
It has been another long time since posting but I have two excuses. First, I went on an extended vacation and started Echo because of ease of transport. Second... The second reason is a combination of funny and terrifying. I had Atalanta sitting on the floor in preparation for taking some photos. I then tripped on willow-the-wisp and fell into the model inflicting a significant amount of damage to Atalanta. This included resetting every cannon, installing a new quarter deck rail, new side moldings and several other minor repairs. Three weeks later I am able to post the photos that I hoped to take on that fateful day.
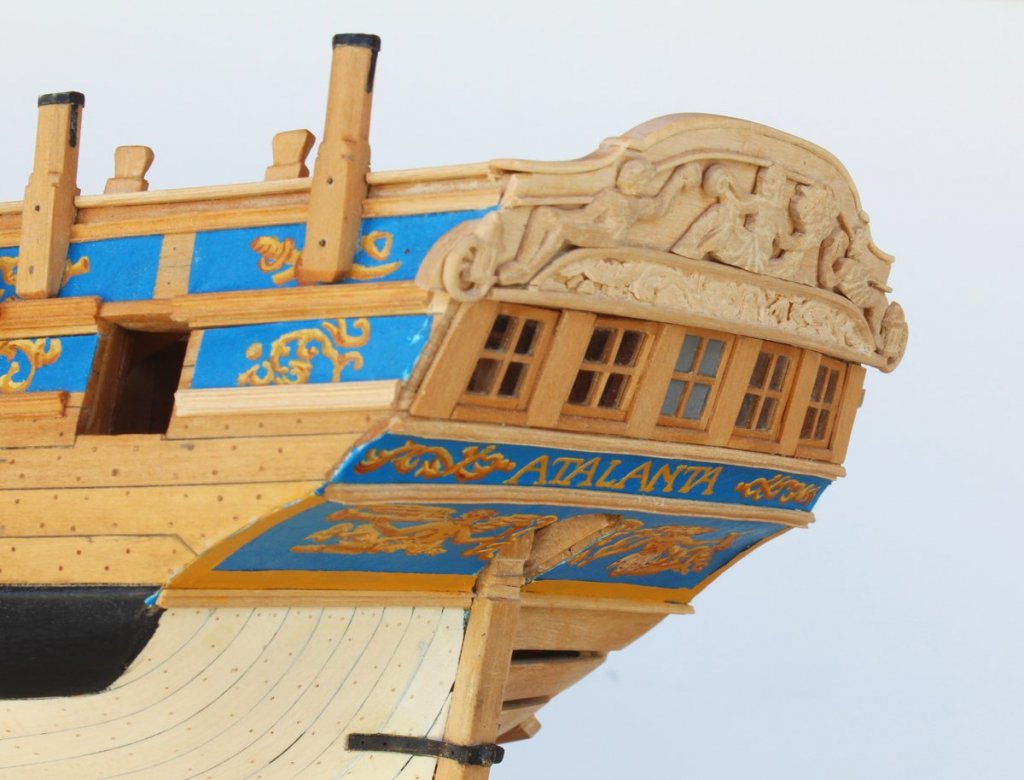
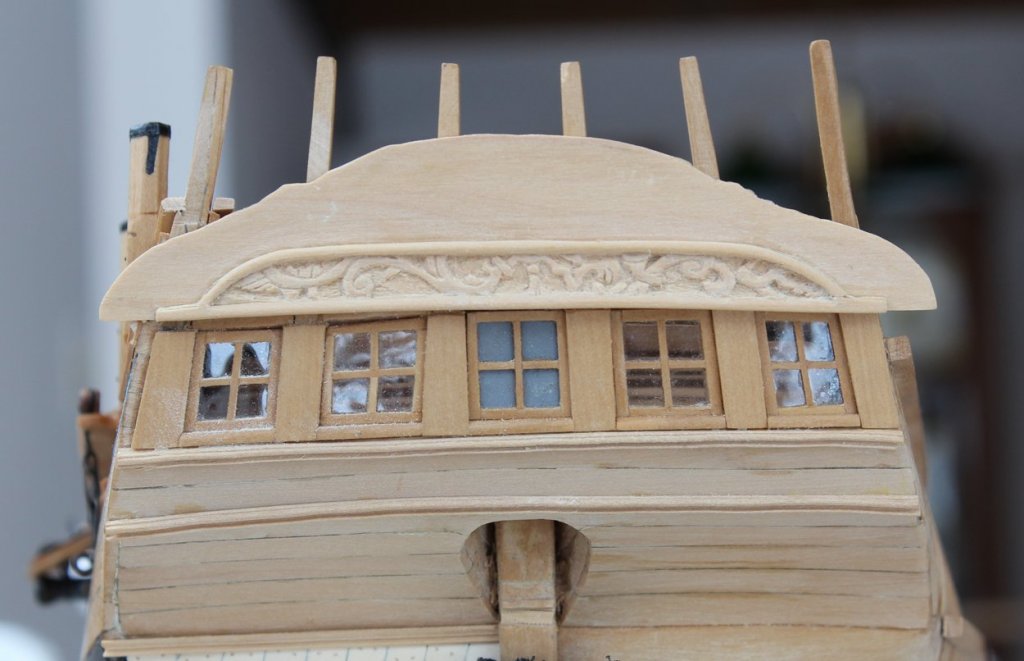
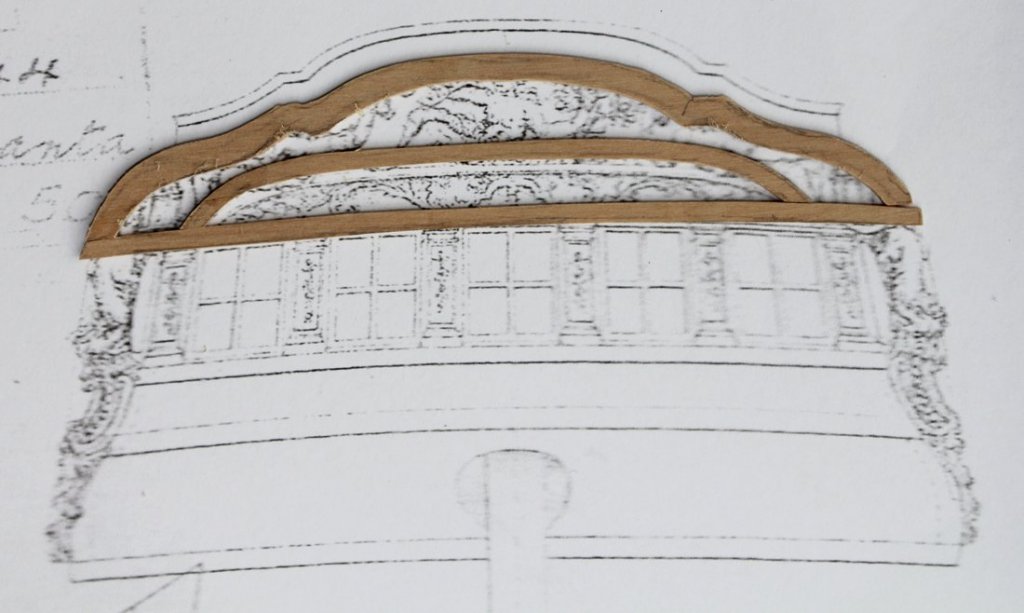
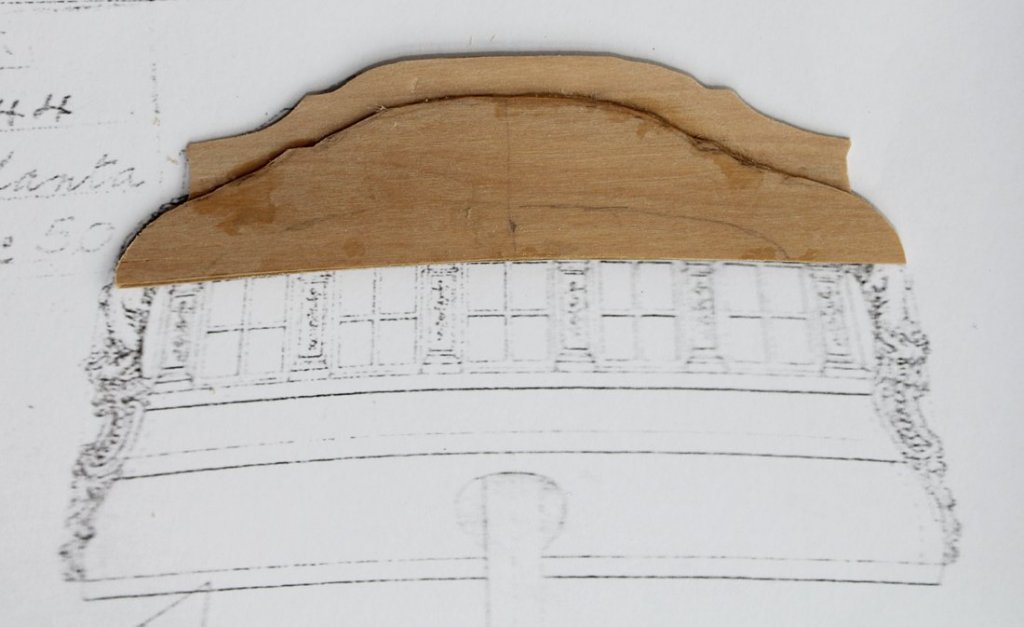
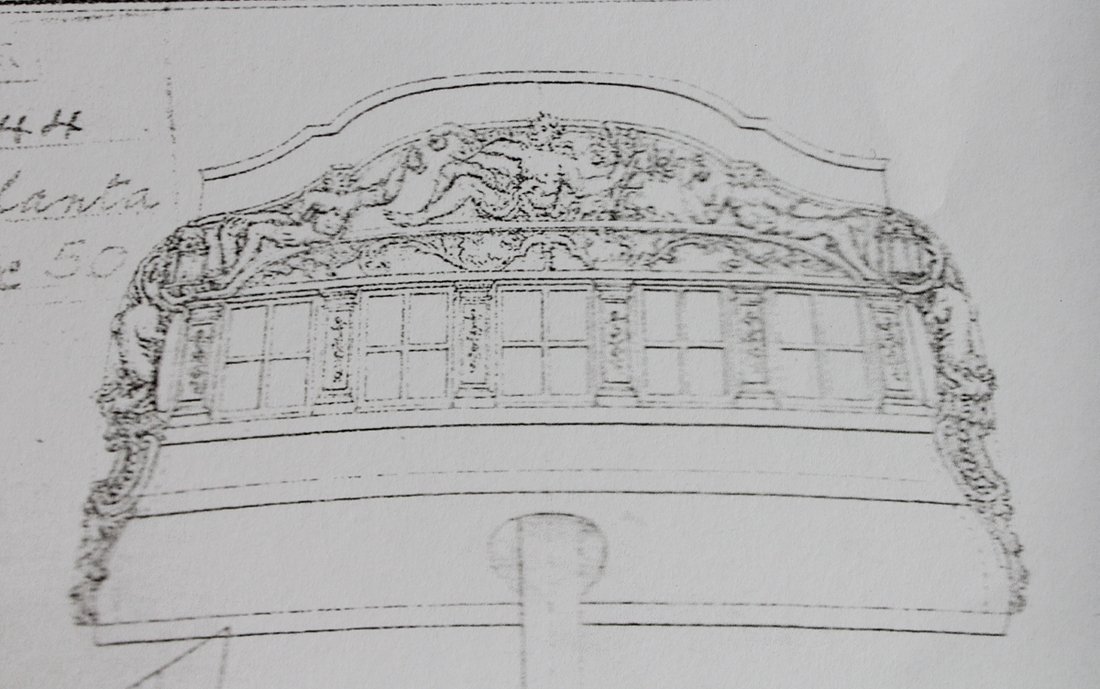
The tafarel carvings have been installed and the assembly has been glued and pinned to the stern timbers. The rail was fabricated from five pieces of wood. The relationship between the caprail and the quarter deck rail was difficult to see on the plans. I hope I built it correctly because I am not doing it again!
-
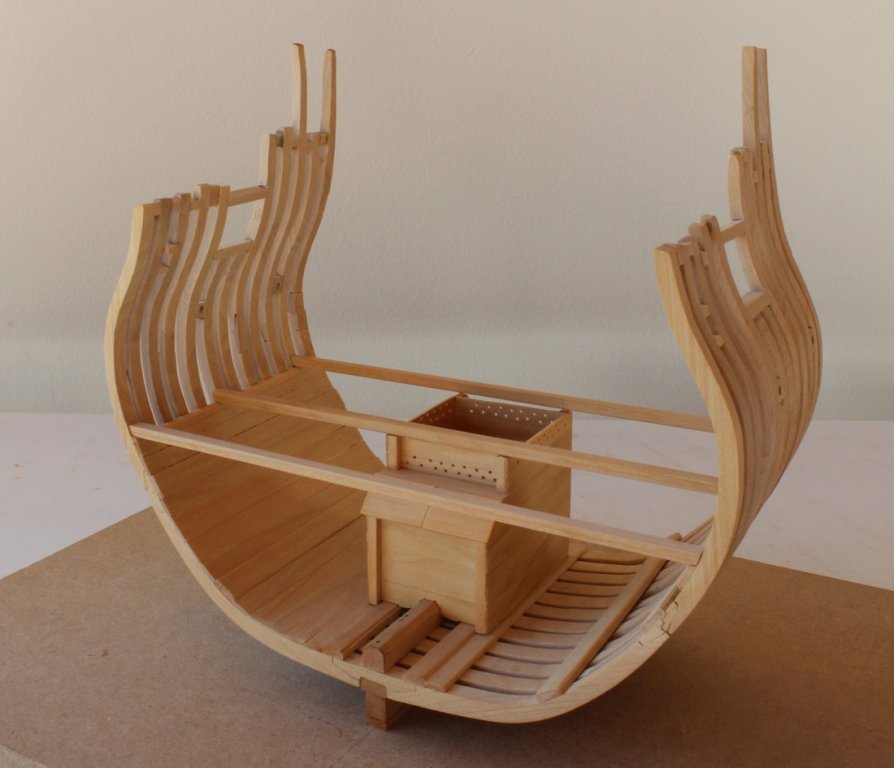
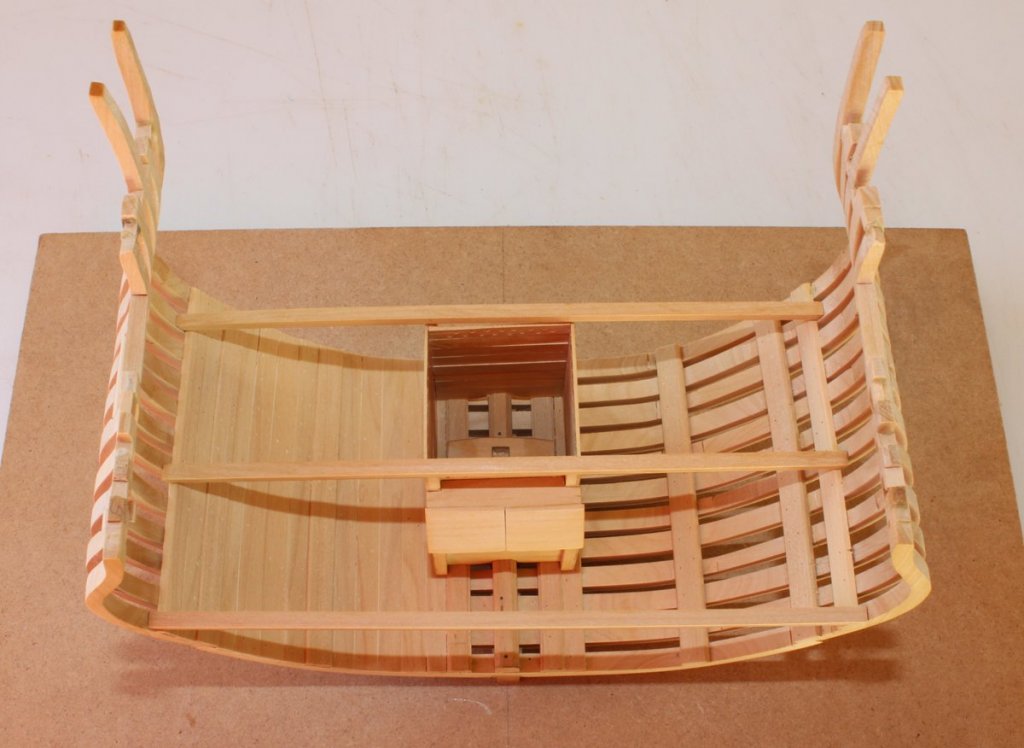
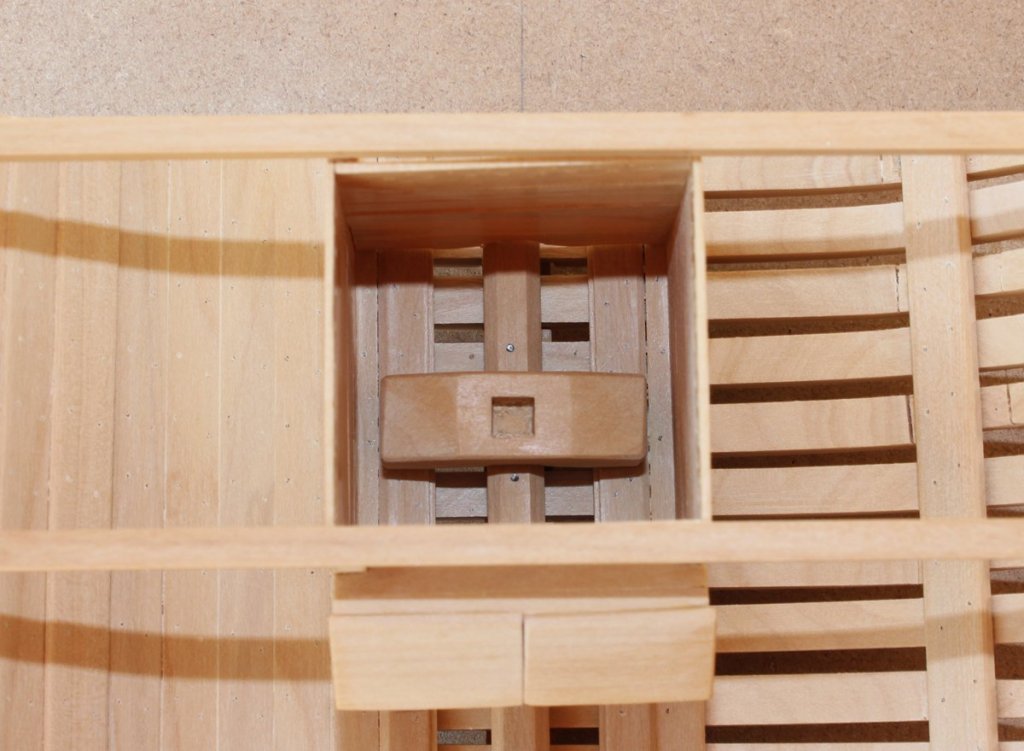
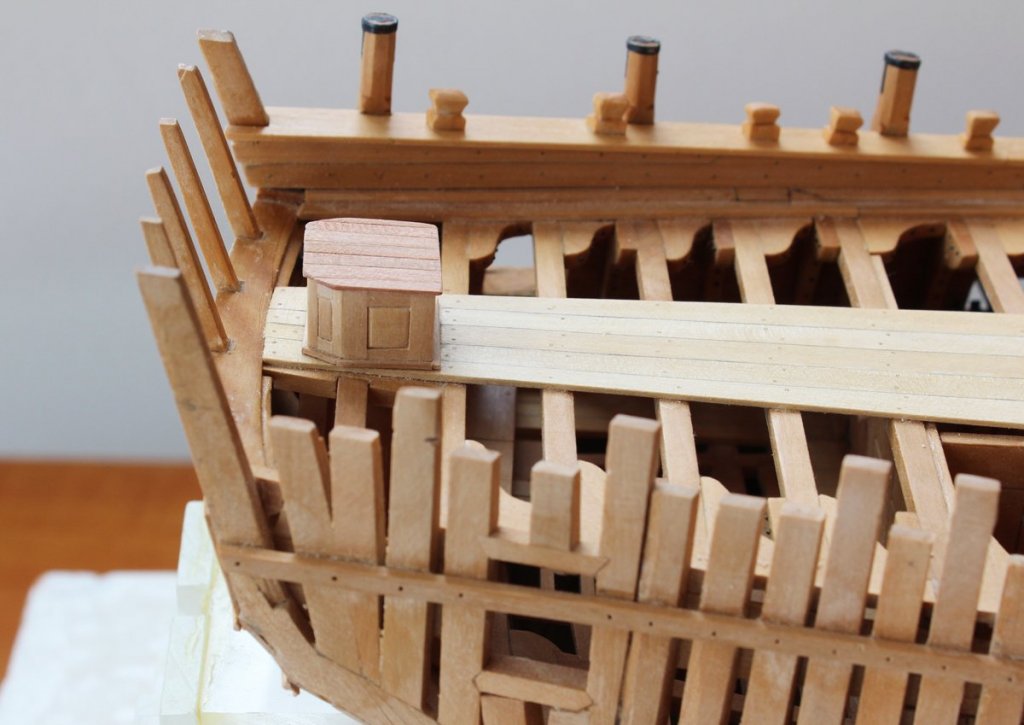
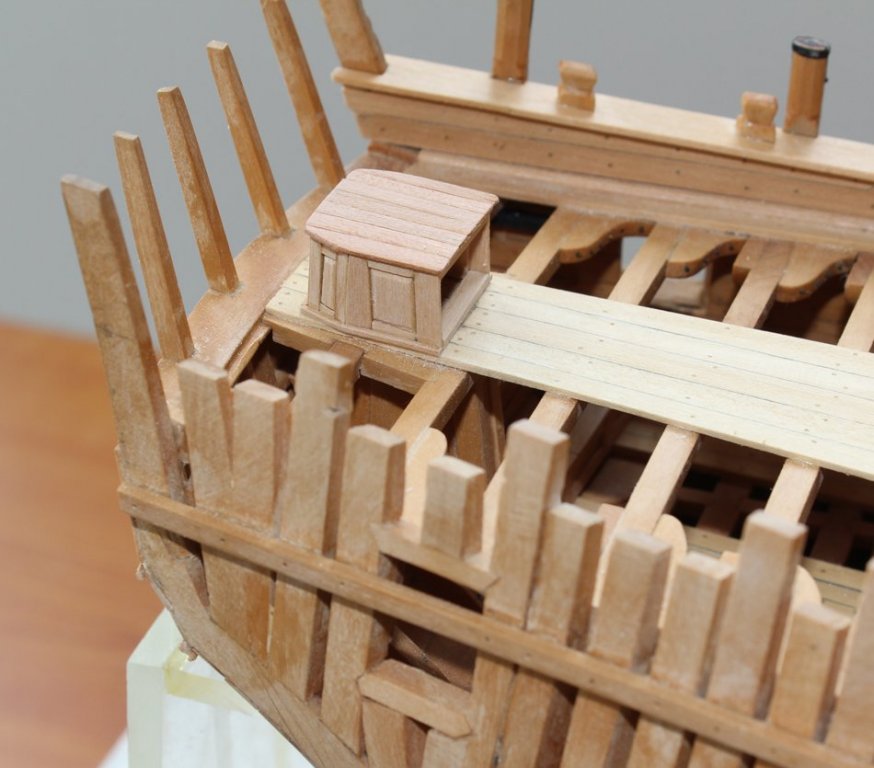
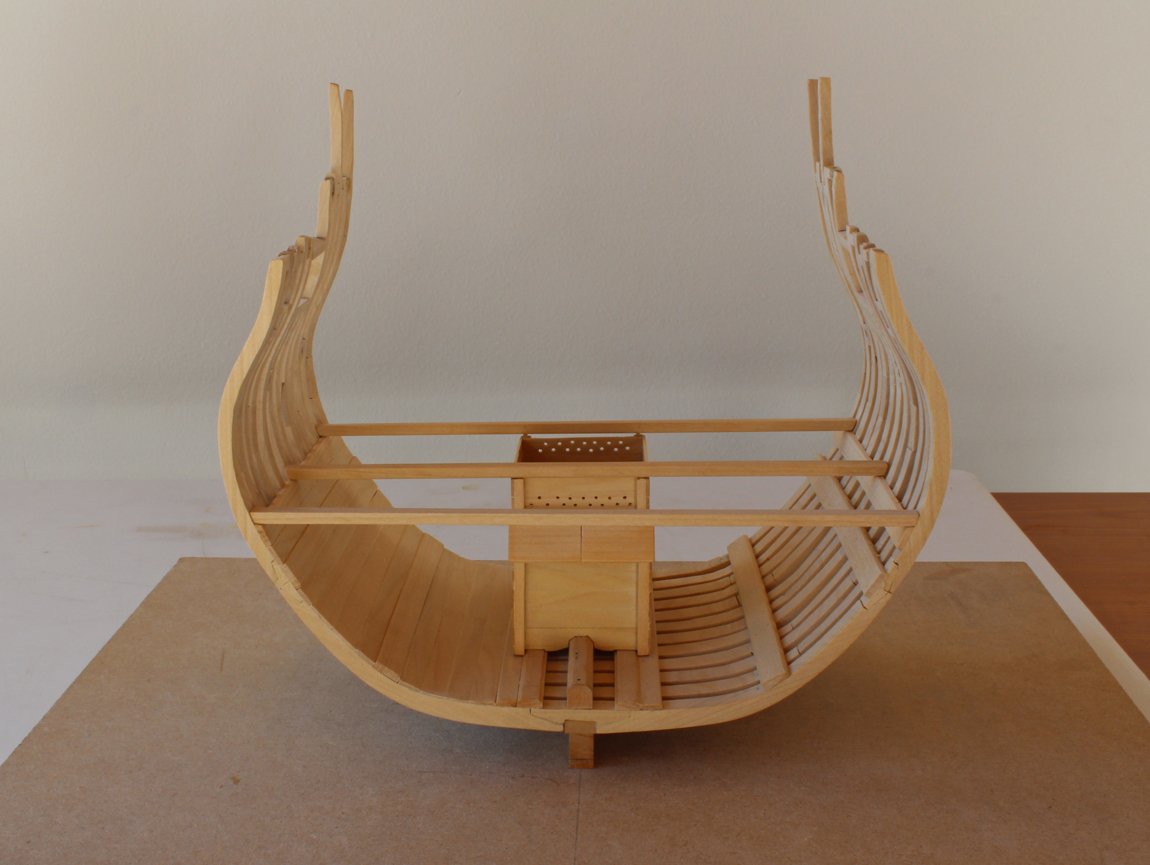
The lower part of the well and lower deck beams have been temporarily installed. The well is still missing the finishing touches like the hinges on the doors. There are pins extending from the corners of the well into the bottom of the lower beams. Once completed, the mast step will be almost invisible (but we will all know it is there).

-
-
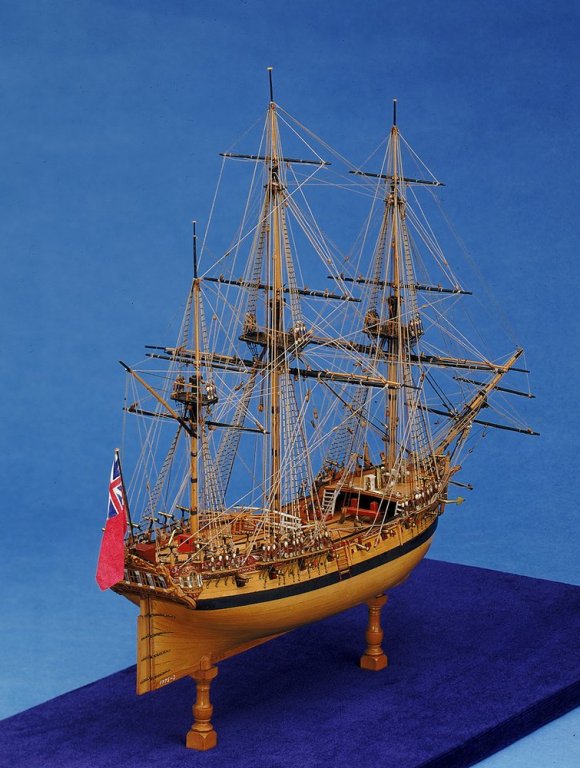
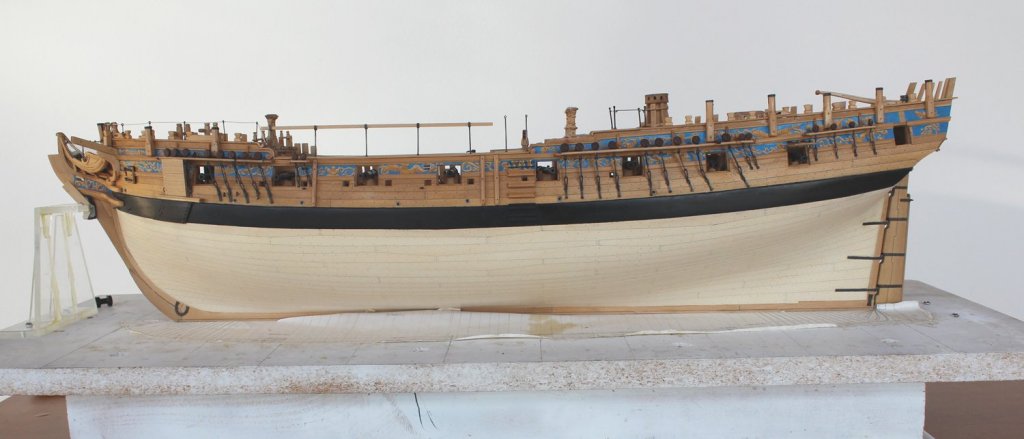
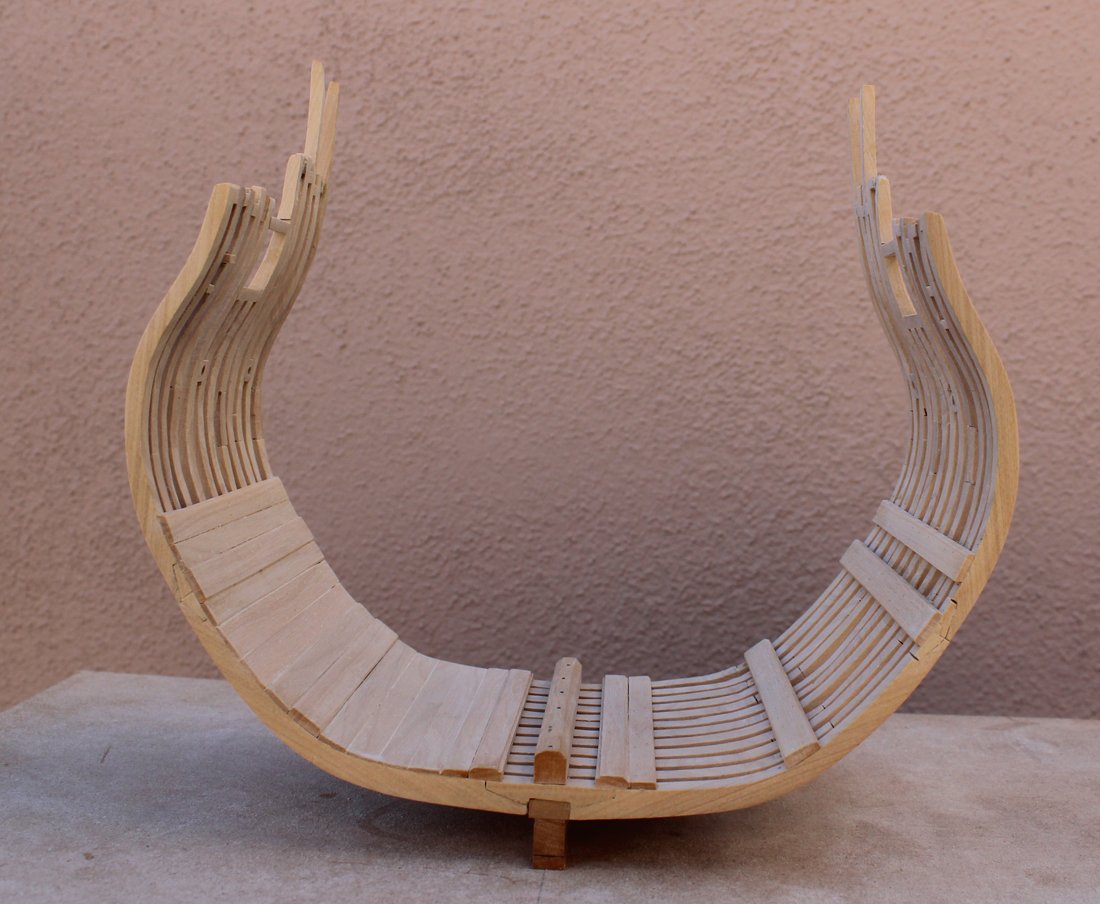
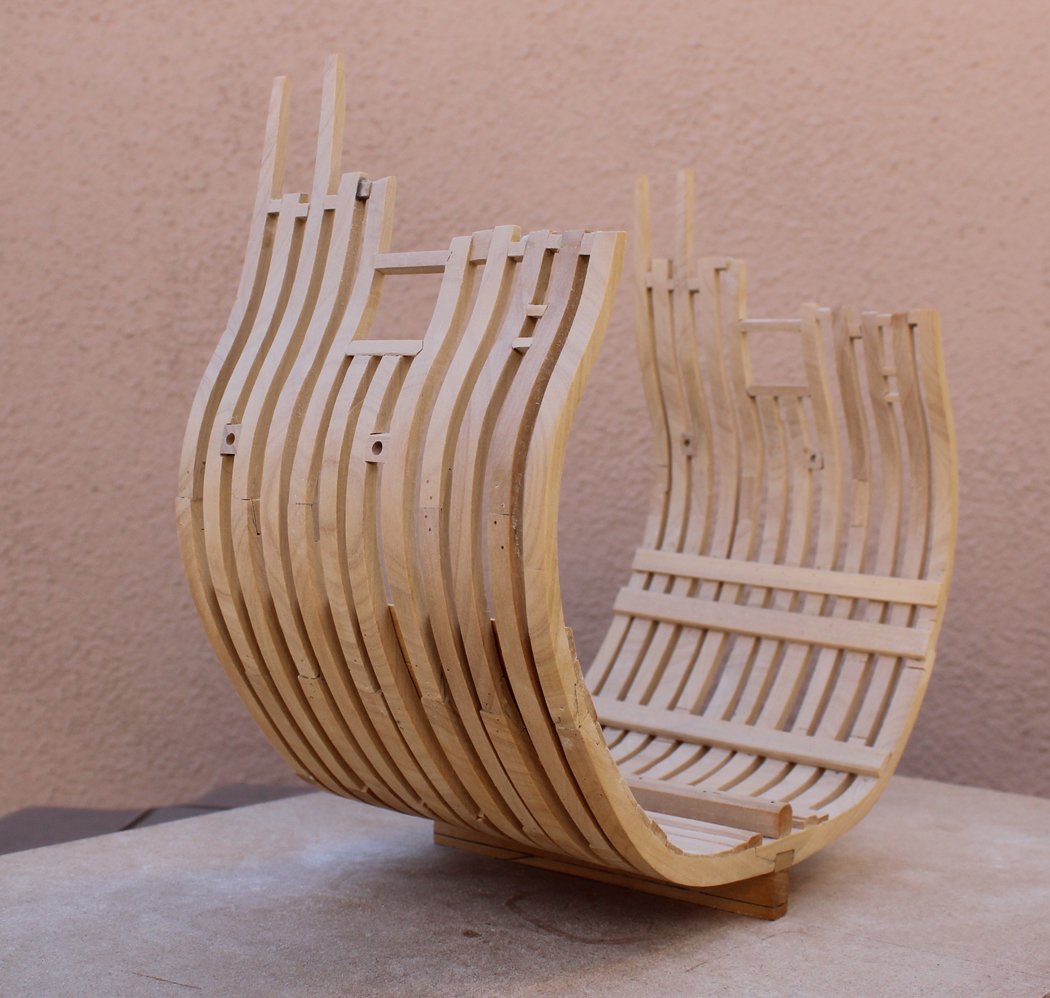
I hesitated starting this topic in the Echo Cross Section area because it will not really be a build log and it will probably take a long time for me to complete. In 2012 I had the pleasure of taking the Echo course presented by David and Greg. Over that weekend I was able to raise two frames and purchased the completion kit which included necessary wood, armament and a CD with the plans. Atalanta has taken me longer than anticipated to complete and Echo has been ignored. I knew I would be traveling this month and did not want to risk injuring Atalanta but when I considered a month without sawdust but when the thought precipitated anxiety attack and I picked up Echo. My eventual plan is to completely plank the starboard side and leave the port side open. The primary wood will be costello boxwood with the lower hull planking in holly.
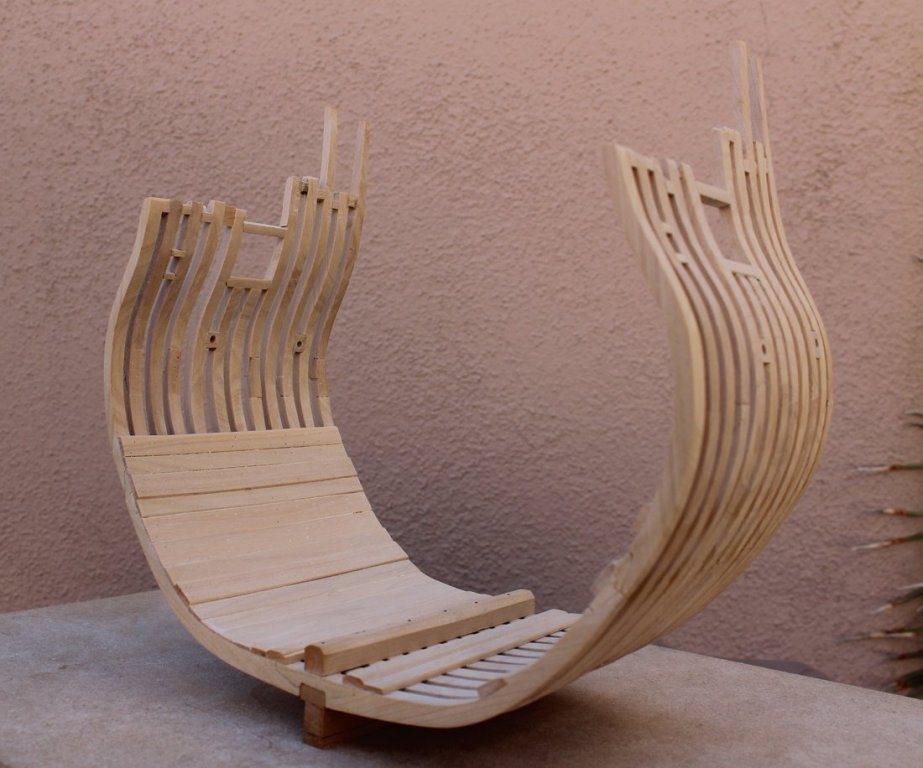
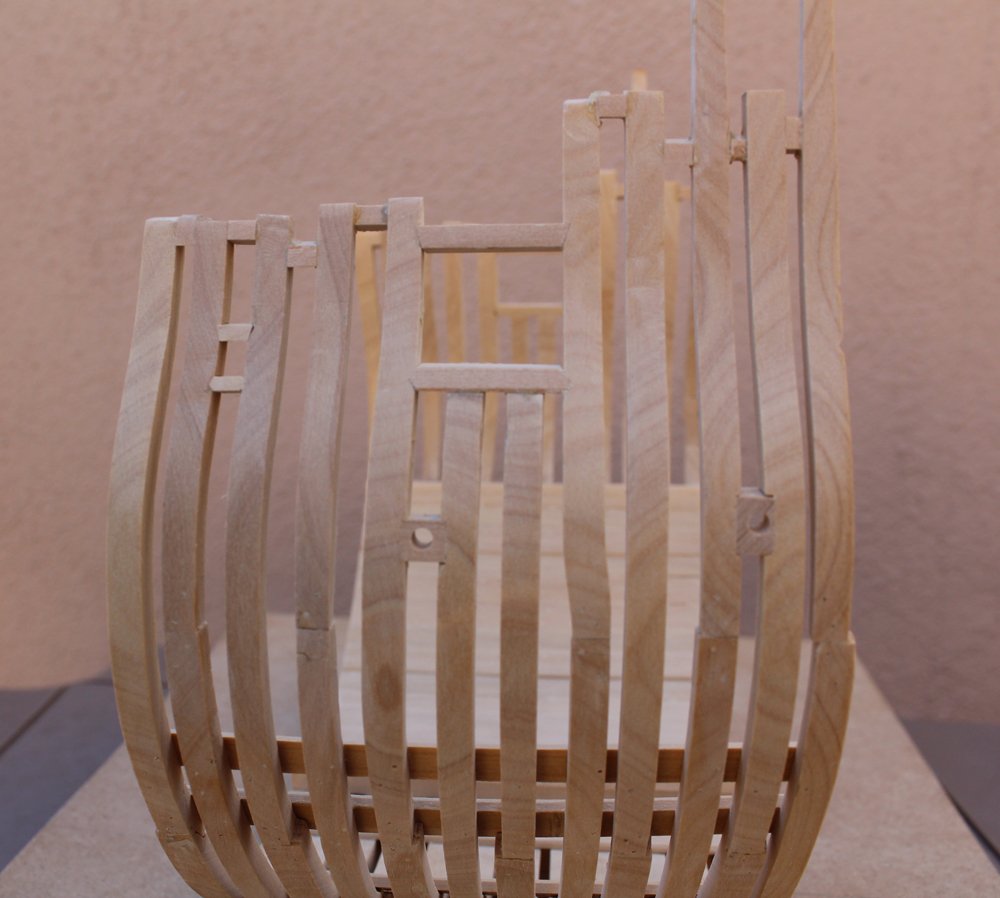
All my frame components were rough cut prior to leaving home since the only power tools traveling with me would be a Dremel and my little Preac saw. Those two frames I built in 2012 could not be used in the actual model because the actual scantlings were different than those used in the course. Let me describe some of the highlights of the hull. There is one gun port, a sweep port and two scupper ports. The sills of the gun and sweep ports are parallel to the water line but the scupper ports angle upwards to facilitate drainage. There are two cast frames that help form the gun port. The top of frames 4-aft and 5-aft are tapered in preparation to forming them into stanchions.
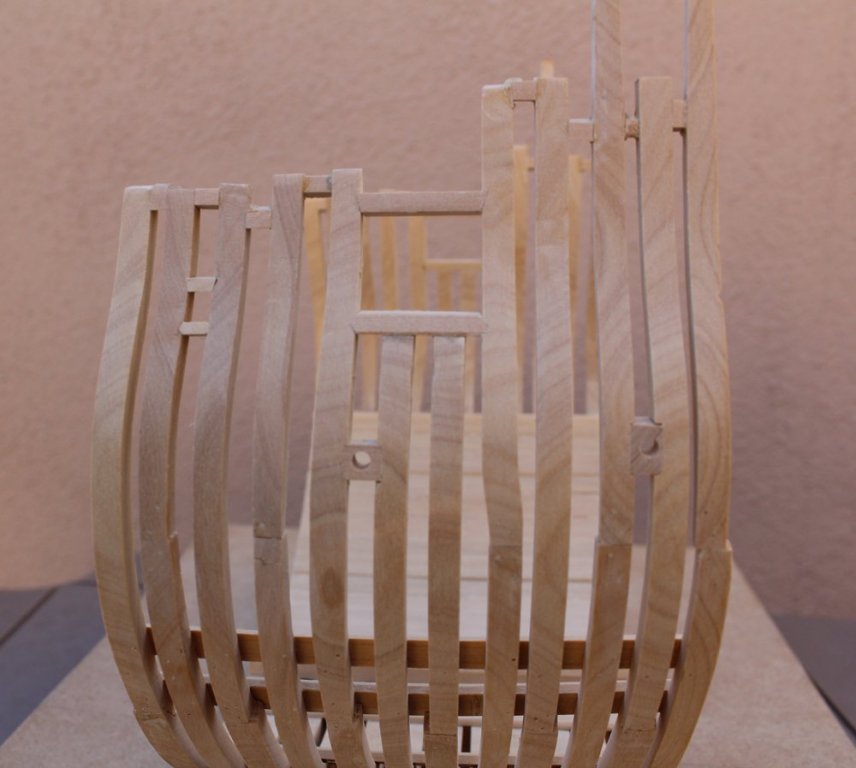
The keelson was installed and bolted to every other frame. The starboard ceiling planks and lower deck clamps have been installed. On the port side I installed the limber strake and the thick stuff over the floor and first futtock head joints. Everything has been treenailed with bamboo.


- Chuck, James H, Ryland Craze and 22 others
-
 25
25
-
Looking very sweet. Almost every time I omit something because it will be hidden, I end up regretting my decision. As a suggestion, install the items on the hidden side first for practice.
- MEDDO, Maury S, Ryland Craze and 3 others
-
6
-
I have the same kit, purchased over 20 years ago. The wood quality is not bad if it has been stored properly. Check to make sure the backbone is true. There are two problems with the kit. First, the instructions are worthless. Unless you can build this off the plans you are in serious trouble. Secondly, the ship is not historically accurate. Take a look at some of the build logs to see the differences. If you are good at making molds, duplicating the missing decorations should not be too much of a problem (unless you are missing the figurehead!).
-
-
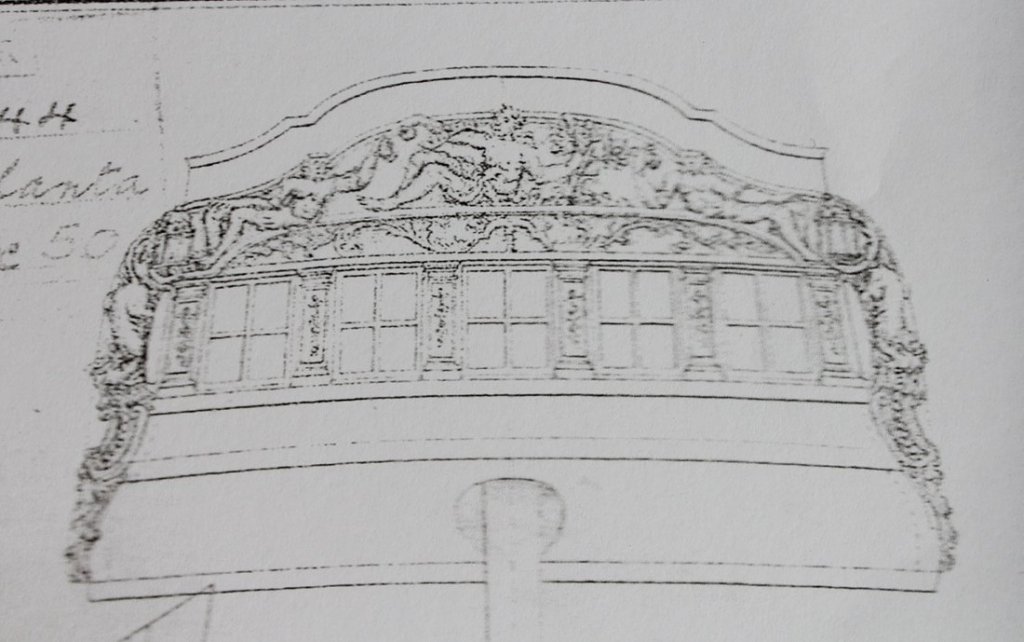
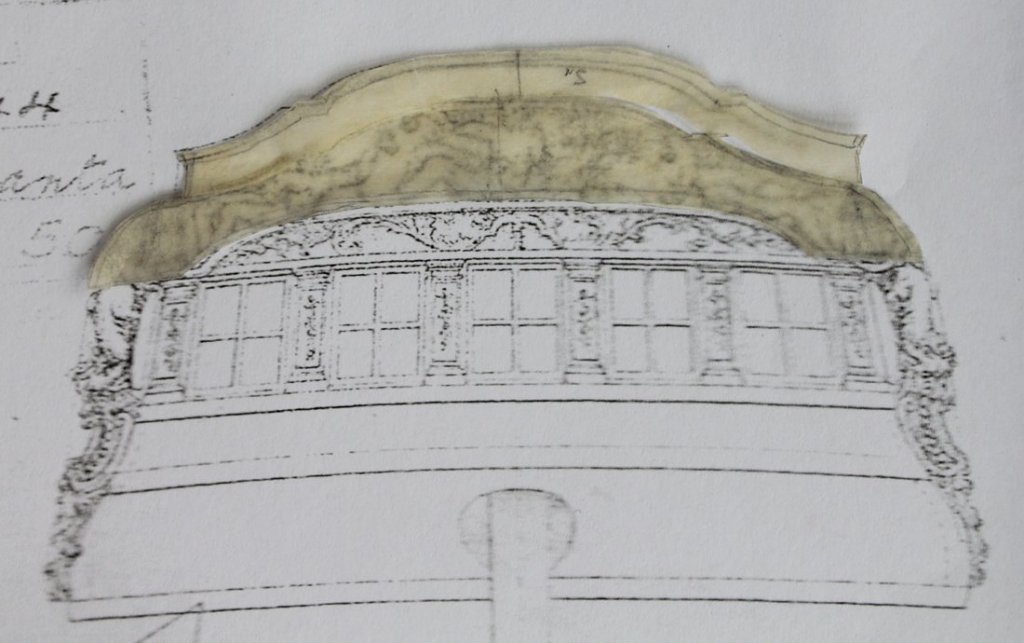
I am in a bit of a quandary. The plans show a taffarel fife rail, an extra rail above the taffarel rail. However, the contemporary model in the RMG does not have this rail. The photo is from the RMG website. Suggestions, anyone? If I build the taffarel fife rail, is the area above the carvings solid or open, showing the counter timbers?
- Archi, AnobiumPunctatum, tadheus and 4 others
-
7
-
-
Thanks guys. My carvings look best when viewed from a distance of 3 feet or greater! But seriously, seeing it blown up on the screen is extremely helpful in picking out areas for improvement that you cannot see when looking at the actual carving. For example, Atalanta's calf is not shapely and her right forearm is too cylindrical, rather than tapering below the biceps.
-
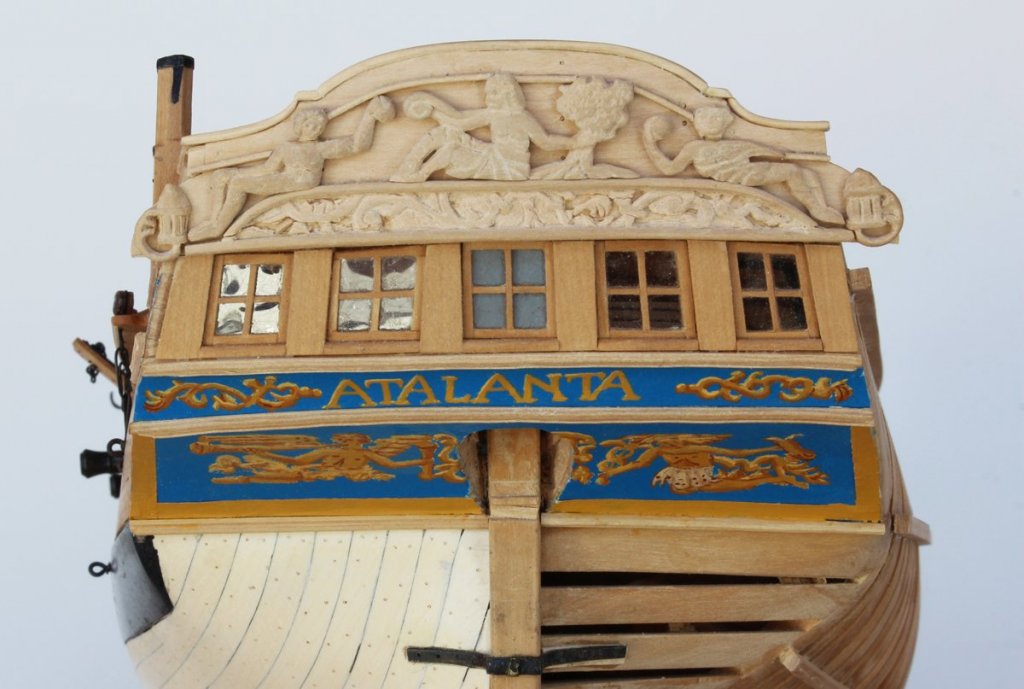
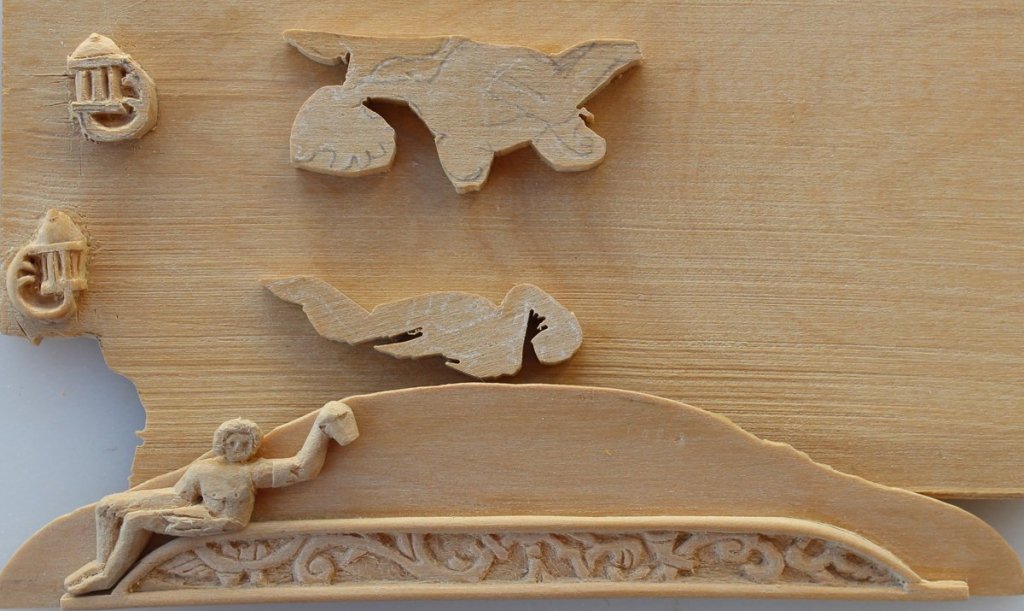
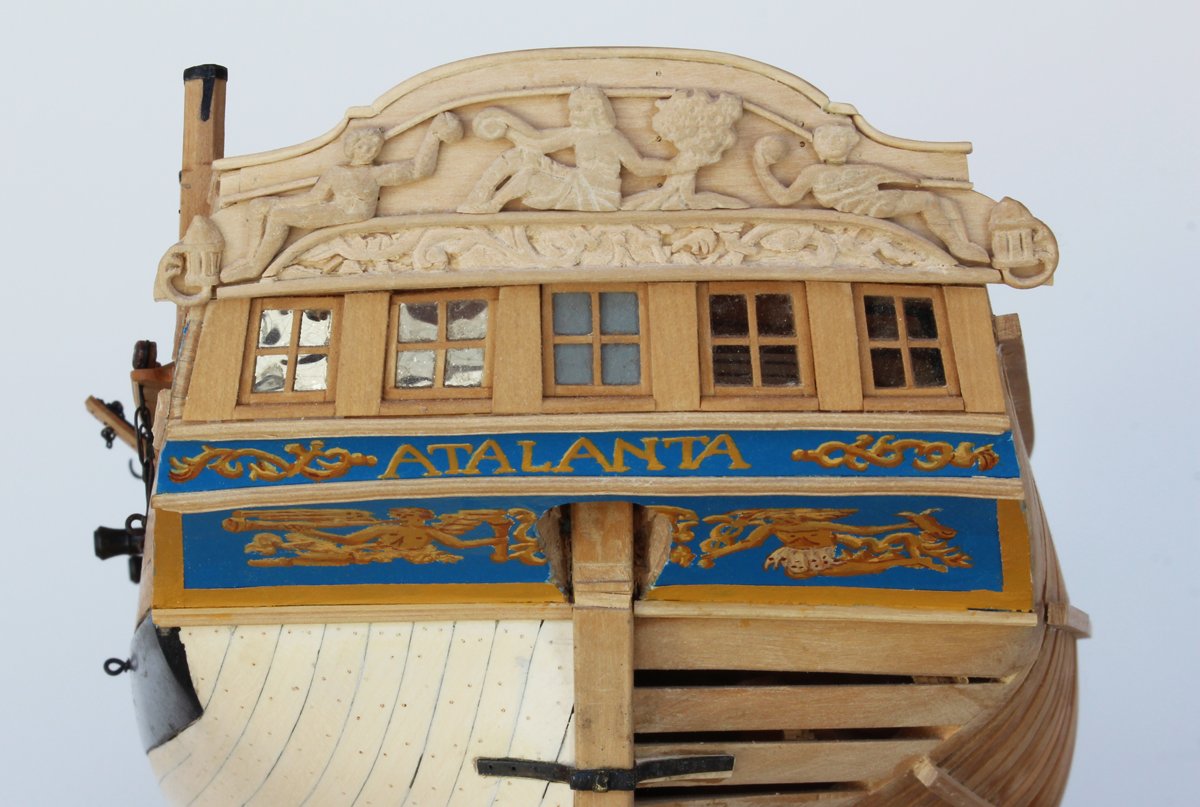
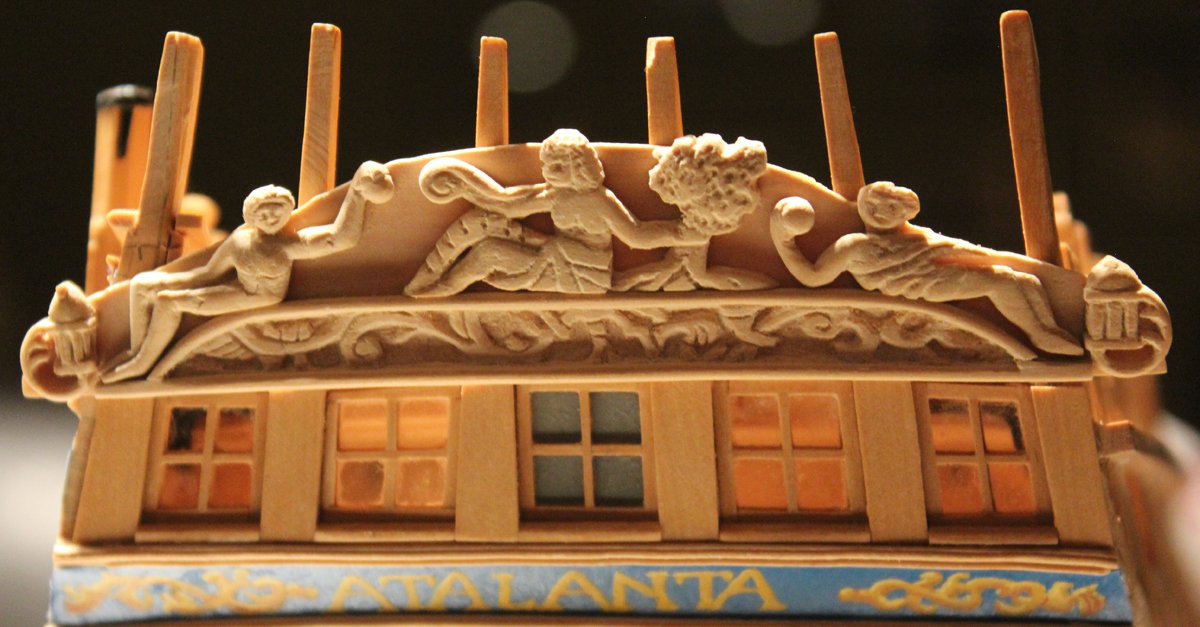
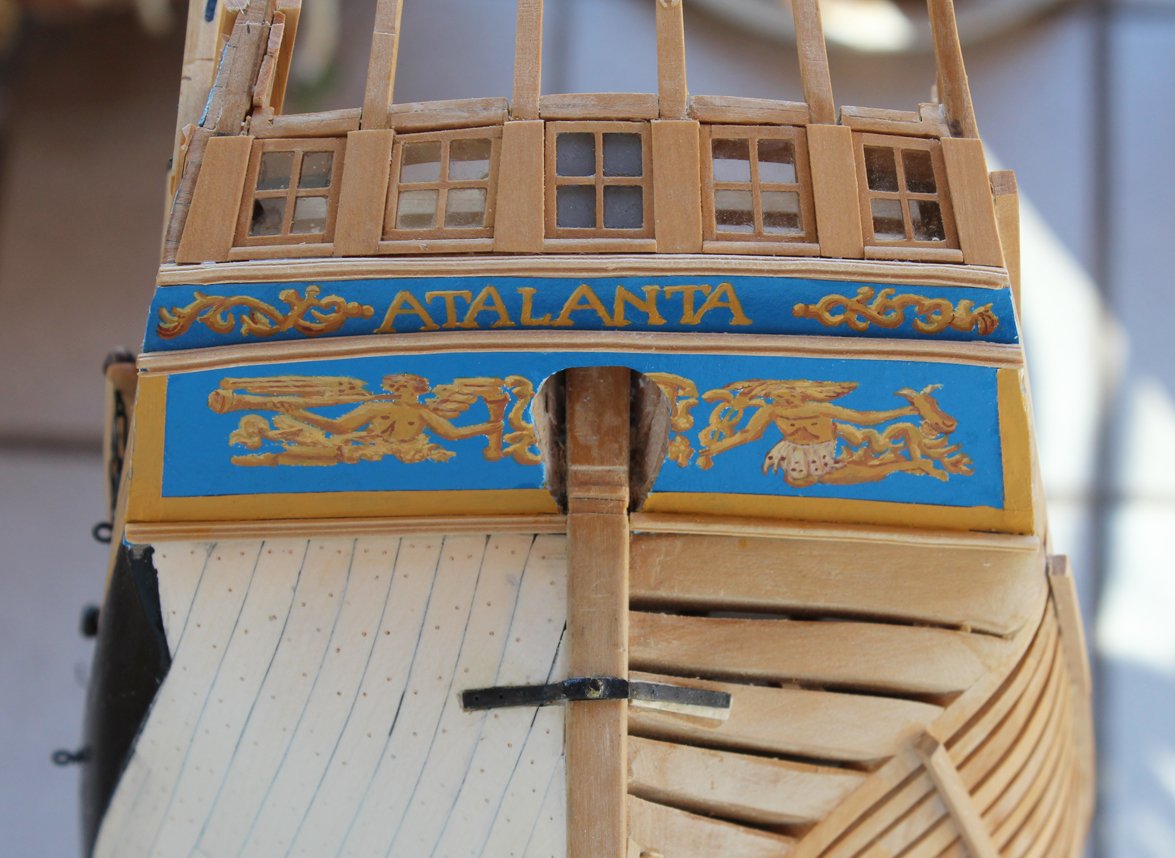
Thanks everyone for the kind comments and likes. As I said in my last post, the carvings are going to take a lot of time. I have absolutely no artistic ability, making carvings anything other than leaves and flowers a tremendous challenge. Here are the stern carvings after an additional 20 hours of work. I am getting close to the point where I am afraid of damaging the carving if I fiddle with it too much more. The center carving represents Aphrodite grasping an apple tree and she is flanked by Hippomenes and Atalanta, each holding apples. The outer carvings, which look like fancy beer steins to me, are supposed to be Greek temples. For those not up on their Greek mythology, Atalanta was a virgin-warrior, daughter of Jason (as in Jason and the argonauts) who could outrun all the boys in town. Her father was forcing her to marry so she came up with a plan she thought would keep her safe. If anyone could beat her in a foot race she would agree to marry him. If they lost, they also lost their head! Hippomenes approached Aphrodite who gave him golden apples to throw on the ground to distract Atalanta. As she bent to pick them up he outran her and won the race. It gets better... Hippomenes forgot to thank Aphrodite. On the way to their ship, Atalanta and Hippomenes suddenly became amorous (thanks to a spell from Aphrodite) and had sex in Zeus's temple. He became furious and turned them into lions. In this era it was thought that lions could not mate with each other so Hippomenes and Atalanta could never mate again.

-
I got my Rope Rocket last week and could not wait for the videos to become available. My previous ropewalk was a bobbin-type and I literally melted the plastic gears running it too fast. Even without the videos, it took me only a few minutes to make beautiful three strand right hand laid rope. (I have not tried left hand laid yet.) I have always found that the most difficult rope to make is at the extremes of thread size but I had no problems using either the included #50 crochet thread, #100 or #10.
- Ryland Craze, PeteB, MEDDO and 6 others
-
9
-
-
I started the carving for the taffarel. Let's just say that it will be a slow process. I need to be in the correct mood to concentrate on it. Therefore, I will work on other aspects of the ship while carving continues.
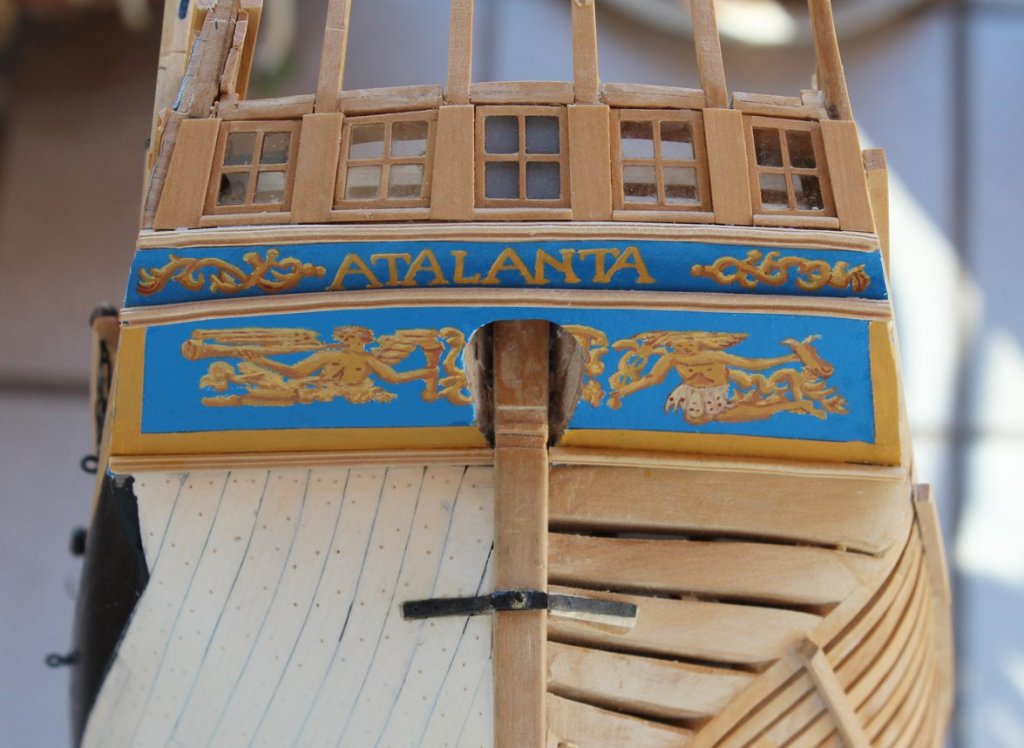
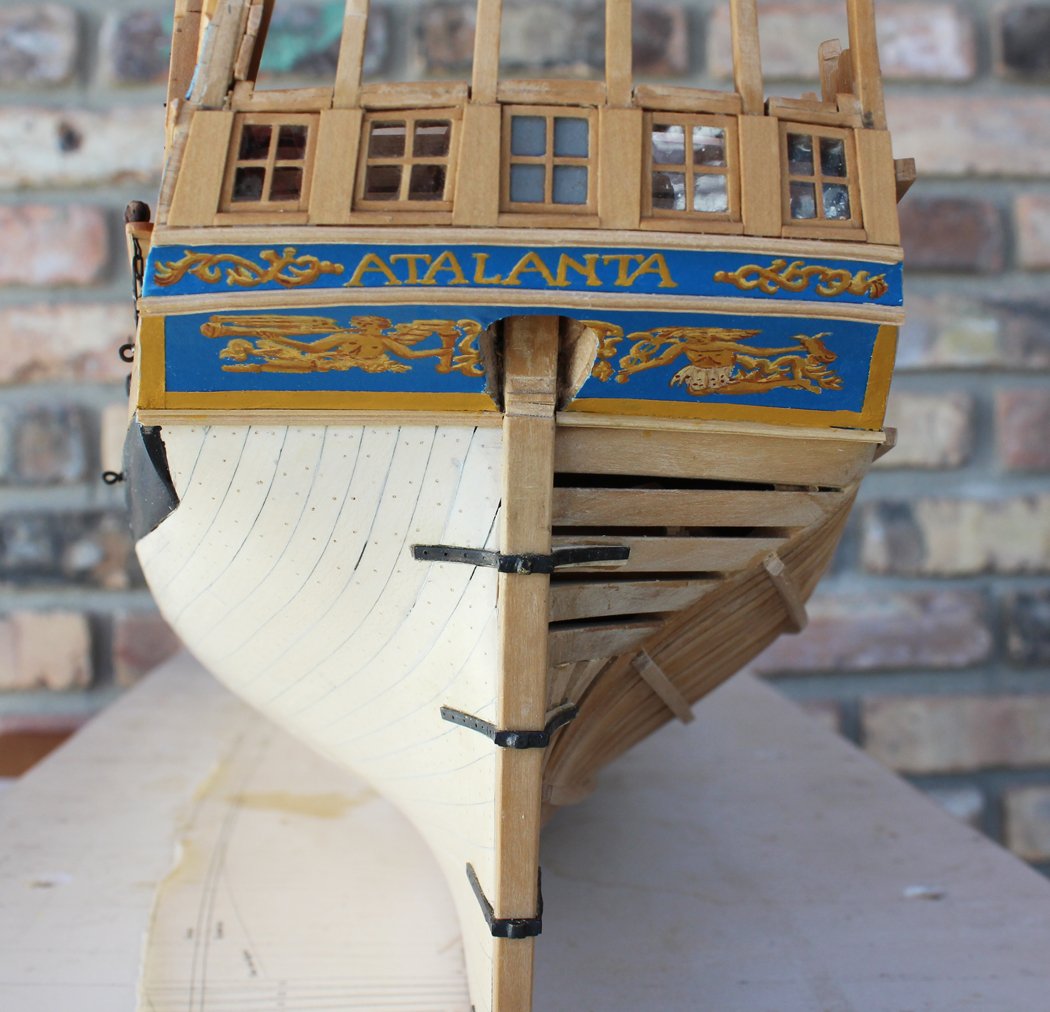
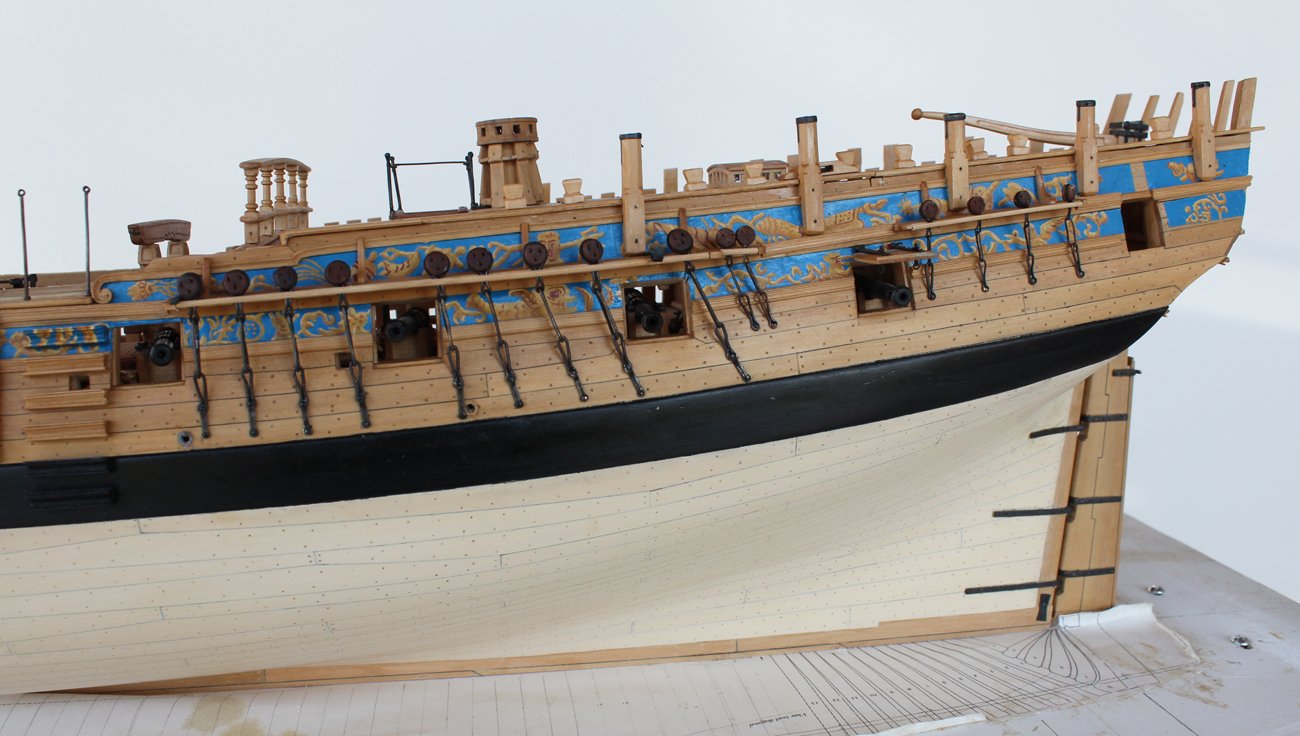
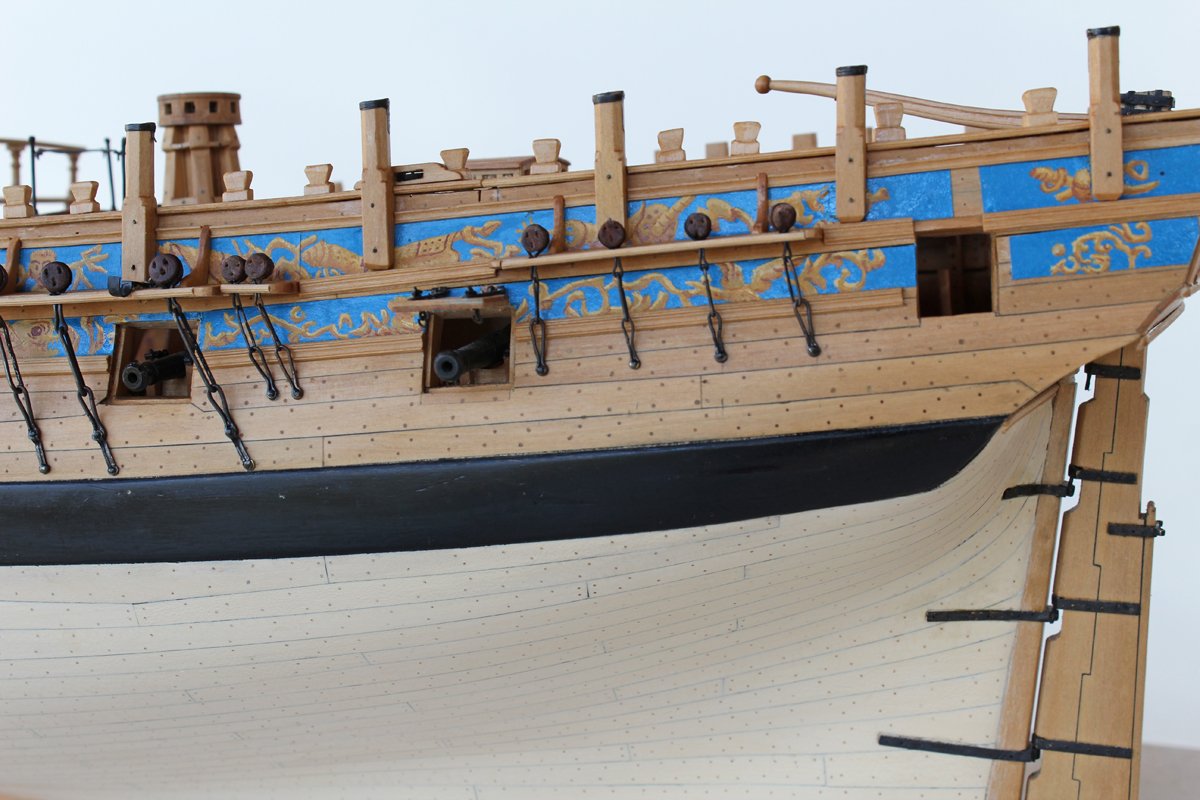
The next thing to tackle is the counter artwork. The upper counter has the name ATALANTA and some acanthus leaves. The artwork was done in the same manner as the side of the ship. The background was spray painted. The artwork was drawn onto the background with transfer paper. The painting was done with artist acrylics. The print shows the lettering as "artsy" rather than block lettering. This did not seem right to me so I attempted to make the lettering more consistent. I could not find any information about the two men on the lower counter. The man on the port side is blowing a horn and the man on the starboard side is holding a caduceus in his right hand and what looks like a gourd in his left hand. I do not think this represents the two prospective suitors of Atalanta because they are seen in the carvings above.

After they were installed I tried to freehand paint the edging on the lower counter. This was an utter failure and I had to remove all of that paint without damaging anything. The best alternative for me was to paint some tissue paper with yellow ochre, cut out strips and glue them onto the blue background. I think it looks reasonably good and will look better after I install the rudder.

- archjofo, Geoff Matson, gjdale and 16 others
-
19
-
-
Thanks to everyone for the likes. John, that is sheet mica in the window lights.
-
Mike, I thing the case looks phenomenal. It is not out of proportion to the hull. What makes it look "heavy" is the skinny TV next to it. The black color of the TV recedes into the wall visually, making the case more prominent. I think your only solution is to get a bigger TV!
-
I went back to the rudderhead cover to see where my errors were. The faces of the cover were all made perpendicular to the water line. I mistakenly assumed that the individual faces would be parallelograms rather than rectangles and shaped the inserts accordingly. Looking back at it after a few weeks, I could only do one thing...recycle. I made up a new cover with all the faces rectangular. I am much happier with the result.
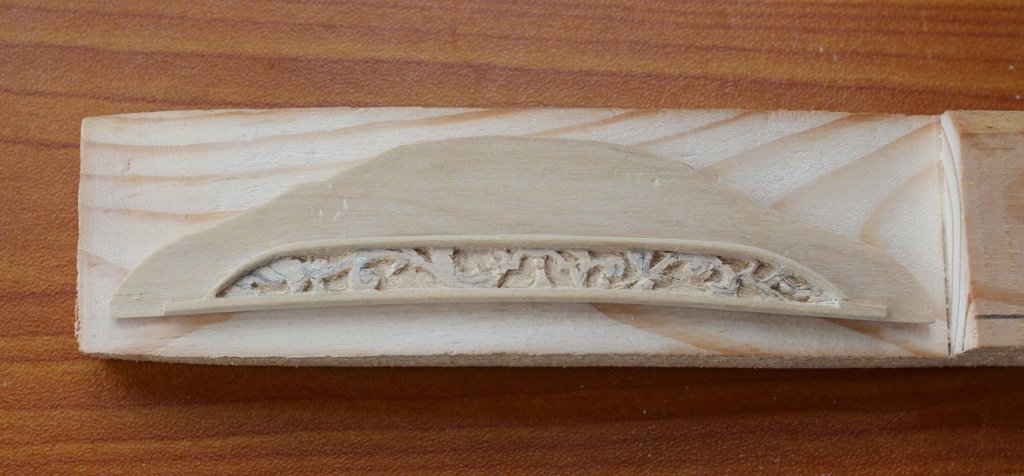
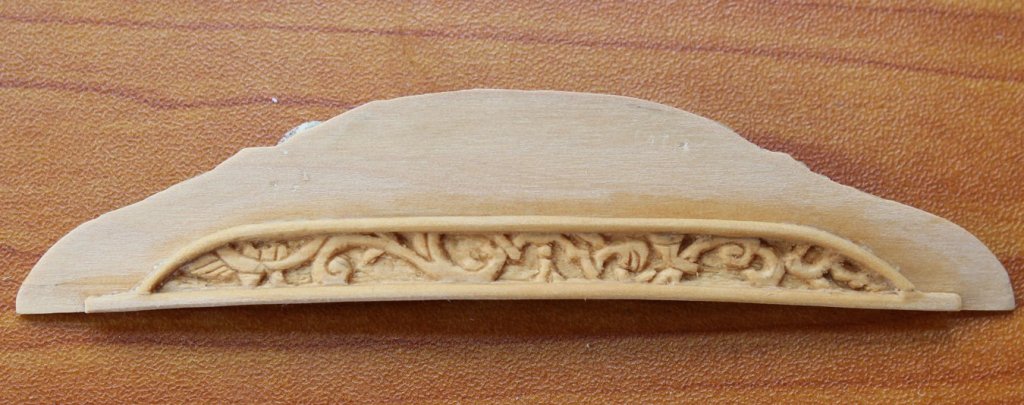
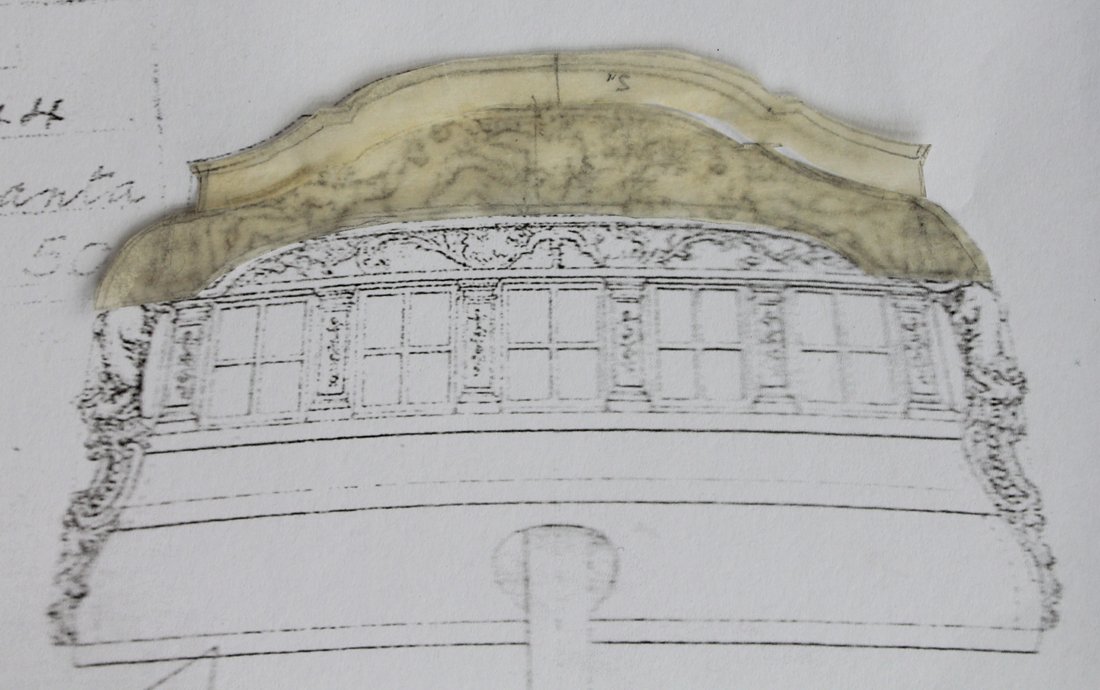
I kept looking at the taffarel thinking how much taller it seemed from the one in TFFM II. Then, as I was thumbing through the last few pages, I discovered my problem. Atalanta was equipped with a taffarel fife rail and the plan was showing the superior extent of that rail. If one looks very carefully at the plan (in the previous post) it is possible to barely discern the counter timbers. I am assuming that the space above the capping rail (the rail that caps the taffarel) and below the taffarel fife rail was open to the air and not solid. So I removed the wood above the capping rail on my taffarel blank.
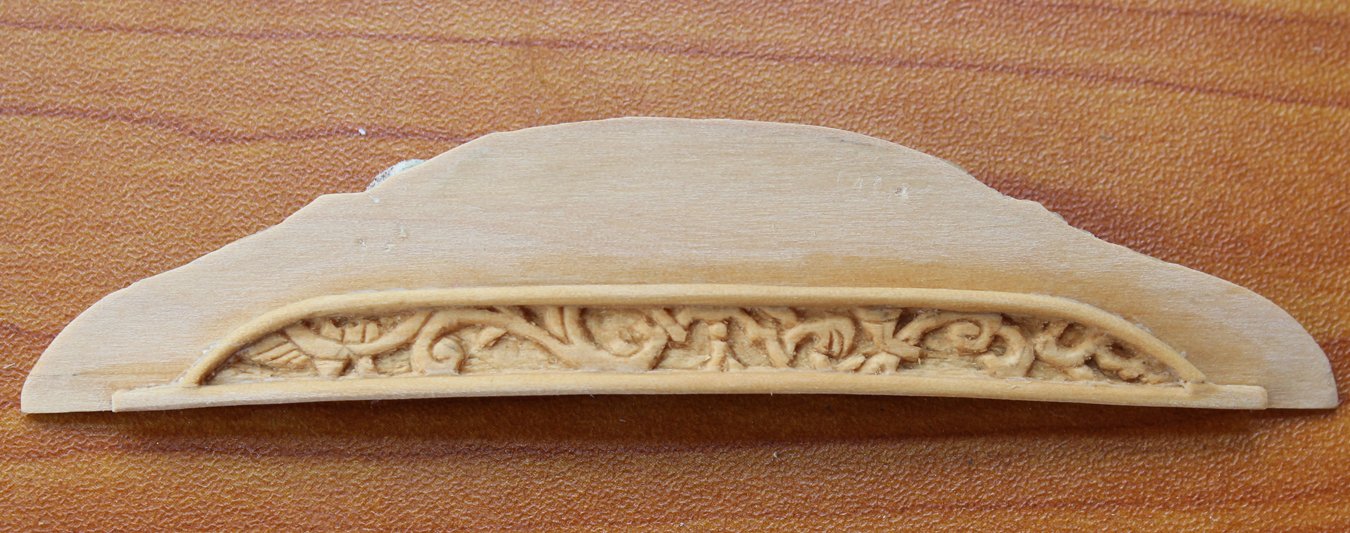
The cove is the area above the windows, surrounded by molding. This is filled with bas relief carving as seen in the plan above. I used transfer paper to copy the design onto the cove and using a combination of #11 scalpel blades and micro-drill bits carved the decoration. Having done the carving project developed by Chuck and sold by the NRG made this go a lot quicker. I tack glued the assembly onto the curved jig to facilitate the carving. This provided me with a handle to hold the assembly while keeping my hands out of the way. I used my ancient Emesco drill since wood carves nicely at low speed. My drill bits are used bits from the OR. By hospital policy, I can only use the bits on one patient, so my team is kind enough to resterilize them and give them to me rather than throwing them out. The first picture is the assembly in the jig. After removing from the jig, I wet down the carving to highlight the depth. The last photo shows the assembly tack glued to the counter timbers.
- Landlocked123, RichardG, pjofc4 and 26 others
-
29
-
-
-
It is time to start construction of the stern structures. I have been dreading this part because of the amount of carving required. Luckily, The plans for Atalanta show the carvings in reasonable detail. Whether I can duplicate them...time will tell.
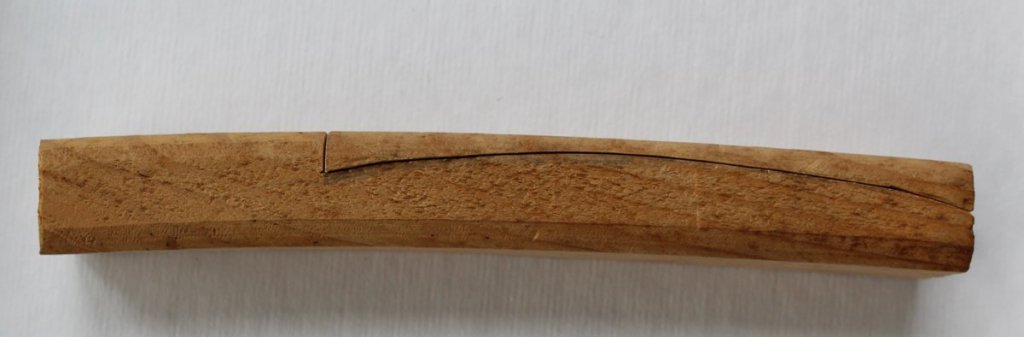
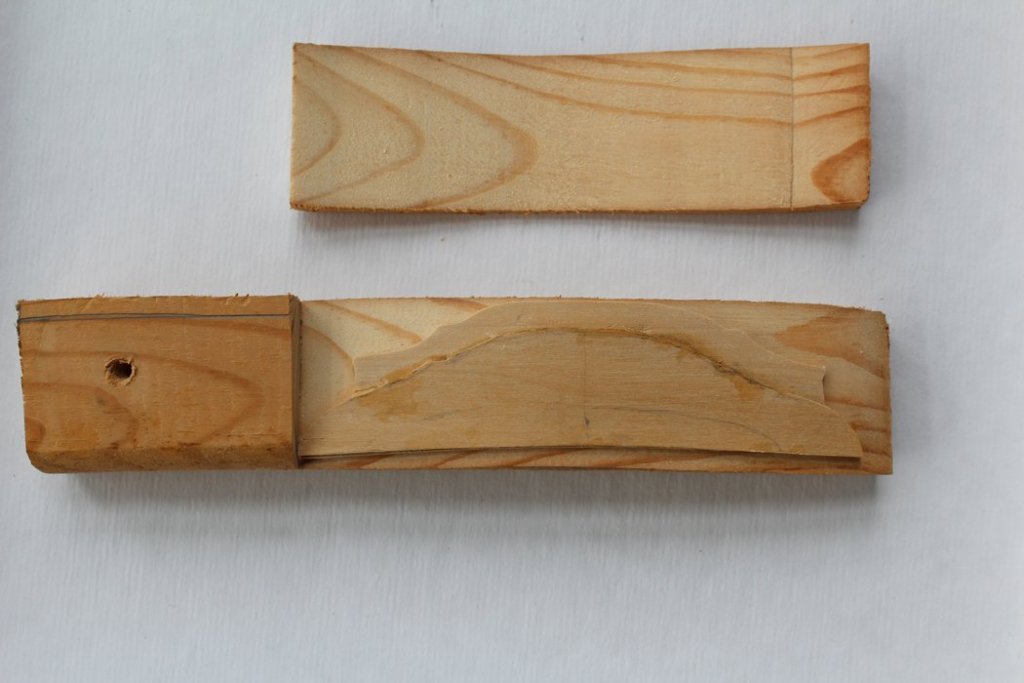
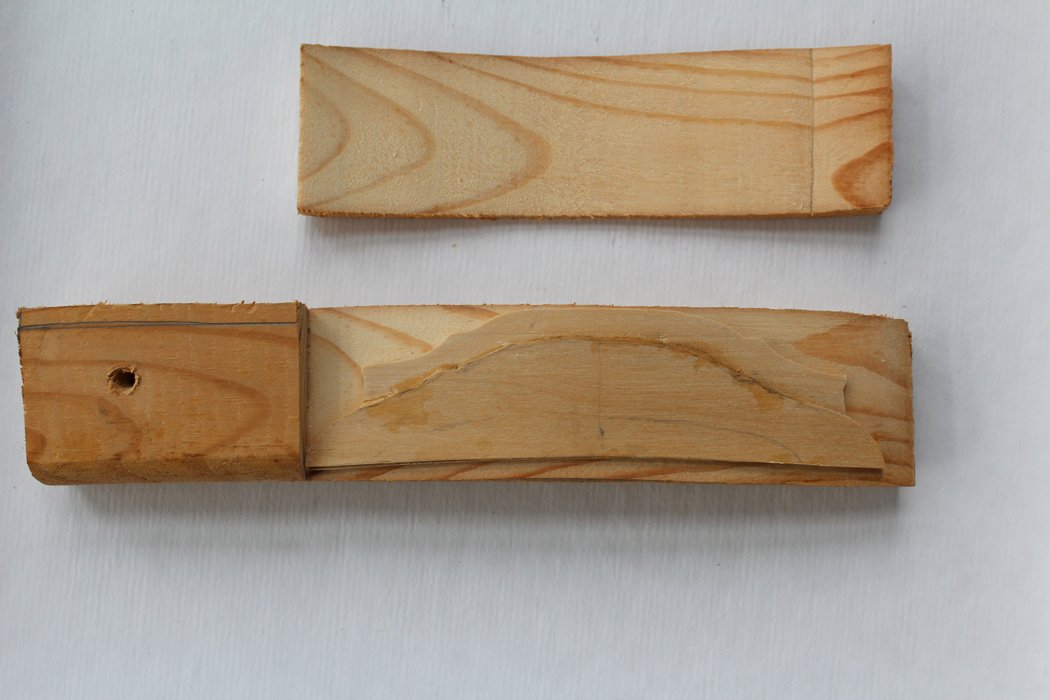
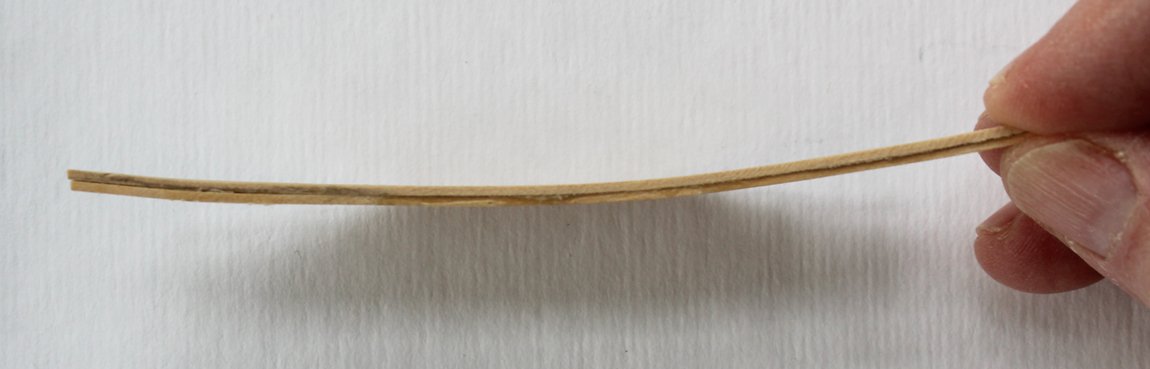
The taffarel is essentially a large painted board of multiple thicknesses onto which the carvings are placed. It is curved to match the curvature of the stern of the ship. The first step was to make a pattern of the curvature. This template was then drawn onto a piece of 1.5" x 3" pine and the curvature was cut out with the scroll saw. This gave me a press into which the various layers of wood will be places to laminate them in the correct curve. By cutting the pine this way I left myself a handle to hold onto. I constructed mine from three layers of 2" board with the grain athwartship.

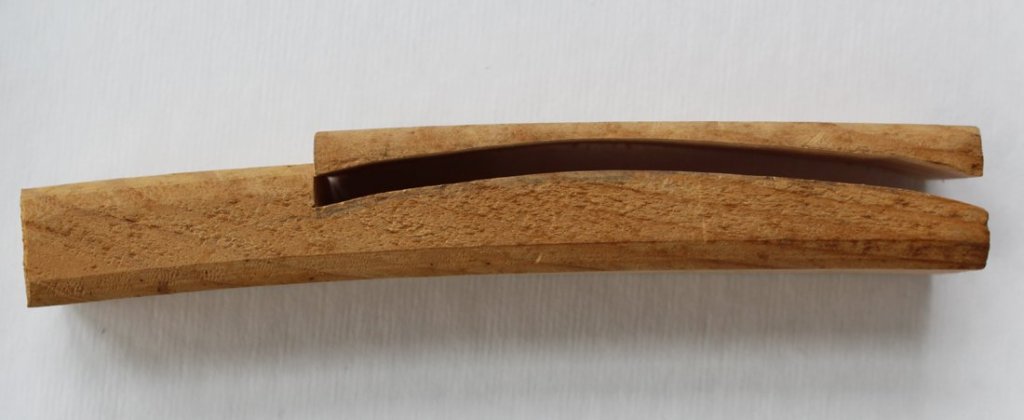
To be completely accurate, the image drawn on the plan must be enlarged to compensate for the fact that one is viewing it end-on. I took multiple measurements from the shear plan and determined that there was 2% inferior/superior difference and a 3% port/starboard difference. This fell within the just-make-it-a-scooch-bigger category, which is what I did by enlarging the drawing 2% on the copier. I took tracings for the overall size of the taffarel and started by cutting out the large base board. I then cut the tracing into smaller pieces representing the remaining boards. It was time to start gluing everything together. I generously applied glue to the two large boards and used bar clamps to hold them until the glue was very tacky. This helped to prevent the boards slipping after being put into the press. I lined the press with Saran Wrap to keep the assembly from adhering to the press. They were kept in the press overnight. The third layer is next and then on to the final shaping.

-
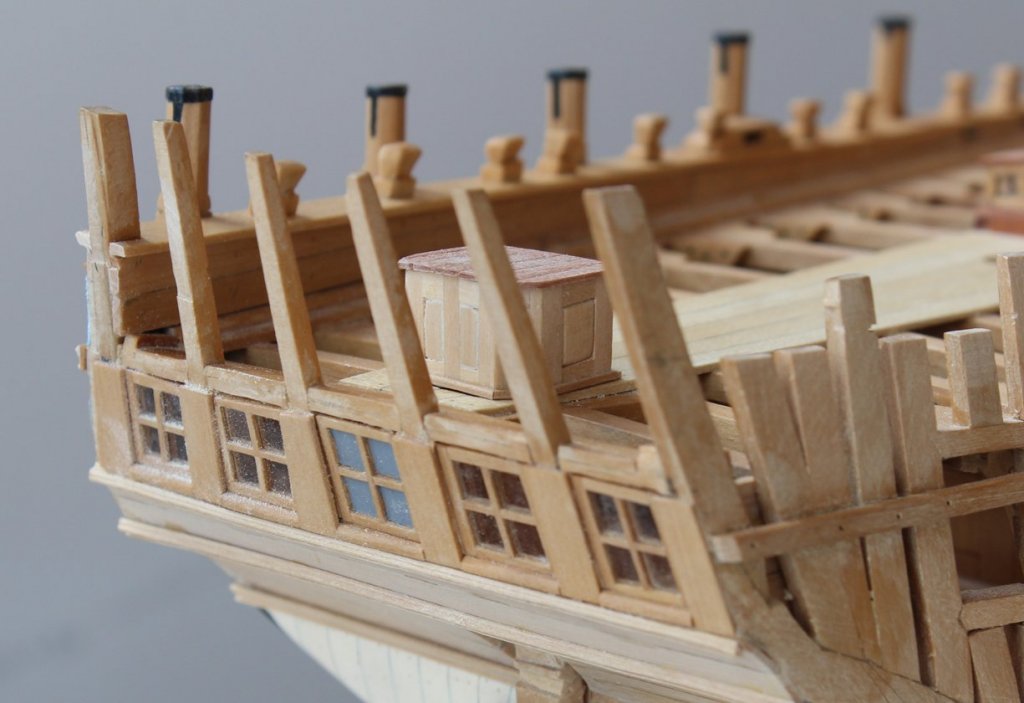
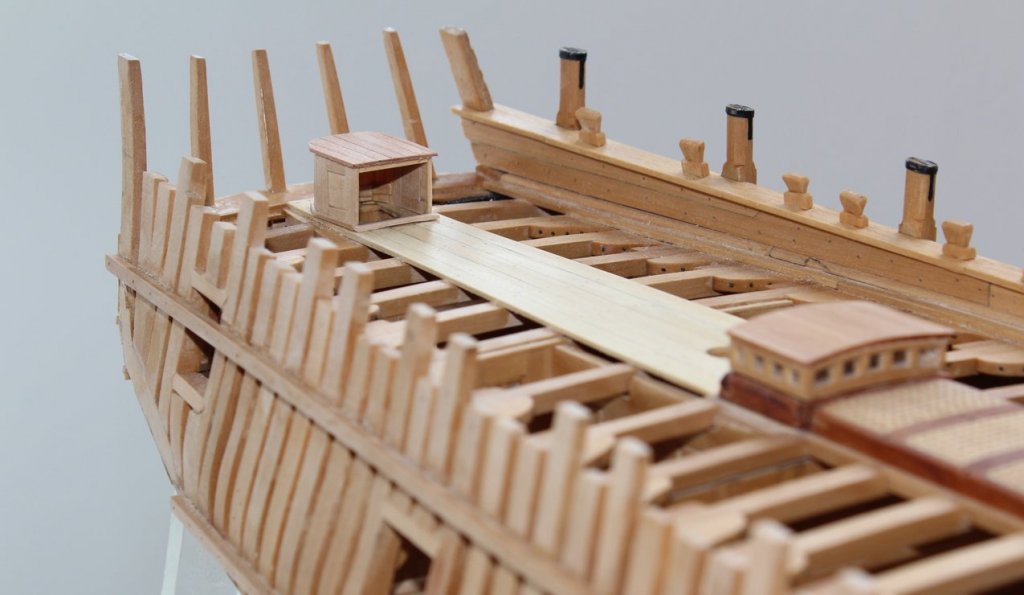
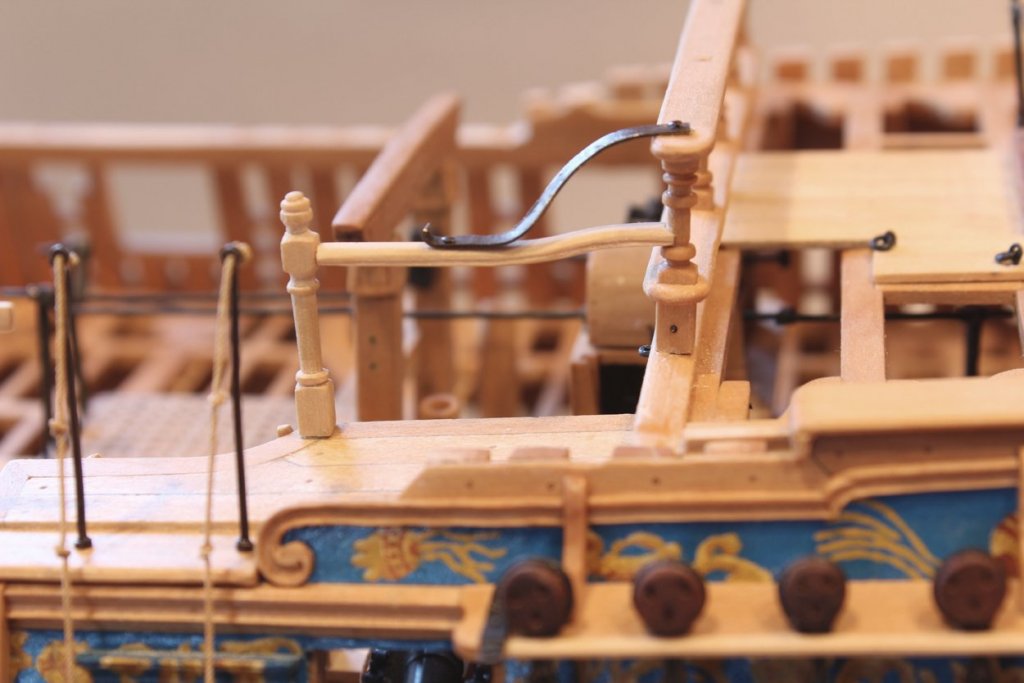
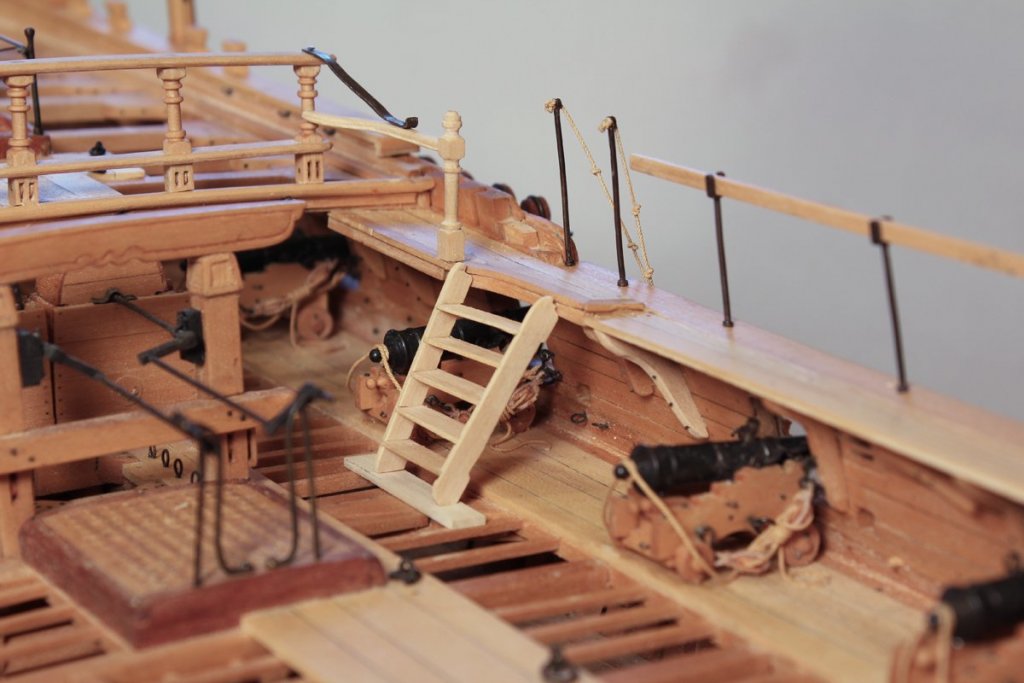
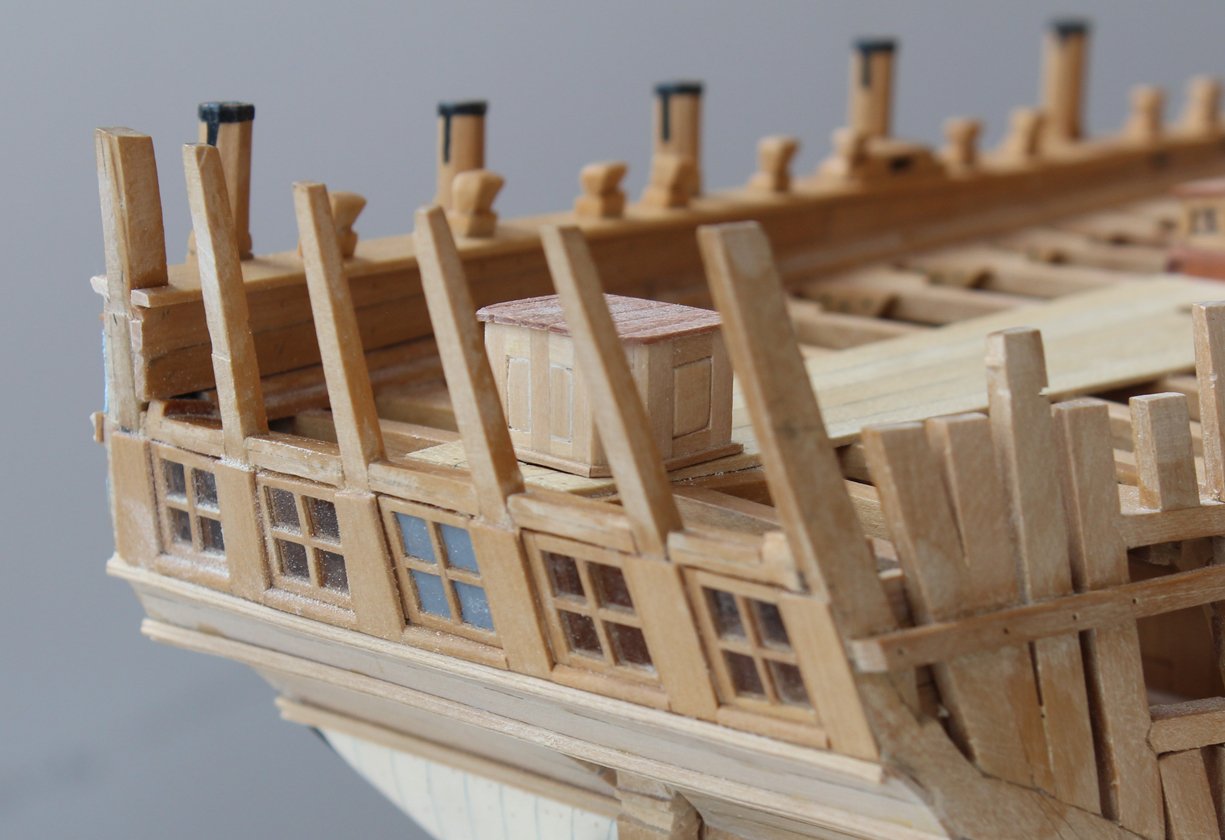
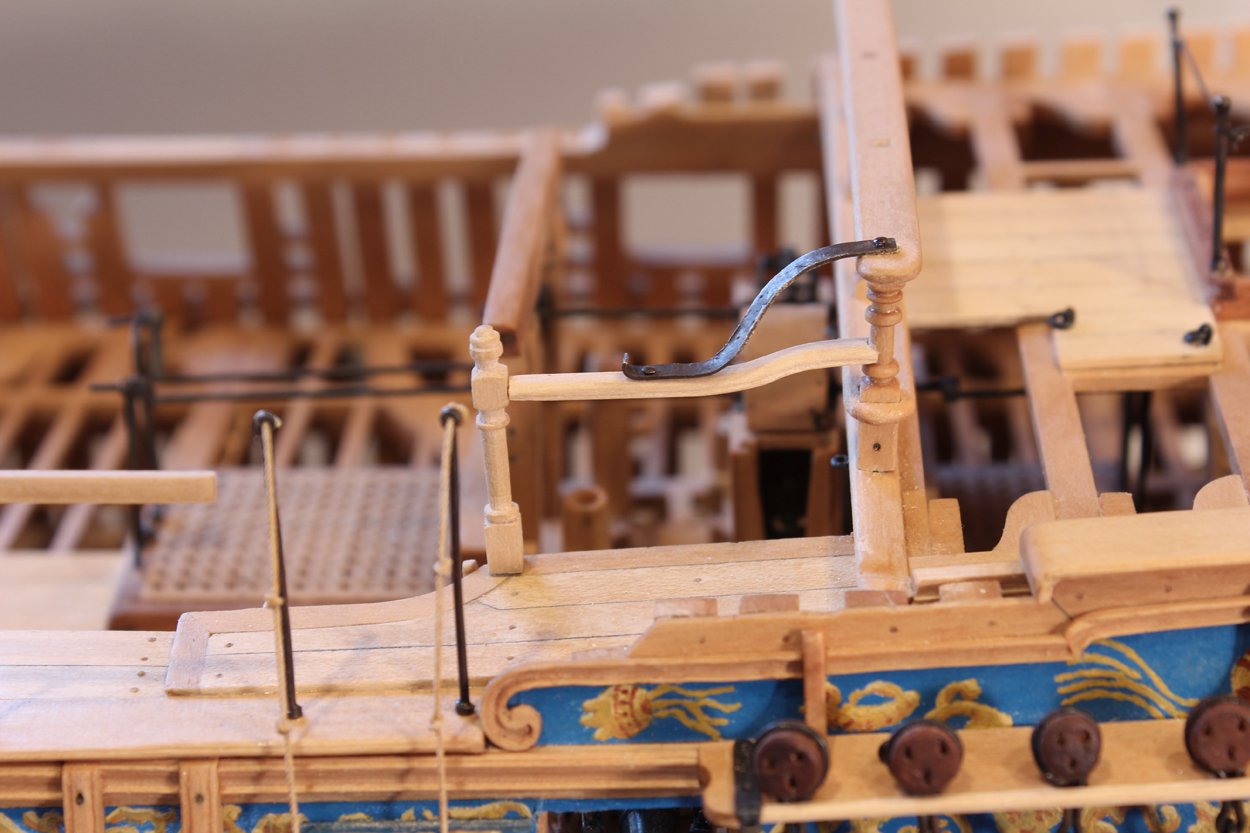
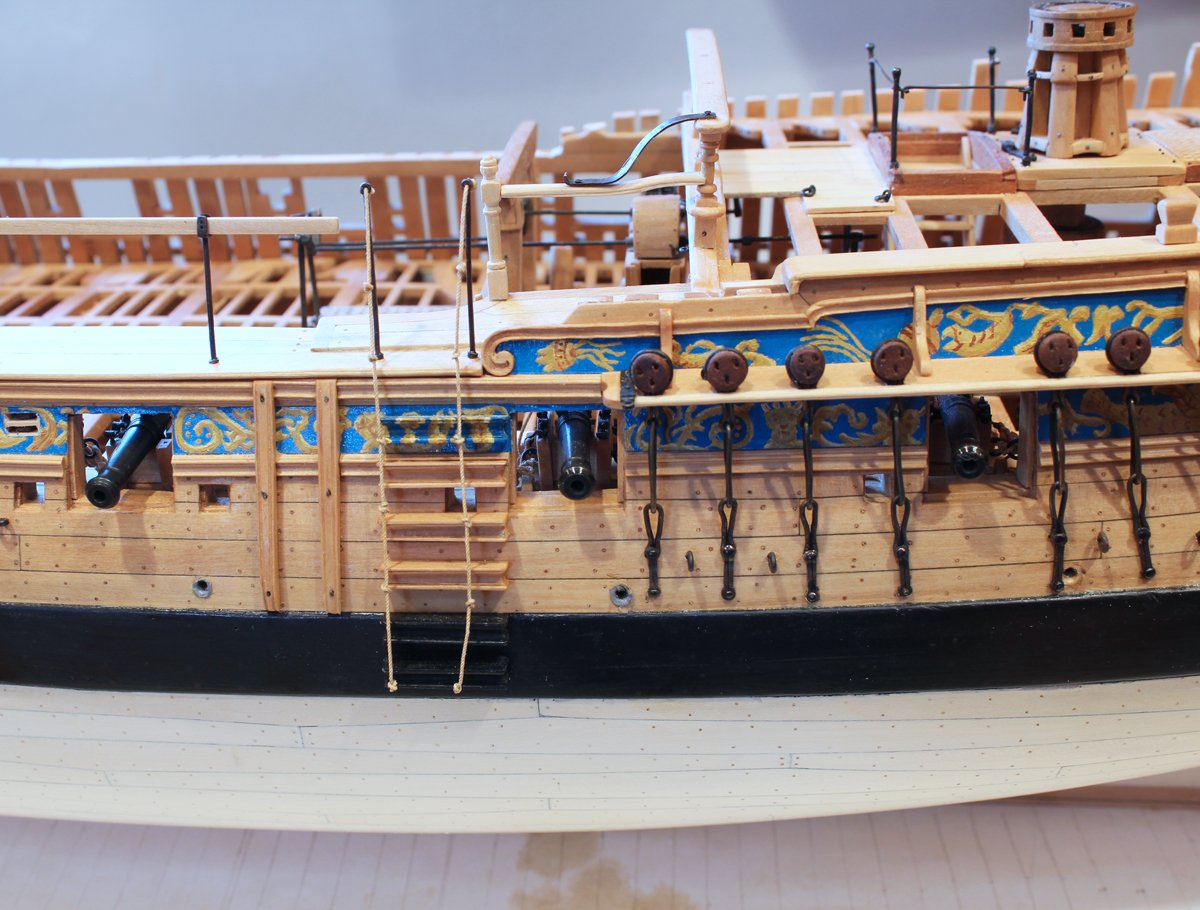
The fixed gangway newel post was turned on the lathe. It is mortised into the deck. The rail between the newel post and quarter deck breastwork is curved and had a decorative shape cut into both sides of the rail. I made mine look like the handrail on my staircase at home. There is an iron strap between the rail and the breastwork rail. It is bolted at both ends. This piece took me many hours to make correctly. It curves in an S-shape between the two rails. It curves outwards as it approached the gangway newel post. The problem is that the breastwork rail is curved to match the deck camber and the gangway railing is parallel to the waterline. This little difference (for myself at least) resulted in the curved portion of the iron strap to appear rotated outboard. The final fix was to overcompensate for the breastwork rail camber when cutting out the strap, allowing it to remain parallel to the waterline throughout, except where it bolted to the breastwork rail. At this point I discovered that the breastwork rail assembly was not exactly perpendicular to the waterline (as seen in the first picture). I removed the entire assembly, only breaking one post, and reinstalled it correctly. The second picture was taken after reassembly. I also installed entering ropes onto the entry stanchions. They are stiffened with very dilute white glue.


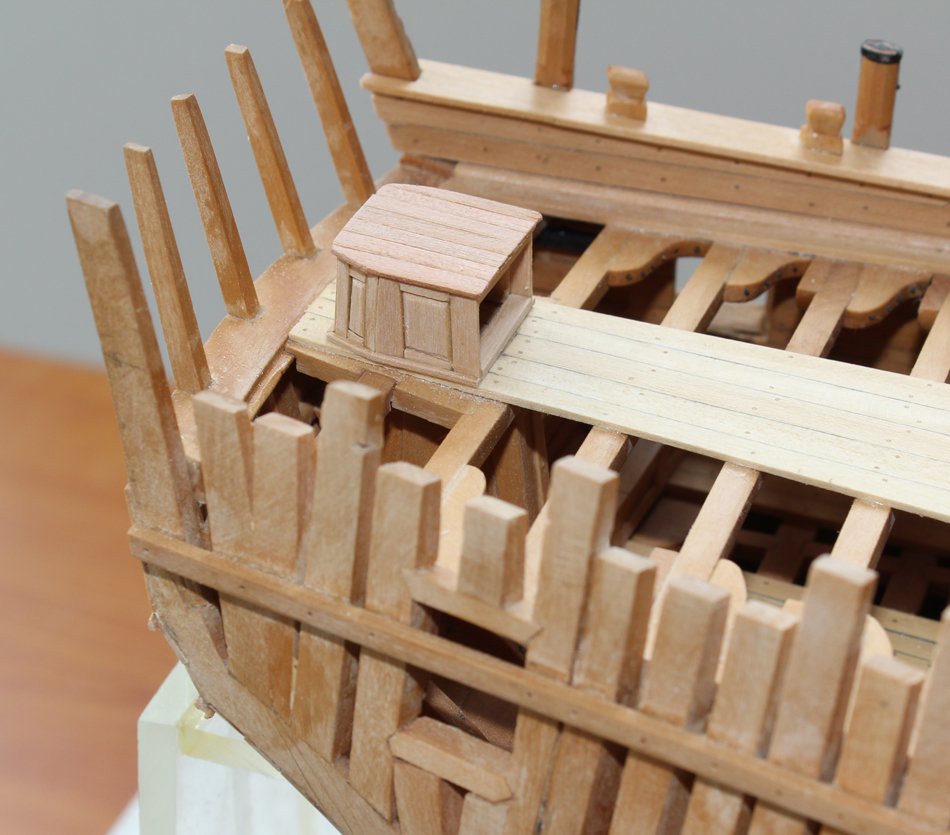
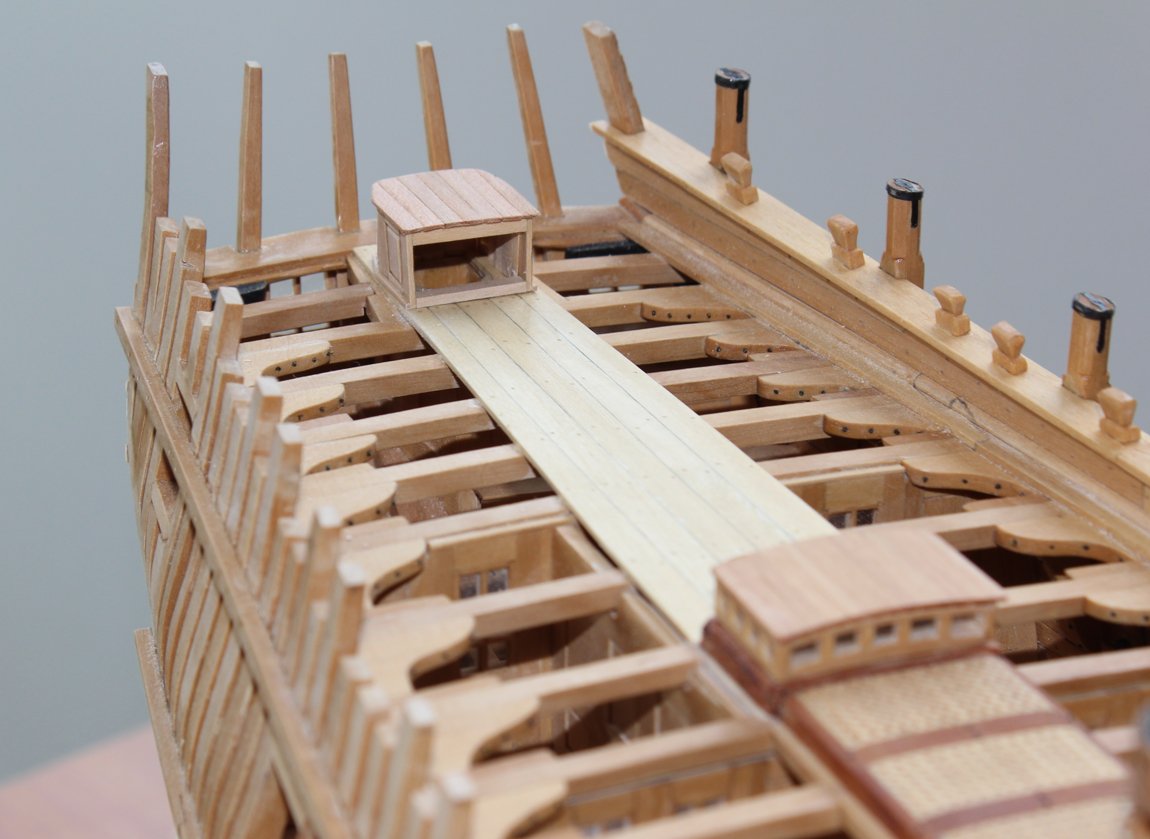
The rudderhead is protected with a cover. The plans show the shape for the cover, basically a three-sided box with the aft corners rounded off with a short wall. The roof is made of cherry. I have removed the rail in preparation for beginning construction of the stern structures.

-
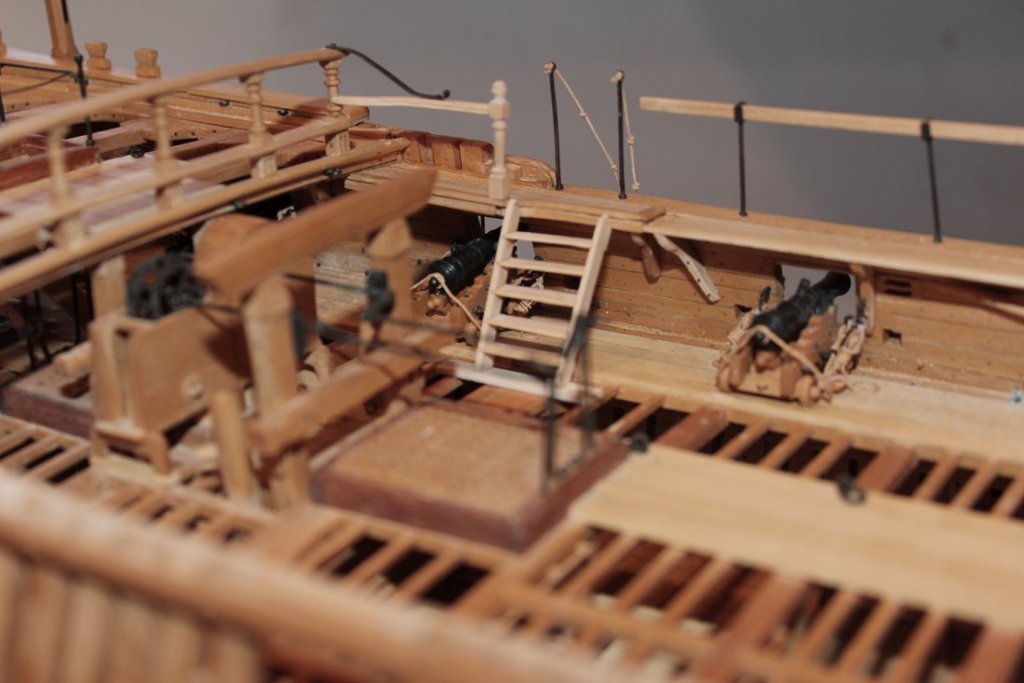
I cannot believe it has been so long since the last post. I found myself being very critical about the way certain things looked or fit together and have been spending a lot of time remaking various items. In between the remaking projects I have gotten in a little bit of new work. The main and mizzen deadeyes and chains have been installed. The mizzen chains do not have chain plates. The preventer eyebolts and swivel bolt below the last gunport have also been installed.


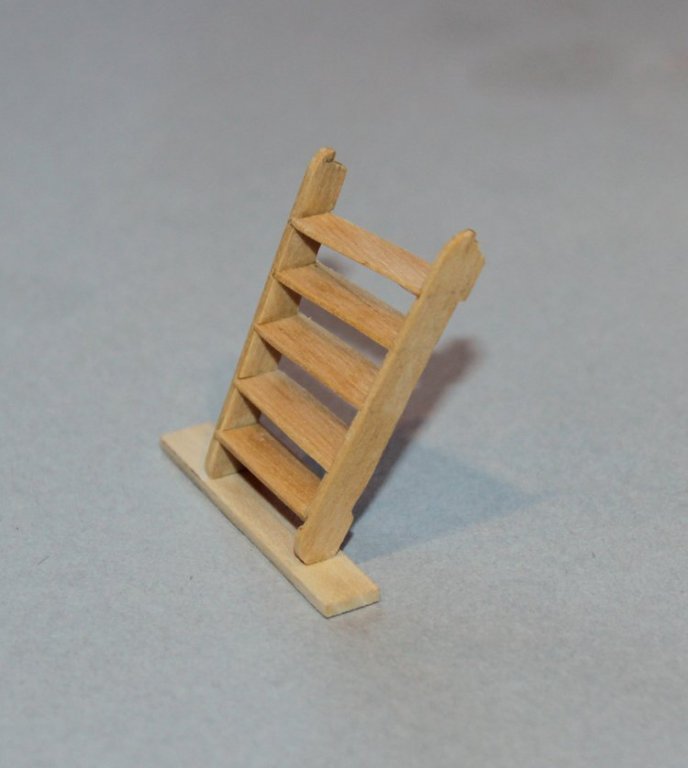
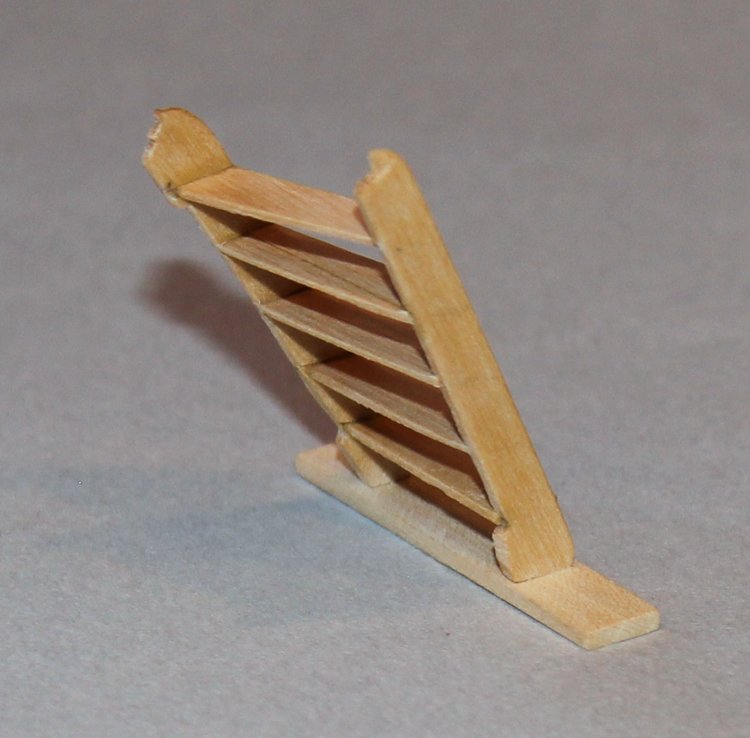
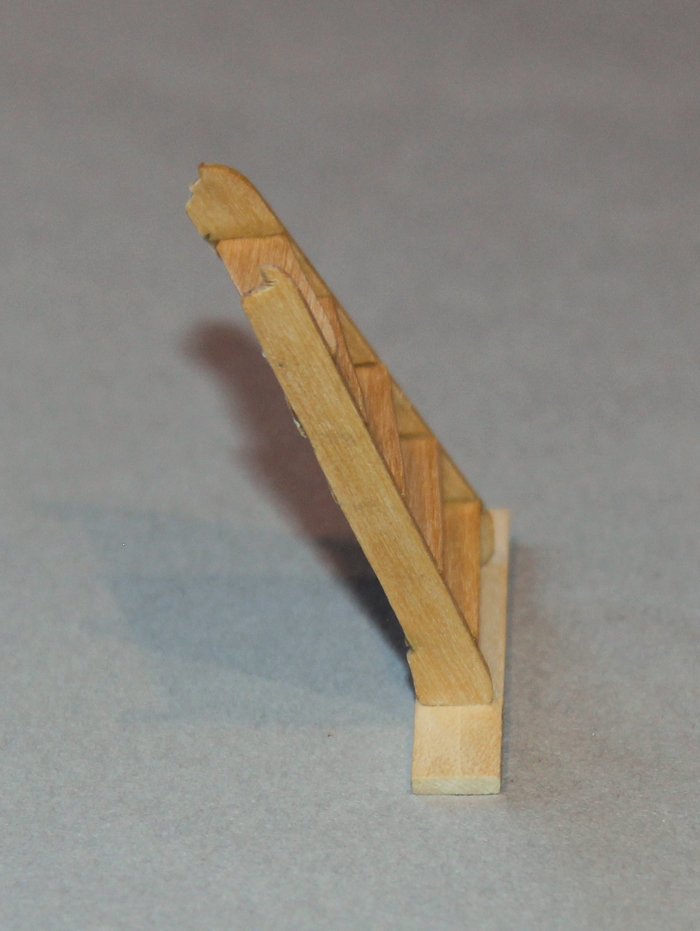
There is a stairway leading down to the deck from the fixed part of the gangway. In TFFM David discusses installing a stairway with parallel treads vs. winding steps. Since the interior aspect of the gangway is curved, I decided to build a winding stairway. This is easier said than done! The uprights are different lengths and sit at different angles to the deck. They articulate with the gangway with a notch at their tops. Once I was happy with the uprights I installed oversized treads. After they had dried I used a drum sander on the Dremel to shape them. I will defer permanent installation until later in the build to preserve access to the cannon to repair them (again!).

- druxey, michael mott, Jack12477 and 20 others
-
23


HMS Atalanta 1775 by tlevine - FINISHED - 1:48 scale - from TFFM plans
in - Build logs for subjects built 1751 - 1800
Posted
Maury, I guess it is a good thing that I don't have too much mass! Thanks everyone for looking in. Now back to carving.