Dan Vadas
-
Posts
3,261 -
Joined
-
Last visited
Content Type
Profiles
Forums
Gallery
Events
Everything posted by Dan Vadas
-
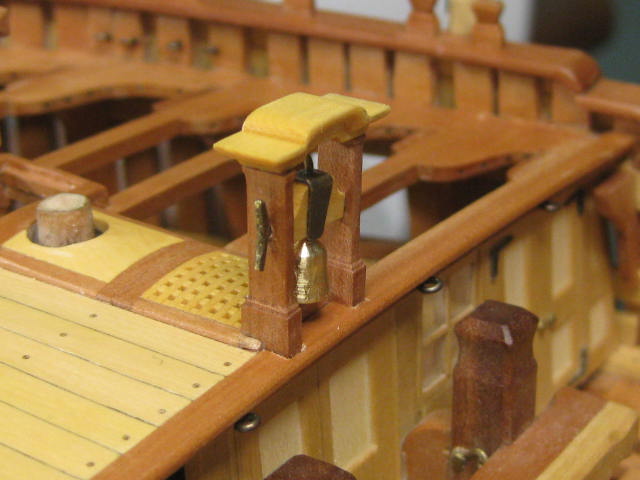
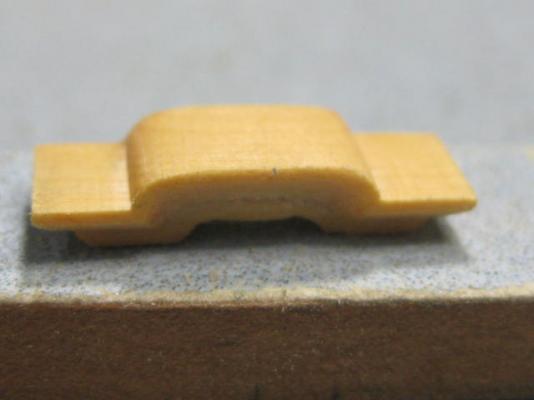
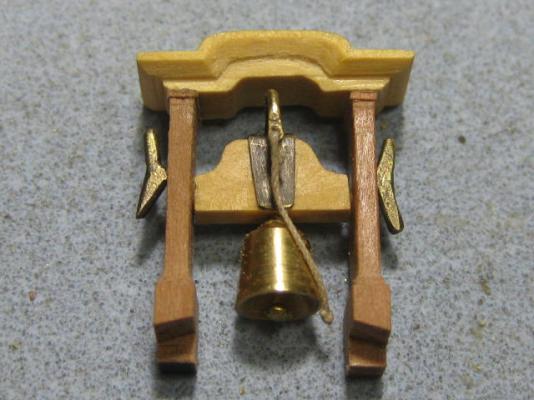
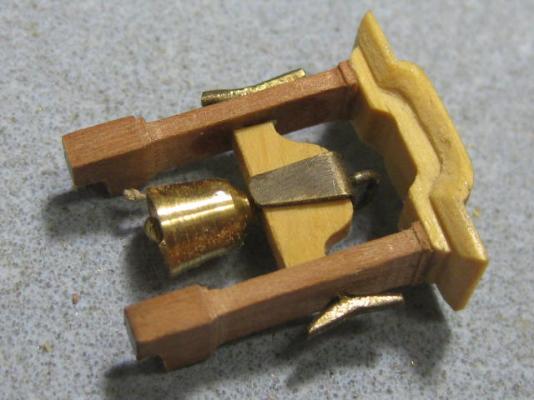
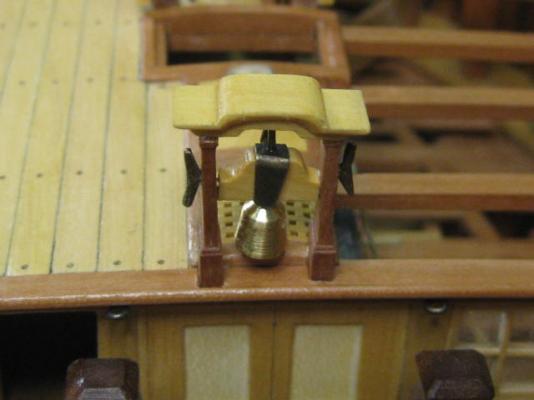
Thanks again Doris, John, Patrick (welcome to my Log) and Edwin . Belfry The Belfry roof is carved from a single piece of English Box : The two stanchions are dark Swiss Pear and the Headstock is English Box. I turned the bell on the lathe and scratchbuilt the two cleats from brass sheet : The belfry assembly fixed in place : Danny

-
Hi Grant, Yep, that's what usually happens, even with a really good timber like English Box . An alternative method to using the stone in the Dremel (in case you DON'T have one of the right diameter) is to drill the centre hole in the piece of wide stock FIRST, then cut the outside on the scroll saw a bit oversize - this can easily be filed to the right shape when the centre has been finessed to shape, cut the circles in half and continue on as you did. Other than that you did it EXACTLY as I would have done - I didn't think the drawing I made needed any further explanation for you . Danny
-
Thank you all . Not really, the eyebolts on the starboard side of the main mast are the same. I had to draw the line as to how many planks I wanted to lay. It's "Minwax" Satin finish, and I don't buff between coats - no need to. Danny
-
Hi Mark, I don't have dado washers - I just make an extra cut or two by moving the fence until I get the required width of cut. Danny
-
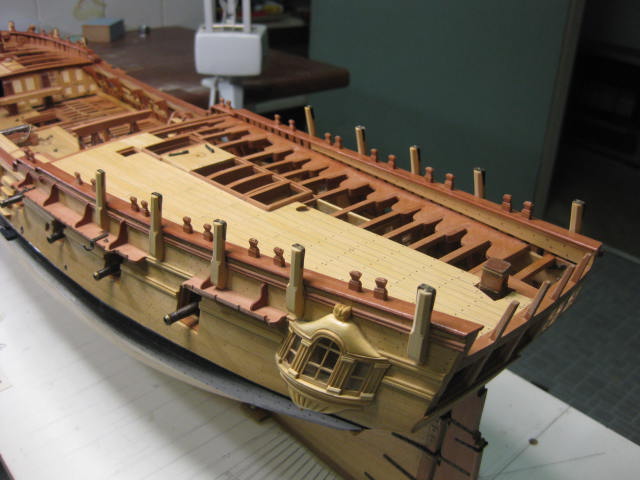
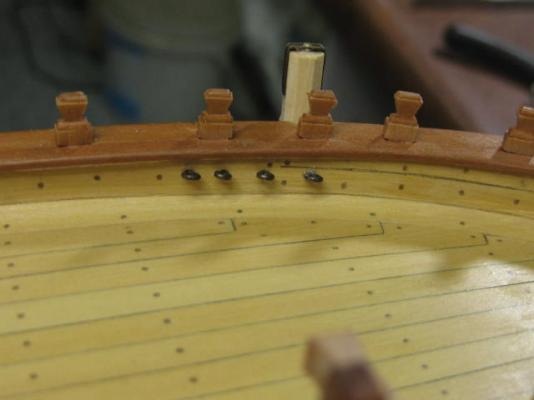
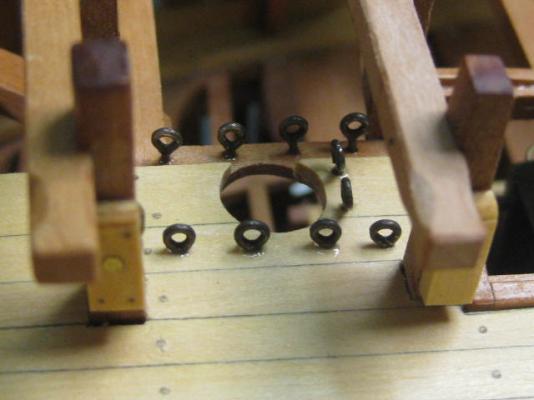
Hi all, I've managed to get a little bit done - the following would normally have taken me about half a day, instead I've spent nearly three days on these pieces. At least I can still do SOMETHING . Fore Jeer Bitts The Fore Jeer Bitts on Vulture are similar to the Fore Topsail Sheet Bitts, except they don't continue down to the upper deck. There is no room for Standards on them either as the hatch behind them is wider than most other Swan Class ships : I've also made and fitted 22 Eyebolts - 10 around the Foremast, 8 in the bulwarks adjacent to the mast, and 4 in the Breast Beam : Danny

-
Sorry Mike, not even close. Vulture is only 15 feet longer than Bounty and has about 60 full frames, plus 20 or so cant frames. Danny
-
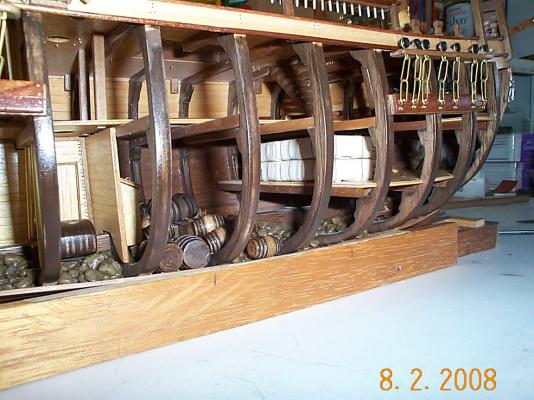
Hi Al, 1. Leave the decks unstained - the supplied timber is as close to the "real" color as you'll get. Decks were usually made from some type of Pine. 2. Don't assume for a minute that the kit "frames" depict the ACTUAL framing of the Bounty. They are just Bulkheads with the middle cut out . The REAL framing of a ship of this type is MUCH more involved - there are at least THREE TIMES as many frames on the "real thing". Same with the Deck Beams and Framing. Check out THIS LINK to my Vulture for an idea of what the framing actually looked like. The decking of the real ship wasn't supported by a sheet of ply, so feel free to add whatever supports you like under the decking - you'll be getting a lot closer to reality than the kit . 3. Regarding Ballast - here's a pic of the very same AL Bounty I built about 7 years ago (before MSW days). I used Aquarium pebbles which I bought from a pet supplies store (click the pic for an enlarged version) : Take a look in THIS LINK for info on how to do that. Danny
- 265 replies
-
- 1
-

-
- finished
- artesania latina
- (and 1 more)
-
Not quite John - I still have a few "odds and ends" to do on the decks before I start that next major project. Thank you to David, Alan, E&T, mhegazi and David . I've been unable to do very much on Vulture lately - for those of you who don't already know and are wondering why, the explanation is HERE. Please leave any comments in that thread as I don't want to clutter the build log with too many "off topic" posts. Thanks again to all those who have already replied to it. I hope to be back here as soon as I possibly can. Danny
-
Welcome back Cats. What John said. I know first-hand how a very bad back feels - I've been having severe back pain for some time now, and it's really taken a toll on my modelling time and quality of work. What used to be a breeze a year or two ago is now a real effort. I know what's causing it, more will be revealed when I get the final results of some tests (not good I think). Danny
- 237 replies
-
- 1
-
-
- cutty sark
- revell
- (and 2 more)
-
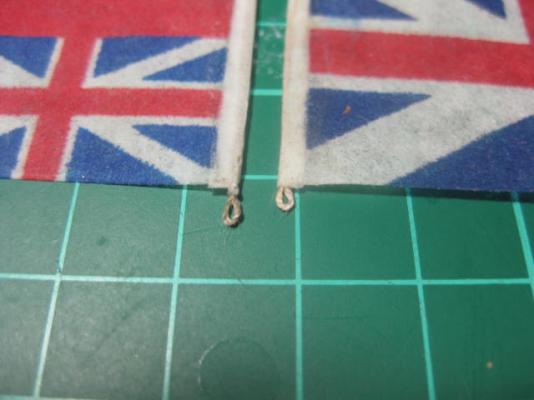
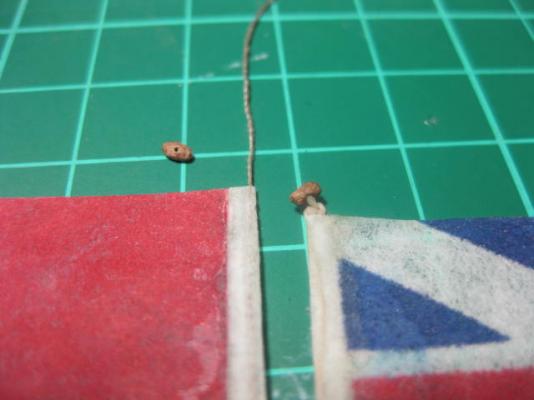
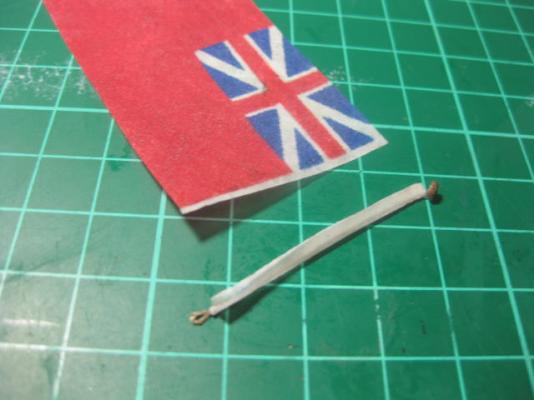
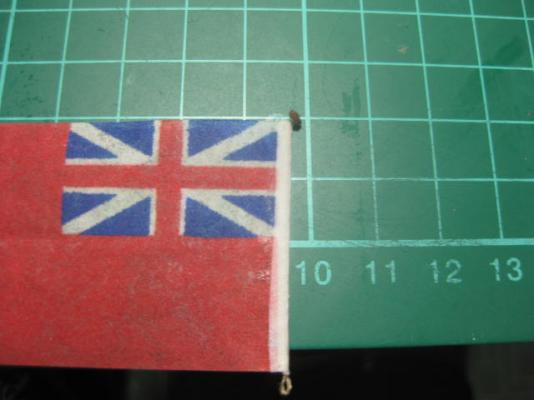
Nice job on the ensign Denis . I trust you will be mounting it in the correct manner? Below are a few pics from my HMAT Supply's ensign that show the method I used : Danny
- 555 replies
-
- 8
-
-
- sovereign of the seas
- mantua
- (and 1 more)
-
Thanks for the compliments Eamonn, Janos, John, Popeye, Maury and Maurino. Janos - yes the darker wood for the handrails is Swiss Pear Maury, I've used the 7 - 10 method for other octagons, but the jig makes it a lot easier as I don't have to keep a careful eye on the lines . Back to work - the Swivel Gun Mounts have a re-enforcing strap to hold the base of the swivel mounts. These are bolted through the timber mounts on the real ship, but I've omitted this detail as the bolt heads would be almost too tiny to see on the model. There is supposed to be an octagonal band around the top as well, but once again I'm not fitting that - I had several attempts at making them using various methods, but none looked satisfactory. All the Mounts are now permanently fitted. The Swivel Guns themselves won't be fitted until almost at the end of the build. Danny


-
Edge bending planks
Dan Vadas replied to ortho85's topic in Building, Framing, Planking and plating a ships hull and deck
Regarding edge bending Jigs, here's mine which I showed to another member. The explanations of how to use it are below the pics. Danny -
I'm glad to hear you found them Peter, as I probably won't be going up to the van for another couple of weeks - I'm not feeling very well at the moment . Danny
-
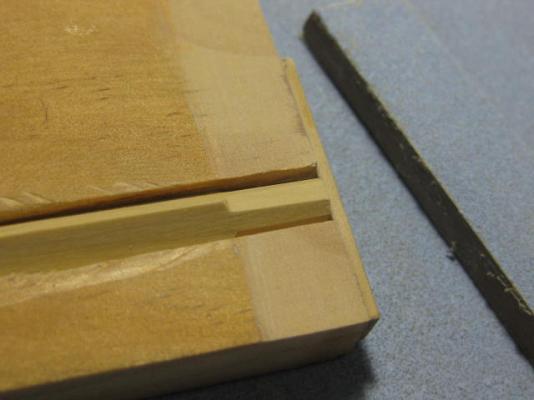
No problem Eamonn. The pics below almost explain themselves. I used my table saw to cut the V groove, first the two outer cuts to depth, then a cut down the middle for the bottom of the V, and then some decreasing cuts either side to remove the bulk of the wood. I finished it off with a V gouge - it looks a bit rough, but it holds the piece quite firmly. I used my fingers to hold the piece down whilst sanding - holding and shaping them is easier done before cutting the piece to length off the long stock. The stopper glued to one end helps keep the stock at the correct distance from the end - I simply marked the jig with a pencil at the point where I had to stop sanding. If all your pieces are the same length you could glue a piece of scrap across the V at the mark to avoid going over it. I start off by sanding down one corner until the sanding stick just touches the top of the jig, then turn it 90 degrees and sand down the second corner and so on. Setting the height was a bit of trial and error, but you could probably calculate and measure the amount of depth required. If you have quite a few pieces to shape you could CA a couple of strips of an old hacksaw blade or flat steel either side of the V groove to avoid sanding the top of the jig too low - I only had 16 pieces to shape so I didn't bother, but the last three or four needed careful work because I DID sand some off the jig. You can see that in the second pic above. Danny


-
Thanks for the comments on the jigs Remco, Mark, dragzz, Doris, John and Pat. I'd toyed with the idea of using the Mill, but after cutting the first swivel mount in a couple of minutes I figured the jig would work quicker . I've now temporarily glued all the Port side mounts in place and sanded the Sheer into them. Now I'll fit the Starboard ones and sand them horizontally athwartships. Danny
-
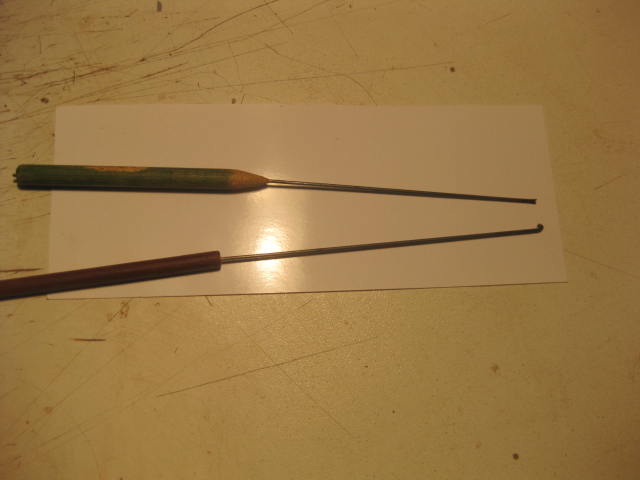
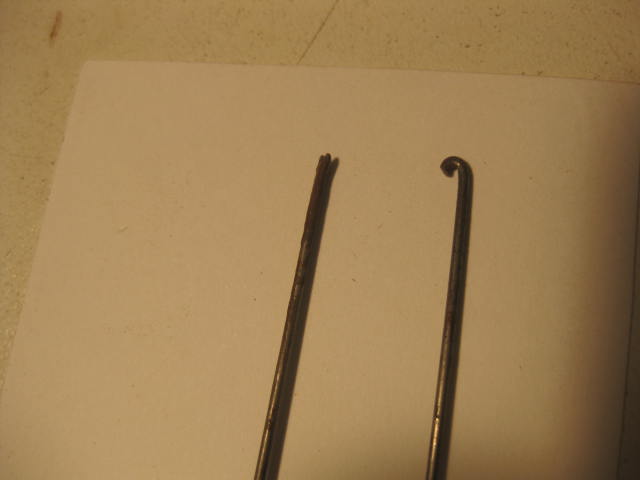
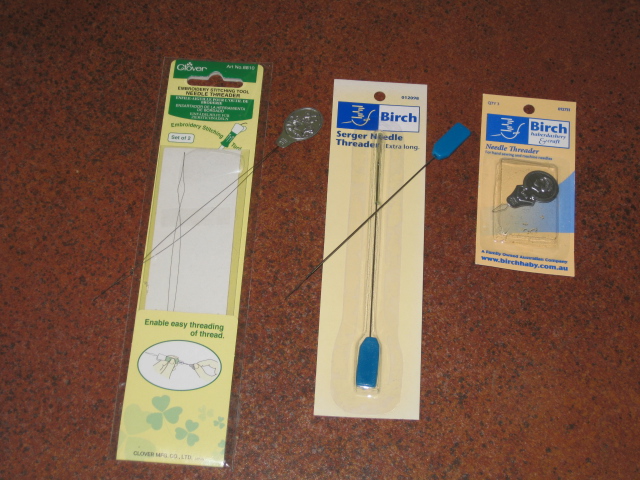
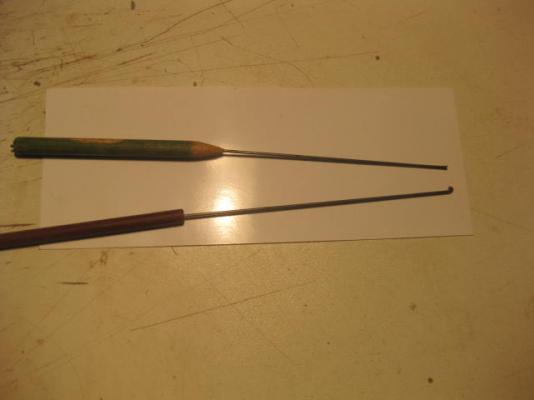
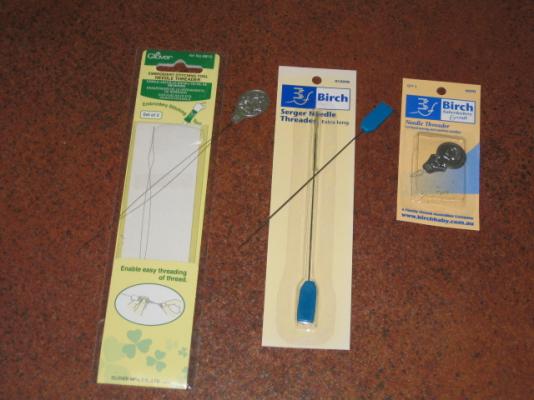
Hi Grant, A bit further to Mike's suggestion above, I made a couple of simple tools for this kind of work. One is a "push" tool, the other a "pull" tool. They are made from piano wire with wooden dowel handles : Couple these with some special Needle Threaders for feeding line through Eyebolts and it simplifies things considerably : Danny

-
Several hours later I've made all the swivel gun mounts to this stage. Next comes some rather tricky ironwork. Danny

-
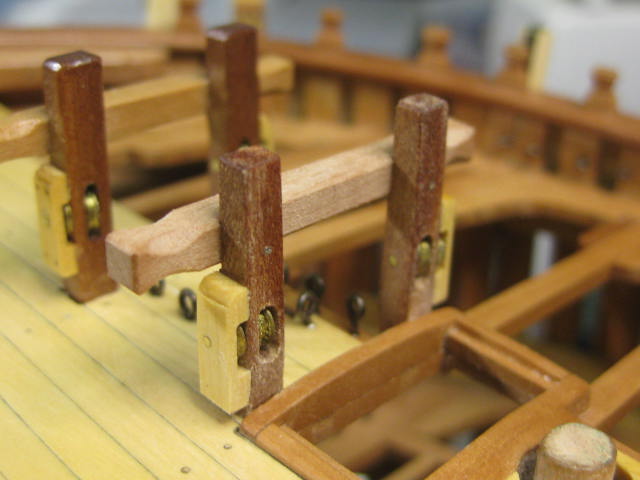
And thank you shihawk, Geoff, Christian, Rafael, Spyglass and John . Swivel Gun Mounts There are six Swivel Gun Mounts on the Forecastle and ten on the Quarterdeck. They are octagon shaped on the upper portion, and square on the lower. I used a jig with a "V" cut into it to sand the octagon shapes in : A small decorative shoulder was cut into the transitions using an Xacto blade : The bottom is quarter-rounded. I used the Byrnes Disc Sander for this : The forecastle mounts are all the same length, so I've made all six. The quarterdeck ones are of varying lengths, so I'll make up two at a time. At this stage I have left the tops of the mounts a little bit long, as they will need to be trimmed to follow the Sheer line longitudinally and are horizontal athwartships. Danny


-
Nicely done David, especially where you differed from the kit's instructions with the linings of the Companionways - yours look much better. That kit-supplied Windlass looks like nice quality - certainly better than some of the cast metal offerings of other kits . Danny
-
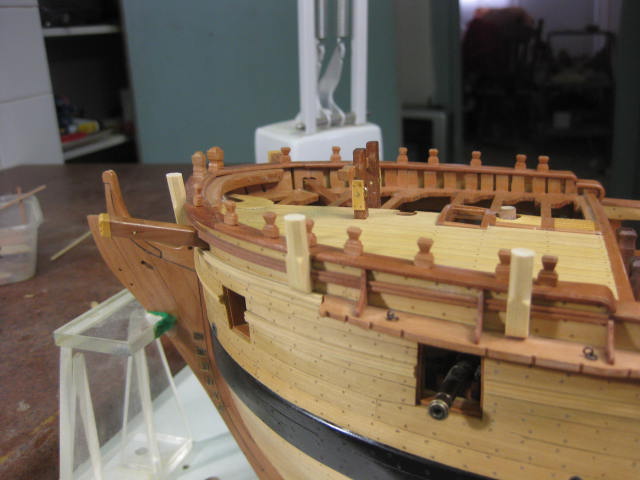
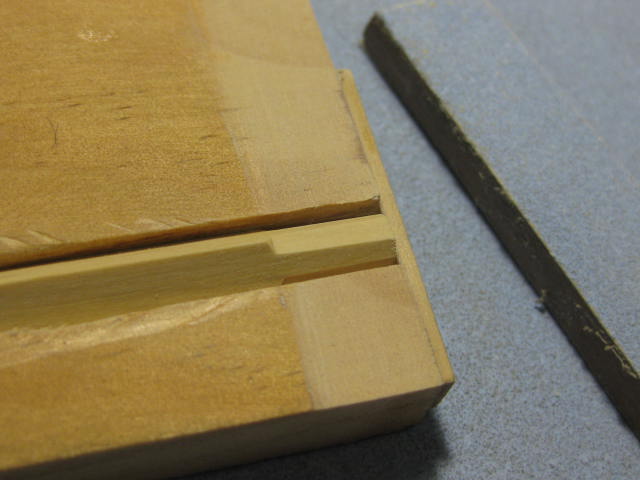
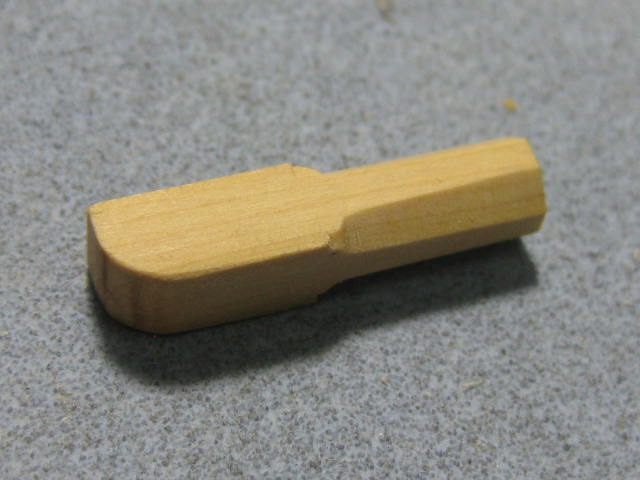
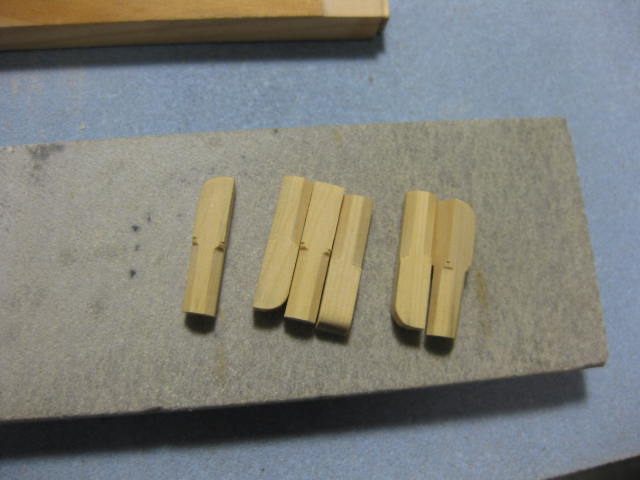
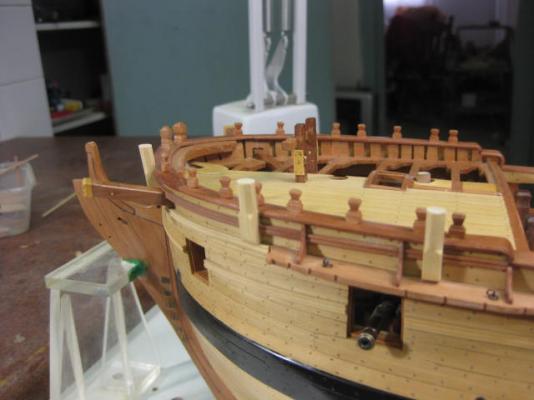
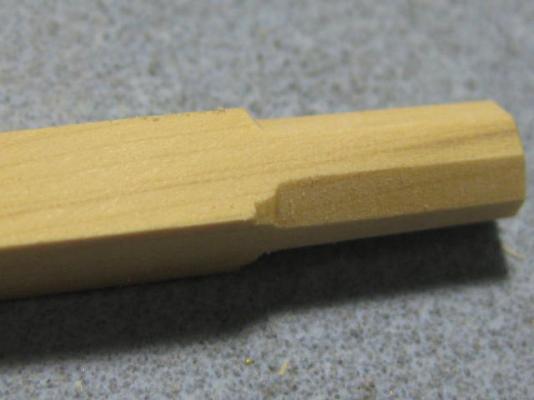
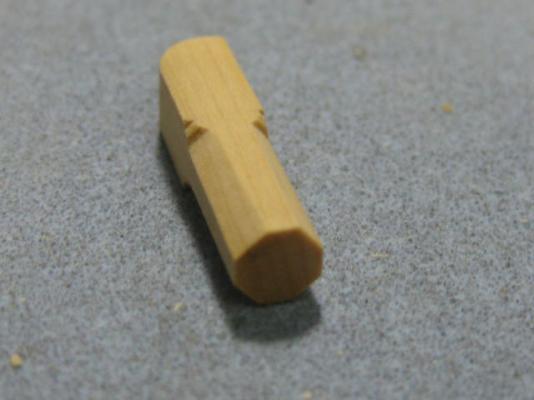
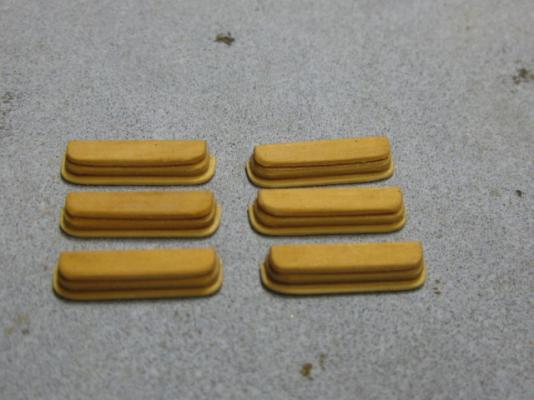
Thanks again Grant, Allan, Bug, David, Guy and Alex - your comments are very welcome . Allan and David - I'm intending to fully mast and rig the ship (if I live that long ). Entry Steps There are six Entry Steps per side - I'm only fitting the Port side. To avoid making yet another Molding Scraper (which would have been very difficult to use around the ends of the steps in any case) I've made each step in two pieces using English Box. I used a previously made scraper to shape the lower portions, along with needle files and Xacto knife. The two steps on the black Wales have been stained with Ebony wood stain - real Ebony didn't like my scraper very much, too much chipping out happened when I tried it on a sample piece : Each step needed a varying degree of bevel sanded into it's inboard face to match the shape of the hull at that point. Danny

-
Hi Rick, For a First Timer good instructions, tips on hull fairing etc would be more beneficial than laser-accurate cut bulkheads. Information like this, rarely supplied in a lot of kits, would give a Newbie the grounding needed to make a good job using the poorer quality material of the lower range kits out there. I'm not saying that laser-cutting isn't a good idea (which it certainly is), just that the cost of a couple of hours worth of typing/illustrating good instructions would be more worthwhile in the long run. Danny
-
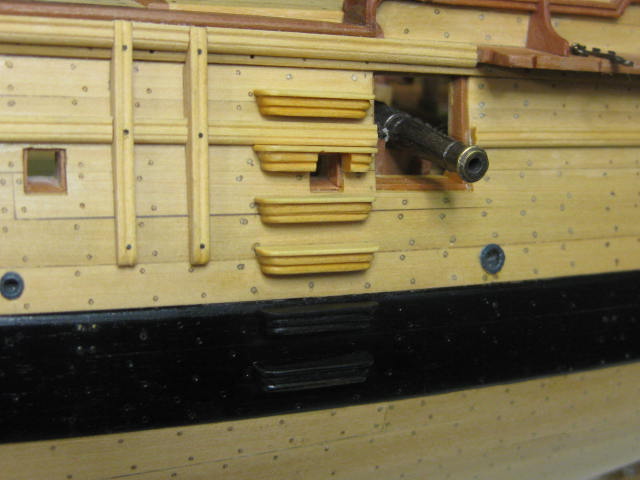
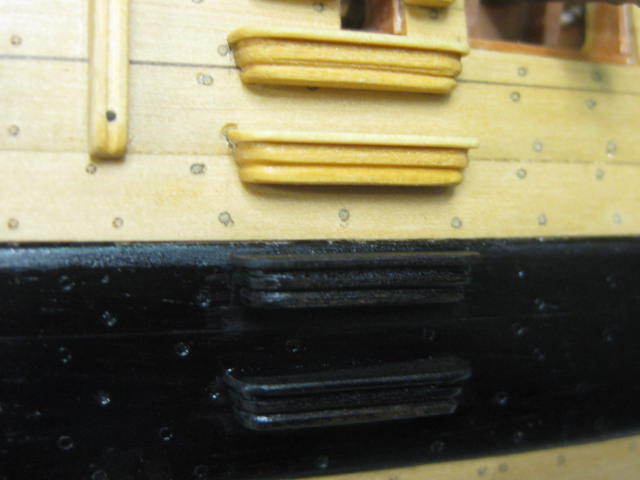
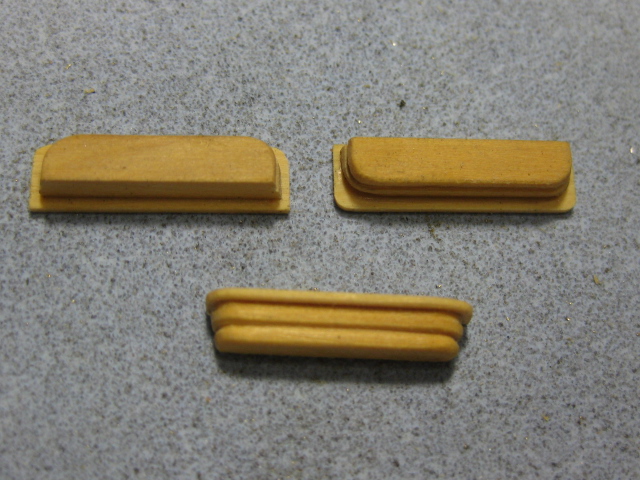
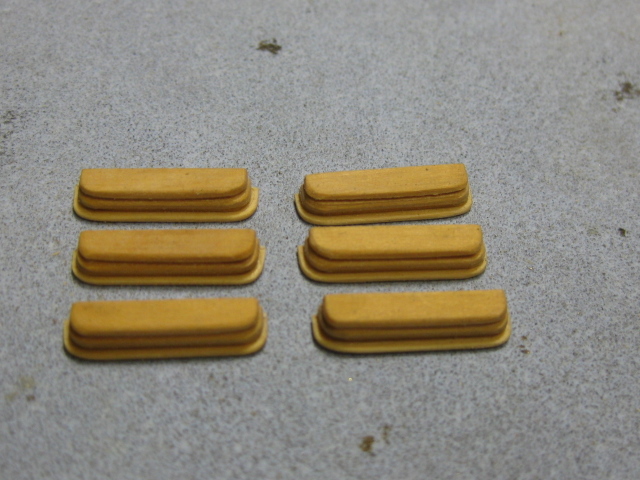
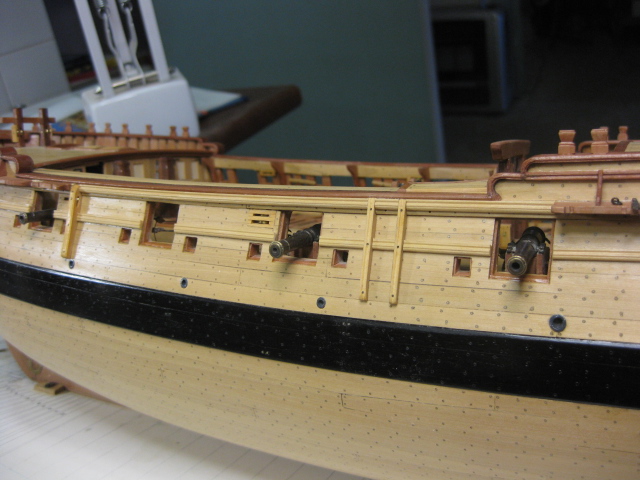
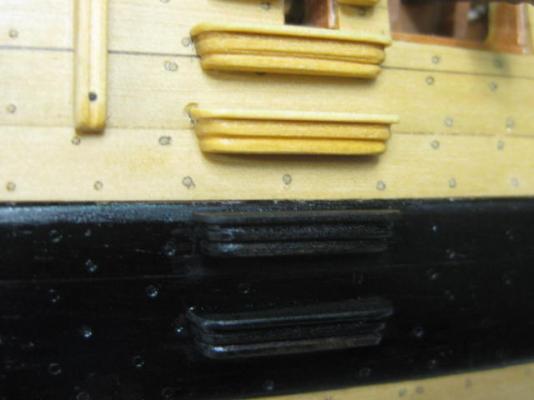
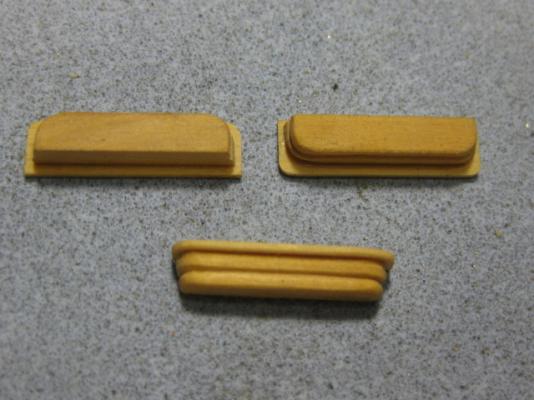
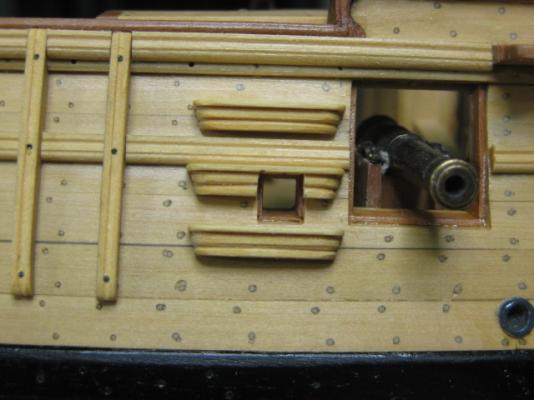
Fenders The Fenders assist in loading the ship, especially from a boat. Barrels could be more easily loaded as the fenders make a smooth run over the rails below : Unlike the Chesstrees I fitted earlier, the fenders don't play any part of the rigging so I'm only fitting them to the Port side. Danny

-
Thanks very much juandavid - and your first post too, that's a double honor . Believe me, it's definitely NOT my eyes. My 4x Optivisor is starting to become ineffective, might be time to upgrade it . Danny
-
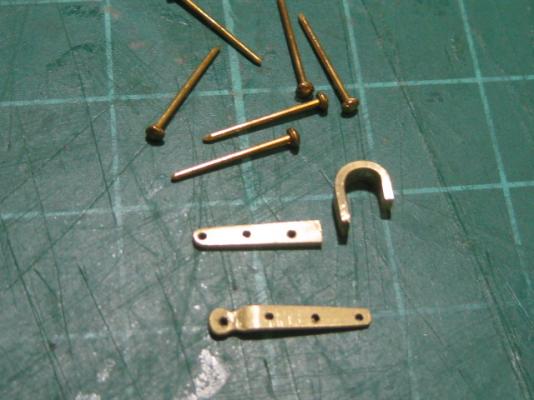
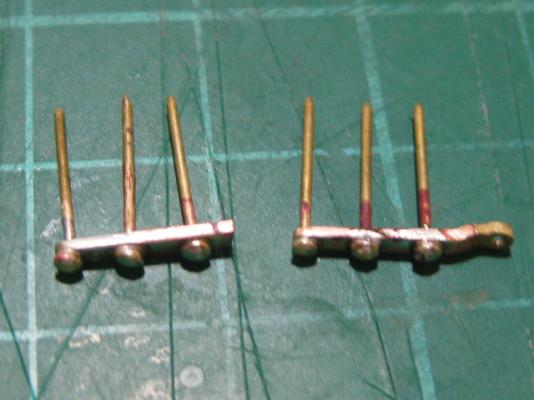
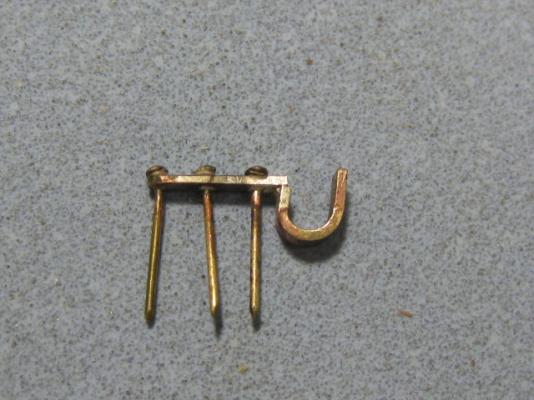
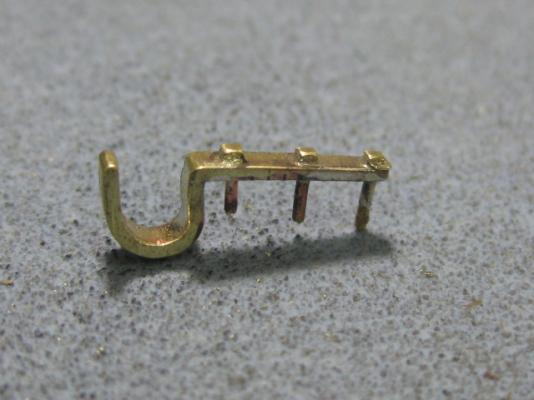
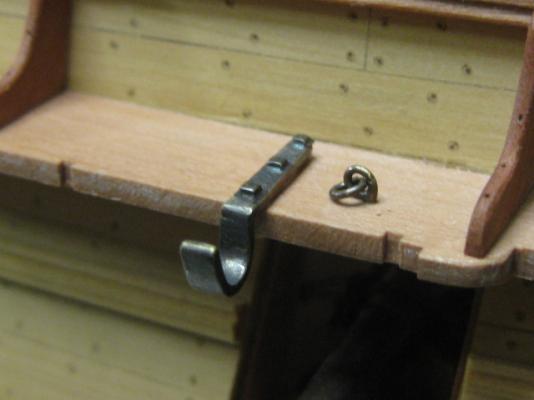
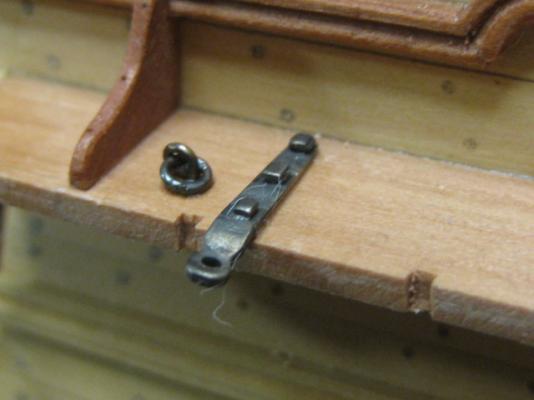
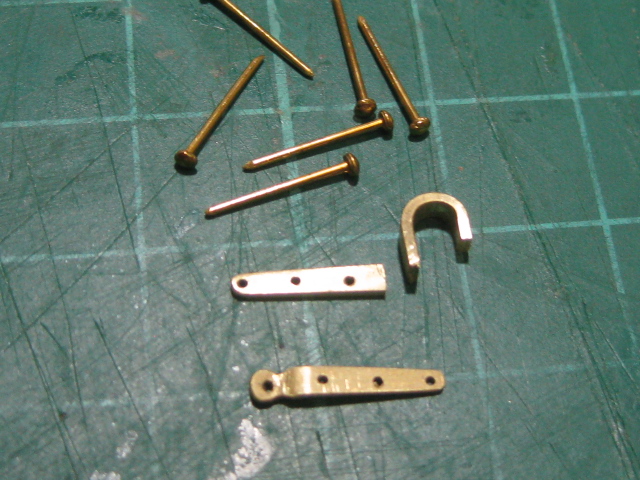
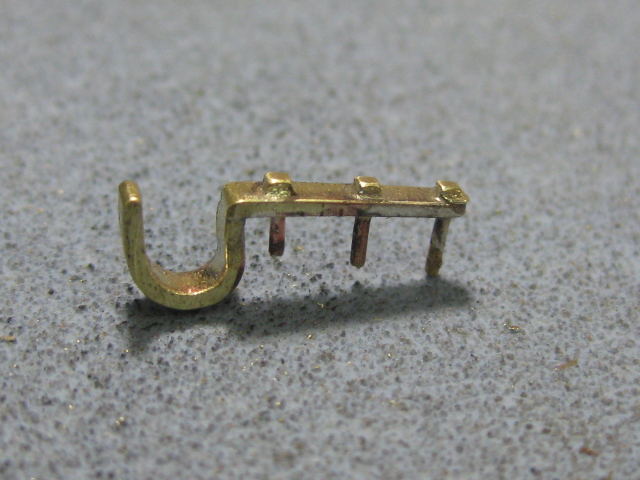
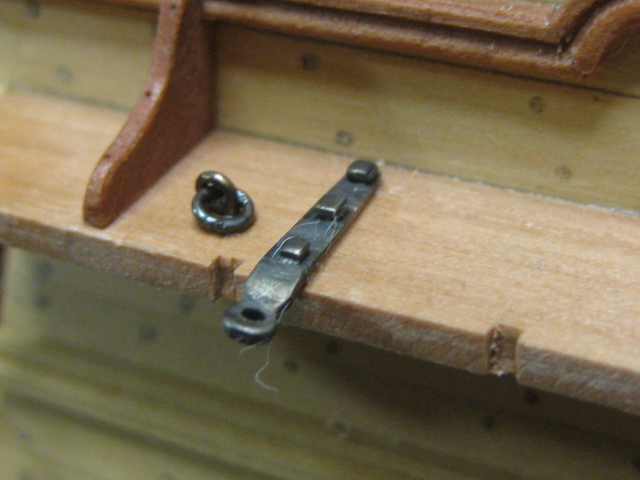
Thank you Mark, John, Druxey and Pat. The puns are flying thick and fast today . Thanks also to all those who have been using the "Like" button. Main Studding Sail Boom Irons There are two pieces of ironwork attached to each main channel. One of these is an Eyestrap, into which a pin on the inboard end of the Main Studding Sail fits allowing it to swing out. The other (aft) one is a Gooseneck which holds the outboard end of the boom when it is stowed. I made these from 1mm thick brass strip. Both pieces taper in width and thickness on the inboard ends. I drilled three holes in each piece for the "bolts", which are made from brass pins silver soldered to the straps and the heads filed square. The gooseneck part was silver soldered to the arm, as it needed a very sharp bend which wasn't possible to do. I trimmed the brass nails to the thickness of the channel : The pieces fitted after cleaning up and blackening : Danny