


chris watton
-
Posts
2,205 -
Joined
-
Last visited
Content Type
Profiles
Forums
Gallery
Events
Posts posted by chris watton
-
-
51 minutes ago, vossiewulf said:
Yeah, that's why I haven't gotten one either. I don't want an extrusion machine as I think they're inherently limited in the scale of detail and quality of surface finish. But when you look at stereolithography machines, well if you're willing to spend $5k-$8k you can get an excellent reliable machine, but that's extremely expensive. And all of them under that price range seem to come with some gotcha or other and seem to need constant maintenance and adjustment to get what you want. In short, not really baked for hobbyist/prosumer use. And unfortunately I've seen little progress in the last couple years.
Yes, I was looking at the more expensive machines. However, companies that can 3-D print your STL files are a dime a dozen right now, so prices are competitive. I got the two cannon, anchor and the two winch STL files 3-D printed quite cheap - so cheap that it would take an £8k machine a lifetime to pay for itself. I invested some of that money earmarked for a printer into better quality wood strip instead.
ETA - When I looked at the original plans for my next model, my first thought was 'HMS Fly on steroids'!
-
1 hour ago, vossiewulf said:
I don't see how you could make common parts across different ships unless it's deck/hull fittings and yards/masts and even then you'd have to offer a series of say 32/38 gun RN frigates from the 1780s for it to make sense.
What I hope for in the long run is Chris and Chuck or people like them have reasonable cost access to excellent laser and zillion axis CNC milling machines and highly accurate stereolithography 3d printers. With a (reasonably significant) amount of CAD work, you could offer multiple decorations and figureheads for ships in a class, or offer POB and POF versions of the same model. Line and some fittings and strip wood is stocked, the rest of the parts are produced when an order comes in and the person has chosen this particular ship's decorations and the POF version and selected any other options like wood or quality of fittings. That way they wouldn't have to maintain large part inventories, and the flexibility for the customer leads to more orders.
But since none of us are actually doing it for a living, we just have to see whether any of it makes sense to Chris and Chuck, who are the people putting out money to produce kits.
I have looked very deep into 3-D printers with the aim of purchasing one and learning to draw the 3-D carvings myself. (in fact, one of the deciding factors of selling my car to invest was because I wanted a 3-D printer). However, after much research and visits to various 3-D printer companies, this area is a complete mine field, and the thought of spending many thousands of Pounds (or Dollars, the cheaper ones would be no good at all for fine prototype parts), only to find that the investment isn't all it's cracked up to be, or a newer, much better model may come out put me off. For now, it is better financially to sub contract such work, as, at the moment, there are not enough hours in the day for me already.
I must stress that right now, it really is just me doing this, with my wife (who also works full time) helping when she can in searching for reliable suppliers (she will also pack, I hope..). Also, the new designed for the larger kits are meant for everyone, from beginner to expert. This means the development is more complex than standard kits with a lot more parts, which should make it easier for the model maker. I love looking at the finished model, and to that end, I try to design the kit to be as painless as possible in order for me to get there. I want the kits to be fun for the relative beginner, and a good starting point/blank canvas for the more experienced to sink their teeth into.
Most of the parts are bespoke to that particular model, and as the subjects I have chosen for the first 6-8 models are quite different in looks and sizes, the fittings will not be interchangeable. For example, even with something as seemingly simple as a 6 pounder cannon barrel and carriage; the larger 2nd kit has 6 of them, but the sizes are larger than those of the Alert's 6 pounders. So, even very similar fittings can vary from kit to kit - I guess if I was more business/money minded, I would just say they are the same (on paper) and use both for the same kits. But that would be wrong, at least to me.
I am sure there will be certain fittings available in the long run like cannons, anchors etc. But for now, I have to build up the range. so every new kit will have its own set of cannon, anchors, decoration, capstans, winches etc. Even the hatch combings are now all laser cut to the exact size as the original plans, together with gratings, which are now photo-etched parts so I do not have to compromise of size and shape (many combings and gratings taper fore or aft).
At the moment, and for the next 2-3 years at least, I will be concentrating on building up the range of kits I want to see on the market (assuming they sell and I can invest in the next development), so working on the core developments, rather than using my time to sort out many added extras to sell separately, this isn't really at the forefront of my plans. A commercial kit will always have to be a compromise, otherwise they become way too expensive for the vast majority (in our little niche within a niche) to buy - but it's knowing where to compromise that is the trick.
- Mike Y, hollowneck, paulsutcliffe and 13 others
-
 16
16
-
On 3/8/2019 at 7:33 PM, ASAT said:
Chris, that is a great model - finally a kit i clan purchase and not have to change out most of the wood in the kit, I’m excited for your future as a manufacturer! Which model is next? Are you saying yet?
Lou
Thanks guys
")
As for the next model I am already working on it, as I need the figurehead and stern decoration sorted, and will feel better when I already have these areas sorted. It is over well over twice the size of Alert, and quite pretty with 50 guns..
- JeffT, Haliburton, marktiedens and 3 others
-
6
-
On 12/29/2018 at 2:42 PM, Siggi52 said:
Hello,
no, you did't take my threat over. I started the discussion and thought that we could settle this may be for all.
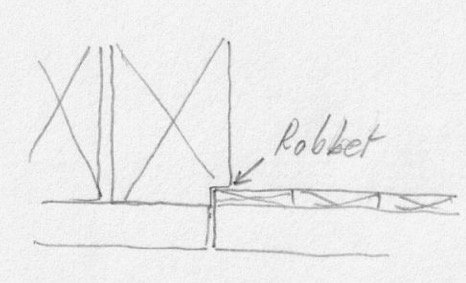
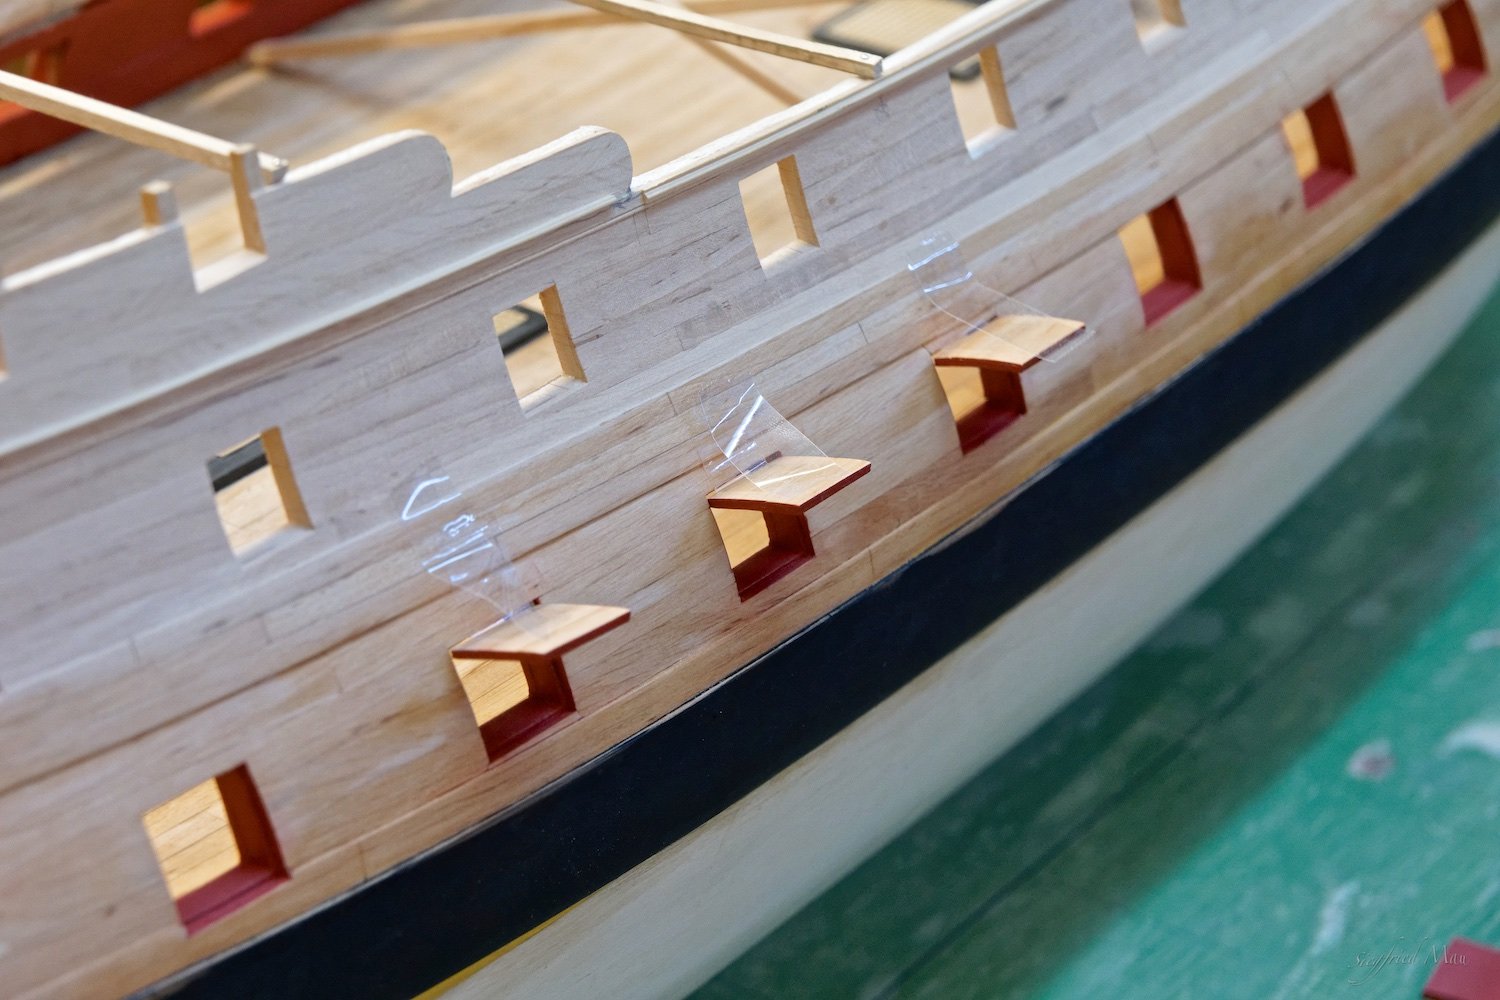
What makes me a little curios is the fact, that most, when not all, admiralty models have these square ports, without any step. So as I drew it at the right side of my drawing. I think that this is not only a shortcut, they are nearly in the accurate size. To understand what I mean, my planks at the gun deck are 3" thick and have a lining of 1" = 1,6 mm + 0,5 mm = 2,1 mm

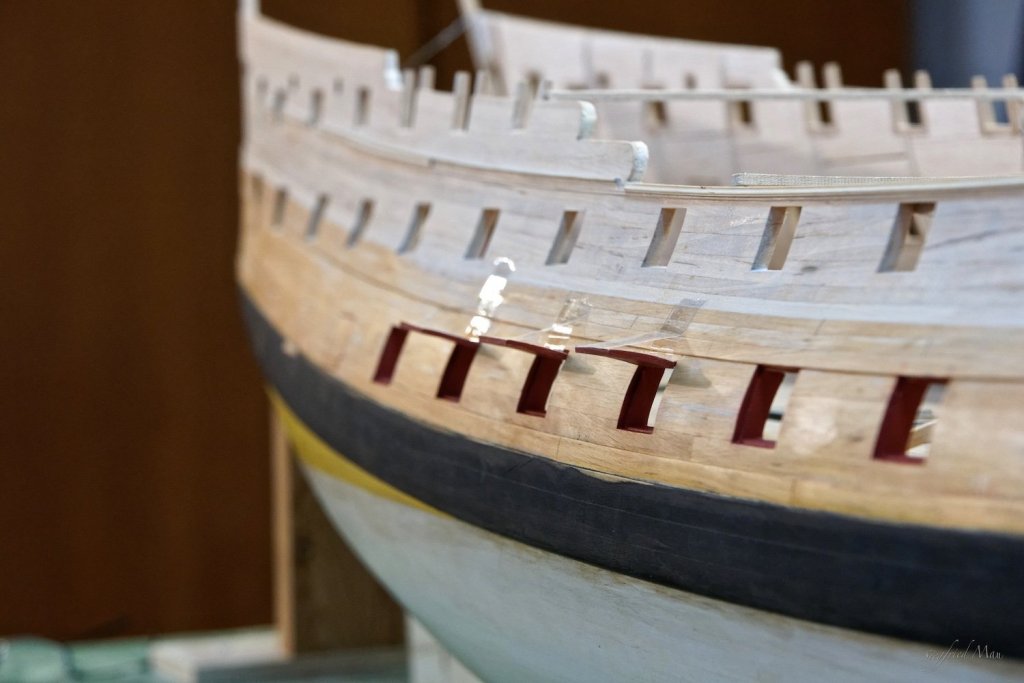
Here the Centurion 1:48

and the 60 gunner 1:60. Here the ports are slightly thinner.
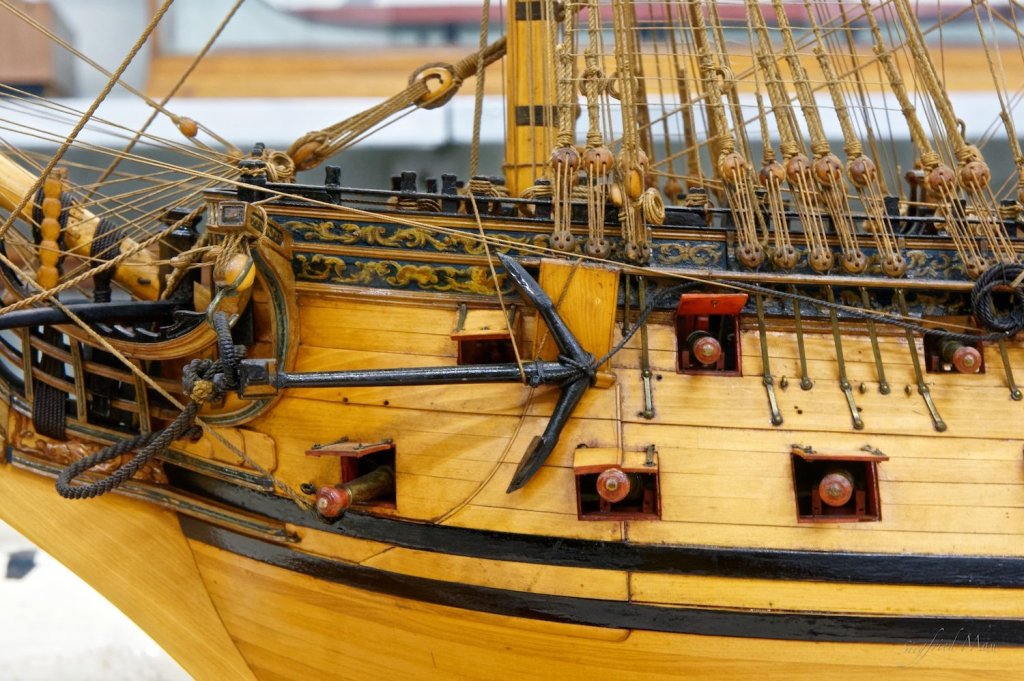
You could see, that the dimensions are nearly the same. They did't skip the lining.
There is not much written about the port lids. Goodwin wrote that they are without a step around them and the Victory has that future. Lavery mention them, but did't write nothing special, because he had no information I think. And there is that one sentence in Steels treatise from around 1800 that is now the truth.
I would no one irritate, but we should together find an answer and the models speak for themselves. The shipwrights know what to do. That is with most things of the past the case, where every body know how it looks like.
Druxey, could't it be that you misinterpret the sentence: Well seasoned linings fitted into the stops. That could mean all, even that:
And most models give me right. Ok, you have to rewrite some of your books, that is the bad thing about it and I'm not lucky about it. You remember the wales. You could interpret it your way, but all the models show it the other way. So what is right?
From what I understand, all gun ports with lids had the inner sill or lining. I know that Victory shows this on the gun port inner edge sides and top, but interestingly, no step on the bottom (due to the tumblehome, perhaps)?. All gun port openings without lids have a frame that is flush with the hull.
Either way, gun ports and lids are a pain on 2 and 3 deckers...
- FriedClams, coxswain, mtaylor and 5 others
-
8
-
maaaslo, I am currently having a website sorted thanks to a very kind forum member!
I can confirm that the deck planking will be Castello Boxwood and the second/outer hull planking will be Pear Wood (But have ordered a similar amount of Cherry Wood, too)
All rigging thread is ordered, it is the same thread that I have always used for every prototype model I have rigged, so I do not have any problems with it.
-
45 minutes ago, Haliburton said:
Beautiful work! When are you hoping to have your first production run ready to market?
Thank you! I think around May, hopefully I will have got everything sorted by then.
The hatch combings are not just wood strip, but laser cut and fit together with simple half lap joins. I prefer laser cutting as you can have the exact scale height - same with gratings in PE, they can have the right size square holes, and the correct outer dimensions with no restrictions
- Canute, hollowneck, Haliburton and 4 others
-
7
-
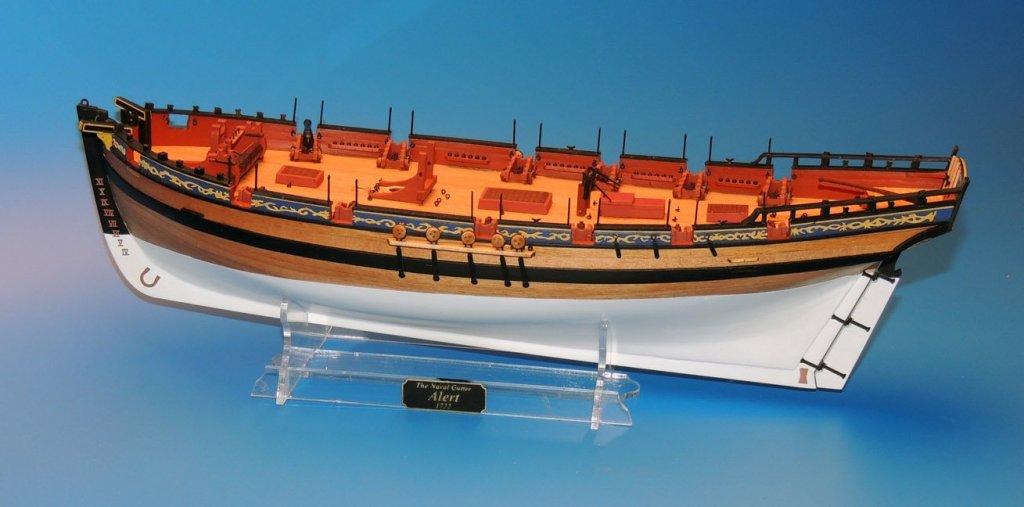
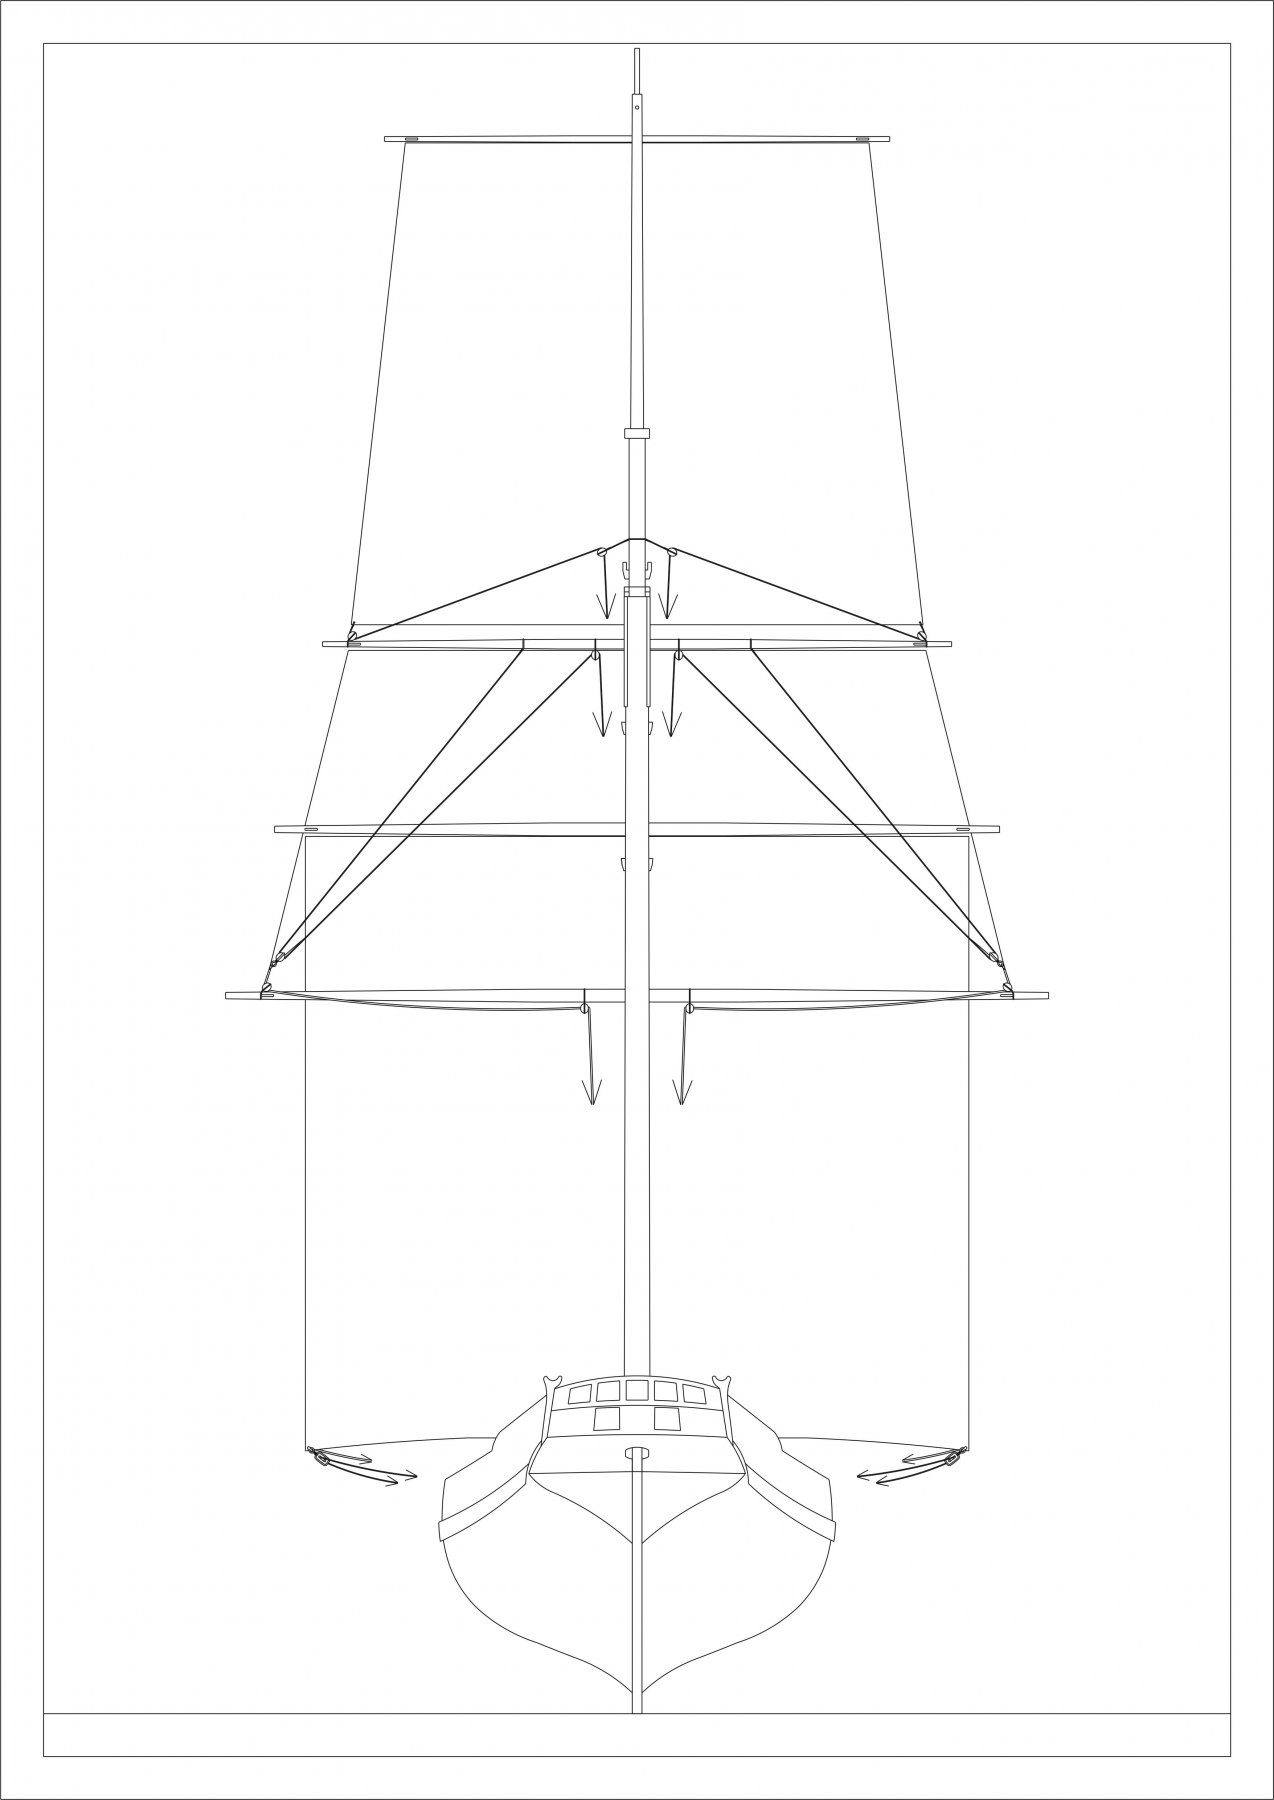
Almost done, just waiting for a couple of parts to complete..
I added the sheets and bowlines to the yards otherwise they would have had hardly anything on them, plus it keeps them more or less in place a little better..


- kurtvd19, paulsutcliffe, Rustyj and 26 others
-
29
-
On 2/24/2019 at 11:13 AM, Thunder said:
Hi Chris, was expecting more answers to your last post. However, these are my thoughts:
You have two markets and this type of vessel could be seen as a good beginners kit. Therefore I would suggest the standard wood and threads as no beginner is going to want to spend a fortune. They might not even understand how beneficial it is to buy a well designed kit.
On the other hand the kit is designed to meet a very high standard which would appeal to the market on here. A lot of the persons on here, including myself, might not have the facilities to scratch build but want a kit something better than the average mass produced kit. We are fed up with the usual wood and threads and the cost of replacement. Also, the difficulties in obtaining them replacements.
Consequently the options are:
Try to provide for both markets - more stock for you and boxing issues. Do the standard version by wholesale and the deluxe version mail order direct.
Reach a happy medium - at risk of not selling to either.
Stick to the normal market and standard - lots of competition.
Also, for timber and threads I think you should be looking to source from places other than those directed to on here. You need to buy at cost so can you look direct to manufacturers? Understand this might not be possible with first kit as they may want you to buy in bulk.
Thank you for your thoughts.
I hear what you're saying and I agree! However, I need to get some kits out first. My first priority must be to develop the kits, this is where all of my investment money is going. Once I have a few out, I can then 'fine tune' each kit to include various packages. Right now, let me tell you, it is taking up all of my time just developing the base kit and getting all of the various supplies together. I know some say that if they were developing kits they would include all the bells and whistles from the off, but again, I haven't go an infinite amount of money to spend. For example, I am about to put in an order for various thicknesses of rigging thread that is well over £500, and this is just one small aspect of the kits! I am also waiting for new wood strip samples to arrive.
I am waiting for costings for the laser cutting and photo etching, there may well be room to sell some of these separately, but I haven't had time to think about anything other than the kit as a whole. I have almost completed the prototype model, it is mast and bowsprit/yards and is rigged, just waiting for the cast cannon barrels and anchors now. Hell, I haven't even had time to think about a website yet! This little model has been one hell of a learning curve..
-
21 minutes ago, Dubz said:
Kinda same issue as with wood. Supply perfect rope or nothing or at least let customers choose 🙂 My 2 cent 🙂
...But let's not lose sight of the fact that I am doing a kit that will sell for under £200, not £2000.....
- paulsutcliffe, coxswain, robdurant and 6 others
-
9
-
Cheers guys, and sorry for the late reply, have been very busy, and not spending as much time on Alert as I would like. But I cannot do a lot more to the prototype model until I receive the castings for the cannon, winch and anchors. I have built up the mast and yards, but cannot step the mast yet.
I have done all cleats for the masts and yards in PE, so you can drill and glue and pin them into position - plus they will all be the exact same shape. As the yards are almost always painted black, the brass colour isn't an issue.
I also realised I need to get rigging thread supplies sorted..
Just for a laugh, I have attached a size comparison of Alert and Lady Nelson (both same scale). Alert is bigger than I thought it was, compared to the LN...
-
Thanks Chuck, very interesting, and very nice.
At the moment, I will see how I get on using my Italian colleague, who seems to be able to get the wood sheets and laser cutting done at a good cost right now, much cheaper than anyone here in the UK! As I am working full time right now, and doing this in my (limited) spare time, I will stick with that arrangement - but I am sure this will change in the future, if things work out.
It was you that convinced me to try doing this by myself - before that, I had no intention of ever developing another kit again. Now I look forward to the next development...
- hollowneck, mtaylor, SimonV and 6 others
-
9
-
35 minutes ago, Haliburton said:
Since it is important to hit the sweet spot for kit pricing, could you offer a wood upgrade set for those prepared to pay, or leave it to other providers like crown timber yard to offer a wood upgrade package? (they have this upgrade set for the Lady Nelson for example)
Yes, but I think it would be better to concentrate on spending my initial development money (which isn't infinite), on developing the kits. At least until I have a few out and are making money. Once that happens, I can then think about investing in extras.
I have a couple of other avenues for wood sources to try first, before settling on the norm..
-
11 minutes ago, Dubz said:
Hint, a better Translator to use is: https://www.deepl.com/translator
I had very very very bad experience with Horschig in sense of quality and very rude after sales behaviour. I can show pictures if needed. At least i absolutly can't recommend buying strips from him if you wanna have consitence coloring.
cheers Dirk
And here's the crux of the matter - do I stay with what I know, or risk spending upwards of £2k on thousands of strips of wood that is no better, or possibly worse quality that the standard wood I use?
It is all very well buying a few lengths for a single kit, but I have to buy enough for around 50 kits. I am then stuck with this wood, and if it's not very good, people will complain that the quality of my kits is rubbish! Not only that, but if I order less, I still have to write what the wood is in the manual, which has to be printed, which again, will be many copies and cost a fair amount. If I then decide I cannot get that particular wood strip in a decent enough quality and have no choice but to change it, the parts list is wrong for however many manuals I have left. Can you now see why manufacturers stick with what they know?
Having said that, I may just sell a dozen kits and that's it....
No point asking for samples, too, as wood is a natural product, and what I receive as samples may not be a true reflection of the 2000 strips (x 6 in differing widths) I intended to order.
As a matter of interest, apart from colour variations, what were the edges of the strips like, and were the strips all cut with the grain, rather than against (like some strips of Tanganyika are)? I find that good edges are a must, if they are not, gaps in between the planking can be quite the eyesore.
-
Thank you guys, I have some prices from Frank Horschig.
What would you guys think about cherry or pear for second planking, and boxwood for deck planking?
This (deck planking) is fine for single decked vessels like the cutter or a brig/sloop, even perhaps a frigate, but I do intend to design the larger kits in the roughly the same style as my 64th scale Victory, which has multiple decks. That is a hell of a lot of expensive wood!
- JeffT, vossiewulf, mtaylor and 1 other
-
4
-
5 hours ago, davyboy said:
Chris, Have a look at www.massiv-holz-werkstatt.de Frank Horschigs website.
Example prices for Beech,Cherry and Pear sheets 1000mm x 100mm x 1mm are €3.10,€5.00
and €7.20 respectively. Cheaper to buy sheets and mill your own strips He has a large selection
of other wood and also does strips. I buy my wood from him,good quality timber.
Hope this helps,
Dave

Thank you, looks interesting, I will have a better look later today (just back from work, bed time..). Wish they had an English language option - but if I can secure this wood, I will be happy.
-
7 hours ago, Beef Wellington said:
Chris - did you consider a similar approach to that which Chuck is taking on his Winchelsea project...the carved results are just amazing.
I will have to look. This is a learning experience for me, all I know is that I want to use the same people for supply of parts, including master carvings if possible - plus I need to keep costs down if I want to sell the kits at reasonable prices. At the same time, I do not want to restrict myself to subjects that have no carvings, and know that having masters made will not be dirt cheap.
7 hours ago, Thunder said:Would it be possible, as a smaller and more high range model producer, to provide upgrade wood choices to those requesting it. I would except that you could not stock all woods and so it would incur an extended delivery time and handling fee. The standard kits could be sold through the normal outlets as the method of providing your regular sales. It would prevent these piles of Walnut and Tanganika that I don't know what to do with other than throw away.
Cherry, pear, box or beach for hull planking and maple, lime or box for the deck. You would have to limit choices to stop it getting silly.
Incidentally I have just brought an old kit which strangely has Tanganika for the hull planking but Walnut for the deck! Not sure that is going to look right.
Same applies as above, if I can get a reliable source of other woods in the sizes required, I most certainly will. At the moment, all of my investment money I have from selling my car must be spent as wisely as possible, and wood upgrade bundles is low on the list of money to spend. That may change, however, once I have a couple of kits out and can start to re-invest and look at better options. I cannot find any reliable supplier of 1x3, 1x4, 1x5, 1x1, 1x2mm and other size pear, cherry, beach, boxwood strip or sheets. If anyone could point me the right direction?
-
32 minutes ago, Thunder said:
Completely agree regarding walnut being too dark, it also is not that nice a material to plank with. I would change it every time but it is getting replacement stock for the keel sections in other materials that has proved the problem. At least if you have to buy from a hobby stockist.
I have never liked Tanganika for the decks and have kept some to plank the hull on one of my future models as the colour looks far more suited to that.
It is clear why walnut is so popular though, consistent quality, close grain and quite easy to bend. Very 'user friendly' I have mentioned before, I absolutely hated the look of the Pegasus prototype model, as it was done in walnut, and I had always envisaged using the warmer hues of Tanganyika. (In lieu of a better wood like cherry, which would be prohibitively expensive for a commercial kit).
I don't mind it for decks (I think limewood would be OK, as in reality, the deck planking on the real thing was almost white, light grey even), but to give the hull and deck different tones when using the same wood strip for both, I apply a couple of coats of matt wood varnish to the hull, making the planking slightly darker, and just spray the decks using Army Painter matt anti shine varnish, along with the rest of the model.
-
26 minutes ago, SpyGlass said:
Couple of things Chris -
Tanganika - most of my experience with this wood is for deck planking in kits.
But I bought some stock when I wanted to try some "fancier" planking and found real trouble with the way it split along the grain - not an obvious choice for planking a hull to me - but you must know better !
The pics didnt really show her horizontal, is the bow actually as high as the stern from the waterline?
But she looks beautiful
I know all too well the varying quality of Tanganika, I know I need to ensure I get the best quality, like the type I used for the Bellona model. I find walnut a little too dark for a lot of hulls. It is fine for the 16th and 17th centuries, but a lighter hull looks a lot nicer when it's an 18th Century ship, more so when the upper worked are painted in blues, blacks or reds. But I may be the only one that thinks that..
And yes, the bow is higher than the stern when resting at waterline level, in 64th scale, around 4.5mm higher.
- SimonV, AgesOfSail, Canute and 2 others
-
5
-
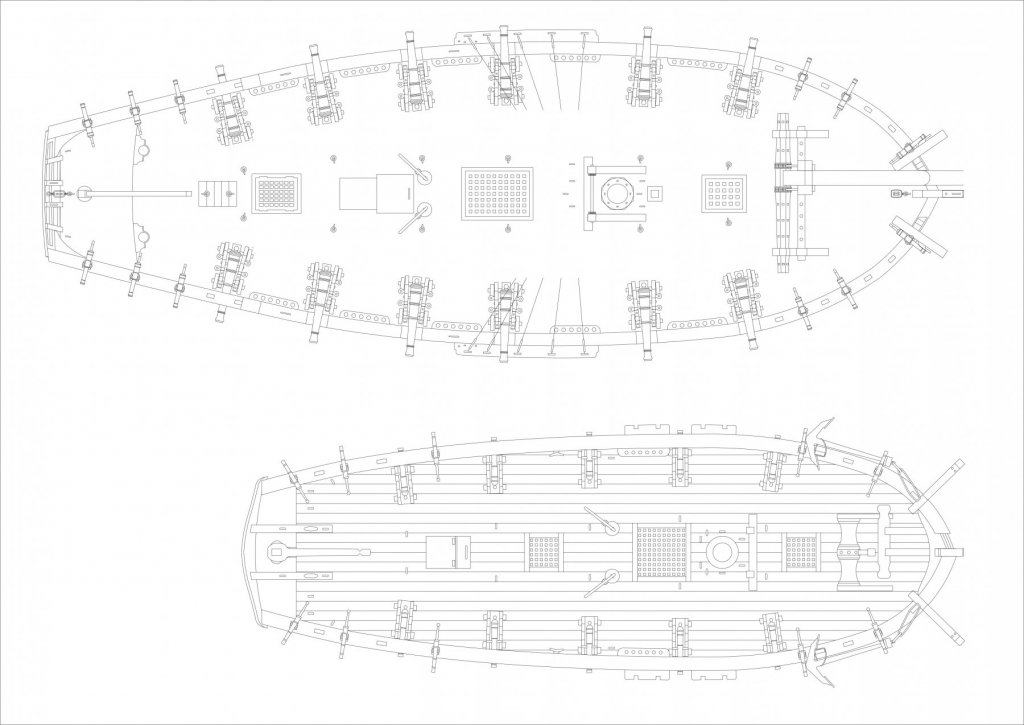
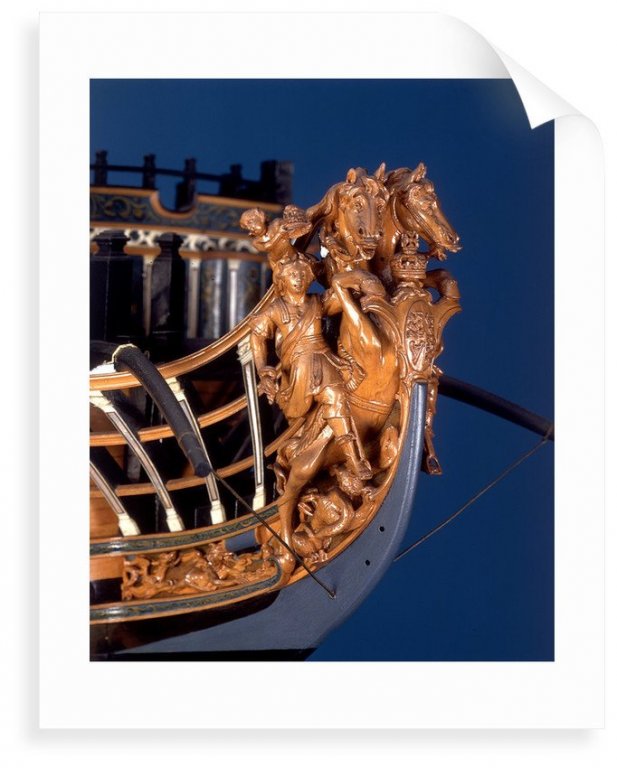
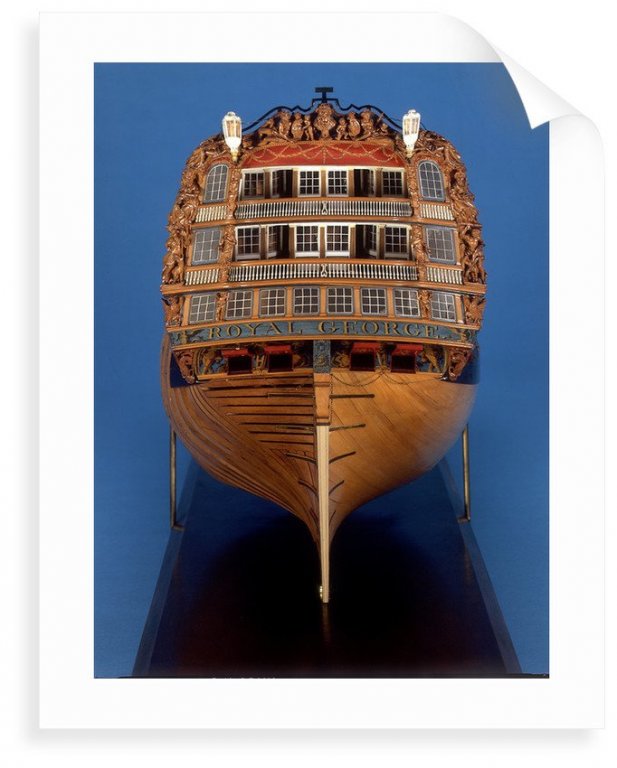
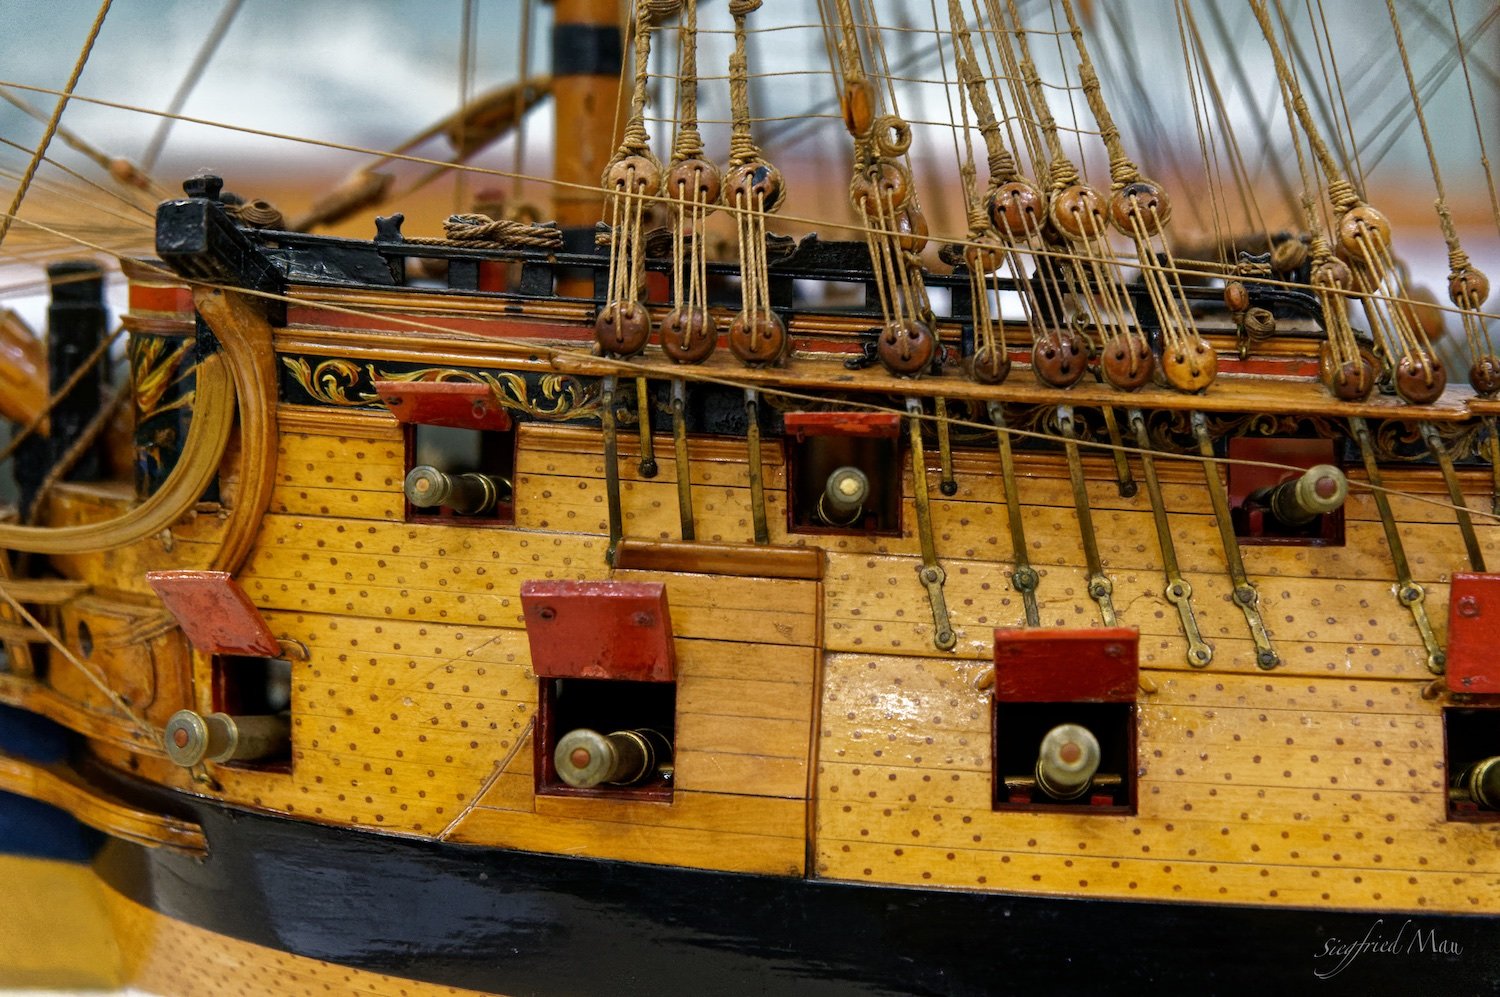
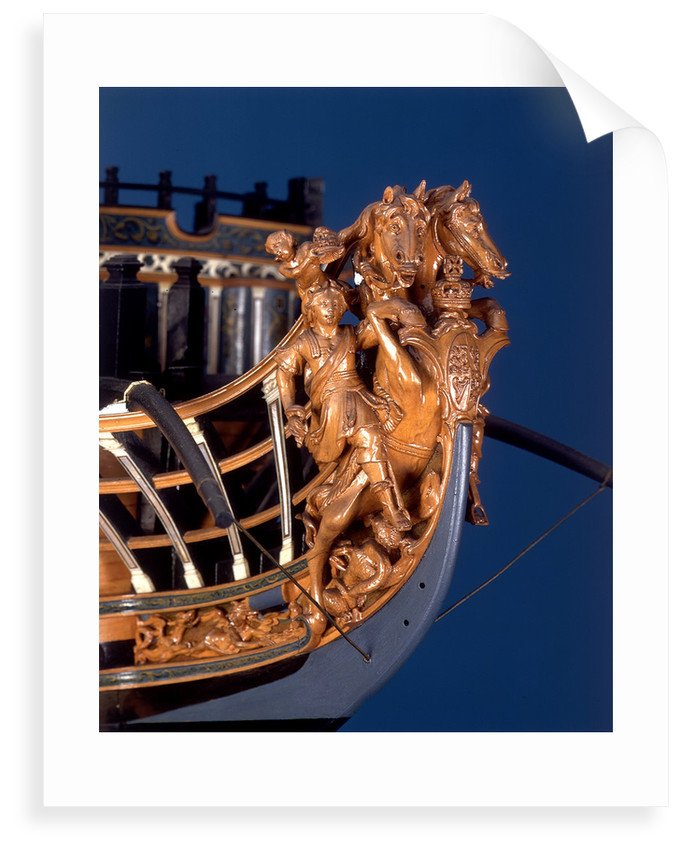
One thing I need to ask, is there anyone out there who can carve, either in tangible or digital form, the decoration shown in the attached pictures?
I have started to learn more about digital sculpting, but I feel these require a little more than what I could do and, as I intend it to be the 'flagship' of the range, I want them to look pretty good...
-
14 minutes ago, Landrotten Highlander said:
What scale will she be?
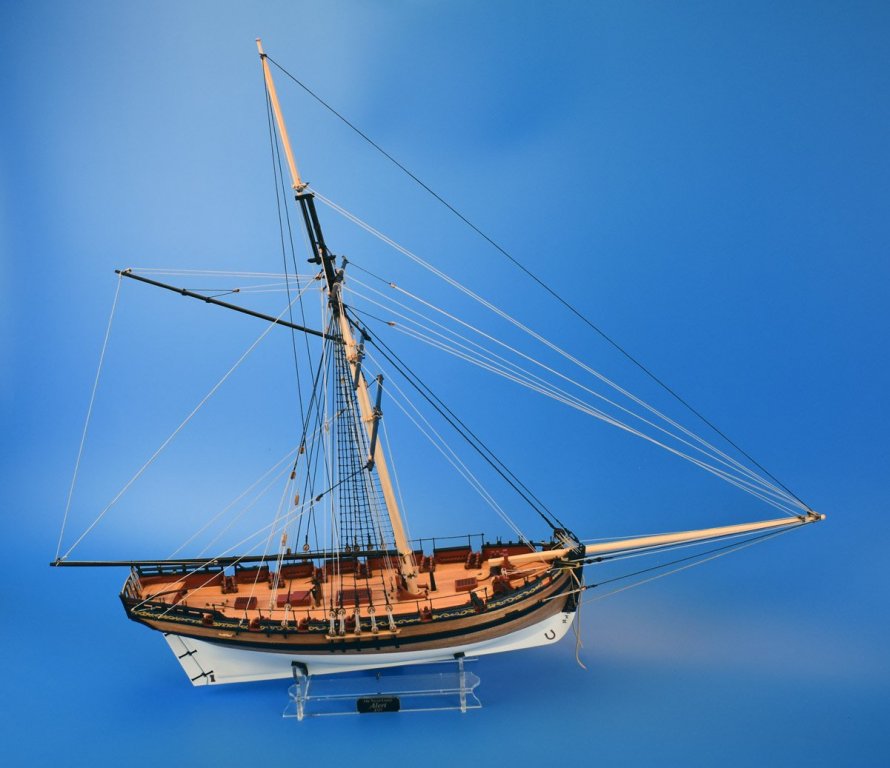
She is 1:64 scale, making overall dimensions (including masts/spars):
Length - 638mm
Height - 524mm
Width - 256mm
Hull length (without bowsprit) is around 377mm
I want to try and keep to 64th, no matter how large or small the subject
- hollowneck, mtaylor, Jörgen and 2 others
-
5
-
-
Thanks' guys! Ron, of course I shall mast and rig her. I just have to wait for the remaining castings to turn up (They have been 3-d printed and are now being cast in production moulds). These will be the 6 Pounder cannon barrels, the half-Pound swivel barrels, the octagonal drum winch (which I have used from a spare master for the prototype), anchors and little drum winch that fits in between the mast bitt posts.
I can certainly make a start on turning the mast, bowsprit and yards, though..
B.E. - had a look at your cutter thread today, great work!
- hollowneck, paulsutcliffe, mtaylor and 2 others
-
5
-
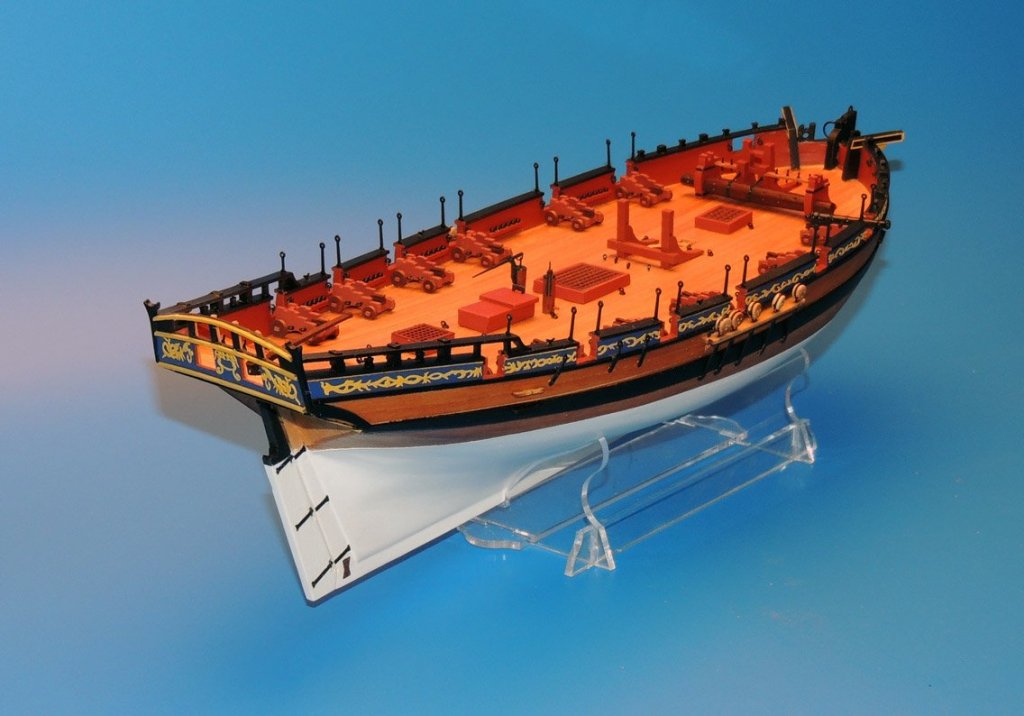
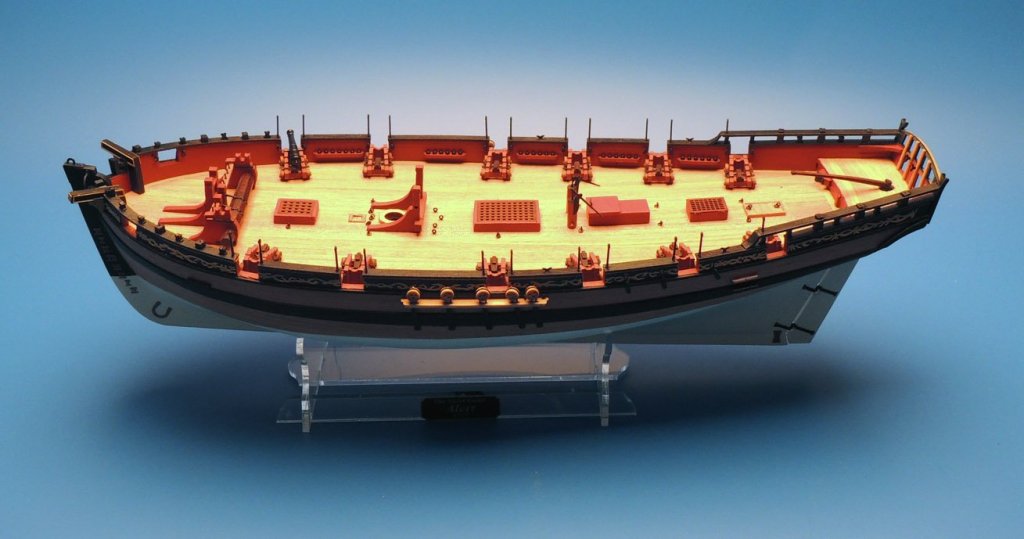
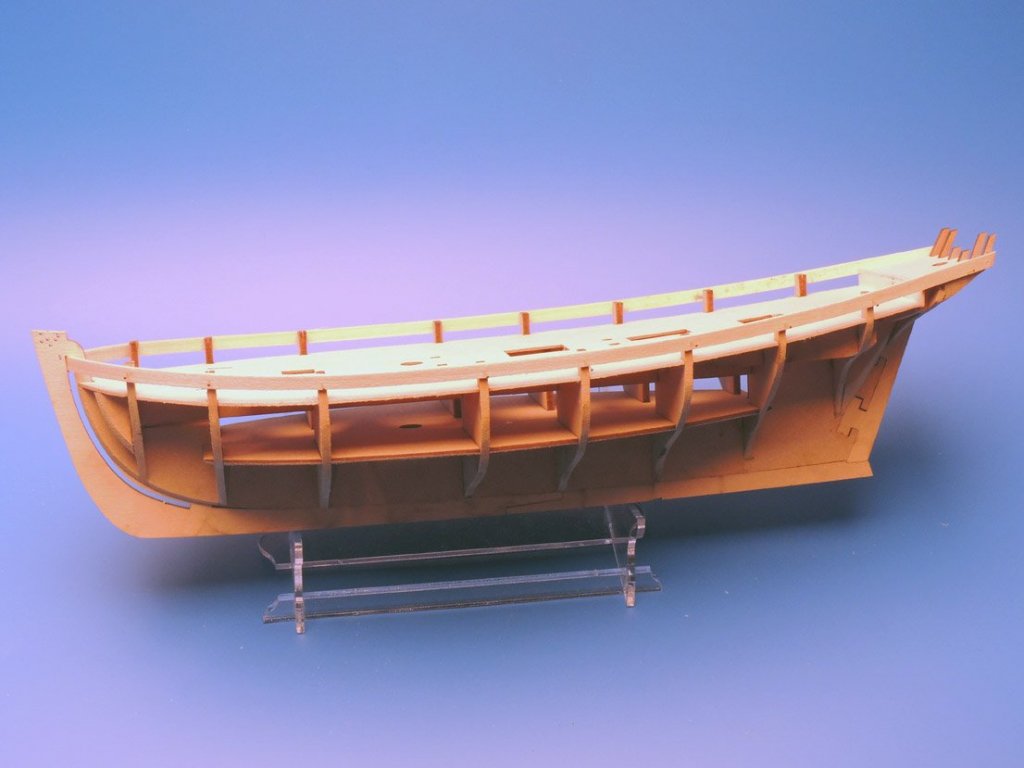
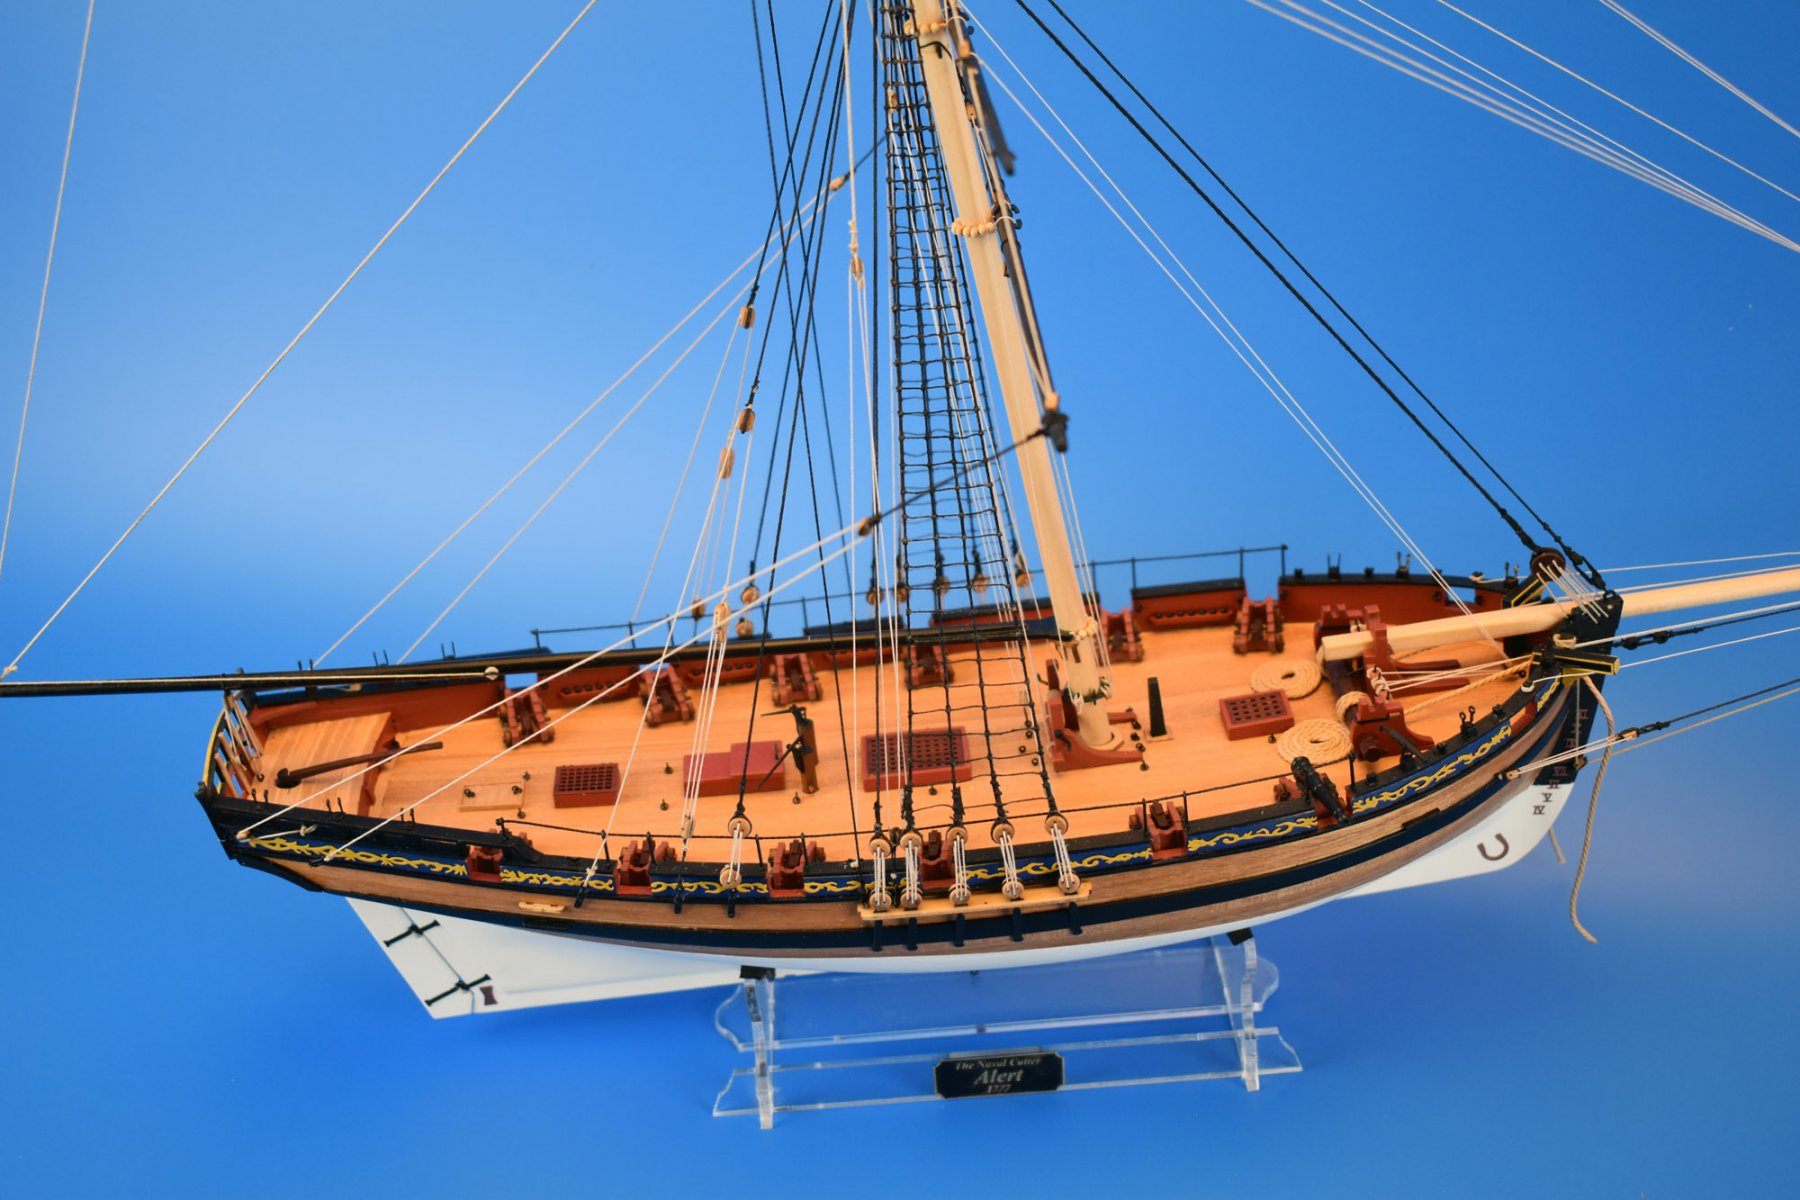
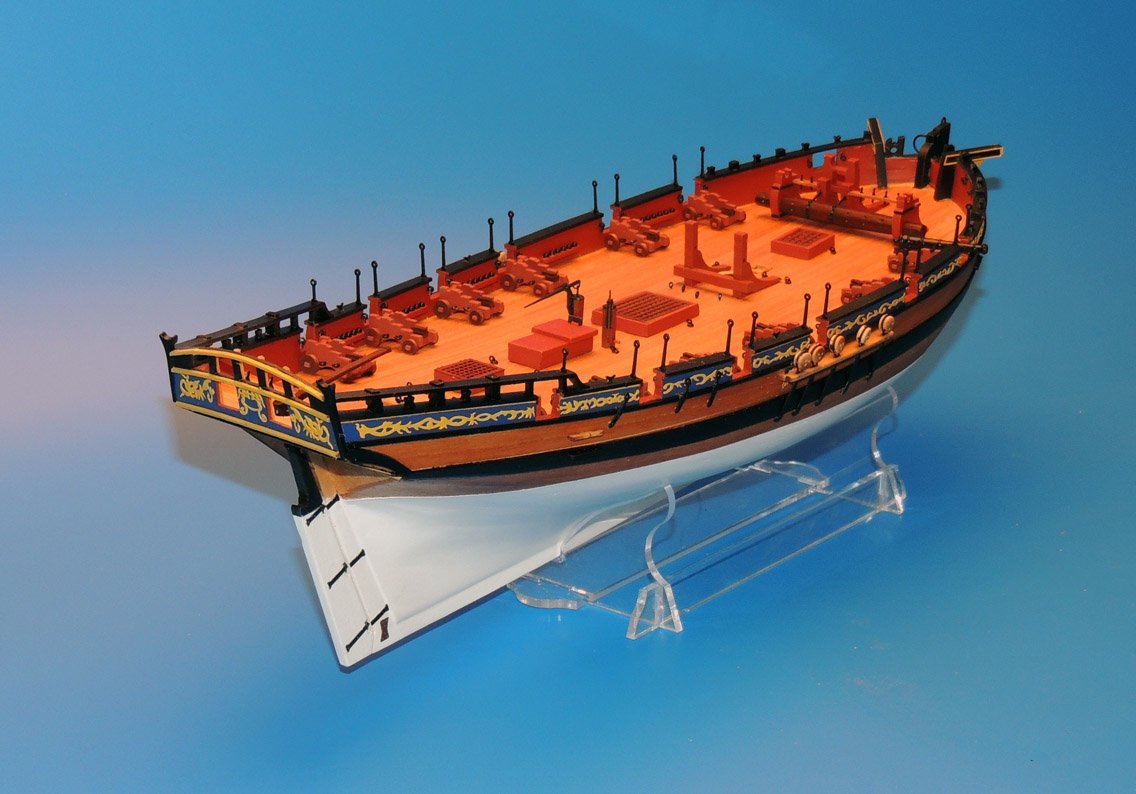
It has been a while, but I have been busy.
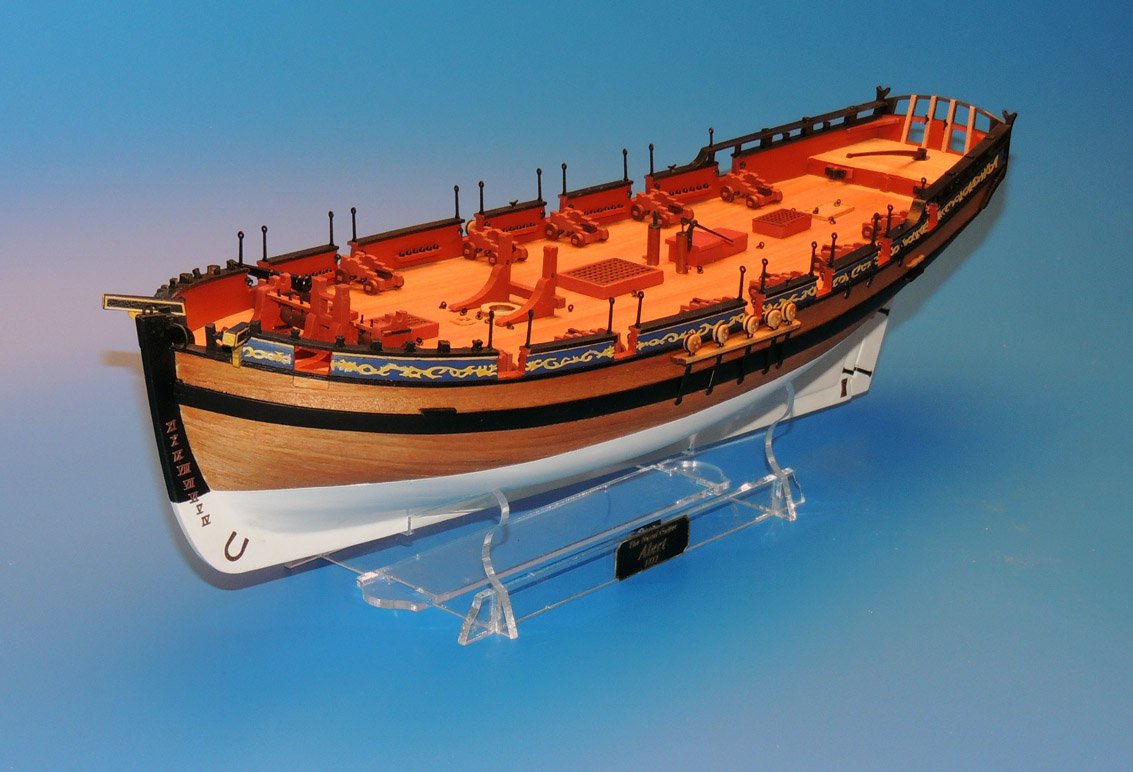
I have almost completed the hull assembly for my version of Alert, I am now waiting for the castings to come back to me (cannon barrels, small winch drum, anchors etc.). I have made quite a few changes to the designs whilst building this.
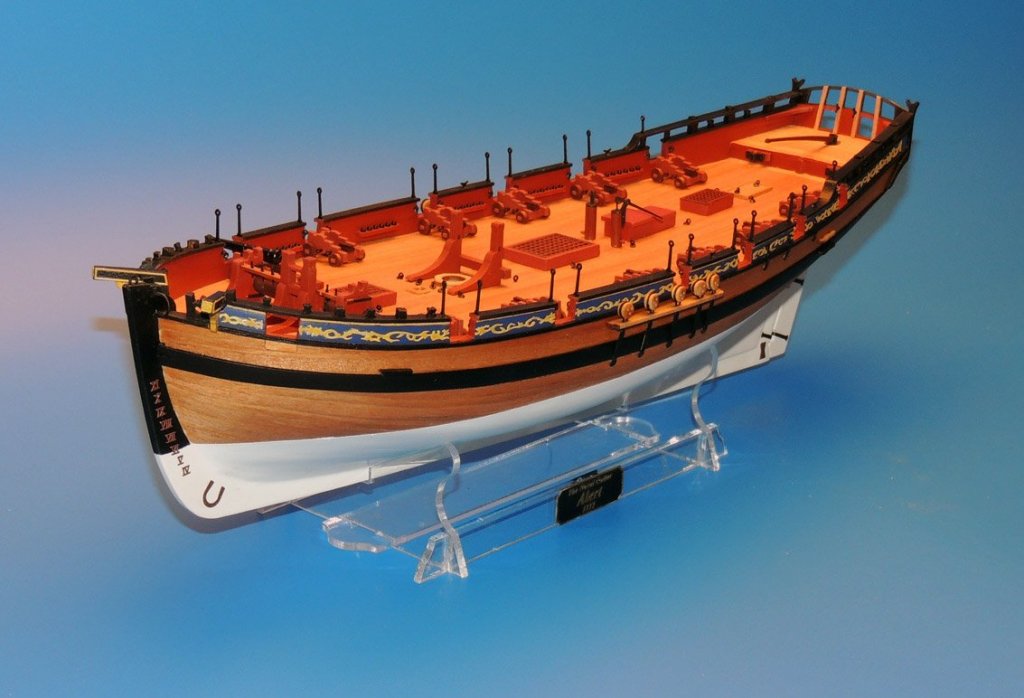
Apart from the deadeyes, all the fittings are bespoke, which means that for once, the drum winch doesn't look out of place (or out of period..). The belaying pins are quite small on this model (following Goodwin's AotS book Alert, so I did those in PE. I have tried to make it as detailed as I can, while still being quite easy to fit together.
Am glad I chose Tanganika wood for the second planking (although would love cherry), as it gives the hull a 'warmer' look. I wanted to use this wood for the prototype of Pegasus, as I knew it would suite the overall look of the model much better, but unfortunately, someone else started the hull on that one..
Was apprehensive about putting these pics on here, as it's my first model I have done outside an external company, to eventually put on the market, and it's quite scary (buy also a little exciting..)

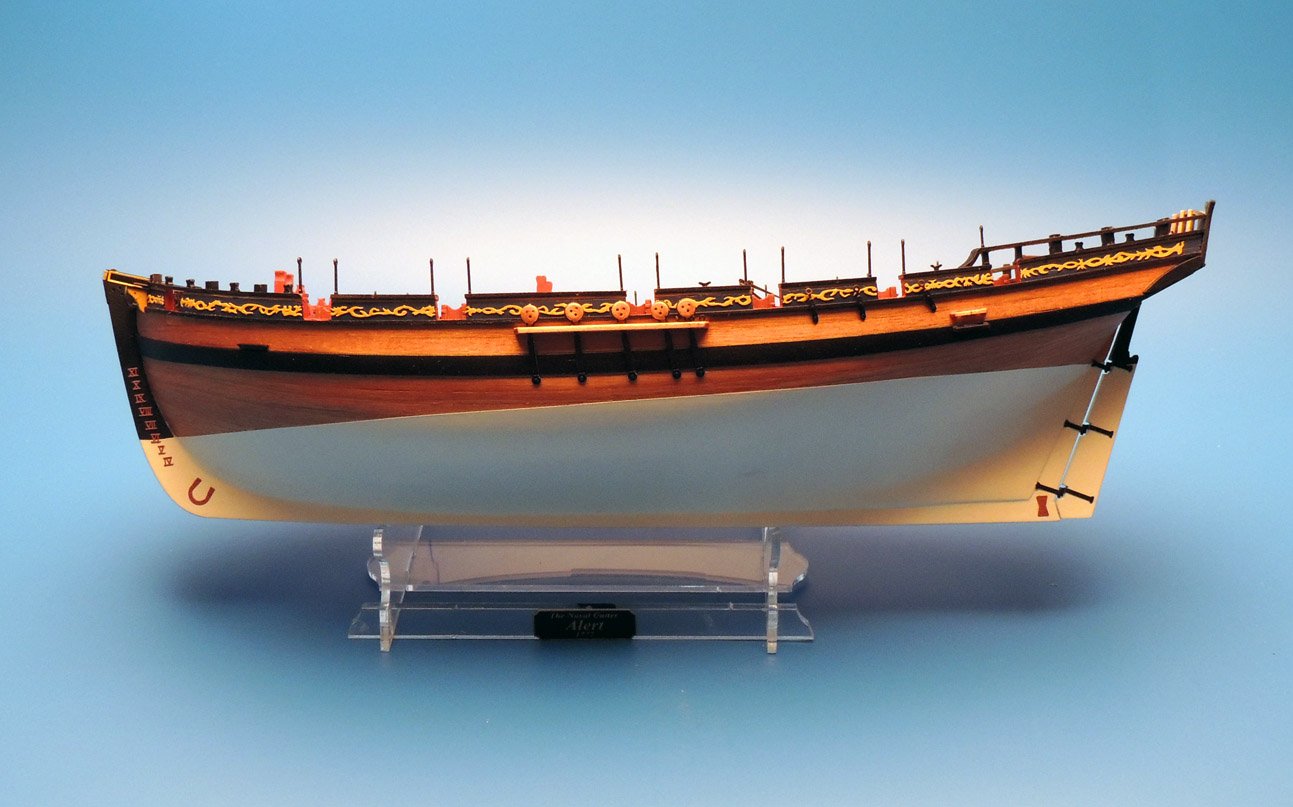
-
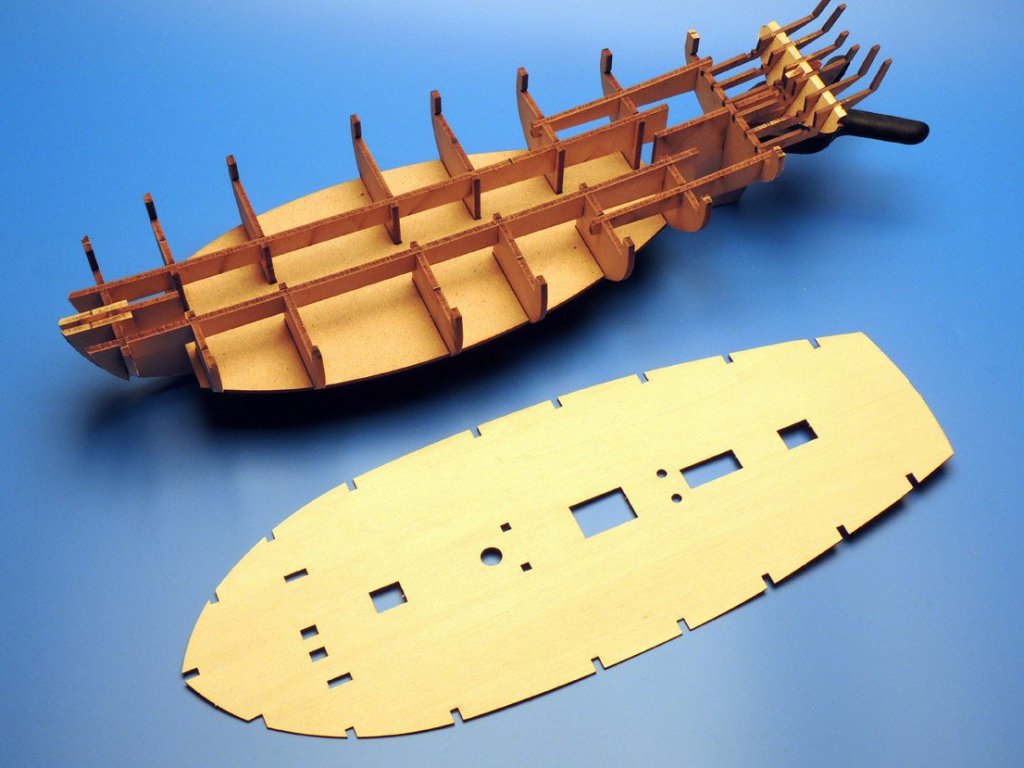
I know it doesn't look too exciting, especially when compared to what I have done (and am going to do), but this is the first plank laid on a model for almost a year, after convincing myself I never wanted to make another model again - much less starting my own range of kits!
The stern for this was a bit of a challenge, as it's so lightly built - and lightly built mean very fragile parts, more so for beginners. So things had to be 'beefed' up a little more than usual. The keel is not flat on this cutter but has a curve throughout the length. I added a very narrow notch on the bottom edge of the aft keel, to stop it slipping down on its cradle. Oh, and this cutter is around 25% larger than Lady Nelson (It has 10 x 6 pounder carriage guns and 10 x half-pounder swivel guns, which were drawn in CAD and 3-D printed)
- Haliburton, vossiewulf, druxey and 18 others
-
21


L' Hermione by MESSIS - Artesania Latina - 1/89 - 2nd build
in - Kit build logs for subjects built from 1751 - 1800
Posted
The modern version of Hermione is, I am quite sure built using the La Belle Poule drawings, as both are near identical, even in decoration.
I did this a few years ago, it was the Hemione but after much research, I used all of the J. Boudroit plans to develop the model.
Never released, as far as I know...