mobbsie
-
Posts
1,493 -
Joined
-
Last visited
Content Type
Profiles
Forums
Gallery
Events
Everything posted by mobbsie
-

ROYAL CAROLINE 1749 by Doris - 1:40 - CARD
mobbsie replied to DORIS's topic in - Build logs for subjects built 1501 - 1750
Hi Doris, My belated birthday wishes to you, I hope you got all you wanted and had a great day. What a fantastic build, I love what your doing here and that Captains Cabin scene is incredible, very well done. I will be watching from now on. mobbsie- 883 replies
-
- 1
-

-
- royal caroline
- ship of the line
- (and 1 more)
-
Hi Jason, Happy Birthday mate, have a good one. mobbsie
- 800 replies
-
- 1
-
-
- snake
- caldercraft
- (and 1 more)
-
Brilliant Sjors, very well done. Lets have some more scratch please. mobbsie
-
Hi Guys & Girls, Thank you very much for all the kind remarks you've made, it's really nice to get positive feedback. Progress continues, so far all the profile rails are fitted, the rudder is now a permanent fitment and painting the hull has commenced. I don't have any pics just yet but as soon as I do I'll post em. Be Good. mobbsie
- 1,279 replies
-
- 2
-
-
- agamemnon
- caldercraft
- (and 1 more)
-
That's an impressive fix Peter, very well done. You have some lovely rigging there as well, no wonder the Captain is looking happy. Keep up the great work. mobbsie
-
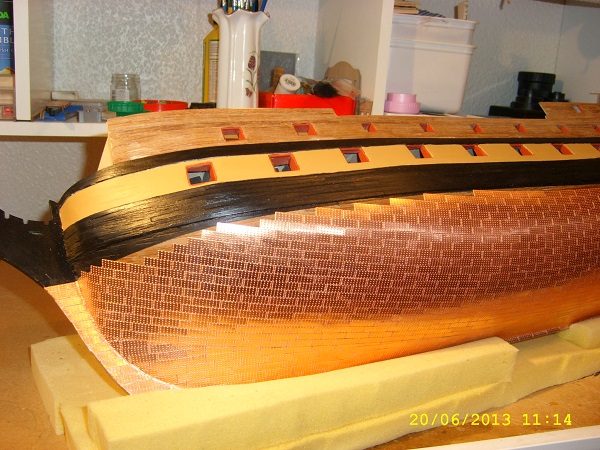
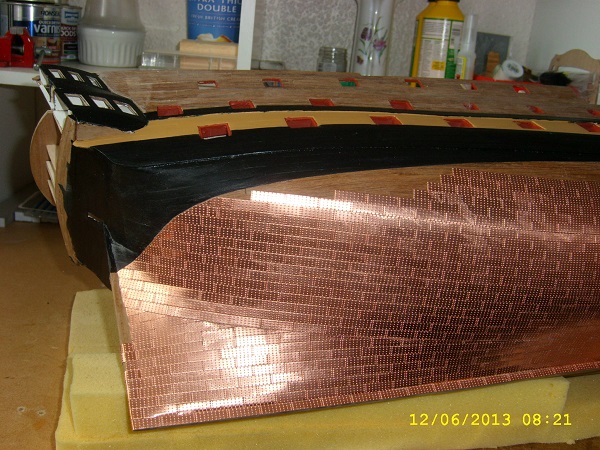
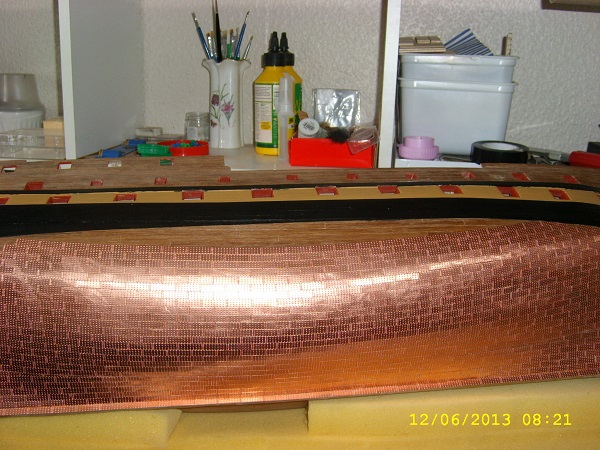
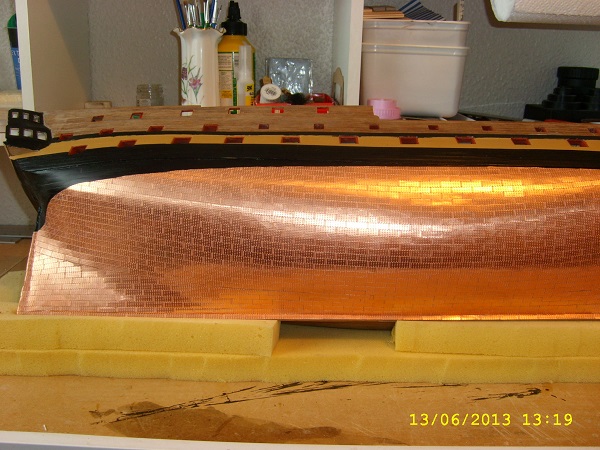
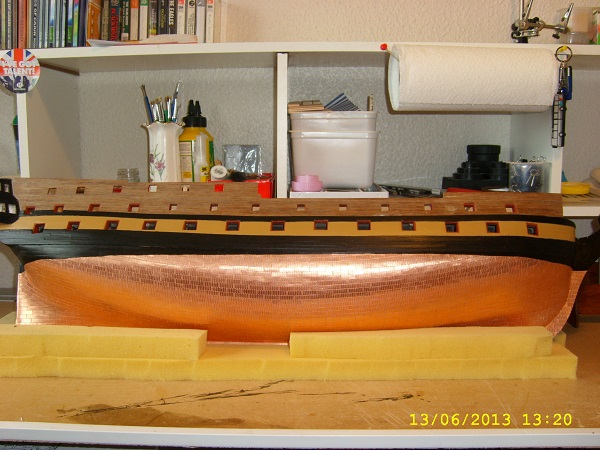
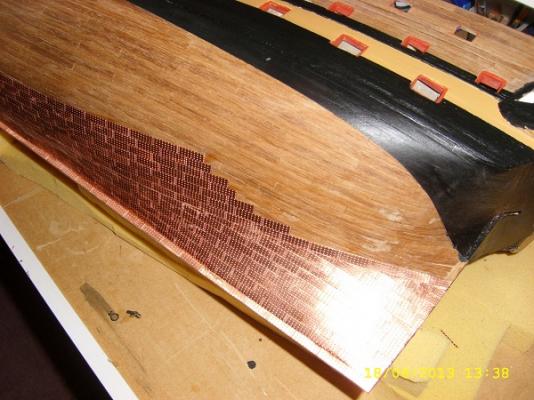
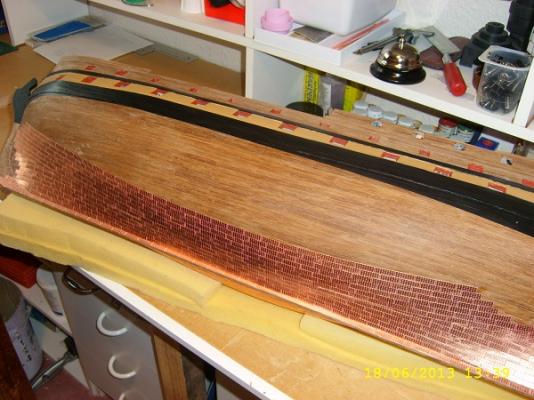
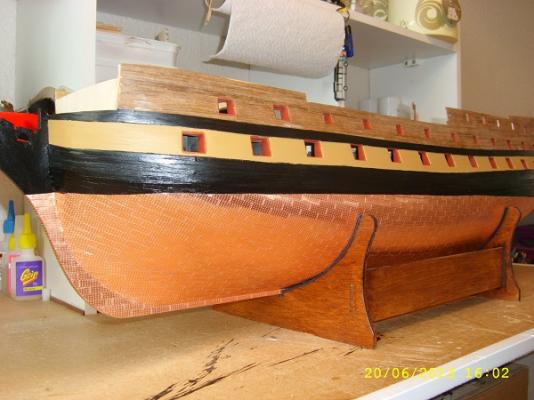
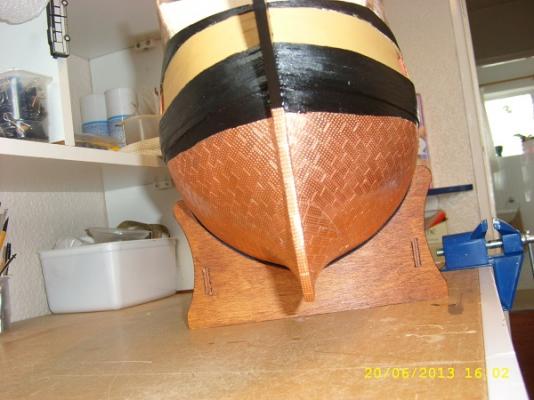
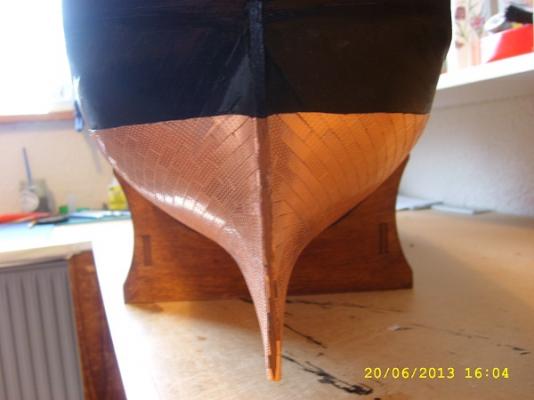
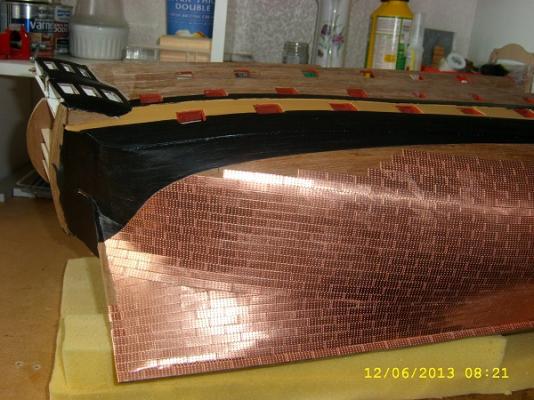
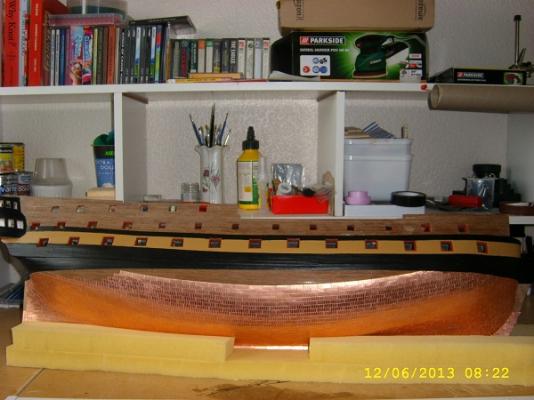
Hi Guys, Thanks for looking in and the good words and encouragement given, it does really help. A quick progress on the coppering, IT'S FINISHED, the port side took me about 25hrs to do with a few fopars along the way. The last couple of days have been almost a nightmare for me, I've had the droppsies which, when you think about it doesn't seem so bad, a bit frustrating perhaps, but I'm talking blades here, I have picked up a few cuts along the way, nothing serious, some I didn't know I had, a bit scary though when you see a craft knife falling and heading for the bulbous belly, this happened a few times, picked up a few puncture wounds with that. Tweezers with very sharp points sticking in the palms of my hands, my thoughts at that time were similar to " blast that really shouldn't be happening ". The final straw was the Aggy falling from it's foam matt onto the floor, not too much damage though, just a little crushing of the stern post and a few popped plates, the stern post just needed to be trimmed and the plates stuck back on. I had to pull a few plates of the bow as they were not following the correct line, the old glue then had to be scrapped of and the plates replaced. The rest was pretty well straight forward with no major problems. I have learned one lesson though, when I next plate a ship I will be overlapping slightly, Caldercraft plates have rounded corners and as you can imagine these leave an unsightly gap. OK I have a few pics. The offending area that needed stripping and replating Stern view. Portside view Now the fun begins, cutting in the waterline More cutting in The finish So there we have it, all done. Next step is to place the rest of the trim on and complete painting her. mobbsie

- 1,279 replies
-
- 14
-
-
- agamemnon
- caldercraft
- (and 1 more)
-
Nicely done my friend. I wonder if the humidity has got something to do with glue not sticking well, we have had some warm wet days lately. Ive had some trouble with my plates not sticking very well, I don't know about the visual imagery being frightening, it's the stuff nightmares are made of. Your getting there, keep it up mate. mobbsie
- 1,873 replies
-
- 1
-
-
- occre
- san ildefonso
- (and 1 more)
-
Well done on the blocks and cross trees, really looking good. Wont be long and you will soon be getting tied up with all string and stuff. Definitely making excellent progress mate. mobbsie
-
Well Hamilton, you've really gone and done it now, with such a superb fix you've given yourself one big confidence boost. The world is now your oyster. Very well done my friend. mobbsie
-
It's been said before Augie, all that's left for me to do is to concur with my piers. Superb. mobbsie
- 1,668 replies
-
- 1
-
-
- syren
- model shipways
- (and 1 more)
-
I think it's too late for that Mark, he's dropped a couple of the round spherical things in several places. I think a bit of grovelling is required here, then some pics. :mellow: mobbsie
- 1,873 replies
-
- 1
-
-
- occre
- san ildefonso
- (and 1 more)
-
That's some fantastic plating Ray, I totally agree with you regards the gore line, in my case it was just luck it worked out ok. Thanks for posting the details. mobbsie
- 536 replies
-
- 1
-
-
- diana
- caldercraft
- (and 1 more)
-
HMS AGAMEMNON by PMG - Caldercraft
mobbsie replied to PMG's topic in - Kit build logs for subjects built from 1751 - 1800
Hi Pierre, Good idea to put that saw away mate, it looked a bit heavy for what you needed to do. I ended up putting a sharp drill bit in my Rotacraft and milling some of the wood out, I also packed out the upper gunports between the bulworks and 1st planking to give a bit extra support. Nothing you can do about the main gundeck but just be careful and take your time. Wait until you have lined the gunports before filling in with filler otherwise it's almost a waste of time. I lined mine before the second planking, seemed easier to cut the 2nd planks around the gunports. Remember what the saying is " Slowly slowly catchy monkey " take your time mate and all will come good. The best of luck mobbsie -
Good idea to scratch my friend, you never know what you are capable of until you try it. Your new transom is looking good mate, well done. mobbsie
-
Susanne, Your father will be sadly missed by you and your family and my heart goes out to you. He was also a member of an extended family and will be sorely missed by all at MSW. He was both liked and well respected and he will not be forgotten by all his friends. mobbsie
-
I love the community spirit on the forum, long lasting friendships are made from guys & gals we may never meet but just having them around makes the world a much nicer place to live in. It lightens the dull days and fills us with a sense of belonging which cannot be said with many of the local communities we find ourselves living in. Keep on laughing, keep on building and Augie, we want pictures for you know who. :D mobbsie
- 1,668 replies
-
- 3
-
-
- syren
- model shipways
- (and 1 more)
-
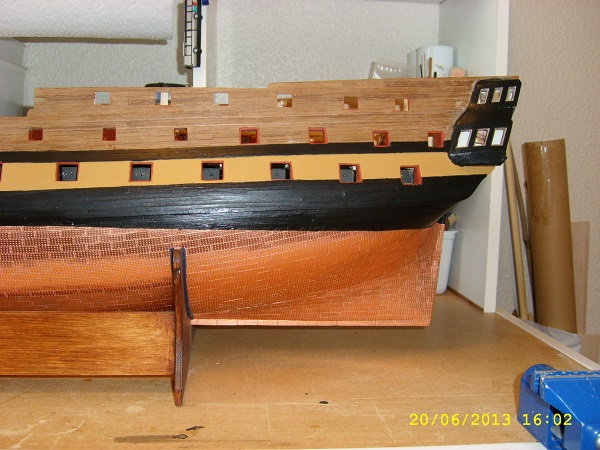
Hi Guys & Gals, Thank you very much for the vote of confidence and your constructive comments and as a result changes have been made. Ben made a very good point with regards to the rudder pintle's, the recess's have been squared and the all the copper plates removed, the platres have also been removed from the stern post so hopefully making it a better fit when the time comes. The stern post and leading edge of the rudder have been painted copper. Augie, there is no mention of bevelling the rudder but it does need to be tapered along it's length from 5mm down to 3mm, this has now been done and coppering will commence once again. Keith, I also like to take my time and I think I do, it's just that when you get into a zone all else is forgotten and you end zipping along, it's just the way I am I suppose. As far as the time taken is concerned I didn't put a clock on it but from dead reckoning it must have taken me about 25 to 30 hours for the starboard side. I will record the port side a little more accurately if I remember. OK onwards an upwards, I hear the sound of copper plates calling me, time to go slightly insane. Again thanks for all your very kind remarks and comments and thanks for putting me right on the rudder. mobbsie
-
Hi Jason, Thanks for the heads up mate, I have just checked with the manual and it does say to paint the stern post copper, but only the stern post. I will check the rudder alignment tomorrow and see how that goes, it wont take much to remove the plates from the inside edge. :mellow: You are correct about the white metal parts, the pins are quite small, I was trying to avoid using copper paint if I could, it never seems to match very well. Thanks again, appreciated. mobbsie
-
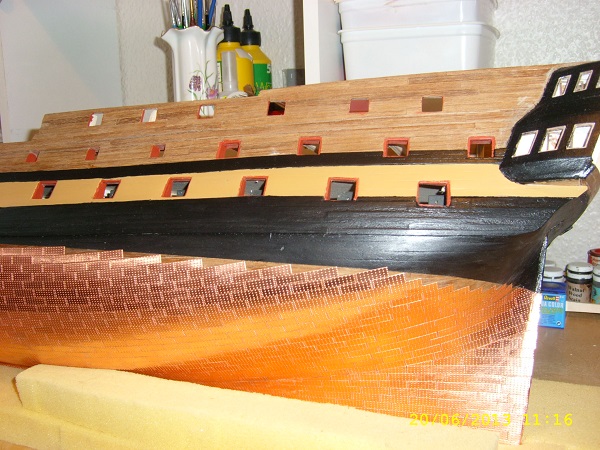
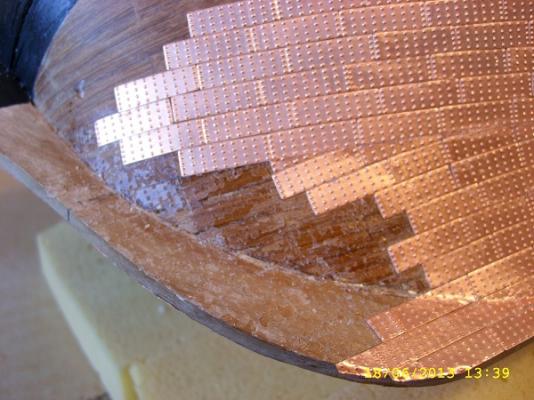
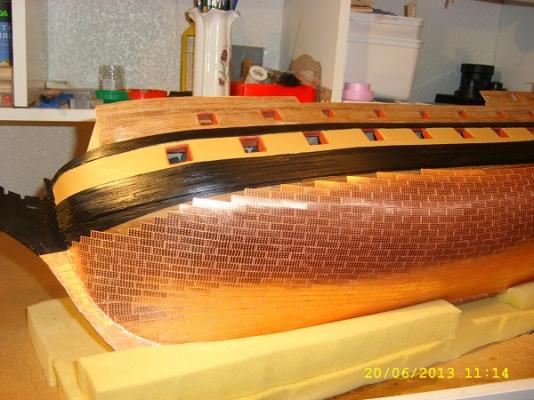
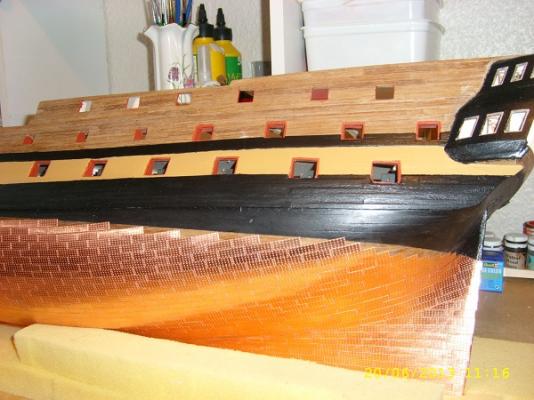
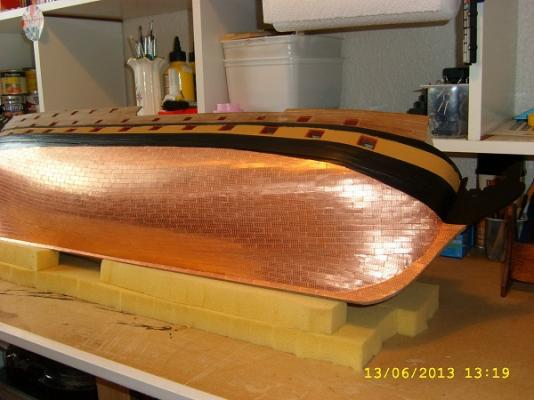
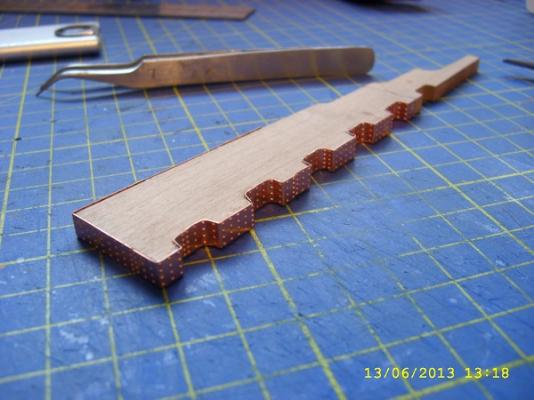
Hi Guys Thanks for looking in and the kind comments, suggestions and remarks, appreciate them all. Andrieke, it's not that difficult when you get started, you will every now and then get one that overlaps slightly but generally it's not a problem. I found my biggest problem was / is that when gluing a plate down the time allowed for adjustment varies a lot, you can place a plate and move it time and again, place another one and the glue grabs straight away, if it's not in the correct position it then needs to be cut off. Another problem I've found is crushing the plate pattern, when cutting or trying to shape a plate it's easy to squash the rivets, this does have an adverse effect to the finish, as I've just found out, overall the effect is pleasing but don't look to close, there are a few howlers. Unfortunately Hamilton I don't eat in my workroom, only coffee and soft drinks allowed, but I'm pressing on. I do have a few pics of the completed starboard side and If anybody has a suggestion for improving the port side please don't hold back. An almost completed side Starboard side is now complete As way of distraction I decided to have a go at the rudder, not as easy as I first thought. So there we have it, right up to date, any suggestions will be warmly received. mobbsie


- 1,279 replies
-
- 9
-
-
- agamemnon
- caldercraft
- (and 1 more)
-
It's been a while since I last checked in Robbyn, all kudos to you for redoing your rigging, hope it all goes well for you. Many congratulations on your engagement, and forget to get the hand fixed before you get the bike. Be Happy mobbsie
- 773 replies
-
- 1
-
-
- san francisco ii
- artesania latina
- (and 1 more)
-
Couldn't agree more. I know it's a few days late but your rigging is really very impressive mate, beautiful work well done. mobbsie
- 1,668 replies
-
- 1
-
-
- syren
- model shipways
- (and 1 more)
-
Hi Peter, Great fix my friend, back on track again, well done. Murphy was from the Republic of Ireland I believe but the fact he was Irish is sometimes enough. mobbsie
-
Don't force anything David, no good will come of it. You could try to steam it and then use elastic bands to pull the bullworks in, that way it's a slow pressure that does the job. Failing that you could always put an extra lining in. What ever you decide mate good luck. mobbsie
-
All that's left for me to do is agree with everyone else, great job mate. mobbsie
-
Hi Andy, The paint Sjors used was as original as can be to the British fleet at that time. A sample was taken from HMS Victory and the pigments analysed and fresh paint made up using the modern day equivalent. It's the most authentic paint you can get for a period British Ship of the line. This is what makes it so expensive, a paint set for the Aggy costs around £30.00 and each individual pot cost about £2.50 as opposed to other paint which can be got for £1.20 - £1.50. So Sjors has actually painted her after she had been captured at Trafalgar and has been given the status of HMS. :D Not to sure if that's a good thing. Nice repaint my friend mobbsie
- 1,873 replies
-
- 1
-
-
- occre
- san ildefonso
- (and 1 more)