HOLIDAY DONATION DRIVE - SUPPORT MSW - DO YOUR PART TO KEEP THIS GREAT FORUM GOING! (Only 20 donations so far - C'mon guys!)
×


augie
-
Posts
4,669 -
Joined
-
Last visited
Content Type
Profiles
Forums
Gallery
Events
Everything posted by augie
-
 Nice crisp work all around, Mobbsie. 1.5 years into the build and she is already most impressive.
- 1,279 replies
-
- 1
-

-
- agamemnon
- caldercraft
- (and 1 more)
-
I believe Chuck has stated that he sees no reason to double plank if you can get it right on the first layer. I was skeptical at first but have been moderately successful on two hulls and still have a sealed jar of filler to prove it. Of course if you are bent on going with some exotic wood (like burled Italian Elm) you might want to leave the double plank option open
-
Interesting idea. It will be up to you to judge if the scale is correct - you don't want them to be overpowering. Have you considered going with a black, rather then brass, finish?
- 1,756 replies
-
- 1
-
-
- constitution
- constructo
- (and 1 more)
-
Coming right along. I bet next you'll be getting a thickness sander to get all your wood uniform !
-
Glad you made it home safely and had a good time.
- 1,756 replies
-
- 1
-
-
- constitution
- constructo
- (and 1 more)
-
That's only with 120 paper ....... very sharp! Nice sheaves, by the way.
-
trunnels on margin planks?
augie replied to hamilton's topic in Building, Framing, Planking and plating a ships hull and deck
Based on the plans for my current build (Passaro Confederacy 1:64), treenails run across the margin planks in line with the butt planking for the deck planks. I would think that, at your scale of 1:53, including them would be most reasonable if that's your preference. -
You won't go wrong with many coats of diluted paint. Glad you're pleased with the results. Look forward to seeing the cutters!
-
Plank a plastic boat? Sorry, can't be done. TERRIFIC IDEA!
-
Have to give you credit young lady. Your learning curve looks like Mt. Everest while mine mimics the Great Plains. Love to see where you wind up with the resin castings.
-
Be nice to take the credit for the gratings Thomas but I mentioned somewhere that they are supplied as laser cut --- so yes, they are one piece. The kit actually comes with 2 sets (both 1/16 and 1/32" thicknesses) so I'm saving the leftovers! Mark - I'm thinking wood at the moment.
- 2,191 replies
-
- 3
-
-
- confederacy
- Model Shipways
- (and 1 more)
-
Thanks for all the info but I'm confused. Now you are 38.....so I guess in 4 weeks you'll be 29. At this rate you will soon no longer be able to drive! I'm a little surprised to hear about the quality of wood for the second planking. I suppose it's OK if she's going to be coppered but it would be nice to have the option to leave her natural if that were your desire.
- 1,616 replies
-
- 2
-
-
- caldercraft
- agamemnon
- (and 1 more)
-
No problem from my end Sawdust. Besides, the photo came with a great idea! Nice job on the stove by the way.
-
Those do look great Dave! Mark -- you know me too well. I did check out the RR stuff but they have only HO and O scale. Neither is close enough. S scale would be the ticket but impossible to find. I'm going to stick with wood. Ben is right ---- it's the finish that will be the key.
- 2,191 replies
-
- 1
-
-
- confederacy
- Model Shipways
- (and 1 more)
-
Thanks everyone for looking in. Yes, deck furniture is fun!!!! I've got an idea on the brickwork and, compared to the Morgan builds, this should be pretty straightforward except for the brick texture. Just assembling the sand, clay and lime for the brickworks
- 2,191 replies
-
- 3
-
-
- confederacy
- Model Shipways
- (and 1 more)
-
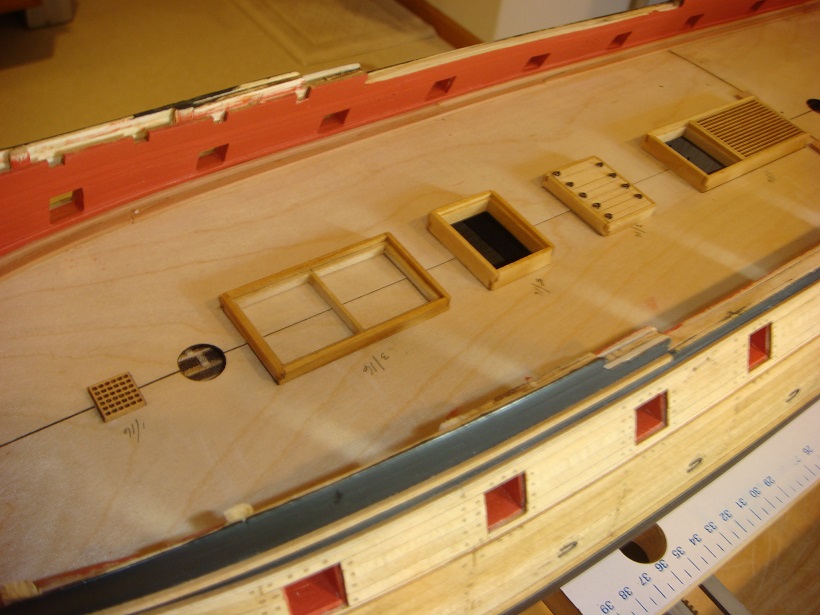
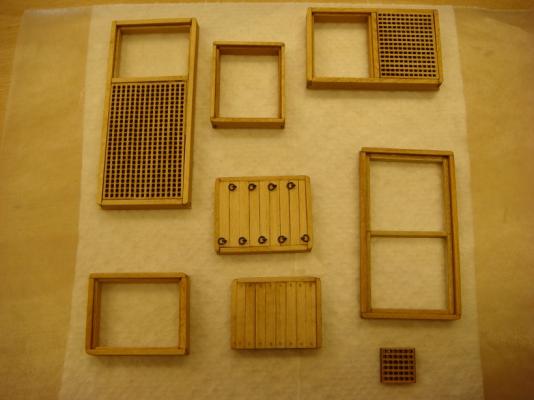
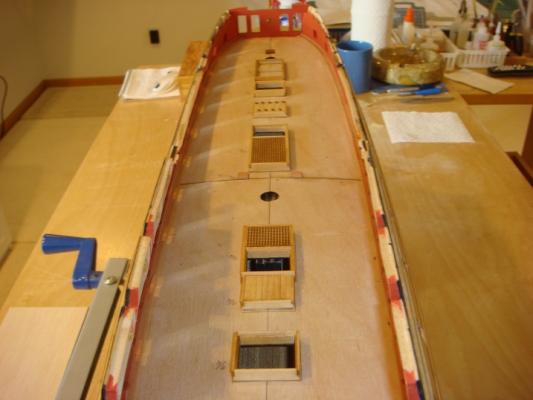
Have been busy making hatches, coamings and gratings for the gun deck. These are all permanently fixed to the false deck and will be planked around. I used simple lap joints for the corners. The gratings were supplied laser cut. The hatch with the pull rings used eyebolts and separate rings made from fine black annealed wire. The corners were slightly rounded above planking level. All are basswood and were stained with diluted Golden Oak. The bottoms were sanded lightly to match the curvature of the false deck. The treenailed platform behind the aftmost grating is for the capstan. Just behind the foremast hole you'll see the coaming for the stove's platform. This has not been set permanently on the deck as we now need to create a 'bricked platform' . We'll take a closer look at this later on (after I figure out how to do it) . Hope everyone is well and prepared to have some grog to celebrate the coming solstice

- 2,191 replies
-
- 27
-
-
- confederacy
- Model Shipways
- (and 1 more)
-
From the plans, it just looks like you need a keel and the thwarts......and that doesn't match up with what you have. Knowing you, something better will evolve!
-
Wow --- that little bit of color really changes her! Good work, my friend. Don't fret about Mobbsie's pace. I believe he has Merlin working with him in the shipyard. And we, the 'gentlemen of leisure', salute the efforts of you poor, downtrodden workers of the world. After all.........we made it!
- 1,616 replies
-
- 6
-
-
- caldercraft
- agamemnon
- (and 1 more)
-
I know that feeling of anticipation. Not so bad once you get the hang of it. Carry on, mate!
-
I've worked with balsa a lot for the model aircraft (naturally). Yes, it's subject to 'hangar rash' with dents and dings coming from apparently nowhere. Filler and sanding usually handles the nicks. For dents we either steam it or inject a little water into the dented area and wrap in Saran for a while. Sometimes this 'hydration' will return the wood to it's original form. It's just too malleable for our ship work ---- except for filler blocks!
-
Have a safe and enjoyable time. We'll keep a light on in the stern gallery to guide you home.
- 1,756 replies
-
- 1
-
-
- constitution
- constructo
- (and 1 more)
-
It's hard to argue with Piet's point of view, so I won't. In fact, I have virtually no power tools that I use for the ships with the exception of a Dremel tool and a drill. Almost everything can be done 'by hand' with a few simple tools and lots of patience and there are plenty of excellent 200 year-old models around to prove it! That said, I think proper tools like lathes and milling machines can certainly add to the precision, accuracy and reproducibility we strive for in our modeling.....provided one spends the time in learning how to use those tools. Just one word of advice. If you do decide to invest in some 'cool tools', buy the best you can afford. It will pay off in the long run.